
All products are trademarks of Nostalgia Products LLC.
Worldwide design & utility patented or patents pending.
© 2018 Nostalgia Products LLC.
www.nostalgiaproducts.com
(rev. 06/21/18 DJ)

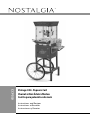
CCP510
Vintage 8 Oz. Popcorn Cart
Chariot à Maïs Éclaté d’Antan
Carrito para palomitas de maíz
Instructions and Recipes
Instructions et Recettes
Instrucciones y Recetas


ENGLISH
2
Make everyday a party!
Visit www.nostalgiaproducts.com for more fun products.
CONTENTS
SAFETY . . . . . . . . . . . . . . . . . . . . . . . . . . . . . . . . . . . . . . . . . 2
IMPORTANT SAFEGUARDS . . . . . . . . . . . . . . . . . . . . . . . . . . . . . 3
ADDITIONAL IMPORTANT SAFEGUARDS . . . . . . . . . . . . . . . . . . . . 3
INTRODUCTION . . . . . . . . . . . . . . . . . . . . . . . . . . . . . . . . . . . . 4
PARTS & ASSEMBLY . . . . . . . . . . . . . . . . . . . . . . . . . . . . . . . . . . 5
HOW TO OPERATE . . . . . . . . . . . . . . . . . . . . . . . . . . . . . . . . . . 10
HELPFUL TIPS . . . . . . . . . . . . . . . . . . . . . . . . . . . . . . . . . . . . . 11
CLEANING & MAINTENANCE . . . . . . . . . . . . . . . . . . . . . . . . . . . 12
RECIPES . . . . . . . . . . . . . . . . . . . . . . . . . . . . . . . . . . . . . . . . . 13
RETURNS & WARRANTY . . . . . . . . . . . . . . . . . . . . . . . . . . . . . . . 15
SAFETY
Appliance Specications:
120 Volts, 60 Hz
600 Watts
THIS PRODUCT IS FOR USE IN 120V AC OUTLET ONLY.
Refer to www.nostalgiaproducts.com/user-manuals/ for the most updated manual.
Your safety and the safety of others is very important.
We have provided many important safety messages in this manual and
on your appliance. Always read and obey all safety messages.
This is the safety alert symbol.
This symbol alerts you to potential hazards that can
cause serious injury to you and others.
All safety messages will follow the safety alert symbol.
All safety messages will tell you what the potential hazard is, tell you how to reduce the
chance of injury, and tell you what can happen if the instructions are not followed.

ENGLISH
3
IMPORTANT SAFEGUARDS
A person who has not read and understood all operating and safety instructions
is not qualied to operate this appliance. All users of this appliance must read and
understand this Instruction Manual before operating or cleaning this appliance.
When using electrical appliances, basic safety precautions
should always be followed, including:
1. Read all instructions before operating this appliance.
2. DO NOT TOUCH the hot surfaces. Use handles or knobs.
3. This appliance is NOT A TOY.
4. Unsupervised young children and cognitively challenged
individuals should never operate this appliance.
5. Close supervision is necessary when any appliance is used by or near children.
6. To protect against electrical shock do not immerse cord, plug
or any part of this unit in water or other liquids.
7. Unplug from outlet when not in use, before removing parts and before cleaning.
Allow to cool before putting on or taking o any parts, and before cleaning.
8. DO NOT operate any appliance with a damaged cord or plug, or after the appliance
malfunctions, or if the appliance has been damaged in any manner. Return the
appliance to the nearest repair shop for examination, repair or adjustment.
9. The manufacturer does not recommend the use of accessory attachments other than
what is provided by the manufacturer. Use of attachments may cause injuries.
10. DO NOT use the appliance for other than its intended use.
11. DO NOT use outdoors. FOR HOUSEHOLD USE ONLY.
12. DO NOT place on or near a hot gas or electric burner, or in a heated oven.
13. DO NOT let cord hang over edge of table or counter, or touch hot surfaces.
14. NEVER leave unit unattended while in use or when plugged into an outlet.
15. Extreme caution must be used when moving an appliance containing hot food.
16. Always attach plug to appliance rst, then plug cord in the wall outlet. To
disconnect, turn any control to "o," then remove plug from wall outlet.
ADDITIONAL IMPORTANT SAFEGUARDS
Operating Safety Precautions
1. DO NOT touch kettle and keep door of main unit closed while
operating. Kettle gets VERY HOT during operation.
2. Ensure the Kettle is properly attached to brackets before operating
and that the motor plug is plugged into the Kettle.
3. Check Kettle for presence of foreign objects prior to use.
4. DO NOT place butter, seasonings, or anything other than popcorn kernels and oil into
the Kettle. Use of these substances may cause hazards and may damage the unit.
5. DO NOT operate unit without oil as the popcorn kernels may burn or smoke.
6. DO NOT leave Kettle motor running once popping has ceased.

ENGLISH
4
7. Exercise caution when emptying popcorn. Always use Crank Handle
to empty popcorn, and make sure the unit is over a countertop so
that residual hot oil running out will not cause burns.
8. DO NOT use the appliance for other than its intended use.
Instructions for the Electrical Cord and Plug
1. ELECTRICAL SHOCK HAZARD: Failure to follow these instructions
can result in death, re, or electrical shock.
• Plug into a grounded 3 prong outlet.
• DO NOT remove ground prong.
• DO NOT use an adapter.
• DO NOT use an extension cord.
2. This unit MUST be grounded. In the event of an electrical short circuit, grounding
reduces the risk of electric shock by providing an escape wire for the electric current.
This unit is equipped with a cord having a grounding wire with a grounding plug.
The plug must be plugged into an outlet that is properly installed and grounded.
3. WARNING: Improper use of the grounding plug can result in a risk of electric
shock. If the plug does not t fully into the outlet, contact a qualied
electrician. Do not attempt to modify the plug in any way.
4. A short power supply cord is provided to reduce the risk resulting
from becoming entangled or tripping over a long cord.
5. The manufacturer does not recommend using this machine in countries that do not
support 120V AC even if a voltage adapter, transformer, or converter is in use.
SAVE THESE INSTRUCTIONS!
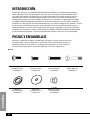
INTRODUCTION
Thank you for purchasing the VINTAGE 8 OZ. POPCORN CART! This 53” tall vendor-
style popcorn cart will be the hit of every party, popping up to 32 cups of hot, fresh,
kettle cooked popcorn per batch. Providing a vintage look and feel reminiscent of
silent movie houses and carnivals, the POPCORN CART features a large, stainless steel
kettle with a built-in stirring system and a kernel catcher to keep unpopped kernels
out of each perfect batch. There is a compartment in the base of the unit to store
supplies, making it easy to keep the cart well stocked and organized. The POPCORN
CART has an easy-to-clean design and its accessible height makes serving a snap!
Visit www.nostalgiaproducts.com to nd out which kits
and accessories are available for this product!

ENGLISH
5
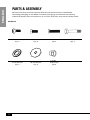
PARTS & ASSEMBLY
Please ensure that you have removed all of the hardware and parts listed before
discarding packaging. In our eorts to reduce packaging, we maximize the packing
material to protect your new purchase. As a result, small parts may not be readily visible.
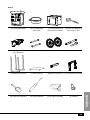
Hardware
#1 Screw (8 mm) #2 Screw (8 mm) #3 Bolt (20 mm) #4 Bolt (60 mm)
Qty. 4 Qty. 6 Qty. 4 Qty. 4
#5 Flat Washer #6 Flat Washer #7 Nut Cap
Qty. 2 Qty. 4 Qty. 6

ENGLISH
6
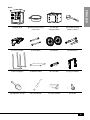
Parts
(A) Main Unit (B) Kernel Measuring
Cap (4 oz.)
(C) Storage
Compartment
(D) Oil Measuring
Spoon (1 tbsp.)
(E) Push Handle (F) Axle Bolts (G) Wheels (H) Wrenches
(I) Base Support (J) Bottom Plate (K) Cross Bar (L) Leg Assembly
(M) Popcorn Scoop (N) Screwdriver (O) Tray Handle (P) Screw

ENGLISH
7
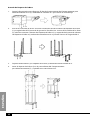
1. Attach Push Handle (E) from inside Storage Compartment (C) using supplied #1 Screws.
2. Insert Cross Bar (K) into the square inserts on the inside of Base Support
(I) and secure from below with two #2 Screws. Insert the Leg Assembly
(L) over the protruding ends of the Base Support (I) and fasten from the
inside of Base Support (I) using four #4 Bolts, and four #7 Nut Caps.
3. Secure Bottom Plate (J) to Base Support (I) using four #2 Screws.
4. Assemble Base Support (I) into the bottom of the Storage
Compartment (C) and secure with four #3 Bolts.
Assembly of Base Support

ENGLISH
8
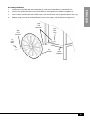
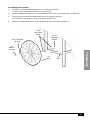
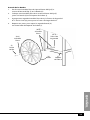
Assembly of Wheels
1. Slide one #5 Flat Washer onto Axle Bolt (F) and insert Axle Bolt (F) into Wheel (G).
2. Put on one #6 Flat Washer. Insert Axle Bolt (F) with Wheel (G) into Base Support (I).
3. Add a second #6 Flat Washer and #7 Nut Cap. Use Wrench (H) to tighten the #7 Nut Cap.
4. Repeat steps to attach second Wheel (G) onto the other side of the Base Support (I).
(#7)
Nut
Cap
(#5)
Flat
Washer
(F)
Axle
Bolt
(G)
Wheel
(I)
Base
Support
(#6)
Flat
Washers

ENGLISH
9
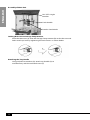
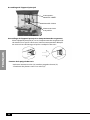
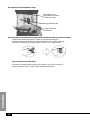
Assembly of Main Unit
ON / OFF & Light
Switches
Crank Handle
Stainless Steel Kettle
Locking Main Unit to Storage Compartment
Place the Main Unit (A) onto the Storage Compartment (B) so that the two side
holes match up. Lock by tightening the Lock Screws as shown below:
Attaching the Tray Handle
Using included screwdriver (N) attach tray handle (O) to
outside of tray with the included screw (P).

ENGLISH
10
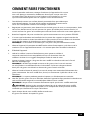
HOW TO OPERATE
Before rst use, clean the inside of the unit by wiping with a moist, non-abrasive
sponge, towel or cloth and then wipe with a non-abrasive dry towel. Wipe down the
inside of the Kettle and be sure it is properly placed in the brackets before starting.
1. First, nd a at surface near an electrical outlet before starting. Make sure your cord
is away from any water source. It is acceptable to use an extension cord if needed.
2. Gather your popcorn making supplies: popcorn, seasonings, cooking oil,
serving bowl, Kernel Measuring Cup and Oil Measuring Spoon. (Kernel
Measuring Cup and Oil Measuring Spoon are included with your unit.)
3. Plug the appliance into the wall outlet while switch is ipped to OFF position.
4. Make sure Kettle is properly secured in the support brackets, and kettle motor cord is fully
plugged into the outlet located on the bottom side of the kettle. The kettle cord is located
on the ceiling of the unit.
NOTE: Kettle will not heat if plug is not fully inserted.
5. Turn appliance ON by ipping the switch on the top of the machine.
Allow the appliance to run 3-5 minutes to heat up the Kettle.
6. Turn unit OFF.
7. Use the supplied Oil Measuring Spoon to add 4 scoops (4 tablespoons) of your favorite
popcorn cooking oil to the Kettle. For best results, it is suggested to use coconut oil.
8. Add 2 scoops (8 oz.) of popcorn kernels to the Kettle using the supplied Kernel Measuring
Cup.
NOTE: DO NOT overll or pack kernels into Kernel Measuring Cup as this will crowd the
Kettle. Doing so may result in more unpopped kernels and cause kernels to smoke or burn.
9. Turn the unit ON and close the door. In no time at all, you will hear the popping begin. Fresh,
hot popcorn will begin to burst out of the ip lids on the Kettle!
NOTE: Steam produced during the popping process is normal.
10. Once the kernels have stopped popping, turn the unit OFF and tip the Kettle using the red
knob on the Crank Handle to release the popcorn.
NOTE: Do not allow motor to continue to run after popcorn is done popping.
IMPORTANT: Extreme caution must be used when emptying popcorn. Always make
sure the unit is over a countertop so that residual hot oil running out will not cause burns.
11. After each batch of popcorn, check for and empty any
unpopped kernels from the Kernel Catcher.

ENGLISH
11
HELPFUL TIPS
NEVER leave the unit unattended while operating.
SMOKING
If your POPCORN CART begins to smoke during cooking, it may be due to grease build up.
In order to reduce smoking, make sure that you clean the inside of the Kettle between uses.
POPCORN
The POPCORN CART is designed for all regular and premium brands of
popping corn. Yellow corn generally pops better than white corn, while
some brands of kernels have a harder outer shell and may result in fewer
popped kernels. Try dierent brands to nd which you like best.
If you notice you are experiencing a lot of unpopped kernels, try adding
more oil to the Kettle. More oil may help pop more kernels.
Always use fresh popcorn. Dried out, stale, or old popcorn pops poorly
as it has lost its moisture content and may scorch. We recommend
storing popcorn in an airtight container in a cool place.
Occasionally popcorn does not pop. This is usually the result of environmental factors
such as freshness and moisture content of the popcorn, or variances of popcorn
type. Unpopped kernels do not necessarily indicate a defect in the appliance.
When lling the Kernel Measuring Cup, make sure to not ll above the marked line.
Underlling can cause less kernels to pop and more unpopped kernels to come out of the
unit. Overlling can cause popped corn to burn and smoke, as it will overll the Kettle.
SEASONING
For more buttery popcorn or when adding seasonings, a spritz of olive oil,
water or butter will allow the seasonings to better stick to the popcorn.
IMPORTANT: DO NOT place butter, seasonings, or anything other than popcorn kernels
into the popcorn Kettle. Use of these substances may cause hazards and may damage the
unit.

ENGLISH
12
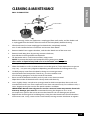
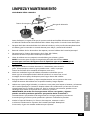
CLEANING & MAINTENANCE
EASY CLEAN KETTLE
Before cleaning, make sure appliance is unplugged from wall outlet, and the kettle cord
is unplugged from the kettle. Allow the unit to cool completely before cleaning.
1. After kettle cord has been unplugged and Kettle has completely cooled,
turn Crank Handle clockwise to loosen and remove from Kettle.
2. Remove Kettle from support brackets, and take the Kettle out of the main unit.
3. Remove both Wing Nuts by twisting counter-clockwise,
then lift the dual-hinged lid from the Kettle.
4. Fill the Kettle with a small amount of hot, soapy water.
NOTE: To protect the kettle cord receptacle from getting wet, never
allow water or liquid of any kind near or in the kettle cord receptacle.
Never place any parts in the dishwasher. Always wash by hand.
5. Allow the Kettle to sit for 15 to 20 minutes to cut the grease. (Time required to cut grease
may vary – use your own judgment depending on the amount of cleaning necessary.)
6. Carefully empty water from the Kettle, taking care to not get water
into the kettle cord receptacle. If necessary, use the scrubber side
of a cleaning sponge to scrub the inside of the Kettle.
7. Rinse inside of the Kettle carefully and dry with a non-abrasive towel.
Wipe the outside of the Kettle with a damp cloth and then dry.
8. Use a slightly damp, non-abrasive sponge, towel or cloth to wipe down the inside and
outside of the main unit. Then wipe with a non-abrasive towel to dry. For stubborn soils, a
citrus degreaser may be used on the panel windows and door.
IMPORTANT: Not all citrus degreasers are the same and some may contain chemicals
that may damage your unit! We recommend testing the degreaser on a small,
inconspicuous spot on the unit to ensure the chemicals do not damage your panels.
9. Replace the dual-hinged Lid and Wing Nuts, then place the Kettle back into the brackets
of the main unit. Lastly, screw in the Crank Handle, turning counter-clockwise to tighten.
Wing Nuts
Kettle
Crank Handle
Lid

ENGLISH
13
RECIPES
The POPCORN CART makes hot, fresh, theater style popcorn anytime!
Enjoy your freshly popped corn in a variety of ways:
• Regular theater style popcorn – add butter and salt.
• Add a pinch of sugar and salt to popcorn for a sweet kettle corn taste.
• Flavored popcorn – add seasoning from any gourmet popcorn seasoning kit.
• Try some of these fun recipes
1 Gallon = 16 cups
PARMESAN POPCORN
• 1 Gallon of
Popped Corn
• 1 Tsp Garlic Powder
• 3 Green Onions,
finely chopped
• ½ Tsp Cracked Pepper
• 1 Tsp Sea Salt
• 1 Cup Parmesan
Cheese, grated (more
or less to taste)
• 3 Tbsps Olive
Oil, heated
Pop corn kernels using the POPCORN CART as
directed in HOW TO OPERATE section.
Combine garlic powder, green onions, cracked
pepper, sea salt and parmesan cheese. Set aside.
In a large mixing bowl, drizzle hot olive oil over popcorn.
Toss until well coated.
Slowly add in dry ingredients while continuously
stirring popcorn until well coated.
You may also shake the dry ingredients over
popcorn in a large paper or muslin bag.
TRADITIONAL POPCORN BALLS
• ½ Cup Popcorn
• ½ Cup Corn Syrup
• ½ Cup Granulated
Sugar
• ½ Teaspoon Salt
• 1 Stick of Butter,
softened
Pop corn kernels using the POPCORN CART as
directed in HOW TO OPERATE section.
Mix corn syrup, sugar and salt together in pot and
dissolve over medium heat for about 3 minutes.
Add popcorn to pot, stirring and tossing consistently
until popcorn is evenly coated at low heat.
Remove from heat.
Use softened butter to form balls while
popcorn mixture is still warm.
Wrap individual balls in plastic wrap, tie
and store at room temperature.

ENGLISH
14
CHUNKY MONKEY
• 1 Gallon Popcorn
• 1 12-oz bag
Semi-Sweet
Chocolate Chips
• 1 12-oz bag Peanut
Butter Morsels
• 4.2 oz bag Banana
Chips, broken into
small pieces
• 11-oz bag Peanuts
Pop corn kernels using the POPCORN CART as
directed in HOW TO OPERATE section.
Melt chocolate chips and peanut butter morsels
over stove, as packaging recommends.
Line cookie sheet with wax paper.
Toss together popcorn and banana chips.
Spread popcorn and banana chip mixture
evenly over cookie sheet.
Drizzle melted chocolate and peanut butter
mixture over popcorn and banana chips.
Sprinkle peanuts over chocolate and peanut butter mixture.
Allow to cool.
When chocolate and peanut butter has hardened,
break up the Chunky Monkey into pieces.
Can be stored in plastic freezer bags.
POPCORN PEPPERMINT BARK
• 1 Gallon Popped Corn
• 1 12-oz bag Semi-
Sweet or Dark
Chocolate Chips
• 1¼ cup Peppermint
Sticks, crushed
Pop corn kernels using the POPCORN CART as
directed in HOW TO OPERATE section.
Melt chocolate chips over stove, as packaging recommends.
Line cookie sheet with wax paper.
Spread popcorn evenly over cookie sheet.
Drizzle melted chocolate over popcorn.
Sprinkle crushed peppermints over chocolate.
Allow to cool.
When chocolate has hardened, break up
Popcorn Peppermint Bark into pieces.
Can be stored in plastic freezer bags.

ENGLISH
15
RETURNS & WARRANTY
SHOULD YOUR UNIT NOT WORK OR IF DAMAGED WHEN YOU FIRST TAKE IT OUT OF
THE BOX, PLEASE RETURN IT TO THE PLACE OF PURCHASE IMMEDIATELY.
VINTAGE 8 OZ. POPCORN CART / CCP510
Should you have any questions, please contact us via email or at the customer service number listed
below between the hours of 8:00 AM and 5:00 PM, Monday through Friday, Central Standard Time.
Distributed by:
Nostalgia Products LLC
1471 Partnership Dr.
Green Bay, WI 54304-5685
Customer Service
Phone: (920) 347-9122
Web: www.nostalgiaproducts.com
Customer Service Inquiry
To submit a Customer Service inquiry, go to www.nostalgiaproducts.com and ll
out the Customer Service Inquiry form and click the Submit button.
A representative will contact you as soon as possible.
Product Warranty Terms
Nostalgia Products LLC (the “Company”) hereby warrants that for a period of one (1) year from the
date of original purchase, this product will be free of defects in material and workmanship under
normal home use, provided that the product is operated and maintained in accordance with the
operating instructions. As the sole and exclusive remedy under this warranty, the Company will
at its discretion either repair or replace the product found to be defective, or issue a refund on the
product during the warranty period. This warranty is only available to the original retail purchaser of
the product from the date of initial retail purchase, and is only valid with the original sales receipt, as
proof of purchase date is required to obtain warranty benets. All warranty claims must be brought
to the attention of the Company within the warranty period and no later than 30 days of the failure
to perform. This warranty does not cover normal wear or damage caused by shipping, mishandling,
misuse, accident, alteration, improper replacement parts, or other than ordinary household use.
You may be required to return the product (with shipping prepaid by you) for inspection and
evaluation. Return shipping costs are not refundable. The Company is not responsible for returns
damaged or lost in transit. Unless otherwise specically permitted by the operating instructions, this
warranty applies to indoor household use only. In order to obtain service under this warranty, please
contact the Company at the telephone number listed above or by lling out the Customer Service
Inquiry Form located at www.nostalgiaproducts.com. Warranty valid only in USA and Canada.
This warranty is in lieu of all other warranties, expressed or implied, including warranties of
merchantability and tness for a particular purpose, which are hereby excluded to the extent
permitted by law. In no event shall the Company be liable for any indirect, incidental, consequential,
or special damages arising out of or in connection with this product or the use thereof. Some
states, provinces or jurisdictions do not permit the exclusion or limitation of incidental or
consequential damages, so the foregoing exclusion or limitation may not apply to you.
This warranty does not apply to re-manufactured merchandise.
Please read the operating instructions carefully. Failure to comply
with the operating instructions will void this warranty.
For more information, visit us online at www.nostalgiaproducts.com.
Like us on Facebook at www.facebook.com/NostalgiaElectrics.
Follow our boards on Pinterest at www.pinterest.com/nostalgiaelctrx.
Tweet along with us on Twitter at www.twitter.com/NostalgiaElctrx.

16
FRANÇAIS
16
Faire une fête tous les jours!
Visiter le site Web www.nostalgiaproducts.com pour d’autres
produits agréables.
TABLE DES MATIÈRES
SÉCURITÉ . . . . . . . . . . . . . . . . . . . . . . . . . . . . . . . . . . . . . . . . 16
PRÉCAUTIONS IMPORTANTES . . . . . . . . . . . . . . . . . . . . . . . . . . . 17
PRÉCAUTIONS IMPORTANTES ADDITIONNEL . . . . . . . . . . . . . . . . .17
INTRODUCTION . . . . . . . . . . . . . . . . . . . . . . . . . . . . . . . . . . . . 19
PIÈCES ET ASSEMBLAGE . . . . . . . . . . . . . . . . . . . . . . . . . . . . . . . 19
COMMENT FAIRE FONCTIONNER . . . . . . . . . . . . . . . . . . . . . . . . . 24
CONSEILS PRATIQUES . . . . . . . . . . . . . . . . . . . . . . . . . . . . . . . . 25
NETTOYAGE ET ENTRETIEN . . . . . . . . . . . . . . . . . . . . . . . . . . . . . 26
RECETTES . . . . . . . . . . . . . . . . . . . . . . . . . . . . . . . . . . . . . . . . 27
RETOURS ET GARANTIE . . . . . . . . . . . . . . . . . . . . . . . . . . . . . . . 29
SÉCURITÉ
Spécications des Appareils:
120 Volts, 60 Hz
600 Watts
CE PRODUIT DOIT ÊTRE UTILISÉ UNIQUEMENT DANS UNE PRISE DE COURANT DE 120 V CA.
Reportez-vous à www.nostalgiaproducts.com/user-manuals/
pour la version la plus récente.
Votre sécurité tout comme celle des autres est primordiale.
Ce manuel renferme plusieurs avis importants sur la sécurité lors de l’utilisation
de votre appareil. Lire le manuel et conformez-vous aux avis contre-indiqués.
Ceci représente le symbole d'avertissement pour votre sécurité.
Ce symbole vous signale les dangers potentiels qui
peuvent blessures graves à vous et à d'autres.
Ce symbole d'alerte à la sécurité suivra tous les avis relatifs à la sécurité.
Tous les avis sécuritaires indiqueront le danger potentiel exact, la façon
dont vous pouvez réduire vos chances de blessure et vous indiquerons les
conséquences potentielles si vous ne suivez pas ces instructions à la lettre.

17
FRANÇAIS
17
PRÉCAUTIONS IMPORTANTES
Une personne n'ayant pas lu et compris toutes les instructions de
fonctionnement et de sécurité n'est pas qualiée pour faire fonctionner cet
appareil. Tous les utilisateurs de cet appareil doivent lire et comprendre
ce mode d'emploi avant d'utiliser ou de nettoyer cet appareil.
Lorsque l'on utilise un appareil électrique, il faut toujours
respecter des précautions de base, y compris celles-ci :
1. Lisez toutes les instructions avant d'utiliser cet appareil.
2. NE PAS TOUCHER les surfaces chaudes. Utiliser les poignées ou les boutons.
3. Cet appareil n'est PAS UN JOUET.
4. Les jeunes enfants non supervisés et les individus ayant une décience
cognitive ne devraient jamais faire fonctionner cet appareil.
5. Une surveillance étroite est nécessaire lorsqu’un appareil
est utilisé par ou à proximité d’enfants.
6. Pour protéger contre les chocs électriques ne pas submerger le cordon, la
che ou aucune pièce de cet appareil dans l'eau ou d'autres liquides.
7. Débranchez l'appareil lorsqu'il ne sert pas, avant de retirer des pièces et avant le nettoyage.
Laisser refroidir avant de mettre ou d'enlever des pièces et avant le nettoyage.
8. NE PAS utiliser un appareil avec un cordon ou une che électrique
endommagés ou après un mauvais fonctionnement de l'appareil ou s'il a
été endommagé d'une manière quelconque. Retournez l'appareil à l'atelier
de réparation le plus proche pour un examen, réparation ou réglage.
9. Le fabricant ne recommande pas l'utilisation d'accessoires autres que ce qui est
prévu par le fabricant. L'utilisation d'accessoires peut causer des blessures.
10. NE PAS utiliser cet appareil pour toute autre utilisation pour laquelle il n’a pas été conçu.
11. N'utilisez PAS l'appareil à l'extérieur. POUR UN USAGE DOMESTIQUE UNIQUEMENT.
12. NE PAS placer sur ou près d'un brûleur à gaz ou électrique ou dans
un four chaué. 1. NE PAS mettre en lave-vaisselle.
13. NE laissez PAS le cordon pendre sur le bord de la table ou
du comptoir, ni toucher les surfaces chaudes.
14. NE laissez JAMAIS l'unité sans surveillance lorsqu'il est en
service ou une fois branché à une prise électrique.
15. Une extrême prudence doit être utilisée pour déplacer
un appareil contenant des liquides chauds.
16. Toujours brancher l'appareil en premier, puis brancher le cordon dans
la prise murale. Pour débrancher l’appareil, mettre tous les boutons à la
position « arrêt », puis débrancher la che de la prise murale.
PRÉCAUTIONS IMPORTANTES ADDITIONNEL
Mesures de sécurité pour le fonctionnement
1. NE PAS toucher à la marmite et gardez la porte de l'appareil fermée durant le
fonctionnement. La marmite deviendra TRÈS CHAUDE durant le fonctionnement.
2. Assurez-vous que la marmite est bien attachée aux supports avant de
la mettre en marche et que le moteur est branché à la marmite.

18
FRANÇAIS
18
3. Vériez en cas d'objets étrangers dans la marmite avant de l'utiliser.
4. NE PAS mettre du beurre, des assaisonnements ou autres que des
grains de maïs et de l'huile dans la marmite. L'utilisation de toutes autres
substances peut causer des dangers et peut endommager l'appareil.
5. NE PAS faire fonctionner la machine sans l'huile car les
grains de maïs pourraient brûler voire fumer.
6. NE PAS laisser le moteur de la marmite fonctionner une fois que le maïs a cessé d'éclater.
7. Soyez prudent lorsque vous videz le maïs éclaté. Toujours utiliser la manivelle
pour vider le maïs éclaté et assurez-vous que l'appareil est au-dessus d'un
comptoir an que l'huile chaude résiduelle s'écoulant ne brûle rien.
8. N'employez PAS l'appareil pour une autre utilisation
que celle pour laquelle elle à été conçue.
Instructions pour le cordon électrique et la prise
1. RISQUE DE DÉCHARGE ÉLECTRIQUE : Ne pas suivre ces instructions
peut entraîner la mort, un incendie ou une électrocution.
• Branchez dans une prise à 3 ches.
• NE retirez PAS la che de la mise à la terre.
• N'utilisez PAS d'adaptateur.
• N'utilisez PAS une rallonge.
2. Cet appareil DOIT être mis à la terre. Dans le cas d’un court-circuit électrique,
la mise à la terre réduit le risque de choc électrique en orant un l
d’échappement pour le courant électrique. Cet appareil est équipé d’un cordon
muni d’un l de mise à la terre avec une che de mise à la terre. La che doit
être branchée sur une prise correctement installée et mise à la terre.
3. AVERTISSEMENT : Une mauvaise utilisation de la prise de mise à la terre peut entraîner un
risque d’électrocution. Si la che n’entre pas complètement dans la prise, contactez un
électricien qualié. Ne pas tenter de modier la che de quelque façon que ce soit.
4. Un court cordon d'alimentation est fourni pour réduire les risques
d'enchevêtrement ou risques de trébucher sur un cordon plus long.
Le fabricant ne recommande pas l’utilisation de cette machine dans les
pays qui ne supportent pas les tensions de 120V AC, même si un adaptateur
de tension, un transformateur ou un convertisseur est utilisé.
CONSERVEZ CES INSTRUCTIONS!
La page charge ...
La page charge ...
La page charge ...
La page charge ...
La page charge ...
La page charge ...
La page charge ...
La page charge ...
La page charge ...
La page charge ...
La page charge ...
La page charge ...
La page charge ...
La page charge ...
La page charge ...
La page charge ...
La page charge ...
La page charge ...
La page charge ...
La page charge ...
La page charge ...
La page charge ...
La page charge ...
La page charge ...
La page charge ...
La page charge ...
-
 1
1
-
 2
2
-
 3
3
-
 4
4
-
 5
5
-
 6
6
-
 7
7
-
 8
8
-
 9
9
-
 10
10
-
 11
11
-
 12
12
-
 13
13
-
 14
14
-
 15
15
-
 16
16
-
 17
17
-
 18
18
-
 19
19
-
 20
20
-
 21
21
-
 22
22
-
 23
23
-
 24
24
-
 25
25
-
 26
26
-
 27
27
-
 28
28
-
 29
29
-
 30
30
-
 31
31
-
 32
32
-
 33
33
-
 34
34
-
 35
35
-
 36
36
-
 37
37
-
 38
38
-
 39
39
-
 40
40
-
 41
41
-
 42
42
-
 43
43
-
 44
44
-
 45
45
-
 46
46


