
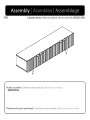
MS1222156


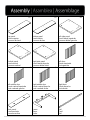
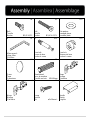
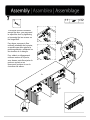
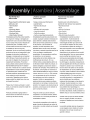
A x1
Top panel
Panel superior
Panneau du haut
B x1
Bottom panel
Panel inferior
Panneau du bas
C x1
Left side panel
Panel lateral izquierdo
Panneau latéral gauche
D x1
Vertical panel
Panel vertical
Panneau vertical
E x1
Right side panel
Panel lateral derecho
Panneau latéral droit
F x1
Left door
Puerta izquierda
Porte gauche
G x1
Left middle door
Puerta central izquierda
Porte centrale gauche
H x1
Right middle door
Puerta central derecha
Porte centrale droite
I x1
Right door
Puerta derecha
Porte droite
J x1
Back panel
Panel posterior
Panneau arrière
K x2
Frame
Marco
Cadre
L x1
Rail
Carril
Rail

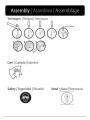
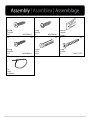
1 x8
Bolt
Tornillo
Boulon Ø1/4"×1/2"L
2 x3
Bolt
Tornillo
Boulon Ø1/4"×1-1/2"L
3 x11
Flat washer
Arandela plana
Rondelle plate
4 x1
Allen wrench
Llave Allen
Clé Allen
5 x12
Cam bolt
Perno de leva
Boulon à came
6 x12
Cam lock
Bloqueo de leva
Serrure à came
7 x12
Cover
Tapa
Couverture
8 x12
Wood dowel
Taco de madera
Cheville en bois Ø8×30mm
9 x4
Hinge
Bisagra
Charnière
10 x4
Hinge
Bisagra
Charnière
11 x48
Screw
Tornillo
Vis ø3×14mm L
12 x4
Handle
Manija
Poignée

13 x8
Screw
Tornillo
Vis ø3×12mm L
14 x17
Screw
Tornillo
Vis ø3×12mm L
15 x4
Bracket
Soporte
Support
16 x4
Screw
Tornillo
Vis ø3×16mm L
17 x4
Anchor
Ancla
Ancre
18 x4
Screw
Tornillo
Vis 8#×1-1/4” L
19 x2
Tie
Lazo
L’attache

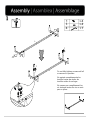
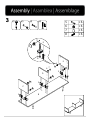
1(1) 1×4
3×4
4×1
1
3
1
3
1
3
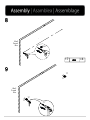
K
L
K
K
L
Do not fully tighten screws until all
screws are in position.
No apriete completamente los tornillos
hasta que estén en su posición.
Ne serrez pas complètement les vis tant
que toutes les vis
K
Do not fully tighten screws until all
screws are in position.
No apriete completamente los
tornillos hasta que todos los
tornillos estén en su lugar.
Ne serrez pas complètement les
vis tant que toutes les vis ne sont
pas en place.

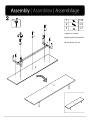
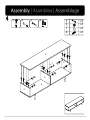
(1)
1
3
1
3
2
3
2
3
2
3
1
31
3
L
K
K
B
B
21×4
2×3
3×7
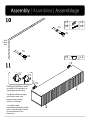
Tighten all screws.
Apretar todos los tornillos.
Serrez toutes les vis.
Tighten all screws.
Apriete todos los tornillos.
Serrez toutes les vis.

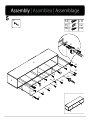
3(1) (2) (3) (4) 5×6
6×6
7×6
8×6
B
C
D
E
58
85
6
7
6
7
58
85
5
8
85
7
6
67
67
67
7
B
E
6
58

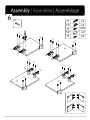
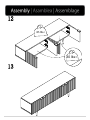
4(1) (2) (3) (4) 5×6
6×6
7×6
8×6
6
7
7
6
67
67
67
6
7
B
C
D
E
A
58
85
58
85
58
85

J
15 16
14
A
E
J
14
15 16
15 16
14
14 14
14
14
14
14
14
14
14
14
14
14 14
14
14
(1)
514 ×17
15 ×2
16 ×4

5(1) 9×4
10 ×4
11 ×16
12 ×8
13 ×8
11
10
10
13
G
I
F
11
9
9
13
H
11
12
12
12
13
11
13
9
9
12
11
11
11
11
10
10
x4

11 ×32
7(1)
11
11
11
11
11
11
F
H
I
G
11
11
11
11
I
A
E
B
A
C
To achieve uniform clearance
around the door, you may need
to adjust the door by tightening
or loosening the two screws on
the hinge itself.
Para lograr un espacio
uniforme alrededor de la
puerta, es posible que deba
ajustar la puerta apretando o
aflojando los dos tornillos de la
bisagra.
Pour obtenir un jeu uniforme
autour de la porte, vous devrez
peut-être ajuster la porte en
serrant ou en desserrant les
deux vis de la charnière.
To achieve uniform clearance
around the door, you may need
to adjust the door by tightening
or loosening the two screws on
the hinge itself.
Para lograr un espacio libre
uniforme alrededor de la puerta,
es posible que deba ajustar la
puerta apretando o aflojando los
dos tornillos de la bisagra.
Pour obtenir un dégagement
uniforme autour de la porte,
vous devrez peut-être ajuster la
porte en serrant ou en
desserrant les deux vis sur la
charnière elle-même.

17
17
17 17
9
17
3/16"
8
17 ×4
Wall
Pared
Mur
Wall
Pared
Mur

19
11
Anti-tipping hardware must be
used for this product to avoid
tipping and injury.
El hardware antivuelco debe
usarse para este producto para
evitar vuelcos y lesiones.
Le matériel anti-basculement
doit être utilisé pour ce produit
afin d'éviter le basculement et
les blessu
FURNITURE FURNITURE
Wall
Wall 19 19
19
15
18
18
15
18
18
10 15 ×2
18 ×4
19 ×2
Wall
Pared
Mur
Anti-tipping hardware must
be used for this product to
avoid tipping and injury.
Se deben utilizar herrajes
anti-vuelco para este
producto para evitar
vuelcos y lesiones.
Le matériel anti-
basculement doit être utilisé
pour ce produit afin d'éviter
le basculement et les
blessures.

85 lbs<
12
30 lbs<
13

-
 1
1
-
 2
2
-
 3
3
-
 4
4
-
 5
5
-
 6
6
-
 7
7
-
 8
8
-
 9
9
-
 10
10
-
 11
11
-
 12
12
-
 13
13
-
 14
14
-
 15
15
-
 16
16
-
 17
17


Southern Enterprises 21010107 Mode d'emploi
- Taper
- Mode d'emploi
Autres documents
-
ROOMS TO GO 21210771 Assembly Instructions
-
-
-
-
-
-
-
-
-