ICD-SX712
Enregistreur IC
Guide de démarrage rapide
FR
GB
Essayez votre nouvel enregistreur IC
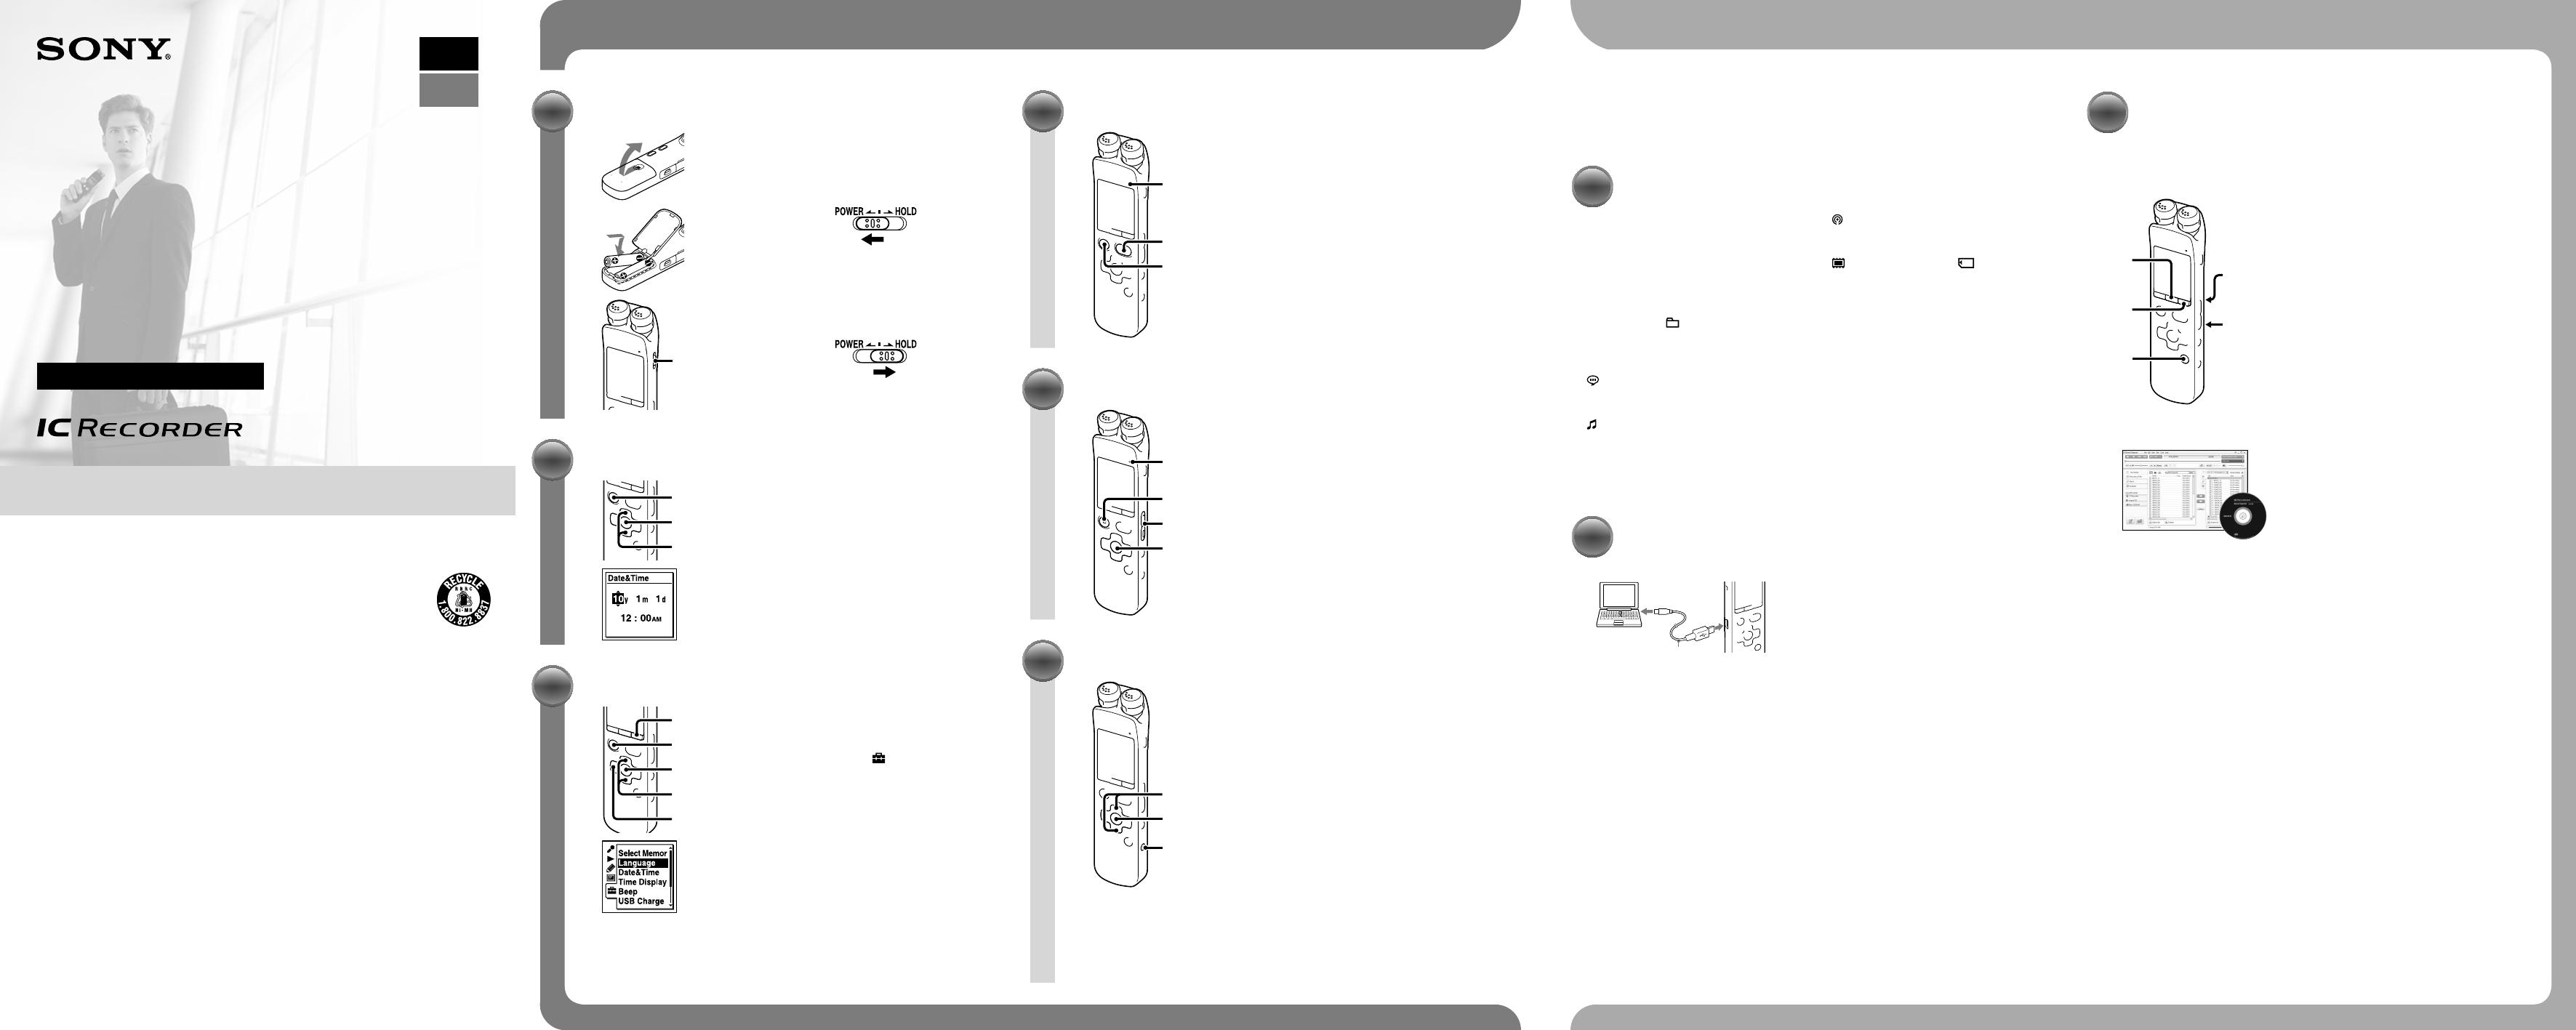
1. Mettez sous tension.
1
1
POWER/
HOLD
1 Insérez deux piles en respectant la
polarité.
L’enregistreur IC est mis sous tension.
Pour mettre hors tension
pendant au moins 2 secondes
Pour mettre de nouveau sous tension, faites glisser le
commutateur POWER/HOLD vers « POWER » pendant au
moins 1 seconde.
Pour prévenir les opérations involontaires (HOLD)
Pour désactiver la fonction HOLD de l’enregistreur IC,
faites glisser le commutateur POWER/HOLD vers le centre.
2. Réglez la date et l’heure.
2
1
1
1 Appuyez sur ou sur pour définir
l’année, le mois, le jour, l’heure et les
minutes dans l’ordre, puis appuyez sur
/ENT.
2 Appuyez sur STOP.
3. Sélectionnez la langue des menus.
1
5
2, 3, 4
2
2, 3, 4
1 Appuyez sur MENU.
2 Appuyez sur , sur ou sur
pour sélectionner , puis appuyez sur
/ENT.
3 Appuyez sur ou sur pour
sélectionner « Language », puis appuyez
sur /ENT.
4 Appuyez sur ou sur pour
sélectionner la langue que vous
souhaitez utiliser dans la fenêtre
d’affichage, puis appuyez sur /ENT.
5 Appuyez sur STOP.
4. Enregistrez.
1
2
Indicateur de
fonctionnement
Avant de commencer à utiliser l’enregistreur IC, assurez-
vous de faire glisser le commutateur POWER/HOLD vers le
centre pour désactiver la fonction HOLD.
1 Appuyez sur REC/PAUSE.
L’enregistrement commence et l’indicateur de
fonctionnement s’allume en rouge.
Vous pouvez interrompre l’enregistrement en
appuyant sur
REC/PAUSE. Appuyez de nouveau sur
REC/PAUSE pour reprendre l’enregistrement.
2 Appuyez sur STOP pour arrêter
l’enregistrement.
L’enregistrement s’arrête et l’indicateur de
fonctionnement clignote en orange.
5. Écoutez.
2
1
3
1 Appuyez sur /ENT.
La lecture commence et l’indicateur de
fonctionnement s’allume en vert.
2 Réglez le volume en appuyant sur
VOLUME –/+.
3 Appuyez sur STOP pour arrêter la
lecture.
6. Effacez.
2
1
2
Une fois qu’un fichier a été effacé, il est impossible de le
restaurer.
1 Appuyez sur ERASE.
« Erase? » s’affiche et le fichier à effacer est lu pour
confirmation.
2 Sélectionnez « Execute » à l’aide de
ou et appuyez sur /ENT.
« Erasing… » s’affiche pendant l’effacement du
fichier sélectionné.
Vous pouvez sélectionner un onglet et un
dossier dans lesquels vous allez enregistrer
un fichier. Vous pouvez également spécifier
le fichier à lire ou à effacer dans le dossier
sélectionné.
1 Sélectionnez un onglet.
Appuyez sur
pour afficher la
fenêtre de sélection de dossier.
Appuyez sur
, puis sur ou sur
pour sélectionner un onglet.
(voix) : zone enregistrable utilisée
pour gérer les fichiers enregistrés avec
l’enregistreur IC.
(musique) : zone de lecture seule
utilisée pour gérer les fichiers de musique
transférés depuis votre ordinateur.
(podcast) : zone de lecture seule
utilisée pour gérer les fichiers podcast
transférés depuis votre ordinateur.
(mémoire intégrée) ou (mémoire
externe) : mémoire utilisée. Vous pouvez
passer de la mémoire intégrée à la
mémoire externe (carte mémoire).
2 Sélectionnez un dossier.
Appuyez sur pour aller à l’onglet que
vous avez sélectionné, puis appuyez sur
ou sur pour sélectionner un dossier.
3 Sélectionnez un fichier.
Appuyez sur pour aller au dossier
que vous avez sélectionné, puis appuyez
sur ou sur pour sélectionner un
fichier.
Sélection d’une mémoire/onglet/dossier/fichier
Étapes suivantes
Câble de raccordement USB
Le mode d’emploi expliquant toutes les
options et fonctions de l’enregistreur IC est
stocké sous forme de fichiers PDF dans la
mémoire intégrée de l’enregistreur IC.
Vous pouvez également télécharger le mode
d’emploi sur la page d’accueil de Sony :
http://www.sony.ca/ElectronicsSupport/
http://fr.sony.ca/ElectronicsSupport/
1 Raccordez l’enregistreur IC à votre
ordinateur.
2 Ouvrez le dossier « Instructions »
sur votre ordinateur.
Sous Windows : cliquez sur [Poste
de travail] ou sur [Ordinateur] -
[IC RECORDER] - [Instructions].
Sous Macintosh : cliquez sur [IC
RECORDER] sur le poste de travail
- [Instructions].
3 Glissez et déposez les fichiers du
mode d’emploi à partir du dossier
« Instructions » sur le disque local
de votre ordinateur.
Les noms des fichiers du mode d’emploi
sont les suivants :
Nom produit_langue_version.pdf
(par ex. ICD-SX712_English_71.pdf)
4 Déconnectez l’enregistreur IC de
votre ordinateur.
Pour lire le mode d’emploi, double-cliquez sur le
fichier pdf que vous souhaitez lire.
Copie du mode d’emploi sur votre
ordinateur
Alimentation
Faites uniquement fonctionner l’appareil sur
une tension de 2,4 V ou 3,0 V CC.
Utilisez deux piles rechargeables NH-AAA ou
deux piles alcalines LR03 (AAA).
Sécurité
Ne faites pas fonctionner l’appareil en
conduisant une voiture, une bicyclette ou
tout autre véhicule motorisé.
Manipulation
Ne laissez pas l’appareil à proximité d’une
source de chaleur ou dans un endroit
exposé au rayonnement direct du soleil,
à une poussière excessive ou à des chocs
mécaniques.
Si des éléments solides ou liquides
venaient à pénétrer à l’intérieur de
l’appareil, retirez les piles et faites-le
vérifier par un technicien qualifié avant de
le remettre en service.
Si vous avez des questions ou des problèmes
concernant cet appareil, consultez votre
revendeur Sony.
Précautions
Bienvenue dans votre nouvel enregistreur
IC Sony !
Ce document est le Guide de démarrage
rapide qui vous fournit des instructions sur
les opérations de base de l’enregistreur IC.
Lisez-le attentivement. Nous espérons que
vous apprécierez votre enregistreur IC Sony.
Capacité (capacité disponible pour
l’utilisateur)
2 Go (environ 1,80 Go = 1 932 735 283 octets)
Une partie de la mémoire est utilisée comme
zone de gestion des données.
Cet appareil numérique de la classe B est
conforme à la norme NMB-003 du Canada.
RECYCLAGE DES ACCUMULATEURS À
HYDRURE MÉTALLIQUE DE NICKEL
Les accumulateurs à hydrure
métallique de nickel sont
recyclables.
Vous pouvez contribuer à
préserver l’environnement en rapportant les
piles usées dans un point de collection et
recyclage le plus proche.
Pour plus d’informations sur le recyclage des
accumulateurs, téléphonez le numéro gratuit
1-800-822-8837 (Etats-Unis et Canada
uniquement), ou visitez http://www.rbrc.org/.
Avertissement: Ne pas utilliser des
accumulateurs à hidrure métallique de nickel
qui sont endommagées ou qui fuient.
Enregistreur IC (1)
Casque stéréo (1)
Câble de raccordement USB (1)
Protection contre le vent* (1)
Socle de chargeur* (1)
Support (1)
Logiciel d’application, Sound Organizer
(CD-ROM) (1)
Logiciel d’application, Dragon
NaturallySpeaking (DVD-ROM)* (1)
Housse de transport (1)
Piles rechargeables NH-AAA (AAA)* (2)
LR03 Piles alcalines (AAA)* (2)
Boîtier de la pile* (1)
Mode d’emploi (stocké dans la mémoire
intégrée)
* Fourni avec certains modèles dans certaines
régions uniquement.
Vérifiez les éléments fournis.
Félicitations ! Vous avez configuré votre enregistreur IC et réalisé votre premier enregistrement.
Passons à l’étape suivante. Il existe des fonctions et des informations plus utiles que vous pouvez
utiliser pour profiter pleinement de votre enregistreur IC.
Pour voir des détails sur chaque opération,
reportez-vous au mode d’emploi au
format PDF que vous avez copié sur votre
ordinateur.
DPC(SPEED)/
KEY CTRL
(à l’arrière)
NOISE CUT
(à l’arrière)
SCENE
MENU
T-MARK
SCENE
Règle les options de menu pour un
enregistrement avec les paramètres les plus
appropriés en fonction de diverses scènes
d’enregistrement.
NOISE CUT
Réduit le bruit ambiant pour rendre le son
de lecture plus clair.
T-MARK
Ajoute un repère de piste pour définir le
point de départ lors de l’enregistrement ou
de la lecture d’un fichier.
DPC (SPEED)/KEY CTRL
Règle la vitesse et/ou le ton de lecture.
MENU
Règle diverses options de menu, telles que
REC Mode, REC Level, etc.
Fonctions plus avancées
Sound Organizer (logiciel
d’application pour PC*)
Plusieurs opérations peuvent être effectuées
à l’aide de Sound Organizer sur votre
ordinateur. Vous pouvez importer des
fichiers enregistrés avec l’enregistreur IC
dans Sound Organizer pour les modifier.
Vous pouvez importer des fichiers de
musique d’un CD de musique ou des fichiers
podcast pour les transférer sur l’enregistreur
IC. Vous pouvez également graver la
musique que vous aimez sur des CD.
* Pour Windows uniquement
Indicateur de
fonctionnement

