
DS80MP1R-019
LBT81103
MP3040 - MP3100
Manuale completo
Complete manual
Manuel complet
Ungekürztes Handbuch
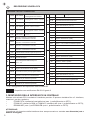
- Installazione - Guida rapida 3
- Installation - Quick guide 8
- Installation
- Guide rapide
13
- Installation
- Kurzanleitung
18
- 23

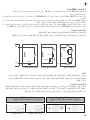
1 2
3
4 5
1
1 1
2
3

LEGENDA SIMBOLI SYMBOL KEY LÉGENDE DES
SYMBOLES SYMBOLLEGENDE
Tensione di
alimentazione continua
Direct current
power voltage
Tension d’alimenta-
tion continue
Gleichstromvers
orgungsspannung
~Tensione di
alimentazione alternata
Alternating power
voltage
Tension d’alimenta-
tion alternative
Versorgung mit
Wechselspannung
Alimentatore dotato di
un doppio isolamento
Power supply unit
with double insulation
Alimentation dotée
d’une double isolation
Mit doppelter Isolie-
rung ausgestattetes
Netzgerät
Riferirsi al manuale
d’installazione del
dispositivo
See the installation
manual of the device
Se reporter au manuel
d’installation du
dispositif
Siehe Installationsan-
leitung des Geräts
76
PWR
EXC TAMPER
RES
SW2 OPT1 OPT2
BUS
BUS
OPT3
+BAT-
+PS -PS
+ A B -
+ A B - +SR +V1 -V1 NC1NO1 C1 U2 SAB +V2 -V2 IN1 IN2 IN3 IN4 IN5 IN6 +V2 -V2 P7 P8
OPER
COM
3+V3
CLOUD
RUN
RELÈ
AC
B
E F D
K L M
N
O
G
H I J P Q R S
8MP3040 - MP3100 EN50131
GRADO 2
2

3
1. INTRODUZIONE
Il presente manuale descrive l’installazione delle centrali MP3040 e MP3100.
CARATTERISTICHE TECNICHE
Corrente massima assorbita CPU ⎓
Tensione nominale di carica batteria (1) ⎓
Soglia batteria scarica ⎓
Soglia di protezione dalle sovratensioni ⎓
Corrente massima per dispositivi esterni: Grado 2 – autonomia 12 ore
Tensione nominale sul morsetto +SR (2) ⎓
Corrente max erogabile dal morsetto +SR (con protezione dai sovraccarichi)
Tensione nominale sul morsetto +BUS ⎓
Corrente max erogabile dal morsetto +BUS (con protezione dai sovraccarichi)
⎓
Corrente max erogabile dai morsetti PrIO
Corrente max erogabile dal morsetto U2
Ingressi
Ingresso Sabotaggio (24h) 1
Uscite
1
2
2
(3)
⎓
Peso
Grado di protezione

4
CARATTERISTICHE TECNICHE
Alimentatore
PS515
Tensione nominale di alimentazione
Tensione nominale di uscita ⎓
Corrente massima erogabile
Ripple max
Fusibile
Classe di isolamento II
(1)
(2)
(3)
superiore a 30 min. abilitato.
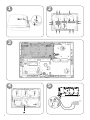
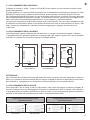
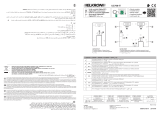
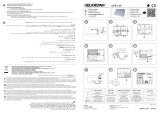
2. INSTALLAZIONE
APERTURA DEL BOX
APERTURE PREFRATTURATE PER IL PASSAGGIO CAVI
RIMOZIONE / INSERIMENTO SCHEDA CPU
FISSAGGIO A PARETE
Montare
A
COLLEGAMENTO TAMPER CENTRALE
COLLEGAMENTO E FISSAGGIO ALIMENTAZIONE
A
B
COLLEGAMENTO E FISSAGGIO BATTERIA
A
ATTENZIONE
transitorie esterne all’apparecchiatura.
2
1
2
3
4
5
6
7

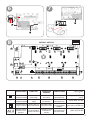
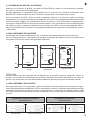
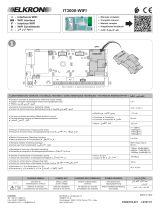
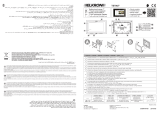
DESCRIZIONE SCHEDA CPU
A
COM
⎓)
BPWR
⎓)
C
D
E
F Connettore tamper
G
Cavo collegamento batteria tampone
⎓ 7Ah
H+PS ⎓)
I Connettore USB tipo B. Consente il collegamen
to in locale di un PC per la programmazione
J
KOPTO 1
LOPTO 2
MOPTO 3
LEGENDA LAY-OUT SCHEDA CPU
NBUS
O*
+⎓)
P
+⎓)
Q
SR ⎓)
⎓)
C1
U2
R
⎓)
S
⎓)
EN50131
GRADO 2
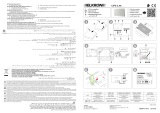
3. MONTAGGIO DELLE INTERFACCE IN CENTRALE
Montare
ATTENZIONE!
non alimentata (rete e
batteria scollegate).
8

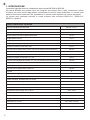
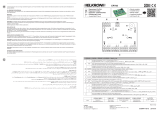
3.1 COLLEGAMENTO BUS CENTRALE
Collegare ai morsetti +AB–
tastiere ed espansioni.
Per il collegamento del BUS utilizzare un cavo multipolare schermato a 4 conduttori di sezione adeguata
1.000 metri.
3.2 COLLEGAMENTO DEGLI INGRESSI
La tipologia
realizzare un sistema che comprenda ingressi di tipologie diverse.
RIVELATORE
Px
+V
Tamper
RIVELATORE
Tamper 1
Tamper 2
RIVELATORE
ATTENZIONE!
3.3 COLLEGAMENTO DELLE USCITE
Sono
assente) e dell’uscita relè (normalmente eccitato o normalmente diseccitato).
USCITA RELE’
Programmata normalmente eccitato
(sicurezza positiva)
USCITA ELETTRICA
Programmata positivo presente
(sicurezza positiva)
relè eccitato relè diseccitato

4. CONFIGURAZIONE DELLA CENTRALE
• accesso
rizzo https://192.168.82.83
• accesso
https://192.168.1.100
• accesso
https://192.168.1.10
• accesso
per la versione iOS. Per utilizzare l’accesso remoto è necessario che l’installatore sia registrato sul
Internet Explorer non è compatibile.
Avanzate e poi Procedi su …
so con codice installatore è possibile anche a impianto inserito e senza abilitazione dall’utente Master.
000000 e come impostazione è “Abilitato”.
La connessione locale o remota a MP Control
Una guida

1. INTRODUCTION
This
TECHNICAL FEATURES
⎓
(1) ⎓
⎓
Overvoltage protection threshold ⎓
(2) ⎓
⎓
⎓
Inputs
Sabotage input (24h) 1
Outputs
1
2
Storing temperature
2
(3)
⎓
Weight

TECHNICAL FEATURES
PS515
power unit
⎓
Max. current that can be delivered
Max. ripple
Fuse
Insulation class II
(1)
(2) .
(3)
exceeding 30 min. enabled.
2. INSTALLATION
BOX OPENING
SCORED OPENINGS FOR CABLE ROUTING
CPU CARD REMOVAL/INSERTION
FIXING TO THE WALL
A
CONTROL PANEL TAMPER CONNECTION
POWER SUPPLY FIXING
A
B
BATTERY CONNECTION AND FIXING
A
IMPORTANT
Once
1
2
3
4
5
6
7

10
CPU BOARD DESCRIPTION
8
EN50131
GRADO 2
3. ASSEMBLING THE INTERFACES IN THE CONTROL PANEL
•
•
•
IMPORTANT!
not powered (mains and battery
disconnected).
A
COM
⎓)
BPWR
⎓)
C
D
E
F Tamper connector
G
⎓
H+PS ⎓)
I
J
KOPTO 1
LOPTO 2
MOPTO 3
CPU BOARD LAYOUT KEY
NBUS
O*
+⎓)
P
+⎓)
Q
SR ⎓)
⎓)
C1
U2
R
⎓)
S
⎓)

11
3.1 CENTRAL BUS CONNECTION
Connect
to the +, A, B, – terminals.
(up to 1000 metres) can be achieved using cascade connections
3.2 INPUT CONNECTION
The
3.3 OUTPUT CONNECTION
RELAY OUTPUT
Normally energised programmed
(positive safety)
ELECTRICAL OUTPUT
Positive present programmed
(positive safety)
relay energised relay de-energised
DETECTOR
Px
+V
Tamper
DETECTOR
Tamper 1
Tamper 2
DETECTOR

12
4. CONFIGURING THE CONTROL PANEL
•
https://192.168.82.83
address.
• Local
https://192.168.1.100
• Local
https://192.168.1.10
used.
• Remote
not compatible.
Advanced and then Go to...
000000 and is set to “Enabled”.
The local or remote connection to MP Control

13
1. INTRODUCTION
Le
CARACTERISTIQUES TECHNIQUES
⎓
Tension nominale de charge de la batterie (1) ⎓
⎓
Seuil de protection contre les surtensions ⎓
Tension nominale sur la borne +SR (2) ⎓
(avec protection contre les surcharges)
Tension nominale sur la borne +BUS ⎓
(avec protection contre les surcharges)
⎓
(avec protection contre les surcharges)
1
Sorties
1
2
2
(3)
Logement batterie ⎓
Poids

14
CARACTERISTIQUES TECHNIQUES
Alimentateur
PS515
Tension nominale d’alimentation
Tension nominale de sortie ⎓
Ondulation maximale
Fusible
Classe d’isolation II
(1)
(connecteurs Faston rouge et noir).
(2)
(3)
2. INSTALLATION
OUVERTURE DE LA BOX
ORIFICES PRÉ-FRACTURÉS POUR LE PASSAGE DES CÂBLES
RETRAIT/MISE EN PLACE DE LA CARTE CPU
FIXATION MURALE
du mur
A
RACCORDEMENT ANTI-SABOTAGE CENTRALE
RACCORDEMENT ET FIXATION DE L’ALIMENTATION
A
B
RACCORDEMENT ET FIXATION DE LA BATTERIE
A
ATTENTION
L’alimentation
1
2
3
4
5
6
7

DESCRIPTION DE LA CARTE CPU
8
EN50131
GRADO 2
A
COM
normal
⎓)
normal
BPWR ⎓)
C
D
E
F Connecteur Tamper
G
⎓
H+PS ⎓)
I
d’un PC en mode local pour la programmation
J
KOPTO 1
LOPTO 2
MOPTO 3
LÉGENDE DU SCHÉMA D’IMPLANTATION DE LA CARTE CPU
NBUS
O*
+⎓)
P
+⎓)
Q
SR ⎓)
⎓)
C1
U2
R
⎓)
S
⎓)
3. INSTALLATION DES INTERFACES DANS LA CENTRALE
Installer
•
•
•
ATTENTION!
hors tension (tension secteur et batterie débranchées).

3.1 CONNEXION DU BUS DE LA CENTRALE
Brancher sur les bornes +AB et -
1.000 mètres.
3.2 RACCORDEMENT DES ENTRÉES
La
3.3 RACCORDEMENT DES SORTIES
ou non).
SORTIE RELAIS
Programmée normalement alimentée
(sécurité positive)
SORTIE ELECTRIQUE
Programmée positif présent
(sécurité positive)
relais alimenté relais non alimenté
CAPTEUR
Px
+V
Tamper
CAPTEUR
Tamper 1
Tamper 2
CAPTEUR

4. CONFIGURATION DE LA CENTRALE
Ce serveur Web est accessible de deux manières:
•
https://192.168.82.83
• accès
https://192.168.1.100
• accès
https://192.168.1.10
• accès
n’est pas compatible.
Paramètres
avancésProcéder....
000000Habilité
MP Control permet de

1. EINLEITUNG
TECHNISCHE EIGENSCHAFTEN
⎓
(1) ⎓
⎓
⎓
(2) ⎓
⎓
⎓
Sabotageeingang (24h) 1
1
2
Lagertemperatur
2
(3)
⎓
Schutzart

TECHNISCHE EIGENSCHAFTEN
Netzgerät
PS515
⎓
Max. Stromleistung
Max. Ripple
Schmelzsicherung
Schutzgrad II
(1)
(2) .
(3)
2. INSTALLATION
ÖFFNEN DES GEHÄUSES
VORGESTANZTE ÖFFNUNGEN ZUM DURCHFÜHREN
ENTNAHME/EINSETZEN CPU-KARTE
WANDBEFESTIGUNG
A
ANSCHLUSS TAMPER ZENTRALE ANSCHLUSS UND
BEFESTIGUNG VERSORGUNGE
A
B
ANSCHLUSS UND BEFESTIGUNG DER BATTERIE
A
ACHTUNG
1
2
3
4
5
6
7
La page est en cours de chargement...
La page est en cours de chargement...
La page est en cours de chargement...
La page est en cours de chargement...
La page est en cours de chargement...
La page est en cours de chargement...
La page est en cours de chargement...
La page est en cours de chargement...
La page est en cours de chargement...
La page est en cours de chargement...
La page est en cours de chargement...
La page est en cours de chargement...
-
 1
1
-
 2
2
-
 3
3
-
 4
4
-
 5
5
-
 6
6
-
 7
7
-
 8
8
-
 9
9
-
 10
10
-
 11
11
-
 12
12
-
 13
13
-
 14
14
-
 15
15
-
 16
16
-
 17
17
-
 18
18
-
 19
19
-
 20
20
-
 21
21
-
 22
22
-
 23
23
-
 24
24
-
 25
25
-
 26
26
-
 27
27
-
 28
28
-
 29
29
-
 30
30
-
 31
31
-
 32
32


Elkron MP3100 Guide de démarrage rapide
- Taper
- Guide de démarrage rapide
- Ce manuel convient également à
dans d''autres langues
- italiano: Elkron MP3100 Guida Rapida
- English: Elkron MP3100 Quick start guide
- Deutsch: Elkron MP3100 Schnellstartanleitung
Documents connexes
-
 Elkron IT3000-WIFI Guide d'installation
-
 Elkron UC700-IT Guide d'installation
-
 Elkron IT3000-2G Manuel utilisateur
-
 Elkron EP708 Guide d'installation
-
Elkron IT3000-4G Manuel utilisateur
-
 Elkron SRPT700 Guide d'installation
-
 Elkron Box plastico con PS15 Guide d'installation
-
 Elkron TS700/7 Guide d'installation
-
 Elkron Box metallico con PS34 Guide d'installation
-
 Elkron IT700-PoE Guide d'installation


