
JUWEL H. Wüster GmbH · A-6460 Imst, Industriezone 19, Tel. 05412-69400 oder
D-82467 Garmisch Parten kirchen, Bahnhof str. 31, Tel. 08821-1679 · E-Mail: kund@juwel.com · Internet: www.juwel.com
Intelligente Produkte für
Garten und Haushalt
www.juwel.com
Anl.-Nr. 03151829 · Litho-Nr. 690-03-15
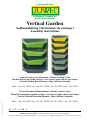
Vertical Garden Grundelement – limette | safran | titan
Module de base de jardin vertical – vert citron | jaune safran | gris titane
Vertical Garden Base Element – lime | saffron | titanium
Dim: ~ 48 x 24 x H 69 cm · Art. No. 20130 | Art. No. 20126 | Art. No. 20133
Vertical Garden Aufbauelement – limette | safran | titan
Module d’extension de jardin vertical – vert citron | jaune safran | gris titane
Vertical Garden Extension Element – lime | saffron | titanium
Dim: ~ 48 x 24 x H 56 cm · Art. No. 20128 | Art. No. 20125 | Art. No. 20123
D – 2 | F – 4 | GB – 6
Aufbauanleitung | Instructions de montage |
Assembly instructions
Vertical Garden

2
Vertical Garden / Jardin Vertical
D Sehr geehrte(r) Kund(e)in!
Vielen Dank für Ihre Entscheidung für das
JUWEL Vertical Garden-System, das Ihnen
Anzucht und Ernte von Gemüse, Salat, Kräutern,
Erdbeeren oder Blumen erleichtern wird, aber
auch zur Begrünung von Mauern oder Wänden
dient. Sie können den Vertical Garden sowohl
nebeneinander, als auch übereinander (Aufbau-
element limette 20128, safran 20125, titan 20123)
kombinieren. Der vorliegende Packungsinhalt
ist zur Montage an einer Innen- als auch
Außenwand vorgesehen. Mit dem als Zubehör
erhältlichen Fußsystem (Art.-Nr. 20127) können
Sie den Vertical Garden aber auch freistehend
oder sogar Rücken an Rücken als Raumteiler
einsetzen.
Wichtige Tipps für den Vertical Garden mit
Erdempfehlung!
In der ganzen Zeit der Erprobung des Vertical
Garden hat sich herausgestellt, dass nicht jede
Panzerde sich gleich gut eignet. Insbesondere für
kurzfristige Trockenperioden ist die Verwendung
einer wasserspeichernden Kübelpanzenerde
mit Tonanteil wichtig.
Wir empfehlen daher eine gute Kübelpanzen-
erde zu verwenden, gute Erfahrungen haben wir
mit EUFLOR ® Kübelpanzenerde, aber auch
Etisso ® Balkon- und Kübelerde (Aqua Control)
oder FLORAGARD® Aquaora Kultursubstrat
gemacht, wählen Sie je nach Bezugsmöglichkeit
in Ihrer Nähe aus.
Natürlich wird auch eine hier nicht genannte
Kübelpanzenerde, soferne Sie Ton und eher
wenig Torf enthält, genauso geeignet sein. Bei
großem Torfanteil besteht die Gefahr, dass es nach
dem möglichen Austrocknen der Erde trotz neuer
Bewässerung recht lange dauern kann, bis das
Kultursubstrat wieder gleichmäßig feucht wird.
Die Wandmontage ist dabei sowohl an Holzwän-
den (nur beiliegende Niro Schrauben verwenden)
als auch Beton, Ziegelmauerwerk oder Hohlblock-
steinen möglich (die beiliegenden Spezialdübel Fi-
scher UX ® sind im Gegensatz zu den bisherigen
Dübeln als Knotendübel (siehe Abbildung 5, Seite
9) dafür besonders geeignet, und müssen mit den
beiliegenden, besonders langen Niro Schrauben
verwendet werden, welche die Dübel in sich
verspreizen.
Mit dem als Zubehör erhältlichen Fischer Ther-
max ® System (Abbildung Seite 14) ist Ihnen
sogar eine Montage auf Außenwänden mit Wär-
medämmung möglich, wobei Sie mit dem Fischer
Thermax 10 (passend für die bereits vorhandenen
Dübel) System bis zu einer Dämmstoffstärke von
180 mm montieren können. (Bezugsquellennach-
weis für Fischer Thermax in Österreich Fischer
Austria GmbH, Tel 02252/53730, sales@scher.
at, in Deutschland Fischer VertriebsGmbH, Tel
07443 12-6000, info@scher.de)
ACHTUNG: Bitte prüfen Sie vor der Montage
- evtl. mit einem Fachmann - die Wand auf Ihre
Tragfähigkeit, Risse und lose Stellen, insbeson-
dere
wenn an Ihrem Montageort mit Windeinuss zu
rechnen ist, oder bei der Montage in mehr-ge-
schossigen Anlagen. Die Belastung ist je Element
Vertical Garden mit 3 Panzschalen und feuchter
Erde ca. 300 N (30 kg) kann sich aber bei Wind-
einuss erhöhen – ein losgerissenes Element kann
zu Beschädigungen oder auch Verletzungen durch
das Herunterfallen führen!
D Vor dem Aufbau Anleitung lesen und für spätere
Verwendung aufbewahren.
GB Please read these instructions prior to assembly
and keep them for further reference.
F Avant le montage, veuillez lire la présente notice
et la ranger soigneusement an de pouvoir la
réutiliser ultérieurement.
I Prima del montaggio, leggere le istruzioni e
conservarle per un utilizzo successivo

Vertical Garden / Jardin Vertical
3
Montage:
Stecken Sie vorerst nach Abb. 1 den Tropftassen-
halter in die Rückwand, und halten Sie die Rück-
wand waagrecht (Wasserwaage) am gewünschten
Montageort ca. 20 cm vom Boden enfernt an die
Wand (Abb. 2 und 3). Markieren Sie die 4 Befesti-
gungsbohrungen an der Wand (Abb. 4).
Nunmehr werden die Bohrungen mit 10 mm
Bohrer (Steinbohrer) mindestens 100 mm tief
gebohrt. (5) Drücken Sie nun die Dübel bündig
mit dem tragenden Mauerwerk (durch eventuelle
Putzschichten) in die Bohrlöcher, setzen Sie die
Rückwand mit den Bohrungen uchtend auf die
Dübelbohrungen und verschrauben mit Schraube
und Unterlegscheibe vorerst handfest mit der
Wand (6). Kontrollieren Sie jetzt ob durch even-
tuelle Unebenheiten der Wand die Rückwand-
platte verzogen ist, und gleichen Sie durch Lösen
und Festziehen der Schrauben Unebenheiten aus.
Eventuell müssen Sie bei grösseren Unebenheiten,
entsprechende Unterlagen unter der Rückwand
mitschrauben, die Rückwand muss nach dem fes-
ten Anziehen der Schrauben plan und gerade sein,
sonst lassen sich die Panzschalen nicht sauber
einhängen.
Beginnen Sie nun mit dem Einhängen der Tropf-
tasse (7). Anschließend wird die unterste Panz-
schale D bis zum Anschlag eingehängt, und die
hintere Öffnung mit der Siebplatte E verschlossen
(8 und 9).
Jetzt bereits die Panzschale mit Erde befüllen,
bevor weiter Panzschalen eingehängt werden! (10)
Nun soll bereits die erste Schale bepanzt, oder
Samen zur Anzucht eingesetzt werden. Sofern
Sie schon fertige Gemüse- oder Blumenpanzen
verwenden, achten Sie bitte darauf, diese leicht
schräg zu sich weisend einzupanzen, sodass die
Panze später genügend Ausdehnungsmöglichkeit
hat, größere Panzen vornehmlich in die rechts
und links bendlichen Ausbuchtungen (Erker)
panzen.
Nun die nächste Panzschale F einhängen (11),
diesmal ohne Siebplatte und wieder mit Erde
befüllen (12). Achten Sie darauf, dass die Erde an
der hinteren Öffnung bis zur unteren Panzschale
eingebracht wird, nur dann können die Wurzeln
von oben durchwachsen. Bepanzen Sie wie davor
beschrieben.
Nun wird die oberste Panzschale D eingehängt
(13) und wie vor befüllt (14). Bepanzen Sie wie
davor beschrieben.
Bei Verwendung eines Aufbauelementes (Art.-Nr.
limette 20128, safran 20125, titan 20123) ohne
Tropftasse und Halter, wird die Rückwand an-
schließend an die Rückwand des Grundelementes
in gleicher Weise mit 4 Schrauben und Speziald-
übeln waagrecht montiert. Dabei muss die bereits
montierte Rückwand nicht gelöst werden, sodass
das Aufbauelement auch nachträglich montiert
werden kann.
Gießen Sie immer vorsichtig in die oberste Panz-
schale, das Gießwasser sickert langsam nach unten,
bis es unten in der Tropftasse einlangt. – Gießen
Sie jetzt nicht weiter. Die Tropftasse mit dem Gieß-
wasser lässt sich leicht entnehmen und wieder zum
Gießen von oben verwenden.
Weiters achten Sie bitte darauf, dass vornehmlich
in die unterste Panzschale eher feuchtigkeitslie-
bende Panzen gepanzt werden. Panzen mit län-
geren Wurzeln, z.b. Tomaten (Tiefwurzler) immer
in die oberste Panzschale panzen, diese wurzeln
dann durch die Ausnehmungen bis zur untersten
Panzschale durch.
Wir wünschen Ihnen schöne Ernteerfolge, bitte
senden Sie uns Ihre Erfahrungen, Bilder und
Ergänzungswünsche.
Alle Einsendungen nehmen an einer monatlichen
Verlosung teil, bei der Sie Gutscheine für JUWEL
Produkte gewinnen können. Mit der Einsendung
von Bildern erklären Sie sich auch mit einer Veröf-
fentlichung in unserem Anwendungsforum einver-
standen – diese Bilder werden gesondert prämiert.

4
F Cher client !
Nous vous remercions d’avoir acheté un module
de jardin vertical JUWEL. Avec ce produit, vous
pouvez faire pousser des légumes, salades, herbes
aromatiques, fraises et eurs en toute simplicité,
mais également végétaliser vos murs et façades !
Vous pouvez placer deux jardins verticaux côte à
côte, ou l’un sur l’autre (avec le module d’extension,
coloris vert citron : réf. 20128 ; ou jaune safran :
réf. 20125 ; ou gris titane : réf. 20123). Le contenu
du paquet permet la xation murale du module
en intérieur ou en extérieur. Le support pour
jardin vertical disponible en accessoire (réf. 20127)
permet de poser le jardin vertical à l’endroit désiré,
sans xation murale. Vous pouvez également y
xer deux jardins verticaux dos à dos.
Conseils importants pour le choix du terreau
Les essais réalisés ont montré que le choix du
terreau est essentiel. Pour les périodes sèches, il
convient d’utiliser du terreau pour bacs, assurant
une bonne rétention de l’eau.
Nous vous recommandons d’utiliser un bon
terreau pour bacs. Nous avons par exemple
obtenu des résultats satisfaisants avec le terreau
pour bacs d’EUFLOR®, le terreau pour jardinères
et bacs Aqua Control d’ETISSO® et le substrat de
culture Aquaora de FLORAGARD®. Renseignez-
vous dans les magasins près de chez vous pour
plus d’informations sur les terreaux pour bacs
disponibles.
Vous pouvez également utiliser des terreaux non
spéciques pour bacs, à condition qu’ils con-
tiennent de l’argile. Les terreaux à faible teneur en
tourbe sont aussi à privilégier, car ils permettent
une répartition homogène et rapide de l’eau dans le
substrat de culture, même lorsque la terre est sèche.
Vous pouvez monter le jardin vertical sur des murs
en bois (uniquement avec les vis en inox fournies),
mais également sur des murs en béton, briques et
parpaings creux. À la différence des chevilles ordi-
naires, les chevilles Fischer UX® incluses assurent
la xation par expansion et par formation de nœud
(voir gure 5, page 9), ce qui les rend particulière-
ment appropriées. Elles doivent être utilisées avec
les longues vis en inox fournies.
La xation sur les systèmes d’isolation de fa-
çade jusqu’à 180 mm d’épaisseur est également
possible avec les chevilles fournies et le système
Fischer Thermax® 10 (voir page 14). Pour plus
d’informations sur le système Fischer Thermax,
contactez Fischer S. A. S.
Tél. : 03.88.39.18.67 · E-mail : info@scher.fr
Site internet : http://www.scher.fr
ATTENTION !
Avant le montage, veuillez vérier, si possible avec
un professionnel, la capacité portante du mur, ainsi
que les éventuelles ssures ou parties lâches, en
particulier si l’emplacement choisi est exposé au
vent. L’inuence du vent est encore plus importante
si le jardin vertical est monté à des étages élevés.
Le poids d’un module de jardin vertical, constitué
de 3 bacs à plantes remplis de terre humide, est
d’environ 300 N (soit 30 kg). Les parties lâches ou
éléments venant à se détacher peuvent causer des
dommages et blessures !
Vertical Garden / Jardin Vertical

Montage
Commencez par emboîter le support pour bac de
récupération d’eau sur la paroi murale (1). Placez
la paroi sur le mur à l’endroit désiré, à 20 cm du
sol, et vériez l’horizontalité à l’aide d’un niveau
à bulle (2 et 3). Marquez les 4 trous de perçage sur
le mur (4).
Percez des trous d’au moins 100 mm de profondeur
avec un foret béton de 10 mm de diamètre (5).
Enfoncez les chevilles dans les trous (à travers le
mur et éventuellement la couche d’enduit). Placez
la paroi murale sur le mur en alignant les trous des
chevilles et ceux de la paroi. Vissez solidement la
paroi au mur à l’aide des vis et rondelles fournies
(6). Vériez que la paroi n’est pas désaxée en raison
d’irrégularités du mur et le cas échéant, reserrer ou
desserrer légèrement les vis an de régler le pro-
blème. En cas d’irrégularités importantes, placez
un support approprié entre le mur et la paroi et
vissez le tout ensemble. Après avoir resserré les vis,
la paroi murale doit être plane et bien droite pour
que les bacs à plantes puissent y être xés.
Emboîtez d’abord le bac de récupération d’eau (7).
Fixez ensuite le bac à plantes inférieur (D) et placez
la grille (E) à l’intérieur, sur l’ouverture au fond du
bac (8 et 9). Remplissez dès maintenant le bac avec
du terreau (10).
Avant de xer le bac à plantes suivant, plantez vos
plants ou graines dans le bac xé sur la paroi. Si
vous plantez des plants de légumes ou de eurs,
veillez à les placer un peu en biais et orientés vers
l’extérieur, an qu’ils puissent se développer de
manière optimale. Placez les grandes plantes dans
la partie la plus large du bac à plantes.
Installez maintenant le bac à plantes suivant (F)
(11) et remplissez-le de terreau (12). Veillez à ce que
la terre se répartisse bien dans l’ouverture au fond
du bac en rejoignant la terre du bac inférieur, pour
que les racines puissent se développer jusqu’au bac
inférieur. Plantez vos plants ou graines dans ce bac.
Pour terminer, xez le dernier bac à plantes (D)
(13), remplissez-le avec du terreau (14) et plantez-y
vos plants ou graines.
Pour le module d’extension, sans bac de récu-
pération d’eau (coloris vert citron : réf. 20128 ;
ou jaune safran : réf. 20125 ; ou gris titane : réf.
20123) : placez la paroi du module d’extension juste
au-dessus du module de base et xez-la au mur à
l’aide des 4 vis et chevilles fournies, en suivant les
instructions de xation du module de base. La paroi
du module de base doit être solidement vissée au
mur avant d’ajouter celle du module d’extension.
Pour l’arrosage, versez doucement l’eau dans le bac
supérieur an qu’elle se répartisse dans la terre de
haut en bas. Le surplus goutte dans le bac de récu-
pération que vous pouvez facilement retirer an de
réutiliser l’eau.
Nous vous conseillons de planter des plantes
aimant l’humidité dans le bac inférieur et de
placer les plantes à longues racines (par exemple,
les plants de tomates) dans le bac supérieur, an
que les racines puissent se développer de manière
optimale.
Nous vous souhaitons des récoltes abondantes !
N’hésitez pas à nous faire part de vos expériences,
photos et suggestions.
Vertical Garden / Jardin Vertical
5

Vertical Garden / Jardin Vertical
6
GB Dear valued client,
Thank you for buying a JUWEL Vertical Garden
Element. With this product, you can easily grow
vegetables, salads, aromatic herbs, strawberries
and owers, but also plant your facades and walls!
You can put two Vertical Gardens beside each other
or one atop another (with the Extension Element
lime 20128, saffron 20125 or titanium 20123). The
content of the package is intended for inside or
outside wall xing. With the stand for Vertical
Garden (Art. No. 20127) available as accessory, the
Vertical Garden can be free-standing and you can
also x two of them back to back.
Important soil advice!
The tests carried out on the Vertical Garden have
showed the importance of soil selection. For dry
periods, we recommend a soil for container garde-
ning with good water-retention properties.
We advise you to use a good soil for container
gardening. We have obtained satisfying results with
the soil for container gardening EUFLOR ®, the
soil for container and balcony gardening ETISSO
® (with Aqua Control), and the culture substratum
Aquaora FLORAGARD ®. For more information
about the soils for container gardening available,
please contact the specialized stores close to you.
You can also use soils not particularly suited for
container gardening, as long as they contain clay.
Favor soils with low peat content as they allow
homogeneous and faster distribution of water in the
culture substratum, even by dry soil.
Vertical Garden Elements can be xed on wooden
walls (with the stainless-steel screws included), but
also on walls made of concrete, brick or hollow
blocks. Unlike ordinary screw anchors, Fischer
UX ® screw anchors (included) are particularly ap-
propriate as the xing results from their expansion
and the knot they form (ill. 5, p. 9). They must be
used with the long stainless-steel screws included.
Vertical Garden Elements can also be xed on
wall insulation systems up to 7 ³⁄32 inches with the
screw anchors included and the Fischer Thermax
10 system (see p. 14 ). For more information about
the Fischer Thermax system, please contact scher
xings LLC in the US, Tel: +1 845 504 5098,
Email: info@scherxingsusa.com, Web: http://
www.scherxingsusa.com; or scher xings UK
Ltd., Tel: +44 1491 82 79 00, Email: info@scher.
co.uk, Web: http://www.scher.co.uk.
CAUTION!
Please check the load carrying capacity of the wall,
as well as cracks and loose parts prior to xing
(with a professional if possible), especially if the se-
lected location is exposed to wind and high up (e.g.
at upper story). The weight of a Vertical Garden
Element, made of 3 planter trays fulled with moist
soil, is around 60 lbs (30 kg). Loose parts or any
other parts breaking away from the wall can cause
damage and injuries!

Vertical Garden / Jardin Vertical
7
Assembly
Assemble the drip tray support with waterproof
back side (1). Put the back side on the wall at the
selected location, 7 7⁄8 inches away from the ground,
and use a spirit level to insure that the back side
is horizontal (2 and 3). Mark the 4 holes on the
wall (4).
Drill holes of at least 3 15⁄16 inches depth with an
25/64 inch masonry bit (5). Place the screw anchors
in the holes (through the wall and the coating). Put
the back side on the wall and align the holes with
the screw anchors. Screw the back side securely
to the wall with the screws and shims delivered
(6). If the back side is distorted due to the wall
unevenness, try to compensate by tightening the
screws rmly or lightly unscrewing them. In case
of great unevenness, place an appropriate material
between the wall and the back side, and screw them
together. After tightening the screws, the back side
shoud be even and upright so that the planter trays
could be xed.
Fit the drip tray on its support (7). Fix the lowest
planter tray (D) and place the grating (E) on its
opening at the bottom (8 and 9). Now ll this tray
with soil (10). Plant your plants or seeds prior to
adding the next tray.
If you plant fresh vegetables or owers, make sure
they are on a slant and oriented toward the exterior
so that they can grow properly. Plant bigger or hig-
her plants in the largest part of the planter trays.
Add the second planter tray (F) (11) and ll it with
soil (12). Make sure the soil is properly spreaded
and goes through the opening so as to connect with
the soil of the below planter tray, allowing the roots
to grow optimally. Plant your plants or seeds.
Assemble the last planter tray (D) (13), ll it as pre-
viously indicated and plant your plants or seeds.
For the Extension Element (lime 20128, saffron
20125 or titanium 20123): place the extension atop
the base element and x it to the wall with the 4
screws and screw anchors included, by following
the instructions for base element xing. The back
side of the base element should be securely screwed
on the wall before adding the extension.
Watering plants: slowly pour some water into the
highest planter tray. The water seeps into the soil of
the lower planter trays and drip into the drip tray,
which can be easily removed to reuse drip water.
We recommend to plant plants which like humidity
in the lowest planter tray and plants with long roots
(e.g. tomato plants) in the highest planter tray, so
that their roots can grow optimally.
We wish you abundant harvests and look forward
to hearing from your experiences, or receiving your
pictures and suggestions.

Vertical Garden / Jardin Vertical
8
Teileliste für Grundelement / Parts list for Base Element / Liste des pièces fournies dans le module
de base / Lista delle parti per elemento di base :
Teileliste für Aufbauelement/ Parts list for Extension Element / Liste des pièces fournies dans le
module d’extension / Lista delle parti per elemento di installazione :
ABCDEFG
1 x 1 x 1 x 2 x 1 x 1 x 4 x
25014 25018 25016 25015 25017 25019 26130
25009 25008
25007 25006
A D F G
1 x 1 x 2 x 4 x
25014 25015 25019 26130
25009 25008
25007 25006
Werkzeug notwendig! Required tools!
Outils nécessaires ! 1 x
1 x
1 x
Kreuz
1 x
1 x
Vor Montage besorgen:
Ca. 20 l gute Kübelpanzenerde, siehe Erdempfehlung! Panzen oder Samen!
To acquire before assembling:
Around 20 L of soil for container gardening (see Important soil advice), plants or seeds
Avant le montage, veuillez vous procurer :
env. 20 L de terreau pour bacs (lire nos conseils sur le choix du terreau), plantes ou graines
ø 10 mm
100 mm

Vertical Garden / Jardin Vertical
9
5
~ 480mm
4x
2
B
3
A
1
A
B
A 1 x B 1 x B
A
4
A
4x
✍
Bildnachweis: Fischer
Abb. 1
Grundelement / Base Element / Module de base / Elemento di base

Vertical Garden / Jardin Vertical
10
Grundelement / Base Element / Module de base / Elemento di base
9
E
E 1 x
8
D
D 1 x
7
C
C 1 x
6
A
G
GG
G
B
4x
G 4 x
F
11
F 1 x
10
D

Vertical Garden / Jardin Vertical
Grundelement / Base Element / Module de base / Elemento di base
11
15
D
13
D 1 x
14
D
12
F

Vertical Garden / Jardin Vertical
12
3
A
G
4x
G 4 x
1
4x
✍
A
A 1 x
4
F
F 1 x
4
24x
Bildnachweis: Fischer
Aufbauelement / Extension Element / Module d’extension / Elemento di installazion

Vertical Garden / Jardin Vertical
13
Aufbauelement / Extension Element / Module d’extension / Elemento di installazion
5
F
6
D 1 x
D
7
F
F 1 x

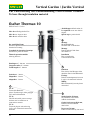
Zur Überbrückung von Wärmedämmung | Pour traverser l’isolant |
To bore through insulation material
Vertical Garden / Jardin Vertical
scher Thermax 10
2
Stockschraube Ø 10 mm,
mit Vorbohren, auch direkt
in Holz einschraubbar
Goujon à pré-percage Ø 10 mm,
Peut être vissé directement
dans le bois
Peg screw Ø 10 mm
Can be screwed directly into wood
Der Anti-Kälte Konus
minimiert Wärmeverluste durch
thermische Trennung
Le module de séparation thermique
minimise les pertes de chaleur
Thermal separation module
reducing heat loss
M6 x 40 mit Beilagscheibe Niro
M6 x 40 avec bague en inox
M6 x 40 with stainless shim
Abdeckkappe schließt sauber ab
Le capuchon assure une nition
soignée
Special cap for perfect nish
Montage
Mit handelsüblicher
Stecknuss SW 13 montierbar
Montage
Peut être réalisé à l’aide d’une
clé à douille 13
Installation
Easy to install with a
13 mm socket wrench
Justierbar 0 - 20 mm
Adaptable 0 - 20 mm
Adaptable 0 - 20 mm
Nutzlängen 45 - 180 mm
Longueurs utiles 45 - 180 mm
Useful lengths 45 - 180 mm
3
Einfräsen
Fräst sich bei der Montage selbst
durch den Putz in den Dämmstoff
Fraisage
Pénètre automatiquement à travers
le crépi et le matériau d’isolation
Milling
Mills automatically into the plaster
on material
4
1
UX 12
Universeller Dübel für
sichere Verankerung in allen gängigen
Voll- und Lochbaustoffen
UX 12
Cheville universelle pour un ancrage
sûr dans tous les matériaux de
construction courants
UX 12
Universal plug for safe anchoring
in all types of standard construction
materials
12
Bildnachweis: Fischer

15
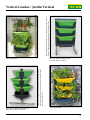
(Art.-Nr. 20130)
(Art.-Nr. 20126)
(Art.-Nr. 20130 + 20127) oder
(Art.-Nr. 20126 + 20127)
(Art.-Nr. 2x 20130 + 20124) oder
(Art.-Nr. 2x 20126 + 20124)
Alu-Doppel-Standfuß nur für Grundelement! / Aluminum double
stand only for Base Element! / Support double en alu uniquement
pour le module de base !
Alu-Standfuß nur für Grundelement! / Aluminum stand only for Base
Element! / Support en alu uniquement pour le module de base !
Vertical Garden / Jardin Vertical

Speziell für
den Balkon
www.juwel.com
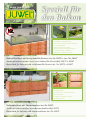
Balkon Hochbeet mit Beetsystem Bio-Protect Art.-Nr. 20275 + Art.-Nr. 20347
Jardin de balcon surélevé avec serre châssis Bio Protect Réf. 20275 + 20347
Raised bed for balcony with coldframe Bio Protect Art. No. 20275 + 20347
Balkonhochbeet mit Thermohauben Art.-Nr. 20275
Jardin de balcon surélevé avec thermo-fenêtres Réf. 20275
Raised bed for balcony with thermowindows Art. No. 20275
• Lüftungshebel mit Windsicherung
• Drainageboden
• Aérateurs avec sécurité anti-vent !
• Fond drainant
• windproof ventilation catches
• Drainage bottom
• Integrierter Schädlings- und Wetterschutz
• Verstellbare Windsicherung
• Filet intégré protégeant des nuisibles
et des intempéries
• Sécurité anti-vent réglable
• Integrated protection against pests
and bad weather conditions
• Adjustable windproof catches
-
 1
1
-
 2
2
-
 3
3
-
 4
4
-
 5
5
-
 6
6
-
 7
7
-
 8
8
-
 9
9
-
 10
10
-
 11
11
-
 12
12
-
 13
13
-
 14
14
-
 15
15
-
 16
16


dans d''autres langues
- English: Juwel 20130
- Deutsch: Juwel 20130