
AGRAS T10
Quick Start Guide
v1.0

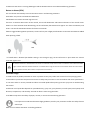
Aircraft
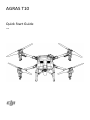
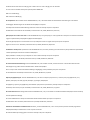
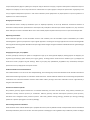
The AGRASTM T10 features a design including a brand-new quadrilateral folding structure and a quick-release spray tank
and flight battery, making replacement, installation, and storage easy. With the updated Route Operation mode users can
mark obstacles outside of the operation area for Smart Continuous Flight.
The aircraft supports centimeter-level positioning when used with the onboard D-RTKTM. Dual-antenna technology
provides strong resistance against magnetic interference. The aircraft comes equipped with the Spherical Perception
Radar System, a pioneering new system for the agriculture industry. Consisting of the Omnidirectional Digital Radar and
Upward Radar, the system provides functions such as terrain following, obstacle sensing, and obstacle circumventing.
With the forward and backward FPV cameras and bright spotlights, the system comprehensively ensures operational
safety day and night in different weather.
The spraying system adopts a 10 L spray tank, four nozzles, and a 2-channel electromagnetic flow meter to ensure
consistent and accurate spraying, save the pesticide, and reduce operating costs effectively.
Core components have two layers of protection and the aircraft has a protection rating of IP67 (IEC standard 60529,
except for the Intelligent Flight Battery) so that it can be washed directly with water.
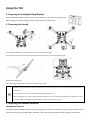
1. Propellers
2. Motors
3. ESCs
4. Aircraft Front Indicators (on two front arms)
5. Frame Arms
6. Folding Detection Sensors (built-in)
7. Hoses
8. Sprinklers
9. Electromagnetic Exhaust Valves
10. Nozzles
11. Omnidirectional Digital Radar
12. Upward Radar (built-in)
13. Heat Sinks
14. Spread Tank
15. Battery Compartment
16. Forward FPV Camera
17. Backward FPV Camera
18. Landing Gear
19. OCUSYNCTM Antennas
20. Onboard D-RTKTM Antennas
21. Aircraft Status Indicators (on two rear arms)
Rear View
Folded

Remote Controller
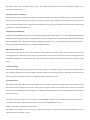
The Smart Controller Enterprise uses DJI OcuSync Enterprise transmission technology, has a max transmission distance
of up to 7 km*, and supports Wi-Fi and Bluetooth. The remote controller has a 5.5-inch bright, dedicated screen and
comes with the updated DJI Agras app built-in, delivering a smooth and easy-to-use experience. When the RTK dongle is
connected to the remote controller, users can plan operations to centimeter-level precision. The Multi-Aircraft Control
mode* of the remote controller can be used to coordinate the operation of up to five aircraft at the same time, enabling
pilots to work efficiently. Both the built-in battery and external battery can be used to supply power to the remote
controller. The remote controller has a working time of up to 4 hours, making it ideal for long and high-intensity
operations.
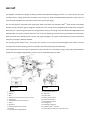
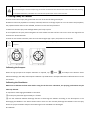
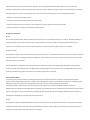
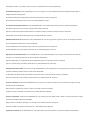
The figure below shows the function that each control stick movement performs and uses Mode 2 as an example. In
Mode 2, the left stick is used to control the altitude and heading of the aircraft while the right stick is used to control the
forward, backward, left, and right movements.
1. Antennas
2. Back/Function Button
3. Control Stick
4. RTH Button
5. Button C3 (customizable)
6. Flight Mode Switch
7. Status LED Descriptions
8. Battery Level Indicators
9. 5D Button (customizable)
10. Power Button
11. Confirm Button
12. Touch Screen
13. USB-C Charging Port
14. Dongle Compartment Cover
15. Spray Rate Dial
16. Spray Button
17. HDMI Port
18. microSD Card Slot
19. USB-A Port
20. FPV/Map Switch Button
21. Work Efficiency Dial
22. Air Outlet
23. Button C1 (customizable)
24. Button C2 (customizable)
25. Battery Cover
26. Battery Cover Release Button
27. Handle

* The remote controller is able to reach its maximum transmission distance (FCC/NCC: 7 km (4.35 mi); SRRC: 5 km (3.11
mi); CE/KCC/MIC: 4 km (2.49 mi)) in an open area with no electromagnetic interference, and at an altitude of
approximately 2.5 m (8.2 ft).
Make sure to comply with local laws and regulations when using Multi-Aircraft Control mode.
Fly Safe
It is important to understand some basic flight guidelines, both for your protection and for the safety of those around
you.
1. Flying in Open Areas: pay attention to utility poles, power lines, and other obstacles. DO NOT fly near or above water,
people, or animals.
2. Maintain Control at All Times: keep your hands on the remote controller and maintain control of the aircraft when it
is in flight, even when using intelligent functions such as the Route and A-B Route operation modes and Smart Return to
Home.
3. Maintain Line of Sight: maintain visual line of sight (VLOS) with your aircraft at all times and avoid flying behind
buildings or other obstacles that may block your view.
4. Monitor Your Altitude: for the safety of manned aircraft and other air traffic, fly at altitudes lower than 30 m (98 ft)
and in accordance with all local laws and regulations.
Visit https://www.dji.com/flysafe for more information on critical safety features such as GEO zones.
Flight Environment Requirements
1. DO NOT use the aircraft to spray in winds exceeding 18 kph (11 mph).
2. DO NOT use the aircraft in adverse weather conditions such as winds exceeding 28 kph (17 mph), heavy rain exceeding
25 mm (0.98 in) in 12 hours, snow, or fog.
3. DO NOT fly more than 4.5 km (14,763 ft) above sea level.
4. Once the operating altitude reaches 1 km (3,280 ft), the payload capacity of the spray tank is reduced by 1.2 kg. For
every additional km, the payload capacity will be reduced a further 1.2 kg.

5. Make sure that there is a strong GNSS signal and the D-RTK antennas are unobstructed during operation.
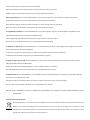
Return to Home (RTH)
The aircraft will automatically return to the Home Point in the following situations:
Smart RTH: user presses and holds the RTH button.
Failsafe RTH: the remote controller signal is lost.*
If there is an obstacle within 20 m of the aircraft, the aircraft decelerates and brakes and hovers. If the aircraft comes
within 6 m of the obstacle while decelerating, the aircraft brakes, flies backward to approx. 6 m from the obstacle, and
hovers. The aircraft exits RTH and waits for further commands.
If RTH is triggered during Route operations, the aircraft can plan a flight path for RTH to circumvent the obstacles added
when planning a field.
* If Failsafe RTH is disabled (the default setting in the DJI Agras app), the aircraft hovers in place when the remote
controller signal is lost.
● Obstacle avoidance is disabled when the aircraft is in Attitude mode, which it enters in situations such as when the GNSS
signal is weak. Note that obstacle avoidance is unreliable when using the aircraft in environments where the radar module
cannot operate normally. Extra caution is required in such situations.
Pesticide Usage
1. Avoid the use of powder pesticides as much as possible as they may reduce the service life of the spraying system.
2. Pesticides are poisonous and pose serious risks to safety. Only use them in strict accordance with their specifications.
3. Use clean water to mix the pesticide and filter the mixed liquid before pouring into the spray tank to avoid blocking
the strainer.
4. Effective use of pesticides depends on pesticide density, spray rate, spray distance, aircraft speed, wind speed, wind
direction, temperature, and humidity. Consider all factors when using pesticides.
5. DO NOT compromise the safety of people, animals, or the environment during operation.
It is important to understand the basic flight guidelines, both for your protection and for the safety of those
around you.
Make sure to read the disclaimer and safety guidelines.
RTH

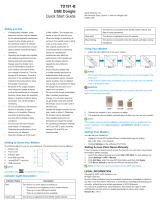
Using the T10
1. Preparing the Intelligent Flight Battery
Only use official DJI flight batteries (model: BAX501-9500mAh-51.8V). Check the battery level
before flying and charge according to the corresponding manual document.
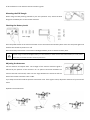
2. Preparing the Aircraft
Unfold the M2 and M6 arms, and fasten the two arm locks. Avoid pinching fingers.
Unfold the M3 and M5 arms followed by M1 and M4 and fasten the four arm locks. Avoid pinching fingers.
Unfold the propeller blades.
Insert the Intelligent Flight Battery into the aircraft until you hear a click.
●Make sure that the battery is firmly inserted into the aircraft. Only insert or remove the battery when the aircraft is
powered off.
●To remove the battery, press and hold the clamp and lift the battery up.
●When folding the arms, make sure to fold the M3 and M5 arms first, and then the M2 and M6 arms. Otherwise, the arms
may be damaged. Lift and lower the M1 and M4 arms gently to reduce wear and tear.
3. Preparing the Remote Controller
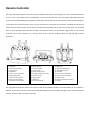
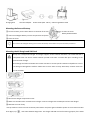
Charging the Batteries
Charge the external Intelligent Battery using the charging hub and AC power adapter. Charge the internal battery of the
remote controller using the USB charger and USB-C cable. Fully charge the batteries before using for the first time.

Charging Hub AC Power Adapter Power Outlet (100 - 240 V) USB Charger USB-C Cable
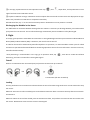
Mounting the External Battery
① Press the battery cover release button on the back of the remote controller down to open the cover.
② Insert the Intelligent Battery into the compartment and push it to the top.
③ Close the cover.
●To remove the Intelligent Battery, press and hold the battery release button and push the battery downward.
Mounting the 4G Dongle and SIM Card
●Only use a DJI-approved dongle. The dongle supports various network standards. Use a SIM card that is
compatible with the chosen mobile network provider and select a mobile data plan according to the
planned level of usage.
●The dongle and SIM card enable the remote controller to access specific networks and platforms such as
the DJI Agras Management Platform. Make sure to insert them correctly. Otherwise, network access will
not be available.
① Remove the dongle compartment cover.
② Make sure the SIM card is inserted into the dongle. Insert the dongle into the USB port and test the dongle.*
③ Reattach the cover firmly.
* Test procedure: Press the remote controller power button and press again and hold to power on the remote controller.
In DJI Agras, tap , and select Network Diagnostics. The dongle and SIM card are functioning properly if the status
Battery Release Button

of all the devices in the network chain are shown in green.
Mounting the RTK Dongle
When using the RTK planning method to plan the operation area, attach the RTK
dongle to the USB-A port on the remote controller.
Checking the Battery Levels
Press the power button on the remote controller once to check the internal battery level. Press once and press again and
hold for two seconds to power on or off.
Press the battery level button on the external Intelligent Battery once to check the battery level.
●When using an external Intelligent Battery, it is still necessary to make sure that the internal battery has some power.
Otherwise, the remote controller cannot be powered on.
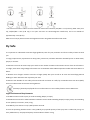
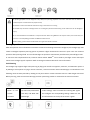
Adjusting the Antennas
Lift the antennas and adjust them. The strength of the remote controller signal is
affected by the position of the antennas. For an optimal connection between the
remote controller and aircraft, make sure the angle between the antennas and the
back of the remote controller is 80° or 180°.
Try to keep the aircraft inside the optimal transmission zone. If the signal is weak, adjust the antennas or fly the aircraft
closer.
Optimal Transmission Zone
Low → High
Low → High

● Avoid using wireless devices that use the same frequency bands as the remote controller.
● If the RTK dongle is used for RTK planning, the module should be disconnected from the remote controller after planning
is completed. Otherwise, it will affect the communication performance of the remote controller.
4. Getting Ready for Takeoff
A. Place the aircraft on open, flat ground with the rear of the aircraft facing toward you.
B. Make sure that the propellers are securely mounted, there are no foreign objects in or on the motors and propellers,
the propeller blades and arms are unfolded, and the arm locks are firmly fastened.
C. Make sure that the spray tank and flight battery are firmly in place.
D. Pour liquid into the spray tank and tighten the cover. Make sure that the four lines on the cover are aligned to the
horizontal or vertical direction.
E. Power on the remote controller, make sure that the DJI Agras app is open, and power on the aircraft.
● When using for the first time, activate the aircraft using the DJI Agras app. A DJI account and internet connection are
required.
Calibrating the Compass
When the app prompts that compass calibration is required, tap , then , and swipe to the bottom. Select
Advanced Settings, then IMU, and Compass Calibration. Tap Calibration in Compass Calibration and follow the on-screen
instructions.
Calibrating the Flow Meter
Make sure to calibrate the flow meter before using for the first time. Otherwise, the spraying performance may be
adversely affected.
A. Preparation: Discharging the Bubbles in the Hoses
① Fill the spray tank with approximately 2 L of water.
② Use the automatic bubbles discharge function to discharge the bubbles according to the descriptions in the
Discharging the Bubbles in the Hoses section below. Users can also manually discharge the bubbles. Press the spray
button to spray the bubbles and press the button again once all bubbles are discharged.
B. Calibration

① In the app, tap Execute Task to enter Operation View. Tap , then , swipe down, and tap Calibration on the
right of the flow meter calibration section.
② Tap Start Calibration to begin. Calibration will be complete after 25 seconds and the results are displayed in the app.
●Users can proceed once calibration is completed successfully.
●If calibration fails, tap “?” to view and resolve the problem. Recalibrate once the problem is resolved.
Discharging the Bubbles in the Hoses
The T30 features an automatic bubbles discharge function. When it is necessary to discharge bubbles, press and hold the
spray button for two seconds. The aircraft will discharge automatically until the bubbles are fully discharged.
5. Flight
In the app, go to Operation View. Make sure that there is a strong GNSS signal and the system status bar indicates Manual
Route (GNSS) or Manual Route (RTK).* Otherwise, the aircraft cannot take off.
In order for the aircraft to automatically take off and perform an operation, it is recommended to create a plan for a field
and select an operation before takeoff. Refer to the Starting Operations section for more information. For other scenarios,
take off and land manually.
* RTK positioning is recommended. In the app, go to Operation View, tap , then RTK to enable Aircraft RTK
Positioning, and select a method for receiving RTK signals.
Takeoff
Perform a Combination Stick Command (CSC) and push the throttle stick up to take off.
Landing
To land, pull down on the throttle stick to descend until the aircraft touches the ground. There are two methods to stop
the motors.
Method 1: when the aircraft has landed, push and hold the throttle stick down. The motors will stop after three seconds.
Throttle Stick
Method 2: When the aircraft has landed, push the throttle stick down, and perform the same CSC that was used to start
the motors. Release both sticks once the motors have stopped.
OR
Throttle Stick (left stick in Mode 2)

● Spinning propellers can be dangerous. Stay away from spinning propellers and motors. DO NOT start the motors in
confined spaces or where there are people nearby.
● Maintain control of the remote controller as long as the motors are running.
● DO NOT stop the motors mid-flight unless in an emergency situation where doing so will reduce the risk of damage or
injury.
● It is recommended to use Method 1 to stop the motors. When using Method 2 to stop the motors, the aircraft may roll
over if it is not completely grounded. Use Method 2 with caution.
●After landing, power off the aircraft before turning off the remote controller.
Starting Operations
After the operation area and obstacles have been measured and settings have been configured, the DJI Agras app uses
a built-in intelligent operation planning system to produce a flight route based on the user’s input. Users can invoke an
operation after planning a field. The aircraft will begin the operation automatically and follow the planned flight route.
In scenarios with complicated terrain, Phantom 4 RTK and DJI TERRATM can be used to plan flight routes and import
routes to the DJI Agras app for operation. Refer to the Agras T30 User Manual for more information.
Field Planning
The DJI Agras app supports flight route planning by flying the aircraft to waypoints, obstacles, and calibration points or
by walking to these points carrying a remote controller, a remote controller with an RTK dongle, or an RTK device. The
following route has been planned by walking to the points with a remote controller that has a RTK dongle connected.
Before planning, make sure that the RTK high precision positioning module is mounted to the remote controller.
Power on the
remote
controller.
Launch DJI
Agras.
Tap Plan Field, select Walk
with RTK, and Walk with
RTK Dongle.
In RTK settings, select a method for receiving RTK signals
and configure the corresponding settings. Make sure the
aircraft status bar at the top of the screen is green.

* Any obstacles in or out of the operation area can be marked.
Once you have finished planning, press the back button on the remote controller to return to the home screen.
●The calibration points are used to offset the bias of the flight route caused by the positioning difference. Choose at least one existing
landmark as the fixed reference point for calibration when executing the same operation. If none are available, use an easily
identifiable object such as a metal stake.
Performing an Operation
Walk with the remote controller
alongside the boundary of the
operation area and tap Add
Waypoint C2 at turning points.
Walk to each
obstacle in turn
and tap Obstacle
Mode C1.*
Walk around the obstacle
and tap Add Obstacle C2
at several points around
the obstacle.*
Tap Waypoint C1 to return
to add edge points to the
operation area.
Walk to the location
of each calibration
point and tap
Calibration Point.
The waypoints and flight route can be
edited. Fine-tune waypoint positions,
configure distance and line spacing, and
adjust the route direction by tapping or
dragging the icon .
Save the
field
plan.
Take the aircraft to
one of the calibration
points.
Tap Execute Task in the
home screen of the
app.
Tap and select the
field from the field list.
Tap Edit to edit the
waypoints and flight
route again.
Tap Use and tap Rectify
Offset.
Tap Start.
Set operation
parameters
and confirm.
Set the auto-takeoff height and move the
slider to take off. The aircraft will perform
the operation automatically.

● Only take off in open areas and set an appropriate auto-takeoff height according to the operating environment.
● An operation can be paused by moving the control stick slightly. The aircraft will hover and record the breakpoint. After
which, the aircraft can be controlled manually. To continue the operation, select it again from the Executing tag in list.
The aircraft will return to the breakpoint automatically and resume the operation. Pay attention to aircraft safety when
returning to a breakpoint.
●In Route Operation mode, the aircraft is able to circumvent obstacles, which is disabled by default and can be enabled in
the app. If the function is enabled and the aircraft detects obstacles, the aircraft will slow down and circumvent the obstacles
and return to the original flight path.
● Users can set the action the aircraft will perform after the operation is completed in the app.
More Operation Modes and Functions
Refer to the Agras T30 User Manual for more information about the A-B Route, Manual, and Manual Plus Operation
modes and on how to use functions such as Smart Supply Reminder, Operation Resumption, System Data Protection,
and Empty Tank.
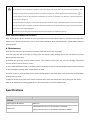
6. Maintenance
Clean all parts of the aircraft and remote controller at the end of each day of spraying:
1. Fill the spray tank with clean water or soapy water and spray the water through the nozzles until the tank is empty.
Repeat the step twice more.
2. Remove the spray tank strainer, nozzle strainers, and nozzles to clean them and clear any blockage. Afterwards,
immerse them in clean water for 12 hours.
3. Use a water-filled washer with a max water pressure of XX MPa to clean the aircraft body and wipe it with a soft brush
or wet cloth before cleaning water residue with a dry cloth.
4. If there is dust or pesticide liquid on the motors and propellers, wipe them with a wet cloth before cleaning water
residue with a dry cloth.
5. Wipe the surface and screen of the remote controller with a clean wet cloth that has been wrung out with water.
Refer to the disclaimer and safety guidelines for more information on product maintenance.
Specifications
Product Model
3WWDZ-10A
Airframe
Max Diagonal Wheelbase
1480 mm
Dimensions
1958×1833×553 mm (arms and propellers unfolded)
1232×1112×553 mm (arms unfolded and propellers folded)

600×665×580 mm (arms and propellers folded)
Propulsion System
Motors
Stator Size
100×10 mm
KV
84 rpm/V
Max Thrust
11.2 kg/rotor
Max Power
2000 W/rotor
Weight
527 g
ESCs
Max Working Current (Continuous)
32 A
Max Working Voltage
60.9 V (14S LiPo)
Foldable Propellers (R3390)
Diameter Pitch
33×90 in
Weight (Single propeller)
92 g
Spraying System
Spray Tank
Volume
Fully loaded: 10 L
Operating Payload
Fully loaded: 10 kg
Nozzles
Model
XR11001VS (standard), XR110015VS, XR11002VS (optional,
purchase separately)
Quantity
16
Max Spray Rate
XR11001VS: 1.8 L/min, XR110015VS: 2.4 L/min, XR11002VS: 3
L/min
Spray Width
3-5.5 m (4 nozzles, at a height of 1.5-3 m above crops)
Droplet Size
XR11001VS: 130-250 μm, XR110015VS: 170-265 μm,
XR11002VS:190-300 μm (subject to operating environment and
spray rate)
Flow Meter
Measurement Range
0.25-20 L/min
Error
< ±2%
Measurable Liquid
Conductivity > 50 μS/cm (liquids such as tap water or pesticides that
contain water)
Omnidirectional Digital Radar/CSM Radar
Model
RD2424R

Operating Frequency
SRRC/NCC/FCC: 24.05-24.25 GHz
MIC/KCC/CE: 24.05-24.25 GHz
Power Consumption
12 W
Transmission Power (EIRP)
SRRC: < 13 dBm; NCC/MIC/KCC/CE/FCC: < 20 dBm
Altitude Detection & Terrain
Follow[1]
Altitude detection range: 1-30 m
Stabilization working range: 1.5-15 m
Max slope in Mountain mode: 35°
Obstacle Avoidance[1]
Obstacle sensing range: 1.5-30 m
FOV: Horizontal: 360°, Vertical: ±15°
Working conditions: Flying higher than 1.5 m over the obstacle at a
speed lower than 7 m/s
Safety limit distance: 2.5 m (distance between the front of
propellers and the obstacle after braking)
Obstacle avoidance direction: Omnidirectional obstacle avoidance
in the horizontal direction.
IP Rating
IP67
Upward Radar
Model
RD2414U
Operating Frequency
SRRC/NCC/FCC: 24.05-24.25 GHz
MIC/KCC/CE: 24.05-24.25 GHz
Power Consumption
4 W
Transmission Power (EIRP)
SRRC: < 13 dBm; NCC/MIC/KCC/CE/FCC: < 20 dBm
Obstacle Avoidance[1]
Obstacle sensing range: 1.5-15 m
FOV: 80°
Working conditions: Available during takeoff, landing, and
ascending when an obstacle is more than 1.5 m above the aircraft.
Safety limit distance: 2 m (distance between the highest point of
the aircraft and the lowest point of the obstacle after braking)
Obstacle avoidance direction: Upward
IP Rating
IP67
FPV Cameras
FOV
Horizontal: 129°,Vertical: 82°
Resolution
1280×720 15-30fps

FPV Spotlights
FOV: 120°,Max brightness: 13.2 lux at 5 m of direct light
Flight Parameters
Operating Frequency
SRRC/NCC/FCC/CE/MIC/KCC: 2.4000-2.4835 GHz
SRRC/NCC/FCC/CE: 5.725-5.850 GHz[2]
Transmission Power (EIRP)
2.4 GHz
SRRC/CE/MIC/KCC: 18.5 dBm, FCC/NCC: 29.5 dBm
5.8 GHz
FCC: 28.5 dBm, SRRC: 20.5 dBm, CE: 12.5 dBm
Total Weight (exc. battery)
12.2 kg
Max Takeoff Weight
26.0 kg (at sea level)
Max Thrust-Weight Ratio
1.70 (takeoff weight of 26.0 kg)
Hovering Accuracy Range (with
strong GNSS signal)
D-RTK enabled: Horizontal: ±10 cm, Vertical: ±10 cm
D-RTK disabled:
Horizontal: ±0.6 m, Vertical: ±0.3 m (Radar module enabled: ±0.1
m)
RTK/GNSS Operating Frequency
RTK: GPS L1/L2, GLONASS F1/F2, BeiDou B1/B2, Galileo E1/E5[3]
GNSS: GPS L1, GLONASS F1, Galileo E1[3]
Battery
DJI-approved flight battery (BAX501-29000mAh-51.8V)
Max Power Consumption
3700 W
Hovering Power Consumption
3200W (takeoff weight of 26 kg)
Hovering Time[4]
19 min (takeoff weight of 16 kg with an 29000 mAh battery)
8.7 min (takeoff weight of 26 kg with an 29000 mAh battery)
Max Tilt Angle
15°
Max Operating Speed
7 m/s
Max Flying Speed
10 m/s (with strong GNSS signal)
Max Wind Resistance
8 m/s
Max Service Ceiling Above Sea Level
4500 m
Recommended Operating
Temperature
< 93%
Recommended Operating
Temperature
0° to 40° C (32° to 104° F)
Remote Controller
Model
RM500-ENT

Screen
5.5-in screen, 1920×1080, 1000 cd/m2, Android system
Built-in Battery
18650 Li-ion (5000 mAh @ 7.2 V)
GNSS
GPS+GLONASS
Power Consumption
18 W
Operating Temperature
-10° to 40° C (14° to 104° F)
Charging Environment Temperature
5° to 40° C (41° to 104° F)
Storage Temperature
-30° to 25° C (-22° to 77° F)
OcuSync 2.0
Operating Frequency
SRRC/NCC/FCC/CE/MIC/KCC: 2.4000-2.4835 GHz
SRRC/NCC/FCC/CE: 5.725-5.850 GHz[2]
Effective Transmission Distance
(Unobstructed, free of interference)
SRRC: 5 km, FCC: 7 km, MIC/KCC/CE: 4 km
Transmission Power (EIRP)
2.4 GHz
SRRC/CE/MIC/KCC: 18.5 dBm, FCC/NCC: 29.5 dBm
5.8 GHz
FCC: 28.5 dBm, SRRC: 20.5 dBm, CE: 12.5 dBm
Wi-Fi
Protocol
Wi-Fi Direct, Wi-Fi Display, 802.11a/g/n/ac
Wi-Fi with 2×2 MIMO
Operating Frequency
2.4000-2.4835 GHz
5.150-5.250 GHz
5.725-5.850 GHz[2]
Transmission Power (EIRP)
2.4 GHz
SRRC/CE: 18.5 dBm, NCC/FCC /MIC/KCC: 20.5 dBm
5.2 GHz
SRRC/NCC/FCC/CE/MIC/KCC: 14 dBm, KCC: 10 dBm
5.8 GHz
SRRC/NCC/FCC: 18 dBm, CE/KCC: 12 dBm
Bluetooth
Protocol
Bluetooth 4.2
Operating Frequency
2.4000-2.4835 GHz
Transmission Power (EIRP)
SRRC/NCC/FCC/CE/MIC/KCC: 6.5 dBm
Remote Controller Intelligent Battery

Model
WB37-4920mAh-7.6V
Battery Type
2S LiPo
Capacity
4920 mAh
Voltage
7.6 V
Energy
37.39 Wh
Charging Environment Temperature
5° to 40° C (41° to 104° F)
Intelligent Battery Charging Hub
Model
WCH2
Input Voltage
17.3-26.2 V
Output Voltage and Current
8.7 V, 6 A
Operating Temperature
5° to 40° C (41° to 104° F)
AC Power Adapter
Model
A14-057N1A
Input Voltage
100-240 V, 50/60 Hz
Output Voltage
17.4 V
Rated Power
57 W
[1] The effective radar range varies depending on the material, position, shape, and other properties of the obstacle.
[2] Local regulations in some countries prohibit the use of the 5.8 and 5.2 GHz frequencies. In some countries, the 5.2
GHz frequency band is only allowed for indoor use.
[3] Support for Galileo will be available at a later date.
[4] Hovering time acquired at sea level with wind speeds lower than 3 m/s.
Compliance Information
FCC Compliance Notice
This device complies with Part 15 of the FCC Rules. Operation is subject to the following two conditions: (1) This device may not cause
harmful interference, and (2) This device must accept any interference received, including interference that may cause undesired
operation.
Any changes or modifications not expressly approved by the party responsible for compliance could void the user’s authority to operate
the equipment.
This equipment has been tested and found to comply with the limits for a Class B digital device, pursuant to part 15 of the FCC Rules.
These limits are designed to provide reasonable protection against harmful interference in a residential installation. This equipment
generates, uses and can radiate radio frequency energy and, if not installed and used in accordance with the instructions, may cause

harmful interference to radio communications. However, there is no guarantee that interference will not occur in a particular
installation. If this equipment does cause harmful interference to radio or television reception, which can be determined by turning the
equipment off and on, the user is encouraged to try to correct the interference by one or more of the following measures:
—Reorient or relocate the receiving antenna.
—Increase the separation between the equipment and receiver.
—Connect the equipment into an outlet on a circuit different from that to which the receiver is connected.
—Consult the dealer or an experienced radio/TV technician for help.
RF Exposure Information
Aircraft
The aircraft complies with FCC radiation exposure limits set forth for an uncontrolled environment. In order to avoid the possibility of
exceeding the FCC radio frequency exposure limits, human proximity to the antenna shall not be less than 20cm during normal
operation. This transmitter must not be co-located or operating in conjunction with any other antenna or transmitter.
Remote Controller
This equipment complies with FCC radiation exposure limits set forth for an uncontrolled environment. End user must follow the specific
operating instructions for satisfying RF exposure compliance. This transmitter must not be co-located or operating in conjunction with
any other antenna or transmitter.
The portable device is designed to meet the requirements for exposure to radio waves established by the Federal Communications
Commission (USA). These requirements set a SAR limit of 1.6 W/kg averaged over one gram of tissue. The highest SAR value reported
under this standard during product certification for use when properly worn on the body.
ISED Compliance Notice
This device contains licence-exempt transmitter(s)/receiver(s) that comply with Innovation, Science and Economic Development
Canada’s licence-exempt RSS(s). Operation is subject to the following two conditions: (1)This device may not cause interference.(2)This
device must accept any interference, including interference that may cause undesired operation of the device.
L’émetteur/récepteur exempt de licence contenu dans le présent appareil est conforme aux CNR d’Innovation, Sciences et
Développement économique Canada applicables aux appareils radio exempts de licence. L’exploitation est autorisée aux deux conditions
suivantes :(1)L’appareil ne doit pas produire de brouillage; (2)L’appareil doit accepter tout brouillage radioélectrique subi, même si le
brouillage est susceptible d’en compromettre le fonctionnement.
Aircraft
This equipment complies with RSS-102 radiation exposure limits set forth for an uncontrolled environment. This equipment should be
installed and operated with minimum distance 20cm between the radiator and your body. This transmitter must not be co-located or
operating in conjunction with any other antenna or transmitter.

Cet équipement est conforme aux limites d'exposition aux radiations CNR-102 établies pour un environnement non contrôlé. Cet
équipement doit être installé et utilisé avec une distance minimale de 20 cm entre le radiateur et votre corps.
Remote Controller
This equipment complies with ISED radiation exposure limits set forth for an uncontrolled environment. End user must follow the specific
operating instructions for satisfying RF exposure compliance. This transmitter must not be co-located or operating in conjunction with
any other antenna or transmitter. The portable device is designed to meet the requirements for exposure to radio waves established by
the ISED.
These requirements set a SAR limit of 1.6 W/kg averaged over one gram of tissue. The highest SAR value reported under this standard
during product certification for use when properly worn on the body.
Cet équipement est conforme aux limites d’exposition aux rayonnements ISED établies pour un environnement non contrôlé.
L’utilisateur final doit suivre les instructions spécifiques pour satisfaire les normes. Cet émetteur ne doit pas être co-implanté ou
fonctionner en conjonction avec toute autre antenne ou transmetteur. Le dispositif portatif est conçu pour répondre aux exigences
d’exposition aux ondes radio établie par le développement énergétique DURABLE.
Ces exigences un SAR limite de 1,6 W/kg en moyenne pour un gramme de tissu. La valeur SAR la plus élevée signalée en vertu de cette
norme lors de la certification de produit à utiliser lorsqu’il est correctement porté sur le corps.
KCC Compliance Notice
“해당무선설비는 운용 중 전파혼신 가능성이 있으므로 인명안전과 관련된 서비스는 할 수 없습니다.”
“해당 무선설비는 운용 중 전파혼신 가능성이 있음”
NCC Compliance Notice
取得審驗證明之低功率射頻器材,非經核准,公司、商號或使
用者均不得擅自變更頻率、加大功率或變更原設計之特性及功能。低功率射頻器材之使用不得影響飛航安全及干擾合法通信;經
發現有干擾現象時,應立即停用,並改善至無干擾時方得繼續使用。前述合法通信,指依電信管理法規定作業之無線電通信。低
功率射頻器材須忍受合法通信或工業、科學及醫療用電波輻射性電機設備之干擾。
應避免影響附近雷達系統之操作。
高增益指向性天線只得應用於固定式點對點系統。
EU Compliance Statement: SZ DJI TECHNOLOGY CO., LTD. hereby declares that this device is in compliance with the essential
requirements and other relevant provisions of the Directive 2014/53/EU.
La page charge ...
La page charge ...
La page charge ...
La page charge ...
La page charge ...
La page charge ...
La page charge ...
La page charge ...
La page charge ...
-
 1
1
-
 2
2
-
 3
3
-
 4
4
-
 5
5
-
 6
6
-
 7
7
-
 8
8
-
 9
9
-
 10
10
-
 11
11
-
 12
12
-
 13
13
-
 14
14
-
 15
15
-
 16
16
-
 17
17
-
 18
18
-
 19
19
-
 20
20
-
 21
21
-
 22
22
-
 23
23
-
 24
24
-
 25
25
-
 26
26
-
 27
27
-
 28
28
-
 29
29


dans d''autres langues
- italiano: dji Agras T10 Guida utente
- English: dji Agras T10 User guide
- română: dji Agras T10 Manualul utilizatorului
Documents connexes
-
home dji Manuel utilisateur
-
dji P4 Multispectral Mode d'emploi
-
dji RC Pro Mode d'emploi
-
dji D-RTK 2 Mode d'emploi
-
-
dji Pilot Guide de démarrage rapide
-
dji Agras T25 Mode d'emploi
-
-
-
dji Mavic 3 Cine Mode d'emploi
Autres documents
-
SKYCATCH SKCEX201 Manuel utilisateur
-
 JACS Solutions TD191-B USB Dongle Mode d'emploi
-
Autel Robotics EVO II RTK V3 Series Rugged Bundle Camera Drone Mode d'emploi
-
Testo TE915IFF Mode d'emploi
-
dals CONNECT PRO Dals Connect Mode d'emploi
-
Autel 102001507 Mode d'emploi
-
 Autel Robotics Smart Controller Mode d'emploi
-
 Autel Robotics V3 Mode d'emploi


