
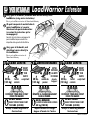
LoadWarrior Extension
LIMITES DE CHARGE:
▲
30 lbs.
(13.5 kg)
▲
contenu de
pannier
NE PAS
DÉPASSER
LA LIMITE
DE CHARGE
du porte-
bagages!
RÉPARTIR LA CHARGE ÉGALEMENT
DANS LE PANIER.
LOAD LIMITS:
▲
30 lbs.
(13.5 kg)
▲
basket
contents
DO NOT
EXCEED
YOUR
RACK’S
weight limit!
DISTRIBUTE YOUR LOAD EVENLY
INSIDE THE BASKET.
LOAD LIMITS:
▲
30 lbs.
(13.5 kg)
▲
basket
contents
DO NOT
EXCEED
YOUR
RACK’S
weight limit!
DISTRIBUTE YOUR LOAD EVENLY
INSIDE THE BASKET.
Carry gear in the basket, and attach boat carriers directly to the
LoadWarrior (using carrier instructions).
Refer to your LoadWarrior instructions for Yakima Limited Warranty.
NE PAS DÉPASSER
LA LIMITE DE CHARGE DANS LE PANIER:
63 kg (140 lb)
DO NOT EXCEED
BASKET CONTENT WEIGHT LIMIT:
140 LBS. (63 KG)
DO NOT EXCEED
BASKET CONTENT WEIGHT LIMIT:
140 LBS. (63 KG)
Part #1031909 RevA
On peut transporter le matériel dans le
panier LoadWarrior et y monter
directement des porte-embarcations
(en suivant les instructions qui les
accompagnent).
Consulter les instructions accompagnant le
panier LoadWarrior pour connaître les
dispositions de la garantie limitée Yakima.
Carry gear in the basket, and
attach boat carriers directly to
the LoadWarrior.
Refer to your LoadWarrior instructions for
Yakima Limited Warranty.
Always tie down long loads at
front and rear.
Toujours attacher les charges
longues à l’avant et à l’arrière.
Always tie down long loads at
front and rear.

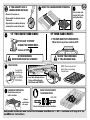
Reassemble hardware and install the Extended LoadWarrior — OR — continue with step 6 of the
LoadWarrior instructions.
IF YOU ALREADY HAVE A
LOADWARRIOR INSTALLED:
Insert screws into
each of the 8 joints
and tighten them.
INSERT THE LOADWARRIOR EXTENSION.
IF YOU HAVE BARS THAT CAN BE MOVED…
Move the bars apart to a minimum of 30".
ATTACH FAIRING.
Pry open the
SnapArounds,
attach them
to the LOWER
FRONT BAR.
• Insert bolts through washers,
fairing and SnapArounds.
• Attach knobs and TIGHTEN.
NOTE: The fairing can fold
down when carrying long
slender loads.
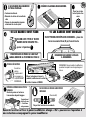
LOAD BASKET ONTO RACKS.
Center basket over your
rack’s crossbars.
DO NOT ATTACH BRACKETS
TO UNSTABLE POINTS.
Do not attach brackets at these locations.
•IF YOU HAVE FIXED BARS: •IF YOUR BARS MOVE:
(SIDE VIEW)
A friend
would make
this easier .
Q TOWER OWNERS:
NEVER REPOSITION THE Q TOWERS!
TIGHTEN YOUR CROSSBARS
IF YOU LOOSENED THEM.
IF YOU HAVE “Q TOWERS”
OR BARS THAT
CANNOT MOVE…
Continue to STEP
.
• Remove it from your car.
• Disassemble the brackets and set
them aside.
• Separate the two basket halves by
removing the screws at the joints.

Remonter les étriers et fixer le panier LoadWarrior allongé — OU — poursuivre à l’opération 6
des instructions accompagnant le panier LoadWarrior.
SI UN PANIER LOADWARRIOR
EST DÉJÀ INSTALLÉ:
Poser les vis dans
les huit joints et les
serrer.
INSÉRER L’ALLONGE LOADWARRIOR.
S’IL EST POSSIBLE DE DÉPLACER LES BARRES… placer les
barres à au moins 84 cm (33 po) l’une de l’autre.
POSER LE DÉFLECTEUR
Écarter les
colliers
SnapAround et
les engager sur
la BARRE AVANT
INFÉRIEURE.
• Glisser les boulons à travers la
rondelle, le déflecteur et le collier.
• Installer le bouton et SERRER.
REMARQUE: On peut rabattre le déflecteur
quand on transporte une charge longue et
mince.
DÉPOSER LE PANIER SUR LE PORTE-
BAGAGES.
Centrer le panier sur les barres
transversales du porte-bagages.
NE PAS FIXER LES ÉTRIERS À DES POINTS
INSTABLES
Ne pas fixer les étriers à ces endroits.
•SI LES BARRES SONT FIXES: •SI LES BARRES SONT MOBILES:
(Vue de côté)
L’opération est
plus facile avec
l’aide d’une
autre personne.
PROPRIÉTAIRES DE PIEDS Q: IL NE FAUT
JAMAIS MODIFIER LA POSITION DES PIEDS Q!
RESSERRER LES BARRES SI ON LES
A DESSERRÉES.
ISI L’ON A DES “PIEDS Q” OU DES
BARRES QUI NE BOUGENT PAS…
passer à l’opération
.
• L’enlever du véhicule.
• Démonter les étriers et les mettre de
côté.
• Séparer les deux moitiés du panier
en enlevant les vis des joints.
-
 1
1
-
 2
2
-
 3
3


YAKIMA Load Warrior Extension Mode d'emploi
- Taper
- Mode d'emploi
- Ce manuel convient également à
dans d''autres langues
Documents connexes
-
YAKIMA MegaWarrior Le manuel du propriétaire
-
-
-
-
-
-
-
-
