
49-1000399 Rev. 2 11-19 GEA
Write the model and serial numbers
here:
Model # ________________________
Serial # ________________________
Find these numbers on a label inside
the refrigerator on the side wall.
REFRIGERATORS
GPV10 Models
OWNER’S MANUAL
& INSTALLATION
INSTRUCTIONS
SAFETY INFORMATION .3
USING THE APPLIANCE
Control Settings ............ 5
Refrigerator Features ....... 5
CARE AND CLEANING ..6
INSTALLATION
INSTRUCTIONS .......... 8
TROUBLESHOOTING
TIPS .................... 14
LIMITED WARRANTY ...15
CONSUMER SUPPORT . .16
GE is a trademark of the General Electric Company. Manufactured under trademark license.
ENGLISH/FRANÇAIS/
ESPAÑOL

2 49-1000399 Rev. 2
THANK YOU FOR MAKING GE APPLIANCES
A PART OF YOUR HOME.
Whether you grew up with GE Appliances, or this is your first, we’re
happy to have you in the family.
We take pride in the craftsmanship, innovation and design that goes
into every GE Appliances product, and we think you will too. Among
other things, registration of your appliance ensures that we can deliver
important product information and warranty details when you need them.
Register your GE appliance now online. Helpful websites and phone
numbers are available in the Consumer Support section of this Owner’s
Manual. You may also mail in the pre-printed registration card included in
the packing material.

49-1000399 Rev. 2 3
IMPORTANT SAFETY INFORMATION
READ ALL INSTRUCTIONS BEFORE USING
CAUTION
To reduce the risk of injury when using your refrigerator, follow
these basic safety precautions.
Ŷ 'RQRWFOHDQJODVVVKHOYHVRUFRYHUVZLWKZDUPZDWHUZKHQWKH\DUHFROG*ODVV
shelves and covers may break if exposed to sudden temperature changes or
impact, such as bumping or dropping. Tempered glass is designed to shatter
into many small pieces if it breaks.
Ŷ .HHSILQJHUVRXWRIWKH³SLQFKSRLQW´DUHDVFOHDUDQFHVEHWZHHQWKHGRRUVDQG
between the doors and cabinet are necessarily small. Be careful closing doors
when children are in the area.
Ŷ 'RQRWWRXFKWKHFROGVXUIDFHVLQWKHIUHH]HUFRPSDUWPHQWZKHQKDQGVDUH
damp or wet, skin may stick to these extremely cold surfaces.
Ŷ 'RQRWUHIUHH]HIUR]HQIRRGVZKLFKKDYHWKDZHGFRPSOHWHO\
WARNING
To reduce the risk of fire, explosion, electric shock, or injury when
using your refrigerator, follow these basic safety precautions:
Ŷ 7KLVUHIULJHUDWRUPXVWEHSURSHUO\LQVWDOOHGDQGORFDWHGLQDFFRUGDQFHZLWKWKH
Installation Instructions before it is used.
Ŷ 'LVFRQQHFWWKHUHIULJHUDWRUIURPPDLQSRZHUVXSSO\DWUHDURIXQLWUHPRYH
refrigerator circuit fuse, or turn off circuit breaker before making repairs or
cleaning.
NOTE: Power to the refrigerator cannot be disconnected by any setting on the
control panel.
NOTE: Repairs must be performed by a qualified Service Professional.
Ŷ 5HSODFHDOOSDUWVDQGSDQHOVEHIRUHRSHUDWLQJ
Ŷ 'RQRWVWRUHRUXVHJDVROLQHRURWKHUIODPPDEOHYDSRUVDQGOLTXLGVLQWKHYLFLQLW\
of this or any other appliance.
Ŷ 'RQRWVWRUHH[SORVLYHVXEVWDQFHVVXFKDVDHURVROFDQVZLWKDIODPPDEOH
propellant in this appliance.
Ŷ 'RQRWXVHDQH[WHQVLRQFRUG8VHRQO\FRQWLQXRXVVXSSO\ZLUHVFRQQHFWHG
GLUHFWO\EHWZHHQWKH'&YROWDJHVRXUFHRUGLVWULEXWLRQSDQHODQGWKHUHIULJHUDWRU
Ŷ 7RSUHYHQWVXIIRFDWLRQDQGHQWUDSPHQWKD]DUGVWRFKLOGUHQUHPRYHWKH
IUHVKIRRGDQGIUHH]HUGRRUVIURPDQ\UHIULJHUDWRUEHIRUHGLVSRVLQJRILWRU
discontinuing its use.
Ŷ 7RDYRLGVHULRXVLQMXU\RUGHDWKFKLOGUHQVKRXOGQRWVWDQGRQRUSOD\LQRUZLWK
the appliance.
Ŷ &KLOGUHQDQGSHUVRQVZLWKUHGXFHGSK\VLFDOVHQVRU\RUPHQWDOFDSDELOLWLHV
or lack of experience and knowledge can use this appliance only if they are
supervised or have been given instructions on safe use and understand the
KD]DUGVLQYROYHG
Ŷ 7KLVDSSOLDQFHLVLQWHQGHGWREHXVHGLQKRXVHKROGDQGVLPLODUDSSOLFDWLRQV
VXFKDVVWDIINLWFKHQDUHDVLQVKRSVRIILFHVDQGRWKHUZRUNLQJHQYLURQPHQWV
IDUPKRXVHVE\FOLHQWVLQKRWHOVPRWHOVEHGEUHDNIDVWDQGRWKHUUHVLGHQWLDO
HQYLURQPHQWVFDWHULQJDQGVLPLODUQRQUHWDLODSSOLFDWLRQV
Ŷ 'RQRWDSSO\KDUVKFOHDQHUVWRWKHUHIULJHUDWRU&HUWDLQFOHDQHUVZLOOGDPDJH
plastic which may cause parts such as the door or door handles to detach
unexpectedly. See the Care and Cleaning section for detailed instructions.
READ AND SAVE THESE INSTRUCTIONS

4 49-1000399 Rev. 2
WARNING
SUFFOCATION AND ENTRAPMENT HAZARD
Failure to follow these disposal instructions can result in death or serious injury
IMPORTANT: Child entrapment and suffocation are not problems of the past. Junked
RUDEDQGRQHGUHIULJHUDWRUVRUIUHH]HUVDUHVWLOOGDQJHURXVHYHQLIWKH\ZLOOVLWIRU³MXVW
DIHZGD\V´,I\RXDUHJHWWLQJULGRI\RXUROGUHIULJHUDWRURUIUHH]HUSOHDVHIROORZWKH
instructions below to help prevent accidents.
Before You Throw Away Your Old Appliance
Ŷ7DNHRIIWKHIUHVKIRRGDQGIUHH]HUGRRUV
Ŷ Leave the shelves in place so that children may not easily climb inside.
Refrigerant and Foam Disposal:
'LVSRVHRIUHIULJHUDWRULQDFFRUGDQFHZLWK)HGHUDODQG/RFDO5HJXODWLRQV)ODPPDEOH
insulation material used requires special disposal procedures. Contact your local
authorities for the environmentally safe disposal of your refrigerator.
PROPER DISPOSAL OF YOUR OLD REFRIGERATOR
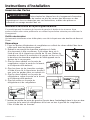
For personal safety, this appliance must be properly grounded.
$YROW'&DPSIXVHG
grounded electrical supply is required.
This provides the best performance and
also prevents overloading RV wiring
FLUFXLWVZKLFKFRXOGFDXVHDILUHKD]DUG
from overheated wires.
'RQRWFRQQHFWWKHUHIULJHUDWRUWR$&
voltage circuits, or to AC outlet of
inverter.
The refrigerator should always be
connected to its own individual electrical
EUDQFKOHDGLQJGLUHFWO\WRWKHPDLQ'&
voltage source or distribution panel.
Immediately discontinue use if the main
power supply line has been damaged.
If the supply line is damaged, it must
be repaired by a qualified service
professional.
When removing the refrigerator away
from the wall, be careful not to roll over
or damage the main power supply line.
CONNECTING ELECTRICITY
INSTALLATION
WARNING
ELECTRICAL SHOCK HAZARD
Failure to follow these instructions can result in death, fire, or electrical shock.
IMPORTANT SAFETY INFORMATION
READ ALL INSTRUCTIONS BEFORE USING
READ AND SAVE THESE INSTRUCTIONS
WARNING
EXPLOSION HAZARD
.HHSIODPPDEOHPDWHULDOVDQGYDSRUVVXFKDVJDVROLQHDZD\IURPUHIULJHUDWRU
Failure to do so can result in fire, explosion, or death.

49-1000399 Rev. 2
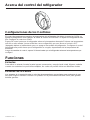
Control Settings
The temperature control maintains the temperature in the refrigerator. Setting the control at
COOL is the warmest setting. Setting the control at COLDEST is the coldest setting. Set
the control at COLD.
Allow 24 hours for the refrigerator to reach the desired temperature. If you want a colder or
warmer temperature, move the dial one setting at a time. Moving the control to OFF stops
cooling but does not turn off the power to the refrigerator. Setting the control too high may
FDXVHIUHH]LQJLQWKHUHIULJHUDWRUGHSHQGLQJRQWKHURRPWHPSHUDWXUH
After changing the control, allow 24 hours for the refrigerator to reach the temperature you
have set.
Shelves
To remove a shelf, lift up the back slightly and pull forward. All models have multi-position
shelves that can be moved to different levels.
Door Shelves
Shelves on the door provide convenient storage for frequently used items. this model has
doors that are deep enough to store large bottles.
Features
Controls
C
o
o
l
O
C
o
l
d
e
s
t
C
o
l
d

6 49-1000399 Rev. 2
Care and Cleaning
Directions for Cleaning Outside Surfaces, Door Handles, and Trim
Cleaning the Inside
To help prevent odorsOHDYHDQRSHQER[RIEDNLQJVRGDLQWKHIUHVKIRRGDQGIUHH]HU
compartments.
Remove power from refrigerator before cleaning.
(LWKHUGLVFRQQHFWPDLQ'&SRZHUVXSSO\ZLUHVDWUHDURIXQLWUHPRYHUHIULJHUDWRUFLUFXLW
IXVHRUWXUQRIIFLUFXLWEUHDNHULQ'&YROWDJHGLVWULEXWLRQSDQHO,IWKLVLVQRWSUDFWLFDOZULQJ
excess moisture out of sponge or cloth when cleaning around switches, lights or controls.
Use warm water and baking soda solution²DERXWDWDEOHVSRRQPORIEDNLQJVRGD
WRDTXDUWOLWHURIZDWHU7KLVERWKFOHDQVDQGQHXWUDOL]HVRGRUV5LQVHDQGZLSHGU\
Other parts of the refrigerator—including door gaskets, fruit and vegetable drawers, and
all plastic parts—can be cleaned the same way.
After cleaning the door gaskets, apply a thin layer of petroleum jelly to the door gaskets at
WKHKLQJHVLGH7KLVKHOSVNHHSWKHJDVNHWVIURPVWLFNLQJDQGEHQGLQJRXWRIVKDSH'RQRW
use cleansing powders or other abrasive cleaners.
CAUTION
'RQRWFOHDQJODVVVKHOYHVRUFRYHUVZLWKZDUPZDWHUZKHQWKH\DUH
cold. Glass shelves and covers may break if exposed to sudden temperature changes or
impact such as bumping or dropping. Tempered glass is designed to shatter into many
small pieces if it breaks.
'RQRWZDVKDQ\SODVWLFUHIULJHUDWRUSDUWVLQWKHGLVKZDVKHU
DO USE DO NOT USE
Soft, clean cloth or sponge Abrasive cloths, scrubbing sponges,
scouring or steel wool pads
Mild detergent mixed with warm water
$SSURYHGVWDLQOHVVVWHHOFOHDQHUV
Visit the Café Appliances parts store
for approved stainless steel cleaners:
geapplianceparts.com or call
Cleaners with oxalic acid such as
%DU.HHSHUV)ULHQG6RIW&OHDQVHU
can be used to remove surface rust,
tarnish and small blemishes.
Abrasive powders or sprays
Window Sprays or Ammonia
Citrus or plant oil-based cleaners
Acidic or vinegar-based cleaners
Oven cleaners
&OHDQHUVFRQWDLQLQJDFHWRQHSURSDQRQH
Any cleaner with WARNING about plastic
contact
NOTE: DO NOT allow stainless steel cleaner to come in contact with any plastic parts
such as trim pieces, handle hardware and liners. If unintentional contact of cleaners
with plastic parts does occur, clean plastic part with a sponge and mild detergent
mixed with warm water.

49-1000399 Rev. 2 7
Preparing for Storage
For long storage or absences when refrigerator will not be used, remove food and
HLWKHUGLVFRQQHFWPDLQ'&SRZHUVXSSO\ZLUHVDWUHDURIXQLWRUUHPRYHUHIULJHUDWRU
FLUFXLWIXVHRUWXUQRIIFLUFXLWEUHDNHULQ'&YROWDJHGLVWULEXWLRQSDQHO0RYHWKH
control to the OFF position, and clean the interior with a baking soda solution of one
WDEOHVSRRQPORIEDNLQJVRGDWRRQHTXDUWOLWHURIZDWHU/HDYHWKHGRRURSHQ
Preparing to Move
5HPRYHIRRGUHPRYHUHIULJHUDWRUFLUFXLWIXVHRUWXUQRIIFLUFXLWEUHDNHULQ'&YROWDJH
GLVWULEXWLRQSDQHODQGGLVFRQQHFWPDLQ'&SRZHUVXSSO\ZLUHVDWUHDURIXQLW6HFXUH
all loose items such as shelves and drawers by taping them securely in place to
prevent damage.
Be sure the refrigerator stays in an upright position during moving.
Defrosting
'HIURVWZKHQHYHUIURVWRQWKHZDOOVRIWKHIUHH]HUFRPSDUWPHQWEHFRPH´WKLFNNever
use a sharp or metallic instrument to remove frost as it may damage the cooling
coils. $SXQFWXUHGFRROLQJFRLOZLOOFDXVHVHULRXVSUREOHPVDQGYRLGWKHZDUUDQW\:H
UHFRPPHQGXVLQJDSODVWLFVFUDSHU'RQRWXVHDQ\HOHFWULFDOGHYLFHLQGHIURVWLQJ\RXU
refrigerator.
To defrost:
Ŷ 5HPRYHIRRGVDQGLFHWUD\VIURPWKHIUHH]HUFRPSDUWPHQW
Ŷ 6HWWKHWHPSHUDWXUHFRQWUROGLDOWROFF.
'HIURVWLQJXVXDOO\WDNHVDIHZKRXUV7RGHIURVWIDVWHUNHHSWKHIUHH]HUGRRURSHQ$OVR
SRXULQJZDUPQRWKRWZDWHURQWKHIURVWHGSDUWPD\VSHHGGHIURVWLQJDo not use boiling
water—it may damage plastic parts.
After defrosting:
Ŷ :LSHWKHIUHH]HUFRPSDUWPHQWZLWKDGDPSFORWK
Ŷ 7XUQWKHWHPSHUDWXUHFRQWUROWRWKHGHVLUHGVHWWLQJDQGUHWXUQIRRGDQGLFHWUD\VWRWKH
refrigerator.
NOTE: ,ILFHEXLOGXSLVYHU\WKLFNLWPD\NHHSWKHIUHH]HUGRRUIURPRSHQLQJRUFORVLQJ
completely. After defrosting, the door will close easily.
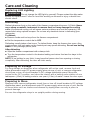
Care and Cleaning
Replacing LED Lighting
WARNING
'RQRWFKDQJHWKH/('OLJKWE\\RXUVHOI3OHDVHFRQWDFWWKHDIWHUVDOHV
service for replacement. Failure to heed this warning could result in injury or death from
electric shock.

8 49-1000399 Rev. 2
Read these instructions completely and carefully.
Refrigerator Location and Operating Range
Ŷ'RQRWLQVWDOOWKHUHIULJHUDWRULQDORFDWLRQH[SRVHGWRZDWHUUDLQHWFRUGLUHFW
sunlight.
ŶInstall it on a floor strong enough to support it fully loaded.
ŶThis refrigerator is designed to function properly in room temperatures ranging from
)&WR)&2SHUDWLQJWKHUHIULJHUDWRULQURRPWHPSHUDWXUHV
outside this range will cause inadequate cooling.
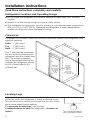
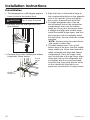
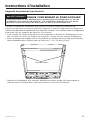
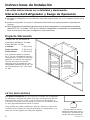
Clearances
For proper air circulation, allow the following clearances between the refrigerator and
adjacent cabinetry.
Sides ´PP
Top ´PP
Back ´PP
7KH´VLGHDQGWRSFOHDUDQFHV
are not necessary between the
refrigerator and the cabinet front
trim. The minimum opening
VL]HLQWKHFDELQHWIURQWWULPIRU
installing the refrigerator should
EH´PPZLGHE\´
PPWDOO
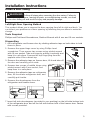
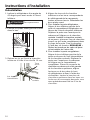
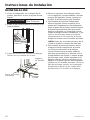
Leveling Legs
Adjustable legs at the front corners of the refrigerator
should be set so the refrigerator is firmly positioned on the
floor and the front is raised just enough that the door closes
easily when opened about halfway.
To adjust the leveling legs, turn the legs
counterclockwise to raise the refrigerator, clockwise to
lower it.
Installation Instructions
Turn counterclockwise to
raise, clockwise to lower.
Minimum
Cavity
Dimensions
behind
Cabinet
Front Trim:
26” W x 61” H
x 24.5”D
Minimum
Opening
Dimensions
in Cabinet
FrontTrim:
24” W x
60” H
26”
24.5”
24”
60”
Cavity
Cabinet
Front
Trim
61”

49-1000399 Rev. 2 9
Installation Instructions
Reverse Door Swing
Left/Right Door Opening Method
This product allows you to reverse the door opening from left to right and back. You
can select your preference of door opening by following the procedure to make the
change.
Tools Required
3KLOOLSVDQG)ODW+HDG6FUHZGULYHUV5DWFKHW:UHQFKZLWKPPDQGPPVRFNHWV
Dismantling
$IIL[UHIULJHUDWRUDQGIUHH]HUGRRUE\VWLFNLQJDGKHVLYHWDSHRQERWKVLGHVWRKROG
doors in place.
2. Remove the upper hinge cover by using Phillips head
screwdriver. Then remove two screws using ratchet wrench
ZLWKPPVRFNHW7DNHRXWKLQJHE\SXOOLQJLWYHUWLFDOO\DQG
keep it in safe place. Remove the top hinge plug from the
opposite side of the cabinet top.
5HPRYHWKHDGKHVLYHWDSHRQIUHH]HUGRRUOLIWLWDQGWDNHRII
the door and carefully put it aside.
4. Remove two screws of middle hinge using
ratchet wrench with 8 mm socket, and
keep them in a safe place.
5HPRYHWKHDGKHVLYHWDSHRQUHIULJHUDWRU
door, lift it and take refrigerator door, and
carefully put it aside.
6. Remove the doorstoppers from the
UHIULJHUDWRUDQGIUHH]HUGRRUV
,QVHUWOHIWVLGHGRRUVWRSSHUVSURYLGHGLQ\RXUSDFNLQJRQWKHOHIWVLGHERWWRPKROH
RIWKHUHIULJHUDWRUGRRUDQGRQWKHOHIWVLGHERWWRPKROHRIWKHIUHH]HUGRRU)DVWHQ
with screws provided.
WARNING
Follow all steps when reversing the door swing. Failure to
follow these instructions, leaving off parts, or overtightening screws, can lead
to the door falling off and result in injury and property damage.

49-1000399 Rev. 2
Installation Instructions
Reinstallation
7LOWUHIULJHUDWRURQDGHJUHHDQJOHWR
have access to the bottom front.
2. Remove both left and right front feet
from bottom.
3. Remove the screws holding the bottom
KLQJHZLWKPPVRFNHW
4. Align the holes in the bottom hinge to
the corresponding holes on the opposite
side of the cabinet. Insert and tighten
the screws. Reinstall both front feet.
7RLQVWDOOUHIULJHUDWRUGRRU/LQHXS
the left bottom hole of the refrigerator
compartment door over the bottom
hinge pin. Move door forward to make
it straight and align with middle hinge.
Install the middle hinge again, and turn
the hinge pin until it completely enters
the door body. Secure it with the screws
provided.
NOTE: Remove plugs from doorframe
and install on other side.
7RLQVWDOOIUHH]HUGRRU/LQHXSOHIW
bottom hole of the door over the middle
hinge middle pin. Move door forward to
PDNHLWVWUDLJKWDQGDOLJQZLWKIUHH]HU
compartment. Place the hinge cover
over the left side of the top hinge, align
holes with hole on the refrigerator top
and tighten with the screws provided.
Insert the top hinge plug into the holes
on the cabinet top from which you
previously removed the 2 hinge screws
CAUTION
Two People Required
Screw
Holes
Middle
Hinge Pin
Middle
Hinge

49-1000399 Rev. 2 11
Installation Instructions
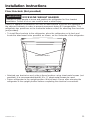
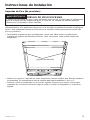
Floor Brackets (Not provided)
Some RV appliance installations use floor or wall brackets to secure the appliance to
the adjacent cabinetry in order to prevent movement during RV transportation. This
refrigerator has provisions on the underside bottom surface for attaching floor brackets
QRWSURYLGHG
• To install floor brackets to the refrigerator, place the refrigerator on its back and
locate the attachment holes provided, as shown, on the underside of the refrigerator.
• Attached one bracket on each side at these locations using sheet metal screws (not
SURYLGHG,WLVUHFRPPHQGHGWKDW[ò´VKHHWPHWDOVFUHZVEHXVHG
• Return refrigerator to the upright position. Wait at least 4 hours after returning the
refrigerator to the upright position before completing the electrical connections.
WARNING
EXCESSIVE WEIGHT HAZARD
8VHWZRRUPRUHSHRSOHWRPRYHDQGSRVLWLRQWKHUHIULJHUDWRUIRUIORRUEUDFNHW
installation. Failure to do so can result in back or other injury.
Attachment Holes

12 49-1000399 Rev. 2
Installation Instructions
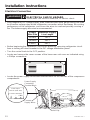
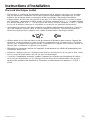
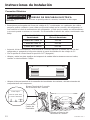
Electrical Connection
/RQJOHQJWKVIRU'&YROWDJHVXSSO\OLQHVFRPELQHGZLWKVPDOOJDXJHZLULQJFDQOHDG
to excessive voltage drop at the refrigerator connection which decreases the cooling
performance of the refrigerator, and cause the wires to overheat possibly causing a
ILUH7KHEHORZVXSSO\ZLUHVL]HLVUHFRPPHQGHG
• Before beginning the installation, disconnect power by removing refrigerator circuit
IXVHRUWXUQLQJRIIFLUFXLWEUHDNHULQWKH'&YROWDJHGLVWULEXWLRQSDQHO
• Turn the control knob to the OFF position.
• Locate and remove the seven screws of the lower rear unit cover as indicated using
a Phillips screwdriver.
• Locate the power supply connection terminal block on the left side of the compressor
compartment.
WARNING
ELECTRICAL SHOCK HAZARD
Failure to follow these instructions can result in death,fire, or electric shock.
Supply
Wire Size
Maximum Supply
Line Length
12 AWG )7
$:* )7
8 AWG )7
Power Supply
Connection
Terminal Block
Connect
Supply Wires
Install Strain
Relief Clip
Power Input:
DC12V (10.8-14V)
Current: 20A MAX
+-
GND

49-1000399 Rev. 2 13
8QVQDSWKHFOHDUSODVWLFFRYHUIURPWKHWHUPLQDOEORFNWRDFFHVVWHUPLQDOVFUHZV
Loosen the supply side terminal screws on the lower side of the block with a Phillips
screwdriver. Attach supply wires to the appropriate polarity and ground terminals
as indicated on label: connect positive wire to terminal marked +, negative wire to
WHUPLQDOPDUNHGDQGJURXQGWRWHUPLQDOPDUNHG*1'5HWLJKWHQWHUPLQDOEORFN
screws and replace clear plastic cover.
• A wiring strain relief clip must be installed for the supply wires. From the selection
RIZLUHFOLSVSURYLGHGLQWKH2ZQHU¶V0DQXDOEDJVHOHFWWKHDSSURSULDWHVL]HFOLS
needed to fit the supply wires used.
8VHWKHVFUHZDOVRSURYLGHGLQWKH2ZQHU¶V0DQXDOEDJWRPRXQWWKHVWUDLQUHOLHI
clip at the location shown on the bottom rail of the compressor compartment. The
wires must be completely snug after clip is installed with no movement or slippage of
the wires within the clip when the wires are tugged.
• Replace the rear unit cover, routing the supply wires through the opening provided.
• Move unit into its final position taking care not to roll over or damage the main power
supply line.
$IWHUFRPSOHWLQJLQVWDOODWLRQHQHUJL]HWKHDSSOLDQFHE\UHSODFLQJUHIULJHUDWRUFLUFXLW
IXVHRUWXUQLQJRQFLUFXLWEUHDNHULQWKH'&YROWDJHGLVWULEXWLRQSDQHO5HWXUQWKH
FRQWURONQREWRWKH&2/'SRVLWLRQ
Electrical Connection (Cont.)
Installation Instructions

14 49-1000399 Rev. 2
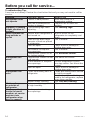
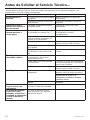
Before you call for service...
Troubleshooting Tips
Save time and money! Review the chart below first and you may not need to call for
service.
Problem Possible Causes What To Do
Refrigerator does
not operate
Control in OFF position. Move the control to a
temperature setting.
7KHIXVHLVEORZQFLUFXLW
breaker is tripped.
Replace fuse or reset the
breaker.
Vibration or rattling
(slight vibration is
normal)
Front leveling legs need
adjusting.
See Leveling Legs.
Motor operates for
long periods or
cycles
Normal when refrigerator is
first turned on.
Wait 24 hours for the
refrigerator to completely cool
down.
Often occurs when large
amounts of food are placed
in refrigerator.
This is normal.
'RRUOHIWRSHQ Check to see if package is
holding door open.
Hot weather or frequent
door openings.
This is normal.
Temperature control set at
the coldest setting.
See About the control.
Refrigerator too
warm
Temperature control not set
cold enough.
See About the control.
Warm weather or frequent
door openings.
Set the temperature control
one step colder. See About the
control.
'RRUOHIWRSHQ Check to see if package is
holding door open.
Refrigerator has
odor
Foods transmitting odor to
refrigerator.
Foods with strong odors should
be tightly wrapped.
.HHSDQRSHQER[RIEDNLQJ
VRGDLQWKHUHIULJHUDWRUUHSODFH
every three months.
Interior needs cleaning. See Care and cleaning.
Moisture forms
on outside of
refrigerator
Not unusual during periods
of high humidity.
Wipe surface dry.
Moisture collects
inside (in humid
weather, air carries
moisture into
refrigerator when
door is opened)
Too frequent or too long
door openings

49-1000399 Rev. 2
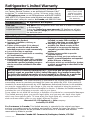
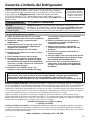
Refrigerator Limited Warranty
For US Customers, all limited warranty service provided by
RXU)DFWRU\6HUYLFH&HQWHUVRUDQDXWKRUL]HG&XVWRPHU&DUH
®
technician. To schedule service, on-line, 24 hours a day, visit us
at GEAppliances.comRUFDOO*($SSOLDQFHVDW*(&$5(6
3OHDVHKDYHVHULDOQXPEHUDQGPRGHOQXPEHU
available when calling for service. In Canada, FDOO
Staple your receipt
here. Proof of the
original purchase
date is needed to
obtain service under
the warranty.
EXCLUSION OF IMPLIED WARRANTIES—Your sole and exclusive remedy is
product repair as provided in this Limited Warranty. Any implied warranties,
including the implied warranties of merchantability or fitness for a particular
purpose, are limited to one year or the shortest period allowed by law.
For US Customers: This limited warranty is extended to the original purchaser and any
VXFFHHGLQJRZQHUIRUSURGXFWVSXUFKDVHGIRUKRPHXVHZLWKLQWKH86$,IWKHSURGXFWLV
ORFDWHGLQDQDUHDZKHUHVHUYLFHE\D*($SSOLDQFHV$XWKRUL]HG6HUYLFHULVQRWDYDLODEOH
you may be responsible for a trip charge or you may be required to bring the product to
DQ$XWKRUL]HG*($SSOLDQFHV6HUYLFHORFDWLRQIRUVHUYLFH,Q$ODVNDWKHOLPLWHGZDUUDQW\
excludes the cost of shipping or service calls to your home.
Some states do not allow the exclusion or limitation of incidental or consequential damages.
This limited warranty gives you specific legal rights, and you may also have other rights
which vary from state to state. To know what your legal rights are, consult your local or
state consumer affairs office or your state’s Attorney General.
Warrantor US: GE Appliances, a Haier company
Louisville, KY 40225
For Customers in Canada: This limited warranty is extended to the original purchaser
and any succeeding owner for products purchased in Canada for home use within Canada.
In-home warrant service will be provided in areas where it is available and deemed
reasonable by Mabe to provide.
Warrantor Canada: MC Commercial, Burlington, Ontario, L7R 5B6
For the Period of: GE Appliances Will Replace
One Year
From the date of the
original purchase
Any part of the refrigerator which fails due to a defect in materials
or workmanship.
'XULQJWKHlimited one-year warranty, GE Appliances will also
provide, free of charge, all labor and related service to replace
the defective part.
What GE Appliances Will Not Cover:
Ŷ 6HUYLFHWULSVWR\RXUKRPHWRWHDFK\RX
how to use the product.
Ŷ ,PSURSHULQVWDOODWLRQGHOLYHU\RU
maintenance.
Ŷ )DLOXUHRIWKHSURGXFWLILWLVDEXVHG
misused, or used for other than the
intended purpose or used commercially.
Ŷ /RVVRIIRRGGXHWRVSRLODJH
Ŷ 5HSODFHPHQWRIKRXVHIXVHVRUUHVHWWLQJ
of circuit breakers.
Ŷ 'DPDJHFDXVHGDIWHUGHOLYHU\
Ŷ 5HSODFHPHQWRIWKHZDWHUILOWHUFDUWULGJH
if included, due to water pressure that is
outside the specified operating range or
due to excessive sediment in the water
supply.
Ŷ 5HSODFHPHQWRIWKHOLJKWEXOEVLI
included, or water filter cartridge, if
included, other than as noted above.
Ŷ 'DPDJHWRWKHSURGXFWFDXVHGE\
accident, fire, floods or acts of God.
Ŷ ,QFLGHQWDORUFRQVHTXHQWLDOGDPDJH
caused by possible defects with this
appliance.
Ŷ3URGXFWQRWDFFHVVLEOHWRSURYLGH
required service.
Ŷ'DPDJHWRILQLVKVXFKDVVXUIDFHUXVW
tarnish, or small blemishes not reported
within 48 hours of delivery.
Ŷ3URGXFWVZKLFKDUHQRWGHIHFWLYHEURNHQ
or which are working as described in the
owner’s manual.

16 49-1000399 Rev. 2
Consumer Support
GE Appliances Website
Have a question or need assistance with your appliance? Try the GE Appliances Website 24 hours a day, any
day of the year! You can also shop for more great GE Appliances products and take advantage of all our on-line
VXSSRUWVHUYLFHVGHVLJQHGIRU\RXUFRQYHQLHQFH,QWKH86GEAppliances.com In Canada: GEAppliances.ca
Register Your Appliance
Register your new appliance on-line at your convenience! Timely product registration will allow for enhanced
communication and prompt service under the terms of your warranty, should the need arise. You may also mail in
the pre-printed registration card included in the packing material.
,QWKH86GEAppliances.com/register
In Canada: Prodsupport.mabe.ca/crm/Products/ProductRegistration.aspx
Schedule Service
Expert GE Appliances repair service is only one step away from your door. Get on-line and schedule your service
DW\RXUFRQYHQLHQFHDQ\GD\RIWKH\HDU,QWKH86GEAppliances.com/service RUFDOOGXULQJ
normal business hours.
In Canada: GEAppliances.ca/en/support/service-requestRUFDOO
Extended Warranties
Purchase a GE Appliances extended warranty and learn about special discounts that are available while your
warranty is still in effect. You can purchase it on-line anytime. GE Appliances Services will still be there after your
ZDUUDQW\H[SLUHV,QWKH86GEAppliances.com/extended-warranty RUFDOOGXULQJQRUPDO
business hours.
In Canada: GEAppliances.ca/en/support/purchase-extended-warrantyRUFDOO
Remote Connectivity
)RUDVVLVWDQFHZLWKZLUHOHVVQHWZRUNFRQQHFWLYLW\IRUPRGHOVZLWKUHPRWHHQDEOH
visit our website at GEAppliances.com/connectRUFDOOLQWKH86RQO\
Parts and Accessories
Individuals qualified to service their own appliances can have parts or accessories sent directly to their homes
9,6$0DVWHU&DUGDQG'LVFRYHUFDUGVDUHDFFHSWHG2UGHURQOLQHWRGD\KRXUVHYHU\GD\
,QWKH86GEApplianceparts.comRUE\SKRQHDWGXULQJQRUPDOEXVLQHVVKRXUV
Instructions contained in this manual cover procedures to be performed by any user. Other servicing
generally should be referred to qualified service personnel. Caution must be exercised, since improper
servicing may cause unsafe operation.
Customers in Canada should consult the yellow pages for the nearest Mabe service center, visit our website at
GEAppliances.ca/en/products/parts-filters-accessoriesRUFDOO
Contact Us
If you are not satisfied with the service you receive from GE Appliances, contact us on our Website with all the
details including your phone number, or write to:
,QWKH86*HQHUDO0DQDJHU&XVWRPHU5HODWLRQV_*($SSOLDQFHV$SSOLDQFH3DUN_/RXLVYLOOH.<
GEAppliances.com/contact
,Q&DQDGD'LUHFWRU&RQVXPHU5HODWLRQV0DEH&DQDGD,QF_6XLWH)DFWRU\/DQH_0RQFWRQ1%(&0
GEAppliances.ca/en/contact-us

49-1000399 Rev. 2 11-19 GEA
Transcrivez les numéros de modèle et
de série ici :
# de modèle ____________________
# de série ______________________
Ils figurent sur l’étiquette qui se
trouve à l’interieur du compartiment
réfrigérateur en haute à droite.
RÉFRIGÉRATEURS
Modèles de GPV10
MANUEL
D’UTILISATION
ET D’INSTALLATION
MESURES DE SÉCURITÉ. . 3
UTILISATION DE
L’APPAREIL
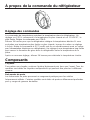
Réglage des commandes ....5
Composants du réfrigérateur . . 5
ENTRETIEN ET
NETTOYAGE ............6
INSTRUCTIONS
D’INSTALLATION .......8
CONSEILS DE
DÉPANNAGE .......... 14
GARANTIE LIMITÉE .....15
SOUTIEN AU
CONSOMMATEUR .......16
GE est une marque déposée de General Electric Company. Fabriqué sous licence de marque.
FRANÇAIS

2 49-1000399 Rev. 2
NOUS VOUS REMERCIONS D’ACCUEILLIR GE
APPLIANCES CHEZ VOUS.
Que vous ayez grandi avec GE Appliances ou qu’il s’agisse de votre première
acquisition, nous sommes heureux de vous accueillir dans notre famille.
Nous sommes fiers du savoir-faire, de l’innovation et de l’esthétique qui
composent chaque appareil GE Appliances, et nous pensons que vous le
serez aussi. Dans cette optique, nous vous rappelons que l’enregistrement
de votre électroménager vous assure la communication de renseignements
importants sur le produit et la garantie lorsque vous en avez besoin.
Enregistrez votre électroménager GE en ligne dès maintenant. Des sites
Web et des numéros de téléphone utiles figurent dans la section Soutien au
consommateur de ce manuel d’utilisation.
Vous pouvez aussi poster la fiche de garantie pré-imprimée incluse dans
l’emballage.

49-1000399 Rev. 2 3
INSTRUCTIONS IMPORTANTES DE SÉCURITÉ. LISEZ TOUTES
LES INSTRUCTIONS AVANT D’UTILISER VOTRE RÉFRIGÉRATEUR.
ATTENTION
Pour réduire le risque de blessures lorsque vous utilisez votre
réfrigérateur, veuillez suivre ces consignes de sécurité.
Ŷ 1HQHWWR\H]SDVOHVWDEOHWWHVRXOHVFRXYHUFOHVHQYHUUHDYHFGHO¶HDXWLqGHTXDQG
ceux-ci sont froids. Les tablettes et couvercles en verre peuvent se casser s’ils sont
exposés à des changements soudains de température ou si vous les cognez ou les
faites tomber. Le verre trempé est conçu pour se briser en petits morceaux en cas de
casse
Ŷ eORLJQH]OHVGRLJWVGHVSDUWLHVGXFRQJpODWHXURO¶RQSHXWIDFLOHPHQWVHSLQFHU
les espaces entre les portes, et entre les portes et les placards sont toujours étroits.
Soyez prudent lorsque vous fermez les portes en présence d’enfants.
Ŷ 1HWRXFKH]SDVOHVVXUIDFHVIURLGHVGXFRQJpODWHXUORUVTXHYRXVDYH]OHVPDLQV
humides ou mouillées. La peau risque d’adhérer à ces surfaces extrêmement froides.
Ŷ 1HUHFRQJHOH]SDVOHVDOLPHQWVVXUJHOpVTXLRQWFRPSOqWHPHQWGpJHOp
AVERTISSEMENT
Pour réduire le risque d’incendie, d’explosion, de choc électrique
ou de blessures lorsque vous utilisez votre réfrigérateur, veuillez
VXLYUHFHVFRQVLJQHVGHVpFXULWp
Ŷ &HUpIULJpUDWHXUGRLWrWUHFRUUHFWHPHQWLQVWDOOpFRQIRUPpPHQWDX[LQVWUXFWLRQV
d’installation avant toute utilisation.
Ŷ
Débranchez la source d’alimentation électrique principale du réfrigérateur derrière
l’appareil, retirez le fusible du circuit du réfrigérateur ou déclenchez le disjoncteur avant
G¶HႇHFWXHUGHVUpSDUDWLRQVRXOHQHWWR\DJH
Remarque : L’alimentation du réfrigérateur ne peut être déconnectée par aucune des
fonctions sur le panneau de commande.
Remarque : /HVUpSDUDWLRQVGRLYHQWrWUHHႇHFWXpHVSDUXQSURIHVVLRQQHOTXDOL¿p
Ŷ 5HPHWWH]WRXWHVOHVSLqFHVHWSDQQHDX[HQSODFHDYDQWG¶XWLOLVHUO¶DSSDUHLO
Ŷ $EVWHQH]YRXVG¶HQWUHSRVHURXG¶XWLOLVHUGHO¶HVVHQFHRXG¶DXWUHVYDSHXUVHWOLTXLGHV
LQÀDPPDEOHVDX[DOHQWRXUVGHFHWpOHFWURPpQDJHURXG¶DXWUHVDSSDUHLOV
Ŷ 1¶HQWUHSRVH]SDVGDQVFHWpOHFWURPpQDJHUGHVVXEVWDQFHVH[SORVLYHVWHOOHVTXHGHV
bombes aérosols qui contiennent un gaz propulseur.
Ŷ 1¶XWLOLVH]SDVXQFRUGRQGHUDOORQJH8WLOLVH]VHXOHPHQWGHV¿OVG¶DOLPHQWDWLRQGHSOHLQH
longueur et branchés directement entre une source de tension continue ou du panneau
de distribution vers le réfrigérateur.
Ŷ $¿QGHSUpYHQLUOHVULVTXHVG¶DVSK\[LHHWG¶HQIHUPHPHQWGHVHQIDQWVHQOHYH]OHVSRUWHV
des compartiments réfrigérateur et congélateur avant de mettre le réfrigérateur au rebut
ou d’en cesser l’usage.
Ŷ $¿QGHSUpYHQLUOHVDFFLGHQWVJUDYHVRXODPRUWOHVHQIDQWVQHGRLYHQWSDVVHWHQLUQL
jouer dans ou sur l’électroménager.
Ŷ /HVHQIDQWVHWOHVSHUVRQQHVGRQWOHVFDSDFLWpVVRQWUpGXLWHVVXUOHSODQSK\VLTXH
sensoriel ou mental, ou qui manquent d’expérience ou de connaissances, peuvent utiliser
cet électroménager seulement si elles sont surveillées ou ont reçues des consignes de
sécurité sur son usage et les risques y sont associés.
Ŷ &HWpOHFWURPpQDJHUHVWFRQoXSRXUXQHXWLOLVDWLRQGRPHVWLTXHHWDSSOLFDWLRQVVLPLODLUHV
VDOOHGXSHUVRQQHOGDQVXQHXVLQHXQEXUHDXRXG¶DXWUHVOLHX[GHWUDYDLOPDLVRQGH
IHUPHFOLHQWVGDQVXQK{WHOXQPRWHOXQJvWHWRXULVWLTXHHWG¶DXWUHVOLHX[UpVLGHQWLHOV
approvisionnement et applications similaires non reliées au commerce de détail.
Ŷ 1¶DSSOLTXH]SDVGHQHWWR\DQWVFRUURVLIVVXUOHUpIULJpUDWHXU&HUWDLQVQHWWR\DQWV
endommagent le plastique et peuvent ainsi causer le détachement inopiné de pièces
telles que porte ou poignées de porte. Voyez la section Entretien et nettoyage pour
des instructions détaillées.
3
LISEZ ET CONSERVEZ CES INSTRUCTIONS

4 49-1000399 Rev. 2
BRANCHEMENTS ÉLECTRIQUES
AVERTISSEMENT
RISQUE DE SUFFOQUER OU D’Y ÊTRE EMPRISONNÉ
/HQRQUHVSHFWGHFHVLQVWUXFWLRQVG¶pOLPLQDWLRQSHXWHQWUDvQHUODPRUWRXGHVEOHVVXUHVJUDYHV
IMPORTANT: Les enfants pris au piège ou
morts d’asphyxie sont toujours d’actualité.
Les réfrigérateurs et congélateurs
abandonnés sont toujours aussi dangereux,
même si on n’attend que «quelques
jours» pour s’en débarrasser. Si vous ne
gardez pas votre ancien réfrigérateur ou
congélateur, veuillez suivre les directives
ci-dessous afin de prévenir les accidents.
Avant de vous débarrasser de votre ancien
DSSDUHLO
Ŷ'pPRQWH]OHVSRUWHVGXFRPSDUWLPHQW
de réfrigération et du compartiment de
congélation.
Ŷ/DLVVH]OHVFOD\HWWHVHQSODFHDILQ
d’empêcher les enfants de grimper à
l’intérieur.
Mise au rebut des produits réfrigérants et en mousse :
Mettez l’électroménager au rebut conformément à la réglementation fédérale et locale.
Le inflammable matériel isolant utilisés nécessitent des procédures de mise au rebut
VSpFLDOHV&RPPXQLTXH]DYHFOHVDXWRULWpVORFDOHVSRXUFRQQDvWUHODIDoRQGHPHWWUH
votre électroménager au rebut qui soit respectueuse de l’environnement.
MISE AU REBUT APPROPRIÉE DE VOTRE ANCIEN RÉFRIGÉRATEUR
INSTRUCTIONS IMPORTANTES DE SÉCURITÉ. LISEZ TOUTES
LES INSTRUCTIONS AVANT D’UTILISER VOTRE RÉFRIGÉRATEUR.
AVERTISSEMENT
RISQUE D’EXPLOSION
Conservez les matériaux et vapeurs inflammables tels que l’essence à l’écart de votre
UpIULJpUDWHXU8QHH[SORVLRQXQLQFHQGLHYRLUHODPRUWSRXUUDLWHQUpVXOWHU
LISEZ ET CONSERVEZ CES INSTRUCTIONS
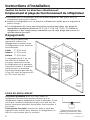
INSTALLATION
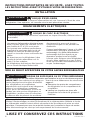
Pour des raisons de sécurité, cet appareil doit être correctement mis à la terre.
8QHVRXUFHG¶DOLPHQWDWLRQpOHFWULTXHDYHF
mise à la terre ayant une intensité 12 VCC
etun fusible de 15 à 20 A sont requis.
Ceci permet une meilleure performance
et prévient la surcharge des circuits de
câblage du véhicule récréatif pouvant
causer un incendie et une surchauffe des
câbles.
Ne branchez pas le réfrigérateur à des
circuits de tension alternative ou à la
sortie CA d’un onduleur.
Le réfrigérateur doit toujours être branché
sur un circuit électrique distinct relié
directement à la source de tension
continue principale ou au panneau de
distribution.
Cessez immédiatement l’usage si le câble
d’alimentation électrique principale est
HQGRPPDJp8QFkEOHG¶DOLPHQWDWLRQ
endommagé doit être réparé par un
réparateur professionnel et qualifié.
Lorsque vous éloignez votre réfrigérateur
du mur, faites attention à ne pas le faire
rouler sur le cordon d’alimentation afin de
ne pas l’endommager.
AVERTISSEMENT
RISQUE DE CHOC ÉLECTRIQUE
La désobéissance à ces instructions représente un risque d’incendie, d’électrocution et
de mortalité.
La page est en cours de chargement...
La page est en cours de chargement...
La page est en cours de chargement...
La page est en cours de chargement...
La page est en cours de chargement...
La page est en cours de chargement...
La page est en cours de chargement...
La page est en cours de chargement...
La page est en cours de chargement...
La page est en cours de chargement...
La page est en cours de chargement...
La page est en cours de chargement...
La page est en cours de chargement...
La page est en cours de chargement...
La page est en cours de chargement...
La page est en cours de chargement...
La page est en cours de chargement...
La page est en cours de chargement...
La page est en cours de chargement...
La page est en cours de chargement...
La page est en cours de chargement...
La page est en cours de chargement...
La page est en cours de chargement...
La page est en cours de chargement...
La page est en cours de chargement...
La page est en cours de chargement...
La page est en cours de chargement...
La page est en cours de chargement...
-
 1
1
-
 2
2
-
 3
3
-
 4
4
-
 5
5
-
 6
6
-
 7
7
-
 8
8
-
 9
9
-
 10
10
-
 11
11
-
 12
12
-
 13
13
-
 14
14
-
 15
15
-
 16
16
-
 17
17
-
 18
18
-
 19
19
-
 20
20
-
 21
21
-
 22
22
-
 23
23
-
 24
24
-
 25
25
-
 26
26
-
 27
27
-
 28
28
-
 29
29
-
 30
30
-
 31
31
-
 32
32
-
 33
33
-
 34
34
-
 35
35
-
 36
36
-
 37
37
-
 38
38
-
 39
39
-
 40
40
-
 41
41
-
 42
42
-
 43
43
-
 44
44
-
 45
45
-
 46
46
-
 47
47
-
 48
48


GE GPV10FSNSB Le manuel du propriétaire
- Taper
- Le manuel du propriétaire
- Ce manuel convient également à
dans d''autres langues
- English: GE GPV10FSNSB Owner's manual
- español: GE GPV10FSNSB El manual del propietario