
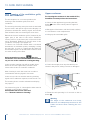
Fridge
User manual
Réfrigérateur
Mode d’emploi
Frigorífico
Manual de usuario

www.fhiaba.com · www.thevettagroup.com · Info Line 1-855-4-FHIABA (1-855-434-4222)
2

www.fhiaba.com · www.thevettagroup.com · Info Line 1-855-4-FHIABA (1-855-434-4222)
3
EN
1
1.1
1.2
1.3
1.4
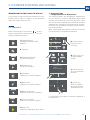
IMPORTANT DIRECTIONS OF SAFETY AND THE ENVIRONMENT
For your safety.................................................................................................................................................................
Important information when using the applance ...............................................................................................
Caring for the environment..........................................................................................................................................
Cleaning, sanitization and maintenance of the ice and/or water dispenser (if present)...........................
4
4
4
5
5
2
2.1
2.2
2.3
2.4
INSTALLATION
Installation.........................................................................................................................................................................
Connection to electrical power supply......................................................................................................................
Connection to the electrical power.............................................................................................................................
Refrigerant........................................................................................................................................................................
6
6
6
6
6
3
3.1
3.2
3.3
3.4-
BEFORE STARTING
Know your Fhiaba...........................................................................................................................................................
Main conmponents.........................................................................................................................................................
Electic Control..................................................................................................................................................................
Main control panel (models 1T, 0T, 0H and 0F)......................................................................................................
7
8
8
10
10
4
4.1
4.2
4.3
APPLIANCE SWITCHING ON AND OFF
Switching on and o......................................................................................................................................................
How to adjust the temperature for dierent requirements................................................................................
Information signals of anomaly on the display......................................................................................................
11
12
13
14
5
5.1
5.2
FUNCTIONS AND SETTINGS
Functions...........................................................................................................................................................................
Settings.............................................................................................................................................................................
15
15
21
6
6.1
INTERNAL LAYOUT
Internal layout (positioning, adjustment, removal)...............................................................................................
27
27
7
7.1
7.2
7.3
ACTIVATION AND USE OF THE ICE MAKER
Activation and use of the Ice Maker..........................................................................................................................
Water Filter (not 0F models)........................................................................................................................................
Water filter for freezer column Ice Maker................................................................................................................
28
28
29
29
8
8.1
LIGHTING
Lighting...............................................................................................................................................................................
30
30
9
9.1
9.2
FOOD PRESERVATION
General directions..........................................................................................................................................................
How to maintain good food quality............................................................................................................................
31
31
31
10
10.1
10.2
10.3
CARE AND CLEANING
Care and Cleaning...........................................................................................................................................................
Cleaning of the ventilation grill and condenser.....................................................................................................
Internal cleaning.............................................................................................................................................................
32
32
32
33
11
11.1
11.2
TROUBLESHOOTING GUIDE
Troubleshooting Guide...................................................................................................................................................
Malfunction messages appearing on the display..................................................................................................
34
34
36
INDEX

www.fhiaba.com · www.thevettagroup.com · Info Line 1-855-4-FHIABA (1-855-434-4222)
4
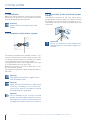
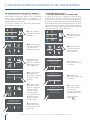
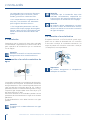
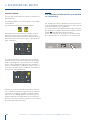
1.1 For your safety
> If this appliance is replacing an existing appliance
which must be removed or disposed of, make sure
that it does not become a dangerous trap for chil-
dren by cutting its power supply cable and render-
ing it impossible to close the door. Use the same
caution at the end of the lifespan of the new appli-
ance.
> This appliance is designed to refrigerate bever-
ages and foods and is intended for domestic use.
> The appliance must be installed by following
the instructions in the Installation Guide, particu-
lar care should be taken not to obstruct the vent
openings of the appliance and of the built-in units.
> The appliance features a concentrated lighting
system with LED lamps. Do not stare into these
lamps when they are on to avoid possible eyesight
damage.
This warning is also contained on the label attached
to the inside of the refrigerator door.
> When the freezer is functioning do not touch the
inner surfaces in stainless steel with wet or damp
hands, since skin may stick to the very cold sur-
faces.
> Do not use any type of electrical equipment inside
of the food conservation compartments.
> When positioning the shelves, do not place fingers
in the shelf slide guides.
> Do not position containers of flammable liquids
near the appliance.
> Completely switch o the appliance and unplug
the power supply cable during cleaning operations.
If the plug is not easily reached, it is a good idea to
turn o the breaker or remove the fuse that con-
trols the socket that the appliance is connected to.
> The packaging parts can be dangerous for chil-
dren: do not allow children to play with the plastic
bags, plastic film or Styrofoam.
> Any repairs must be performed by a qualified Fh-
iaba Service technician.
> This appliance is not intended for use by persons
(including children) with reduced physical, sensory
or lack of experience and knowledge unless they
have been given supervision or instruction con-
cerning use of the appliance by a person responsi-
ble for their safety. Children should be supervised
to ensure that they do not play with the appliance.
> Do not damage the appliance refrigerant circuit
pipes.
> Do not store explosive substances such as aerosol
cans with a flammable propellant in this appliance.
> If the power cord of this appliance is damaged,
it must be replaced by the manufacturer, customer
service or a similarly qualified person. Improper in-
stallations and repairs may put the user at consid-
erable risk.
> Repairs may be performed by the manufacturer,
customer service or a similarly qualified person
only.
> Plug into a grounded 3 prong outlet.
> Do not remove ground prong.
> Do not use an adapter.
> Do not use an extension cord.
> Disconnect power to all units before servicing.
> If the SUPPLY CORD is damaged, it must be repla-
ced by the manufacturer, its service agent or simi-
lar qualified person in order to avoid a hazard.
> Children should be supervised to ensure that they
do not play with the appliance.
1.2 Important information when using
the appliance
> Never use electrical appliances inside the appli-
ance (e.g. heater, electric ice maker, etc.). Explosion
hazard!
> Never defrost or clean the appliance with a
steam cleaner! The steam may penetrate electri-
cal parts and cause a short-circuit. Risk of electric
shock!
> Do not use pointed and sharp-edged implements
to remove frost or layers of ice. You could dam-
age the refrigerant tubes. Leaking refrigerant may
cause eye injuries or ignite.
> Do not store products which contain flammable
propellants (e.g. spray cans) or explosive sub-
stances in the appliance.
Explosion hazard!
> Do not stand on or lean heavily against base of
appliance, drawers or doors, etc.
> Before cleaning the appliance, pull out the power
cord plug or switch o the fuse. Do not pull out the
power cord plug by tugging on the power cord.
> Store high-percentage alcohol tightly closed and
standing up.
> Keep plastic parts and the door seal free of oil
and grease. Otherwise, parts and door seal will
become porous.
> Never cover or block the ventilation openings for
the appliance.
1. IMPORTANT DIRECTIONS FOR SAFETY AND THE ENVIRONMENT

www.fhiaba.com · www.thevettagroup.com · Info Line 1-855-4-FHIABA (1-855-434-4222)
5
EN
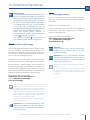
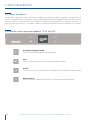
Symbols used in the Guide:
Note
Recommendations for correct use of the
appliance
Important
Directions for avoiding appliance damage
Warning
Indications for avoiding injury to people
1.3 Caring for the environment
> Pay special attention to correct disposal proce-
dure for all the packaging materials.
> The appliance must not be disposed of with urban
waste. Contact local waste disposal centres for on
how to dispose of recyclable waste.
> Prior to disposal, cut the power supply cord and
make it impossible to close the door.
> During disposal, avoid damage to the refrigera-
tion circuit.
> The appliance does not contain hazardous sub-
stances for the atmospheric ozone layer, neither in
the refrigeration circuit nor in the insulation.
1.4 Cleaning, sanitization and mainte-
nance of the ice and/or water dispens-
er (if present)
Failure to follow the instructions regarding sanitiz-
ing can compromise the hygienic safety of the wa-
ter dispensed.
> When using the appliance for the first time and
every time the filter is changed, it is recommended
to let the water flow in the circuit using the “Manual
Cleaning” and discard the ice produced in the first
24 hours.
> If the water dispenser has not been used for more
than 4/5 days, it is advisable to clean the circuit and
run o the first litre of water.
> Reposition the removable water dispenser (if pre-
sent), ensuring your hands are hygienically clean.
> Clean the ice bucket or drawer regularly but using
only drinking water.
> The filter must be changed when indicated on the
control panel or when the ice/water dispenser has
not been used for more than 30 days.
> With each filter replacement, sanitise the ice and/
or water distribution system using a food grade
disinfectant (with sodium hypochlorite), which does
not alter the characteristics of the materials. Rinse
with at least 2 litres of water before use.
> Only original spare parts supplied by the manu-
facturer should be used when replacing compo-
nents in the ice and water dispenser.
> Any work on the appliance must be carried out
by a qualified technician or the After-sales Service.
Warning
To avoid contamination of food, please
respect the following instructions:
> Opening the door for long periods can
cause a significant increase of the tempe-
rature in the compartments of the applian-
ce.
> Clean regularly surfaces that can come in
contact with food and accessible drainage
systems.
> Clean water tanks if they have not been
used for 48 h; flush the water system con-
nected to a water supply if water has not
been drawn for 5 days.
> Store raw meat and fish in suitable con-
tainers in the refrigerator, so that it is not in
contact with or drip onto other food.
>Two-star frozen-food compartments are
suitable for storing pre-frozen food, storing
or making icecream and making ice cubes.
> One-, two- and three-star compartments
are not suitable for the freezing of fresh
food.
> If the refrigerating appliance is left empty
for long periods, switch o, defrost, clean,
dry, and leave the door open to prevent
mould developing within the appliance.
EN

www.fhiaba.com · www.thevettagroup.com · Info Line 1-855-4-FHIABA (1-855-434-4222)
6
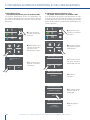
2. INSTALLATION
2.3 Connection to the electrical power
supply
The appliance operates at 115 V AC, 60 Hz and is
equipped with a power supply cord with a 3-prong
grounded plug, which must be connected to a cor-
responding 3-prong (15 Amp) grounding-type wall
receptacle.
Important
Do not use extension cords and/or mul-
tiple adapters for the power supply con-
nection.
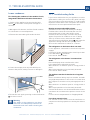
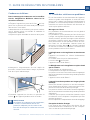
2.1 Installation
Make sure that installation is performed correctly,
adhering to all directions in the specific installation
manual provided with the appliance.
Warning
Always connect the water before the
power.
2.2 Connection to the water system
The models provided with Ice Maker require a con-
nection to the domestic water supply system. This
can be executed through the 1/4” water line (copper
or polyethylene)to the house water supply.
The system pressure must be between from 8 psi
to 75 psi (between 0.5 bar and 5 bar).
Dierent pressures can cause malfunctions or le-
aks in the water system.
The appliance should be supplied only with drinka-
ble water.
Warning
The appliance should be supplied only
with drinkable water.
Warning
Make sure that installation is performed
correctly, according to all of the direc-
tions in the specific installation manual
provided with the appliance.
Warning
Do not attempt to use a locally sourced
garden hose threaded adapter or braid-
ed supply line. It will strip the threads on
the appliance water connection solenoid.

www.fhiaba.com · www.thevettagroup.com · Info Line 1-855-4-FHIABA (1-855-434-4222)
7
XS8990TST6IU
FP36BI-RS
F20200101000006
4.5 oz MODEL
CODE
SER.NO./N° SERIE
3186660
ETL LISTED
CONFORMS TO
ANSI/UL STD 250
CERTIFIED TO CAN/CSA
STD C22.2 NO.63
4.2 oz
4.8 A
115 V
60 Hz
R134a
Fridge Gas Fill Charge
Quantité de Gaz Réfrigerateur
Freezer Gas Fill Charge
Quantité de Gaz Congélateur
Total Absorbed Current
Courant Absorbée Totale
Voltage
Tension
Frequency
Frequence
Refrigerant Gas Type
Type de Gaz Rèfrigerant
Defrost Heater
Chauage de Dégivrage
Made in Italy
213 W
EN
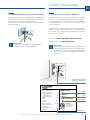
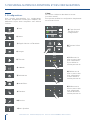
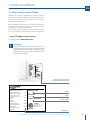
3. BEFORE STARTING
Position of the serial number inside the
compartment.
Model .
Code .
Features .
Serial Number .
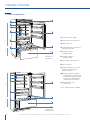
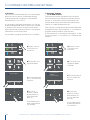
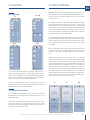
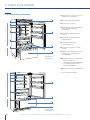
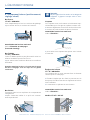
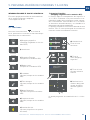
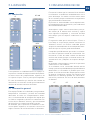
3.1 Know your Fhiaba
Congratulations for having purchased your new
Fhiaba: from now on you can use our innovative con-
servation system, which will allow you to keep all of
your food in the best way possible.
This manual will answer most of your questions
about the product’s features. Should you require fur-
ther information, please check our website
> call us: 1-855-4-FHIABA (1-855-434-4222)
> our website www.fhiaba.com
Important
Before calling, write down the model type
and serial number which are available on
the warranty certificate and on the rating
plate, and any messages which may have
appeared on the display.

www.fhiaba.com · www.thevettagroup.com · Info Line 1-855-4-FHIABA (1-855-434-4222)
8
Models 1T
/Country
Models 0T
/ Brilliance
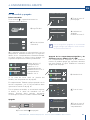
1) Stainless steel body.
2) Interactive control panel.
3) Water filter (*).
4) Patented shelf positioning
system (Even Lift).
5) Drawers fresco
compartment.
6) Drawers fridge
compartment.
7) Ice maker countainer (*).
8) Door shelves.
9) LED illuminations for the
freezer compartment
bottom drawer.
10) Freezer bottom drawer
compartment convertible
into Fridge compartment
or Fresco compartment
(TriMode functionality).
11) Removable Grill
(capacitor).
(*) on models with Ice Maker.
3.2 Main components
3. BEFORE STARTING
FridgeTriMode Fresco
FridgeTriMode
1
9
2
3
4
5
1
4
7
6
7
8
11
11
10
2
3
9
8
10

www.fhiaba.com · www.thevettagroup.com · Info Line 1-855-4-FHIABA (1-855-434-4222)
9
EN
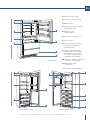
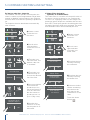
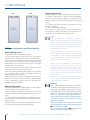
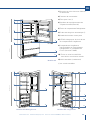
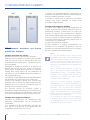
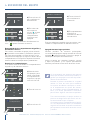
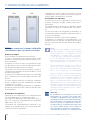
Models0FR Fridge Models 0FZ Freezer
Models 0H
1) Stainless steel body.
2) Interactive control panel.
3) Water filter (*).
4) Patented shelf positioning
system (Even Lift).
5) Drawers fridge
compartment.
6) Ice maker countainer (*).
7) Door shelves.
8) LED illuminations for the
freezer compartment
bottom drawer.
9) Freezer bottom drawer
compartment convertible
into Fridge compartment
or Fresco compartment
(TriMode functionality).
10) Stainless stell drawers AISI
304 satin scotch brite.
11) Removable Grill
(capacitor).
(*) on models with Ice Maker.
FrigoTriModeFrigo
Freezer
1
8
2
4
5
6
1
4
5
7
9
11
11
11
2
7
1
2
7
4
10
6

www.fhiaba.com · www.thevettagroup.com · Info Line 1-855-4-FHIABA (1-855-434-4222)
10
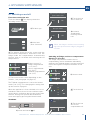
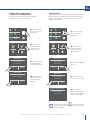
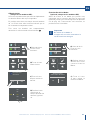
3.4 Main control panel (models 1T, 0T, 0H and 0F).
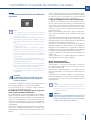
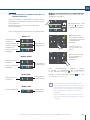
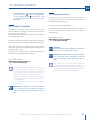
3.3 Eletronic Control
The innovative electronic control system designed by Fhiaba maintains constant temperature on the
three compartments and visualizes it on the control panel display. It also allows user interaction mak-
ing it possible to personalize settings of the various functions and to receive sound and/or visual mes-
sages should any malfunction occur in the appliance.
Turning On/ Turning Off:
Touch the icon for turning on or off the unit.
Home
Touch the icon home for going back to the main display screen.
Allarm
Touch the icon to view the allarm tone functions and to deactivate them.
Back
Touch the arrow icon for going back to the previous display screen.
3. BEFORE STARTING

www.fhiaba.com · www.thevettagroup.com · Info Line 1-855-4-FHIABA (1-855-434-4222)
11
5
°C
+
Settings
Functions
0
°C
+
°C
18
-
5
°C
+
Settings
Functions
0
°C
+
°C
18
-
Settings
Functions
Initial test …
Are you sure you want to
power o this unit?
Yes No
Are you sure?
On O
Turn Compartment
OFF?
Yes No
+ 2 °C
+ 4
+ 3
0
+ 1
OK
OFF
EN
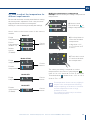
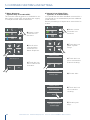
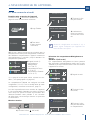
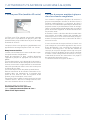
4.1 Switching on and o
First time starting the unit
Touch the button
. The display shows the
following launch screens:
4. APPLIANCE SWITCHING ON
Switching off Fridge and fresco compartment.
(Models 1T, OT e OH )
The fridge compartment and the fresco
compartment, can be shutdown individually
whereas the TriMode drawer can't be turned off
unless through the complete shutdown of the
unit
(*) The home screen varies depending on the
models ; (see paragraph 4.2 page 13).
The TriMode compartment is set in the freezer
mode [-18° (0°F)]. For changing this setting look
up the function 5 page 21.
When the appliance is first switched on is recco-
mended to wait at least 12 hours without open-
ing the doors and before placing any food inside
the unit.During such period deactivated any
error message by pressing the Alarm button.
4) Home screen (*).
- fridge compartment
+4°C (39°F)
- fresco compartment
0°C (32°F)
- TriMode compartment
-18° (0°F)
When the fridge is o there are no warning
signs that prove that the fridge is plugged to
a socket.
1) Home screen.
2) Touch the icon
Yes to swich on
3) Conferm
shutdown by
touching the On
icon.
1) Fhiaba Logo.
2) Initial test
(lasts 3 minuts).
3) The display shows the main screen with the
envirorment temperature measured from the
fridge inside the compartments. Automatically
the unit start to cool down until reaching the set
temperatures.
2) Touch the icon
off.
Shutdown.
3) Touch the icon
Yes to turn
compartment off.
1) touch the bottom off.

www.fhiaba.com · www.thevettagroup.com · Info Line 1-855-4-FHIABA (1-855-434-4222)
12
+ 2 °C
+ 4
+ 3
0
+ 1
OK
OFF
Are you sure?
Yes No
Are you sure?
Yes No
Turn compartment
ON?
Yes No
Settings
Fuctions
0
°C
+
°C
18
-
o
Settings
Fuctions
0
°C
+
°C
18
-
o
5
°C
+
Settings
Functions
0
°C
+
°C
18
-
Turn back on the compartments.
In the case you wish to turn on again the fridge
and fresco compartments.
For turning off the fresco compartment
follow the same sequence.
Turning on the fridge and fresco compartment
again.
For turning on the unit again press the button,
the display will turn on; the starting screen and
the home screen, with the temperature measu-
red from the fridge inside the compartments,
will appear again. The fridge will start cooling
off until reaching the set temperatures.
1) Home screen.
For example, for
turning back on
the fridge
compartment,
touch the icon off.
5) On the screen
home appears the
icon off, which
indicates that the
fridge
compartment is
off.
2) Touch the icon
on.
4) Touch the icon
Yes for confirming
the disactivation.
Switching off for long periods
During long absence periods it is recommended
to switch off the refrigerator by pressing the
Unit button
for three seconds and disconnect-
ing the electrical plug or the breaker controlling
the socket.
Completely empty the refrigerator, clean and
dry it and leave the doors and drawers partially
open to prevent unpleasant odors.
5) Now the fridge
compartment will
turn back on. The
home screen will
appear again.
4) Touch the yes
icon to confirm
activation.
Follow the same procedure for turning back on
the fresco compartment.
If at the first startup the Standby message
does not appear, but another message ap-
pears, it means that the appliance has al-
ready started the cooling process.
During the first startup, it will not be possi-
ble to use the Menu to modify the factory set-
tings until the preset temperature has been
reached. During the first startup, it will not be
possible to use the Menu to modify the fac-
tory settings until the preset temperature has
been reached.
Each time the appliance is switched on it goes
through a self-diagnosis procedure lasting
three minutes before completely starting up.
If only the refrigerator compartment or the
Fresco compartment is switched o, the spe-
cific fan will continue to operate to prevent the
formation of unpleasant odours and mould.
3) Touch the icon
yes.
4. APPLIANCE SWITCHING ON

www.fhiaba.com · www.thevettagroup.com · Info Line 1-855-4-FHIABA (1-855-434-4222)
13
5
°C
+
0
°C
+
°C
18
-
5
°C
+
°C
18
-
+ 2 °C
+ 4
+ 3
0
+ 1
OK
OFF
+ 2 °C
+ 4
+ 3
0
+ 1
OK
OFF
5
°C
+
Settings
Functions
0
°C
+
°C
18
-
EN
5
°C
+
°C
18
-
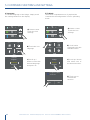
4.2 How to adjust the temperature for
dierent requirements.
Each model has been carefully tested before leaving
the factory and is adjusted in such a way to ensure
high performance and low consumption.
Usually, it is not necessary to modify the settings.
Fridge
Compartment
Drawer
freezer
(TriMode)
Preset
temperatures
Model 1T
How it looks to the home screen in the various
models:
Fresco
Compartment
(models 1T)
Fridge
compartment
Freezer
compartment
Freezer
compartment
(TriMode)
Preset
temperatures
Preset
temperature
Preset
temperature
Model 0T/0H
Model 0FR
Model 0FZ
Fridge
Compartment
3) Touch the icon ok
to confirm the desi-
der temperature.
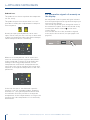
Modify the temperatures compartment
Example: How to modify the Fridge compartment
temperature.
1) Home screen.
Touch the icon
of
fridge compartement.
2) Scoll up/down to
select the desided
temperature
fridge from +1°C
to +7°C (from 34°F
to 46°F)
The temperature shown can vary slightly in
respect to the set temperature following
frequent openings of the doors or insertion
of room temperature foods or large
quantities of foods.
6 to 12 hours are necessary to reach the
selected temperature.
The same procedure is required to set the
temperature in the Fresco compartment
from-2°C to +2°C (from 28°F to 36°F) and in the
Trimode bottom
drawer from -13°C to -23°C
(from 9°F to -11°F).

www.fhiaba.com · www.thevettagroup.com · Info Line 1-855-4-FHIABA (1-855-434-4222)
14
+ 2 °C
+ 4
+ 3
0
+ 1
OK
OFF
+ 2 °C
+ 4
+ 3
0
+ 1
OK
OFF
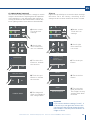
Padlock icon.
The padlock icon shows up when the temperatu-
res are set up.
The padlock open/close shows that is or isn't
possible to modify the compartment's tempera-
tures anymore.
Usually an open yellow padlock can be seen
open; in that case you can scroll up or down with
a finger on the display, select the desired tempe-
rature and press OK for confirming.
Whereas a closed padlock can be seen if the
user has activated some functions (described
in the paragraph 5.1 page 15) that modify the
settings of the Frigo Compartment, Fresco
Compartment and Freezer Compartment the-
refore the user in that situation will not be able
anymore to change the temperature of the com-
partments.
If the icon function is touched and a specific
function is set (for example holiday, shopping
trimode, ect...), the yellow padlock will be seen
closed and it won't be possible to change the
temperature of the compartments as long as the
function won't be completed or if it is manually
deactivated.
4.3 Information signals of anomaly on
the display.
An integrated control system will give informa-
tion through bright texual signals messages you
can see on the display.
The voiced signal that goes along with some of
the anomalies signals and can be turned off by
touching the button allarm on the main
control panel.
You can find the list of the anomalies signals
at the end of this manual. (see paragraph 12.2
page 36).
4. APPLIANCE SWITCHING ON

www.fhiaba.com · www.thevettagroup.com · Info Line 1-855-4-FHIABA (1-855-434-4222)
15
Shopping Mode
Fridge
(up to 24 hours)
On O
5
°C
+
Settings
Functions
0
°C
+
°C
18
-
Vacation Mode
Shopping Mode:
Fridge
Rapid Bottle Cooler
Shopping Mode:
Trimode
Rapid Bottle Cooler
Shopping Mode:
Trimode
Vacation Mode
Shopping Mode:
Fridge
9hour
11
10
7
8
OK
Ice Maker
Water Dispenser
Water Filter
Light 12h
Water System
Purge
EN
It is possible to program in advance between 1
and 24 hours.
5. CUSTOMIZE FUNCTIONS AND SETTINGS.
INFORMATION FOR THE USE OF THE DISPLAY.
5.1 Functions.
It is possible to personalize the operation of your
Fhiaba unit in order to adapt it to the different
ways you might want to use it.
After touching the icon Function on the
home screen will be shown the icon of the fol-
lowing available functions.
1) Shopping Fridge
(Shopping freezer in 0FZ models).
The function lowers the refrigerator temperature
to +2°C (36°F) for 12 hours, permitting more rapid
cooling of food that has just been placed in. Once
the 12 hours have expired, the function deactivates
automatically, returning to the previously set tem-
perature. It is possible to program a timed activa-
tion of the function.
After a prolonged interruption of electrical current,
it is necessary to reactivate the function.
1) Shopping frigo
(Shopping freezer in 0FZ
models)
2) Vacation.
3) Shopping Trimode.
(no in 0FR models).
4) Bottle Cooler.
(no in 0FR models).
5) Ice Maker.
(optional, no in 0FR models).
6) Water filter
(optional, no in 0FR models).
7) Water Dispenser
(optional ,only in 0FR models ).
C) Touch the icon
On to activate the
function.
B) Touch the icon
Shopping Mode
Fridge.
D) Scroll up /
down to setting
the desired time
and then pres ok.
A) Home screen.
Touch the icon
functions.
8) Circuit cleaning
(optional, no in 0FR models).
9) Light 12h.
(optional, fridge with glass door).
EN

www.fhiaba.com · www.thevettagroup.com · Info Line 1-855-4-FHIABA (1-855-434-4222)
16
9day
11
10
7
8
OK
Vacation Mode
Shopping Mode:
Fridge
Rapid Bottle Cooler
Shopping Mode:
Trimode
Vacation Mode
Shopping Mode:
Fridge
Rapid Bottle Cooler
Shopping Mode:
Trimode
5
°C
+
Settings
Functions
0
°C
+
°C
18
-
5
°C
+
Settings
Functions
0
°C
+
°C
18
-
9hour
11
10
7
8
OK
Vacation Mode
On O
Shopping Mode
TriMode
(up to 24 hours)
On O
3) Shopping TriMode
(no in 0FR models).
This function must be activated at least 24 hours
before inserting room temperature items into the
freezer, or several hours before placing into the
freezer previously frozen items which have been
subject to a slight temperature rise.
This function is automatically deactivated when the
programmed time period expires. It is possible o
program timed activation of the function.
If interrupted by a prolonged interruption of the
electrical power, it is necessary to reactivate the
function.
2) Vacation
This function (recommended in case of prolonged
absences since it allows considerable energy
savings) brings the refrigerator compartment
temperature to +14°C (57°F)
It is possible to program the duration, or it can be
manually deactivated upon re-entry after a period
of absence. This function remains active even if
during the period of absence there is a prolonged
interruption of electrical power.
It is possible to program a period from 1 to 90 days.
C) Touch the button
On to activate the
function.
B) Touch the icon
Shopping Mode
TriMode.
D) Scroll up /
down to set the
desired time (in
hours) and then
pres ok.
It is possible to pro-
gram a period from
1 to 24 hours.
C) Touch the button
On to activate the
function.
B) Touch the icon
Vacation Mode.
D) Scroll up /
down to set the
desired time (in
days) and then
pres ok.
It is possible to pro-
gram a period from
1 to 90 days.
A) Home screen.
Touch the icon
functions.
A) Home screen.
Touch the icon
functions.
5. CUSTOMIZE FUNCTIONS AND SETTINGS.

www.fhiaba.com · www.thevettagroup.com · Info Line 1-855-4-FHIABA (1-855-434-4222)
17
Vacation Mode
Shopping Mode:
Fridge
Rapid Bottle Cooler
Shopping Mode:
Trimode
37min
39
38
35
36
OK
5
°C
+
Settings
Functions
0
°C
+
°C
18
-
5
°C
+
Settings
Functions
0
°C
+
°C
18
-
Rapid Bottle Cooler
On O
Ice Maker
On O
Ice Maker
Water Dispender
Water Filter
Water System
Flush
EN
4) Rapid Bottle Cooler
(no in 0FR models).
This function can be activated when it is necessary
to cool o beverages quickly, by placing them inside
the freezer compartment.
It is possible to select a duration of 1 to 45 minutes.
A sound signal will indicated when the optimal tem-
perature has been reached.
After removing the beverages, deactivate the sound
signal by pressing the Alarm button
.
5) Ice Maker activation
(optional, no su modelli 0FR).
A prewash of the water circuit should be per-
formed before activating the Ice Maker for the first
time. After a few minutes the Ice Maker can be
activated. (See section 5.2 page 18). After a few
minutes the Ice Maker can be activated.
Important
Do not activate the Ice Maker unless
the appliance is connected to the water
mains.
C) Touch the button
On to activate the
function.
B) Touch the icon
Rapid Bottle
Cooler.
D) Scroll up /
down to set the
desired time (in
minutes) and then
pres ok.
B) Scroll twice right
and then touch the
icon ice maker.
C) Touch the button
On to activate the
ice maker.
A) Home screen.
Touch the icon
functions.
A) Home screen.
Touch the icon
functions.

www.fhiaba.com · www.thevettagroup.com · Info Line 1-855-4-FHIABA (1-855-434-4222)
18
5
°C
+
Settings
Functions
0
°C
+
°C
18
-
5
°C
+
Settings
Functions
0
°C
+
°C
18
-
Ice Maker On/O
SuperIce
Set Cube Size
Ice Maker On/O
SuperIce
Set Cube Size
Set Cube Size
Medium Large
Activation de le
Glaçons Super?
On O
Enable reminder
countdown timer?
Yes No
Water Filter
Ice Maker
Water Dispender
Water Filter
Water System
Flush
Ice Maker
Water Dispender
Water Filter
Water System
Flush
C) Confirm the fun-
ction by touching
the on button.
Are you sure?
Yes No
Water Filter
Next reminder…
Left 365 days
Water Filter Status
6) Water Filter Activation
(optional, no in 0FR models)
The water filter is essential for the purification of
the water used for making ice, for cleaning the
circuit or for supplying water for the fridge com-
partment (water dispenser available with the mo-
dels OFR). The display permits visualizing the time
left before the filter needs to be replaced. The water
filter Remider have to be activated by the user.
5a) Set Ice cube Size - SuperIce
The IceMaker function permits selecting the size
of the ice cubes, by choosing between Large (base
setting) or Medium, and activation of the SuperIce
function, which increases the quantity of produced
ice.
The SuperIce function deactivates automatically
after 24 hours.
B) Scroll twice
right and then
touch the icon ice
maker.
B) Scroll ones
right and then
touch the icon
water filter.
D) Touch the icon
medium/large to
choose the desired
Set Cube Size.
C) Toch the icon
Set Cube Size. The
default cube size
is "medium".
E) If you would like
to increase the
production of ice,
touch the Superice
icon, this will ena-
ble the freezer to
produce more ice,
up to 1,5kg a day.
A) Home screen.
Touch the icon
functions.
A) Home screen.
Touch the icon
functions.
E) Here are indica-
ted the remaining
days before the
due date for the
substitution of the
filter.
Touch the home
button.
D) Confirm the fun-
ction by touching
the button Yes.
F) Confirm the
function or not by
touching the On or
Off button.
5. CUSTOMIZE FUNCTIONS AND SETTINGS.

www.fhiaba.com · www.thevettagroup.com · Info Line 1-855-4-FHIABA (1-855-434-4222)
19
Ice Maker
Water Dispender
Water Filter
Water System
Flush
Disable reminder?
Yes No
Water Filter
5
°C
+
Settings
Functions
0
°C
+
°C
18
-
Ice Maker
Water Dispender
Water Filter
Water System
Flush
5
°C
+
Settings
Functions
0
°C
+
°C
18
-
Reset reminder
countdown?
Yes No
Water filter
Next reminder…
Left 365 days
Water Filter Status
Next reminder…
Left XXX days
O Reset
Water Filter
Next reminder…
Left XXX days
O Reset
Water Filter
EN
D) Confirm the
function by tou-
ching the Yes
button.
C) Push off to the
activate Water
Filter Reminder.
B) Scroll ones
right and then
touch the icon
water filter.
A) Home screen.
Touch the icon
functions.
Push Home buttom
to go back to the
main screen or push "Yes" to deactivate
filter reminder.
C) Touch the button
reset.
D) Touch the Yes
button to proceed.
E) You will be
shown the full du-
ration of the Water
Filter Cartridge.
A) Home screen.
Touch the icon
functions.
B) Scroll once
right and then
touch the icon
Water filter.
6a) Water Filter Deactivation
(optional, no in 0FR models)
To deactivate an active filter reminder
countdown follow these steps:
6b) Reset Filter
The Reset Filter function sets to zero the time left
before the filter needs to be replaced. It is neces-
sary to set the meter to zero each time the car-
tridge is replaced.

www.fhiaba.com · www.thevettagroup.com · Info Line 1-855-4-FHIABA (1-855-434-4222)
20
Yes No
Manual Clean
5
°C
+
Settings
Functions
0
°C
+
°C
18
-
5
°C
+
Settings
Functions
0
°C
+
°C
18
-
Water Dispenser
OOn
Ice Maker
Water Dispender
Water Filter
Water System
Flush
Ice Maker
Water Dispender
Water Filter
Water System
Flush
Enter
Start Cleaning
Manual Clean
Manual Clean
Please wait...
Cleaning running
Manual Clean
C) Touch the icon
On to confirm the
activation.
7) Water dispenser
(optional only for models 0FR).
The function water dispenser ia available in mo-
dels fridge column OFR and enables the supply
of cold pure water without bacterias.
A) Home screen.
Touch the icon
functions.
B) Scroll twice
right and then
touch the icon
Water dispenser.
C) Touch the icon
yes to activate the
manual cleaning.
B) Touch the icon
Water System
Purge.
E) Touch the icon
ok to start the
cleaning.
F) Cleaning run-
ning...
D) Please wait...
8) Manual Clean, Water Filter
(optional, no in 0FR models)
If ice production has been disabled or unused for a
long period it is recommended to perform a Manual
Clean function.
Before proceeding it is important to turn o the ice
maker.
A) Home screen.
Touch the icon
functions.
5. CUSTOMIZE FUNCTIONS AND SETTINGS.
La page est en cours de chargement...
La page est en cours de chargement...
La page est en cours de chargement...
La page est en cours de chargement...
La page est en cours de chargement...
La page est en cours de chargement...
La page est en cours de chargement...
La page est en cours de chargement...
La page est en cours de chargement...
La page est en cours de chargement...
La page est en cours de chargement...
La page est en cours de chargement...
La page est en cours de chargement...
La page est en cours de chargement...
La page est en cours de chargement...
La page est en cours de chargement...
La page est en cours de chargement...
La page est en cours de chargement...
La page est en cours de chargement...
La page est en cours de chargement...
La page est en cours de chargement...
La page est en cours de chargement...
La page est en cours de chargement...
La page est en cours de chargement...
La page est en cours de chargement...
La page est en cours de chargement...
La page est en cours de chargement...
La page est en cours de chargement...
La page est en cours de chargement...
La page est en cours de chargement...
La page est en cours de chargement...
La page est en cours de chargement...
La page est en cours de chargement...
La page est en cours de chargement...
La page est en cours de chargement...
La page est en cours de chargement...
La page est en cours de chargement...
La page est en cours de chargement...
La page est en cours de chargement...
La page est en cours de chargement...
La page est en cours de chargement...
La page est en cours de chargement...
La page est en cours de chargement...
La page est en cours de chargement...
La page est en cours de chargement...
La page est en cours de chargement...
La page est en cours de chargement...
La page est en cours de chargement...
La page est en cours de chargement...
La page est en cours de chargement...
La page est en cours de chargement...
La page est en cours de chargement...
La page est en cours de chargement...
La page est en cours de chargement...
La page est en cours de chargement...
La page est en cours de chargement...
La page est en cours de chargement...
La page est en cours de chargement...
La page est en cours de chargement...
La page est en cours de chargement...
La page est en cours de chargement...
La page est en cours de chargement...
La page est en cours de chargement...
La page est en cours de chargement...
La page est en cours de chargement...
La page est en cours de chargement...
La page est en cours de chargement...
La page est en cours de chargement...
La page est en cours de chargement...
La page est en cours de chargement...
La page est en cours de chargement...
La page est en cours de chargement...
La page est en cours de chargement...
La page est en cours de chargement...
La page est en cours de chargement...
La page est en cours de chargement...
La page est en cours de chargement...
La page est en cours de chargement...
La page est en cours de chargement...
La page est en cours de chargement...
La page est en cours de chargement...
La page est en cours de chargement...
La page est en cours de chargement...
La page est en cours de chargement...
La page est en cours de chargement...
La page est en cours de chargement...
La page est en cours de chargement...
La page est en cours de chargement...
La page est en cours de chargement...
La page est en cours de chargement...
La page est en cours de chargement...
La page est en cours de chargement...
-
 1
1
-
 2
2
-
 3
3
-
 4
4
-
 5
5
-
 6
6
-
 7
7
-
 8
8
-
 9
9
-
 10
10
-
 11
11
-
 12
12
-
 13
13
-
 14
14
-
 15
15
-
 16
16
-
 17
17
-
 18
18
-
 19
19
-
 20
20
-
 21
21
-
 22
22
-
 23
23
-
 24
24
-
 25
25
-
 26
26
-
 27
27
-
 28
28
-
 29
29
-
 30
30
-
 31
31
-
 32
32
-
 33
33
-
 34
34
-
 35
35
-
 36
36
-
 37
37
-
 38
38
-
 39
39
-
 40
40
-
 41
41
-
 42
42
-
 43
43
-
 44
44
-
 45
45
-
 46
46
-
 47
47
-
 48
48
-
 49
49
-
 50
50
-
 51
51
-
 52
52
-
 53
53
-
 54
54
-
 55
55
-
 56
56
-
 57
57
-
 58
58
-
 59
59
-
 60
60
-
 61
61
-
 62
62
-
 63
63
-
 64
64
-
 65
65
-
 66
66
-
 67
67
-
 68
68
-
 69
69
-
 70
70
-
 71
71
-
 72
72
-
 73
73
-
 74
74
-
 75
75
-
 76
76
-
 77
77
-
 78
78
-
 79
79
-
 80
80
-
 81
81
-
 82
82
-
 83
83
-
 84
84
-
 85
85
-
 86
86
-
 87
87
-
 88
88
-
 89
89
-
 90
90
-
 91
91
-
 92
92
-
 93
93
-
 94
94
-
 95
95
-
 96
96
-
 97
97
-
 98
98
-
 99
99
-
 100
100
-
 101
101
-
 102
102
-
 103
103
-
 104
104
-
 105
105
-
 106
106
-
 107
107
-
 108
108
-
 109
109
-
 110
110
-
 111
111
-
 112
112


dans d''autres langues
- English: Fhiaba BI30B-LO User manual
- español: Fhiaba BI30B-LO Manual de usuario
Documents connexes
-
Fhiaba FI36BDI-RO Manuel utilisateur
-
Fhiaba FM24BWRLGS Manuel utilisateur
-
Fhiaba BI30BI-LO Guide d'installation
-
-
Fhiaba BKI36BI-LS Guide d'installation
-
-
-
Autres documents
-
Bertazzoni REF24FCIPIXR Manuel utilisateur
-
-
Bertazzoni REF24RCPRL Manuel utilisateur
-
Fulgor Milano F7PBM36S1R Guide d'installation
-
Bertazzoni REF24WCPRL Manuel utilisateur
-
Fulgor F7IRC36O1-L Manuel utilisateur
-
-
-
Whirlpool 21379 Mode d'emploi
-
Bertazzoni REF30PIXR Manuel utilisateur