
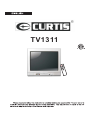
TV1311
POWER
12
3
4
567
8
90
CH+
CH-
V-
MENU
TV
AV
/
MUTE
V+
SCAN
RECALL
DISPLY
PM
SLEEP
CCD
V-CHIP
GAME
CALENDA
R

1
2
3
4
6
8
9
10
12
13
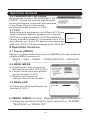
Connecting other external devices
Tune menu
Parental guide (V-CHIP)and CCD
Menu operation
Television installation
CONTENTS
Operation your TV
TROUBLE SHOOTING
SPECIFICATIONS
14
15
5

-1-

wall outlet
-2-

CH- CH+
9
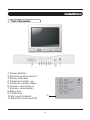
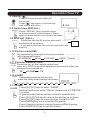
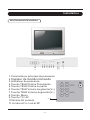
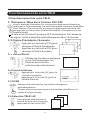
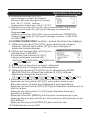
1.Power Buttom
2.Remote control sensor
3.Power indicator
4.Channel number up
5.Channel number down
6.Volume increase(+)
7.Volume decrease(-)
8.Menu key
9.TV/AV key
10.AV input sockets
11.Rear AV in/out and RF
-3-
45678910
11
L
R

key
POWER
1234
5678
90
CH+
CH-
V-
MENU
TV AV
/
MUTE
V+
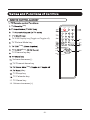
key
TV Picture Mode key
:
key
Volume decrease(-)
TV Game key
-4-
TV Channel up key
SCAN RECALL
DISPLY PM SLEEP
CCD V-CHIP GAME CALENDAR
8
9
12
10
11
17
14
15
16
TV OSD Display key(Toggle on/Toggle off)
key
TV Sleep key
TV Calendar key
18
TV Channel down key
key
17:
18:
Volume increase(+)

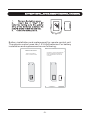
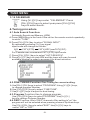
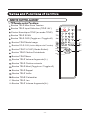
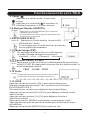
Battery and replacement for remote control unit
The remote control uses two 1.5V AAA batteries.For battery
installation and replacement are as following:
installation
2 Load two 1.5V AAA size batteries
into the compartment,with the +/-
poles of batteries in line with the
+/- marks.
1 Remove the sliding
Cover of remote control
-5-

Operation Your TV
3.Operation Your TV
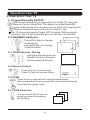
With Power status On,you can also turn off the TV using the
Remote Control Hand Unit.This status is called Stand-By
mode.In this mode,You can also turn on the TV by pressing the
Channel.Up/Down keys on the front of the TV set.
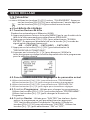
3.1 Power/Stand-By ON/OFF
The TV has an Automatic Power OFF function. With no signal
condition, the TV will automatically turn off after 10 minutes.
3.2 CHANNEL Up/Down
Press[CH+]key to change
Channel Up.
Press[CH-]key to change
Channel Down.
3.3 Direct Access Tuning
Using the numeric keys on
Remote Control,Channels
can be selected directly.
2
3.4 Volume Control
Press [V+] key for Volume Up.
Press [V-] key for Volume Down.
3.5 SCAN
Press this key,channels will change automatically.
Each program will be previewed for 2 seconds,and stop at
the channel original tuned.
3.6 TV/AV Selection
You can select the AV source
which you want by pressing
the [AV]key.
3
AV1
AV2
TV/AV
v-
v+
v-
v+
-6-

Press this key,sound output will
be muted.
Press [ ] key again,or Volume Up,
and sound will return.
3.7 MUTE
( )
3.8 Quick View (RECALL)
Press [ RECALL] key to quick return
to the previously tuned channel. Press
again to come back to the current channel.
Press this key,the AV source status will
be displayed on screen.
if you press this key ,the current menu will exit
directly.
3.9 DISPLAY (CALL)
1
AUTO
10:10
Program N0
3.10 Picture mode(PM)
By repeatedly pressing this key,picture mode
will change as follows:
STANDARD MILD DYNAMIC USER
3.11 Parental Guide(V-CHIP
)
Press this key on the remote control and
enter to V-CHIP mode.With repeatedly pressing this key,the
mode will be changed as:
TV V-CHIP TV
Operation Your TV
"0 10 20 30 40 50 60 70 80 90 100 110 120
3.12 SLEEP
Repeatedly pressing this key will
make the sleep timer change as follows:
-7-
RECALL
PM
3.13 GAME
Press[V+]/[V-] keys to enter
Another method to enter "Game",please see 6.5
SETUP
Function.
In game mode,the box will be moved to specific dot.
Press [CH+]/[CH-] keys to move the box for up or down.
Press[V+]/[V-] keys to move the box for right or left.
Press[MENU]key once to restart the game.
Press it twice or above to select a more difficult game.
Press [DISPLAY] key to exit the Game.
"GAME".
GAME
DISPLAY
V-CHIP
SLEEP

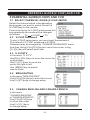
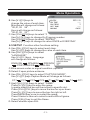
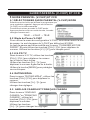
4.Tuning procedure
4.1 Auto Search Function:
Automatic Search and Memory (ASM)
A.Press [MENU]key i repeatedly
to select "TUNE".
B.Press[CH+]/[CH-]key to select "SIGNAL INPUT".
By repeatedly pressing [V+] key,signal
input mode will change as follows:
n the front of the unit or the remote control
AIR CATV(STD) CATV(HRC) CATV(IRC)
For Canada user,recommend CATV(STD) input mode.
C.Press [CH+]/[ ] keys to select "AUTO SEARCH".
D.Press[V+]/[V-] keys to start ASM and the tuner will scan for each
available channel in order to program it for direct selection.
CH-
4.2.FINE TUNING Function:Fine Tuning for current setting.
A.Use[CH+]/[CH-]keys to select "PROGRAM".Using [V+]/[V-] keys,
to change program Number.
B.Use [CH+]/[CH-] keys to select "FINE TUNE".
C.Use[V+]/[V-] keys to adjust for best tuning.
4.4.SKIP Function:Use to"SKIP"channels.After setting to"on",the
program will not be selected when pressing channel Up/down keys.
Use [CH+]/[CH-] keys to select"SKIP".Use[V+]/[V-] keys to
select "ON" or "OFF".
TUNE MENU
4.3.Program Function:Use to change program.
Use [CH+]/[CH-]keys to select"PROGRAM".Use[V+]/[V-]
keys to change Program Number.
-8-
3.14 CALENDAR
Using [V+]/[V-] keys enter "CALENDAR". Press
[CH+]/[CH-] keys to select year.press [CH+],[CH-]
keys to select month.
CALENDAR

PARENTAL GUIDE(V-CHIP) AND CCD
5.1 SELECT PARENTAL GUIDE (V-CHIP) MODE
Select the channel which is broadcasting
the program you want to watch.Press the
[V-CHIP]key on the remote.
Control and enter to V-CHIP mode press this
key repeatedly,the mode will be changed
as follows:
TV V-CHIP TV
V-CHIP Password
5.2
To use V-CHIP setup menu,you must input the password.
The default of V-CHIP password is 410000.
Password may be changed by "CHANGE PASSWORD" menu.
And then Using [CH+]/[CH-]keys to move the cursor. using
[V+]/[V-]keys to select each item.
5.3 U.S.PGTV
In the menu "U.S.TV",
Use[CH+]/[CH-]keys to move the cursor for
up and down.
Use [V+]/[V-]keys to move the
cursor for right or left.
Use [MENU] key to preset
view or block.
MPAA RATING
5.4
In the menu "MPAA RATING",
Use [CH+]/[CH-]keys to move the cursor.
Use [V+]/[V-]keys to change setup.
CANADA ENGLISH AND CANADA FRENCH
5.5
In the menu
"CANADA ENGLISH"
or"CANADA FRENCH",
Use [CH+]/[CH-]keys
to move the cursor.
Use [V+]/[V-] keys
to change setup.
5 PARENTAL GUIDE(V-CHIP) AND CCD
-9-

5.6 CHANGE PASSWORD
Select"CHANGE PASSWORD"menu,
Using digital keys directly to input new
password and confirm.And then it will
automatically return to the V-CHIP menu.
5.7 CCD
Select the program which is broadcasting the CCD
you want to watch,press[CCD]key on the remote
control,"CCD ON"appear on the screen and after
it disappears,the information of CCD will be display
on the screen.By repeatedly pressing [CCD]key,
CCD will be changed between ON and OFF.
CCD ON
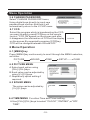
6 Menu Operation
6.1 [MENU]key
Press [MENU]key continuously,to scroll through the MENU selection,
as follow:
PICTURE SOUND TIME SETUP TUNE
6.2 PICTURE MENU
A.Select each option using
[CH+]/[CH-]keys.
B.Each value can be adjusted by
using [V+]/[V-]keys.
C.Repeat any option setting if
required.
6.3 SOUND MENU
The value can be adjusted by
[V+]/[V-]keys.
Menu Operation
6.4 TIME MENU Function:Time and Timer setting.
A.Use [CH+]/[CH-] keys to select "CLOCK","ONTIME",or"OFF
TIME".
-10-

B.Use [V+]/[V-]keys to
change the value of each item.
Minutes will change as follows:
"00,01,02 59".
Hours will change as follows:
"00,01,02 23".
C.Use [CH+]/[CH-]keys to selest "On PROG".
Use[V+]/[V-] keys to change On Program number.
Use [CH+]/[CH-]keys to selest "REPEAT".
Use[V+]/[V-] keys to change its value:ONCE or EVERYDAY.
A.Use [CH+]/[ ] keys to select each item.
Use [V+]/[V-]keys to change the value of each item.
B.Use [CH+]/[CH-]keys to select
"LANGUAGE"
Use [V+]/[V-] keys, Language
will change as follows:
CH-
E.Use [CH+]/[CH-] keys to select"CAPTION MODE".
Use [V+]/[V-]keys Caption Mode will change as follows:
6.5 SETUP Function:other functions setting.
F.Use[ ]/[ ]keys to select "GAME"
Press[V+]/[V-] keys to enter the game.
In game mode,the box will be moved to specific dot.
Press [CH+]/[CH-] keys to move the box for up or down.
Press[V+]/[V-] keys to move the box for right or left.
Press[MENU]key once to restart the game.
Press it twice or above to select a more difficult game.
Press [CALL] key to exit the Game.
CH+ CH- .
ENGLISH SPANISH FRENCH
PORTUGUESE ENGLISH
CC1 CC2 CC3 CC4 T1 T2 T3 T4 CC1
Menu Operation
C.Blue screen under no signal condition ,optional.
D.Select if open picture enhance.
-11-
G.Select whether open AVL.

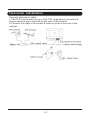
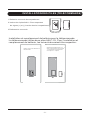
Televi on Installationsi
Connect antenna or cable
1.Use 75 coaxial cable plug or 300-75 impedance converter to
plug in antenna input terminal on the rear of the cabinet.
2.Connect the cable to the audio & video-in jack on the rear of the
cabinet.
Ω
Ω
-12-

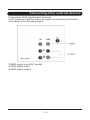
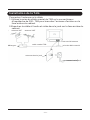
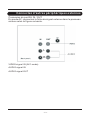
Connecting other external devices
Connection of AV input/output terminal
In AV mode,connect the external signal line of back panel board
according to the following figure.
VIDEO signal input(AV1 mode)
AUDIO signal input
AUDIO signal output
-13-
L
R

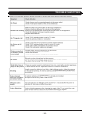
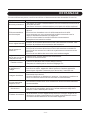
TROUBLE SHOOTING
Should your television product develop a problem, please refer below before requesting service.
-14-
Check color situation in the menu.
Check if the sound volume is at minimum.
good directivity is strongly
good directivity
before turning on again.

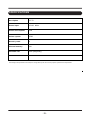
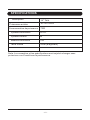
SPECIFICATIONS
Description
14” TV
Power input
AC120 60Hz
Power consumption
75W
Colour system
NTSC
Sound system
M
Channel memory
180
Viewable size
34cm (diagonally)
Note: Design and specifications are subject to change without prior notice for the purpose of performance improvement.
-15-

FRANÇAIS
Veuillez lire et suive soigneusement les instructions avant d’utiliser la télé afin d’éviter tout
dommage dû à mauvaises opérations. Toute réparation ou réglage à la télé doit être effectué
par un ingénieur qualifié.
TV1311
POWER
12
3
4
567
8
90
CH+
CH-
V-
MENU
TV
AV
/
MUTE
V+
SCAN
RECALL
DISPLY
PM
SLEEP
CCD
V-CHIP
GAME
CALENDA
R

1
2
3
4
6
8
9
10
12
13
Connectez d'autres périphériques externes
Menu Réglage
Opération du menu
Installation de télé
DÉPANNAGE
SPÉCIFICATIONS
14
TABLE DES MATIÈRES
Fonctionnement de votre télé
15
Précautions de sécurité
Instructions importantes de sécurité
Vue frontale de la machine
La télécommande
Guide parental (V-CHIP) et CCD
5
INSTALLATION DES PILES (TÉLÉCOMMANDE)

-1-
Garanties importantes
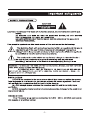
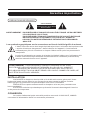
PRÉCAUTIONS DE SÉCURITÉ
AVERTISSEMENT
RISQUE DE CHOC ÉLECTRIQUE
NE PAS OUVRIR
AVERTISSEMENT : POUR RÉDUIRE LE RISQUE DE CHOC ÉLECTRIQUE. NE PAS RETIRER
LE COUVERCLE (OU LE DOS)
POUR RÉDUIRE LE RISQUE D’INCENDIE OU DE CHOC ÉLECTRIQUE.
NE PAS EXPOSER CET APPAREIL À LA PLUIE OU L’HUMIDITÉ.
AUCUN UTILISATEUR RÉPARABLE. RÉPARATION À PERSONNEL
QUALIFIÉ.
Les symboles graphiques sur la couverture arrière de la télé signifie le suivant :
L’éclair fléché au centre du triangle équilatéral prévient l’utilisateur de la présence de
« tension électrique dangereuse » dans le boîtier de l’appareil, d’une intensité
suffisante pour pouvoir constituer un risque d’électrocution pour les personnes le
manipulant.
Le point d’exclamation au centre du triangle équilatéral indique que l’utilisateur doit
lire des instructions importantes de fonctionnement et d’entretien (maintenance)
dans les manuels fournis avec l’appareil.
AVERTISSEMENT : POUR RÉDUIRE LE RISQUE D’INCENDIE OU DE CHOC
ÉLECTRIQUE. NE PAS EXPOSER CET APPAREIL À LA PLUIE OU L’HUMIDITÉ.
APPAREILS NE DOIVENT PAS ÊTRE EXPOSÉS AUX GOUTTES OU
ÉCLABOUSSURES ET AUCUN OBJET REMPLI DE LIQUIDE, COMME LES VASES, NE
DOIT ÊTRE PLACÉ SUR L’APPAREIL.
INSTALLATION
LOCALISEZ le récepteur dans la salle où la lumière directe ne grève pas l'écran.
L'obscurité totale ou une réflexion sur l'image écran peut causer la fatigue oculaire.
Éclairage doux et indirect est recommandé pour une vision confortable.
PRÉVOYEZ un espace suffisant entre le récepteur et le mur pour permettre une
bonne ventilation.
ÉVITEZ les endroits trop chauds pour prévenir d'éventuels dommages à l'armoire
ou de panne de composant.
CONNEXION
Le cordon d'alimentation de cette télé peut être connecté à 120V 60HZ, JAMAIS
connectez à l'alimentation de DC ou toute autre puissance.
La page est en cours de chargement...
La page est en cours de chargement...
La page est en cours de chargement...
La page est en cours de chargement...
La page est en cours de chargement...
La page est en cours de chargement...
La page est en cours de chargement...
La page est en cours de chargement...
La page est en cours de chargement...
La page est en cours de chargement...
La page est en cours de chargement...
La page est en cours de chargement...
La page est en cours de chargement...
La page est en cours de chargement...
-
 1
1
-
 2
2
-
 3
3
-
 4
4
-
 5
5
-
 6
6
-
 7
7
-
 8
8
-
 9
9
-
 10
10
-
 11
11
-
 12
12
-
 13
13
-
 14
14
-
 15
15
-
 16
16
-
 17
17
-
 18
18
-
 19
19
-
 20
20
-
 21
21
-
 22
22
-
 23
23
-
 24
24
-
 25
25
-
 26
26
-
 27
27
-
 28
28
-
 29
29
-
 30
30
-
 31
31
-
 32
32
-
 33
33
-
 34
34


