ATEN VP2120 Guide de démarrage rapide
- Catégorie
- Télécommandes
- Taper
- Guide de démarrage rapide

Switch per la presentazione ininterrotta VP2120 con multistreaming con visualizzazione quadrupla
www.aten.com
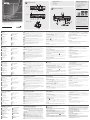
A
Revisione Hardware
Vista anteriore
1
Porte USB tipo A (3.0)
2
Controllo volume
3
Pulsante Info sala
Vista posteriore
1
Slot per fascetta cavi
2
Connettore d'alimentazione
3
Porta Ethernet
4
Porta ricevitore IR
5
Porta MIC In
Telecomando a infrarossi
1
On/Off
2
Navigazione
3
Controllo volume
4
Passa alla modalità Live
Funzionamento
È possibile azionare il VP2120 utilizzando i pulsanti sul pannello anteriore, il
telecomando a infrarossi o l'interfaccia web. Per le istruzioni dettagliate, consultare il
manuale dell’utente.
Pulsante pannello anteriore
• Per azionare il VP2120, premere il pulsante Menu per visualizzare il menu OSD,
quindi usare i pulsanti di navigazione per scorrere e confi gurare le impostazioni, se
necessario.
• Per bloccare o sbloccare i pulsanti del pannello anteriore, tenere premuto il pulsante di
navigazione su per cinque secondi. Quando il pannello anteriore è bloccato, l'icona
di blocco (
) si illumina di rosso.
Telecomando a infrarossi
• Per azionare il VP2120, premere il pulsante Menu per visualizzare il menu OSD,
quindi usare i pulsanti di navigazione per scorrere e confi gurare le impostazioni,
se necessario.
• Per trasmettere il contenuto di un display, premere il pulsante Go Live (A o B).
Web GUI
Usare la Web GUI per confi gurare le impostazioni di sistema o per eseguire lo
streaming delle schermate. Per accedere alla Web GUI, seguire questi passaggi.
1. Premere il pulsante Room Info sul pannello anteriore/telecomando a infrarossi
per visualizzare l'indirizzo IP dell'unità.
2. Digitare l'indirizzo IP in un browser Web, quindi fare clic sulla scheda
Amministratore.
3. Accedere usando le seguenti credenziali predefi nite (administrator/password).
Partecipare a una riunione online
Assicurarsi di avere a portata di mano il codice sala e l'indirizzo IP della pagina di
accesso, e utilizzare uno dei seguenti metodi per partecipare a una riunione online.
Web GUI
1. Digitare l'indirizzo IP del VP2120 in un browser Web.
2. Fare clic sulla scheda Partecipante.
3. Digitare il proprio nome e il codice sala.
App mobile
1. Scaricare e installare l'ATEN Video Presentation Control App.
2. Seguire le istruzioni su schermo per collegare la LAN dove è installato il VP2120,
quindi eseguire la ricerca automatica della rete.
3. Selezionare il VP2120 e digitare il codice sala.
B
Installazione Hardware
Per collegare i dispositivi al VP2120, fare riferimento al diagramma di installazione
sopra e alle istruzioni indicate di seguito.
1
Utilizzare un fi lo di messa a terra per mettere a terra l'unità collegando
un'estremità al morsetto di messa a terra e l'altra estremità ad un oggetto idoneo.
Nota: Non saltare questo passaggio. La messa a terra adeguata aiuta a prevenire
danni all'unità dovuti a sovraccarico o elettricità statica.
2
Utilizzare un cavo HDMI per collegare una sorgente HDMI alla porta HDMI In.
3
Utilizzare un cavo HDMI per collegare l'unità ad almeno un display abilitato HDMI.
4
(Facoltativo) Collegare un altoparlante attivo alla porta Audio Out.
5
(Facoltativo) Collegare un microfono alla porta MIC In.
6
(Facoltativo) Per controllare il VP2120 tramite telecomando a infrarossi, collegare il
ricevitore IR alla porta ricevitore IR.
7
(Facoltativo) Per consentire l'accesso all'interfaccia Web usare un cavo Ethernet per
collegare la porta Ethernet dell'unità a uno switch di rete.
8
Collegare l'adattatore di alimentazione alla presa di alimentazione. (Facoltativo)
Usare lo slot per fascetta cavi e una fascetta cavi per tenere al suo posto il cavo di
alimentazione.
9
Premere il pulsante di alimentazione per alimentare il VP2120.
10
Accendere tutti i dispositivi collegati.
6
Porta porta Audio Out stereo
7
Porta HDMI In
8
Porte HDMI Out
9
Terminale di messa a terra
5
Menu
6
Info sala
7
Disattivazione audio
8
Lavagna
4
Pulsanti di navigazione
5
Pulsante di alimentazione
6
Pulsante Menu
VP2120 Conmutador de presentación sin interrupción con Quad View Multistreaming
www.aten.com
A
Revisión del hardware
Vista frontal
1
Puerto USB tipo A (3.0)
2
Control del volumen
3
Botón de información de la sala
Vista posterior
1
Ranura del organizador de cables
2
Conector de alimentación
3
Puerto Ethernet
4
Puerto receptor IR
5
Puerto de entrada MIC
Mando a distancia IR
1
Encendido/apagado
2
Navegación
3
Control del volumen
4
En vivo
Funcionamiento
Puede utilizar el VP2120 usando los botones del panel frontal, el mando a distancia
IR o la interfaz web. Para obtener instrucciones detalladas, consulte el manual del
usuario.
Botones del panel frontal
• Para utilizar el VP2120, presione el botón Menu para mostrar el menú OSD y luego
utilice los botones de Navegación para navegar y confi gurar los ajustes necesarios.
• Para bloquear o desbloquear los botones del panel frontal, mantenga presionado
el botón Navegación arriba durante cinco segundos. Cuando el panel frontal está
bloqueado, el icono del candado (
) se ilumina en rojo.
Mando a distancia IR
• Para utilizar el VP2120, presione el botón Menu para mostrar el menú OSD y luego
utilice los botones de Navegación para navegar y confi gurar los ajustes necesarios.
• Para transmitir el contenido de una pantalla, presione el botón Go Live (A o B).
GUI de Web
Use la GUI de web para confi gurar los ajustes del sistema o mostrar las pantallas. Para
acceder a la GUI de web, siga estos pasos.
1. Presione el botón de Room Info desde el panel frontal/mando a distancia IR para
mostrar la dirección IP de la unidad.
2. Escriba la dirección IP en un navegador de web y luego haga clic en la pestaña
Administrador.
3. Inicie sesión con las siguientes credenciales predeterminadas (administrator/
password).
Unirse a una reunión en línea
Asegúrese de tener a mano el código de la sala y la dirección IP de la página de inicio
de sesión y utilice uno de los siguientes métodos para unirse a una reunión en línea.
GUI de Web
1. Escriba la dirección IP del VP2120 en un navegador web.
2. Haga clic en la fi cha Participante.
3. Escriba su nombre y el código de la sala.
Aplicación móvil
1. Descargue e instale ATEN Video Presentation Control App.
2. Siga las instrucciones en pantalla para conectarse a la LAN donde está instalado el
VP2120 y luego escanee automáticamente la red.
3. Seleccione el VP2120 y escriba el código de la sala.
B
Instalación del hardware
Consulte el diagrama de instalación anterior y las instrucciones siguientes para
conectar dispositivos al VP2120.
1
Utilice un cable de tierra para conectar la unidad a tierra conectando un extremo al
terminal de tierra y el otro extremo a un objeto conectado a tierra correctamente.
Nota: No omita este paso. La conexión a tierra adecuada ayuda a evitar daños en
la unidad por sobrecargas de energía o electricidad estática.
2
Utilice un cable HDMI para conectar una fuente HDMI al puerto de entrada HDMI.
3
Utilice un cable HDMI para conectar la unidad a al menos una pantalla compatible
con HDMI.
4
(Opcional) Conecte un altavoz activo al puerto de salida de audio estéreo.
5
(Opcional) Conecte un micrófono al puerto de entrada MIC.
6
(Opcional) Para controlar el VP2120 con un control remoto IR, conecte el receptor
IR al puerto del receptor IR.
7
(Opcional) Para permitir el acceso a la interfaz web, utilice un cable Ethernet para
conectar el puerto Ethernet de la unidad a un conmutador de red.
8
Enchufe el adaptador de corriente a la clavija de alimentación. (Opcional) Utilice la
ranura del organizador de cables y una brida para sujetar el cable de alimentación
en su lugar.
9
Presione el botón de encendido para encender el VP2120.
10
Encienda todos los dispositivos conectados.
6
Puerto de salida de audio estéreo
7
Puerto de entrada HDMI
8
Puertos de salida HDMI
9
Terminal de conexión a tierra
5
Menú
6
Información de la sala
7
Silencio
8
Pizarra blanca
4
Botones de navegación
5
Botón de encendido
6
Botón menú
VP2120 Seamless Präsentation Switch mit Quad View Multistreaming
www.aten.com
A
Hardware Übersicht
Ansicht von vorne
1
USB Typ-A Anschluss (3.0)
2
Lautstärkesteuerung
3
Rauminfo Drucktaste
Ansicht von hinten
1
Kabelbinder Steckplatz
2
Netzbuchse
3
Ethernet-Port
4
IR Empfangsanschluss
5
MIC Eingang
IR-Fernbedienung
1
Ein/Aus
2
Navigation
3
Lautstärkesteuerung
4
Live gehen
9
Drücken Sie die Ein-/Aus-Drucktaste, um den VP2120 einzuschalten.
10
Schalten Sie alle angeschlossenen Geräte ein.
Bedienung
Sie können den VP2120 über die Drucktasten an der Vorderseite, die IR-Fernbedienung und
die Webschnittstelle bedienen. Detaillierte Anweisungen fi nden Sie im Benutzerhandbuch.
Drucktasten an der Vorderseite
• Um den VP2120 zu bedienen, drücken Sie die Menü Drucktaste, um das OSD-
Menü anzuzeigen, und verwenden Sie dann die Navigation Drucktasten, um die
Einstellungen nach Bedarf zu durchsuchen und zu konfi gurieren.
• Zum Ver- oder Entriegeln der Drucktasten an der Vorderseite drücken und halten
Sie die Navigationstaste nach oben fünf Sekunden lang gedrückt. Wenn die
Vorderseite verriegelt ist, leuchtet das Schloss-Symbol (
) rot.
IR-Fernbedienung
• Um den VP2120 zu bedienen, drücken Sie die Menü Taste, um das OSD-Menü
anzuzeigen, und verwenden Sie dann die Navigation Tasten, um die Einstellungen
nach Bedarf zu durchsuchen und zu konfi gurieren.
• Um den Inhalt eines Bildschirms zu übertragen, drücken Sie die Go Live Taste (A oder B).
Web GUI
Verwenden Sie die Web GUI, um Systemeinstellungen zu konfi gurieren oder Bildschirme
zu streamen. Um auf das Web GUI zuzugreifen, befolgen Sie die folgenden Schritte.
1. Drücken Sie die Drucktaste Room Info an der Vorderseite/IR-Fernbedienung, um
die IP-Adresse des Geräts anzuzeigen.
2. Geben Sie die IP-Adresse in einen Webbrowser ein, und klicken Sie dann auf die
Registerkarte Administrator.
3. Melden Sie sich mit den folgenden Standard-Anmeldeinformationen
(administrator/password) an.
An einer Online-Besprechung teilnehmen
Stellen Sie sicher, dass Sie den Raumcode und die IP-Adresse der Anmeldeseite zur
Hand haben, und verwenden Sie eine der folgenden Methoden, um an einer Online-
Besprechung teilzunehmen.
Web GUI
1. Geben Sie die IP-Adresse des VP2120 in einen Webbrowser ein.
2. Klicken Sie auf die Registerkarte Teilnehmer.
3. Geben Sie Ihren Namen und den Raumcode ein.
Mobil App
1. Laden Sie die ATEN Video Presentation Control App herunter und installieren Sie sie.
2. Befolgen Sie die Anweisungen auf dem Bildschirm, um eine Verbindung mit dem
LAN herzustellen, in dem der VP2120 installiert ist, und scannen Sie das Netzwerk
anschließend automatisch.
3. Wählen Sie den VP2120 aus und geben Sie den Raumcode ein.
B
Hardware Installation
Lesen Sie das Installationsschema oben und die Anweisungen unten, um Geräte an
den VP2120 anzuschließen.
1
Verwenden Sie ein Erdungskabel, um das Gerät zu erden, indem Sie ein Ende mit
der Erdungsklemme und das andere Ende mit einem geeigneten geerdeten Objekt
verbinden.
Hinweis: Lassen Sie diesen Schritt nicht aus. Eine angemessene Erdung hilft bei
der Verhinderung von Geräteschäden durch Spannungsspitzen oder
statische Elektrizität.
2
Verwenden Sie ein HDMI-Kabel, um eine HDMI-Quelle an den HDMI-
Eingangsanschluss anzuschließen.
3
Verwenden Sie ein HDMI-Kabel, um das Gerät an mindestens einen HDMI-fähigen
Bildschirm anzuschließen.
4
(Optional) Schließen Sie einen aktiven Lautsprecher an den Stereo Audio-Ausgang an.
5
(Optional) Schließen Sie ein Mikrofon an den MIC-Eingang an.
6
(Optional) Um den VP2120 mit einer IR-Fernbedienung zu steuern, verbinden Sie
den IR-Empfänger mit dem IR Empfangsanschluss.
7
(Optional) Um den Zugriff auf die Webschnittstelle zu ermöglichen, verwenden Sie
ein Ethernet-Kabel, um den Ethernet-Anschluss des Geräts mit einem Netzwerk-
Switch zu verbinden.
8
Stecken Sie den Netzadapter in die Netzbuchse ein. (Optional) Verwenden Sie den
Kabelbinder Steckplatz und einen Kabelbinder, um das Netzkabel an seinem Platz
zu halten.
6
Stereo Audio-Ausgang
7
HDMI Eingang
8
HDMI Ausgänge
9
Erdungsanschluss
5
Menü
6
Rauminfo
7
Stumm
8
Whiteboard
4
Navigationsdrucktasten
5
Ein-/Aus-Drucktaste
6
Menü Drucktaste
Commutateur de presentation Continue VP2120 avec Multistreaming Quad View
www.aten.com
A
Présentation du matériel
Vue de devant
1
Port USB de type A (3.0)
2
Contrôle du volume
3
Bouton Info de Salle
Vue de derrière
1
Socle de Nœud pour Câble
2
Prise d'alimentation
3
Port Ethernet
4
Port récepteur IR
5
Port d'entrée MICRO
Télécommande IR
1
Marche/Arrêt
2
Navigation
3
Contrôle du volume
4
En direct
Fonctionnement
Vous pouvez opérer le VP2120 à l’aide des boutons du panneau avant, de la
télécommande IR ou de l'interface web. Pour des instructions plus en détails, consultez
le manuel d'utilisation.
Boutons du panneau avant
• Pour opérer le VP2120, pressez le bouton Menu pour affi cher le menu OSD, puis
utilisez les boutons Navigation pour naviguer et confi gurer les paramètres comme
nécessaire.
• Pour verrouiller ou déverrouiller les boutons du panneau avant, appuyez et
maintenez enfoncé le bouton Navigation Haut pendant cinq secondes. Lorsque le
panneau avant est verrouillé, l'icône de verrouillage (
) s'allume en rouge.
Télécommande IR
• Pour opérer le VP2120, pressez le bouton Menu pour affi cher le menu OSD, puis
utilisez les boutons Navigation pour naviguer et confi gurer les paramètres comme
nécessaire.
• Pour diffuser le contenu d’un affi chage, pressez le bouton Go Live (A ou B).
Interface graphique Web
Utilisez l'interface graphique Web pour confi gurer les paramètres système ou les
écrans de diffusion en continu. Pour accéder à l'interface graphique Web, suivez les
étapes ci-dessous.
1. Pressez le bouton Room Info sur le panneau avant/télécommande IR pour affi cher
l’adresse IP de l’unité.
2. Entrez l’adresse IP dans un navigateur web et cliquez sur la languette
Administrateur.
3. Enregistrez-vous en utilisant les droits par défaut suivants (administrator/
password).
Joindre un Meeting En Ligne
Assurez-vous de posséder le code de la salle et l’adresse IP de la page d’enregistrement,
puis utilisez une des méthodes suivantes pour joindre un Meeting En Ligne.
Interface graphique Web
1. Entrez l’adresse IP du VP2120 dans un navigateur web.
2. Cliquez sur la languette Participant.
3. Entrez votre nom et le code de la salle.
App Mobile
1. Téléchargez et installez ATEN Video Presentation Control App.
2. Suivez les instructions à l’écran pour vous connecter au LAN où le VP2120 est
installé, puis autoscannez le réseau.
3. Sélectionnez le VP2120 et entrez le code de la salle.
B
Installation matérielle
Consultez le diagramme d’installation ci-dessus et les instructions suivantes pour
connecter des appareils au VP2120.
1
Utilisez un fi l de mise en terre pour relier l'unité à terre en connectant une extrémité à la
borne de terre et l'autre extrémité à un objet correctement relié à terre.
Remarque : N'ignorez pas cette étape. Une mise à terre appropriée permet
d'éviter que l'appareil ne soit endommagé par des surtensions ou de
l'électricité statique.
2
Utilisez un câble HDMI pour connecter une source HDMI au Port d'entrée HDMI.
3
Utilisez un câble HDMI pour connecter l’unité à au moins un écran HDMI.
4
(Facultatif) Connectez un haut-parleur actif au Port de Sortie Audio Stéréo.
5
(Facultatif) Connectez un microphone au Port d'entrée MICRO.
6
(Facultatif) Pour contrôler le VP2120 avec une télécommande IR, connectez le
récepteur IR au Port du Récepteur IR.
7
(Facultatif) Pour permettre l’accès à l’interface internet, utilisez un câble Ethernet
pour connecter le Port Ethernet de l'unité à un commutateur de réseau.
8
Branchez l'adaptateur électrique à la Prise d'Alimentation. (Facultatif) Utilisez
le Socle de Nœud pour Câble et un nœud pour câble pour maintenir le câble
électrique en place.
9
Pressez le bouton d'allumage pour allumer le VP2120.
10
Allumez tous les appareils connectés.
6
Port de Sortie Audio Stéréo
7
Port d'entrée HDMI
8
Ports de Sortie HDMI
9
Prise de terre
5
Menu
6
Info de salle
7
Muet
8
Tableau Blanc
4
Boutons de navigation
5
Bouton d'allumage
6
Bouton de menu
Многопотоковый презентационный коммутатор VP2120 с технологией Seamless и функцией Quad View
www.aten.com
A
Обзор оборудования
Вид спереди
1
USB-порт типа A (3.0)
2
Регулятор громкости
3
Кнопка «Сведения о помещении»
Вид сзади
1
Разъем для кабеля с хомутом
2
Разъём питания
3
Порт Ethernet
4
Порт ИК-ресивера
5
Входной порт микрофона
ИК-пульт
1
Вкл/Выкл
2
Перемещение
3
Регулятор громкости
4
Трансляция в живую
9
Нажмите кнопку «Питание», чтобы включить VP2120.
10
Включите все подключенные устройства.
Эксплуатация
Устройством VP2120 можно управлять с помощью кнопок на передней
панели, либо ИК-пульта или веб-интерфейса. Подробные инструкции см. в
руководстве пользователя.
Кнопки на передней панели
• Для отображения экранного меню, позволяющего управлять устройством
VP2120, нажмите кнопку Меню, а затем используйте кнопки Перемещение
для просмотра и настройки необходимых параметров.
• Для блокировки или разблокировки кнопок передней панели, нажмите и
удерживайте кнопку Перемещение вверх в течение пяти секунд. При
блокировке передней панели значок блокировки (
) горит красным.
ИК-пульт
• Для отображения экранного меню, позволяющего управлять устройством
VP2120, нажмите кнопку Меню, а затем используйте кнопки Перемещение
для просмотра и настройки необходимых параметров.
• Для трансляции информации на мониторе нажмите кнопку Go Live (A или B).
Веб-интерфейс
Используйте веб-интерфейс для настройки видеотрансляции и системных
параметров. Для доступа к веб-интерфейсу выполните следующие действия.
1. Для вывода на экран IP-адреса устройства нажмите кнопку Room Info на
передней панели или ИК-пульте.
2. Введите IP-адрес в веб-браузере и нажмите на вкладку Администратор.
3. Выполните вход в систему с помощью следующих учетных данных по
умолчанию (administrator/password).
Подключение к онлайн-встрече
Для подключения к онлайн-встрече одним из следующих способов необходимо
знать код помещения и IP-адреса устройства.
Веб-интерфейс
1. Введите IP-адрес устройства VP2120 в веб-браузере.
2. Нажмите на вкладку Participant.
3. Введите свое имя и код помещения.
Мобильное приложение
1. Загрузите и установите приложение ATEN Video Presentation Control App.
2. Следуя инструкциям на экране, чтобы подключиться к локальной сети,
где установлено устройство VP2120, а затем выполните автоматическое
сканирование сети.
3. Выберите VP2120 и введите помещения.
B
Установка оборудования
Для подключения устройств к VP2120 см. представленную выше схему
установки и представленные ниже инструкции.
1
Для заземления устройства возьмите заземляющий провод и подсоедините
один конец провода к контакту заземления, а другой конец - к подходящему
заземленному объекту.
Примечание: Не пропускайте это действие. Надлежащее заземление
помогает защитить устройство от повреждений, вызванных
перепадами напряжения и статическим электричеством.
2
Используйте кабель HDMI для подключения источника HDMI к входному
порту HDMI.
3
Используйте кабель HDMI для подключения устройства минимум к одному
HDMI-монитору.
4
(Дополнительно) Подключите активный динамик к выходному порту для
аудио стереосигнала.
5
(Дополнительно) Подключите микрофон к входному порту микрофона.
6
(Дополнительно) Для управления устройством VP2120 с помощью ИК-
пульта подключите ИК-ресивер к порту ИК-ресивера.
7
(Дополнительно) Для доступа к веб-интерфейсу используйте кабель Ethernet,
чтобы соединить порт Ethernet на устройстве с сетевым коммутатором.
8
Вставьте адаптер питания в разъём питания. (Дополнительно) Используйте
разъем для кабеля с хомутом и хомут, чтобы зафиксировать кабель питания.
6
Выходной порт для аудио
стереосигнала
7
Входной порт HDMI
8
Выходные порты HDMI
9
Контакт заземления
5
Меню
6
Сведения о помещении
7
Выкл звук
8
Белая доска
4
Кнопки «Перемещение»
5
Кнопка «Питание»
6
Кнопка «Меню»
9
6
1
1 2
2
5
4
3
2
1
5
6
8
7
3 4
4
3 4 5 6 7 8
© Copyright 2019 ATEN
®
International Co., Ltd.
ATEN and the ATEN logo are trademarks of ATEN International Co., Ltd. All rights reserved. All
other trademarks are the property of their respective owners.
Part No. PAPE-1223-R70G Printing Date: 07/2019
Seamless Presentation Switch with
Quad View Multistreaming
Quick Start Guide
VP2120
VP2120 Seamless Presentation Switch with Quad View Multistreaming
www.aten.com
ATEN VanCryst
™
B
Package Contents
1 VP2120 Seamless Presentation Switch
1 IR Receiver
1 IR Remote Control
1 Power Adapter
1 User Instructions
Hardware Installation
Front View
Rear View
IR Remote Control
A
Hardware Review
A
Hardware Review
Front View
1
USB Type-A Port (3.0)
2
Volume Control
3
Room Info Pushbutton
Rear View
1
Cable Tie Slot
2
Power Jack
3
Ethernet Port
4
IR Receiver Port
5
MIC In Port
IR Remote Control
1
On/Off
2
Navigation
3
Volume Control
4
Go Live
Operation
You can operate the VP2120 using the front-panel pushbuttons, IR remote
control, or the web interface. For detailed instructions, see the user manual.
Front-panel Pushbuttons
• To operate the VP2120, press the Menu Pushbutton to display the OSD
menu and then use Navigation Pushbuttons to browse and confi gure
settings as needed.
• To lock or unlock the front-panel pushbuttons, press and hold the Up
Navigation Pushbutton for fi ve seconds. When the front-panel is locked,
the lock icon (
) lights red.
IR Remote Control
• To operate the VP2120, press the Menu button to display the OSD menu
and then use Navigation buttons to browse and confi gure settings as
needed.
• To broadcast the content of a display, press the Go Live button (A or B).
Web GUI
Use the web GUI to confi gure system settings or stream out screens. To access
the web GUI, follow the steps below.
1. Press the Room Info Pushbutton/button from the front panel/IR remote
control to display the unit’s IP address.
2. Type the IP address in a web browser and then click the Administrator tab.
3. Log in using the following default credentials (administrator/password).
Joining an Online Meeting
Make sure to have the room code and the IP address of the login page at
hand, and use one of the following methods to join an online meeting.
Web GUI
1. Type the VP2120’s IP address in a web browser.
2. Click the Participant tab.
3. Type in your name and the room code.
Mobile App
1. Download and install the ATEN Video Presentation Control App.
2. Follow the on-screen instructions to connect to the LAN where the VP2120
is installed, and then autoscan the network.
3. Select the VP2120 and type in the room code.
B
Hardware Installation
Refer to the installation diagram above and the instructions below to connect
devices to the VP2120.
1
Use a grounding wire to ground the unit by connecting one end to the
grounding terminal, and the other end to a suitable grounded object.
Note: Do not omit this step. Proper grounding helps prevent damage to
the unit from power surges or static electricity.
2
Use an HDMI cable to connect an HDMI source to the HDMI In Port.
3
Use an HDMI cable to connect the unit to at least one HDMI-enabled
display.
4
(Optional) Connect an active speaker to the Stereo Audio Out Port.
5
(Optional) Connect a microphone to the MIC In Port.
6
(Optional) To control the VP2120 using an IR remote control, connect the IR
Receiver to the IR Receiver Port.
7
(Optional) To allow access to the web interface, use an Ethernet cable to
connect the Ethernet Port of the unit to a network switch.
8
Plug the power adapter to the Power Jack. (Optional) Use the Cable Tie
Slot and a cable tie to hold the power cable in place.
9
Press the Power Pushbutton to power on the VP2120.
10
Power on all the connected devices.
Internet/
LAN
A
1
8
7
6
5 4
2
3
B
6
Stereo Audio Out Port
7
HDMI In Port
8
HDMI Out Ports
9
Grounding Terminal
5
Menu
6
Room Info
7
Mute
8
Whiteboard
4
Navigation Pushbuttons
5
Power Pushbutton
6
Menu Pushbutton
Support and Documentation Notice
All information, documentation, fi rmware,
software utilities, and specifi cations contained in
this package are subject to change without prior
notifi cation by the manufacturer.
To reduce the environmental impact of our
products, ATEN documentation and software can
be found online at
http://www.aten.com/download/
Technical Support
www.aten.com/support
이 기기는 업무용(A급) 전자파적합기기로서 판매자 또는 사용자는 이 점을
주의하시기 바라며, 가정외의 지역에서 사용하는 것을 목적으로 합니다.
Scan for
more information
EMC Information
FEDERAL COMMUNICATIONS COMMISSION INTERFERENCE
STATEMENT:
This equipment has been tested and found to comply with the limits
for a Class A digital device, pursuant to Part 15 of the FCC Rules.
These limits are designed to provide reasonable protection against
harmful interference when the equipment is operated in a commercial
environment. This equipment generates, uses, and can radiate radio
frequency energy and, if not installed and used in accordance with
the instruction manual, may cause harmful interference to radio
communications. Operation of this equipment in a residential area
is likely to cause harmful interference in which case the user will be
required to correct the interference at his own expense.
FCC Caution: Any changes or modifi cations not expressly approved by
the party responsible for compliance could void the user's authority to
operate this equipment.
Warning: Operation of this equipment in a residential environment
could cause radio interference.
This device complies with Part 15 of the FCC Rules. Operation is subject
to the following two conditions:(1) this device mat not cause harmful
interference, and(2) this device must accept any interference received,
including interference that may cause undesired operation.
Important. Before proceeding, download the Installation and
Operation Manual by visiting the website, www.aten.com and
navigating to the product page. The manual includes important
warnings, loading specifi cations and grounding instructions.
ATEN Website
La page charge ...
-
 1
1
-
 2
2


ATEN VP2120 Guide de démarrage rapide
- Catégorie
- Télécommandes
- Taper
- Guide de démarrage rapide
dans d''autres langues
- italiano: ATEN VP2120 Guida Rapida
- English: ATEN VP2120 Quick start guide
- español: ATEN VP2120 Guía de inicio rápido
- Deutsch: ATEN VP2120 Schnellstartanleitung
- русский: ATEN VP2120 Инструкция по началу работы
- português: ATEN VP2120 Guia rápido
- polski: ATEN VP2120 Skrócona instrukcja obsługi
- 日本語: ATEN VP2120 クイックスタートガイド
- Türkçe: ATEN VP2120 Hızlı başlangıç Kılavuzu
Documents connexes
-
ATEN VP2730 Guide de démarrage rapide
-
ATEN VM51616H Guide de démarrage rapide
-
ATEN VM6404H Guide de démarrage rapide
-
ATEN VM3909H Guide de démarrage rapide
-
ATEN VM0404HB Guide de démarrage rapide
-
ATEN VM5404H Guide de démarrage rapide
-
ATEN VM1600 Guide de démarrage rapide
-
-
ATEN VM6809H Guide de démarrage rapide
-
ATEN VM6404HB Guide de démarrage rapide
