GE ZDOD240HSS Guide d'installation
- Catégorie
- Frigos
- Taper
- Guide d'installation
Ce manuel convient également à

INSTALLATION
INSTRUCTIONS
with Design Guide
Outdoor/Indoor Refrigerator
Monogram.com

2 31-51542-5
Safety Information
BEFORE YOU BEGIN
Read these instructions completely and carefully.
•
IMPORTANT – Save these instructions for
local inspector’s use. Observe all governing codes and
ordinances.
• Note to Installer – Be sure to leave these instructions
with the Consumer.
• Note to Consumer – Keep these instructions with your
Owner’s Manual for future reference.
If you received a damaged refrigerator, you should
immediately contact your dealer or builder.
Skill Level – Installation of this refrigerator requires
basic mechanical, carpentry and plumbing skills. Proper
installation is the responsibility of the installer. Product
failure due to improper installation is not covered under
the GE Appliance Warranty. See the Owner’s Manual for
warranty information.
WARNING
Explosion Hazard. Keep flammable materials and vapors, such as gasoline, away from
refrigerator. Failure to do so can result in fire, explosion, or death.
WARNING
To reduce the risk associated with choking, do not allow children under 3 years of age to have access
to small parts during the installation of this product.
Do not, under any circumstances, cut or remove the third (ground) prong from the power cord.
For personal safety, this appliance must be properly grounded.
The power cord of this appliance is equipped with a
3-prong (grounding) plug which mates with a standard
3-prong (grounding) wall outlet to minimize the possibility
of electric shock hazard from this appliance.
Have the wall outlet and circuit checked by a qualified
electrician to make sure the outlet is properly grounded.
Where a standard 2-prong wall outlet is encountered, it
is your personal responsibility and obligation to have it
replaced with a properly grounded 3-prong wall outlet. Do
not use an adapter.
The refrigerator should always be plugged into its own
individual electrical outlet which has a voltage rating that
matches the rating plate.
A 115 Volt AC, 60 Hz, 15- or 20-amp fused, grounded
electrical supply is required. This provides the best
performance and also prevents overloading house wiring
circuits which could cause a fire hazard from
overheated wires.
Never unplug your refrigerator by pulling on the
power cord. Always grip plug firmly and pull
straight out from the outlet.
Immediately discontinue use of a damaged
supply cord. If the supply cord is damaged
it must be replaced by a qualified service
professional with an authorized service part
from the manufacturer.
When moving the refrigerator away from the wall, be
careful not to roll over or damage the power cord.
CONNECTING ELECTRICITY
For Monogram local service in your area, call 800.444.1845 or visit monogram.com.
For Monogram service in Canada, call 888.880.3030
For Monogram Parts and Accessories, call 800.444.1845 or visit monogram.com.
For Monogram Parts and Accessories in Canada, call 888.880.3030 or visit monogram.ca.
WARNING
Electrical Shock Hazard.
Plug into a grounded 3-prong outlet.
Do not remove the ground prong.
Do not use an adapter.
Do not use an extension cord.
THIS PRODUCT MUST BE CONNECTED TO A
POWER SOURCE WITH GROUND FAULT CIRCUIT
INTERRUPT (GFCI) PROTECTION WHEN INSTALLED
IN AN OUTDOOR LOCATION. LOCAL CODES MAY
REQUIRE A SEPARATE CIRCUIT. IF YOU ARE
UNCERTAIN ABOUT THE GFCI PROTECTION ON THE
POWER SOURCE TO WHICH YOU ARE CONNECTING
THIS APPLIANCE, PLEASE CONTACT
A PROFESSIONAL ELECTRICIAN FOR
VERIFICATION.
Failure to follow these instructions can result
in death, fire, or electrical shock.

31-51542-5 3
AVERTISSEMENT
Risque d’électrocution.
Branchez l’appareil dans une prise à 3 broches mise à la
terre.
N’enlevez pas la broche de mise à la terre.
N’utilisez pas un adaptateur.
N’utilisez pas un cordon de rallonge.
CE PRODUIT DOIT ÊTRE CONNECTÉ À UNE SOURCE
D’ALIMENTATION À DISJONCTEUR DE FUITE À LA
TERRE, EN CAS D’INSTALLATION EN PLEIN-AIR. LES
RÉGLEMENTATIONS LOCALES PEUVENT EXIGER
UN CIRCUIT DISTINCT. SI VOUS DOUTEZ DE LA
PROTECTION DDFT DE LA SOURCE D’ALIMENTATION
ÉLECTRIQUE À LAQUELLE VOUS CONNECTEZ CET
APPAREIL, VEUILLEZ COMMUNIQUER
AVEC UN ÉLECTRICIEN AGRÉÉ POUR
VÉRIFICATION.
Le non-respect de ces instructions peut
entraîner des risques d’incendies, des chocs
électriques ou la mort.
AVERTISSEMENT
Risque d’explosion.
Conservez les matériaux et vapeurs inflammables tels que l’essence à l’écart de votre réfrigérateur. Le non-respect de
cette instruction peut entraîner un risque d’incendie, d’explosion ou de décès.
AVERTISSEMENT
3RXUUpGXLUHOHULVTXHG¶pWRXႇHPHQWSHQGDQWO¶LQVWDOODWLRQGHFHSURGXLWQHSDVODLVVHUOHV
petites pièces à la portée des enfants âgés de moins de 3 ans.
Consignes de Sécurité
Ne coupez pas ou n’enlevez pas, sous aucun prétexte, la troisième broche de mise à la terre du cordon
d’alimentation. Pour des raisons de sécurité, cet appareil doit être correctement mis à la terre.
Le cordon d’alimentation de cet appareil est équipé d’une
fiche à trois broches (pour une mise à la terre) qui s’adapte
à la prise de courant standard à 3 broches (pour une mise
à la terre) pour minimiser les risques de chocs électriques
par cet appareil.
Faites vérifier la prise murale et le circuit électrique par
un électricien qualifié pour s’assurer que le système est
correctement mis à la terre.
Dans le cas d’une prise biphasée, l’installateur a la
responsabilité et l’obligation de la remplacer par une prise
triphasée correctement mise à la terre. N’utilisez pas
d’adaptateur.
Le réfrigérateur doit toujours être branché à sa propre
prise électrique d’une tension nominale correspondant à
celle indiquée sur sa plaque signalétique.
Une alimentation électrique à 115 volts CA, 60 Hz, avec
un fusible de 15 ou 20 ampères et une mise à la terre est
nécessaire. Ceci permet d’obtenir un meilleur rendement
et évite de surcharger les circuits électriques du domicile
qui risque d’occasionner un incendie en surchauffant.
Ne débranchez jamais le réfrigérateur en tirant sur le
cordon d’alimentation. Prenez toujours fermement la fiche
en main et tirez pour la sortir de la prise.
Cessez immédiatement l’utilisation d’un cordon
électrique endommagé. Si le cordon électrique
est endommagé, son remplacement doit être
exécuté par un technicien en réparation
qualifié au moyen d’un cordon de rechange
autorisé par le fabricant.
Lorsque vous éloignez votre réfrigérateur du
mur, faites attention à ne pas le faire rouler
sur le cordon d’alimentation afin de ne pas
l’endommager.
BRANCHEMENTS ÉLECTRIQUES

4 31-51542-5
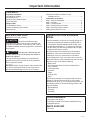
Important Information
CONTENTS
Important Information
Grounding the Product ............................................... 3
Key Ejecting Lock ........................................................ 4
Caring for Your Stainless Steel .................................... 4
Tools, Hardware........................................................... 4
Design Guide
The Installation Space ................................................. 4
Product Clearances and Location
Requirements .............................................................. 4
Preparation for Built-In Under-Counter
Installations Only ................................................... 4
Installation Instructions
Step 1, Remove Packaging ......................................... 6
Step 2, Leveling ........................................................... 6
Step 3, Connect Power................................................ 6
Step 4, Slide Product into Cutout ................................ 6
Step 5, Set Temperature Controls ...............................6
Staining Wood Drawer Fronts .................................... 7
CARING FOR YOUR STAINLESS
STEEL
%HIRUHLQVWDOODWLRQRU¿UVWXVHZHVWURQJO\DGYLVH\RX
polish the stainless steel exterior and handle with a
commercially available stainless steel cleaner such
as Stainless Steel Magic™. To preserve and protect
WKH¿QH¿QLVKZHDOVRVWURQJO\DGYLVHWKDW\RXDSSO\
stainless steel cleaner monthly.
All stainless steel can be damaged by the following
substances. Care must be taken not to allow these
substances to come in contact with your Outdoor/
Indoor Refrigerator. If any of these do get on your unit,
wash and clean the unit immediately (see the Care and
Cleaning section in the Owner’s Manual).
• Battery Acid
• Pool Chemicals (such as Chlorine and Bromine)
• Lawn Fertilizer
• Ice Melting Salts
• Creosole
• Iodine
• Pickling Juice
• Urine
The following naturally occurring materials can cause
GDPDJHWRWKHVWDLQOHVVVWHHO¿QLVK,IDQ\RIWKHVH
substances do get on your unit, wash and clean the unit
immediately (see the Care and Cleaning section in the
Owner’s Manual).
• Bird Droppings
• Tree Sap
• Sea Water
TOOLS REQUIRED
• Heavy-duty work gloves
• #2 Phillips screwdriver (for built-in installations only)
• Adjustable wrench
PARTS SUPPLIED
• Two keys
KEY EJECTING LOCK
(NOTE: Two keys are included.)
CAUTION
To prevent a child from being
entrapped, keep the key out of reach of children and
away from the appliance. .Keep the keys out of reach
of children and away from the refrigerator in a safe and
secure place.
ATTENTION
Pour prévenir l’enfermement des
enfants, gardez la clé hors de portée des enfants, à
distance du appareil.
The key for the spring-loaded lock is automatically
ejected. The key will not remain in the lock while the
door is opened or closed.
NOTICE: Before closing the door, make sure the lock
pin does not protrude beyond the top of the door, to
prevent potential damage to the cover or cabinetry.

31-51542-5 5
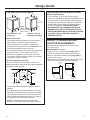
Design Guide
PRODUCT CLEARANCES AND
LOCATION REQUIREMENTS
The Outdoor/Indoor Refrigerator is factory set for
a 110° door swing.
When installed in a corner:
$OORZƎPLQFOHDUDQFHRQWKHhinge side for
the 90° door swing and to allow racks to slide out.
$OORZƎPLQLPXPFOHDUDQFHRQWKHhinge side for
a full 110° door swing.
• Test the door swing. Carefully open and close the door.
Adjust if the door makes contact with cabinetry.
15" Minimum
to Wall
110˚
110˚
Door
Swing
21-5/8"
23-5/8"
5-1/4" Minimum
to Wall
90˚
90˚
Door
Swing
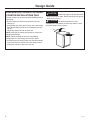
THE INSTALLATION SPACE
Choose the location:
• This product has been designed as a free-standing
unit; however, if desired, it may also be built-in.
• These products may be closed in on the top and
three sides as long as the front is unobstructed for air
circulation and proper access to the door.
• Do not operate these products where the temperature
will go below 45°F (7°C) or above 120°F (49°C).
• Unit must be installed on a structurally sound and
level surface strong enough to support a fully loaded
refrigerator, or approx. 250 lbs.
7KHFXWRXWGHSWKVKRXOGEHƎ
The cutout dimensions shown allow for a full door
swing and access to the pull-out racks when installed in
VWDQGDUGƎGHHSFDELQHWV
• The Outdoor/Indoor Refrigerator can be used free-
standing.
,ILQVWDOOLQJEHWZHHQIUDPHOHVVFDELQHWVDƎZLGH
¿OOHUVWULSRUVLGHSDQHOPD\EHUHTXLUHGRQWKHKLQJH
VLGH7KH¿OOHUVWULSZLOODFWDVDVSDFHUEHWZHHQWKH
case and adjacent cabinet door swing. The width of
WKHRSHQLQJPXVWLQFOXGHWKH¿OOHUSDQHOV
NOTE:,QDVWDQGDUGƎRSHQLQJWKHGRRUZLOO
SURWUXGHƎIRUZDUGRIWKHVXUURXQGLQJFDELQHWV
Locate
Outlet
34-1/2"-35"
24"
23-3/4" Min.
1-1/2"
9"
Max.
8-1/2"
9" Max.
10-1/2"
1-1/2"
Free-Standing – Use
canopy top
Built-In – Remove
canopy top (if needed)
36"
23-3/4"
23-3/4"
23-3/4"
34-1/4"
23-3/4"
to 34-3/4"
NOTE:
Handle and
KDQGOHVWDQGRႇ
GHSWKLVƎ
THE INSTALLATION SPACE (Cont.)
$GGLWLRQDO6SHFL¿FDWLRQV
• A 120 volt 60Hz., 15 or 20 amp power supply is
required. An individual properly grounded branch circuit
or circuit breaker is recommended. Install a properly
grounded 3-prong electrical receptacle recessed into
the back wall as shown. Electrical must be located
on rear wall as shown. THIS PRODUCT MUST
BE CONNECTED TO A POWER SOURCE WITH
GROUND FAULT CIRCUIT INTERRUPTER (GFCI)
PROTECTION WHEN INSTALLED IN AN OUTDOOR
LOCATION. LOCAL CODES MAY REQUIRE A
SEPARATE CIRCUIT.

6 31-51542-5
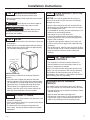
PREPARATION FOR BUILT-IN UNDER-
COUNTER INSTALLATIONS ONLY
The top canopy may be removed when installing under a
countertop.
• Remove the three screws from the back of the top
canopy (A).
• Using heavy-duty work gloves, lift up on the top canopy
back (B) and slide it forward until it unlatches from the
unit (C).
/LIWWKHWRSFDQRS\XSDQGRႇRIWKHXQLW
NOTE: Keep the top canopy and screws for future free-
standing installations.
NOTE: When installing the unit in a free-standing
FRQ¿JXUDWLRQWKHWRSFDQRS\PXVWEHOHIWLQSODFH
• If replacing the top canopy make sure the three latches
in the front slide into the front lip of the canopy before
pushing the canopy to the rear of the unit.
CAUTION
Under side edges of the stainless steel
canopy top may be sharp. Wear heavy-duty work gloves
when moving the top.
ATTENTION
Les bords du dessus en acier
inoxydable du réfrigérateur peuvent être acérés. Portez
des gants lorsque vous le retirez.
Design Guide
(A)
(B)
(C)

31-51542-5 7
STEP 2 LEVEL
• Use an adjustable wrench to turn and raise or lower the
leveling legs.
0HDVXUHÀRRUWRFRXQWHUWRSKHLJKWLQVLGHWKHRSHQLQJ
Adjust leveling legs until the product is approximately
ƎOHVVWKDQFRXQWHUWRSKHLJKW
INSTALLATION TIP:
0HDVXUHÀRRUWRXQGHUVLGHRIFRXQWHUWRSLQVLGHWKH
opening.
,IWKHURRPÀRRULVKLJKHUWKDQWKHÀRRULQVLGHWKH
opening, adjust the rear leveling legs to approximately
ƎOHVVWKDQWKHRSHQLQJKHLJKW6FUHZIURQWOHYHOLQJ
legs all the way in to shorten the height at the front.
This will allow you to slightly tip the unit into the
opening. Once the unit is in the correct position, the
front legs can be adjusted to level the product.
Installation Instructions
STEP 5 SET TEMPERATURE
CONTROLS
• The temperature controls are preset. Refer to the
Owner’s Manual for more information. Allow 12–24
hours for temperature to stabilize.
NOTE: The Outdoor/Indoor Refrigerator operates very
quietly. You may not notice the unit running, and when
¿UVWLQVWDOOHGWKHIDQVDQGPRWRUPD\QRWFRPHRQ
immediately—this is normal. If the display is lit and the
light is working, the unit is operating.
STEP 3 CONNECT POWER
• If the refrigerator is used outdoors, plug the power cord
into a GFCI receptacle.
• Check to make sure power is on by opening the door to
see if interior light turns on.
• The interior fan runs at all times except when the
door is open. See the the Owner’s Manual for further
explanation.
STEP 4 SLIDE PRODUCT INTO THE
CUTOUT
NOTICE: Do not push against the door with your
knees. Do not push or lift the unit by the door handle.
Damage may occur!
• Open the door and gently push the unit back into the
opening with your hands against the sides. Be careful
not to entangle power cord.
,QDVWDQGDUGƎRSHQLQJWKHGRRUZLOOSURWUXGHƎ
forward of the surrounding cabinets.
• Check again to be sure the unit is level.
• If the unit is installed under a countertop, adjust the
OHYHOLQJOHJVXQWLOWKHXQLWLVUHVWLQJ¿UPO\DJDLQVWWKH
bottom of the countertop.
• If alignment with adjacent cabinetry is an issue, use
a shim to secure the unit against the underside of the
countertop.
• Test the door swing. Carefully open and close the door.
The door should not rub or catch on adjacent cabinetry.
Notify the installer if the door makes contact with
cabinetry.
STEP 1 REMOVE PACKAGING
• Remove corner blocks and foam drawer stops.
• Remove all packing material, tape and protective plas-
tic coverings.
WARNING
Small objects are a choke hazard for
children. Remove and discard any parts not used.
AVERTISSEMENT
Les petits objets peuvent
étrangler les enfants. Il faut jeter toutes les piéces
qui ne sont pas utilisées.
Turn Right to Lower
Turn Left to Raise
STAINING WOOD DRAWER
FRONTS
7KHGUDZHUIURQWVDUHXQ¿QLVKHGFKHUU\ZRRG'XULQJ
use, oil from hands may accumulate and stain the wood.
• The drawer fronts may be stained and sealed to match
adjacent cabinetry.
• Apply the stain and sealer according to the
manufacturer’s instructions. To avoid unpleasant odor,
keep the door open to ventilate and allow the stain/
sealer to dry completely before using the product.

31-51542-5
02-19 GEA
Monogram.com
Printed in Serbia
NOTE: While performing installations described in this
book, safety glasses or goggles should be worn.
NOTE: Product improvement is a continuing endeavor
at Monogram. Therefore, materials, appearance and
specifications are subject to change without notice.
-
 1
1
-
 2
2
-
 3
3
-
 4
4
-
 5
5
-
 6
6
-
 7
7
-
 8
8


GE ZDOD240HSS Guide d'installation
- Catégorie
- Frigos
- Taper
- Guide d'installation
- Ce manuel convient également à
dans d''autres langues
- English: GE ZDOD240HSS Installation guide