West Bend Chefscape TEMPR Manuel utilisateur
- Catégorie
- Grille-pain
- Taper
- Manuel utilisateur

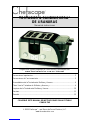
4-SLOT EGG & MUFFIN TOASTER™
Instruction Manual
Register this and other Focus Electrics products through our website:
www.focuselectrics.com
Important Safeguards...............................................................................................2
Operating Precautions..............................................................................................3
Assembling Your Egg & Muffin Toaster™.................................................................4
Using Your Egg & Muffin Toaster™...........................................................................4
Cleaning Your Egg & Muffin Toaster™....................................................................10
Recipes..................................................................................................................11
Warranty.................................................................................................................13
SAVE THIS INSTRUCTION MANUAL FOR FUTURE REFERENCE
© 2008 Chefscape™, a Brand of Focus Electrics, LLC.
www.focuselectrics.com

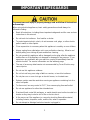
IMPORTANT SAFEGUARDS
To prevent personal injury or property damage, read and follow all instructions
and warnings.
When using electrical appliances, basic safety precautions should always be
followed including:
• Read all instructions, including these important safeguards and the care and use
instructions in this manual.
• Do not touch hot surfaces. Use handles or knobs.
• To protect against electric shock, do not immerse cord, plugs, or other electric
parts in water or other liquids.
• Close supervision is necessary when this appliance is used by or near children.
• Always unplug from outlet when not in use and before cleaning. Allow to cool
before putting on or taking off parts and before cleaning.
• Do not operate this appliance with a damaged cord or plug, after the appliance
malfunctions or if the appliance is dropped or damaged in any manner. If you
experience any problems with your machine, unplug it immediately from the
electrical outlet. For service information see the warranty page.
• The use of accessory attachments not recommended by Focus Electrics may
cause injuries.
• Do not use this appliance outdoors.
• Do not let cord hang over edge of table or counter, or touch hot surfaces.
• Do not place on or near a hot gas or electric burner, in a heated oven.
• Extreme caution must be used when moving an appliance containing hot oil or
other hot liquids.
• To disconnect, turn any control to “OFF”, then remove plug from wall outlet.
• Do not use appliance for other than intended use.
• Oversized foods, metal foil packages, or metal utensils must not be inserted in a
toaster as they may involve a risk of fire or electric shock.
• A fire may occur if the appliance is covered or touching flammable material,
including curtains, draperies, walls, and the like, when in operation.
• Do not attempt to dislodge food when toaster is plugged in.
2

• This appliance has a polarized plug (one blade is wider than the other). To
reduce the risk of electric shock, this plug is intended to fit into a polarized outlet
only one way. If the plug does not fit fully into the outlet, reverse the plug. If it
still does not fit, contact a qualified electrician. Do not attempt to modify the plug
in any way.
• For household use only.
To prevent personal injury or property damage, read and follow all instructions
and warnings.
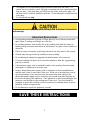
OPERATING PRECAUTIONS
• Avoid toasting foods with frostings or fillings that may run or that are made with
open fillings. Frostings and fillings can catch fire.
• Do not toast pastries, tarts and the like at any setting other than the lowest or
lightest setting and never toast twice as these items can ignite if over-heated and
cause fire.
• Failure to clean and replace crumb tray after each use may result in fire hazard.
• Lift and open the egg cooker lid carefully to avoid scalding.
• Do not attempt to operate the egg poacher without water in the reservoir.
• To prevent spilling hot liquid, do not move the appliance after the egg poaching
process is started.
• A short power-supply cord is provided to reduce risks resulting from becoming
entangled in or tripping over a longer cord.
• Longer, detachable power-supply cords or extension cords are available and
may be used if care is exercised in their use. While use of an extension cord is
not recommended, if you must use one, the marked electrical rating of the
detachable power-supply cord or extension cord should be at least as great as
the electrical rating of the appliance. If the appliance is of the grounded type, the
extension cord should be a grounding-type 3-wire cord. The cord should be
arranged so that it will not hang over the counter top or tabletop where it can be
pulled by children or tripped over.
• Do not attempt to repair this appliance yourself.
SAVE THESE INSTRUCTIONS
3

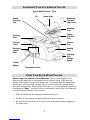
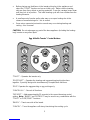
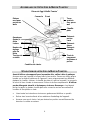
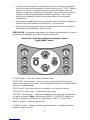
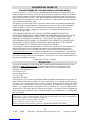
ASSEMBLING YOUR EGG & MUFFIN TOASTER™
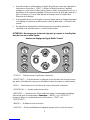
Egg & Muffin Toaster™ Parts
Lid Steam Vent
Round
Poaching
Tray
Measuring
Cup with
Egg Piercer
Warming
Tray
Toasting
Slots
Square
Poaching
Tray
Carriage
Levers
Steamer
Tray
Browning
Control
Dials
Heating
Tray
Poaching
Tray
Storage
Drawer
Control
Buttons
Touchpad Controls
USING YOUR EGG & MUFFIN TOASTER™
Before using your appliance for the first time, be sure to thoroughly clean it.
Make sure the appliance is not plugged into an electrical outlet. Wipe down the
exterior of the appliance with a soft, damp cloth. Thoroughly wash the heating tray,
steamer tray, poaching trays, warming tray, lid, and poaching tray storage drawer
with warm, soapy water. Rinse and dry thoroughly. Do not use abrasive cleaners or
scouring pads. Note: The poaching trays, warming tray, and the lid can be washed
in the dishwasher if placed on the top rack.
• Read all instructions and safety precautions before use.
• Remove all stickers and packaging materials from the machine.
• Be sure the carriage lever is not in the locked down position before plugging in
the power cord.
4

• Before placing any food items in the toaster slots plug in the appliance and
select the “TOAST” function and run an initial cycle. Make sure the toasting
slots are free of any debris or packing materials. Press the carriage levers down
until they lock in to position. This initial toasting cycle will clean residue from the
heating elements.
• A small amount of smoke and/or odor may occur upon heating due to the
release of manufacturing oils – this is normal.
• Some minor expansion/contraction sounds may occur during heating and
cooling – this is normal.
CAUTION: Do not submerge any part of the base appliance (including the heating-
tray) in water or any other liquid.
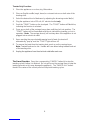
Egg & Muffin Toaster™ Control Buttons
“TOAST” – Operates the toaster only.
“EGG/TOAST” – Operates the toasting and egg poaching/cooking functions
together. Specially designed to simultaneously complete both functions.
“EGG”- Operates the egg poaching or egg cooking only.
“CANCEL ALL” – Cancels all functions.
“DEFROST” – Adds approximately 30 seconds to the current browning control
setting. Note: “BAGEL” and “DEFROST” may be used in any combination with the
“TOAST” or “EGG/TOAST” functions.
“BAGEL” – Toasts one side of the bread.
“CANCEL” – Turns the appliance off at any time during the cooking cycle.
5

6
Toaster Only Function:
1. Place the appliance on a clean, dry, flat surface.
2. Place an English muffin, bagel, bread, or croissant into one or both sets of the
toasting slots.
3. Select the desired level of darkness by adjusting the browning control dial(s).
4. Plug the appliance into a 120 volt, AC electrical outlet only.
5. Push the “TOAST” button on the touchpad. The “TOAST” button will flash blue,
indicating the function is selected.
6. Press one or both of the carriage levers down until they lock into position. The
“TOAST” button will be illuminated solid blue to indicate the toasting cycle is in
operation. Note: The carriage lever(s) will not stay down if the appliance is not
plugged into an electrical outlet.
7. Upon reaching the pre-selected browning level of toast, the toast will
automatically “pop up” and the “TOAST” light will turn off.
8. To remove the toast from the toasting slots, push up on the carriage lever.
Note: Toasted food can be hot. Handle with care when taking toasted food out
of the toasting slots.
9. Unplug the appliance from the electrical outlet after each use.
The Cancel Function: Press the corresponding “CANCEL” button(s) to stop the
toasting cycle(s) before it is finished. Do not pull up on the carriage lever to stop the
toasting process as this may damage the appliance. The “CANCEL ALL” button
found in the center of the control panel will stop both toasting cycles.

7
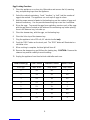
Egg Poaching Function (for breakfast sandwich):
CAUTION: Use extreme care when operating the egg poacher as hot steam is
released through the steam vent.
1. Place the appliance on a clean, dry, flat surface and remove the steamer tray,
poaching tray(s), warming tray, and lid. Fill the measuring cup with water to the
“soft” or “medium” line above the “POACHED EGG” mark and pour into the
heating tray, or add 2 to 2½ tablespoons of water into the heating tray. See the
chart below.
2. Place the steamer tray on top of the heating tray.
3. Apply non-stick cooking spray to the poaching tray(s).
4. Break an egg into the poaching tray and place the poaching tray on top of the
steamer tray.
5. Break the egg yolk by poking it with a fork. The egg may also be scrambled.
6. Optional: Place pre-cooked meat on the warming tray and stack on top of the
poaching tray(s) and the steamer tray. Note: Do not attempt to cook fresh
meat products: use only pre-cooked meat products.
7. Place the lid on top of the warming tray.
8. Plug the appliance into a 120 volt, AC electrical outlet only.
9. Push the “EGG” button on the touchpad. The “EGG” button will illuminate to a
solid blue color.
10. When the poaching is complete, the blue light will turn off.
11. Remove the poaching tray(s), warming tray, and lid from the heating tray.
CAUTION: Remove the trays carefully to avoid scalding.
12. Take the lid off of the warming and poaching trays. Allow the remaining steam
to dissipate.
13. Remove the pre-cooked meat and the poached eggs from their respective trays.
Assemble a sandwich or enjoy separately.
14. Unplug the appliance from the electrical outlet after each use.
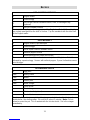
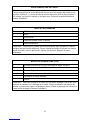
Consistency of Egg Tbsp. Water
Soft (runny center) 2
Medium (partially cooked center) 2½
Hard (fully cooked center) 3

8
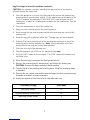
Egg Cooking Function:
1. Place the appliance on a clean, dry, flat surface and remove the lid, warming
tray, and poaching trays from the appliance.
2. Select the cooked consistency, “hard,” “medium,” or “soft,” and the number of
eggs to be cooked. The appliance can cook up to 8 eggs at a time.
3. Add the proper amount of water to the heating tray per the number of eggs and
desired consistency. Use the provided measuring cup or see the chart below.
4. Rinse the eggs. To prevent the eggs from exploding, puncture each of the eggs
with the egg piercer located on the bottom of the measuring cup before placing
them in the steamer tray, hole side up.
5. Place the steamer tray, with the eggs, on the heating tray.
6. Place the lid on top of the steamer tray.
7. Plug the appliance into a 120 volt, AC electrical outlet only.
8. Push the “EGG” button on the touch pad. The “EGG” button will illuminate to a
solid blue color.
9. When cooking is complete, the blue light will turn off.
10. Remove the steamer tray and lid from the heating tray. CAUTION: Remove the
steamer tray and lid carefully to avoid scalding.
11. Unplug the appliance from the electrical outlet after each use.
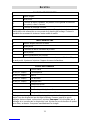
Hard Boiled Egg Soft Cooked Medium Cooked Hard Cooked
# of Eggs Tbsp. Water Tbsp. Water Tbsp. Water
1 3½ 4½ 7
2 3¼ 4¼ 6¾
3 2¾ 3¾ 6¼
4 2½ 3½ 6
5 2½ 3½ 5
6 2¼ 3¼ 4¾
7 2 2¾ 4¼
8 1¾ 2½ 4

9
Poached Egg & Toast Function:
1. Place the appliance on a clean, dry, flat surface and remove the lid, warming
tray, poaching pans, and steamer tray from the appliance.
2. Place an English muffin, bagel, bread, or croissant into the toasting slots.
3. Select the desired level of darkness by adjusting the browning control dial(s).
4. Fill the measuring cup with water to the “soft” or “medium” line above the
“POACHED EGG” mark and pour into the heating tray, or add 2 to 2½
tablespoons of water directly into the heating tray (See table on page 7).
5. Place the steamer tray on top of the heating tray.
6. Apply non-stick cooking spray to the poaching tray(s).
7. Break an egg into the poaching tray and place the poaching tray on top of the
steamer tray.
8. Break the egg yolk by poking it with a fork. The egg may also be scrambled.
9. Place the warming tray on top of the poaching tray(s) and add pre-cooked meat,
if desired.
10. Place the lid on top of the warming tray.
11. Plug the appliance into a 120 volt, AC electrical outlet only.
12. Push the “EGG/TOAST” button on the touchpad control. The “EGG/TOAST”
button will flash blue.
13. Press one or both carriage levers down until locked into position. The “EGG”,
“TOAST”, and “EGG/TOAST” buttons will illuminate. Note: Neither the egg
cooking, or the toasting process will start until at least one, or both of the
carriage levers are locked down.
The Egg & Muffin Toaster™ “EGG/TOAST” function enables synchronized
toasting and egg cooking. The bread will toast to the color set by the browning
control dial but will not “pop up” until the egg cycle has completed. The carriage
will remain down keeping the bread warm until the egg(s) have completed
cooking.
14. When both the egg cycle and toasting are complete, the appliance will
automatically shut off and the toast will automatically “pop up.” The “EGG”,
“TOAST”, and “EGG/ TOAST” button lights will no longer be illuminated, which
signals the appliance has turned off. Note: The egg cooker timing is controlled
by the amount of water placed in the heating tray. The more water added, the
longer the appliance will cook.
15. To remove the toast from the toasting slots, lift up on the carriage lever and
remove the toast.
16. Remove the steamer tray, poaching tray(s), warming tray, and lid from the
heating tray. Allow the remaining steam to dissipate. CAUTION: Remove the
trays carefully to avoid being scalded with steam.
17. Remove the pre-cooked meat and the poached egg from their respective trays.
Assemble a sandwich or enjoy separately.
18. Unplug the appliance from the electrical outlet after each use.

10
CLEANING YOUR EGG & MUFFIN TOASTER™
1. Unplug the appliance from the electrical outlet and allow to cool completely
before cleaning.
2. Wipe down the exterior of the appliance with a damp cloth.
3. Thoroughly wash the heating tray, steamer tray, poaching tray(s), warming tray,
and the lid in warm, soapy water. Periodically remove the poaching tray storage
drawer from the appliance and wipe clean.
4. The steamer tray, poaching tray(s), warming tray and the lid can be washed in
the dishwasher when placed on the top rack.
5. The heating tray may accumulate mineral deposits after prolonged use. To
remove these deposits add ½ teaspoon of concentrated vinegar and ½ cup of
water to the heating tray. With the lid in place, turn on the egg cooker function
and allow the solution to boil for approximately 10 minutes. CAUTION: The
water will be hot!
CAUTION: Do not submerge any part of the appliance base (including the heating-
tray) in water or any other liquid.

11
RECIPES
EGG & MUFFIN SANDWICH
1 English muffin
1 Poached egg
1 Slice of pre-cooked Canadian Bacon, Ham, or Sausage Patty
(optional)
1 Slice of Cheddar Cheese
To assemble: Lay the poached egg on top of the English muffin half followed by the
pre-cooked meat and then the slice of cheese. Top the sandwich with the other half
of the English muffin.
EGGS BENEDICT
2 English muffins, split and open
4 Poached eggs
4 Slices of pre-cooked Canadian Bacon
Salt and pepper to taste
Hollandaise sauce to taste (see recipe)
To assemble: Lay a slice of Canadian bacon on top of each English muffin half
followed by a poached egg. Season with salt and pepper. Spoon Hollandaise sauce
over the eggs.
HOLLANDAISE SAUCE
2 Egg yolks
4 tbs. Heavy cream
2 tbs. Butter
1 tbs. Lemon juice
1 tbs. White vinegar
Pinch of salt
Pinch of sugar
Chicken-broth (optional)
Dash of hot sauce
Combine all ingredients except the white vinegar and chicken broth in the top of a
double boiler, over boiling water. Stir until thick, about 3 minutes. Note: Do not
reheat or cover the pot. Thin if needed with the chicken broth. Stir in the vinegar
immediately.

EGGS BENEDICT WITH CHICKEN
Prepare Eggs Benedict as directed except omit the Canadian bacon. Cut one
skinless, boneless chicken breast into bite-size strips. Add 2 tbs. cooking oil to a
medium skillet; cook and stir for 2 to 3 minutes or until no longer pink. Assemble the
Eggs Benedict as usual.
EGGS FLORENTINE
2 English muffins, split and open
4 Eggs
Salt and pepper to taste
Steamed spinach leaves
Hollandaise sauce
To assemble: Prepare this just like the Eggs Benedict recipe but replace the
Canadian bacon with the spinach leaves. Lay the spinach leaves on top of each
English muffin half followed by a poached egg. Season with salt and pepper. Spoon
Hollandaise sauce over the eggs.
SMOKED SALMON (LOX) BAGEL
1 Toasted plain bagel (or any bagel you like)
1 Tomato slice (optional)
1 Onion slice
Thin slices of lox (smoked salmon)
Plain cream cheese
Capers
To assemble: Spread cream cheese on one half of the bagel. Add thin slices of
smoked salmon on top of the cream cheese. Top with a slice of tomato and onion;
sprinkle with capers. Spread the other half of the bagel with cream cheese and
place on top.
12

13
L5748 05/08 Chefscape™, a Brand of Focus Electrics, LLC. Printed in China
PRODUCT WARRANTY
Appliance 3 Year Limited Warranty
Focus Electrics, LLC (“Focus Electrics”) warrants this appliance from failures in the material
and workmanship for three (3) years from the date of original purchase with proof of purchase,
provided the appliance is operated and maintained in conformity with the provided Instruction
Manual. Any failed part of the appliance will be repaired or replaced without charge at Focus
Electrics’ discretion. This warranty applies to indoor household use only.
This warranty does not cover any damage, including discoloration, to any non-stick surface of
the appliance. This warranty is null and void, as determined solely by Focus Electrics if the
appliance is damaged through accident, misuse, abuse, negligence, scratching, or if the
appliance is altered in any way.
THIS WARRANTY IS IN LIEU OF ALL IMPLIED WARRANTIES, INCLUDING WARRANTIES
OF MERCHANTABILITY, FITNESS FOR A PARTICULAR PURPOSE, PERFORMANCE, OR
OTHERWISE, WHICH ARE HEREBY EXCLUDED. IN NO EVENT SHALL FOCUS
ELECTRICS BE LIABLE FOR ANY DAMAGES, WHETHER DIRECT, INDIRECT,
INCIDENTAL, FORSEEABLE, CONSEQUENTIAL, OR SPECIAL, ARISING OUT OF OR IN
CONNECTION WITH THIS APPLIANCE.
If you think the appliance has failed or requires service within its warranty period, please
contact the Focus Electrics Customer Service Department at (866) 290 –1851 or e-mail us at
[email protected]. Return shipping fees are non-refundable. A receipt proving
original purchase date will be required for all warranty claims. Hand-written receipts are not
accepted. Focus Electrics is not responsible for returns lost in transit.
Valid only in USA and Canada
REPLACEMENT PARTS
Replacement parts, if available, may be ordered directly from Focus Electrics online at
www.focuselectrics.com, or you may call or e-mail the service department at the number/e-mail
address listed above, or by writing to us at:
Focus Electrics, LLC
Attn: Customer Service
P. O. Box 2780
West Bend, WI 53095
Be sure to include the catalog/model number of your appliance (located on the bottom/back of
the unit) and a description and quantity of the part you wish to order. Along with this include
your name, mailing address, Visa/MasterCard number, expiration date and the name as it
appears on the card. Checks can be made payable to Focus Electrics, LLC. Call Customer
Service to obtain purchase amount. Your state’s sales tax and a shipping/processing fee will
be added to your total charge. Please allow two (2) weeks for delivery.
This manual contains important and helpful information regarding the safe use and care of your
new Focus Electrics product. For future reference, attach dated sales receipt for warranty proof
of purchase and record the following information:
Date purchased or received as gift: _______________________________________________
Where purchased and price, if known: _____________________________________________
Item number and Date Code (shown bottom/back of product):___________________________

4-FENTES EGG & MUFFIN TOASTER™
Mode d’emploi
Enregistrez ce produit et les autres produits Focus Electrics sur notre site Internet :
www.focuselectrics.com
Précautions Importantes ..........................................................................................2
Précautions D’Utilisation ..........................................................................................3
Assemblage De Votre EGG & MUFFIN TOASTER™.......................................................4
Utilisation De Votre EGG & MUFFIN TOASTER™...........................................................4
Nettoyage De Votre EGG & MUFFIN TOASTER™........................................................10
Recettes.................................................................................................................11
Garantie .................................................................................................................13
CONSERVEZ CE MODE D’EMPLOI POUR UNE CONSULTATION ULTÉRIEURE
© 2008 Chefscape™, une Marque de Focus Electrics, LLC.
www.focuselectrics.com

PRÉCAUTIONS IMPORTANTES
Pour empêcher toute blessure physique ou tout dommage matériel, lisez et
suivez toutes les consignes et mises en garde.
Lorsque vous utilisez des appareils électriques, les précautions de sécurité
élémentaires devraient toujours être respectées, notamment :
• Lisez toutes les instructions, notamment les présentes précautions importantes,
ainsi que les consignes pour l’entretien de ce manuel.
• Ne touchez pas les surfaces chaudes. Utilisez des poignées rectangulaires ou
rondes.
• Pour vous protéger contre les incendies, les chocs électriques et les blessures,
n’immergez pas le cordon, les fiches ni toute autre pièce électrique dans l’eau ou
dans d’autres liquides.
• Une surveillance étroite est nécessaire lorsque vous cet appareil est utilisé par
ou à proximité d’enfants.
• Débranchez toujours l’appareil du secteur lorsque vous ne l’utilisez pas et avant
de le nettoyer. Laissez l’appareil refroidir avant la mise en place ou le retrait de
pièces et avant tout nettoyage.
• N’utilisez pas cet appareil avec un cordon abîmé ou une fiche détériorée, si
l’appareil a connu un disfonctionnement ou si l’appareil est tombé ou a été
détérioré de quelque manière que ce soit. Si vous rencontrer un problème quel
qu’il soit avec votre appareil, débranchez-le immédiatement de la prise secteur.
Pour des informations sur les réparations, voir la page de garantie.
• L’utilisation d’accessoires non recommandés par Focus Electrics risque de
causer un incendie, une électrocution ou des blessures.
• N’utilisez pas cet appareil à l’extérieur.
• Ne laissez pas pendre le cordon du bord du plan de travail ou de la table et
assurez-vous qu'il ne touche pas de surface chaude.
• Ne le placez pas sur ou près d’un brûleur à gaz ou électrique chaud ou dans un
four chauffé.
• Soyez extrêmement vigilant lorsque vous déplacez un appareil électrique ou un
récipient contenant des liquides ou des aliments à haute température.
• Pour débrancher l’appareil, tournez toute commande sur « OFF » puis retirez la
fiche de la prise murale.
• N’utilisez pas l’appareil pour une autre utilisation que l’utilisation indiquée.
• Ne mettez pas des morceaux d’aliments trop gros, des feuilles d’emballage
métallisées ou des ustensiles métalliques dans le grille-pain car cela entraîne un
risque d'incendie ou de choc électrique.
• Un incendie peut se produire si, en cours de fonctionnement, le appareil est
couvert ou touche des matériaux inflammables, y compris des rideaux, des
doubles-rideaux, des murs et des matières similaires.
2
• N’essayez pas de déloger des aliments coincés avec le grille-pain branché.

3
• Cet appareil est pourvu d’une fiche polarisée (une lame est plus large que
l’autre). Pour réduire le risque d’électrocution, cette fiche est conçue pour
s’encastrer dans une prise secteur polarisée dans un sens uniquement. Si la
fiche ne s’insère pas complètement dans la prise secteur, retournez la fiche. Si
elle ne s’encastre toujours pas, contactez un électricien qualifié. Ne tentez pas
de modifier la fiche de quelque manière que ce soit.
• Pour usage domestique uniquement.
Pour empêcher toute blessure physique ou tout dommage matériel, lisez et
suivez toutes les consignes et mises en garde.
PRÉCAUTIONS D’UTILISATION
• Évitez de faire griller des aliments recouverts de glaçage ou fourrés, qui
risqueraient de couler et de prendre feu.
• Ne grillez pas de pâtisseries, de tartes ni tout autre aliment de même type sur un
autre réglage que le réglage le plus bas ou le plus léger et ne les grillez jamais
deux fois car ces aliments peuvent prendre feu s’ils sont surchauffés et risquent
de provoquer un incendie.
• Le fait de ne pas nettoyer puis remettre en place le plateau ramasse-miettes
après chaque utilisation peut provoquer un incendie.
• Soulevez et ouvrez le couvercle du cuiseur d'oeufs soigneusement pour éviter
l'échaudage.
• Ne tentez pas de faire marcher le cuiseur d’oeufs sans eau dans le réservoir.
• Pour empêcher de renverser le liquide chaud, ne déplacez pas l'appareil après le
début du processus de cuisson des œufs.
• Le cordon d’alimentation fourni est court pour réduire les risques qu’une
personne se prenne les pieds ou trébuche sur un cordon plus long.
• Des cordons d’alimentations plus longs détachables ou des cordons de rallonge
sont disponibles et peuvent être utilisés à condition de faire preuve de prudence
lors de leur utilisation. Bien que l’utilisation d’un cordon de rallonge ne soit pas
recommandée, si vous devez en utiliser un, la puissance nominale indiquée pour
le cordon d’alimentation détachable ou pour le cordon de rallonge devrait être au
moins aussi importante que la puissance nominale de l’appareil. Si l’appareil est
de type raccordé à la terre, le cordon de rallonge devrait être relié à la terre et
composé de trois fils. Le cordon devrait être disposé de manière à ne pas pendre
depuis le plan de travail d’où il risque d’être tiré par des enfants ou d’où
quelqu’un pourrait s’y prendre les pieds.
• N’essayez pas de réparer cet appareil vous-même.
CONSERVEZ CES CONSIGNES

ASSEMBLAGE DE VOTRE EGG & MUFFIN TOASTER™
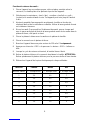
Pièces du Egg & Muffin Toaster™
Couvercle Évent
Plateau
rond pour
pocher les
œufs
Tasse
graduée
avec perce-
œuf
Chauffe-
plats
Ouvertures
(fentes) à
rôties
Plateau à
pocher
carré
Leviers
Plateau à
étuver
Boutons de
réglage
pour les
rôties
Plateau à
chauffer
Touches de
contrôle
Tiroir de
rangement
du plateau à
pocher
Contrôles du clavier
UTILISATION DE VOTRE EGG & MUFFIN TOASTER™
Avant d’utiliser votre appareil pour la première fois, veillez à bien le nettoyer.
Assurez-vous que l’appareil n’est pas branché au secteur. Passez un chiffon propre
humide sur la surface extérieure de l’appareil. Lavez soigneusement les différents
plateaux (à chauffer, à étuver, à chauffer les plats et à pocher les œufs), le couvercle
et le tiroir à l’eau chaude et savonneuse. Rincez et séchez complètement. N’utilisez
pas de détergents abrasifs ni de tampons à récurer. Remarque : Le plateau à
pocher les œufs, le plateau chauffe-plats et le couvercle vont au lave-vaisselle à
condition d’ être placés en haut.
• Lisez toutes les instructions et mises en gardes avant d'utiliser ce produit.
• Retirez tous les autocollants et les matériaux d'emballage de l'appareil.
• Assurez-vous que le levier n’est pas abaissé en position verrouillée avant de
brancher le cordon au secteur.
4

• Avant de mettre un aliment dans les fentes du grille-pain, branchez l’appareil et
sélectionnez la fonction « TOAST » (Rôties) et faites fonctionner l’appareil
pendant un cycle initial. Vérifiez que les fentes à rôties sont propres et qu’il n’y a
pas débris ou de restes d’emballage. Enfoncez le levier du grille-pain jusqu’à ce
qu’il s’enclenche. Ce cycle initial permet de nettoyer tous les résidus des
éléments de chauffage.
• Il est possible qu’un peu de fumée ou qu’une légère odeur se dégagent pendant
le chauffage en raison de la diffusion des huiles de fabrication : c’est tout à fait
normal.
• De petits bruits d’expansion/contraction peuvent se produire pendant le
chauffage et le refroidissement : c’est tout à fait normal.
ATTENTION : Ne plongez pas la base de l’appareil (y compris le chauffe-plats)
dans de l’eau ou un autre liquide.
Boutons de Réglage du Egg & Muffin Toaster™
« TOAST » – Fait fonctionner le grille-pain seulement.
« EGG/TOAST » – Fait fonctionner le grille-pain et les fonctions de cuisson/cuisson
des œufs. Spécialement conçu pour compléter les deux fonctions en même temps.
« EGG » – Fait fonctionner les fonctions de cuisson des œufs seulement.
« CANCEL ALL » – Annule toutes les fonctions.
« DEFROST » – Ajoute environ 30 secondes au temps correspondant au réglage
sélectionné pour le brunissement. Remarque : « BAGEL » et « DEFROST »
peuvent s’utiliser en combinaison avec les fonctions « TOAST » ou
« EGG/TOAST ».
« BAGEL » – Grillade sur une seule face.
« CANCEL » – Éteint immédiatement l’appareil quelque soit le cycle de cuisson.
5

6
Fonction du grille-pain seulement :
1. Placez ce produit sur une surface propre, sèche et plane.
2. Placez une tranche de pain, un bagel, un muffin ou un croissant dans une ou
plusieurs des fentes à rôtir.
3. Sélectionnez un degré de brunissage à l’aide du (des) bouton(s) de réglage.
4. Branchez l’appareil dans une prise secteur de 120 volts CA uniquement.
5. Appuyez sur la touche « TOAST » du panneau. La touche « TOAST » clignote
en bleu pour indiquer que cette fonction est sélectionnée.
6. Enfoncez un ou deux des leviers du grille-pain jusqu’à ce qu’ils s’enclenchent.
La touche « TOAST » reste allumée en bleu pour indiquer que le cycle de la
fonction rôtie est en cours. Remarque : Les leviers ne restent pas enclenchés si
l’appareil n’est pas branché au secteur.
7. Lorsque le niveau de brunissage est atteint, la rôtie ressort automatiquement et
le voyant lumineux de la fonction « TOAST » s'éteint.
8. Pour retirer la rôtie de la fente, levez le levier. Remarque : Les rôties sont très
chaudes. Faites attention quand vous retirez les aliments des fentes.
9. Débranchez l’appareil de la prise électrique après chaque utilisation.
La fonction d’annulation (« Cancel ») : Appuyez sur le bouton « CANCEL »
correspondant pour interrompre le cycle de rôtissage. Ne levez pas le levier des
rôties pour interrompre le processus car cela pourrait endommager l’appareil. Le
bouton « CANCEL ALL » qui se trouve au centre du panneau de commande arrête
les deux cycles de rôtissage.

7
Fonction pour faire des œufs pochés (pour un sandwich au petit-déjeuner) :
ATTENTION : Faites très attention quand vous utilisez la partie pour les œufs
pochés car de la vapeur brûlante sort de l’évent (ou orifice à vapeur).
1. Placez l’appareil sur une surface propre, sèche et plane avant de retirer le
plateau à étuver, le (les) plateau(x) à pocher les œufs, le chauffe-plats et le
couvercle. Remplissez d’eau la tasse graduée jusqu’à la marque soft (pour un
œuf plus coulant) ou medium (pour une cuisson moyenne) au-dessus de la
marque « POACHED EGG » puis versez dans le plateau à chauffer, ou ajoutez
2 à 2½ cuillères à soupe d’eau dans le plateau à chauffer. Voir le tableau ci-
dessous.
2. Placez le plateau à étuver sur le plateau à chauffer.
3. Recouvrez le (les) plateau(x) à pocher les œufs d’une huile de cuisine anti-
adhésive en aérosol.
4. Cassez un œuf et mettez-le dans le plateau à pocher puis placez le plateau à
pocher sur le plateau à étuver.
5. Cassez le jaune de l’œuf avec une fourchette. Vous pouvez aussi faire des
œufs brouillés.
6. Facultatif : Placez de la viande déjà cuite sur le chauffe-plats et mettez le sur le
(les) plateau(x) à pocher qui se trouve(nt) sur le plateau à étuver. Remarque :
Ne tentez pas d’utiliser cet appareil pour faire cuire de la viande : utilisez
seulement de la viande déjà cuite.
7. Placez le couvercle sur le chauffe-plats.
8. Branchez l’appareil dans une prise secteur de 120 volts CA uniquement.
9. Appuyez sur la touche « EGG » du panneau. Le bouton « EGG » s’allume en
bleu.
10. Lorsque le cycle à pocher est terminé, la lumière bleue s’éteint.
11. Retirez le (les) plateau(x) à pocher, le chauffe-plats et le couvercle du plateau à
chauffer. ATTENTION : Retirez prudemment les plateaux pour ne pas vous
brûler à l’eau chaude.
12. Retirez le couvercle des plateaux. Laissez se dissiper la vapeur.
13. Retirez la viande précuite ou les œufs pochés du plateau où ils se trouvent.
Préparez un sandwich ou dégustez sans rien ajouter d’autre.
14. Débranchez l’appareil de la prise électrique après chaque utilisation.
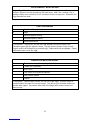
Consistance de l’œuf C. à soupe Eau
Coulant au centre 2
Mollet (le centre est partiellement solide) 2½
Dur (le centre est complètement solide) 3
La page est en cours de chargement...
La page est en cours de chargement...
La page est en cours de chargement...
La page est en cours de chargement...
La page est en cours de chargement...
La page est en cours de chargement...
La page est en cours de chargement...
La page est en cours de chargement...
La page est en cours de chargement...
La page est en cours de chargement...
La page est en cours de chargement...
La page est en cours de chargement...
La page est en cours de chargement...
La page est en cours de chargement...
La page est en cours de chargement...
La page est en cours de chargement...
La page est en cours de chargement...
La page est en cours de chargement...
La page est en cours de chargement...
La page est en cours de chargement...
-
 1
1
-
 2
2
-
 3
3
-
 4
4
-
 5
5
-
 6
6
-
 7
7
-
 8
8
-
 9
9
-
 10
10
-
 11
11
-
 12
12
-
 13
13
-
 14
14
-
 15
15
-
 16
16
-
 17
17
-
 18
18
-
 19
19
-
 20
20
-
 21
21
-
 22
22
-
 23
23
-
 24
24
-
 25
25
-
 26
26
-
 27
27
-
 28
28
-
 29
29
-
 30
30
-
 31
31
-
 32
32
-
 33
33
-
 34
34
-
 35
35
-
 36
36
-
 37
37
-
 38
38
-
 39
39
-
 40
40


West Bend Chefscape TEMPR Manuel utilisateur
- Catégorie
- Grille-pain
- Taper
- Manuel utilisateur
dans d''autres langues
Documents connexes
-
Back to Basics L5769 Manuel utilisateur
-
West Bend Egg and Muffin Toaster Manuel utilisateur
-
Back to Basics 4-SLICE EGG & MUFFIN TOASTER Manuel utilisateur
-
-
-
-
West Bend 86675 Manuel utilisateur