Legrand 752188 Guide d'installation
- Catégorie
- Kits de voiture
- Taper
- Guide d'installation

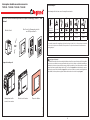
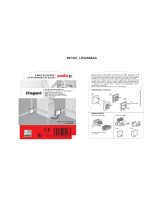
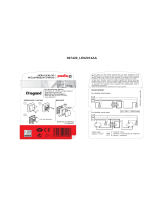
Interrupteur double connecté avec neutre
7 521 88 - 7 522 88 - 7 523 88 - 7 563 88
Nécessite l’achat et l’installation préalable d’un pack de démarrage connecté “... with
Netatmo“
Composition du pack :
Module Control
Interrupteur double
connecté avec neutre
Protection de chantier Plaque de finition
LE12726AA
Prise Control et Commande générale
sans fils Départ/Arrivée
OU
Consignes de sécurité
Ce produit doit être installé conformément aux règles d’installation et de préférence par un électricien qualifié. Une installation
incorrecte et/ou une utilisation incorrecte peuvent entraîner des risques de choc électrique ou d’incendie. Avant d’effectuer
l’installation, lire la notice, tenir compte du lieu de montage spécifique au produit. Ne pas ouvrir, démonter, altérer ou modifier
l’appareil sauf mention particulière indiquée dans la notice. Tous les produits Legrand doivent exclusivement être ouverts et
réparés par du personnel formé et habilité par Legrand. Toute ouverture ou réparation non autorisée annule l’intégralité des
responsabilités, droits à remplacement et garanties. Utiliser exclusivement les accessoires de la marque Legrand.
Caractéristiques
LED
100-240V~
50/60Hz 2x1,5mm
240V~ Maxi. 250W 50W 50W 125VA 125VA
100V~ Maxi. 125W 25W 25W 65VA 65VA
+45°C
+5°C
(*)
(*) Les transformateurs ferromagnétiques doivent être chargés à plus de 60 % de leur puissance nominale.
Lors du calcul de la puissance admissible, il faut prendre en compte le rendement des transformateurs
ferromagnétiques.
2
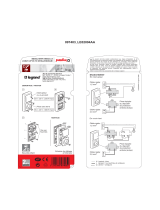
Cet interrupteur fonctionne avec les ampoules suivantes :

Si vous prévoyez d’installer des va-et-vient d’éclairage, lisez les précautions suivantes :
Pour commander une lumière avec 2 points de commande ou plus, utilisez uniquement
les produits suivants :
x 1
Interrupteur double
connecté avec neutre
x 1
ou plusieurs
x 1
ou plusieurs
Commandes sans fils (non incluses dans ce pack).
Jusqu’à 20 maximum.
N’utilisez pas : deux interrupteurs connectés pour commander un même
point d’éclairage.
ET
ET/OU
3
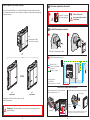
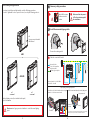
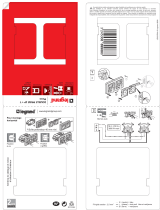
Avant de commencer : précaution de câblage
Installez l’interrupteur connecté
4
Précautions impératives de sécurité
OFF
Coupez le courant au
disjoncteur principal
Vérifier l’absence de
tension avant de procéder à
l’installation.
Câbler l’interrupteur connecté
Astuce dans le cas du remplacement d’un va-et-vient
Bande de fréquence :
2,4 -2,4835 GHz
Niveau de puissance : < 100 mW
Démonter l’interrupteur existant
N (neutre) = bleu
L (phase) = tout sauf bleu
et vert/jaune
(terre) = vert/jaune
8mm
LN1 2
Ancien interrupteur encastré, les 2 navettes doivent être
câblées ensemble dans la borne 1 ou 2
Ancien interrupteur encastré remplacé par la commande sans fils.
8mm
LN1 2
Retour lampe
Navettes
Navettes
Neutre (si
présent)
Utiliser un connecteur pour raccorder ensemble les 3 ls (retour de lampes,
navettes). Utiliser un connecteur séparé pour isoler le l de neutre.

Pour ajouter un produit connecté à votre installation connectée, il
est recommandé de suivre les instructions :
- depuis l’application Legrand Home + Control (section Paramètres/Ajout de nouveau
produit)
- ou consulter les guides et notices d’utilisation sur legrand.fr
LEGRAND - Pro and Consumer Service - BP 30076
87002 LIMOGES CEDEX FRANCE • www.legrand.com
DÉCLARATION UE DE CONFORMITÉ SIMPLIFIÉE
Le soussigné,
Legrand
déclare que les équipements radioélectriques cités sur cette notice sont
conformes à la directive 2014/53/UE.
Le texte complet de la déclaration UE de conformité est disponible à l’adresse
internet suivante :
www.legrandoc.com
www.legrand.fr

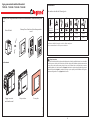
2 gang connected switch with neutral
7 521 88 - 7 522 88 - 7 523 88 - 7 563 88
Requires you to buy and install the Valena Life with Netatmo connected starter pack
first.
Pack contents
Control Module
2 gang connected
switch with neutral
Site protection Cover plate
LE12726AA
Gateway Power Outlet and Home/Away wireless
control
OR
Safety instructions
This product should be installed in compliance with installation rules, preferably by a qualified electrician. Incorrect installation
and/or incorrect use can lead to risk of electric shock or fire. Before carrying out the installation, read the instructions and take
account of the product’s specific mounting location. Do not open up, dismantle, alter or modify the device except where
specifically required to do so by the instructions. All Legrand products must be opened and repaired exclusively by personnel
trained and approved by Legrand. Any unauthorised opening or repair completely cancels all liabilities and the rights to
replacement and guarantees. Use only Legrand brand accessories.
Characteristics
LED
100-240V~
50/60Hz 2x1,5mm
240V~ Maxi. 250W 50W 50W 125VA 125VA
100V~ Maxi. 125W 25W 25W 65VA 65VA
+45°C
+5°C
(*)
Transformers should be charged to over 60% of their rated power.
Take account tranformer losses for power calculations.
2
This switch works with the following loads :

If you plan to install two-way light switches, read the following precautions:
To control 1 light with 2 or more points of control, use only the following products :
x 1
2 gang connected switch
with neutral
x 1
or several
x 1
or several
Wireless lighting controls (not included in this pack).
Up to 20 maximum
Do not use: two 2gang connected switches to control the same lighting
point.
AND
AND/OR
3
Before starting : wiring precautions
Install the connected 2 gang switch
4
Necessary safety precautions
OFF
Switch off the power
at the main circuit
breaker
Make sure that the power is
off before continuing with
the installation.
Wire the connected 2G switch
Tip if replacing an existing 2-way switch
Frequency bands: 2.4 - 2.4835 GHz
Power level: < 100 mW
Remove the existing switch
N (neutral) = blue
L (Live) = all except blue
and green/yellow
(earth) = green/yellow
8mm
LN1 2
The travellers 1 and 2 of the old switch must be wired together
in terminal 1 or 2 of the new connected switch
Old flush mounted switch replaced by a wireless lighting control
8mm
LN1 2
Lamp return wire
Travellers
Travellers
Neutral (if
present)
Use a connector to connect all 3 wires together (travellers 1 and 2 and lamp
return wire). Use a separate connector to insulate the neutral wire

To add a connected product to your connected installation,you
should follow the instructions:
- in the Legrand Home + Control application (Settings/Add a new product section)
- or consult the user manual on legrand.fr
LEGRAND - Pro and Consumer Service - BP 30076
87002 LIMOGES CEDEX FRANCE • www.legrand.com
SIMPLIFIED EU DECLARATION OF CONFORMITY
The undersigned,
Legrand
declares that the radio-electric equipment referred to in these
instructions complies with directive 2014/53/EU.
The full text of the EU declaration of conformity
is available on the following website :
www.legrandoc.com
www.legrand.fr
-
 1
1
-
 2
2
-
 3
3
-
 4
4
-
 5
5
-
 6
6


Legrand 752188 Guide d'installation
- Catégorie
- Kits de voiture
- Taper
- Guide d'installation
dans d''autres langues
- English: Legrand 752188 Installation guide
Documents connexes
-
Legrand Céliane with Netatmo Manuel utilisateur
-
-
-
Legrand 067695 Manuel utilisateur
-
-
-
-
Autres documents
-
 SCS Sentinel 3245060958350 Le manuel du propriétaire
-
 SCS Sentinel 3245060974473 Le manuel du propriétaire
-
 SCS Sentinel 3245060977207 Le manuel du propriétaire
-
 SCS Sentinel 3245060974206 Le manuel du propriétaire
-
 SCS Sentinel 3245060974039 Le manuel du propriétaire
-
 SCS Sentinel 3245060973728 Le manuel du propriétaire
-
 SCS Sentinel 3245060699888 Le manuel du propriétaire
-
Bticino 4673 Mode d'emploi
-
-


