Dometic PW3800 Mode d'emploi
- Catégorie
- Bandes lumineuses
- Taper
- Mode d'emploi

PW3800
Awning
Operating manual . . . . . . . . . . . . . . . . . . . . 12
Markise
Bedienungsanleitung . . . . . . . . . . . . . . . . .26
Store extérieuru
Notice d’utilisation . . . . . . . . . . . . . . . . . . . 41
Toldo
Instrucciones de uso . . . . . . . . . . . . . . . . . .56
Toldo
Manual de instruções . . . . . . . . . . . . . . . . .70
Tenda d a sole
Istruzioni per l’uso . . . . . . . . . . . . . . . . . . . .84
Zonnescherm
Gebruiksaanwijzing. . . . . . . . . . . . . . . . . . .98
Markise
Betjeningsvejledning . . . . . . . . . . . . . . . . 112
Markis
Bruksanvisning. . . . . . . . . . . . . . . . . . . . . .126
Markise
Bruksanvisning. . . . . . . . . . . . . . . . . . . . . .139
Markiisi
Käyttöohje . . . . . . . . . . . . . . . . . . . . . . . . . 152
Синусоидальный инвертор
Инструкция по эксплуатации . . . . . . . . . 166
Markiza
Instrukcja obsługi . . . . . . . . . . . . . . . . . . . 181
Markýza
Návod k obsluze . . . . . . . . . . . . . . . . . . . . 195
Markiza
Navodilo za uporabo . . . . . . . . . . . . . . . . 209
Τέντα
Οδηγίες χειρισμού . . . . . . . . . . . . . . . . 223
EN
DE
FR
ES
PT
IT
NL
DA
SV
NO
FI
RU
PL
CS
SL
EL
AWNINGS
PERFECTWALL
PW3800-O-16s.book Seite 1 Dienstag, 2. April 2019 12:30 12

PW3800-O-16s.book Seite 2 Dienstag, 2. April 2019 12:30 12

PW3800
3
3
1
2
1
2
3
4
4
1
1.
2.
3.
2
PW3800-O-16s.book Seite 3 Dienstag, 2. April 2019 12:30 12

PW3800
4
1.
2.
3.
3
1
4
PW3800-O-16s.book Seite 4 Dienstag, 2. April 2019 12:30 12

PW3800
5
2.
1.
5
6
PW3800-O-16s.book Seite 5 Dienstag, 2. April 2019 12:30 12

PW3800
6
7
3.
2.
1.
8
9
PW3800-O-16s.book Seite 6 Dienstag, 2. April 2019 12:30 12

PW3800
7
0
1.
2.
3.
a
b
PW3800-O-16s.book Seite 7 Dienstag, 2. April 2019 12:30 12

PW3800
8
c
B
A
B
3.
A
2.
1.
4 mm
d
PW3800-O-16s.book Seite 8 Dienstag, 2. April 2019 12:30 12

PW3800
9
e
D
C
C
D
2.
1.
4 mm
3.
f
PW3800-O-16s.book Seite 9 Dienstag, 2. April 2019 12:30 12

PW3800
10
2
1
1
g
15 – 20 Nm
h
PW3800-O-16s.book Seite 10 Dienstag, 2. April 2019 12:30 12

PW3800
11
4.
1.
3.
2.
i
PW3800-O-16s.book Seite 11 Dienstag, 2. April 2019 12:30 12

EN
Explanation of symbols PW3800
12
!
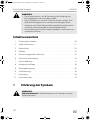
Table of contents
1 Explanation of symbols . . . . . . . . . . . . . . . . . . . . . . . . . . . . . . . . . . . . . . . . . .12
2 Safety instructions . . . . . . . . . . . . . . . . . . . . . . . . . . . . . . . . . . . . . . . . . . . . . .13
3 Scope of delivery . . . . . . . . . . . . . . . . . . . . . . . . . . . . . . . . . . . . . . . . . . . . . .15
4 Accessories . . . . . . . . . . . . . . . . . . . . . . . . . . . . . . . . . . . . . . . . . . . . . . . . . . .15
5 Intended use . . . . . . . . . . . . . . . . . . . . . . . . . . . . . . . . . . . . . . . . . . . . . . . . . .16
6 Technical description . . . . . . . . . . . . . . . . . . . . . . . . . . . . . . . . . . . . . . . . . . .16
7 Operating the awning. . . . . . . . . . . . . . . . . . . . . . . . . . . . . . . . . . . . . . . . . . .17
8 Cleaning and maintenance. . . . . . . . . . . . . . . . . . . . . . . . . . . . . . . . . . . . . . 22
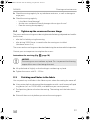
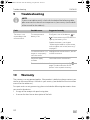
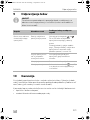
9 Troubleshooting . . . . . . . . . . . . . . . . . . . . . . . . . . . . . . . . . . . . . . . . . . . . . . 24
10 Warranty . . . . . . . . . . . . . . . . . . . . . . . . . . . . . . . . . . . . . . . . . . . . . . . . . . . . 24
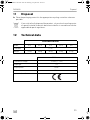
11 Disposal. . . . . . . . . . . . . . . . . . . . . . . . . . . . . . . . . . . . . . . . . . . . . . . . . . . . . 25
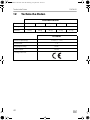
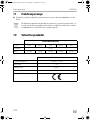
12 Technical data . . . . . . . . . . . . . . . . . . . . . . . . . . . . . . . . . . . . . . . . . . . . . . . . 25
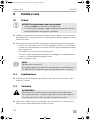
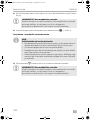
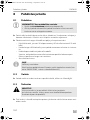
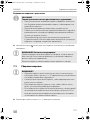
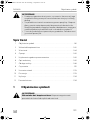
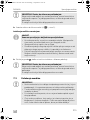
1 Explanation of symbols
!
WARNING!
• This operating manual must be read and understood before the
device is operated, cleaned or serviced.
• This product must be mounted by a specialist. Improper assembly
can lead to serious injury. Alterations to the product can be
extremely dangerous and lead to serious injury or damage to the
device.
• Keep this instruction manual with the product. The owner must read
it carefully.
WARNING!
Safety instruction: Indicates a hazardous situation that, if not avoided,
could result in death or serious injury.
PW3800-O-16s.book Seite 12 Dienstag, 2. April 2019 12:30 12

EN
PW3800 Safety instructions
13
A
I
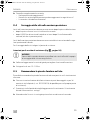
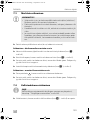
2 Safety instructions
Please observe the prescribed safety instructions and stipulations from the
vehicle manufacturer and service workshops.
The manufacturer accepts no liability for damage in the following cases:
• Damage to the product resulting from mechanical influences and incorrect
connection voltage
• Alterations to the product without express permission from the manufacturer
• Use for purposes other than those described in the operating manual
!
WARNING!
• Before starting your journey, check that the awning is fully retracted.
Never move the vehicle when the awning is open.
• Never drive with the crank inserted. Remove the crank before starting
your journey.
• Do not drive the vehicle if the fabric is damaged or torn, even if the
awning has been properly retracted. The awning arms are held in
place by the fabric. If the fabric rips while driving, the awning will
suddenly shoot out. This can lead to serious injury. Secure the awning
so that it cannot extend suddenly and unexpectedly while driving.
•Do not open the awning while driving.
•Do not open the awning in strong winds or snowfall.
• Retract the awning if strong winds, heavy rain or snowfall are
imminent.
• Make sure that water or snow does not accumulate on the fabric.
Otherwise this could damage the awning or the awning arms could
collapse and cause severe or fatal injury.
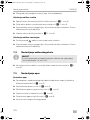
NOTICE!
Indicates a situation that, if not avoided, can result in property damage.
NOTE
Supplementary information for operating the product.
PW3800-O-16s.book Seite 13 Dienstag, 2. April 2019 12:30 12

EN
Safety instructions PW3800
14
• Do not approach the awning
– if it was left open during heavy winds
– if pools of water have formed on it
– if snow has accumulated on it
– if any debris is on the awning fabric.
The awning may move unexpectedly, become unstable and bend or
break off.
• Only motor version: If the connection cable of the awning is
damaged, it must be replaced by an expert.
• Only motor version: Disconnect the power supply by means of the
on/off switch before you clean the vehicle in the vicinity of the awning
or the awning itself.
• Do not leave the extended awning unattended. Retract the awning
before leaving your site.
• Keep a safe distance away from the awning when having barbecues or
open fires. The fabric can be damaged by heat or catch fire.
• This device can be used by children aged 8 years or over, as well as by
persons with diminished physical, sensory or mental capacities or a
lack of experience and knowledge, providing they are supervised or
have been taught how to use the device safely and are aware of the
resulting risks.
• Only motor version: Electrical devices are not toys.
Keep the remote control out of the reach of children. Prevent children
from playing with the wall switch (accessory).
• Children must be supervised to ensure that they do not play with the
device.
A
NOTICE!
• Park the motor home or caravan at a site where debris (branches,
leaves or similar) cannot fall onto the fabric.
• The fabric of the awning should not hang down at the edges, and must
remain taut at all times. If the fabric hangs down, it could rub against
the arms and become damaged.
The fabric used for long awnings should not sag in the middle.
• Only retract the awning when the fabric is free of debris (branches,
leaves or similar). Otherwise the awning may be damaged when it is
retracted.
• Keep the awning free of dirt to prevent abrasions, stains and mildew.
PW3800-O-16s.book Seite 14 Dienstag, 2. April 2019 12:30 12

EN
PW3800 Scope of delivery
15
• Only retract the awning if it is wet for safety reasons. Extend it again as
soon as possible. Otherwise, mildew or stains can form or the colour
may fade.
• Never bend down an awning arm or the cover to drain water off the
awning. This can bend the awning and impair its function.
• Do not hang any objects on the awning, on the front cover or the
awning arms.
• Do not use any sprays (e. g. insect repellent, hairspray) near the
awning. This will soil the fabric or the water-repellent effect of the
fabric will be lost.
• If there is insufficient space above the door after the awning is
mounted, the door must remained closed when retracting or
extending to avoid the door making contact with the arms or the lead
rail.
The required space depends on the design of the door (door width,
swing or sliding door) as well as the set awning angle of inclination.
3Scope of delivery
4Accessories
Available as accessories (not included in the scope of delivery):
Quantity Description
1 Awning
1 Hand crank (only hand crank version)
Emergency crank (only motor version)
4Pegs
1 Remote control (only motor version)
Description
TieDown Kit
Straps for anchoring the awning
Dometic Light LK120
LED light kit with remote control for installation on the awning arms
PW3800-O-16s.book Seite 15 Dienstag, 2. April 2019 12:30 12

EN
Intended use PW3800
16
5 Intended use
The PerfectWall PW3800 awning is suitable for installation on motor homes or
caravans.
The awning may be only be used while the vehicle is stationary.
6 Technical description
PerfectWall PW3800 awnings are available as motor version or as hand crank
version.
The motor version can be extended and retracted with a motor that is controlled by
remote control or wall switch (accessory).
The hand crank version can be extended and retracted using a hand crank.
The awning is self-supporting.The integrated struts can be mounted on the side of
the vehicle or on the ground to support the height of the lead rail.
LED LightStrip
LED strip available in different lengths for installation on the underside of the awning
LED Profile
LED lighting available in different lengths for installation on the underside of wall-mounted
awnings
Awning cleaner
Special awning cleaner
Repair Kit
Awning repair patch
Wall switch
Description
PW3800-O-16s.book Seite 16 Dienstag, 2. April 2019 12:30 12

EN
PW3800 Operating the awning
17
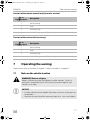
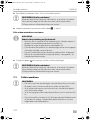
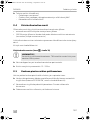
Controls of the remote control (only for motor version)
Controls of the wall switch (accessory)
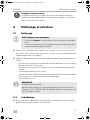
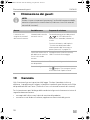
7 Operating the awning
Observe the safety instructions in chapter “Safety instructions” on page 13.
7.1 Note on the vehicle location
!
A
No. in
fig. 1, page 3
Description
1 Retract awning
2 Stop
3 Extend awning
4 Switch LED lighting on/off (accessory)
No. in
fig. 1, page 3
Description
1 Retract awning
2 Stop
3 Extend awning
4 Switch LED lighting on/off (accessory)
WARNING! Beware of injury.
Keep a sufficient distance from objects or other vehicles. Once it is
retracted, it should be at least 40 cm away from other objects and
vehicles on all sides.
NOTICE!
• Park the vehicle so that no debris (branches, leaves or similar) gets on
to the fabric.
• Keep the awning free of dirt to prevent abrasions, stains and mildew.
PW3800-O-16s.book Seite 17 Dienstag, 2. April 2019 12:30 12

EN
Operating the awning PW3800
18
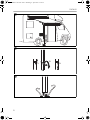
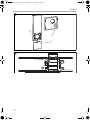
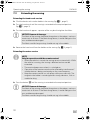
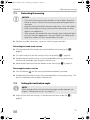
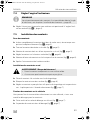
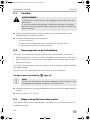
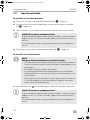
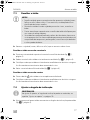
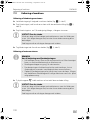
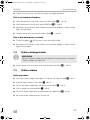
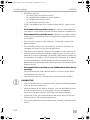
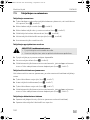
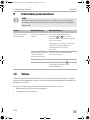
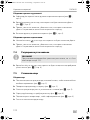
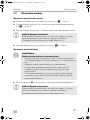
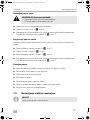
7.2 Extending the awning
Extending the hand crank version
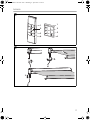
➤ Click the hand crank into the holder in the awning (fig. 2 1, page 3).
➤ Turn the hand crank until the awning is extended to the required position
(fig. 2 2, page 3).
➤ Turn the hand crank approx. a quarter of the way back to tighten the fabric.
A
➤ Remove the hand crank from the holder on the awning (fig. 2 3, page 3).
Extending the motor version
I
➤ Press the button until the awning is extended to the required position.
A
NOTICE! Beware of damage.
The fabric of the awning should not hang down at the edges, and must
remain taut at all times. If the fabric hangs down, it could rub against the
arms and become damaged.
The fabric used for long awnings should not sag in the middle.
NOTE
Only for operation with the remote control:
• When the vehicle is started, the awning retracts automatically. While
the vehicle is running, the awning is blocked and can not be
extended.
• The receiver beeps once when it is switched on.
• Operation of the remote control can be affected by interference if
another device is being used nearby on the same frequency.
• Keep the remote control in a safe place while you are driving. The
magnet in the holder is not designed for strong vibrations, such as
sudden braking.
NOTICE! Beware of damage.
The fabric of the awning should not hang down at the edges, and must
remain taut at all times. If the fabric hangs down, it could rub against the
arms and become damaged.
The fabric used for long awnings should not sag in the middle.
PW3800-O-16s.book Seite 18 Dienstag, 2. April 2019 12:30 12

EN
PW3800 Operating the awning
19
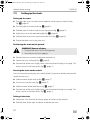
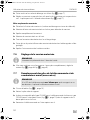
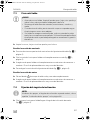
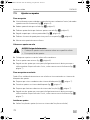
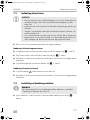
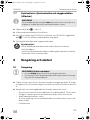
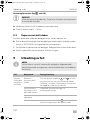
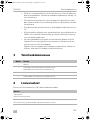
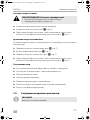
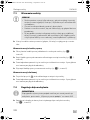
7.3 Retracting the awning
A
➤ Remove any debris (branches, leaves or similar) lying on the fabric.
Retracting the hand crank version
➤ Click the top end of the hand crank into the holder in the awning (fig. 3 1,
page 4).
➤ Turn the hand crank until the awning is fully retracted (fig. 3 2, page 4).
➤ Double-check that the awning is fully retracted before starting your journey.
The lead rail should be right up against the housing.
➤ Remove the hand crank from the holder on the awning (fig. 3 3, page 4).
Retracting the motor version
➤ Press the button until the awning has been completely retracted.
➤ Double-check that the awning is fully retracted before starting your journey. The
lead rail should be right up against the housing.
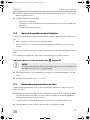
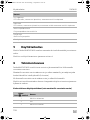
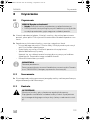
7.4 Setting the inclination angle
I
➤ Adjust the nut until the awning is in the desired inclination angle (fig. 4 1,
page 4).
NOTICE!
• Only retract the awning when the fabric is free of debris (branches,
leaves or similar). Otherwise the awning may be damaged when it is
retracted.
• Keep the awning free of dirt to prevent abrasions, stains and mildew.
• When retracting the awning, make sure that no branches or other
objects are trapped in it.
• If the awning is retracted when wet, extend it again and let the fabric
dry out at the next opportunity. If the wet fabric stays rolled up for a
long time, mildew will form and the fabric can fade.
NOTE
When setting up the struts the inclination angle can be reduced, see
chapter “Setting up the struts” on page 20.
PW3800-O-16s.book Seite 19 Dienstag, 2. April 2019 12:30 12

EN
Operating the awning PW3800
20
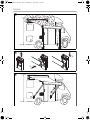
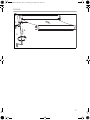
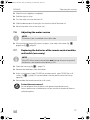
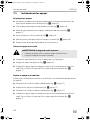
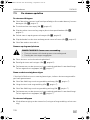
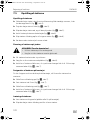
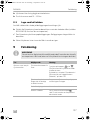
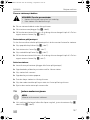
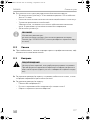
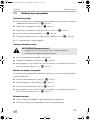
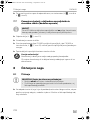
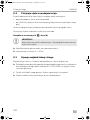
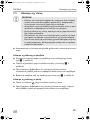
7.5 Setting up the struts
Putting up the struts
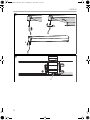
➤ Push the right strut in the front cover together so that you can move it freely
(fig. 5, page 5).
➤ Turn the right strut to the side (fig. 5, page 5).
➤ Fold the right strut down and set it on the ground (fig. 6, page 5).
➤ Adjust the strut to the required height (fig. 7, page 6).
➤ Fold the lever for the strut up to secure the struts (fig. 8, page 6).
➤ Extend the other strut in the same way.
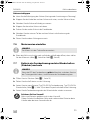
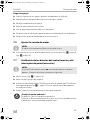
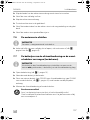
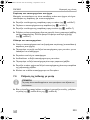
Positioning the struts on the ground
!
➤ Position the struts vertically underneath the lead rail.
➤ Secure the struts with pegs (fig. 9 , page 6).
➤ Position one of the struts slightly lower so that the lead rail hangs at an angle. This
allows rain to run off more easily (fig. 0, page 7).
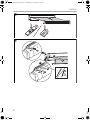
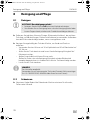
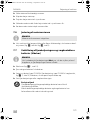
Securing the struts on the vehicle
You can secure the awning on your vehicle directly if you have already mounted the
latches for the struts.
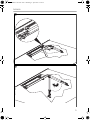
➤ Slide the cover of the latch up (fig. a, page 7).
➤ Fit the struts into the latch (fig. a, page 7).
➤ Slide the cover of the latch down (fig. a, page 7).
➤ Position one of the struts slightly lower so that the lead rail hangs at an angle. This
allows rain to run off more easily (fig. b, page 7).
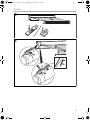
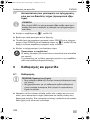
Putting in the struts
➤ Loosen the struts from the fastenings (pegs or latches on the vehicle).
➤ Fold the lever of the right strut down to loosen the struts.
WARNING! Beware of injury
• Only position the struts on solid ground.
• Secure the struts from slipping.
PW3800-O-16s.book Seite 20 Dienstag, 2. April 2019 12:30 12
La page est en cours de chargement...
La page est en cours de chargement...
La page est en cours de chargement...
La page est en cours de chargement...
La page est en cours de chargement...
La page est en cours de chargement...
La page est en cours de chargement...
La page est en cours de chargement...
La page est en cours de chargement...
La page est en cours de chargement...
La page est en cours de chargement...
La page est en cours de chargement...
La page est en cours de chargement...
La page est en cours de chargement...
La page est en cours de chargement...
La page est en cours de chargement...
La page est en cours de chargement...
La page est en cours de chargement...
La page est en cours de chargement...
La page est en cours de chargement...
La page est en cours de chargement...
La page est en cours de chargement...
La page est en cours de chargement...
La page est en cours de chargement...
La page est en cours de chargement...
La page est en cours de chargement...
La page est en cours de chargement...
La page est en cours de chargement...
La page est en cours de chargement...
La page est en cours de chargement...
La page est en cours de chargement...
La page est en cours de chargement...
La page est en cours de chargement...
La page est en cours de chargement...
La page est en cours de chargement...
La page est en cours de chargement...
La page est en cours de chargement...
La page est en cours de chargement...
La page est en cours de chargement...
La page est en cours de chargement...
La page est en cours de chargement...
La page est en cours de chargement...
La page est en cours de chargement...
La page est en cours de chargement...
La page est en cours de chargement...
La page est en cours de chargement...
La page est en cours de chargement...
La page est en cours de chargement...
La page est en cours de chargement...
La page est en cours de chargement...
La page est en cours de chargement...
La page est en cours de chargement...
La page est en cours de chargement...
La page est en cours de chargement...
La page est en cours de chargement...
La page est en cours de chargement...
La page est en cours de chargement...
La page est en cours de chargement...
La page est en cours de chargement...
La page est en cours de chargement...
La page est en cours de chargement...
La page est en cours de chargement...
La page est en cours de chargement...
La page est en cours de chargement...
La page est en cours de chargement...
La page est en cours de chargement...
La page est en cours de chargement...
La page est en cours de chargement...
La page est en cours de chargement...
La page est en cours de chargement...
La page est en cours de chargement...
La page est en cours de chargement...
La page est en cours de chargement...
La page est en cours de chargement...
La page est en cours de chargement...
La page est en cours de chargement...
La page est en cours de chargement...
La page est en cours de chargement...
La page est en cours de chargement...
La page est en cours de chargement...
La page est en cours de chargement...
La page est en cours de chargement...
La page est en cours de chargement...
La page est en cours de chargement...
La page est en cours de chargement...
La page est en cours de chargement...
La page est en cours de chargement...
La page est en cours de chargement...
La page est en cours de chargement...
La page est en cours de chargement...
La page est en cours de chargement...
La page est en cours de chargement...
La page est en cours de chargement...
La page est en cours de chargement...
La page est en cours de chargement...
La page est en cours de chargement...
La page est en cours de chargement...
La page est en cours de chargement...
La page est en cours de chargement...
La page est en cours de chargement...
La page est en cours de chargement...
La page est en cours de chargement...
La page est en cours de chargement...
La page est en cours de chargement...
La page est en cours de chargement...
La page est en cours de chargement...
La page est en cours de chargement...
La page est en cours de chargement...
La page est en cours de chargement...
La page est en cours de chargement...
La page est en cours de chargement...
La page est en cours de chargement...
La page est en cours de chargement...
La page est en cours de chargement...
La page est en cours de chargement...
La page est en cours de chargement...
La page est en cours de chargement...
La page est en cours de chargement...
La page est en cours de chargement...
La page est en cours de chargement...
La page est en cours de chargement...
La page est en cours de chargement...
La page est en cours de chargement...
La page est en cours de chargement...
La page est en cours de chargement...
La page est en cours de chargement...
La page est en cours de chargement...
La page est en cours de chargement...
La page est en cours de chargement...
La page est en cours de chargement...
La page est en cours de chargement...
La page est en cours de chargement...
La page est en cours de chargement...
La page est en cours de chargement...
La page est en cours de chargement...
La page est en cours de chargement...
La page est en cours de chargement...
La page est en cours de chargement...
La page est en cours de chargement...
La page est en cours de chargement...
La page est en cours de chargement...
La page est en cours de chargement...
La page est en cours de chargement...
La page est en cours de chargement...
La page est en cours de chargement...
La page est en cours de chargement...
La page est en cours de chargement...
La page est en cours de chargement...
La page est en cours de chargement...
La page est en cours de chargement...
La page est en cours de chargement...
La page est en cours de chargement...
La page est en cours de chargement...
La page est en cours de chargement...
La page est en cours de chargement...
La page est en cours de chargement...
La page est en cours de chargement...
La page est en cours de chargement...
La page est en cours de chargement...
La page est en cours de chargement...
La page est en cours de chargement...
La page est en cours de chargement...
La page est en cours de chargement...
La page est en cours de chargement...
La page est en cours de chargement...
La page est en cours de chargement...
La page est en cours de chargement...
La page est en cours de chargement...
La page est en cours de chargement...
La page est en cours de chargement...
La page est en cours de chargement...
La page est en cours de chargement...
La page est en cours de chargement...
La page est en cours de chargement...
La page est en cours de chargement...
La page est en cours de chargement...
La page est en cours de chargement...
La page est en cours de chargement...
La page est en cours de chargement...
La page est en cours de chargement...
La page est en cours de chargement...
La page est en cours de chargement...
La page est en cours de chargement...
La page est en cours de chargement...
La page est en cours de chargement...
La page est en cours de chargement...
La page est en cours de chargement...
La page est en cours de chargement...
La page est en cours de chargement...
La page est en cours de chargement...
La page est en cours de chargement...
La page est en cours de chargement...
La page est en cours de chargement...
La page est en cours de chargement...
La page est en cours de chargement...
La page est en cours de chargement...
La page est en cours de chargement...
La page est en cours de chargement...
La page est en cours de chargement...
La page est en cours de chargement...
La page est en cours de chargement...
La page est en cours de chargement...
La page est en cours de chargement...
La page est en cours de chargement...
La page est en cours de chargement...
La page est en cours de chargement...
La page est en cours de chargement...
La page est en cours de chargement...
La page est en cours de chargement...
La page est en cours de chargement...
La page est en cours de chargement...
La page est en cours de chargement...
La page est en cours de chargement...
La page est en cours de chargement...
La page est en cours de chargement...
La page est en cours de chargement...
La page est en cours de chargement...
La page est en cours de chargement...
La page est en cours de chargement...
La page est en cours de chargement...
-
 1
1
-
 2
2
-
 3
3
-
 4
4
-
 5
5
-
 6
6
-
 7
7
-
 8
8
-
 9
9
-
 10
10
-
 11
11
-
 12
12
-
 13
13
-
 14
14
-
 15
15
-
 16
16
-
 17
17
-
 18
18
-
 19
19
-
 20
20
-
 21
21
-
 22
22
-
 23
23
-
 24
24
-
 25
25
-
 26
26
-
 27
27
-
 28
28
-
 29
29
-
 30
30
-
 31
31
-
 32
32
-
 33
33
-
 34
34
-
 35
35
-
 36
36
-
 37
37
-
 38
38
-
 39
39
-
 40
40
-
 41
41
-
 42
42
-
 43
43
-
 44
44
-
 45
45
-
 46
46
-
 47
47
-
 48
48
-
 49
49
-
 50
50
-
 51
51
-
 52
52
-
 53
53
-
 54
54
-
 55
55
-
 56
56
-
 57
57
-
 58
58
-
 59
59
-
 60
60
-
 61
61
-
 62
62
-
 63
63
-
 64
64
-
 65
65
-
 66
66
-
 67
67
-
 68
68
-
 69
69
-
 70
70
-
 71
71
-
 72
72
-
 73
73
-
 74
74
-
 75
75
-
 76
76
-
 77
77
-
 78
78
-
 79
79
-
 80
80
-
 81
81
-
 82
82
-
 83
83
-
 84
84
-
 85
85
-
 86
86
-
 87
87
-
 88
88
-
 89
89
-
 90
90
-
 91
91
-
 92
92
-
 93
93
-
 94
94
-
 95
95
-
 96
96
-
 97
97
-
 98
98
-
 99
99
-
 100
100
-
 101
101
-
 102
102
-
 103
103
-
 104
104
-
 105
105
-
 106
106
-
 107
107
-
 108
108
-
 109
109
-
 110
110
-
 111
111
-
 112
112
-
 113
113
-
 114
114
-
 115
115
-
 116
116
-
 117
117
-
 118
118
-
 119
119
-
 120
120
-
 121
121
-
 122
122
-
 123
123
-
 124
124
-
 125
125
-
 126
126
-
 127
127
-
 128
128
-
 129
129
-
 130
130
-
 131
131
-
 132
132
-
 133
133
-
 134
134
-
 135
135
-
 136
136
-
 137
137
-
 138
138
-
 139
139
-
 140
140
-
 141
141
-
 142
142
-
 143
143
-
 144
144
-
 145
145
-
 146
146
-
 147
147
-
 148
148
-
 149
149
-
 150
150
-
 151
151
-
 152
152
-
 153
153
-
 154
154
-
 155
155
-
 156
156
-
 157
157
-
 158
158
-
 159
159
-
 160
160
-
 161
161
-
 162
162
-
 163
163
-
 164
164
-
 165
165
-
 166
166
-
 167
167
-
 168
168
-
 169
169
-
 170
170
-
 171
171
-
 172
172
-
 173
173
-
 174
174
-
 175
175
-
 176
176
-
 177
177
-
 178
178
-
 179
179
-
 180
180
-
 181
181
-
 182
182
-
 183
183
-
 184
184
-
 185
185
-
 186
186
-
 187
187
-
 188
188
-
 189
189
-
 190
190
-
 191
191
-
 192
192
-
 193
193
-
 194
194
-
 195
195
-
 196
196
-
 197
197
-
 198
198
-
 199
199
-
 200
200
-
 201
201
-
 202
202
-
 203
203
-
 204
204
-
 205
205
-
 206
206
-
 207
207
-
 208
208
-
 209
209
-
 210
210
-
 211
211
-
 212
212
-
 213
213
-
 214
214
-
 215
215
-
 216
216
-
 217
217
-
 218
218
-
 219
219
-
 220
220
-
 221
221
-
 222
222
-
 223
223
-
 224
224
-
 225
225
-
 226
226
-
 227
227
-
 228
228
-
 229
229
-
 230
230
-
 231
231
-
 232
232
-
 233
233
-
 234
234
-
 235
235
-
 236
236
-
 237
237
-
 238
238
-
 239
239
-
 240
240


Dometic PW3800 Mode d'emploi
- Catégorie
- Bandes lumineuses
- Taper
- Mode d'emploi
dans d''autres langues
Documents connexes
-
Dometic PerfectWall PW3500 Mode d'emploi
-
Dometic PW1100 Mode d'emploi
-
Dometic PerfectWall PW 1000 Le manuel du propriétaire
-
-
-
-
-
-
-
Autres documents
-
 vidaXL 313210 Manuel utilisateur
-
Thule HideAway - Roof Mount Manuel utilisateur
-
 Selve commeo Wind Sensor Mode d'emploi
-
Silvercrest 282352 Operation and Safety Notes
-
weinor VertiTex WeiTop Instructions For Assembly Maintenance And Use
-
LIVARNO 399078 Le manuel du propriétaire
-
Philips LightStrip Guide d'installation
-
Jula 791-212 Window Awning Le manuel du propriétaire

