Garden Oasis D71 M80922 Le manuel du propriétaire
- Taper
- Le manuel du propriétaire

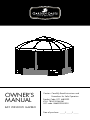
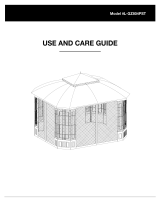
OWNER’S
MANUAL
BAY WINDOW GAZEBO
Date of purchase: _____/ _____/ _____
Caution: Carefully Read Instructions and
Procedures for Safe Operation
Product Code: D71 M80922
KSN: 780-01834636-1
UPC code: 846822000503

Warning:
1. When assembling and using this product, basic safety precautions should always be followed
to reduce the risk of personal injury and damage to equipment. Please read all instructions
before assembly and use.
2. Some parts may contain sharp edges, wear protective gloves if necessary. At least four or more
people are recommended for safe assembly.
3. Keep all children and pets away from assembly area.
4. Begin assembly not less than 6 feet from any obstruction such as fence, garage, house,
overhanging branches, laundry line or electrical wires.
5. Install on level ground. This gazebo cannot be permanently staked or attached to concrete floor
or platform. This gazebo is intended for decorative and sunshade purposes only and is not meant
to withstand inclement weather including high winds, rain and snow. Gazebo fabric is water
resistant, not water proof and may leak during exposure to precipitation.
6. Check all nuts and bolts for tightness before and during usage.
7. Keep all flame and heat sources away from this gazebo fabric. This gazebo is made with fabric
that meets CPAI-84 specifications for flame resistance. It is not fire proof. The fabric will burn if left
in continuous contact with any flame source. The application of any foreign substance to the gazebo
fabric may render the flame-resistant properties ineffective.
P1

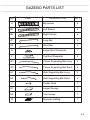
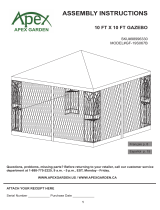
GAZEBO PARTS LIST
P2
NO PART
DESCRIPTION
A
B1
B2
C1
C2
E
F
G1
G2
H1
H2
J
K1
K2
N
QTY
4
4
4
2
2
1
4
4
4
2
2
1
1
1
1
Big screen
Left Screen
Right Screen
Long Bar
Short Bar
Larger Roof Connector
Top Roof Supporter
Corner Supporting Bar-Long
Corner Supporting Bar-Short
Side Supporting Bar-Long
Side Supporting Bar-Short
Center Hook
Larger Canopy
Top Canopy
Mosquito Netting

HARDWARE PACK
SPARE HARDWARE PACK
P3
NO PART
DESCRIPTION QTY
AA
BB
CC
DD
EE
16
20
36
8
48
WW
M6×25mm Screw
M6×20mm Screw
M6 Washer
Stake
Plastic ring for
mosquito netting
Plastic ring for
mosquito netting
M6 Wrench 1
NO PART
DESCRIPTION QTY
AA
BB
CC
EE
2
4
6
4
3
1
M6×25mm Screw
M6×20mm Screw
M6 Washer
Snap link
Touch up paint
Assembly Tools Required: a ladder and a hammer (not provided)

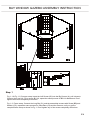
BAY WINDOW GAZEBO ASSEMBLY INSTRUCTION
P4
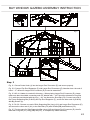
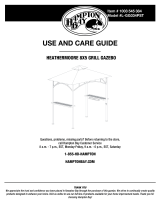
Step: 1
Fig. 1-1 & Fig. 1-2, Screens setup: Insert the Left Screen (B1) into the Big Screen (A), pull it down to
fix them; then use AA, CC to secure B1 & A; repeat the same process for B2 & A attachment. Don’t
tighten the screws completely at this time.
Fig. 1-3, Frame setup: Connect the Long Bar (C1) and the assembled screens with Screw (BB) and
Washer (CC); repeat the same process for Short Bars (C2) and the Screens, until you get the
complete frame setup as shown in Fig. 1. Don’t tighten any of the screws completely at this time.

BAY WINDOW GAZEBO ASSEMBLY INSTRUCTION
P5
Fig. 2
Fig. 2-1 Fig. 2-2 Fig. 2-3
Fig. 2-5
Fig. 2-4
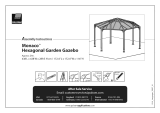
Step: 2
Fig. 2-1: Screw Center Hook (J) into the Larger Roof Connector (E) and secure properly.
Fig. 2-2: Connect Top Roof Supporter (F) with Larger Roof Connector (E). Attention here: the end of
Label “→F” affixed on Larger Roof Connector (E) is used to assemble F.
Fig. 2-3 & 2-4: A ladder is needed for this step--- When placing Larger Roof Connector (E), please
make sure that, the middle connecting end of E labeled with “→H2” should be directed to Long Bar
(C1); while the part labeled with the logo “→H1” be directed to Short Bar (C2). Connect one end of
the Corner Supporting Bar (G1&G2) and Top Roof Supporter (F), and fix the other end of (G1&G2)
with Big Screen (A).
Fig. 2- 5 & 2-6: Connect one end of Side Supporting Bar (Long) (H1) and Larger Roof Connector (E),
and secure the other end of (H1) to the Short Bar (C2) with Screws (BB) and Washers (CC).
Fig. 2-7: Do the same for Side Supporting Bar (short) (H2) and Larger Roof Connector (E), then fix
them with Long Bar (C1) using (BB) and (CC), to complete top frame assembly.
E
E
J
FF
G1
F
G2
G1
G1
G1
H1
E
G2
C1
C2
B1
B2
A
G2
G2
G2
A
B1
G1
C2
H1
H2
C1
C1
B1
B2
A
Fig. 2-7
Fig. 2-6
C2
BB
CC
BB
CC
C1
H1
H2

BAY WINDOW GAZEBO
ASSEMBLY INSTRUCTION
P6
2-3 .giF1-3 .giF
4-3 .giF3-3 .giF
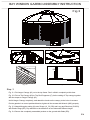
Step: 3
Fig. 3-1: Put Larger Canopy (K1) on to the top frame. Don’t unfold it completely at this time.
Fig. 3-2: Put on Top Canopy (K2) to Top Roof Supporter (F); tie the netting of Top canopy together
with the straps on Larger Canopy (K1).
Unfold Larger Canopy completely, and attach the hooks on the canopy to the holes in screens.
Put the gazebo in a correct position/direction; tighten all the screws with Wrench (WW) properly.
Fig. 3-3: Attach Mosquito netting (N) onto Screen (A
B1, B2) and Long and Short bar (C1&C2)
with Plastic Rings (EE). Pay attention to the difference of two sides with different length.
Fig. 3-4: Secure the completely assembled product on the ground with Stake (DD).
K1
K1
DD DD
K2
EE
N
A,B1,B2,C1,C2
Fig 3

BAY WINDOW GAZEBO ASSEMBLY INSTRUCTION
P7
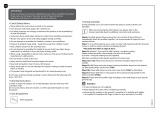
Care & Maintenance
Our steel components for garden accessories and furniture are treated with rust inhibiting paint that
protects it from rusting. However, due to the nature of steel, surface oxidation (rusting) will occur once
these protective coatings are scratched. This is a natural process and is not a defect! To minimize this
condition, we recommend care when assembling & handling the product to prevent scratching the paint.
Should any scratching or damage occur, we recommend immediate touch-up with rust inhibiting paint,
which is included in the package. Surface rust can also be easily removed with a very light application
of common cooking oil. If surface oxidation (rusting) occurs and if no measure is taken to prevent this,
the oxidation may start dripping on to deck or patio and cause damaging stains, which may be difficult
to remove. This can be prevented if the measure is taken to keep the product from oxidizing.
Limited Warranty
The item is warranted to be free from defects in material or workmanship for a period of 1 year.
However, we don't reimburse for transportation or delivery costs, or compensate the individual or any
outside party for assembling or disassembling the product.
This limited warranty is extended to the original purchaser and applies to defects in materials and
workmanship of your item, provided the item is maintained with care and used only for personal,
residential purposes.
Exclusions
Items used for commercial, contract, or other non-residential purposes, or items damaged due to acts
of nature, vandalism, misuse, or improper assembly are not covered. Corrosion or rusting of hardware
is not covered. Proof of purchase (dated register receipt) is required for warranty claims. Warranty is
to the original purchaser and is non-transferable. Any replacement of warranted items will be in the
original style and color, or a similar style and color if the original is unavailable or has been discontinued.
As some states do not allow exclusions or limitations on an implied warranty, the above exclusions and
limitations may not apply. This warranty gives you specific rights, and you may also have other rights,
which vary from state to state.
Important
Please do not return this product to the store. For technical assistance on assembly or replacement parts,
call Sunjoy Industries at (866) 578-6569 from 8:30 AM to 5:30 PM EST Monday to Friday, for expedited
replacement parts order, fax the attached completed customer service replacement form to
1-740-283-3549, or send email to [email protected] for assistance.
Made in China

-iiÊÕÀÊiÝÌiÃÛiÊ>ÃÃÀÌiÌÊvÊÕÌ`ÀÊÛ}Ê«À`ÕVÌÃ
iÊ>ÌÊÜÜÜ°Ãi>ÀðVÊ>`ÊÜÜÜ°>ÀÌ°V
>`iÊÊÉÊiVÊiÊ
ÃÌÀLÕÌi`ÊLÞÊ-i>ÀÃ]Ê,iLÕVÊ>`Ê°]Êvv>ÊÃÌ>ÌiÃ]ÊÊÈä£Ç
Ãi>ÀðV
ÀʵÕiÃÌÃÊÀÊViÌÃÊ>LÕÌÊ«À`ÕVÌ\
>\ÊÃi>ÀÃJÃÕÞ}ÀÕ«°VÊÀÊV>ÊÌvÀii\ÊnÈÈxÇnÈxÈ
*i>ÃiÊÀiviÀÊÌÊ«>ÀÌÊÕLiÀÃÊÜiÊÀiÀ`iÀ}
-
 1
1
-
 2
2
-
 3
3
-
 4
4
-
 5
5
-
 6
6
-
 7
7
-
 8
8
-
 9
9


Garden Oasis D71 M80922 Le manuel du propriétaire
- Taper
- Le manuel du propriétaire
dans d''autres langues
Autres documents
-
 Sunjoy 110111002 Mode d'emploi
-
 Hampton Bay L-GZ804PST Guide d'installation
-
 APEX GARDEN GF-19S067B Manuel utilisateur
-
 Hampton Bay L-GG034PST Guide d'installation
-
Woods XP1010ST-BT Le manuel du propriétaire
-
Sojag 500-9165470 Guide d'installation
-
Paragon Outdoor GZ584 Guide d'installation
-
 Palram 702563 Guide d'installation
-
 Palram 702564 Guide d'installation
-
 Palram 702564 Mode d'emploi


