Audio Service microConnect Set Manuel utilisateur
- Taper
- Manuel utilisateur

USER MANUAL
microConnect Set
MODE D´EMPLOI
microConnect Set
GEBRUIKSAANWIJZING
microConnect Set
MANUALE D’USO
microConnect Set
MANUAL DE INSTRUCCCIONES
microConnect Set

2 3
EN Page 2-35FR Page 36-69NL Pagina 70-103IT Pagina 104-137ES página 138-171
Dear CUSTOMER,
Congratulations on the purchase of your microConnect Set from
Audio Service. You have chosen a sophisticated, high-quality pro-
duct.
With the Audio Service microConnect Set, we provide you with
the option of connecting your hearing systems wirelessly to mo-
dern media and communication technology. This user manual will
help to familiarize you with the functions and applications of your
microConnect Set.
If you require further information, please contact your hearing
system specialist, who will be happy to help.
2 3

4 5
EN Page 2-35FR Page 36-69NL Pagina 70-103IT Pagina 104-137ES página 138-171
CONTENT
microConnect 6-7
TRANSMITTER 8
INCLUDED IN DELIVERY 9
INTENDED USE 10
SAFETY INSTRUCTIONS 11-14
BASIC FUNCTIONS 15-19
– Charging 15
– Power LED state 16
– Wearing microConnect 17
– Turning the microConnect on/off 17
– Turning the hearing systems on/off 17
– Changing the hearing program of your hearing
systems 18
– Changing the audio source (if connected) 18
– Changing the volume 19
– Fade out ambient noises (mute) 19
BLUETOOTH 20-21
– Pairing 20
BLUETOOTH COMPATIBLE PHONES 22-23
– Accepting an incoming call 22
– Rejecting an incoming call 23
– Making a call 23
OTHER BLUETOOTH COMPATIBLE DEVICES 24
USING THE TRANSMITTER 25-28
– Before first use 25
– Turning the Transmitter on/off 25
– Sound Level 25
– Receiving audio stream via transmitter 26-28
STEREO SOCKET 29-30
USING A LOOP SYSTEM 31
ACCESSORIES 32
– FM-Transmitter (DAI) 32
MAINTENANCE AND CARE 33
DISPOSAL / CE 34
TECHNICAL DATA - POWER SUPPLY 35
CONTENT

6 7
EN Page 2-35FR Page 36-69NL Pagina 70-103IT Pagina 104-137ES página 138-171
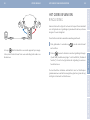
microConnectmicroConnect
microConnect
3
4
5
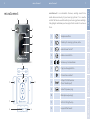
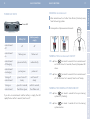
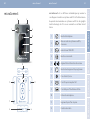
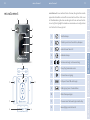
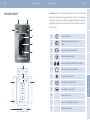
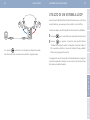
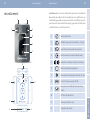
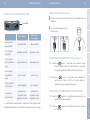
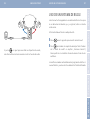
microConnect is an automatic streamer, sending sound from
audio devices wirelessly to your hearing systems. It is a remote
control that can be
used to control your hearing systems and high
tech gadgets and allows you to enjoy brilliant sound in true stereo
form.
1 Telephone button
2 Stand-by for hearing systems; mute
3 microConnect on/off
4 Audio source button
5 Volume up / volume down
6
Program
change button
7 2.5 mm stereo socket
8
DAI port for FM receiver
(Direct Audio Input)
9 Socket for power plug
10 Microphone openings
11 Slots for fixing the clip
12 Lanyard attachment
P
2
5
6
1
12
1111
7
9
8
10
5

8 9
EN Page 2-35FR Page 36-69NL Pagina 70-103IT Pagina 104-137ES página 138-171
microConnect
(with lanyard and clip)
Transmitter (with adhesive
tape for affixing)
2 USB-power plugs with country specific adapters
(one for the remote control, one for the transmitter)
Cabels
1.8 m audio cable with 3.5 mm stereo plug and a
2.5 mm stereo plug
0.3 m audio cable with 3.5 mm stereo plug and a
2.5 mm stereo plug
Adapterset
2.5 mm stereo plug to 3.5 mm stereo socket
6.3 mm stereo plug to 3.5 mm stereo socket
RCA (cinch) to 3.5 mm stereo socket
RCA (cinch) to SCART
INCLUDED IN DELIVERY
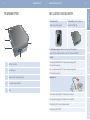
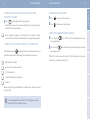
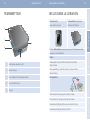
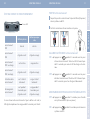
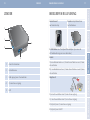
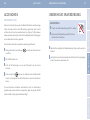
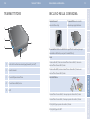
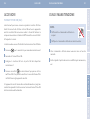
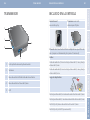
INCLUDED IN DELIVERYTRANSMITTER
TRANSMITTER
1 On/off switch
2 Sound level
3 USB-socket for power plug
4 2.5 mm stereo socket
5 LED
On
Off
Sound level
T
ransmitte
r
Aux
in
Power
O
U
T
PU
T
On
Of
f
So
u
n
d
level
T
ransmitter
Aux
i
n
Po
we
r
5
1
2
3
4

10 11
EN Page 2-35FR Page 36-69NL Pagina 70-103IT Pagina 104-137ES página 138-171
SAFETY INSTRUCTIONSINTENDED USE
INTENDED USE
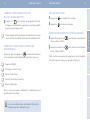
Symbols:
Be aware of information marked with the warning symbol
WARNING, CAUTION or NOTICE!
WARNING points out a situation that could lead to
serious injuries, CAUTION indicates a situation that
could lead to minor and moderate injuries.
NOTICE NOTICE indicates possible property damage
Advice and tips on how to handle your device better.
Instruction. Indicates that something has to be done.
Indicates an option that not every device has. Ask
your hearing system specialist to check off the rele-
vant information.
WARNING
Wireless systems may interfere with measuring devices and
electronic equipment
.
Turn the remote control of f when in hospitals or airplanes.
Prior to use in conjunction with an electronic implant or
life supporting system, have the electromagnetic compa-
tibility verified.
NOTICE
Operating temperature: charge min. 0°C bis max. 45°C;
discharge min. -20°C to max. 60°C
Storage conditions: min. -20°C to max. 60°C; low humidity
This remote control is intended to operate hearing systems. Read
and follow the instructions of this user manual to avoid injuries or
damage to the remote control.
SAFETY INSTRUCTIONS

12 13
EN Page 2-35FR Page 36-69NL Pagina 70-103IT Pagina 104-137ES página 138-171
SAFETY INSTRUCTIONS SAFETY INSTRUCTIONS
In some countries restrictions for the usage of wireless
equipment exist.
Refer to local authorities for further information.
In the event your hearing systems can be controlled by
another person’s remote control, return hearing systems
and remote control to your hearing system specialist.
The performance of the wireless function binaural syn-
chronisation may be affected by electromagnetic inter-
ference – e.g. from a computer monitor or fluorescent
lamp system
.
Move away from the source of interference if you
experience difficulty.
NOTICE
The remote control is sensitive to extreme heat, high humi-
dity, strong magnetic fields (> 0,1T), X-rays and mechanical
stress.
Do not expose the remote control to extreme tempera-
ture or high humidity.
Do not leave it in direct sunlight.
Do not immerse it in water.
Do not place your remote control in a microwave oven.
WARNING
Risk of interference with active implants – e.g. pacema-
kers.
Consult a cardiologist before using accessories with
audio streaming functions together with active im-
plants.
WARNING
Strangulation hazard when lanyard gets entangled in
moving mechanical parts of machines for example
.
Use only the delivered breakaway lanyard. It will auto-
matically detach when entangled.
Do not use lanyard for children under the age of twelve.

14 15
EN Page 2-35FR Page 36-69NL Pagina 70-103IT Pagina 104-137ES página 138-171
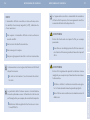
BASIC FUNCTIONS SAFETY INSTRUCTIONS
BASIC FUNCTIONS
WARNING
Choking hazard posed by small parts.
Keep batteries, small parts and remote control out of
children‘s reach.
If swallowed consult a physician or hospital immedia-
tely.
This remote control is not designed for children under
the age of 36 month or mentally disabled persons.
NOTICE
Please make sure that the power plug is easily accessible to
remove it from power supply if necessary.
Charge microConnect before first use.
CHARGING
Connect
microConnect
with the USB-power plug to a power
supply.
Charging is complete when the power LED shines green.
WARNING
Hazard of explosion in gas-filled spaces!
Do not use your hearing systems and remote
control in areas where there is danger of explosions
(e.g. mining).

16 17
EN Page 2-35FR Page 36-69NL Pagina 70-103IT Pagina 104-137ES página 138-171
BASIC FUNCTIONS BASIC FUNCTIONS
WEARING microConnect
Wear microConnect no further than 60 cm (24 inches) away
from the hearing systems.
Use lanyard or clip to wear microConnect.
TURNING THE microConnect ON/OFF
ON
£ Press for about 3 seconds to turn microConnect
on. All LEDs shine for 3 seconds, then only the power LED
shines.
OFF £ Press for about 3 seconds to turn microConnect
off. All LEDs shine for 3 seconds, then turn off slowly.
TURNING THE HEARING SYSTEMS ON/OFF
OFF
£ Press for about 3 seconds to turn your hearing
systems off (stand-by).
ON £ Press for about 3 seconds to turn the hearing
systems back on.
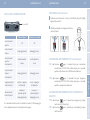
Battery full
Battery nearly
empty
microConnect
off
off off
microConnect
on
flashes green flashes red
microConnect
off/charging
green constantly red constantly
microConnect
on/charging
pulses green pulses red
Turning off
microConnect
green / turns off
slowly
red / turns off
slowly
Turning on
microConnect
green for 3 seconds,
then flashes green
red for 3 seconds,
then flashes red
Power LED
If you turn on microConnect a
nd the battery is empty, the LED
rapidly flashes red for 3 seconds, then turns off.
POWER LED STATE

18 19
EN Page 2-35FR Page 36-69NL Pagina 70-103IT Pagina 104-137ES página 138-171
BASIC FUNCTIONS BASIC FUNCTIONS
CHANGING THE HEARING PROGRAM OF YOUR
HEARING SYSTEMS
Press
P
to change the hearing program.
Each time you press the program button, your hearing system
switch to the next program.
Each program change is confirmed by an acoustic signal.
This function must be activated by your hearing system specialist.
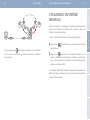
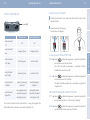
CHANGING THE AUDIO SOURCE (IF CONNECTED)
Each time you press your microConnect switches to the next
available audio source according to the following overview:
FM-Transmitter (DAI)
Line-in (2.5 mm stereo socket)
First Transmitter
Second Transmitter (optional)
Telecoil
When connecting via Bluetooth, the switch-over time can be up
to 5 seconds.
Your
hearing system specialist
has to configure your mi-
croConnect for your audio sources.
CHANGING THE VOLUME
Press to increase the volume.
Press to decrease the volume.
FADE OUT AMBIENT NOISES (MUTE)
Press shortly to switch off the microphones of your
hearing systems.
Press shortly to switch on again the microphones of your
hearing systems.
With this function you can fade out distracting noise from envi-
ronment (e.g. while watching TV).

21
EN Page 2-35FR Page 36-69NL Pagina 70-103IT Pagina 104-137ES página 138-171
20
BLUETOOTH
Bluetooth is a wireless standard that provides a way to connect
wireless devices like cell phones, TV, headsets and others.
Once a bluetooth device with control panel (e.g. iPhone, iPod,
BlackBerry, mp3 player, laptop) is paired with microConnect, the
connection to the microConnect will be established automatically.
PAIRING
Press for about 3 seconds to turn microConnect on.
Activate the Bluetooth function in your device.
BLUETOOTHBLUETOOTH
i
The Bluetooth connection has a range of about 10 m
(32 ft). Walls or objects between the devices can shorten
the distance.
i
The microConnect can be paired via Bluetooth with up to
two phones, two transmitters and a further Bluetooth de-
vice (e.g. mp3 player or laptop) at the same time.
Press on your microConnect for about 5 seconds to prepare
your microConnect for pairing.
Search in the menu of your device fot other Bluetooth devices.
Choose „RCU Connect“ to pair microConnect and your device.
Enter the PIN „0000“ if requested.
When pairing mode has been activated, all 3 buttons (on/off button,
telephone button and audio source button) shine for 3 seconds, then
flashes while the
microConnect
is searching for a connection
to an audio source. This can take several seconds. Once a connection
is established,
and shines constantly for 3 seconds.
i
Refer to the user guide of your connected device for more
detailed information on how to link devices via Bluetooth.

22 23
EN Page 2-35FR Page 36-69NL Pagina 70-103IT Pagina 104-137ES página 138-171
BLUETOOTH COMPATIBLE PHONES
When you are making a call with a Bluetooth compatible phone
or cell phone, the microConnect allows you to use your hearing
instruments as a wireless headset.
Instead of using the telephone microphone, you speak into micro-
Connect and listen through your hearing systems.
Pair the Bluetooth compatible phone with your
microConnect
(refer to „Pairing“ in chapter „Bluetooth“).
ACCEPTING AN INCOMING CALL
Your hearing systems change automatically to the telephone
program if your phone rings.
Press to accept the incoming call.
Speak into microConnect‘s microphone to talk.
Press to terminate the call. Your hearing systems switch
back to the hearing program you used before taking the call.
BLUETOOTH COMPATIBLE PHONESBLUETOOTH COMPATIBLE PHONES
REJECTING AN INCOMING CALL
Press for about 3 seconds to reject the incoming call
if supported by the phone.
MAKING A CALL
Dial the desired number on your phone.
If your phone does not transfer the connection to the micro-
Connect automatically, press
once or twice* to transfer
the connection from your phone to the microConnect.
Press once or twice* to transfer the connection from the
microConnect back to the phone.
* Test to see how your phone works with the microConnect.
i
If paired with two phones,
microConnect
uses different
ring tones to distinguish incoming calls.

24 25
EN Page 2-35FR Page 36-69NL Pagina 70-103IT Pagina 104-137ES página 138-171
USING THE TRANSMITTEROTHER BLUETOOTH COMPATIBLE DEVICES
OTHER BLUETOOTH COMPATIBLE
DEVICES
Pair the Bluetooth compatible device (e.g. mp3 player, laptop)
with your microConnect (refer to „Pairing“ in chapter
„Bluetooth“).
Start the audio transmission on your Bluetooth compatible
device.
You can now hear sound from your device through your hearing
systems via Bluetooth.
i
Refer to the user manual of your connected device for more
detailed information on how to link devices via Bluetooth.
USING THE TRANSMITTER
The transmitter is intended to make devices without Bluetooth-
function compatible to Bluetooth.
BEFORE FIRST USE
The transmitter is equipped with a rechargeable battery.
Charge the transmitter if necessary using the supplied USB-
power plug.
While charging the LED shines red.
Charging time is about 3 hours depending on the status of the
rechargeable battery.
TURNING THE TRANSMITTER ON/OFF
ON
£ Use the on/off switch.
OFF £ Use the on/off switch.
SOUND LEVEL
Press the sound level button to change the volume of the audio
signal.
The sound level can be adjusted in 5 levels.
The LED flashes blue. The number of times the LED flashes indicates
the volume level.

26 27
EN Page 2-35FR Page 36-69NL Pagina 70-103IT Pagina 104-137ES página 138-171
USING THE TRANSMITTERUSING THE TRANSMITTER
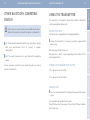
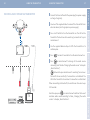
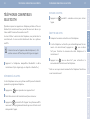
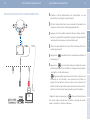
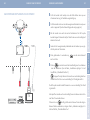
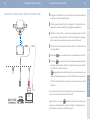
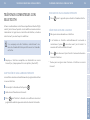
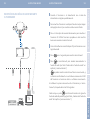
RECEIVING AUDIO STREAM VIA TRANSMITTER
Transmitter
TV
P
Connect the transmitter with the power plug to a power supply
or charge it regularly.
Use one of the supplied cables to connect the transmitter to an
external device (refer to graphic on previous page).
Press on/off switch to turn the transmitter on. The LED on the
transmitter flashes blue while searching a connection to your
microConnect.
Use the supplied adhesive tape to affix the transmitter at a
suitable place.
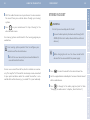
Press for about 3 seconds to turn the microConnect on.
Press on microConnect to change to the audio source
manually (refer to table “Changing the audio source” in chapter
„Basic function“).
flashes while your microConnect is searching for a connec-
tion and it shines constantly if a connection is established. The
LED on the transmitter shines blue if a connection is established.
When connecting via Bluetooth, the switch-over time can be up
to 15 seconds.
Each time you press
your microConnect switches to the next
available audio source according to table „Changing the audio
source“ in chapter „Basic functions“.

28 29
EN Page 2-35FR Page 36-69NL Pagina 70-103IT Pagina 104-137ES página 138-171
VERWENDEN DES TRANSMITTERS
Start the audio transmission on your device. You can now hear
the sound from your external device through your hearing
systems.
Press
P
on your microConnect to stop listening to the
external audio source.
Your hearing systems switch back to the hearing program you
used before.
You can use a second transmitter, which is available as an acces-
sory. This way the first transmitter can always remain connected
to your preferred device while the second transmitter is con-
nected with another device (e.g. a second TV in your bedroom).
USING THE TRANSMITTER
Your hearing system specialist has to configure your
microConnect for external devices
.
Refer to the user manual of your connected device for
more detailed information.
STEREO SOCKET
STEREO SOCKET
Press for about 3 seconds to turn microConnect on.
Use the supplied cables and adapters to connect microConnect
with an audio device.
Press , to change to the audio program (refer to table
“Changing the audio source” in chapter „Basic functions“).
WARNING
Risk of injuries caused by electric shock!
Connect audio input only to a device conforming to IEC
60065 (IEC-Norm for audio, video and other electronic
devices).
While charging do not use the stereo socket with
devices that are connected to the power supply.

30 31
EN Page 2-35FR Page 36-69NL Pagina 70-103IT Pagina 104-137ES página 138-171
STEREO SOCKET
P
If you press without an audio device connected to it, micro-
Connect will search for a connection to other audio sources.
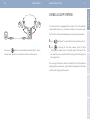
USING A LOOP SYSTEM
Your microConnect is equipped with a telecoil. This is intended for
using induction loops, e. g. in churches, theaters or in a lecture room.
This function must be activated by your hearing system specialist.
Press for about 3 seconds to turn the microConnect on.
Press to change to the loop receiver (refer to table
„Changing the audio source“ in chapter „Basic functions“). You
can now hear the sound from the loop system through your
hearing systems.
The hearing systems will switch automatically to the telephone
program when your phone rings and will change back to the loop
system after hanging up the phone.
USING A LOOP SYSTEM

32 33
EN Page 2-35FR Page 36-69NL Pagina 70-103IT Pagina 104-137ES página 138-171
MAINTENANCE AND CAREACCESSORIES
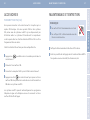
ACCESSORIES
FM-TRANSMITTER (DAI)
Your microConnect can be connected to any standard FM receiver.
This enables you to use FM systems even with hearing systems
which are not equipped with an audio shoe. FM systems help to
improve speech understanding in difficult listening situations and
are frequently used in schools.
This function must be activated by your hearing system specialist.
Press for about 3 seconds to turn the microConnect on.
Turn the FM transmitter on.
Connect the FM receiver with the DAI port of the microConnect.
Press once on microConnect to change to the FM transmit-
ter. Now you can hear sound from the FM transmitter through
your hearing systems.
The hearing systems switch automatically to the telephone program
when your phone rings and change back to the FM transmitter after
terminating the call.
MAINTENANCE AND CARE
NOTICE
Do NOT put your remote control in water!
Do NOT clean your remote control with alcohol or benzine.
Clean the remote control as necessary with a soft tissue.
Avoid abrasive cleaning liquids with additives such as citric
acids, ammonia, etc.

34 35
EN Page 2-35FR Page 36-69NL Pagina 70-103IT Pagina 104-137ES página 138-171
DISPOSAL / CE TECHNICAL DATA - POWER SUPPLY
DISPOSAL INFORMATION
Within the European Union, the marked equip-
ment is covered by Directive 2002/96/EC of
the European Parliament and of the Council of
27 January 2003 on waste electrical and electroni-
cal equipment. Amended by Directive 2003/108/EC
(WEEE).
Recycle the device and acccessories according to national
regulations.
CE-MARK
With the CE mark Audio Service confirms compliance with the Eu-
ropean Directive 93/42/EEC concerning medical devices and the
European Directive 99/5/EC (R&TTE) concerning radio and tele-
communications terminal equipment.
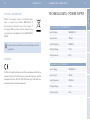
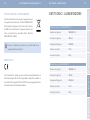
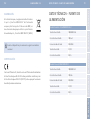
TECHNICAL DATA - POWER SUPPLY
Kuantech Model: KSAA050080W1UV-1
Input voltage: 100-24 0 V AC
Input current: 180 mA
Input frequency: 50-60 Hz
Output voltage: 5 VDC
Output current: 0.8 A
Fuhua Model: UE10W-050080SPC
Input voltage: 100-24 0 V AC
Input current: 150 mA
Input frequency: 50-60 Hz
Output voltage: 5 VDC
Output current: 0.8 A

36 37
EN Page 2-35FR Page 36-69NL Pagina 70-103IT Pagina 104-137ES página 138-171
CHÈRE CLIENTE,
CHER CLIENT,
Nous vous félicitions pour l‘achat de votre microConnect Set
d‘Audio Service. Vous avez ainsi choisi un produit avancé et de
haute qualité.
Le microConnect Set d‘Audio Service vous permet de connecter
vos systèmes auditifs sans fil à des supports et systèmes de com-
munication modernes. Ce mode d‘emploi vous familiarisera avec
les fonctions et les applications possibles du microConnect Set.
Si vous avez besoin de plus amples informations, n‘hésitez pas à
vous adresser à votre audioprothésiste qui vous fournira tous les
renseignements voulus.

38 39
EN Page 2-35FR Page 36-69NL Pagina 70-103IT Pagina 104-137ES página 138-171
SOMMAIRE SOMMAIRE
microConnect 40-41
TRANSMETTEUR 42
INCLUS DANS LA LIVRAISON 43
UTILISATION CONFORME 44
CONSIGNES DE SÉCURITÉ GÉNÉRALE 45-48
FONCTIONS DE BASE 49-53
– Mise en charge 49
– État du voyant de fonctionnement 50
– Porter la microConnect 51
– Allumer ou éteindre la microConnect 51
– Mise en marche et en veille des systèmes auditifs 51
–
Changer le programme d‘écoute des systèmes auditifs
52
–
Changer de source audio (connexion indispensable)
52
– Réglage du volume 53
– Suppression des bruits de fond (silencieux) 53
BLUETOOTH 54-55
– Appairage 54
TÉLÉPHONES COMPATIBLES BLUETOOTH 56-57
– Répondre à un appel 56
– Refuser un appel 57
– Émettre un appel 57
AUTRES APPAREILS COMPATIBLES BLUETOOTH 58
UTILISATION DU TRANSMETTEUR 59-62
– Avant la première utilisation 59
– Allumer ou éteindre le transmetteur 59
– Niveau sonore 59
– Recevoir un flux audio via un transmetteur 60-62
PRISE STÉRÉO 63-64
UTILISATION D‘UN SYSTÈME EN BOUCLE 65
ACCESSOIRES 66
– Transmetteur FM (DAI) 66
MAINTENANCE ET ENTRETIEN 67
CONSIGNE D
‘
ÉLIMINATION / CE
68
DONNÉES TECHNIQUES- ALIMENTATION
69
La page est en cours de chargement...
La page est en cours de chargement...
La page est en cours de chargement...
La page est en cours de chargement...
La page est en cours de chargement...
La page est en cours de chargement...
La page est en cours de chargement...
La page est en cours de chargement...
La page est en cours de chargement...
La page est en cours de chargement...
La page est en cours de chargement...
La page est en cours de chargement...
La page est en cours de chargement...
La page est en cours de chargement...
La page est en cours de chargement...
La page est en cours de chargement...
La page est en cours de chargement...
La page est en cours de chargement...
La page est en cours de chargement...
La page est en cours de chargement...
La page est en cours de chargement...
La page est en cours de chargement...
La page est en cours de chargement...
La page est en cours de chargement...
La page est en cours de chargement...
La page est en cours de chargement...
La page est en cours de chargement...
La page est en cours de chargement...
La page est en cours de chargement...
La page est en cours de chargement...
La page est en cours de chargement...
La page est en cours de chargement...
La page est en cours de chargement...
La page est en cours de chargement...
La page est en cours de chargement...
La page est en cours de chargement...
La page est en cours de chargement...
La page est en cours de chargement...
La page est en cours de chargement...
La page est en cours de chargement...
La page est en cours de chargement...
La page est en cours de chargement...
La page est en cours de chargement...
La page est en cours de chargement...
La page est en cours de chargement...
La page est en cours de chargement...
La page est en cours de chargement...
La page est en cours de chargement...
La page est en cours de chargement...
La page est en cours de chargement...
La page est en cours de chargement...
La page est en cours de chargement...
La page est en cours de chargement...
La page est en cours de chargement...
La page est en cours de chargement...
La page est en cours de chargement...
La page est en cours de chargement...
La page est en cours de chargement...
La page est en cours de chargement...
La page est en cours de chargement...
La page est en cours de chargement...
La page est en cours de chargement...
La page est en cours de chargement...
La page est en cours de chargement...
La page est en cours de chargement...
La page est en cours de chargement...
La page est en cours de chargement...
-
 1
1
-
 2
2
-
 3
3
-
 4
4
-
 5
5
-
 6
6
-
 7
7
-
 8
8
-
 9
9
-
 10
10
-
 11
11
-
 12
12
-
 13
13
-
 14
14
-
 15
15
-
 16
16
-
 17
17
-
 18
18
-
 19
19
-
 20
20
-
 21
21
-
 22
22
-
 23
23
-
 24
24
-
 25
25
-
 26
26
-
 27
27
-
 28
28
-
 29
29
-
 30
30
-
 31
31
-
 32
32
-
 33
33
-
 34
34
-
 35
35
-
 36
36
-
 37
37
-
 38
38
-
 39
39
-
 40
40
-
 41
41
-
 42
42
-
 43
43
-
 44
44
-
 45
45
-
 46
46
-
 47
47
-
 48
48
-
 49
49
-
 50
50
-
 51
51
-
 52
52
-
 53
53
-
 54
54
-
 55
55
-
 56
56
-
 57
57
-
 58
58
-
 59
59
-
 60
60
-
 61
61
-
 62
62
-
 63
63
-
 64
64
-
 65
65
-
 66
66
-
 67
67
-
 68
68
-
 69
69
-
 70
70
-
 71
71
-
 72
72
-
 73
73
-
 74
74
-
 75
75
-
 76
76
-
 77
77
-
 78
78
-
 79
79
-
 80
80
-
 81
81
-
 82
82
-
 83
83
-
 84
84
-
 85
85
-
 86
86
-
 87
87


Audio Service microConnect Set Manuel utilisateur
- Taper
- Manuel utilisateur
dans d''autres langues
Autres documents
-
Siemens miniTek Manuel utilisateur
-
-
Yamaha RX-A880 Le manuel du propriétaire
-
Yamaha RX-V4A Mode d'emploi
-
Yamaha HTR-6072 Le manuel du propriétaire
-
-
Yamaha TSR-400 Mode d'emploi
-
Nokia 6133 Manuel utilisateur
-
Widex Sound Assist Mode d'emploi
-