
Placa de inducción
Induction plate
Plaque à induction
Placa de indução
Induktionsplatte
Piastra a induzione
Inductieplaat
Keramikñ pláka
Индукционная плитка
Indukciós főzőlap
Ñndüksiyon ocaxñ
Miami
Cód. 30510
MODO DE EMPLEO
OPERATING INSTRUCTIONS
MODE D’EMPLOI
MODO DE EMPRÊGO
GEBRAUCHSANLEITUNG
ISTRUZIONI
GEBRUIKSAANWIJZING
TROPOS CRHSHS
HASZNÁLATI UTASÍTÁS
KULLANMA WEKLI
�
GB
E
F
P
D
I
NL
GR
RU
AR
HU
TR

2
1. Power cord
2. Hotplate
3. Control panel
4. Temperature selector
5. Timer setting
6. Lamp
7. Operating indicator
8. ON/OFF key
9. Timer cancel
10. Time display
11.
Stew Key
12. Sauté Key
13. Simmer Key
14. Boil Key
1. Cordon d’alimentation
2. Plaque supérieure
3. Tableau de fonctionnement
4. Régulateur de température
5. Réglage du temporisateur
6. Témoin lumineux
7. Indicateur de fonctionnement
8. Touche marche/arrêt
9. Annulation du temporisateur
10. Indicateur de temps
11.
Touche de fonction Mijoter
12. Touche de fonction Sauter
13. Touche de fonction Cuire
14. Touche de fonction Bouillir
1. Cabo de potência
2. Placa superior
3. Painel de funcionamento
4. Regulador de temperatura
5. Botão do temporizador
6. Indicador luminoso
7. Indicador de funcionamento
8. Tecla “Ligado”/”Desligado”
9. Cancelamento do temporizador
10. Indicador de tempos
11.
Tecla de função Estufar
12. Tecla de função Refogar
13. Tecla de função Cozinhar
14. Tecla de função Ferver
1. Netzkabel
2. Kochplatte
3. Bedienfeld
4. Temperaturregler
5. Zeiteinstellung
6. Anzeigeleuchte
7. Kontrollleuchte für Ein/Aus
8. Ein-/Austaste
9. Aufhebung der Zeiteinstellung
10. Kochzeitangabe
11.
Funktionstaste Schmoren
12. Funktionstaste Dünsten
13. Funktionstaste Kochen
14. Funktionstaste Aufbrühen
1. Cavo elettrico
2. Piastra superiore
3. Pannello dei comandi
4. Regolazione della temperatura
5. Regolazione del temporizzatore
6. Indicatore luminoso
7. Spia luminosa dell’accensione
8. Pulsante accensione /spegnimento
9. Annullare il temporizzatore
10. Indicatore del tempo di cottura
11.
Pulsante per la funzione Stufare
12. Pulsante per la funzione Soffriggere
13. Pulsante per la funzione Cuocere
14. Pulsante per la funzione Bollire
1. Elektriciteitskabel
2. Bovenste plaat
3. Bedieningspaneel
4. Temperatuurregelaar
5. Afstellen van de tijdschakelaar
6. Waarschuwingslampje
7. Indicatielampje aan
8. Aan/uittoets
9. Uitzetten van de tijdschakelaar
10. Tijdindicatie
11.
Functietoets Stoven
12. Functietoets Fruiten
13. Functietoets Koken
14. Functietoets Aan de kook brengen
1. Kalýdio trofodosíav
2. Epánw pláka
3. Pínakav leitourgíav
4. Ruqmistñv thv qermokrasíav
5. Rúqmish thv cronodiakópth
6. Fwteinñ éndeixh
7. Endeixh tou étoimo na leitourgñsei
8. Plñktro qéshv se leitourgía/apenergopoíhsh
9. Akúrwsh tou cronodiakópth
10. Endeíxeiv twn crónwn
11. Plñktro thv leitourgíav Stifádo
12. Plñktro thv leitourgíav Tsigárisma
13. Plñktro thv leitourgíav Mageíreuma
14. Plñktro thv leitourgíav Brásimo
1. Кабель питания
2. Рабочая поверхность
3. Панель управления
4. Регулятор температуры
5. Настройка таймера
6. Световой индикатор
7. Индикатор включения
8. Кнопка включения/отключения
9. Сброс таймера
10. Счетчик времени
11.
Кнопка функции «Тушение»
12. Кнопка функции «Пассирование»
13. Кнопка функции «Варка»
14. Кнопка функции «Кипячение»
1. Vezetékcsatlakozó kábel
2. Felső lap
3. Kapcsolótábla
4. Hőfokszabályozó
5. Időszabályozó
6. Kijelző lámpa
7. Működésjelző
8. Bekapcsolás / kikapcsolás gomb
9. Az időszabályozó törlése
10. Időkijelző
11.
Húspárolás gomb
12. Pirítás gomb
13. Főzés gomb
14. Forralás gomb
1.
Elektrik kablosu
2.
Üst levha
3.
Ocak iwlev paneli
4.
Isñ regülatörü
5.
Zaman programlama ayarñ
6.
Iwñklñ gösterge
7.
Çalñwma durumu göstergesi
8.
Açñk / Kapalñ düxmesi
9.
Zaman ayarñ iptali
10.
Zaman göstergesi
11.
Yahni yapma düxmesi
12.
Hafifçe kñzartma düxmesi
13.
Piwirme düxmesi
14.
Hawlama düxmesi

3
ESPAÑOL . . . . . . . . . . . . . . . . . . 4
ENGLISH . . . . . . . . . . . . . . . . . . . 6
FRANÇAIS . . . . . . . . . . . . . . . . . 8
PORTUGUÊS
. . . . . . . . . . . . . . . 10
DEUTSCH . . . . . . . . . . . . . . . . . . 12
ITALIANO
. . . . . . . . . . . . . . . . . . 14
NEDERLANDS . . . . . . . . . . . . . . 16
ELLHNIKA . . . . . . . . . . . . . . . . . 18
. . . . . . . . . . . . . . . . 20
. . . . . . . . . . . . . . . 23
MAGYAR
. . . . . . . . . . . . . . . . . . . 24
TÜRKÇE . . . . . . . . . . . . . . . . . . . 26
GB
E
F
P
D
I
NL
GR
RU
AR
HU
TR
1. Cable de potencia
2. Placa superior
3. Panel de funcionamiento
4. Regulador de temperatura
5. Ajuste del temporizador
6. Indicador luminoso
7. Indicador de encendido
8. Tecla encendido/apagado
9. Cancelación
del temporizador
10. Indicador de tiempos
11. Tecla de función Estofar
12. Tecla de función Sofreir
13. Tecla de función Cocer
14. Tecla de función Hervir
2
1
3
4
4
8
10
7
9 5141312
11
6
Fig. 1
Fig. 2
Fig. 3
Fig. 4
Fig. 5
Fig. 6

4
5
Nuestros productos están desarrollados para alcanzar los más altos estándares de calidad, funcionalidad y diseño. Esperamos que
disfrute de su nueva placa de inducción Miami de PALSON.
CONSEJOS DE SEGURIDAD
- No desmontar la unidad para repararla uno mismo, ya que es peligroso y se puede dañar la cocina de inducción.
- Si el cable de corriente está dañado, deberá ser sustituido por el fabricante, su servicio técnico autorizado o por un técnico cualificado,
con tal de evitar un peligro.
- Este producto no está permitido para uso infantil u otras personas sin asistencia o supervisión si su estado físico, sensorial o mental
le limita de usarlo con seguridad. Los niños deberían ser supervisados para asegurar que no juegan con dicho producto.
- Si la superficie se rompe, apague el aparato para evitar la posibilidad de choque eléctrico.
- Los objetos metálicos tales como cuchillos, tenedores, cucharas y otros cubiertos no deben ser colocados sobre la placa de cocción
dado que pueden calentarse.
Funciones de las teclas del panel de control
Encendido/apagado (fig.1)
1. Conectar el enchufe a la toma de corriente principal, la cocina de inducción se pondrá en el estado de preparada al pulsar la tecla
encendido/apagado. Pulsar cualquier tecla de selección de función y se pondrá en marcha su funcionamiento y se encenderá la
correspondiente luz indicadora.
2.
Pulsar de nuevo la tecla encendido/apagado para detener el funcionamiento de la cocina de inducción.
Modo de Estofar (fig.2)
1.
Pulsar esta tecla para seleccionar el modo de “Estofar”, con el indicador luminoso encendido.
2.
Ajustar la potencia entre 350W y 1600W, por medio de las teclas de subida y bajada, para hacer el estofado.
3.
Si es seleccionado el modo “WARM” (mantener caliente), la cocina de inducción calentará a un promedio de potencia de 100W, y
mantendrá la temperatura entre 40ºC y 80ºC.
Modo de Sofreir (fig.3)
1.
Pulsar esta tecla para seleccionar el modo de “Sofreir”, con el indicador de regulación de temperatura activado.
2.
Ajustar la temperatura establecida y el calor por medio de las teclas de subida y bajada.
Modo de Cocer (fig.4)
1.
Pulsar esta tecla para seleccionar el modo de “Cocer”. El tiempo total durará aproximadamente 1-2 horas. Durante la cocción, la
temperatura y el calor no pueden ser ajustados por el usuario.
2.
Para ahorrar tiempo, se pueden precalentar el caldo con alta temperatura con el modo “Estofar”.
Modo de Hervir (fig.5)
1.
Pulsar esta tecla para seleccionar el modo “Hervir”. Durante la cocción, la temperatura y el calor no pueden ser ajustados por el
usuario.
2.
La capacidad de agua es de 1-4L aproximadamente.
Regulador de temperatura (fig.6)
1.
Pulsar para ajustar la temperatura y calor así como también la función “WARM” (mantener caliente).
Botón de ajuste del tiempo
Este botón es apto para parar la cocina de inducción en base al tiempo establecido de entre la gama de 1 ~ 99 minutos. Pulsar este botón
una vez para ajustar un dígito individual y mantenerlo pulsado continuamente para ajustar las decenas. El botón de ajuste del tiempo debe
ser utilizado conjuntamente con las funciones.
Funcionamiento y dispositivos de seguridad
Dispositivos de seguridad
1.
Inspección del material del cazo
Si se coloca un cazo no indicado para la inducción, la unidad producirá un pitido corto, y entonces se desconectará
automáticamente.
2.
Dispositivo de seguridad por fuera de tiempo
Si no hay ninguna tecla de función pulsada o no se mueve el cazo después de 2,5 horas con la potencia conectada, la unidad se
desconectará automáticamente como protección de seguridad.
3.
Protección para el cocido en seco
En el modo de estofado o sopa, cuando no hay agua en el cazo, la unidad producirá un pitido, y entonces se desconectará
automáticamente.
4. Dispositivo de protección de seguridad al movimiento del cazo
Si el cazo es apartado durante la cocción, la unidad producirá un pitido, y entonces se desconectará automáticamente.
E

4
5
Modo de utilización
1. Introducir el enchufe en la toma de corriente, pulsar la tecla encendido/apagado para ponerla en marcha, y el indicador de potencia
se iluminará.
2.
Poner los ingredientes de cocción en el cazo y colocarlo en el medio de la placa superior.
3.
Seleccionar el modo de cocción.
4.
Pulsar el regulador de temperatura para establecer la temperatura adecuada, la temperatura del cazo se mantendrá
automáticamente.
5.
Pulsar la tecla encendido/apagado para desconectar todas las funciones después de la cocción.
Como escoger el cazo para la cocina de inducción:
1. Utensilios utilizables
Acero o fundición de hierro, hierro esmaltado, acero inoxidable, bandejas y cazos de fondo plano con un diámetro de 12-26 cm.
2.
Utensilios no utilizables
Cristal resistente al calor, recipiente de cerámica, cobre, aluminio, bandejas y cazos de fondo redondo y cazos y bandejas de menos
de 12 cm de diámetro.
Puntos de comprobación
En el caso en que aparezca cualquier problema de funcionamiento en la cocina de inducción, por favor hacer las comprobaciones
relacionadas en la tabla de abajo antes de enviarla para su reparación.
Problema Inspección
- No se oye ningún pitido al introducir el enchufe, no hay ninguna
indicación en la visualización digital.
- ¿Se ha soltado el enchufe?
- ¿Se ha desconectado su interruptor o fusible automático?
- ¿Está la potencia desconectada?
- La cocina se para después de 60 segundos de un pitido corto. La
visualización digital indica E1.
- ¿Es utilizable el utensilio de cocción?
- ¿Está colocado el utensilio de cocción sobre el centro de la bandeja
plana?
- ¿Permanece el cazo sobre la cocina después de la cocción? (No
mantener el cazo sobre la cocina después de la cocción).
- La cocina se para después de un pitido. La visualización digital indica
E5.
- E5 indica que el sensor de temperatura en la bobina está dañado, el cual
debe ser enviado al SAT para su reparación.
- E5 indica que el sensor de temperatura en el aspa de refrigeración está
dañado, el cual debe ser enviado al SAT para su reparación.
- La cocina deja de calentar de repente durante el funcionamiento. El
calentamiento se interrumpe.
- La interrupción del calor puede aparecer durante el calentamiento, en
algunos niveles bajos de potencia, freído del pan, funciones de asado y
en algunas otras funciones. Esto es normal.
- La cocina se para y hace pitidos de repente. La visualización digital indica
E6.
- ¿Se ha pulsado una tecla de función incorrecta? (p.ej. ¿sofrito bajo la
función de cazo caliente?)
- No hay agua en el utensilio de cocción al efectuar la función de cazo
caliente o sopa.
- La cocina se para y hace pitidos de repente. La visualización digital indica
E6.
- El relleno del cazo no es de un material adecuado para la inducción, o
contenido de sopa demasiado espeso, o agua insuficiente.
- El cazo puesto en la placa está vacío, no hay ningún líquido o alimento
dentro.
- La cocina se para y hace pitidos de repente. La visualización digital indica
E2.
- ¿Es la temperatura ambiente demasiado elevada?
- ¿Está la entrada o salida de aire bloqueada?
- Quizá la temperatura interna es demasiado elevada. Volver a poner en
marcha la cocina unos minutos más tarde.
- La cocina se para y hace pitidos de repente. La visualización digital indica
E4.
- El voltaje de suministro de la red es inferior a 170V.
- La cocina se para y hace pitidos de repente. La visualización digital indica
E3.
- El voltaje de suministro de la red es superior a 260V.
- La temperatura está fuera de control durante el funcionamiento. - ¿Es la base del utensilio de cocción utilizado plana o tiene su centro una
concavidad superior a 2 mm?
- El agua no hierve. - ¿Es la cantidad de agua superior a 4 litros o inferior a 1 litro?
- ¿Es el utensilio de cocción aplicable (el material del utensilio no es
aplicable para la cocina de inducción o la holgura por debajo de la base
del utensilio es demasiado grande)?
- ¿Es la temperatura ambiente inferior a 5ºC?
- El arroz no está bien hecho o está quemado en la ejecución automática
de arroz.
- ¿Es la cantidad de arroz superior a 1,25 kg o inferior a 0,25 kg?
- ¿Es demasiada el agua añadida?
- El utensilio de cocción utilizado no es aplicable. Utilizar un utensilio con
base de compuesto.
Gracias por demostrarnos su confianza al elegir uno de nuestros productos.

6
7
GB
Our products are developed to meet the highest quality, performance and design standards. We hope you enjoy your new PALSON Miami
induction hotplate.
SAFETY PRECAUTIONS
- Do not dismantle the appliance to repair it yourself; this is dangerous and may damage the induction cooker.
- If the power cord is damaged, it must be replaced by the manufacturer or its authorised technical service centre or by a qualified
technician in order to avoid hazards.
- This product must not be used by children or by other people without assistance or supervision if their physical, sensory or mental
condition limits safe use of the appliance. Children must be watched to make sure that they do not play with the appliance.
- If the surface cracks, turn off the appliance to prevent any electric shock hazards.
- Metal objects such as knives, forks, spoons and other cutlery must not be placed on the hotplate as they may become hot.
Functions of the control panel keys
Turning on/off (fig.1)
1. Insert the plug in the mains socket, the induction cooker will enter the ready status when the on/off key is pressed. Press any function
selection key, the appropriate function will start operating and the corresponding indicator lamp will light.
2. Press the on/off key again to turn off the induction cooker.
Stew mode (fig.2)
1. Press this key to select the «Stew» mode, with the indicator lamp lit.
2. Using the up and down keys, set the power between 350W and 1600W for the stewing function.
3. If the «WARM» mode is selected, the induction cooker will heat at an average power setting of 100W, and hold the temperature
between 40ºC and 80ºC.
Sauté mode (fig.3)
1. Press this key to select the «Sauté» mode, with the temperature selection indicator lit.
2. Set the required temperature and heat using the up and down keys.
Simmer mode (fig.4)
1. Press this key to select the «Simmer» mode. The total time will be about 1-2 hours. During simmering, the user will not be able to
adjust the temperature and heat settings.
2. To save time, the broth can be preheated to a high temperature using the «Stew» mode.
Boil mode (fig.5)
1. Press this key to select the «Boil» mode. During heating, the user will not be able to adjust the temperature and heat settings.
2. The water capacity is approximately 1-4L.
Temperature selector (fig.6)
1. Press to set the temperature and heat and also the “WARM” function.
Timer button
This button is used to set a fixed time for the induction cooker between 1 and 99 minutes. Press this button once to change one digit at a
time and hold down to set the tens. The timer button should be used together with the other functions.
Operation and safety features
Safety features
1. Inspection of the pan material
If a pan made of an incompatible material is used, the appliance will emit a short beep and will turn off automatically.
2. Timeout safety feature
If no key is pressed or the pan is not moved after 2.5 hours with the appliance turned on, it will turn off automatically as a protective measure.
3. Protection against boiling dry
In the stew or soup mode, the unit will beep and turn off automatically when there is no water in the pan.
4. Moved pan safety feature
If the pan is taken off the hotplate during cooking, the appliance will beep and turn off automatically.
Directions for use
1. Insert the plug in the mains socket, press the on/off key to turn it on and the operating lamp will light.
2. Place the ingredients in the pan and place the pan in the centre of the hotplate.
3. Select the cooking mode.
4. Press the temperature selector to set the required temperature, the pan temperature will be held automatically.
5. Press the on/off key to turn off all functions after cooking.

6
7
How to choose the right pan for the induction cooker:
1. Utensils that can be used
Steel or cast iron, enamelled iron, stainless steel, flat-bottomed trays and pans with a diameter of 12-26 cm.
2. Utensils that cannot be used
Heat-resistant glass, pottery, copper, aluminium, round-bottomed trays and pans with a diameter less than 12 cm.
Troubleshooting
If any problem should occur during operation of the induction cooker, please perform the checks listed in the table below before sending
for repair.
Problem Check
- No beep is heard when the plug is inserted in the mains
socket, nothing is seen on the display.
- Has the plug come loose?
- Has the relay or fuse tripped?
- Is the mains power disconnected?
-
The cooker stops 60 seconds after a short beep. The display
shows E1.
- Is the cooking utensil suitable for use?
- Is the cooking utensil in the middle of the hotplate?
- Is the pan still on the cooker after cooking is completed? (Do
not keep the pan on the cooker after cooking).
-
The cooker stops after a beep. The display shows E5.
- E5 indicates that the temperature sensor in the coil is
damaged. It must be sent to the technical service centre for
repair.
- E5 indicates that the temperature sensor in the cooling fan
is damaged. It must be sent to the technical service centre
for repair.
-
The cooker suddenly stops heating while it is operating. It no
longer heats.
- The cooker may stop heating at certain low power settings,
when frying bread, when roasting and during some other
functions. This is normal.
-
The cooker suddenly stops and beeps. The display shows E6.
- Have you pressed the wrong key? (e.g. sauté under the keep
warm function?)
- There is no water in the cooking utensil and you have selected
the keep warm or soup function.
-
The cooker suddenly stops and beeps. The display shows E6.
-
The pan content is not suitable for induction, or the soup is too
thick, or there is not enough water.
-
The pan on the hotplate is empty, there is no food or liquid in it.
- The cooker suddenly stops and beeps. The display shows E2.
- Is the room temperature too high?
- Is the air inlet or outlet blocked?
- Perhaps the internal temperature is too high. Turn on the
cooker again a few minutes later.
-
The cooker suddenly stops and beeps. The display shows E4. - The mains voltage is less than 170V.
-
The cooker suddenly stops and beeps. The display shows E3. - The mains voltage is more than 260V.
-
The temperature is out of control during operation.
-
Is the base of the cooking utensil used flat or does its centre
have a bulge greater than 2 mm?
- The water cannot be boiled.
- Is the water content more than 4 litres or less than 1 litre?
- Is the cooking utensil suitable (the utensil’s material is not
suitable for induction cooking or the clearance underneath the
utensil’s base is too large)?
- Is the room temperature below 5ºC?
- The rice is underdone or it is burnt in the automatic rice cooking
function.
- Is the quantity of rice greater than 1.25 kg or less than 0.25 kg?
- Is there too much water?
- The cooking utensil used is not suitable. Use a suitable utensil.
Thank you for choosing one of our products.

8
9
F
Nos produits sont développés pour répondre aux standards de qualité, de fonctionnalité et de design les plus élevés. Nous espérons que
vous profiterez de votre nouvelle plaque à induction Miami de PALSON.
CONSEILS DE SECURITE
- Ne démontez pas l’unité pour la réparer vous-même, car ceci est dangereux et vous pourriez abîmer la plaque à induction.
- Si le cordon d’alimentation est endommagé, il devra être remplacé par le fabricant, par son service technique agréé ou par un
technicien qualifié, afin d’éviter tout danger.
- Ce produit ne peut pas être utilisé par des enfants ou d’autres personnes sans aide ou sans surveillance si leur état physique,
sensoriel ou mental ne leur permet de l’utiliser en toute sécurité. Les enfants devraient être surveillés pour s’assurer qu’ils ne jouent
pas avec ce produit.
- Si la surface casse, éteignez l’appareil pour éviter une décharge électrique éventuelle.
- Les objets métalliques comme les couteaux, fourchettes, cuillères et autres couverts ne doivent pas être placés sur la plaque de
cuisson, car ils peuvent chauffer.
Fonctions des touches du tableau de contrôle
Marche/arrêt (fig.1)
1.
Branchez la fiche à la prise de courant principale, la plaque à induction sera prête à fonctionner en appuyant sur la touche marche/arrêt.
Appuyez sur n’importe quelle touche de sélection de fonction et elle se mettra en marche. Le témoin lumineux correspondant s’éclairera.
2. Appuyez à nouveau sur la touche marche/arrêt pour arrêter le fonctionnement de la plaque à induction.
Mode Mijoter (fig.2)
1. Appuyez sur cette touche pour sélectionner le mode «Mijoter», avec le témoin lumineux allumé.
2. Réglez la puissance entre 350W et 1600W, à l’aide des touches de montée et de descente, pour faire mijoter.
3. Si le mode «WARM» (maintenir au chaud) est choisi, la plaque à induction chauffera à une puissance moyenne de 100W et
maintiendra la température entre 40ºC et 80ºC.
Mode Sauter (fig.3)
1. Appuyez sur cette touche pour sélectionner le mode «Sauter», avec l’indicateur de réglage de la température activé.
2. Réglez la température établie et la chaleur à l’aide des touches de montée et de descente.
Mode Cuire (fig.4)
1. Appuyez sur cette touche pour sélectionner le mode «Cuire». La durée totale sera d’environ 1-2 heures. Durant la cuisson, la
température et la chaleur ne peuvent pas être réglées par l’utilisateur.
2. Pour gagner du temps, vous pouvez préchauffer le bouillon à haute température avec le mode «Mijoter».
Mode Bouillir (fig.5)
1. Appuyez sur cette touche pour sélectionner le mode «Bouillir». Durant la cuisson, la température et la chaleur ne pourront pas être
réglées par l’utilisateur.
2. La capacité d’eau est d’environ 1-4L.
Régulateur de température (fig.6)
1. Appuyez sur pour régler la température et la chaleur, ainsi que la fonction «WARM» (maintenir au chaud).
Bouton de réglage du temps
Ce bouton sert à arrêter la plaque à induction en fonction du temps établi compris entre 1 ~ 99 minutes. Appuyez une fois sur ce bouton
pour régler les unités et gardez-le enfoncé de manière continue pour réglez les dizaines. Le bouton de réglage du temps doit être utilisé
en même temps que les fonctions.
Fonctionnement et dispositifs de sécurité
Dispositifs de sécurité
1. Inspection du matériel de la casserole
Si vous placez une casserole non adaptée à l’induction, la plaque émettra un signal sonore court et elle se débranchera
automatiquement.
2. Dispositif de sécurité pour excès de temps
Si aucune touche de fonction n’est enfoncée ou que la casserole n’est pas déplacée après 2,5 heures alors que la plaque est
branchée, celle-ci se débranchera automatiquement par sécurité.
3. Protection pour la cuisson à sec
En mode mijotage ou soupe, lorsqu’il n’y a pas d’eau dans la casserole, l’unité émettra un signal sonore et elle se débranchera
automatiquement.
4. Dispositif de protection de sécurité en cas de déplacement de la casserole
Si la casserole est éloignée durant la cuisson, l’unité émettra un signal sonore et elle se débranchera automatiquement.

8
9
Mode d’emploi
1. Introduisez la fiche dans la prise de courant, appuyez sur la touche marche/arrêt pour mettre la plaque en marche et l’indicateur de
fonctionnement s’éclairera.
2. Mettez les ingrédients à cuire dans la casserole et placez celle-ci au milieu de la plaque supérieure.
3. Sélectionnez le mode de cuisson.
4. Appuyez sur le régulateur de température pour établir la température adéquate, la température de la casserole sera maintenue
automatiquement.
5. Appuyez sur la touche marche/arrêt pour débrancher toutes les fonctions après la cuisson.
Comment choisir une casserole pour la plaque à induction:
1. Ustensiles utilisables
Acier ou fonte, fonte émaillée, acier inoxydable, plateaux et casseroles à fond plat d’un diamètre de 12-26 cm.
2. Ustensiles non utilisables
Verre résistant à la chaleur, récipients en céramique, cuivre, aluminium, plateaux et casseroles à fond rond et casseroles et plateaux
de moins de 12 cm de diamètre.
Points de vérification
En cas de problème de fonctionnement de la plaque à induction, veuillez effectuer les vérifications signalées dans le tableau suivant avant
de l’envoyer pour réparation.
Problème Vérification
- Aucun signal sonore ne se fait entendre en branchant la fiche, aucune
indication n’apparaît sur l’écran numérique.
- La fiche est-elle débranchée?
- L’interrupteur ou le fusible automatique se sont-ils débranchés?
- L’alimentation est-elle débranchée?
- La plaque s’arrête après 60 secondes d’un signal sonore court. L’écran
numérique indique E1.
- Le récipient de cuisson est-il utilisable?
- Le récipient de cuisson se trouve-t-il au centre du plateau plat?
- La casserole est-elle restée sur la plaque après la cuisson? (Ne laissez
pas la casserole sur la plaque après la cuisson).
- La plaque s’arrête après un signal sonore. L’écran numérique indique
E5.
- E5 indique que le capteur de température dans la bobine est
endommagé; vous devrez donc envoyer la plaque au SAT pour
réparation.
- E5 indique que le capteur de température dans l’hélice de réfrigération
est endommagé; vous devrez donc envoyer la plaque au SAT pour
réparation.
- La plaque ne chauffe plus soudainement en cours de fonctionnement.
Le chauffage s’interrompt.
- L’interruption de chaleur peut apparaître en cours de chauffage, à
certains niveaux de puissance bas, lors du grillage de pain, avec des
fonctions de rôtissage ou certaines autres. Ceci est normal.
- La plaque s’arrête et émet soudain un signal sonore. L’écran numérique
affiche E6.
- Avez-vous appuyé sur une touche de fonction incorrecte? (par exemple
sauté avec la fonction de casserole chaude).
- Il n’y a pas d’eau dans le récipient de cuisson en utilisant la fonction de
casserole chaude ou soupe.
- La plaque s’arrête et émet soudain un signal sonore. L’écran numérique
affiche E6.
- Le contenu de la casserole n’est pas une matière adaptée à l’induction,
ou contenu en soupe trop épais ou eau insuffisante.
- La casserole posée sur la plaque est vide, il n’y a pas de liquide ou
d’aliment à l’intérieur.
- La plaque s’arrête et émet soudain un signal sonore. L’écran numérique
affiche E2.
- La température ambiante est-elle trop élevée?
- L’entrée ou la sortie d’air sont-elles bloquées?
- La température interne est peut-être trop élevée. Remettez la plaque en
marche au bout de quelques minutes.
- La plaque s’arrête et émet soudain un signal sonore. L’écran numérique
affiche E4.
- Le voltage du réseau est inférieur à 170 V.
- La plaque s’arrête et émet soudain un signal sonore. L’écran numérique
affiche E3.
- Le voltage du réseau est supérieur à 260 V.
- La température est hors contrôle durant le fonctionnement.
- La base du récipient de cuisson utilisé est-elle plane ou son centre a-t-il
une concavité supérieure à 2 mm?
- L’eau ne peut pas être bouillie.
- La quantité d’eau est-elle supérieure à 4 litres ou inférieure à 1 litre?
- Le récipient de cuisson peut-il être utilisé ? (le matériel du récipient peut-
il être utilisé avec une plaque à induction ou la largeur en dessous de la
base du récipient n’est-elle pas trop grande ?)
- La température ambiante est-elle inférieure à 5ºC?
- Le riz n’est pas bien cuit ou il est brûlé en mode automatique «riz».
- La quantité de riz est-elle supérieure à 1,25 kg ou inférieure à 0,25 kg?
- Avez-vous ajouté trop d’eau?
- Le récipient de cuisson utilisé n’est pas adapté. Utilisez un autre
récipient avec une base composite.
Merci de nous démontrer votre confiance en choisissant l’un de nos produits.

10
11
P
Os nossos produtos estão desenvolvidos para atingir os mais altos padrões de qualidade, funcionalidade e design. Esperamos que
desfrute da sua nova placa de indução Miami da PALSON.
MEDIDAS DE SEGURANÇA IMPORTANTES
Ao utilizar aparelhos eléctricos, é necessário tomar sempre algumas precauções de segurança, incluindo as seguintes:
- Não desmontar o aparelho para tentar repará-lo por si próprio, já que é perigoso e poderia danificar seriamente a placa de indução.
- Se o cabo de alimentação estiver danificado, deverá ser substituído pelo fabricante ou o seu serviço técnico autorizado ou por um
técnico qualificado, com o fim de evitar possíveis perigos.
- Este produto não está desenhado para uso infantil ou outras pessoas sem assistência ou supervisão se o estado físico, sensorial
ou mental das mesmas limitara a sua capacidade de utilizar o aparelho com segurança. Deve-se vigiar as crianças para impedir que
fiquem a brincar com o aparelho.
- Se a superfície se partir, desligue o aparelho imediatamente para evitar a possibilidade de choque eléctrico.
- Os objectos metálicos tais como facas, garfos, colheres e outros utensílios não devem ser colocados sobre a placa de indução, dado
que se podem aquecer.
Funções das teclas do painel de controlo
“Ligado”/”Desligado” (fig. 1)
1.
Ligar a ficha do cabo na tomada de corrente. A placa de indução estará pronta para usar depois de se premir a tecla “Ligado”/”Desligado”.
Premir qualquer tecla de selecção de função. A função entrará em funcionamento e o correspondente indicador luminoso acenderá.
2. Premir de novo a tecla “Ligado”/”Desligado” para parar o funcionamento da placa de indução.
Modo de Estufar (fig. 2)
1. Premir esta tecla para seleccionar o modo de “Estufar”, estando o indicador luminoso aceso.
2. Ajustar a potência entre 350 W e 1600 W utilizando as teclas de subida e descida para confeccionar a iguaria estufada.
3. Escolhendo o modo “WARM” (manter quente), a placa de indução aquecerá a uma média de potência de 100 W e, assim, manterá
a temperatura entre 40º C e 80º C.
Modo de Refogar (fig. 3)
1. Premir esta tecla para escolher o modo de “Refogar” com o indicador de regulação de temperatura activado.
2. Ajustar a temperatura estabelecida e o calor utilizando as teclas de subida e descida.
Modo de Cozinhar (fig. 4)
1. Premir esta tecla para seleccionar o modo de “Cozinhar”. O tempo total durará aproximadamente 1-2 horas. Durante a cozedura, a
temperatura e o calor não podem ser ajustados pelo utente.
2. Para poupar tempo, pode-se pré-aquecer o caldo a alta temperatura utilizando o modo “Estufar”.
Modo de Ferver (fig. 5)
1.
Premir esta tecla para escolher o modo “Ferver”. Durante a cozedura, a temperatura e o calor não podem ser ajustados pelo utente.
2. A capacidade de água é de 1 a 4 litros, aproximadamente.
Regulador de temperatura (fig. 6)
1. Premir para ajustar a temperatura e calor, bem como a função “WARM” (manter quente).
Botão de ajuste do tempo
Este botão serve para parar a placa de indução em base ao tempo estabelecido entre a gama de 1 ~ 99 minutos. Premir este botão uma
vez para ajustar um dígito individual e mantê-lo pressionado continuamente para ajustar as dezenas. O botão de ajuste do tempo deve
ser utilizado conjuntamente com as funções.
Funcionamento e dispositivos de segurança
Dispositivos de segurança
1. Inspecção do material da panela
Quando se utiliza uma panela ou recipiente não indicados para a indução, o aparelho emite um aviso sonoro curto e, a seguir, desliga-
se automaticamente.
2. Dispositivo de segurança por tempo excedido
Se não há nenhuma tecla de função pressionada ou, estando com a potência ligada, não se move a panela depois de 2,5 horas, o
aparelho desliga-se automaticamente como medida de segurança.
3. Protecção para cozedura a seco
No modo de estufado ou sopa, quando já não existe água na panela, o aparelho emite um aviso sonoro e, a seguir, desliga-se
automaticamente.
4. Dispositivo de medida de segurança contra movimentos da panela
Se a panela se desloca durante a cozedura, o aparelho emite um aviso sonoro e, a seguir, desliga-se automaticamente.

10
11
Modo de utilização
1. Introduzir a ficha do cabo na tomada de corrente. Premir a tecla “Ligado”/”Desligado” para colocar o aparelho em funcionamento. O
indicador de potência acende-se.
2. Deitar os alimentos a confeccionar na panela. Pôr a panela no centro da placa superior.
3. Escolher o modo de cozedura.
4. Premir o regulador de temperatura para estabelecer a temperatura apropriada, a temperatura da panela manter-se-á
automaticamente.
5. Premir a tecla “Ligado”/”Desligado” para desligar todas as funções depois da cozedura.
Como escolher a panela para a placa de indução:
1. Utensílios utilizáveis
Aço ou ferro fundido, ferro esmaltado, aço inoxidável, bandejas e panela com fundo plano e um diâmetro de 12 a 26 cm.
2. Utensílios não utilizáveis
Vidro resistente ao calor, recipiente de cerâmica, cobre, alumínio, bandejas e panelas com fundo arredondado e panelas e bandejas
de menos de 12 cm de diâmetro.
Pontos de verificação
No caso que observe qualquer problema de funcionamento na placa de indução, queira, por favor, realizar as verificações que se indicam
na tabela de abaixo antes de enviar o aparelho para o serviço de assistência técnica.
Problema Inspecção
- Não se ouve nenhum aviso sonoro ao introduzir a ficha do cabo. Não há
nenhum indicador na visualização digital.
- Soltou-se a ficha do cabo?
- O interruptor ou fusível automático desligou-se?
- A potência está desligada?
- A placa de indução deixa de funcionar depois de 60 segundos após a
emissão de um aviso sonoro curto. A visualização digital indica E1.
- O utensílio de cozedura é utilizável?
- O utensílio de cozedura está colocado no centro da bandeja plana?
- A panela permaneceu posta sobre a placa de indução depois da
cozedura? (Não mantenha a panela sobre a placa de indução depois da
cozedura).
- A placa de indução deixa de funcionar depois da emissão de um aviso
sonoro curto. A visualização digital indica E5.
- E5 indica que o sensor de temperatura na bobina está danificado e deve
ser enviado para o serviço de assistência técnica para ser reparado.
- E5 indica que o sensor de temperatura na aspa de refrigeração está
danificado e deve ser enviado para o serviço de assistência técnica para
ser reparado.
- A placa de indução deixa de aquecer de repente durante o
funcionamento. O aquecimento interrompe-se.
- A interrupção do calor pode aparecer durante o aquecimento, em alguns
níveis baixos de potência (frigir pão, funções de assado e em algumas
outras funções). Isto é normal.
- A placa de indução deixa de funcionar e emite avisos sonoros
repentinamente. A visualização digital indica E6.
- Se premiu uma tecla de função incorrecta? (p. ex., refogar sob a função
de manter a panela quente?)
- Não há água no utensílio de cozedura ao efectuar a função de manter a
panela quente ou sopa.
- A placa de indução deixa de funcionar e emite avisos sonoros
repentinamente. A visualização digital indica E6.
- O revestimento da panela não é de um material apropriado para a
indução, ou a consistência da sopa é muito espessa, ou a água é
insuficiente.
- A panela posta na placa está vazia, não há nenhum líquido ou alimento
dentro.
- A placa de indução deixa de funcionar e emite avisos sonoros
repentinamente. A visualização digital indica E2.
- A temperatura ambiente é muito elevada?
- A entrada ou saída de ar está bloqueada?
- Talvez a temperatura interna seja muito alta. Torne a colocar a placa de
indução em funcionamento depois de uns minutos.
- A placa de indução deixa de funcionar e emite avisos sonoros
repentinamente. A visualização digital indica E4.
- A voltagem de fornecimento da rede é inferior a 170 V.
- A placa de indução deixa de funcionar e emite avisos sonoros
repentinamente. A visualização digital indica E3.
- A voltagem de fornecimento da rede é superior a 260 V.
- A temperatura está fora de controlo durante o funcionamento.
- A base do utensílio de cozedura utilizado é plana ou tem no seu centro
uma concavidade superior a 2 mm?
- A água não pode ser fervida.
- A quantidade de água é superior a 4 litros ou inferior a 1 litro?
- O utensílio de cozedura é apto (o material do utensílio não é apto para a
placa de indução ou a separação por baixo da base do utensílio é muito
grande)?
- A temperatura ambiente é de menos de 5º C?
- O arroz não está bem feito ou está queimado na execução automática de
confecção de arroz.
- A quantidade de arroz é superior a 1,25 kg ou inferior a 0,25 kg?
- Acrescentou-se muita água?
- O utensílio de cozedura utilizado não é apto. Utilizar um utensílio com
base composta.
Obrigado por depositar a sua confiança em nós escolhendo um dos nossos produtos.

12
13
D
Unsere Produkte sind auf höchste Ansprüche hinsichtlich Qualität, Funktionsfähigkeit und Design ausgelegt. Wir hoffen, dass Sie mit Ihrer
neuen Induktionsplatte Miami von PALSON zufrieden sein werden.
SICHERHEITSHINWEISE
- Nehmen Sie das Gerät nicht selbst auseinander zum Reparieren. Das ist gefährlich und könnte die Induktionsplatte beschädigen.
- Ein beschädigtes Stromkabel ist vom Hersteller oder seinem autorisierten Kundendienst zu ersetzen oder durch einen ausgebildeten
Techniker, um Gefahren zu verhindern.
- Dieses Produkt darf nicht von Kindern benutzt werden oder von sonstigen Personen, bei denen aufgrund der körperlichen,
sensorischen oder geistigen Verfassung ein sicherer Gebrauch ohne Hilfe oder Beaufsichtigung einschränkt ist. Kinder sind zu
beaufsichtigen, um sicherzustellen, dass sie das Produkt nicht zum Spielen benutzen.
- Wenn die Oberfläche bricht, schalten Sie das Gerät sofort aus, um einen elektrischen Schlag zu vermeiden.
- Metallische Gegenstände wie Messer, Gabeln, Löffel und sonstige Bestecke dürfen nicht auf die Kochplatte gelegt werden, da sie
sehr heiß werden können.
Funktionen der Tasten auf dem Bedienfeld
Ein/Aus (Abb. 1)
1. Stecken Sie den Stecker in die Netzsteckdose. Die Induktionskochplatte ist jetzt betriebsbereit, wenn Sie auf die Ein-/Austaste drücken.
Wenn Sie eine beliebige Wahltaste drücken, wird die entsprechende Funktion eingeschaltet und die Kontrollleuchte leuchtet auf.
2. Drücken Sie erneut die Ein-/Austaste, um die Induktionskochplatte auszuschalten.
Schmoren (Abb. 2)
1. Drücken Sie diese Taste, um „Schmoren“ zu wählen. Die Anzeigeleuchte leuchtet auf.
2. Stellen Sie die Leistung mit der Auf- und Abtaste zwischen 350W und 1600W ein, um ein Schmorgericht zu bereiten.
3. Wenn der Modus „WARM“ angewählt ist, wärmt die Induktionsplatte bei durchschnittlich 100W und hält die Temperatur zwischen 40ºC
und 80ºC.
Dünsten (Abb. 3)
1. Drücken Sie diese Taste, um „Dünsten“ zu wählen. Die Anzeige des Temperaturreglers ist aktiviert.
2. Stellen Sie die gewünschte Temperatur und Kochhitze mit der Auf- und Abtaste ein.
Kochen (Abb. 4)
1. Drücken Sie diese Taste, um „Kochen“ zu wählen. Die Gesamtzeit beträgt ca. 1-2 Stunden. Während des Kochens kann die
Temperatur und Kochhitze nicht vom Benutzer eingestellt werden.
2. Um Zeit zu sparen, kann Brühe bei hoher Temperatur im Modus „Schmoren“ vorgewärmt werden.
Aufbrühen (Abb. 5)
1. Drücken Sie diese Taste, um „Aufbrühen“ zu wählen. Während des Kochens kann die Temperatur und Kochhitze nicht vom Benutzer
eingestellt werden.
2. Die Wassermenge liegt bei ca. 1-4 Litern.
Temperaturregler (Abb. 6)
1. Drücken Sie zum Einstellen der Temperatur und Kochhitze sowie die Funktion „WARM“.
Taste für Zeiteinstellung
Mit dieser Taste wird die Induktionsplatte in Abhängigkeit von der festgelegten Zeit (zwischen 1 ~ 99 Minuten) abgeschaltet. Drücken
Sie diese Taste einmal, um eine Einzelziffer einzustellen und halten Sie die Taste gedrückt, um Zehnerstellen einzustellen. Die Taste für
Zeiteinstellung wird zusammen mit den Funktionstasten benutzt.
Funktionsweise und Sicherheitsvorrichtungen
Funktionsweise und Sicherheitsvorrichtungen
1. Prüfung des Topfmaterials
Wenn ein nicht für das Induktionskochen geeigneter Topf auf die Platte gestellt wird, erzeugt das Gerät einen kurzen Piepton und
schaltet automatisch ab.
2. Sicherheitsvorrichtung für Zeitüberschreitung
Ist keine Funktionstaste gedrückt und wird der Kochtopf nach 2,5 Stunden bei eingeschaltetem Gerät nicht bewegt, schaltet die
Kochplatte zur Sicherheit automatisch ab.
3. Sicherung gegen Trockenkochen
Wenn im Modus für Schmoren oder Suppe kein Wasser mehr im Kochtopf ist, erzeugt das Gerät einen Piepton und schaltet
automatisch ab.
4. Sicherung gegen Bewegung des Kochtopfs
Wenn der Kochtopf während des Kochens von der Platte genommen wird, erzeugt das Gerät einen Piepton und schaltet automatisch ab.

12
13
Bedienungsanleitung:
1. Stecken Sie den Stecker in die Steckdose, drücken Sie die Ein-/Austaste, und die Kontrollleuchte leuchtet auf.
2. Geben Sie die Kochzutaten in den Topf und stellen diesen in die Mitte der Kochplatte.
3. Wählen Sie den gewünschten Kochmodus aus.
4. Drücken Sie den Temperaturregler, um die geeignete Kochtemperatur festzulegen. So bleibt die Temperatur des Kochtopfs
automatisch gleich.
5. Drücken Sie nach dem Kochen die Ein-/Austaste, um alle Funktionen auszuschalten.
Auswahl des Kochtopfs für die Induktionsplatte:
1. Verwendbare Kochgeräte
Stahl oder Gusseisen, emailliertes Eisen, Edelstahl, Pfannen und Töpfe mit flachem Boden und einem Durchmesser von 12-26 cm.
2. Nicht verwendbare Kochgeräte
Hitzebeständiges Glas, Töpfe aus Keramik, Kupfer, Aluminium, Pfannen und Töpfe mit gewölbtem Boden, sowie Pfannen und Töpfe
mit einem Durchmesser unter 12 cm.
Zu prüfende Punkte
Im Fall einer Betriebsstörung nehmen Sie bitte zunächst die in der nachfolgenden Tabelle aufgeführten Überprüfungen an der
Induktionsplatte vor, bevor Sie sie zur Reparatur einschicken.
Problem Überprüfung
- Beim Einstecken des Steckers liegt kein Piepton und keine
Digitalanzeige vor.
- Ist der Stecker abgezogen?
- Ist der Schalter oder die automatische Sicherung unterbrochen?
- Ist das Gerät vom Netz abgeschaltet?
- Die Kochplatte schaltet nach einem 60 Sekunden langen Piepton
ab. Auf der Digitalanzeige steht E1.
- Handelt es sich um ein geeignetes Kochgerät?
- Steht der Kochtopf in der Mitte der Kochplatte?
- Bleibt der Kochtopf nach dem Kochen auf der Platte stehen?
(Der Kochtopf darf nach dem Kochen nicht auf der Platte stehen
bleiben).
- Die Kochplatte schaltet nach einem Piepton ab. Auf der
Digitalanzeige steht E5.
- E5 zeigt an, dass der Temperaturfühler in der Spule beschädigt ist
und zur Reparatur zum Kundendienst eingeschickt werden muss.
- E5 zeigt an, dass der Temperaturfühler am Kühlungsflügel
beschädigt ist und zur Reparatur zum Kundendienst eingeschickt
werden muss.
- Die Kochplatte hört plötzlich während des Betriebs auf zu heizen.
Die Aufheizung wird unterbrochen.
- Die Unterbrechung kann in der Aufheizphase erfolgen, bei
niedriger Leistungseinstellung, beim Brotbacken, bei Bratfunktionen
und einigen anderen Funktionen. Das ist völlig normal.
- Die Kochplatte schaltet ab und erzeugt plötzlich einen Piepton. Auf
der Digitalanzeige steht E6.
- Wurde eine falsche Funktionstaste gedrückt? (z.B. Dünsten unter
der Funktion für heißen Kochtopf?)
- Im Kochtopf befindet sich kein Wasser beim Betätigen der Funktion
für heißen Kochtopf oder Suppe.
- Die Kochplatte schaltet ab und erzeugt plötzlich einen Piepton. Auf
der Digitalanzeige steht E6.
- Das Material der Kochtopfeinlage ist nicht für das Induktionskochen
geeignet, der Suppeninhalt ist zu dickflüssig, oder es ist nicht
ausreichend Wasser vorhanden.
- Der Topf auf der Kochplatte ist leer. Er enthält keinerlei Flüssigkeit
oder Lebensmittel.
- Die Kochplatte schaltet ab und erzeugt plötzlich einen Piepton. Auf
der Digitalanzeige steht E2.
- Ist die Umgebungstemperatur zu hoch?
- Ist der Luftein- oder –austritt verstopft?
- Eventuell ist die Innentemperatur zu hoch. Schalten Sie die
Kochplatte nach einigen Minuten wieder ein.
- Die Kochplatte schaltet ab und erzeugt plötzlich einen Piepton. Auf
der Digitalanzeige steht E4.
- Die Spannung der Netzeinspeisung liegt unter 170V.
- Die Kochplatte schaltet ab und erzeugt plötzlich einen Piepton. Auf
der Digitalanzeige steht E3.
- Die Spannung der Netzeinspeisung liegt über 260V.
- Die Temperatur ist während des Betriebs außer Kontrolle.
- Ist die Unterseite des Kochtopfs flach oder befindet sich in der
Mitte eine über 2 mm große Vertiefung?
- Das Wasser kann nicht kochen.
- Liegt die Wassermenge über 4 Litern oder unter 1 Liter?
- Ist das Kochgerät geeignet (das Material ist nicht für das
Induktionskochen geeignet, oder die Vertiefung am Boden des
Kochgerätes ist zu groß)?
- Liegt die Umgebungstemperatur unter 5ºC?
- Der Reis ist nicht durchgekocht oder angebrannt bei der
automatischen Funktion für Reis.
- Liegt die Reismenge über 1,25 kg oder unter 0,25 kg?
- Wurde zu viel Wasser hinzugefügt?
- Das verwendete Kochgerät ist nicht geeignet. Verwenden Sie ein
Kochgerät mit Verbundstoffboden.
Vielen Dank, dass Sie eines unserer Produkte ausgewählt haben.

14
15
I
I nostri prodotti sono stati sviluppati per raggiungere i più elevati standard per qualità, funzionalità e design. Ci auguriamo che possiate
usufruire pienamente della vostra nuova piastra a induzione Miami di PALSON.
CONSIGLI DI SICUREZZA
- Non smontate l’apparecchio per ripararlo voi stessi, dato che è pericoloso e la cucina a induzione si potrebbe danneggiare.
- Se il cavo di corrente è danneggiato dovrà essere sostituito dal fabbricante o dal servizio tecnico autorizzato o da un tecnico
qualificato, in maniera tale da evitare eventuali pericoli.
- Non si consente l’uso di questo prodotto a bambini o ad altre persone senza assistenza o controllo qualora il loro stato fisico,
sensoriale o mentale non ne consentano l’uso sicuro. I bambini dovrebbero essere controllati per assicurarsi che non giochino con
detto prodotto.
- Se la superficie si rompe, spegnere l’apparato per evitare possibili scosse elettriche.
- Non si devono collocare sopra la piastra ad induzione oggetti metallici come coltelli, forchette, cucchiai o altre posate, dato che
potrebbero diventare caldi.
Funzioni dei pulsanti del pannello di controllo
Accensione/spegnimento (fig.1)
1. Collegare la spina alla presa di corrente; la cucina a induzione passerà allo stato di preaccensione premendo il pulsante di
accensione/spegnimento. Premendo qualsiasi pulsante di selezione delle funzioni, questa si metterà in funzionamento, accendendosi
anche la corrispondente spia luminosa.
2. Premere di nuovo il pulsante di accensione/spegnimento per interrompere il funzionamento della cucina a induzione.
Modo Stufare (fig.2)
1. Premere questo pulsante per selezionare il modo “Stufare”, con la spia luminosa accesa.
2. Utilizzando gli appositi pulsanti per aumentare o abbassare la potenza, regolarla tra 350W e 1600W, per preparare lo stufato.
3. Se si è selezionato il modo “WARM” (mantenere tiepido), la cucina a induzione scalderà a una potenza media di 100W, e manterrà
la temperatura tra 40ºC e 80ºC.
Modo Soffriggere (fig.3)
1. Premere questo pulsante per selezionare il modo “Soffriggere”, con l’indicatore di regolazione temperatura attivato.
2. Regolare la temperatura desiderata e il calore utilizzando i pulsanti di incremento e diminuzione.
Modo Cuocere (fig.4)
1. Premere questo pulsante per selezionare il modo “Cuocere”. Il tempo complessivo di cottura sarà approssimativamente di 1-2 ore.
Durante la cottura, la temperatura e il calore non possono venire regolati dall’utilizzatore.
2. Per risparmiare tempo, si puó pre-riscaldare il brodo ad alta temperatura con il modo “Stufare”.
Modo Bollire (fig.5)
1. Premere questo pulsante per selezionare il modo “Bollire”. Durante la cottura, la temperatura e il calore non possono venire regolati
dall’utilizzatore.
2. La capacità è di circa 1-4L di acqua.
Regolatore di temperatura (fig.6)
1. Premere per regolare la temperatura e il calore, cosí come anche la funzione “WARM” (mantenere tiepido).
Bottone per la regolazione del temporizzatore
Questo bottone serve per spegnere la cucina a induzione in base al tempo prescelto, in una scala che va da 1 ~ 99 minuti. Premere questo
bottone una sola volta per programmare una cifra singola e mantenerlo premuto in modo continuato per programmare le decine. Il bottone
di regolazione del tempo deve essere utilizzato contemporaneamente alle funzioni.
Funzionamento e dispositivi di sicurezza
Dispositivi di sicurezza
1. Controllo del materiale della pentola
Se si colloca una pentola non adatta alla induzione, l’apparecchio produrrà un breve suono e quindi si spegnerà automaticamente.
2. Dispositivo di sicurezza per tempo eccessivo
Se nessun pulsante di funzione viene premuto o se la pentola non si muove dopo 2,5 ore con la corrente accesa, l’apparecchio si
spegnerà automaticamente, come protezione di sicurezza.
3. Protezione contro la cottura senza acqua
Nel modo stufato o minestra, l’apparecchio produrrá un breve suono e quindi si spegnerà automaticamente nel caso in cui non vi sia
acqua nella pentola.
4. Dispositivo di protezione di sicurezza contro il movimento della pentola
Se la pentola viene spostata durante la cottura, l’apparecchio produrrà un breve suono e quindi si spegnerà automaticamente.

14
15
Istruzioni per l’uso
1. Introdurre la spina nella presa di corrente, premere il pulsante accensione/ spegnimento per mettere in funzione l’apparato, e la spia
luminosa dell’indicatore di corrente si illuminerà.
2. Introdurre gli ingredienti da cuocere nella pentola e collocarlo al centro della piastra superiore.
3. Selezionare il modo di cottura.
4. Premere il selettore della temperatura per stabilire la temperatura adatta: la temperatura della pentola si manterrà
automaticamente.
5. Premere il pulsante accensione/ spegnimento per interrompere tutte le funzioni al termine della cottura.
Come scegliere la pentola per la cucina a induzione:
1. Utensili utilizzabili
Acciaio o lega di ferro, ferro smaltato, acciaio inossidabile, vassoi e pentole dal fondo piano con un diametro di 12-26 cm.
2. Utensili non utilizzabili
Cristallo resistente al calore, recipienti di ceramica, rame, alluminio, vassoi e pentole dal fondo arrotondato e pentole e vassoi dal
diametro inferiore a 12 cm.
Punti da controllare
Nel caso in cui si verifichi qualsiasi problema di funzionamento nella cucina a induzione, Vi preghiamo di realizzare i controlli descritti nella
tavola che segue prima di mandarla a riparare.
Problema Verifica
- Non si sente nessun suono quando si inserisce la spina, non appare
nessuna indicazione nel visore digitale.
- Si è staccata la spina?
- Si è scollegato l’interrutore generale o è scattato il salvavita?
- Si è interrotta la corrente?
- La cucina si ferma dopo aver prodotto un suono breve durante 60
secondi. Il visore digitale indica E1.
- L’utensile utilizzato per la cottura è adatto?
- L’utensile utilizzato per la cottura è collocato nel centro della superficie
piana?
- La pentola è rimasta sulla cucina dopo la cottura? (Non si deve lasciare
la pentola sopra la cucina dopo aver terminato la cottura).
- La cucina si ferma dopo aver prodotto un suono breve. Il visore digitale
indica E5.
- E5 indica che il sensore della temperatura nella bobina è danneggiato:
lo si deve inviare al Servizio di assistenza tecnica per farlo riparare.
- E5 indica che il sensore della temperatura nella elica di raffreddamento
è danneggiato: lo si deve inviare al Servizio di assistenza tecnica per
farlo riparare.
- La cucina smette improvvisamente di scaldare durante il funzionamento.
Il riscaldamento si interrompe.
- La interruzione del calore si puó verificare durante il riscaldamento, in
alcuni livelli con bassa corrente, nella frittura del pane, nelle funzioni di
arrosto e in alcune altre. Ció è del tutto normale.
- La cucina si spegne e produce improvvisamente dei suoni brevi. Il visore
digitale indica E6.
- È stato premuto un pulsante di funzione incorretto? (p.es. soffritto sotto
la funzione di pentola calda?)
- Non c’è acqua nell’utensile di cottura avendo selezionato la funzione di
pentola calda o minestra.
- La cucina si spegne e produce improvvisamente dei suoni brevi. Il visore
digitale indica E6.
- Ció che sta all’interno della pentola non è un materiale adatto alla
induzione, o il contenuto della minestra è troppo denso, o l’acqua è
insufficiente.
- La pentola messa sulla piastra è vuota, non contiene nessun liquido o
alimento.
- La cucina si spegne e produce improvvisamente dei suoni brevi. Il visore
digitale indica E2.
- La temperatura ambiente è troppo elevata?
- L’entrata o uscita dell’aria è bloccata?
- Forse la temperatura interna è troppo alta. Rimettere in funzionamento
la cucina qualche minuto piú tardi.
- La cucina si spegne e produce improvvisamente dei suoni brevi. Il visore
digitale indica E4.
- Il voltaggio della rete è inferiore a 170V.
- La cucina si spegne e produce improvvisamente dei suoni brevi. Il visore
digitale indica E3.
- Il voltaggio della rete è superiore a 260V.
- La temperatura è fuori controllo durante il funzionamento.
- La base dell’utensile utilizzato per la cottura è piana o ha al centro una
concavità superiore a 2 mm?
- L’acqua non arriva a bollire.
- La quantità di acqua è superiore a 4 litri o inferiore a 1 litro?
- L’utensile utilizzato per la cottura è adatto (il materiale dell’utensile
non è adatto alla cucina a induzione o lo spazio al di sotto della base
dell’utensile è troppo grande)?
- La temperatura ambiente è inferiore a 5ºC?
- Il riso non è abbastanza cotto o è bruciato con la preparazione
automatica di riso.
- La quantità di riso è superiore a 1,25 kg o inferiore a 0,25 kg?
- È stata aggiunta troppa acqua?
- L’utensile usato per la cottura non è adatto. Utilizzare un utensile con la
base di composto.
Vi ringraziamo per la fiducia accordataci nello scegliere uno dei nostri prodotti.

16
17
NL
Onze producten zijn ontworpen om aan de hoogste vereisten met betrekking tot kwaliteit, functionaliteit en design te voldoen. Wij hopen
dat u veel plezier beleeft aan uw nieuwe inductieplaat Miami van PALSON.
VEILIGHEIDSMAATREGELEN
- Demonteer de eenheid niet zelf voor reparatie. Dat is gevaarlijk en kan de inductiekookplaat beschadigen.
- Indien het elektriciteitssnoer is beschadigd dient het, om gevaar te voorkomen, te worden vervangen door de fabrikant, de erkende
technische dienst of door een bevoegde technicus.
- Dit product is niet geschikt om zonder toezicht te worden gebruikt door kinderen of andere personen die vanwege hun lichamelijke,
zintuiglijke of geestelijke gesteldheid niet in staat zijn om het op veilige wijze te gebruiken. Er moet altijd goed op de kinderen worden
gelet om te voorkomen dat zij met het product gaan spelen.
- Indien het oppervlak kapot gaat, zet het apparaat dan uit om eventuele elektrische schokken te voorkomen.
- Metalen voorwerpen zoals messen, vorken, lepels en ander bestek mogen niet op de kookplaat worden gelegd, omdat zij heet kunnen
worden.
Functies van de toetsen van het bedieningspaneel
Aan/uit (fig.1)
1. Steek de stekker in het stopcontact. Door op de aan/uittoets te drukken, zet u de inductiekookplaat op de stand gereed. Druk op een
willekeurige functietoets om de plaat in werking te zetten. Het overeenkomstige waarschuwingslampje gaat nu aan.
2. Druk opnieuw op de aan/uitknop om de inductiekookplaat uit te zetten.
Stand voor Stoven (fig.2)
1. Kies met behulp van deze toets, en met het waarschuwingslampje aan, de stand “Stoven”.
2. Stel het vermogen af tussen 350W en 1600W, door middel van de toetsen voor op en neer, voor het stoofgerecht.
3. Als de stand “WARM” (warmhouden) is ingesteld, verwarmt de inductiekookplaat op een vermogen van gemiddeld 100W en wordt
een temperatuur tussen 40ºC en 80ºC gehandhaafd.
Stand voor Fruiten (fig.3)
1. Kies met behulp van deze toets, en met de temperatuurregelaar aan, de stand “Fruiten”.
2. Stel de temperatuur en de warmte af met de toetsen voor op en neer.
Stand voor Koken (fig.4)
1. Druk op deze toets voor de stand “Koken”. De totale tijd bedraagt tussen de 1-2 uur. Tijdens het koken kunnen de temperatuur en de
warmte niet door de gebruiker worden bijgesteld.
2. Om tijd te besparen kan de bouillon op een hoge temperatuur, op de stand “Stoven”, worden voorverwarmd.
Stand voor Aan de kook brengen (fig.5)
1. Druk op deze toets voor de stand “Aan de kook brengen”. Tijdens het koken kunnen de temperatuur en de warmte niet door de
gebruiker worden bijgesteld.
2. De watercapaciteit is ongeveer 1-4L.
Temperatuurregelaar (fig.6)
1. Toets om de temperatuur en de warmte af te stellen, en toets eveneens de functie “WARM” (warmhouden).
Knop voor het instellen van de tijd
Deze knopt dient ertoe om de inductiekookplaat uit te zetten na het verstrijken van de ingestelde tijdsduur, tussen de 1 ~ 99 minuten. Druk
een keer op deze knop voor het instellen van de eenheden en houd hem ingedrukt om de tientallen in te stellen. De knop voor het instellen
van de tijd moet samen met de functies worden gebruikt.
Werking en veiligheidsvoorschriften
Veiligheidsvoorschriften
1. Controleer het materiaal van de pan
Als er een pan wordt gebruikt die niet geschikt is voor inductie, dan laat de eenheid een korte pieptoon horen en gaat vervolgens
automatisch uit.
2. Veiligheidsmechanisme te lange tijdsduur
Indien er geen functietoets is ingedrukt of de pan gedurende langer dan 2,5 uur niet wordt bewogen, met het vermogen ingeschakeld,
dan schakelt de eenheid, als veiligheidsmaatregel, automatisch uit.
3. Beveiliging tegen droogkoken
Op de stand voor stoven of bij het maken van soep, laat de eenheid, als er geen water in de pan zit, een pieptoon horen en gaat
vervolgens automatisch uit.
4. Veiligheidsmechanisme wegnemen van de pan
Indien de pan tijdens het koken wordt weggenomen, laat de eenheid een pieptoon horen en schakelt vervolgens automatisch uit.

16
17
Gebruiksaanwijzing
1. Steek de stekker in het stopcontact, druk op de aan/uittoets om de plaat aan te zetten. Het controlelampje gaat nu aan.
2. Doe de te bereiden ingrediënten in de pan en zet de pan midden op de bovenste plaat.
3. Stel de kookwijze in.
4. Druk op de temperatuurregelaar om de juiste temperatuur in te stellen, de temperatuur van de pan blijft automatisch gehandhaafd.
5. Druk na het koken op de aan/uittoets om alle functies uit te schakelen.
Het kiezen van de pan voor de inductieplaat:
1. Geschikte pannen
Staal of gietijzer, geëmailleerd ijzer, roestvrij staal, platen en pannen met een vlakke bodem met een diameter van 12-26 cm.
2. Ongeschikte pannen
Warmtebestendig glas, keramiek schalen, koper, aluminium, platen en pannen met bolle bodem of met een diameter van minder dan
12 cm.
Controlepunten
Indien er zich problemen voordoen tijdens de werking van de inductiekookplaat, controleer dan de punten uit onderstaande tabel alvorens
de plaat weg te brengen voor reparatie.
Probleem Controle
- Er klinkt geen geluid als de stekker in het stopcontact wordt
gestoken, er verschijnt niets op het digitale scherm.
- Is de stekker losgeraakt?
- Is de schakelaar of automatische stop uitgeschakeld?
- Is de stroom uitgeschakeld?
- De kookplaat gaat 60 seconden na een korte pieptoon uit. Op het
digitale scherm verschijnt E1.
- Is de gebruikte pan geschikt?
- Staat de pan midden op de vlakke plaat?
- Staat de pan na het koken nog op de kookplaat? (Laat de pan na
het koken niet op de kookplaat staan).
- De kookplaat gaat na een pieptoon uit. Op het digitale scherm
verschijnt E5.
- E5 geeft aan dat de temperatuursensor in de spoel beschadigd is.
Deze moet voor reparatie naar de SAT worden gebracht.
- E5 geeft aan dat de temperatuursensor in de koelplaat beschadigd
is. Deze moet voor reparatie naar de SAT worden gebracht.
- De kookplaat stopt tijdens de werking ineens met verwarmen. Het
verwarmen wordt onderbroken.
- De warmteonderbreking kan optreden tijdens het opwarmen, op
sommige lage standen, bij het frituren van brood, functies voor
braden en andere functies. Dit is normaal.
- De kookplaat gaat uit en laat plotseling pieptonen horen. Op het
digitale scherm verschijnt E6.
- Is er een verkeerde functietoets ingedrukt? (bijv. Fruiten bij de
functie warm houden?)
- Er zit geen water in de pan bij het uitvoeren van de functie pan
warm houden of soep.
- De kookplaat gaat uit en laat plotseling pieptonen horen. Op het
digitale scherm verschijnt E6.
- De pan is van een materiaal dat ongeschikt is voor inductie, of de
soep is te dik of er is te weinig water.
- De pan die op de plaat staat is leeg, bevat geen vloeistof of
voedsel.
- De kookplaat gaat uit en laat plotseling pieptonen horen. Op het
digitale scherm verschijnt E2.
- Is de omgevingstemperatuur te hoog?
- Is de luchtingang of –uitgang verstopt?
- Misschien is de temperatuur binnenin te hoog. Zet de kookplaat
een paar minuten later weer aan.
- De kookplaat gaat uit en laat plotseling pieptonen horen. Op het
digitale scherm verschijnt E4.
- De voedingsspanning van het net is lager dan 170V.
- De kookplaat gaat uit en laat plotseling pieptonen horen. Op het
digitale scherm verschijnt E3.
- De voedingsspanning van het net is hoger dan 260V.
- De temperatuur is tijdens de werking onbeheersbaar.
- Is de bodem van de gebruikte pan vlak of heeft het midden
daarvan een holte van meer dan 2 mm?
- Het water kan niet aan de kook.
- Is de hoeveelheid water meer dan 4 liter of minder dan 1 liter?
- Is de pan geschikt (het materiaal van de pan is niet geschikt voor
inductiekookplaat of de speling onder de bodem van de pan is te
groot)?
- Is de omgevingstemperatuur lager dan 5ºC?
- De rijst is niet goed gaar of is verbrand bij het automatisch
bereiden van rijst.
- Is de hoeveelheid rijst groter dan 1,25 kg of lager dan 0,25 kg?
- Is er teveel water toegevoegd?
- De gebruikte pan is niet geschikt. Gebruik een pan met een bodem
van samengesteld materiaal.
Wij danken u voor uw vertrouwen in ons en voor het kiezen van een van onze producten.

18
19
GR
Ta diká mav proiónta eínai kataskeuasména gia na antapokrínontai sta pléon uyhlá stántar tóso se poióthta óso kai se leitourgikóthta
kai scediasmó. Elpízoume na apolaúsete to kainoúria sav keramikñ pláka Miami thv PALSON.
SUMBOULES ASFALEIAS
- Mhn aposunarmologeíte thn suskeuñ gia na thn epidiorqýsete eseív o ídiov,epeidñ káti tétoio eínai epikínduno kai qa mporoúse na
prokalései akóma megalúterh blábh sthn keramikñ pláka kouzínav.
- Eán to kalýdio trofodosíav tou hlektrikoú reúmatov écei fqareí, qa prépei na antikatastaqeí to suntomýtero dunatón apo ton
kataskeuastñ ñ apo éna exousiodothméno tecnikó grafeío exuphréthshv ñ apo énan exeidikeuméno tecnikó, me apýtero skopó thn
apofugñ opoioudñpote kindúnou.
- Autó to proión den epitrépetai giá paidikñ crñsh ñ apó álla átoma, cwrív parakoloúqhsh kai epíbleyh, ótan h fusikñ,
aisqhthriakñ ñ yucikñ touv katástash ta empodízei na to crhsimopoioún me asfáleia.Ta paidiá qa prépei na epithroúntai étsi
ýste na eíste sígouroi pwv den paízoun me to proanaferqén proión.
- Eán h epifáneia spásei, na sbñsete thn suskeuñ gia na apofúgete ton kínduno próklhshv hlektroplhxíav.
- Ta metalliká antikeímena tétoia opwv macaíria, koutália, phroúnia, kai álla parómoia eídh den qa prépei na topoqetoúntai epánw
sthn pláka mageirématov epeidñi mporoún na qermaínontai.
Leitourgíev twn plñktrwn tou pínaka elégcou
Qésh se leitourgía/apenergopoíhsh(eik.1)
1. Sundéete ton reumatolñpth sthn príza tou basikoú hlektrikoú reúmatov, h keramikñ pláka kouzínav qa teqeí sthn katástash,
étoimh,gia na pathqeí to plñktro thv qéshv se leitourgíav/apenergopoíhsh. Na patñsete opoiodñpote plñktro thv epilogñv
kápoiav leitourgíav kai qa teqeí se leitourgía h energopoíhsñ tou ený tautógcrona qa anáyei h antístoich fwteinñ éndeixh.
2. Na patñsete ek néou to plñktro thv qéshv se leitourgía/ apenergopoíhsh gia na paúsete thn leitourgía thv keramikñv plákav
kouzínav.
Trópov stifádo (eik.2)
1. Patáte autó to plñktro gia na epiléxete ton trópo “stifádo”, me anamménh thn fwteinñ éndeixh.
2. Ruqmíste thn iscú anámesa sta 350W éwv kai ta 1600W, me thn boñqeia twn plñktrwn aúxhshv kai meíwshv, étsi ýste na kánete
to stifádo.
3. Eán eínai epilegménov o trópov “WARM” (na diathreítai zestó), h keramikñ pláka kouzínav qa zestaínei se mía mésh iscú thv táxhv
twn 100
W, kai qa diathreí thn qermokrasía anámesa stouv 40ºC éwv kai touv 80ºC.
Trópov Tsigárisma (eik.3)
1. Patáte autó to plñktro gia na epiléxete ton trópo “tsigárisma”, me ton deíkth rúqmishv thv qermokrasíav energopoihméno.
2. Na ruqmísete thn prokaqorisménh qermokrasía kai thn qérmansh mésou twn plñktrwn aúxhshv kai meíwshv.
Trópov Mageíreuma (eik.4)
1. Patáte autó to plñktro gia na epiléxete ton trópo “Mageíreuma”. O sunolikóv crónov qa diarkései perípou 1-2 ýrev. Kata thn
diárkeia tou mageirématov, h qermokrasía kai h qérmansh den qa mporoún na ruqmízontai apo ton crñsth.
2. Gia na kerdísete cróno, mporeíte na proqermánete thn soúpa se uyhlñ qermokrasía me ton trópo “Stifádo”.
Trópov Brásimo (eik.5)
1. Patáte autó to plñktro gia na epiléxete ton trópo “Brásimo”. Kata thn diárkeia tou mageirématov, h qermokrasía kai h qérmansh
den qa mporoún na ruqmízontai apo ton crñsth.
2. H cwrhtikóthta se neró eínai apo 1 éwv 4L perípou.
Rúqmish thv qermokrasíav (eik.6)
1. Patáte to gia na ruqmísete thn qermokrasía kai thn qérmansh ópwv epíshv thn leitourgía “WARM” (na diathreítai zestó).
Koumpí thv rúqmishv tou crónou
Autó to koumpí eínai katállhlo gia na paúei thn leitourgía thv thn keramikñv plákav kouzínav me básh ton prokaqorisméno cróno
anámesa sthn gkáma apo 1 ~ 99 leptá. Patáte autó to koumpí móno mía forá gia na ruqmísete éna atomikó yhfiakó kai to diathreíte
pathméno sunéceia gia na ruqmízete ta dekadiká yhfiaká. To koumpí rúqmishv tou crónou qa prépei na crhsimopoieítai mazí me tiv
leitourgíev.
Leitourgía kai mhcanismoí asfaleíav
Mhcanismoí asfaleíav
1. Epiqeýrhsh tou ulikoú mésa sthn katsaróla
Eán topoqetñsete mía mh katállhlh katsaróla gia thn keramikñ qérmansh mésou epagwgñv, h suskeuñ qa parágei éna súntomo
sfúrigma, kai tóte qa apenergopoihqeí autómata.
2. Mhcanismóv asfaleíav ótan écei perásei o crónov
Eán den upárcei kanéna plñktro leitourgíav pathméno ñ den metakinhqeí to katsaróla metá apo 2,5 ýrev sunecoúv súndeshv sthn
príza parocñv reúmatov, h suskeuñ qa aposundeqeí autómata san prostasía asfaleíav.
3. Prostasía gia to stegnó mageíreuma
Ston trópo tou stifádo ñ thv soúpav ótan den upárcei neró sto katsaróla, h suskeuñ qa parágei éna sfúrigma kai tóte qa
aposundeqeí autómata.
4. Prostateutikóv mhcanismóv asfaleíav ótan metakineíte to katsaróla
Eán h katsaróla apomakrúnetai kata thn diárkeia tou mageirématov, h suskeuñ qa parágei éna sfúrigma kai tóte qa aposundeqeí
autómata.

18
19
Trópov crhsimopoíhshv
1. Eiságete ton reumatolñpth sthn príza tou hlektrikoú reúmatov, patáte to plñktro thv qéshv se leitourgía/ apenergopoíhsh kai
o deíkthv thv iscúov qa fwtisteí.
2. Bázete ta sustatiká prov mageírema sthn katsaróla kai thn topoqeteíte sthn mésh thv epánw plákav.
3. Epilégete ton trópo tou mageireúmatov.
4. Patáte ton ruqmistñ thv qermokrasíav gia na kaqorísete thn katállhlh qermokrasía, h qermokrasía sthn katsaróla qa diathrhqeí
autómata.
5. Patáte to plñktro thv qéshv se leitourgía/ apenergopoíhsh gia na aposundésete ólev tiv leitourgíev metá to mageírema.
Pwv na dialéxete thn katállhlh katsaróla gia thn keramikñ pláka kouzínav:
1. Crhsimopoioúmena macairopñrouna
Atsáli ñ tñxeiv sidñrou, smaltwménov síderov, anoxeídwto atsáli, tayiá kai katsarólev epípedou pátou me mía diámetro thv táxhv
twn 12-26
cm.
2. Mh crhsimopoioúmena macairopñrouna
Krústallo anqektikó sthn qérmansh, doceía me keramikñ epéndush, mpakirénia skeúh, aloumínio,tayiá kai katsarólev me
strogguló páto kai tayiá ñ katsarólev me diámetro mikróterh twn 12
cm.
Shmeía epalñqeushv
Se períptwsh pou emfanisteí opoiodñpote próblhma leitourgíav sthn keramikñ pláka kouzínav, parakaloúme na kánete tiv scetikév
epalhqeúseiv tou parakátw paratiqémenou pínaka prin thn páte sto grafeío gia thn episkeuñ thv.
Próblhma Epalñqeush
- Den akoúgetai kanéna sfúrigma ótan bázete ton reumatolñpth, den
upárcei kammía éndeixh sthn yhfiakñ apeikónhsh.
- ¿Bgñke íswv o reumatolñpthv;
- ¿Aposundéqhke o diakópthv tou ñ h autómath asfáleia;
- ¿Eínai aposundedeménh h parocñ reúmatov;
- H kouzína paúei na leitourgeí metá apo 60 deuterólepta metádoshv enóv
súntomou sfurígmatov. H yhfiakñ apeikónhsh upodeiknúei E1.
- ¿ Eínai katállhlo gia crñsh to crhsimopoioúmeno macairopñrouno; ¿
Eínai topoqethménh h katsaróla epánw sto kéntro thv epípedou tayioú;
- ¿Paraménei h katsaróla epánw sthn kouzína metá apo to mageírema; (Mhn
diathreíte thn katsaróla epánw sthn kouzína metá apo to mageírema).
- H kouzína stamatá améswv apo éna sfúrigma. H yhfiakñ apeikónhsh
upodeiknúei E5.
- E5 upodeiknúei pwv o sénsorav thv qermokrasíav sto phnío écei uposteí
blábh, gia autó qa prépei na staleí améswv se ATGE gia thn episkeuñ
tou.
- E5 upodeiknúei pwv o sénsorav thv qermokrasíav ston anemistñra
yúxhv écei uposteí blábh gia autó qa prépei na staleí améswv se ATGE
gia thn episkeuñ tou.
- H kouzína stamatá na qermaínei xafniká kata thn diárkeia thv leitourgíav.
To zéstama diakóptetai.
- O diakópthv qérmanshv mporeí na emfanisteí kata thn diárkeia
qérmanshv, se camhlá epípeda iscúov,ópwv sto thgánisma ywmioú,
leitourgíev yhsímatov, kai se merikév állev leitourgíev. Autó eínai
kanonikó.
- H kouzína stamatá kai ekpémpei éna sfúrigma xafniká. H yhfiakñ
apeikónhsh upodeiknúei E6.
- ¿Patñqhke íswv éna lanqasméno plñktro leitourgíav; (p.c. camhló
tsigárisma se trópo zestñv katsarólav;)
- Den upárcei neró sto mageirikó skeúov ótan pragmatopoieítai h
leitourgía tou zestñ katsaróla ñ soúpa.
- H kouzína stamatá kai ekpémpei sfurígmata xafniká. H yhfiakñ
apeikónhsh upodeiknúei E6.
- H gémish thv katsarólav den égine me éna ulikó katállhlo gia thn
keramikñ epagwgñ, ñ to periecómeno thv soúpav eínai uperboliká phktó,
ñ anepárkeia neroú.
- H topoqethménh katsaróla sthn pláka eínai ádeia, den upárcei kammía
ugró trofñ mésa se autñn.
- H kouzína stamatá kai ekpémpei sfurígmata xafniká. H yhfiakñ
apeikónhsh upodeiknúei E2.
- ¿Eínai h peribantologikñ qermokrasía uperboliká uyhlñ;
- ¿Eínai frakarisménh h eísodov ñ h éxodov tou aéra;
- Iswv h eswterikñ qermokrasía eínai uperboliká uyhlñ. Na qésete se
leitourgía thn kouzína se líga leptá.
- H kouzína stamatá kai ekpémpei sfurígmata xafniká. H yhfiakñ
apeikónhsh upodeiknúei E4.
- H tásh parocñv hlektrikoú reúmatov tou diktúou eínai kátw twn 170V.
- H kouzína stamatá kai ekpémpei sfurígmata xafniká. H yhfiakñ
apeikónhsh upodeiknúei E3.
- H tásh parocñv hlektrikoú reúmatov tou diktúou eínai megalúterh twn
260V.
- H qermokrasía paraménei ektóv elégcou kata thn diárkeia leitourgíav.
- ¿Eínai h básh tou crhsimopoioúmenou mageirikoú skeúouv epípedh ñ écei
sto kéntro thv mía koilóthta megalúterh twn 2 mm?
- To neró den mporeí na brázei.
- ¿Eínai h posóthta tou neroú pánw apo 4 lítra ñ kátw apo 1 lítro?
- ¿Eínai to crhsimopoioúmeno mageirikó skeúov katállhlo (to ulikó tou
mageirikoú skeúouv den eínai katállhlo gia thn keramikñ pláka kouzínav
ñ to fárdov kátw apo thn básh tou mageirikoú skeúouv eínai uperboliká
megálo);
- ¿ Eínai h peribantologikñ qermokrasía kátw apo touv 5ºC?
- To rúzi den écei brásei kalá ñ écei kaeí sthn autómath ektélesh thv
leitourgíav brasmoú tou ruzioú.
-
¿Eínai h posóthta ruzioú megalúterh apo 1,25 kg ñ katýterh apo 0,25 kg?
- ¿Eínai uperbolikñ h posóthta tou prostiqémenou neroú?
- To crhsimopoioúmeno mageirikó skeúov den eínai to katállhlo. Na
crhsimopoieíte to katállhlo mageirikó skeúov me básh thn sústasñ tou.
Eucaristoúme gia thn empistosúnh pou mav deícnete dialégontav éna apo ta diká mav proiónta.

20
21
RU
Проектируя наши изделия, мы стремимся к тому, чтобы их качество, дизайн и функциональность отвечали стандартам наивысшего
уровня. Надеемся, что Вам понравится новая индукционная плитка Miami фирмы PALSON.
РЕКОМЕНДАЦИИ ПО МЕРАМ ПРЕДОСТОРОЖНОСТИ
- Не разбирать прибор и не пытаться ремонтировать его самостоятельно — это может привести к несчастному случаю или
поломке прибора.
- При повреждении кабеля питания во избежание опасности его замена должна осуществляться производителем, официальной
технической службой или другими квалифицированными специалистами.
-
Запрещается включать прибор детям и другим лицам без помощи или наблюдения, если их физическое или умственное состояние
не позволяет им безопасно пользоваться прибором. Не оставлять детей без присмотра и не разрешать им играть с прибором.
- В случае разбивания рабочей поверхности отключите прибор от сети во избежание удара током.
- Такие металлические предметы, как ножи, вилки, ложки и другая утварь, не должны оставаться на рабочей поверхности, где
они могут раскалиться.
Функции кнопок панели управления
Включение/отключение (рис. 1)
1. Подключите вилку шнура к электросети нажмите на кнопку включение/отключение для приведения прибора в готовность
к работе. При нажатии на кнопку желаемой функции загорится соответствующий световой индикатор, свидетельствуя о
включении выбранного рабочего режима прибора.
2. Для отключения прибора снова нажать на кнопку включение/отключение.
Режим “Тушение” (рис. 2)
1. Нажать на эту кнопку для выбора режима “Тушение” при включенном световом индикаторе.
2. Установить мощность в пределах от 350 Вт до 1600 Вт, пользуясь кнопками «вверх» и «вниз» перед началом приготовления
пищи.
3. При выборе режима “WARM” (подогрев) мощность нагрева индукционной плитки составляет приблизительно 100 Вт, а
температура удерживается в пределах 40ºC-80ºC.
Режим “Пассирование” (рис. 3)
1. Нажать на эту кнопку для выбора режима “Пассирование” при включенном регуляторе температуры.
2. Установить температуру нагрева, пользуясь кнопками «вверх» и «вниз».
Режим “Варка” (рис. 4)
1. Нажать на эту кнопку для выбора режима “Варка”. Общая длительность программы составляет 1-2 часа. Работа в этом
режиме не дает возможности задавать температуру нагрева.
2. В целях экономии времени при варке супа его можно предварительно разогреть, выбрав режим “Тушение”.
Режим “Кипячение” (рис. 5)
1.
Нажать на эту кнопку для выбора режима “Кипячение”. Работа в этом режиме не дает возможности задавать температуру нагрева.
2. Допускаемый объем воды 1-4 литра.
Регулятор температуры (рис. 6)
1. Нажать для установки температуры нагрева, а также выбора функции “WARM” (подогрев).
Кнопка установки времени
Эта кнопка предназначена для установки времени приготовления пищи в диапазоне 1-99 минут. Нажать на кнопку один раз для
поминутного увеличения времени; удерживать кнопку нажатой для увеличения времени на десятиминутные интервалы. Кнопка
установки времени должна использоваться в сочетании с кнопками функций.
Работа и предохранительные устройства
Предохранительные устройства
1. Проверка кухонной посуды
При установке посуды непригодной для индукционной плитки раздается короткий звуковой сигнал, за которым следует
автоматическое отключение прибора.
2. Предохранительное устройство от превышения времени
Если на подключенную к сети плитку была поставлена посуда, но ни одной из рабочих функций выбрано не было, через 2,5
часа прибор автоматически отключится.
3. Предохранительное устройство от выкипания
По выкипании воды во время приготовления тушеных или вареных блюд, раздается звуковой сигнал, за которым следует
автоматическое отключение прибора.
4. Предохранительное устройство при снятии посуды
Если посуда снимается с плитки в процессе приготовления пищи, раздается звуковой сигнал, за которым следует
автоматическое отключение прибора.
La page est en cours de chargement...
La page est en cours de chargement...
La page est en cours de chargement...
La page est en cours de chargement...
La page est en cours de chargement...
La page est en cours de chargement...
La page est en cours de chargement...
La page est en cours de chargement...
-
 1
1
-
 2
2
-
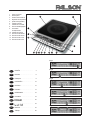 3
3
-
 4
4
-
 5
5
-
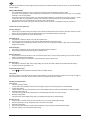 6
6
-
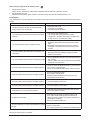 7
7
-
 8
8
-
 9
9
-
 10
10
-
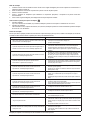 11
11
-
 12
12
-
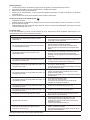 13
13
-
 14
14
-
 15
15
-
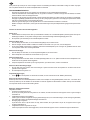 16
16
-
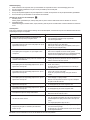 17
17
-
 18
18
-
 19
19
-
 20
20
-
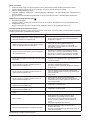 21
21
-
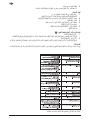 22
22
-
 23
23
-
 24
24
-
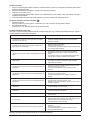 25
25
-
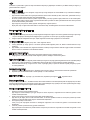 26
26
-
 27
27
-
 28
28


Palson Miami 30510 Le manuel du propriétaire
- Taper
- Le manuel du propriétaire
- Ce manuel convient également à
dans d''autres langues
- italiano: Palson Miami 30510 Manuale del proprietario
- English: Palson Miami 30510 Owner's manual
- español: Palson Miami 30510 El manual del propietario
- Deutsch: Palson Miami 30510 Bedienungsanleitung
- русский: Palson Miami 30510 Инструкция по применению
- Nederlands: Palson Miami 30510 de handleiding
- português: Palson Miami 30510 Manual do proprietário
- slovenčina: Palson Miami 30510 Návod na obsluhu
- Türkçe: Palson Miami 30510 El kitabı
Documents connexes
-
Palson TECHNO Le manuel du propriétaire
-
Palson Techno Duo Le manuel du propriétaire
-
Palson Maya Le manuel du propriétaire
-
-
Palson 30472 Le manuel du propriétaire
-
-
Palson Basmati Le manuel du propriétaire
-