Sony PHOTOVAULT Le manuel du propriétaire
- Taper
- Le manuel du propriétaire

MCS1 (WW) 2-320-924-02(1)
2-320-924-02 (1)
2004 Sony Corporation
Mini CD-R Station
MCS1
FR
ES
GB
Operating Instructions
Mode d’emploi
Manual de instrucciones
FR

2
GB
MCS1(WW)_2-320-924-02(1)
WARNING
To prevent fire or shock hazard, do
not expose the unit to rain or
moisture.
Dangerously high voltages are
present inside the unit. Do not open
the cabinet. Refer servicing to
qualified personnel only.
For customers in the U.S.A.
Owner’s Record
The model number and the serial number are located
on the bottom of the drive. Record the serial number
in the space provided below. Refer to this number
whenever you call your Sony dealer regarding this
product.
Model No. MCS1
Serial No. ____________________
If you have any questions about this product, you may
call; Sony Customer Information Service Center
1-866-654-SONY(7669) or
http://www.mediabysony.com
FCC Notice
This equipment has been tested and found to comply
with the limits for a Class B digital device, pursuant
to Part 15 of the FCC Rules. These limits are
designed to provide reasonable protection against
harmful interference in a residential installation. This
equipment generates, uses, and can radiate radio
frequency energy and, if not installed and used in
accordance with the instructions, may cause harmful
interference to radio communications. However, there
is no guarantee that interference will not occur in a
particular installation. If this equipment does cause
harmful interference to radio or television reception,
which can be determined by turning the equipment
off and on, the user is encouraged to try to correct the
interference by one or more of the following
measures:
– Reorient or relocate the receiving antenna.
– Increase the separation between the equipment and
receiver.
– Connect the equipment into an outlet on a circuit
different from that to which the receiver is connected.
– Consult the dealer or an experienced radio/TV
technician for help.
The supplied interface cable must be used with this
equipment in order to comply with the limits for a
digital device pursuant to Subpart B of Part 15 of
FCC Rules.
Caution:
You are cautioned that any changes or modifications
not expressly approved in this manual could void
your authority to operate this equipment.
The use of optical instruments with this product will
increase eye hazard.
For customers in Canada
This Class B digital apparatus complies with
Canadian ICES-003.
For customers in Europe
T
his equipment conforms with the following
European Directives: 89/336/EEC, 92/31/EEC (EMC
Directive), 93/68/EEC (CE Marking Directive).
This equipment complies with EN 55022 Class B and
EN 55024 for use in the following areas: residential,
commercial and light-industrial.
Audio and picture distortion may occur if this
equipment is positioned in close proximity to any
equipment emitting electromagnetic radiation.
This equipment has been tested and found to comply
with the limits set forth in the EMC Directive for
using connection cables shorter than 3 metres (9,8
feet).
This CD-R drive is classified as a CLASS 1 LASER
PRODUCT and complies with the Laser Products
Safety Standard IEC 60825-1:1993+A1:1997+A2:2001.
Repair and maintenance only by authorized Sony
technicians.
Improper use and repairs can create a safety hazard.
LUOKAN 1 LASERLAITE
KLASS 1 LASER APPARAT
The CLASS 1 LASER PRODUCT label is located on
the bottom of the equipment.
Maximum optical power of MCS1 is 0.22 mW
Maximum optical power of laser diode is 26 mW.
Caution – Use of controls or adjustments or
performance of procedures other than those specified
herein may result in hazardous radiation exposure.
CLASS 1
LASER PRODUCT
LASER KLASSE 1
PRODUKT

3
GB
MCS1(WW)_2-320-924-02(1)
• “Memory Stick”, , “Memory Stick
PRO”, and “Memory Stick Duo”, are
trademarks of Sony Corporation.
• All other names of systems, products and
services are trademarks of their respective
owners. In the manual, the ™ or ® marks are
not specified.
GB
Table of Contents
Introduction
What This Product Can Do..................... 4
Compatible media and devices ........ 5
Supplied Accessories .............................. 6
Locating the Controls and Connectors ... 6
Basic Operation
Preparations ............................................ 9
Using the AC adapter ...................... 9
Using the battery pack ..................... 9
Copying Data to a CD-R ...................... 11
Inserting the CD-R ........................ 11
Copying data from a “Memory Stick”
media ........................................... 12
Copying data from a digital still
camera ......................................... 14
Viewing Digital Images on
a Television ....................................... 17
Advanced Operation
Various Copy Functions ....................... 19
Adding data ................................... 19
Copying the same data to multiple
CD-Rs ......................................... 20
Copying data larger than the
remaining CD-R capacity ........... 20
Finalizing a disc ............................ 22
Copying data from a USB storage
media ........................................... 23
Verifying copied data .................... 23
Various Playback Functions ................. 25
Viewing other index pages in
6-image steps .............................. 25
Viewing images as a slide show .... 25
Changing the slide show time
interval ........................................ 26
Rotating an image.......................... 26
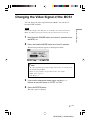
Changing the Video Signal of
the MCS1 .......................................... 27
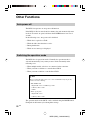
Other Functions .................................... 28
Auto power-off .............................. 28
Switching the operation mode ....... 28
Miscellaneous
Precautions ........................................... 29
Maintenance ......................................... 30
Notes on Handling a “Memory Stick”
Media ................................................ 30
Power Supply........................................ 31
About Batteries ..................................... 31
Specifications ....................................... 32
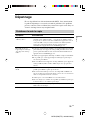
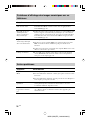
Troubleshooting .................................... 33
Problems during copying .............. 33
Problems with displaying digital
images on a television ................. 34
Other problems .............................. 34
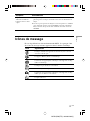
Message Icons ...................................... 35

4
GB
MCS1(WW)_2-320-924-02(1)
Introduction
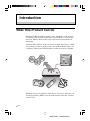
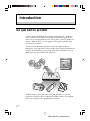
What This Product Can Do
The Mini CD-R Station MCS1 (simply called “the MCS1” in this manual)
is a backup tool specially designed to use 8 cm CD-R discs. You can copy
data from “Memory Stick” media to this small and convenient media for
safekeeping.
A built-in USB connector allows connection of digital still cameras or USB
storage media, for direct copying of data onto CD-Rs without having to use
a computer. CD-R created with the MCS1 can then be used on a computer.
The MCS1 also has an output for connection to a television, which lets you
view digital pictures (JPEG) stored on media inserted in the unit or devices
connected to it.

5
GB
Introducion
MCS1(WW)_2-320-924-02(1)
Notes
• Only still images in Baseline JPEG (EXIF) format can be viewed. The MCS1 cannot
reproduce images in other formats or play back video files.
• Depending on the JPEG format of your files, the MCS1 may not be able to display
some files.
Compatible media and devices
Copy source media and devices*
Data from the following types of media and devices can be used to copy.
Category Supported media and devices
“Memory Stick” media • “Memory Stick” media
• “Memory Stick Duo” media (adapter required)
• “Memory Stick PRO” media
• “Memory Stick PRO Duo” media
(adapter required)
* Parallel high-speed data transfer not supported.
Digital camera with USB interface • Digital still camera compatible with Mass
Storage Class or PTP
USB storage media • Sony USM64D/128D/256D
• Sony USM128E/256E/512E
* You can find the latest information about compatibility at:
http://www.sony.net/photovault/
Note
The MCS1 cannot be connected to devices or media other than those listed above, such as
a computer or printer. It also cannot be used in conjunction with a USB hub.
Compatible CD-R
The MCS1 is compatible with 8 cm CD-R conforming to the Orange Book
Part II specifications, having a storage capacity of 156 to 210 MB. The
actual amount of data that can be stored is less than the amount shown on
the disc package.
Notes
•8 cm CD-RW cannot be used.
• Depending on the make of your 8 cm CD-R, you may not always be able to write data
to disc.

6
GB
MCS1(WW)_2-320-924-02(1)
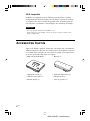
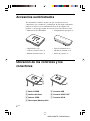
Supplied Accessories
After unpacking the unit, make sure that all the parts listed below are
present. If anything is missing, contact the Sony dealer where you
purchased this product or a Sony service representative in your area.
• Mini CD-R Station MCS1 • Battery pack (1)
• AC adapter (1)
• Power cord (1)
• Video output cable (1)
•8 cm CD-R (1)
• Operating Instructions (1)
• Warranty Card (1)
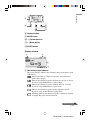
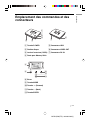
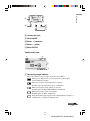
Locating the Controls and Connectors
1
2
3
6
45
7
1 POWER button
2 Disc window
3 OPEN lever
4 Memory Stick slot
5 USB connector
6 VIDEO OUT connector
7 DC IN connector

7
GB
Continued on next page
Introducion
MCS1(WW)_2-320-924-02(1)
0
qs
9
8
qa
8 Display window
9 MODE button
0 t (Forward) button
qa T (Back) button
qs ENTER button
Display window
4
3
1 2
1 Remaining charge indicator
The icon shown here indicates the remaining charge of the battery pack
of the MCS1.
Indicates that the AC adapter is connected or that the battery
pack is fully charged.
Indicates that the battery pack is beginning to run low on charge.
If you are using Ni-Mn batteries, replace them.
Indicates that the battery pack is running quite low on charge.
If you are using NiMH batteries, replace them.
Indicates that the battery pack is nearly depleted of charge.
If you are using alkaline batteries, replace them.
(Flashing) Indicates that the battery pack is completely depleted
of charge. The power will shut off now.

8
GB
MCS1(WW)_2-320-924-02(1)
2 Connected device indicator
The icon shown here indicates the type of media currently inserted in or
connected to the MCS1.
“Memory Stick” media
Digital still camera and USB storage media
CD-R
Finalized CD-R. For details, see page 22.
The icon showing completion of the finalization process also appears
here. For details, see page 22.
3 Operation mode/message display
Gives information about the current operation status and shows various
messages.
4 Navigation guide indicator
Shows what functions the buttons of the unit performs in the current
operation mode.

9
GB
Continued on next page
Basic Operation
MCS1(WW)_2-320-924-02(1)
Basic Operation
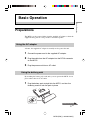
Preparations
The MCS1 can be powered either from the supplied AC adapter or from the
supplied battery pack. It is not possible to use both together.
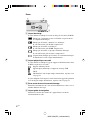
Using the AC adapter
At home, the supplied AC adapter is normally used to power the unit.
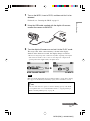
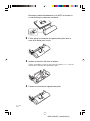
1 Connect the power cord to the supplied AC adapter.
2 Plug the cable from the AC adapter into the DC IN connector
on the MCS1.
3 Plug the power cord into an AC outlet.
Using the battery pack
By attaching the battery pack to the unit, you can operate the MCS1 also in
places where there is no AC outlet.
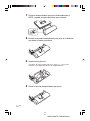
1 Plug the battery pack straight into the MCS1, and turn the
fastening screw to lock the pack in place.

10
GB
MCS1(WW)_2-320-924-02(1)
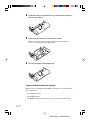
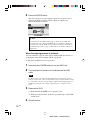
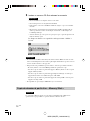
2 Slide the battery compartment lid in the direction shown by
the arrow to open it.
3 Insert four AA batteries into the battery pack.
Make sure that the plus and minus orientation of the batteries is
correct, as shown inside the compartment.
4 Close the battery compartment lid.
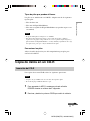
Types of batteries that can be used
Batteries are not supplied with the MCS1. Purchase one of the following
types of batteries:
• AA alkaline batteries
• AA Ni-Mn batteries
• AA NiMH rechargeable batteries (cannot be charged with this unit)

11
GB
Continued on next page
Basic Operation
MCS1(WW)_2-320-924-02(1)
Notes
• You cannot use manganese batteries with the MCS1.
• For details on the remaining charge indicator, see the explanation on page 7.
Particularly in the case of Ni-Mn and NiMH batteries, voltage decreases rapidly when
charge runs low, so it is best to replace batteries early.
To remove the batteries
Turn the fastening screw to disengage the lock and then pull the battery
pack off the MCS1.
Copying Data to a CD-R
Inserting the CD-R
To copy data to a CD-R, proceed as follows.
Notes
• Be sure the MCS1 is placed on a flat surface.
• Do not let anything shake or strike the MCS1 during copying.
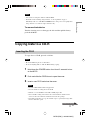
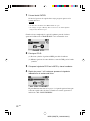
1 Hold down the POWER button for at least 2 seconds to turn
on the MCS1.
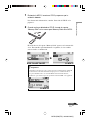
2 Push and slide the OPEN lever to open the cover.
3 Insert a new CD-R and close the cover.
Notes
• Insert the CD-R with the label facing upwards.
• Do not touch the recording side of the CD-R.
• Push the cover of the MCS1 down until it audibly snaps shut.
• Due to CD-R recording characteristics, the actual amount of data that can be
stored on a disc is less than the amount shown on the disc package.
• Depending on the files you copy, the amount of space copied may be larger than
the size of the files copied.

12
GB
MCS1(WW)_2-320-924-02(1)
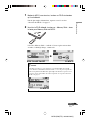
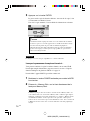
The disc is detected and its remaining storage capacity appears in the
display window.
Notes
• If you insert a CD-R that already contains data into the MCS1, it automatically enters
the video output mode. For details, see “Adding data” on page 19.
• To prevent the possibility of losing data, be sure to observe the following precautions.
– Never open the cover of the MCS1 during copying.
– While copying data from a “Memory Stick” media, do not remove the “Memory
Stick” media.
– While copying data from a digital still camera, do not turn the camera off or
disconnect the USB cable.
– While copying data from USB storage media, do not remove the USB storage media.
•A maximum of 3,000 files (including folders) can be copied.
Copying data from a “Memory Stick” media
Note
The entire contents of the “Memory Stick” media are copied to the CD-R in one
operation. It is not possible to selectively copy files.
1 Turn on the MCS1, insert a CD-R, and then wait for it to be
detected.
For details, see “Inserting the CD-R” on page 11.
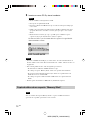
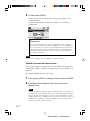
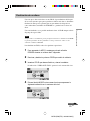
2 Once the CD-R is detected, insert the “Memory Stick” media
into the Memory Stick slot of the MCS1.

13
GB
Basic Operation
MCS1(WW)_2-320-924-02(1)
The usage status of the “Memory Stick” media is shown in the display
window. After about two seconds, the display changes as follows.
b
z Hint
If the size of the data to be copied exceeds the remaining capacity of the CD-R,
the display window shows the following. In such a case, you can split the data
over several CD-R. For details, see “Copying data larger than the remaining
CD-R capacity” on page 20.
3 Press the ENTER button.
The data copy process starts. During copying, the progress status is
shown in the display window. When copying is complete, the
indication changes as follows.
z Hint
If you want to give the CD-R to other people or want to use the CD-R with
copied data in a device other than the MCS1, it is recommended to finalize the
disc. This ensures that the CD-R can be read by most computers. For details on
the finalization procedure, see page 22. Note that you are unable to add data to a
finalized disc.
Note
8 cm discs are not compatible with some computers.

14
GB
MCS1(WW)_2-320-924-02(1)
When the copying process is finished...
You can continue to copy the same data to another CD-R. For details, see
“Copying the same data to multiple CD-R” on page 20.
To shut down the MCS1, proceed as follows.
1 Hold down the POWER button to turn the MCS1 off.
2 Pull the “Memory Stick” media straight out of the Memory
Stick slot.
Note
The MCS1 cannot erase data on a “Memory Stick” media. If you wish to erase the
contents of a “Memory Stick” media, use the digital still camera, computer or other
device where the “Memory Stick” media is normally used. Before doing so, verify
that the data was correctly written to CD-R. Verify this by playing it on the MCS1
and using the video output, or by playing it on a computer or other device.
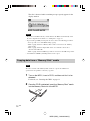
3 Remove the CD-R.
(1) Push and slide the OPEN lever to open the cover.
(2) While pressing the center of the disc, grasp the edges of the
CD-R and lift it out.
4 Close the cover.
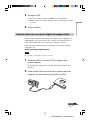
Copying data from a digital still camera
You can connect most USB-compatible digital still cameras to the MCS1 to
copy their data to a CD-R. Use the USB cable supplied with your camera to
make the connection.
You can find the latest information about compatible digital cameras at:
http://www.sony.net/photovault/
Note
It is not possible to copy specific files only.

15
GB
Continued on next page
Basic Operation
MCS1(WW)_2-320-924-02(1)
1 Turn on the MCS1, insert a CD-R, and then wait for it to be
detected.
For details, see “Inserting the CD-R” on page 11.
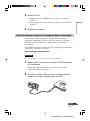
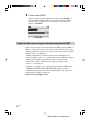
2 Using the USB cable supplied with the digital still camera,
connect the camera to the MCS1.
3 Turn the digital still camera on and set it to the PLAY* mode.
The usage status of the camera memory is shown in the display
window. After about two seconds, the display changes as follows.
* Mode for viewing images. The actual name may differ depending on the digital
still camera. For details, see the section on connecting to the computer in the
operating instructions supplied with your digital camera.
b
Note
Make sure that the digital still camera has sufficient battery capacity before starting
the copy process. If the battery fails during copying, data is not written correctly.
z Hint
If the size of the data to be copied exceeds the remaining capacity of the CD-R,
you can split the data over several CD-R. For details, see “Copying data larger
than the remaining CD-R capacity” on page 20.

16
GB
MCS1(WW)_2-320-924-02(1)
4 Press the ENTER button.
The data copy process starts. During copying, the progress status is
shown in the display window. When copying is complete, the
indication changes as follows.
z Hint
If you want to give the CD-R to other people or want to use the CD-R with
copied data in a device other than the MCS1, it is recommended to finalize the
disc. This ensures that the CD-R can be read by most computers. For details on
the finalization procedure, see page 22. Note that you are unable to add data to a
finalized disc.
When the copying process is finished...
You can continue to copy the same data to another CD-R. For details, see
“Copying the same data to multiple CD-R” on page 20.
To shut down the MCS1, proceed as follows.
1 Hold down the POWER button to turn the MCS1 off.
2 Turn the digital still camera off and disconnect the USB
cable.
Note
The MCS1 cannot erase data in the digital still camera. If you wish to erase the
memory contents of the camera, use the functions of the camera itself. Before doing
so, verify that the data was correctly written to CD-R. Verify this by playing it on
the MCS1 and using the video output, or by playing it on a computer or other
device.
3 Remove the CD-R.
(1) Push and slide the OPEN lever to open the cover.
(2) While pressing the center of the disc, grasp the edges of the CD-R
and lift it out.
4 Close the cover.

17
GB
Continued on next page
Basic Operation
MCS1(WW)_2-320-924-02(1)
Viewing Digital Images on a Television
If you connect the MCS1 to a television using the supplied video output
cable, you can view digital images (JPEG images) on the television screen.
The images may come from a CD-R or a “Memory Stick” media inserted in
the MCS1, or from a digital still camera connected to it.
Notes
• Only still images in Baseline JPEG (EXIF) format can be viewed. The MCS1 cannot
reproduce images in other formats or play back video files.
• You may experience problems viewing JPEG files other than those taken with a digital
still cameras (Exif files).
• You may experience problems viewing images of 6 megapixels or greater.
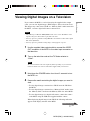
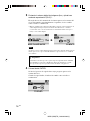
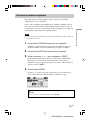
1 Use the supplied video output cable to connect the VIDEO
OUT connector of the MCS1 to the video input connector on
the television.
2 Turn on the television and set the TV/Video selector to
“Video”.
Note
The selection method of the video input may differ depending on your television
model. For details, refer to the documentation supplied with your television.
3 Hold down the POWER button for at least 2 seconds to turn
the MCS1 on.
4 Prepare the media containing the digital images you want to
view.
• To view digital images contained on a CD-R, insert the CD-R into
the MCS1.
• To view digital images contained on a “Memory Stick” media, insert
the “Memory Stick” media into the Memory Stick slot on the MCS1.
• To view digital images in a digital still camera, connect the camera
to the MCS1 using the USB cable supplied with the camera.
When displaying digital images from CD-R, the following indication
appears in the display window of the MCS1.

18
GB
MCS1(WW)_2-320-924-02(1)
z Hint
If several media are available to the MCS1 at the same time, you can use the
MODE button to select one of them. For details, see “Switching the operation
mode” on page 28.
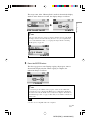
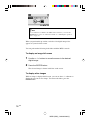
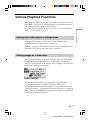
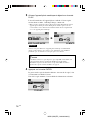
When you perform this procedure, an index of six digital images first
appears on your television screen.
You can perform the following in the index with the MCS1 controls.
To display an image full-screen
1 Use the T/t buttons to move the cursor to the desired
digital image.
2 Press the ENTER button.
The selected image is shown in full size on the screen.
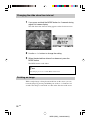
To display other images
While an image is displayed full-screen, you can use the T/t buttons to
display the previous or next image. To return to the index, press the
ENTER button.

19
GB
Advanced Operation
MCS1(WW)_2-320-924-02(1)
Advanced Operation
Various Copy Functions
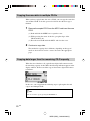
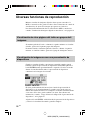
Adding data
As long as a disc has not been finalized, you can add more data to it until
the disc capacity is reached. The steps for adding data are basically the
same as when writing data for the first time (using a new disc), except for
the following points.
• When a non-finalized CD-R is inserted in the MCS1, the unit
automatically goes into video output mode for displaying images from
copy source media or devices. To copy new data, you must manually
switch to copy mode. To do this, press the MODE button repeatedly until
“COPY: MS” or other similar indications including the source media or
device appears in the display window. See “Switching the operation
mode” on page 28.
• The MCS1 creates a new folder each time it copies data. The name of the
folder is always the creation date of the newest file copied. For example,
if the newest file copied was created 2004/02/01, the folder name
becomes “01022004_001”. If you copy other data where the newest file
has the same date as above, the folder name becomes “01022004_002”,
and so on.
Notes
• If data was written to the CD-R in a computer or other device other than the MCS1, it
may no longer be possible to add more data using the MCS1.
• You cannot add data to finalized CD-R.
• When you copy data to a CD-R, the amount of space copied may be larger than the size
of the files copied.

20
GB
MCS1(WW)_2-320-924-02(1)
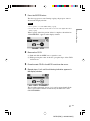
Copying the same data to multiple CD-Rs
When you have copied some data onto a CD-R, you can copy the same data
onto another CD-R. To do this, proceed as follows after the first copy is
finished.
1 Remove the copied CD-R from the MCS1 and insert the new
CD-R.
(1) Push and slide the OPEN lever to open the cover.
(2) While pressing the center of the disc, grasp the edges of the
CD-R and lift it out.
(3) Place the new CD-R inside the MCS1 and close the cover.
2 Continue to copy data.
The method for copying data is different, depending on the type of
media or device that is used as a source. Proceed to the appropriate
page.
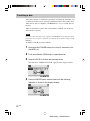
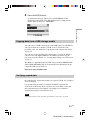
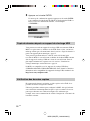
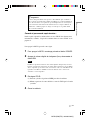
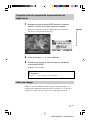
Copying data larger than the remaining CD-R capacity
When the size of the data to be copied from a digital still camera exceeds
the remaining capacity of the CD-R, the following indication appears in the
display window. We have used the copy of data from a digital still camera
to illustrate.
In this case, you can perform the following steps to split up the data and
copy it onto multiple CD-R.
z Hint
You can cancel the copy by pressing the MODE button.
La page est en cours de chargement...
La page est en cours de chargement...
La page est en cours de chargement...
La page est en cours de chargement...
La page est en cours de chargement...
La page est en cours de chargement...
La page est en cours de chargement...
La page est en cours de chargement...
La page est en cours de chargement...
La page est en cours de chargement...
La page est en cours de chargement...
La page est en cours de chargement...
La page est en cours de chargement...
La page est en cours de chargement...
La page est en cours de chargement...
La page est en cours de chargement...
La page est en cours de chargement...
La page est en cours de chargement...
La page est en cours de chargement...
La page est en cours de chargement...
La page est en cours de chargement...
La page est en cours de chargement...
La page est en cours de chargement...
La page est en cours de chargement...
La page est en cours de chargement...
La page est en cours de chargement...
La page est en cours de chargement...
La page est en cours de chargement...
La page est en cours de chargement...
La page est en cours de chargement...
La page est en cours de chargement...
La page est en cours de chargement...
La page est en cours de chargement...
La page est en cours de chargement...
La page est en cours de chargement...
La page est en cours de chargement...
La page est en cours de chargement...
La page est en cours de chargement...
La page est en cours de chargement...
La page est en cours de chargement...
La page est en cours de chargement...
La page est en cours de chargement...
La page est en cours de chargement...
La page est en cours de chargement...
La page est en cours de chargement...
La page est en cours de chargement...
La page est en cours de chargement...
La page est en cours de chargement...
La page est en cours de chargement...
La page est en cours de chargement...
La page est en cours de chargement...
La page est en cours de chargement...
La page est en cours de chargement...
La page est en cours de chargement...
La page est en cours de chargement...
La page est en cours de chargement...
La page est en cours de chargement...
La page est en cours de chargement...
La page est en cours de chargement...
La page est en cours de chargement...
La page est en cours de chargement...
La page est en cours de chargement...
La page est en cours de chargement...
La page est en cours de chargement...
La page est en cours de chargement...
La page est en cours de chargement...
La page est en cours de chargement...
La page est en cours de chargement...
La page est en cours de chargement...
La page est en cours de chargement...
La page est en cours de chargement...
La page est en cours de chargement...
La page est en cours de chargement...
La page est en cours de chargement...
La page est en cours de chargement...
La page est en cours de chargement...
La page est en cours de chargement...
La page est en cours de chargement...
La page est en cours de chargement...
La page est en cours de chargement...
La page est en cours de chargement...
La page est en cours de chargement...
La page est en cours de chargement...
La page est en cours de chargement...
La page est en cours de chargement...
La page est en cours de chargement...
La page est en cours de chargement...
La page est en cours de chargement...
-
 1
1
-
 2
2
-
 3
3
-
 4
4
-
 5
5
-
 6
6
-
 7
7
-
 8
8
-
 9
9
-
 10
10
-
 11
11
-
 12
12
-
 13
13
-
 14
14
-
 15
15
-
 16
16
-
 17
17
-
 18
18
-
 19
19
-
 20
20
-
 21
21
-
 22
22
-
 23
23
-
 24
24
-
 25
25
-
 26
26
-
 27
27
-
 28
28
-
 29
29
-
 30
30
-
 31
31
-
 32
32
-
 33
33
-
 34
34
-
 35
35
-
 36
36
-
 37
37
-
 38
38
-
 39
39
-
 40
40
-
 41
41
-
 42
42
-
 43
43
-
 44
44
-
 45
45
-
 46
46
-
 47
47
-
 48
48
-
 49
49
-
 50
50
-
 51
51
-
 52
52
-
 53
53
-
 54
54
-
 55
55
-
 56
56
-
 57
57
-
 58
58
-
 59
59
-
 60
60
-
 61
61
-
 62
62
-
 63
63
-
 64
64
-
 65
65
-
 66
66
-
 67
67
-
 68
68
-
 69
69
-
 70
70
-
 71
71
-
 72
72
-
 73
73
-
 74
74
-
 75
75
-
 76
76
-
 77
77
-
 78
78
-
 79
79
-
 80
80
-
 81
81
-
 82
82
-
 83
83
-
 84
84
-
 85
85
-
 86
86
-
 87
87
-
 88
88
-
 89
89
-
 90
90
-
 91
91
-
 92
92
-
 93
93
-
 94
94
-
 95
95
-
 96
96
-
 97
97
-
 98
98
-
 99
99
-
 100
100
-
 101
101
-
 102
102
-
 103
103
-
 104
104
-
 105
105
-
 106
106
-
 107
107
-
 108
108


Sony PHOTOVAULT Le manuel du propriétaire
- Taper
- Le manuel du propriétaire
dans d''autres langues
- English: Sony PHOTOVAULT Owner's manual
- español: Sony PHOTOVAULT El manual del propietario