Hilti BX 3-ME Mode d'emploi
- Catégorie
- Outils électroportatifs
- Taper
- Mode d'emploi


1
Printed: 24.08.2016 | Doc-Nr: PUB / 5269973 / 000 / 02

2
3
4
5
Printed: 24.08.2016 | Doc-Nr: PUB / 5269973 / 000 / 02

6
7
8
Printed: 24.08.2016 | Doc-Nr: PUB / 5269973 / 000 / 02

BX 3-ME
BX 3-IF
en Original operating instructions . . . . . . . . . . . . . . . . . . . . . . . . . . . . . . . . . . . . . . . 1
fr Mode d'emploi original . . . . . . . . . . . . . . . . . . . . . . . . . . . . . . . . . . . . . . . . . . . 13
es Manual de instrucciones original . . . . . . . . . . . . . . . . . . . . . . . . . . . . . . . . . . . . 26
pt Manual de instruções original . . . . . . . . . . . . . . . . . . . . . . . . . . . . . . . . . . . . . . 39
Printed: 24.08.2016 | Doc-Nr: PUB / 5269973 / 000 / 02

Printed: 24.08.2016 | Doc-Nr: PUB / 5269973 / 000 / 02

English 1
1 Information about the documentation
1.1 Explanation of signs used
1.1.1 Warnings
Warnings alert persons to hazards that occur when handling or using the product. The following signal words
are used in combination with an icon:
DANGER! Draws attention to imminent danger that will lead to serious personal injury or fatality.
WARNING! Draws attention to a potentially dangerous situation that could lead to serious per-
sonal injury or fatality.
CAUTION! Draws attention to a potentially dangerous situation that could lead to minor personal
injury or damage to the equipment or other property.
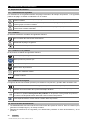
1.1.2 Symbols
The following symbols are used in this document:
Read the operating instructions before use.
General warning
Instructions for use and other useful information
1.1.3 Symbols on the product
The following symbols are used on the product:
General mandatory sign
Wear eye protection
Wear ear protection
Wear a hard hat
Return waste material for recycling
Direct current (DC)
1.1.4 Characters used in illustrations
The illustrations in these operating instructions are intended to promote a better understanding and may
deviate from the actual version of the product.
These numbers refer to the corresponding illustrations found at the beginning of these operating
instructions.
The numbering in the illustrations reflects the order of the work steps in the illustration and may
deviate from the numbering of work steps in the text.
Item reference numbers are used in the overview illustration and refer to the numbers used in
the product overview section. In the product overview section, the numbers shown in the legend
relate to these item reference numbers.
These characters are intended to specifically draw your attention to certain points when handling
the product.
1.2 About this documentation
▶ Read these operating instructions before the product is used or operated for the first time. This is a
prerequisite for safe, trouble-free handling and use of the product.
Printed: 24.08.2016 | Doc-Nr: PUB / 5269973 / 000 / 02

2 English
▶ Observe the safety instructions and warnings in this documentation and on the product.
▶ This document forms a permanent, integral part of the product described and must always be with the
product when it is handed over to other persons.
1.3 Product information
Hilti products are designed for professional use and may be operated, serviced and maintained only by
trained, authorized personnel. This personnel must be informed of any particular hazards that may be
encountered. The product and its ancillary equipment may present hazards when used incorrectly by
untrained personnel or when used not as directed. The type designation and serial number are printed on
the type identification plate.
▶ Write down the serial number in the table below. You will be required to state the product details when
contacting Hilti Service or your local Hilti organization to enquire about the product.
Product information
Type: BX 3-ME | BX 3-IF
Generation: 01
Serial number:
2 Safety
2.1 Safety instructions
The safety instructions given in the following section contain all the general safety instructions for power
tools which are to be listed in the operating instructions in accordance with the applicable standards. As a
result, some of the instructions listed may not be relevant to this tool.
2.1.1 General power tool safety warnings
WARNING
Read all safety warnings and all instructions. Failure to follow the warnings and instructions may result in
electric shock, fire and/or serious injury.
Save all warnings and instructions for future reference.
The term “power tool” in the warnings refers to your mains-operated (corded) power tool or battery-operated
(cordless) power tool.
Work area safety
▶ Keep work area clean and well lit. Cluttered or dark areas invite accidents.
▶ Do not operate power tools in explosive atmospheres, such as in the presence of flammable
liquids, gases or dust. Power tools create sparks which may ignite the dust or fumes.
▶ Keep children and bystanders away while operating a power tool. Distractions can cause you to lose
control.
Electrical safety
▶ Power tool plugs must match the outlet. Never modify the plug in any way. Do not use any adapter
plugs with earthed (grounded) power tools. Unmodified plugs and matching outlets will reduce risk of
electric shock.
▶ Avoid body contact with earthed or grounded surfaces, such as pipes, radiators, ranges and
refrigerators. There is an increased risk of electric shock if your body is earthed or grounded.
▶ Do not expose power tools to rain or wet conditions. Water entering a power tool will increase the
risk of electric shock.
▶ Do not abuse the cord. Never use the cord for carrying, pulling or unplugging the power tool. Keep
cord away from heat, oil, sharp edges or moving parts. Damaged or entangled cords increase the
risk of electric shock.
▶ When operating a power tool outdoors, use an extension cord suitable for outdoor use. Use of a
cord suitable for outdoor use reduces the risk of electric shock.
▶ If operating a power tool in a damp location is unavoidable, use a residual current device (RCD)
protected supply. Use of an RCD reduces the risk of electric shock.
Personal safety
▶ Stay alert, watch what you are doing and use common sense when operating a power tool. Do
not use a power tool while you are tired or under the influence of drugs, alcohol or medication. A
moment of inattention while operating power tools may result in serious personal injury.
Printed: 24.08.2016 | Doc-Nr: PUB / 5269973 / 000 / 02

English 3
▶ Use personal protective equipment. Always wear eye protection. Protective equipment such as dust
mask, non-skid safety shoes, hard hat, or hearing protection used for appropriate conditions will reduce
personal injuries.
▶ Prevent unintentional starting. Ensure the switch is in the off‐position before connecting to power
source and/or battery pack, picking up or carrying the tool. Carrying power tools with your finger on
the switch or energising power tools that have the switch on invites accidents.
▶ Remove any adjusting key or wrench before turning the power tool on. A wrench or a key left
attached to a rotating part of the power tool may result in personal injury.
▶ Do not overreach. Keep proper footing and balance at all times. This enables better control of the
power tool in unexpected situations.
▶ Dress properly. Do not wear loose clothing or jewellery. Keep your hair, clothing and gloves away
from moving parts. Loose clothes, jewellery or long hair can be caught in moving parts.
▶ If devices are provided for the connection of dust extraction and collection facilities, ensure these
are connected and properly used. Use of dust collection can reduce dust-related hazards.
Power tool use and care
▶ Do not force the power tool. Use the correct power tool for your application. The correct power tool will
do the job better and safer at the rate for which it was designed.
▶ Do not use the power tool if the switch does not turn it on and off. Any power tool that cannot be
controlled with the switch is dangerous and must be repaired.
▶ Disconnect the plug from the power source and/or the battery pack from the power tool before
making any adjustments, changing accessories, or storing power tools. Such preventive safety
measures reduce the risk of starting the power tool accidentally.
▶ Store idle power tools out of the reach of children and do not allow persons unfamiliar with the
power tool or these instructions to operate the power tool. Power tools are dangerous in the hands
of untrained users.
▶ Maintain power tools. Check for misalignment or binding of moving parts, breakage of parts and
any other condition that may affect the power tool’s operation. If damaged, have the power tool
repaired before use. Many accidents are caused by poorly maintained power tools.
▶ Keep cutting tools sharp and clean. Properly maintained cutting tools with sharp cutting edges are
less likely to bind and are easier to control.
▶ Use the power tool, accessories and tool bits etc. in accordance with these instructions, taking
into account the working conditions and the work to be performed. Use of the power tool for
operations different from those intended could result in a hazardous situation.
Battery tool use and care
▶ Recharge only with the charger specified by the manufacturer. A charger that is suitable for one type
of battery pack may create a risk of fire when used with another battery pack.
▶ Use power tools only with specifically designated battery packs. Use of any other battery packs may
create a risk of injury and fire.
▶ When battery pack is not in use, keep it away from other metal objects, like paper clips, coins,
keys, nails, screws or other small metal objects, that can make a connection from one terminal to
another. Shorting the battery terminals together may cause burns or a fire.
▶ Under abusive conditions, liquid may be ejected from the battery; avoid contact. If contact
accidentally occurs, flush with water. If liquid contacts eyes, additionally seek medical help. Liquid
ejected from the battery may cause irritation or burns.
Service
▶ Have your power tool serviced by a qualified repair person using only identical replacement parts.
This will ensure that the safety of the power tool is maintained.
2.1.2 Tacker safety warnings
▶ Always assume that the tool contains fasteners. Careless handling of the fastening tool can result in
unexpected firing of nails causing personal injury.
▶ Do not point the tool towards yourself or anyone nearby. A nail will be ejected by the tool if it is
triggered unexpectedly, possibly leading to injury.
▶ Do not actuate the tool unless the tool is placed firmly against the workpiece. If the tool is not in
contact with the workpiece, the fastener may be deflected away from your target.
▶ Disconnect the tool from the power source when the fastener jams in the tool. While removing a
jammed fastener, the fastening tool may be accidentally activated if it is plugged in.
▶ Use caution while removing a jammed fastener. The mechanism may be under tension and the nail
may be forcefully ejected while attempting to free a jam.
Printed: 24.08.2016 | Doc-Nr: PUB / 5269973 / 000 / 02

4 English
BX 3-ME
▶ When fastening electrical cables, make sure the cables are not energized. Hold the fastening
tool only by insulated gripping surfaces. Use only fasteners designed for electrical cable
installations. Check that the fastener has not damaged the insulation of the electrical cable. A
nail that damages the insulation of electric cables can lead to electric shock and fire hazards.
BX 3-IF
▶ Do not use this fastening tool to fasten electric cables. It is not suitable for the installation of
electric cables as damage to the insulation on the electric cables may be caused, thus resulting in a
risk of electric shock and fire hazards.
2.1.3 Additional safety instructions
Working safely and carefully with the fastening tools
▶ Do not tamper with or modify the tool.
▶ Do not damage the casing of the tool when applying identification marks.
▶ Always remove the battery and fasteners before breaks between working, before cleaning, care
or maintenance and before storage or transport.
▶ Store tools in a secure place when not in use. When not in use, tools must be stored in a dry, high
place or locked away out of reach of children.
▶ Keep your arms flexed when operating the tool (do not straighten the arms).
▶ Pull the safety trigger only when the tool is pressed against the workpiece at right angles and
when the edge distance and fastener spacing distance have been observed (see technical data
sheet for the nail).
▶ Always hold the tool securely and at right angles to the workpiece when driving fasteners. This will
help to prevent fasteners being deflected by the workpiece.
▶ Never trigger the tool again in an attempt to improve the hold of a previously driven nail or stud.
Fasteners can break or jam.
▶ Do not drive fasteners into existing holes except in situations where this is recommended by Hilti.
▶ Always observe the application guidelines.
▶ Do not grip or hold the tool by the nosepiece.
▶ Do not use the magazine as a grip.
▶ Do not use the tool as a hammer.
▶ Never drop the tool.
▶ A nail will be ejected by the tool if it is triggered inadvertently, possibly leading to injury. Never press the
nose of the tool against your hand or other part of your body or the body of another person. In the
event of a malfunction, remove the battery, press the nose of the tool against the workpiece and
pull the safety trigger.
▶ Do not cover the ventilation slots on the tool, e.g. when working using both hands, to prevent the
tool from overheating.
▶ If the tool has overheated, allow it to cool down. Do not exceed the specified maximum fastener
driving rate.
▶ Never use the tool if the applicable safety devices have been damaged or removed.
Careful use of battery-powered tools
▶ Observe the special guidelines applicable to the transport, storage and use of Li-ion batteries.
▶ Do not expose batteries to high temperatures and keep them away from fire. There is a risk of
explosion.
▶ Do not disassemble, squash or incinerate batteries and do not subject them to temperatures over
80 °C (176 °F). There is otherwise a risk of fire, explosion or chemical burns.
▶ Use only batteries of the type approved for use with the applicable tool. Use of other batteries or
use of the batteries for purposes for which they are not intended presents a risk of fire and explosion.
▶ Do not use the battery as a power source for other unspecified power tools.
▶ Do not apply excessive force when fitting or removing the battery.
▶ Do not attempt to continue to use or charge damaged batteries (e.g. batteries with cracks, broken
parts or bent or distorted contacts).
▶ Avoid short circuiting the battery terminals. Check that the contacts on the battery and on the tool
are free from foreign objects before inserting the battery into the tool. Short circuiting the battery
terminals presents a risk of fire, explosion and chemical burns.
▶ Do not use the tool in wet weather (rain) or in damp conditions.
Printed: 24.08.2016 | Doc-Nr: PUB / 5269973 / 000 / 02

English 5
▶ Avoid ingress of moisture. Ingress of moisture may cause a short circuit, resulting in burning injuries or
fire.
Workstation
▶ Do not attempt to drive fasteners into materials that are too hard, such as welded steel or cast
steel. Attempting to drive fasteners into these materials may lead to malfunctions, incorrectly driven
fasteners or breakage of fasteners.
▶ Do not attempt to drive fasteners into materials that are too soft, such as wood or plasterboard.
Attempting to drive fasteners into these materials may lead to malfunctions and fasteners being driven
incorrectly or driven right through the material.
▶ Do not attempt to drive fasteners into materials that are too brittle, such as glass or tiles. Attempting
to drive fasteners into these materials may lead to malfunctions, fasteners being driven incorrectly and
may cause the material to shatter.
▶ Before driving fasteners, check that there is no risk of injuring persons or of damaging objects
present behind or below the workpiece.
▶ Keep the grips dry, clean and free from oil and grease.
▶ Dust from materials such as paint containing lead, some types of wood, concrete, masonry and stone
containing quartz, as well as minerals and metals, may present health risks. Contact with or inhalation of
the dust may cause allergic reactions and/or respiratory or other diseases among operators or bystanders.
Certain kinds of dust such as oak and beech wood dust are classified as carcinogenic, especially in
conjunction with additives for wood conditioning (chromate, wood preservative). Materials containing
asbestos may be handled only by specialists. Use a dust-extraction device wherever possible. When
indicated, wear a respirator appropriate for the type of dust generated. Ensure that the workplace
is well ventilated. Follow national requirements for the materials you want to work with.
Mechanical safety rules
▶ Use only fasteners of a type approved for use with the tool.
Personal safety
▶ Wear ear protectors. Exposure to noise can cause hearing loss.
▶ Improve the blood circulation in your fingers by relaxing your hands and exercising your fingers
during breaks between working.
▶ The tool is not intended for use by persons who have not received special training. Keep the tool
out of reach of children.
▶ Wear protective gloves to prevent the hands from chafing with frequent use of the tool.
Electrical safety
▶ Concealed electrical cables or gas and water pipes present a serious hazard if damaged while you are
working. Before beginning the work, check the working area for concealed electrical cables, gas
and water pipes, e.g. using a metal detector. External metal parts of the power tool may become live,
for example, when an electrical cable is damaged accidentally.
3 Description
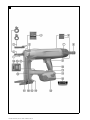
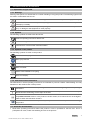
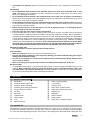
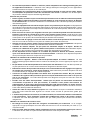
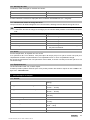
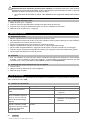
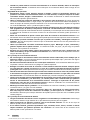
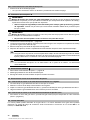
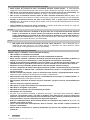
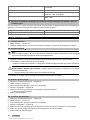
3.1 Overview of the product 1
@
Nosepiece
;
Fastener guide X-FG B3-ME
=
Fastener guide X-FG B3-IF
%
Fastener guide locking mechanism
&
Single nail selector switch
(
Air vents
)
Belt hook
+
Scaffold hook
§
Safety trigger
/
Grip
:
Release buttons
∙
State of charge display
$
Liion battery
£
Scaffold hook
|
Nail pusher, locked position
¡
Nail pusher release mechanism
Q
Support leg
W
Magazine
E
Status indicator
R
On/off button
T
Nail pusher, unlocked position
3.2 Intended use
The product is a hand-held, battery-operated fastening tool for indoor use. It is designed to drive specially-
manufactured fasteners (nails) into concrete, steel, masonry, sand-lime block and other materials suitable
for use of the direct fastening technique. The product is also designed to fasten electrical cables with clips
Printed: 24.08.2016 | Doc-Nr: PUB / 5269973 / 000 / 02

6 English
if the appropriate fasteners are used. Use only approved fasteners in conjunction with the fastener guide
designed for use with these specific fasteners (see “Technical data” section).
The fastening tool, battery and fasteners form a single technical unit. This means that trouble-free fastening
can be ensured with this fastening tool only when it is used in conjunction with the Hilti fasteners specially
designed and manufactured for it and with the batteries and chargers recommended by Hilti. The fastening
and application recommendations made by Hilti apply only when this condition is observed.
▶ The fastening tool is for hand-held use only.
▶ Misuse of the fastening tool must be ruled out. Misuse of the fastening tool includes triggering in
single-fastener mode without a nail inserted in the fastener guide, driving nails into very soft materials
(e.g. wood), driving single nails when the tool is set up for magazine operation, and driving nails into
materials that are too hard (e.g. high-strength steel or very hard natural stone).
▶ Use only Hilti Liion batteries of the B 18 series with this product.
▶ Use only Hilti battery chargers of the C 4/36 series to charge these batteries.
3.3 Safety devices
When using the nail magazine, the nail detection feature prevents triggering without a nail loaded, which
could damage the fastening tool.
The contact pressure safety device is intended to prevent the free flighting of nails (i.e. actuation and driving
a nail when the nosepiece is not in contact with the workpiece). When using a nail magazine, the tool can be
pressed against the surface and triggered only when a nail is loaded in the tool.
To use the tool in single-fastener mode, the single-fastener mode switch must be pressed before the
fastening tool is pressed against the working surface.
3.4 Features
The fastening tool is fitted with an ergonomic, non-slip and vibration-damped grip along with a support arm
with tool hook. The tool is protected from overloading by electronic overload protection and from overheating
by temperature monitoring.
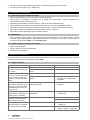
3.5 Status indicator
The status indicator provides information about the status of the fastening tool.
Status Meaning
Off • The fastening tool is switched off
Lights green • The fastening tool is switched on
Further status indications are described in the troubleshooting table (see → page 11).
3.6 Indication of battery charge status
When one of the battery release buttons is pressed the display indicates the battery’s state of charge.
Note
Reliable indication of the charge status is not possible while a fastener is being driven or immediately
after a fastener is driven.
Status Meaning
All four LEDs light green. • Charge status is 75 % to 100 %.
Three LEDs light green. • Charge status is 50 % to 75 %.
Two LEDs light green. • Charge status is 25 % to 50 %.
One LED lights green. • Charge status is 10 % to 25 %.
One LED blinks green. • Charge status is below 10 %. The tool is ready
for use.
3.7 Batteries
Battery performance drops at low temperatures.
When battery performance drops, it takes longer until the fastening tool is ready to drive the next fastener
(longer than with a fully charged battery).
If you continue to operate the fastening tool after noticing a drop in battery performance, the fastening tool
will switch itself off automatically to prevent damage to the battery.
Printed: 24.08.2016 | Doc-Nr: PUB / 5269973 / 000 / 02

English 7
3.8 Items supplied
BX 3-ME or BX 3-IF fastening tool, operating instructions.
You can find other system products approved for your product at your local Hilti Center or online at:
www.hilti.com
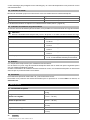
4 Technical data
4.1 Fastening tool
Weight
8.4 lb
(3.8 kg)
Nail length (collated nails)
0.6 in … 0.9 in
(14 mm … 24 mm)
Nail length (single nails)
1.2 in … 1.4 in
(30 mm … 36 mm)
Nail diameter
0.12 in
(3.0 mm)
Magazine capacity
20 nails
Compression stroke
0.5 in
(12 mm)
Contact pressure
11 lb
f
… 16 lb
f
(50 N … 70 N)
Recommended maximum fastening rate
500/h
Rated voltage
21.6 V
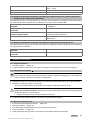
4.2 Examples of approved fasteners for electrical, plumbing, heating and air-conditioning systems
installation applications
In conjunction with the X-FG B3-ME fastener guide the following fasteners are approved for electrical,
plumbing, heating and air-conditioning systems installation applications.
Nails for magazine mode
X-S 14 B3 MX | X-P 17 B3 MX | X-P 20 B3 MX | X-
P 24 B3 MX
Nails for single-fastening mode
X-P 30 B3 P7 | X-P 36 B3 P7
Threaded studs for single-fastening mode
X-M6-7-14 B3 P7 | X-M6-7-24 B3 P7 | X-W6-12-
14 B3 P7 | X-W6-12-20 B3 P7
Fastening electric cables
X-EKB MX | X-ECT MX | X-ECH MX | X-EKS MX |
XEKS C MX
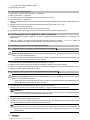
4.3 Examples of approved fasteners for drywall applications
In conjunction with the X-FG B3-IF fastener guide the following fasteners are approved for drywall
applications.
Nails for magazine mode
X-P 17 B3 MX | X-C 20 B3 MX | X-C 24 B3 MX
Nails for single-fastening mode
X-P 30 B3 P7 | X-P 36 B3 P7
5 Preparing the tool for use
5.1 Charging the battery
1. Remove the battery. → page 10
2. Charge the battery in accordance with the information provided in the operating instructions for the
charger.
Printed: 24.08.2016 | Doc-Nr: PUB / 5269973 / 000 / 02

8 English
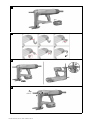
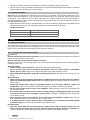
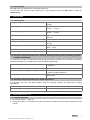
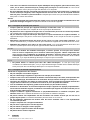
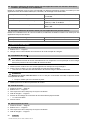
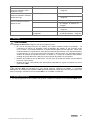
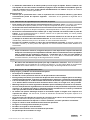
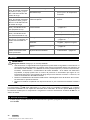
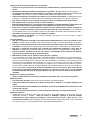
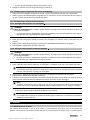
5.2 Inserting the battery 2
Note
In order to achieve maximum battery lifetime, replace the discharged battery with a fully charged
battery as soon as you notice a clear drop in battery performance.
1. Check that the contacts on the battery and on the tool are free from foreign objects.
2. Fit the battery and make sure that it is heard to engage.
◁ Once the battery has been fitted, the charge status LEDs light for a short time.
CAUTION
A falling battery presents a hazard. If the battery is not secured correctly it may drop out and fall
while the work is in progress.
▶ Always check that the battery is securely seated.
3. Check that the battery is securely seated in the fastening tool.
5.3 Removing the fastener guide
1. Switch the fastening tool off. → page 10
2. Remove the battery. → page 10
3. Pull the nail pusher down until it engages.
4. Unload the magazine. → page 10
5. Slide the fastener guide locking catch as far as it will go in the direction of the arrow.
◁ The fastener guide will be released.
6. Remove the fastener guide.
5.4 Inserting the fastener guide
1. Switch the fastening tool off. → page 10
2. Remove the battery. → page 10
3. Pull the nail pusher down until it engages.
4. Unload the magazine. → page 10
5. Slide the fastener guide locking catch as far as it will go in the direction of the arrow and hold it in this
position.
6. Slide the fastener guide into the nosepiece until it is heard to engage.
7. Release the fastener guide locking catch.
◁ The fastener guide jumps to the middle position.
8. Grip and pull the fastener guide to check that it is securely seated.
5.5 Working safely with the belt and scaffold hook 3
▶ Before beginning work, make sure that the scaffold hook is securely attached to the tool.
▶ Use the scaffold hook only when necessary. Lay the tool down in a safe place when it is not in use for a
long period.
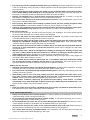
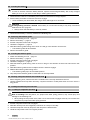
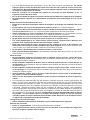
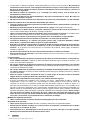
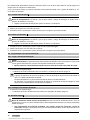
5.6 Loading the fastening tool with nails
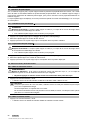
5.6.1 Loading for magazine operation 4
CAUTION
Risk of crushing! The nail pusher, if it jumps back under spring pressure, may cause injury and
damage to the fastening tool.
▶ When pulling the nail pusher down, take care to ensure that it engages securely. Do not allow the
nail pusher to jump back under spring pressure.
1. Pull the nail pusher down until it engages.
2. Slide the nail strips into the magazine (a maximum of 2 strips of 10 nails).
3. Hold the nail pusher securely and press the nail pusher release button.
4. Guide the nail pusher back to its original position.
Printed: 24.08.2016 | Doc-Nr: PUB / 5269973 / 000 / 02

English 9
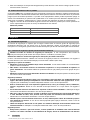
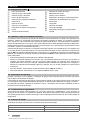
5.6.2 Loading in single-fastener mode 5
CAUTION
Risk of crushing! The nail pusher, if it jumps back under spring pressure, may cause injury and
damage to the fastening tool.
▶ When pulling the nail pusher down, take care to ensure that it engages securely. Do not allow the
nail pusher to jump back under spring pressure.
1. Pull the nail pusher down until it engages.
2. Allow the nail strip to slide out of the magazine and then check that the magazine is empty.
Note
The fastening tool may be damaged if you have not removed all the nails from the magazine before
activating single-fastener mode.
3. Hold the nail pusher securely and press the nail pusher release button.
4. Guide the nail pusher back to its original position.
5. Insert the nail in the depression provided in the fastener guide. You may also then place an approved
fastening element on the nose of the fastener guide.
Note
Triggering the tool with more than one nail in the fastener guide may damage the fastening tool.
When operating the tool in single-fastener mode, load only one nail into the fastener guide.
6. Activate the single-fastener selector switch.
◁ The single-fastener switch should be heard to engage.
Note
If the nail pusher is pulled down a few centimeters the single-fastener switch will disengage.
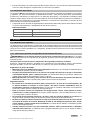
6 Operation
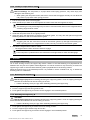
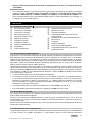
6.1 Using the support leg
On an even working surface, the support leg makes it easier to hold the fastening tool perpendicular as
attention then only has to be paid to lateral alignment. On uneven surfaces it may necessary to retract the
support leg in order to ensure that the fastener guide is perpendicular to the working surface.
When the support leg is in the extended position it is possible to use the scaffold hook, e.g. to attach the
fastening tool to a scaffold bar.
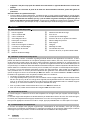
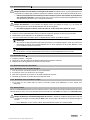
6.1.1 Retracting the support leg 6
CAUTION
Risk of finger injury! When extending/retracting the support leg there is a risk of trapping the fingers
between the scaffold hook and the casing of the tool.
▶ Hold the fastening tool by the grip when extending/retracting the support leg.
1. Push against the support leg to release it from its resting position.
2. Pivot the support leg back through about 180°.
3. Push against the support leg from below until it engages in the retracted position.
6.1.2 Extending the support leg 6
CAUTION
Risk of finger injury! When extending/retracting the support leg there is a risk of trapping the fingers
between the scaffold hook and the casing of the tool.
▶ Hold the fastening tool by the grip when extending/retracting the support leg.
1. Push against the support leg to release it from its resting position.
2. Pivot the support leg forward through about 180°.
3. Push against the support leg from below until it engages in the extended position.
Printed: 24.08.2016 | Doc-Nr: PUB / 5269973 / 000 / 02

10 English
6.2 Switching the fastening tool on/off
6.2.1 Switching the fastening tool on
WARNING
Risk of injury! Pressing the nosepiece of the fastening tool against a part of the body may lead to
serious injury due to inadvertent firing and release of a fastener.
▶ Never press the nosepiece of the tool against your hand or any other part of the body.
▶ Press the on/off button.
◁ The spring element can be heard to build up tension and the status indicator lights green.
Note
When battery performance drops, tensioning of the spring element will take longer than with a fully
charged battery.
Battery performance drops at low temperatures.
If you continue to operate the fastening tool after noticing a drop in battery performance, the
fastening tool will switch itself off automatically before damage to the battery cells occurs.
6.2.2 Switching off the fastening tool
▶ Press the on/off button.
◁ The spring element can be heard to release the tension and the status indicator goes out.
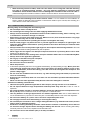
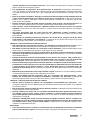
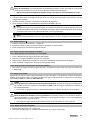
6.3 Driving a nail 7
WARNING
Risk of injury by flying parts! When driving a fastener, there is a risk of injury to the body and eyes
caused by splintered fragments of the workpiece and by flying parts of the nail strip.
▶ Wear personal protective equipment and always wear protective glasses and protective
gloves. Other persons in the vicinity must also wear eye protection and a hard hat.
WARNING
Risk of injury! Pressing the nosepiece of the fastening tool against a part of the body may lead to
serious injury due to inadvertent firing and release of a fastener.
▶ Never press the nosepiece of the tool against your hand or any other part of the body.
1. Switch the fastening tool on. → page 10
2. Position the nose of the fastening tool at right angles to the workpiece and then press it against the
surface, pushing the fastener guide in as far as it will go.
3. Drive the nail by pressing the safety trigger.
4. After driving the nail, lift the fastening tool away from the workpiece completely.
Note
The fastening tool switches itself off automatically if the fastener guide is pressed against the
workpiece for longer than 6 seconds without a nail being driven. The fastening tool can be switched
back on again by pressing the on/off button.
Note
If the fastening tool is not used for 6 minutes, it switches itself off automatically.
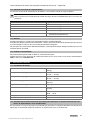
6.4 Removing the battery 8
1. Switch the fastening tool off. → page 10
2. Press the two release buttons and hold them in the pressed position.
3. Pull the battery out of the fastening tool to the rear.
6.5 Removing nails from the fastening tool
6.5.1 Removing a nail when in magazine mode
1. Pull the nail pusher down until it engages.
Printed: 24.08.2016 | Doc-Nr: PUB / 5269973 / 000 / 02

English 11
2. Slide the nail downwards out of the magazine.
3. Hold the nail pusher securely and press the nail pusher release button.
4. Guide the nail pusher back to its original position.
6.5.2 Removing a nail when in single-fastener mode
▶ To remove a nail that has been inserted into the fastener guide, proceed in the same way as for removing
a jammed nail (see → page 11).
6.6 Jammed nails
Individual nails may get stuck in the fastener guide. You can remove jammed nails from the fastener guide
with the aid of the X-NP drift punch set. Accessories are available from your Hilti Center or can be ordered
online at www.hilti.com.
WARNING
There is a risk of injury and damage to the fastening tool. Use of unsuitable items instead of the
recommended genuine Hilti accessories may result in injury or damage to the fastening tool.
▶ To release a jammed nail, use only the recommended drift punch set.
CAUTION
Risk of injury by flying parts! Triggering the tool (attempting to drive a fastener) when foreign objects
are present in the area around the fastener guide, or when a fastener is jammed in the fastener guide,
may lead to injury caused by flying objects or fragments.
▶ Never attempt to remedy tool malfunctions by continuing to trigger the tool.
6.6.1 Releasing jammed nails
1. Remove the fastener guide (see → page 8).
2. Fit the fastener guide into the supporting sleeve from the drift punch set.
3. Use the drift punch and a hammer to drive the jammed nail out of the fastener guide.
4. Fit the fastener guide (see → page 8).
7 Care and maintenance
7.1 Care of the fastening tool
▶ Remove plastic fragments from the fastener guide at regular intervals.
▶ Never operate the fastening tool when the air vents are blocked. Clean the air vents carefully using a dry
brush.
▶ Do not allow foreign objects to enter the interior of the fastening tool.
▶ Clean the exterior of the fastening tool with a slightly damp cloth at regular intervals.
▶ Do not use a spray, pressure jet washer or running water for cleaning.
▶ Keep the grips of the fastening tool dry, clean and free from oil and grease.
▶ Do not use cleaning agents containing silicone.
7.2 Maintenance
▶ To help ensure safe and reliable operation, use only genuine Hilti spare parts and consumables. You can
find other spare parts, consumables and accessories approved for this product at your local Hilti Center
or online at: www.hilti.com.
7.3 Cleaning the inside of the nosepiece
1. Remove the fastener guide.
2. Clean the inside of the nosepiece.
3. Insert the fastener guide.
8 Troubleshooting
If the trouble you are experiencing is not listed in this table or you are unable to remedy the problem by
yourself, please contact Hilti Service.
Printed: 24.08.2016 | Doc-Nr: PUB / 5269973 / 000 / 02

12 English
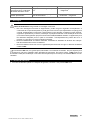
8.1 Troubleshooting table
Trouble or fault Possible cause Action to be taken
The spring element is not ten-
sioned; no status indication.
The battery is empty. ▶ Change the battery.
The battery is not fitted correctly. ▶ Fit the battery. → page 8
The spring element is not ten-
sioned, the status indicator
blinks green and 1 battery
charge status LED blinks.
The battery is empty. ▶ Change the battery.
Battery temperature too low. ▶ Allow the battery to warm up
slowly to room temperature.
The spring element is not re-
tensioned, the status indica-
tor blinks green and 4 battery
charge status LEDs blink.
The fastening tool has overheated. ▶ Allow the fastening tool to cool
down.
The spring element is not ten-
sioned and the status indica-
tor blinks red.
The fastener guide is not fitted
correctly.
▶ Insert the fastener guide.
→ page 8
The spring element is not ten-
sioned and the status indica-
tor lights red.
System fault. ▶ Remove the battery. → page 10
▶ Fit the battery. → page 8
The fastener guide cannot
be pressed in and the status
indicator lights green.
The magazine is empty. ▶ Load the magazine. → page 8
The nail pusher is jammed. ▶ Remove the nail strips from
the magazine and clean the
magazine.
Nail jammed in the fastener guide. ▶ Release the jammed nail.
→ page 11
The fastener guide is jammed
in the pressed-in state.
Dirt between the fastener guide
and the nosepiece.
▶ Clean the inside of the nose-
piece. → page 11
9 Disposal
WARNING
Risk of injury. Hazards presented by improper disposal.
▶ Improper disposal of the equipment may have the following consequences: The burning of plastic
components generates toxic fumes which may present a health hazard. Batteries may explode
if damaged or exposed to very high temperatures, causing poisoning, burns, acid burns or
environmental pollution. Careless disposal may permit unauthorized and improper use of the
equipment. This may result in serious personal injury, injury to third parties and pollution of the
environment.
▶ Dispose of defective batteries right away. Keep them out of reach of children. Do not disassemble
or incinerate the batteries.
▶ Batteries that have reached the end of their life must be disposed of in accordance with national
regulations or returned to Hilti.
Most of the materials from which Hilti tools and appliances are manufactured can be recycled. The
materials must be correctly separated before they can be recycled. In many countries, your old tools,
machines or appliances can be returned to Hilti for recycling. Ask Hilti Service or your Hilti representative
for further information.
10 Manufacturer’s warranty
▶ Please contact your local Hilti representative if you have questions about the warranty conditions.
Printed: 24.08.2016 | Doc-Nr: PUB / 5269973 / 000 / 02

Français 13
1 Indications relatives à la documentation
1.1 Explication des symboles
1.1.1 Avertissements
Les avertissements attirent l'attention sur des dangers liés à l'utilisation du produit. Les termes de
signalisation suivants sont utilisés en combinaison avec un symbole :
DANGER ! Pour un danger imminent qui peut entraîner de graves blessures corporelles ou la
mort.
AVERTISSEMENT ! Pour attirer l'attention sur une situation pouvant présenter des dangers
susceptibles d'entraîner des blessures corporelles graves ou la mort.
ATTENTION ! Pour attirer l'attention sur une situation pouvant présenter des dangers entraînant
des blessures corporelles légères ou des dégâts matériels.
1.1.2 Symboles
Les symboles suivants sont utilisés dans la présente documentation :
Lire le mode d'emploi avant d'utiliser l'appareil
Avertissement danger général
Pour des conseils d'utilisation et autres informations utiles
1.1.3 Symboles sur le produit
Les symboles suivants sont utilisés sur le produit :
Symboles d'obligation généraux
Porter des lunettes de protection
Porter un casque antibruit
Porter un casque de protection
Recycler les déchets
Courant continu
1.1.4 Signalétique dans les illustrations
Les illustrations dans le présent mode d'emploi sont destinées à faciliter la compréhension et peuvent différer
de la version effective.
Ces chiffres renvoient à l'illustration correspondante au début du présent mode d'emploi.
La numérotation des illustrations détermine la séquence des étapes de travail dans l'image et
peut se différencier de la numérotation des étapes de travail dans le texte.
Les numéros de position sont utilisés dans l'illustration Vue d'ensemble et renvoient aux numé-
ros des légendes de la section Vue d'ensemble du produit. Dans la section Vue d’ensemble du
produit, les numéros des légendes renvoient à ces numéros de position.
Ce signe doit inviter à manier le produit en faisant particulièrement attention.
1.2 À propos de cette documentation
▶ Avant de mettre l'appareil en marche, lire impérativement ce mode d'emploi. C'est la condition
préalablement requise pour assurer la sécurité du travail et un maniement sans perturbations.
Printed: 24.08.2016 | Doc-Nr: PUB / 5269973 / 000 / 02

14 Français
▶ Bien respecter les consignes de sécurité et les avertissements de la présente documentation ainsi que
celles figurant sur le produit.
▶ Cette documentation fait partie intégrante et permanente du produit décrit et doit être transmise avec ce
dernier en cas de cession à d'autres personnes.
1.3 Informations produit
Les produits Hilti sont conçus pour les utilisateurs professionnels et ne doivent être utilisés, entretenus et
réparés que par un personnel agréé et formé à cet effet. Ce personnel doit être au courant des dangers
inhérents à l'utilisation de l'appareil. Le produit et ses accessoires peuvent s'avérer dangereux s'ils sont
utilisés de manière incorrecte par un personnel non qualifié ou de manière non conforme à l'usage prévu. La
désignation du modèle et le numéro de série figurent sur sa plaque signalétique.
▶ Inscrivez le numéro de série dans le tableau suivant. Les informations produit vous seront demandées
lorsque vous contactez nos revendeurs ou services après-vente.
Caractéristiques produit
Type : BX 3-ME | BX 3-IF
Génération : 01
Numéro de série :
2 Sécurité
2.1 Consignes de sécurité
Les indications de sécurité du chapitre suivant contiennent toutes les indications générales de sécurité
pour les outils électriques qui, selon les normes applicables, doivent être spécifiées dans le présent mode
d'emploi. Par conséquent, il est possible que certaines indications ne se rapportent pas à cet appareil.
2.1.1 Indications générales de sécurité pour les outils électriques
AVERTISSEMENT Lire et comprendre toutes les consignes de sécurité et instructions. Tout
manquement à l'observation des consignes de sécurité et instructions risque de provoquer une électrocution,
un incendie et/ou de graves blessures.
Les consignes de sécurité et instructions doivent être intégralement conservées pour les utilisations
futures.
La notion d'« outil électroportatif » mentionnée dans les consignes de sécurité se rapporte à des outils
électriques raccordés au secteur (avec câble de raccordement) et à des outils électriques sur accu (sans
câble de raccordement).
Sécurité sur le lieu de travail
▶ Conserver la zone de travail propre et bien éclairée. Un lieu de travail en désordre ou mal éclairé
augmente le risque d'accidents.
▶ Ne pas faire fonctionner les outils électriques en atmosphère explosive et où se trouvent des
liquides, des gaz ou poussières inflammables. Les outils électriques produisent des étincelles qui
peuvent enflammer les poussières ou les fumées.
▶ Maintenir les enfants et les personnes présentes à l'écart pendant l'utilisation de l'outil électro-
portatif. En cas d'inattention il y a risque de perdre le contrôle de l'appareil.
Sécurité relative au système électrique
▶ La fiche de secteur de l'outil électroportatif doit être adaptée à la prise de courant. Ne jamais
modifier la fiche de quelque façon que ce soit. Ne pas utiliser d'adaptateurs avec des outils
électriques à branchement de terre. Des fiches non modifiées et des prises de courant adaptées
réduiront le risque de choc électrique.
▶
Éviter le contact physique avec des surfaces mises à la terre tels que tuyaux, radiateurs, cuisinières
et réfrigérateurs. Il y a un risque élevé de choc électrique au cas où votre corps serait relié à la terre.
▶ Ne pas exposer les outils électroportatifs à la pluie ou à l'humidité. La pénétration d'eau à l'intérieur
d'un outil électroportatif augmentera le risque d'un choc électrique.
▶ Ne jamais utiliser le cordon à d'autres fins que celles prévues, telles que pour porter, accrocher ou
débrancher l'outil électroportatif de la prise de courant. Maintenir le cordon à l'écart de la chaleur,
des parties grasses, des bords tranchants ou des parties de l'appareil en mouvement. Des cordons
endommagés ou emmêlés augmentent le risque de choc électrique.
Printed: 24.08.2016 | Doc-Nr: PUB / 5269973 / 000 / 02
La page est en cours de chargement...
La page est en cours de chargement...
La page est en cours de chargement...
La page est en cours de chargement...
La page est en cours de chargement...
La page est en cours de chargement...
La page est en cours de chargement...
La page est en cours de chargement...
La page est en cours de chargement...
La page est en cours de chargement...
La page est en cours de chargement...
La page est en cours de chargement...
La page est en cours de chargement...
La page est en cours de chargement...
La page est en cours de chargement...
La page est en cours de chargement...
La page est en cours de chargement...
La page est en cours de chargement...
La page est en cours de chargement...
La page est en cours de chargement...
La page est en cours de chargement...
La page est en cours de chargement...
La page est en cours de chargement...
La page est en cours de chargement...
La page est en cours de chargement...
La page est en cours de chargement...
La page est en cours de chargement...
La page est en cours de chargement...
La page est en cours de chargement...
La page est en cours de chargement...
La page est en cours de chargement...
La page est en cours de chargement...
La page est en cours de chargement...
La page est en cours de chargement...
La page est en cours de chargement...
La page est en cours de chargement...
La page est en cours de chargement...
La page est en cours de chargement...
La page est en cours de chargement...
La page est en cours de chargement...
-
 1
1
-
 2
2
-
 3
3
-
 4
4
-
 5
5
-
 6
6
-
 7
7
-
 8
8
-
 9
9
-
 10
10
-
 11
11
-
 12
12
-
 13
13
-
 14
14
-
 15
15
-
 16
16
-
 17
17
-
 18
18
-
 19
19
-
 20
20
-
 21
21
-
 22
22
-
 23
23
-
 24
24
-
 25
25
-
 26
26
-
 27
27
-
 28
28
-
 29
29
-
 30
30
-
 31
31
-
 32
32
-
 33
33
-
 34
34
-
 35
35
-
 36
36
-
 37
37
-
 38
38
-
 39
39
-
 40
40
-
 41
41
-
 42
42
-
 43
43
-
 44
44
-
 45
45
-
 46
46
-
 47
47
-
 48
48
-
 49
49
-
 50
50
-
 51
51
-
 52
52
-
 53
53
-
 54
54
-
 55
55
-
 56
56
-
 57
57
-
 58
58
-
 59
59
-
 60
60


Hilti BX 3-ME Mode d'emploi
- Catégorie
- Outils électroportatifs
- Taper
- Mode d'emploi
dans d''autres langues
- English: Hilti BX 3-ME Operating instructions
- español: Hilti BX 3-ME Instrucciones de operación
- português: Hilti BX 3-ME Instruções de operação