
FRAMTID
HGA2K
GB
DE
FR
IT
GR
CH GB GR


GB CH
CH
CH
CH
GR
ENGLISH 4
DEUTSCH 14
FRANÇAIS 26
ITALIANO 38
ΕΛΛΗΝΙΚΑ 50
Language, Sprache, Langue, Lingua, Γλώσσα
Country, Land, pays, Paese, Χώρα

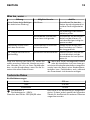
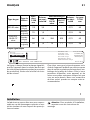
Contents
Safety information 4
Product description 5
Daily use 5
Helpful hints and tips 6
Care and cleaning 6
What to do if… 7
Technical data 7
Installation 8
Environment concerns 11
IKEA GUARANTEE 12
Subject to change without notice
Safety information
For your safety and correct operation of
the appliance, read this manual carefully
before installation and use. Always keep these
instructions with the appliance even if you
move or sell it. Users must fully know the oper-
ation and safety features of the appliance.
Correct use
• Do not leave the appliance unattended dur-
ing operation.
• The appliance is designed exclusively for
domestic use.
• The appliance must not be used as a work
surface or as a storage surface.
• Do not place or store flammable liquids,
highly inflammable materials or fusible ob-
jects (e.g. plastic film, plastic, aluminium) in
or near the appliance.
• Watch out when connecting electric appli-
ances to sockets nearby. Do not allow con-
necting leads to come into contact with or to
catch underneath the appliance or hot cook-
ware.
• Do not do repairs yourself to prevent injury
and damage to the appliance. Always con-
tact your local After Sales Service (refer to
the Service chapter).
Child safety
• Only adults can use this appliance. Children
must get supervision to make sure that they
do not play with the appliance.
• Keep all packaging away from children.
There is a risk of suffocation.
• Keep children away from the appliance
when it is on.
General safety
• This appliance is not intended for use by
persons (including children) with reduced
physical, sensory or mental capabilities, or
lack of experience and knowledge, unless
they have been given supervision or instruc-
tion concerning use of the appliance by a
person responsible for their safety.
• Ensure there is a continuous air supply while
using the hob, keep air vents in good con-
dition or install a cooker hood with a venting
hose. Improve ventilation by opening a win-
dow or increasing the extractor speed.
• This appliance is supplied with safety device
in form of the thermocouple. If after ignition
of the burner or during use flame will go out
and the thermocouple will not be heat up
enough gas supply will be interrupted.
Installation
• Make sure that the appliance is not dam-
aged because of transport. Do not connect
a damaged appliance. If necessary, contact
the After Sales Service (refer to the Service
chapter).
• Only an authorized service engineer can in-
stall, connect or repair this appliance. Use
only original spare parts.
• Built-in appliances can only be used after
they are built into suitable built-in units and
work surfaces that meet standards.
• Do not change the specifications or modify
this product. Risk of injury and damage to
the appliance.
Warning! Carefully obey the instructions
for electrical and gas connections.
ENGLISH 4

• Do not install the appliance if it is damaged
during the transportation.
Safety during use
• Remove all packaging, stickers and film from
the appliance before the first use.
Warning! Fire hazard! Overheated fats
and oils can ignite very quickly.
• Switch the burners off after each use.
• Risk of burns! Burners and accessible parts
become hot during use. Make sure pots do
not protrude over the edges of the cooktop.
How to avoid damage to the appliance
• To avoid damaging the hob, do not allow
saucepans or frying pans to boil dry.
• Do not use the burners with empty cookware
or without cookware.
• Never line any part of the appliance with
aluminium foil. Never place plastic or any
other material which may melt on the appli-
ance.
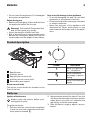
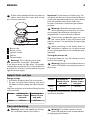
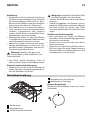
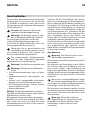
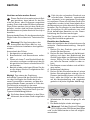
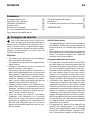
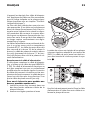
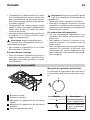
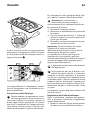
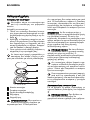
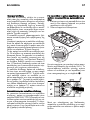
Product description
1
2
5
34
1 Rapid burner
2 Auxiliary burner
3 Rapid burner control knob
4 Auxiliary burner control knob
5 Removable pan support
Burner control knob
The burner control knobs are situated on the
front of the hob.
Symbol Description
there is no gas sup-
ply / off position
there is maximum
gas supply / Ignition
setting
there is minimum gas
supply
Daily use
Ignition of the burners
Always ignite the burners before posi-
tioning pots or pans.
To ignite the burner:
1. Push the relevant control knob completely
in and turn it counter-clockwise to the max-
imum position marked
.
2. Keep the knob pushed for about 5 sec; this
will allow thermocouple to heat up, and the
safety device to switch off, otherwise the
gas supply would be interrupted.
3. After the flame is regular, adjust it as pre-
ferred.
ENGLISH 5

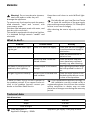
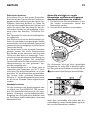
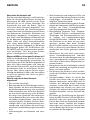
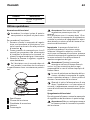
If after a few attempts the burner does not
ignite, check that the crown and its cap
are in correct positions.
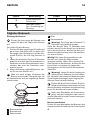
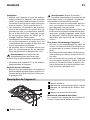
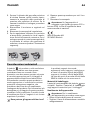
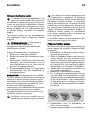
1
2
3
4
5
1 Burner cap
2 Burner crown
3 Ignition candle
4 Injector
5 Thermocouple
Warning! Do not keep control knob
pressed for more than 15 seconds.
If the burner does not light after 15 seconds,
release the control knob, turn it into off position
and wait for at least 1 minute before trying to
light the burner again.
Important! In the absence of electricity You
can ignite the burner without electrical device;
in this case approach the burner with a flame,
push the relevant knob down and turn it
counter-clockwise to maximum gas release
position.
Warning! Maintain extreme caution
while operating with open fire in kitchen
environment. Manufacturer declines any
responsibility in case of misuse of flame.
If the burner accidentally goes out, turn
the control knob to the off position and
wait for at least 1 minute before trying to light
it again.
When switching on the mains, after in-
stallation or a power cut, it is quite normal
for the spark generator to be activated auto-
matically.
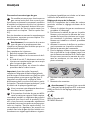
Turning the burners off
To put the flame out, turn the relevant control
knob to the symbol
.
Warning! Always turn the flame down or
switch it off before removing the pans of
the burner.
Helpful hints and tips
Energy savings
• If possible, always place lids on the pans.
• As soon as liquid starts boiling, turn down
the flame to barley keep the liquid simmer-
ing.
Use pots and pans with bottom fitting the size
of burner used.
Burner minimum di-
ameter of pots
and pans
maximum di-
ameter of pots
and pans
Rapid 180 mm 260 mm
Burner minimum di-
ameter of pots
and pans
maximum di-
ameter of pots
and pans
Auxili-
ary
80 mm 160 mm
The bottom of the cookware should be as thick
and flat as possible.
Care and cleaning
Warning! Switch the appliance off and
let it cool down before you clean it.
Warning! For safety reasons, do not
clean the appliance with steam blasters
or high-pressure cleaners.
ENGLISH 6

Warning! Do not use abrasive cleaners,
steel wool pads or acids, they will
damage the appliance.
To remove any food remains wash the enam-
elled elements, "caps" and "crowns", with
warm soapy water.
Stainless steel elements wash with water, and
then dry with a soft cloth.
This model is equipped with electrical ignition,
it is obtained through ceramic "candle" and
electrode.
Keep them well clean to avoid difficult light-
ning.
Periodically ask your local Service Centre
to check the conditions of the gas supply
pipe and the pressure adjuster, if it is fitted (this
service is not free of charge).
After cleaning, be sure to wipe dry with a soft
cloth.
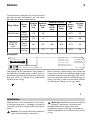
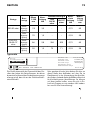
What to do if…
Problem Possible cause Remedy
There is no spark when light-
ing the gas
There is no electrical supply Check that the unit is plugged
in and the electrical supply is
switched on.
Check the house electric in-
stallation fuse.
Burner cap and Crown are
placed uneven
Check the burner cap and
crown have been replaced
correctly, e.g. after cleaning.
The flame is blowing out im-
mediately after lightning
Thermocouple is not heated
enough
After lightning the flame, keep
the knob pushed for about 5
sec.
The gas ring burns unevenly Burner crown is blocked with
food residues
Check the main injector is not
blocked and the burner crown
is clear of food particles.
If there is a fault, first try to find a solution to
the problem yourself. If you cannot find a sol-
ution to the problem yourself, contact your
dealer or the After Sales Service.
If you operated the appliance wrongly, or
the installation was not carried out by a
registered engineer, the visit from the customer
service technician or dealer may not take
place free of charge, even during the warranty
period.
Technical data
Hob dimensions
width 290 mm
depth 510 mm
built in height 30 mm
Class Appliance: 3
Appliance Category: : II2H3+
Appliance gas supply: G20 (2H) 20 mbar
ENGLISH 7

This appliance is designed for use with natural
gas but can be converted for use with other
gas type according to table below.
Type of Gas
Burner
type
Injectors
1/100
mm
Nominal
Power
kW
Nominal Flow g/h
Re-
duced
Power
kW
by-pass
1/100
mm
G30
28/30
mbar
G31 37
mbar
G20 20 mbar
Rapid
(large)
119 3.0 - - 0.75 42
Auxiliary
(small)
70 1.0 - - 0.33 28
G30/G31
28-30/37
mbar
Rapid
(large)
86 2.8 204 200 0.75 42
Auxiliary
(small)
50 1.0 73 71 0.33 28
Rating Plate
801-541-59
Made In Italy
© Inter IKEA Systems B.V. 1999
21552
PQM
PNC. 949738167 TYPE H3MF20-G/VI
G20 20mbar = 4 kW
G110 8 mbar = 4 kW
G120 8 mbar = 3.8 kW
G31 37 mbar =271 g/h
G30 28-30 mbar = 276 g/h
G30/G31 30/30 mbar = 276 g/h
II2H3+ (UK-CH-GR)
III1a2H3B/P (DK)
III1ab2H3B/P (SE)
II2H3B/P (NO-FI)
230 V
~
50 Hz
ZO 0694
The graphic above represents rating plate of
the appliance (without serial number which is
generated dynamically during the production
process), which is located at its underneath
surface of the casing.
Dear Customer, please apply here aside the
sticker you can find in the dedicate plastic bag
inserted inside the hob packaging. This will al-
low us to assist you better, by identifying pre-
cisely your hob, in case you will need in future
our assistance. Thank you for your help!
Installation
Manufacturer is not responsible for any injury
to persons and pets or damage to property
caused by failure to comply following require-
ments.
Caution! To proceed with the installation
refer to the assembly instructions.
Warning! Installation process must follow
the laws, ordinances, directives and
standards (electrical safety rules and
regulations, proper recycling in accordance
with the regulations, etc.) in force in the country
of use!
ENGLISH 8

Ensure that the local distribution condi-
tions (nature of the gas and gas pressure)
and the adjustment of the appliance are com-
patible before proceeding with the installa-
tion.
The parameters of adjustment setting for
this appliance are stated on the rating
plate (refer to the Technical data chapter).
Warning! The appliance must be
earthed!
Warning! Risk of injury from electrical
current.
• The electrical mains terminal is live.
• Make electrical mains terminal free of volt-
age.
• Loose and inappropriate plug and socket
connections can make the terminal over-
heat.
• Have the clamping connections correctly in-
stalled.
• Use strain relief clamp on cable.
Important! You must observe the minimum
distances to other appliances and furniture
cabinets or other units according to Assembly
Instruction.
If there is no oven beneath the hob insert a di-
viding panel at a minimum distance of 20 mm
from the bottom of the hob.
Protect the cut surfaces of the worktop against
moisture using a suitable sealant included in
the product in fitting bag. The sealant seals the
appliance to the work top with no gap. Do not
use silicon sealant between the appliance and
the worktop. Avoid installing the appliance
next to doors and under windows as hot cook-
ware may be knocked off the pan support
when doors and windows are opened.
Only an authorized service engineer can in-
stall, connect or repair this appliance. Any gas
installation must be carried out by a GAS SAFE
REGISTER installer. Use only original spare
parts.
Gas Connection
Warning! This appliance is not
connected to a combustion products
evacuation device.
Installation must comply with current local reg-
ulation.
The connection of the cooktop to the gas pipe
network or gas cylinder must be made by
means of a rigid copper or steel pipe with fit-
tings complying with local regulations, or by
means of a continuous surface stainless steel
hose complying with local regulations.
If you see any abnormalities do not repair
the pipe, contact local After Sales Service
(refer to the Service chapter).
The connection must be installed correctly,
fixed into hob connection pipe. Otherwise it
will cause leakage of gas
Warning! Once the installation is
complete, check the perfect seal of every
pipe fixing. Use soapy water, never flame.
Electrical connection
Before connecting, check that the nominal volt-
age of the appliance stated on the rating
plate, corresponds to the available supply
voltage. Also, check the power rating of the
appliance and ensure that the wire is suitably
sized to suit the appliance power rating (refer
to the Technical data chapter).
The rating plate is located on the lower casing
of the hob.
The appliance is supplied with a connection
cable. This has to be provided with a proper
plug, able to support the load marked on the
identification plate (refer to the Technical data
chapter).
The plug has to be fitted in a proper socket. If
connecting the appliance directly to the elec-
tric system, it is necessary that you install a
double pole switch between the appliance
and the electricity supply, with a minimum gap
of 3 mm between the switch contacts. The dou-
ble pole has to be of a type suitable for the
required load in compliance with the current
rules.
ENGLISH 9

The connection cable has to be placed in order
that, in each part, it cannot reach a 90 °C tem-
perature. The blue neutral cable must be con-
nected to the terminal block marked with "N".
The brown (or black) phase cable (fitted in the
terminal block contact marked with "L") must
always be connected to the live phase.
Replacement of the connection cable.
If the connection cable must be replaced, only
a type H05V2V2-F T90 cable must be used.
The cable section must be suitable to the volt-
age and the working temperature. The yel-
low/green earth wire must be approximately
2 cm. longer than the brown (or black) phase
wire.
To open the terminal block and reach
the terminals, proceed as follows:
1. insert the point of a screwdriver into one of
the two visible protruding part of the ter-
minal block
2. exert a light pressure and lift
The hob is supplied with a three pole terminal
block designed for a 230 V connection. The
yellow/green earth wire must always be con-
nected to the terminal marked with the symbol
.
Upon completion, secure the connection cable
with the cable clamp and close the terminal
block.
Gas setting conversion
This model is designed for use with natu-
ral gas but can be converted for use with
butane or propane gas providing the correct
injectors. The injectors not supplied with the
appliance have to be ordered from After Sales
Service (refer to the Service chapter).
For data concerning injector replacement, see
chapter "Technical data"
Warning! Conversion or replacement
can only be performed by a registered
installer.
To replace injectors:
1. Remove pan support.
2. Remove burner cap and crown.
3. With a socket spanner 7 unscrew and re-
move the injectors, replace them with the
ones required for the type of gas in use.
4. Reassemble the parts, following the same
procedure backwards.
Important! Replace the rating label (placed
near gas supply pipe) with relevant one for the
new type of gas supply before sealing the
appliance. If the appliance is already sealed
please stick it directly on the user manual
booklet after Technical data chapter close to
the rating plate drawing.
You can find this label in package sup-
plied with appliance
ENGLISH 10

If the feeding gas pressure will be differ-
ent or variable, comparing with the re-
quired, you must install an appropriate pres-
sure adjuster, which is not supplied with the
product and if needed must be ordered sep-
arately from the local After Sales Service (refer
to the Service chapter). The pressure adjuster
must be fitted on gas supply pipe, in compli-
ance with the rules of the force.
The rating plate is located on the lower casing
of the hob.
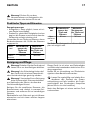
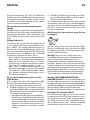
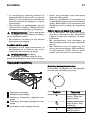
Adjusting flame level
When hob has been fully installed, it is neces-
sary to check the minimum flame setting:
1. Turn the gas tap to the maximum position
and ignite.
2. Set the gas tap to the minimum flame po-
sition then turn the control knob from mini-
mum to maximum several times. If the flame
is unstable or extinguished, follow the pro-
cedure further.
3. Re-ignite the burner and set to minimum.
4. Remove the control knob.
5. To adjust, use a thin bladed screwdriver
and turn the adjustment screw until the
flame is steady and does not extinguish,
when the knob is turned from minimum to
maximum, and vice versa (see following
picture).
6. Repeat this procedure for all burners.
7. Reassemble the knobs.
Warning! If the appliance is connected
to liquid gas (G31 propane or G30
butane), the regulation screw must be fastened
as tightly as possible.
IKEA of Sweden AB
SE-34381 Älmhult
Environment concerns
The symbol on the product or on its
packaging indicates that this product may not
be treated as household waste. Instead it
should be taken to the appropriate collection
point for the recycling of electrical and
electronic equipment. By ensuring this product
is disposed of correctly, you will help prevent
potential negative consequences for the
environment and human health, which could
otherwise be caused by inappropriate waste
handling of this product. For more detailed
information about recycling of this product,
please contact your local council, your
household waste disposal service or the shop
where you purchased the product.
Packaging materials
The materials with the symbol
are recycla-
ble. Dispose the packaging in a suitable col-
lection containers to recycle it.
Before disposal of appliance
Warning! Do these steps to dispose the
appliance:
• Pull the mains plug out of the mains socket.
• Cut off the mains cable and discard it.
ENGLISH 11

IKEA GUARANTEE
How long is the IKEA guarantee valid?
This guarantee is valid for five (5) years from
the original date of purchase of Your appli-
ance at IKEA, unless the appliance is named
LAGAN in which case two (2) years of guar-
antee apply. The original sales receipt is re-
quired as proof of purchase. If service work is
carried out under guarantee, this will not ex-
tend the guarantee period for the appliance,
Which appliances are not covered by the
IKEA five (5) years guarantee?
The range of appliances named LAGAN and
all appliances purchased in IKEA before 1st of
August 2007
Who will execute the service?
IKEA service provider will provide the service
through its own service operations or author-
ized service partner network.
What does this guarantee cover?
The guarantee covers faults of the appliance,
which have been caused by faulty construction
or material faults from the date of purchase
from IKEA. This guarantee applies to domestic
use only. The exceptions are specified under
the headline “What is not covered under this
guarantee?” Within the guarantee period, the
costs to remedy the fault e.g. repairs, parts, la-
bour and travel will be covered, provided that
the appliance is accessible for repair without
special expenditure. On these conditions the
EU guidelines (Nr. 99/44/EG) and the respec-
tive local regulations are applicable. Replaced
parts become the property of IKEA.
What will IKEA do to correct the problem?
IKEA appointed service provider will examine
the product and decide, at its sole discretion,
if it is covered under this guarantee. If consid-
ered covered, IKEA service provider or its au-
thorized service partner through its own serv-
ice operations, will then, at its sole discretion,
either repair the defective product or replace
it with the same or a comparable product.
What is not covered under this guarantee?
• Normal wear and tear.
• Deliberate or negligent damage, damage
caused by failure to observe operating in-
structions, incorrect installation or by con-
nection to the wrong voltage, damage
caused by chemical or electro-chemical re-
action, rust, corrosion or water damage in-
cluding but not limited to damage caused by
excessive lime in the water supply, damage
caused by abnormal environmental condi-
tions.
• Consumable parts including batteries and
lamps.
• Non-functional and decorative parts which
do not affect normal use of the appliance,
including any scratches and possible color
differences.
• Accidental damage caused by foreign ob-
jects or substances and cleaning or unblock-
ing of filters, drainage systems or soap
drawers.
• Damage to the following parts: ceramic
glass, accessories, crockery and cutlery bas-
kets, feed and drainage pipes, seals, lamps
and lamp covers, screens, knobs, casings
and parts of casings. Unless such damages
can be proved to have been caused by pro-
duction faults.
• Cases where no fault could be found during
a technician’s visit.
• Repairs not carried out by our appointed
service providers and/or an authorized
service contractual partner or where non-
original parts have been used.
• Repairs caused by installation which is faulty
or not according to specification.
• The use of the appliance in a non-domestic
environment i.e. professional use.
• Transportation damages. If a customer
transports the product to their home or other
address, IKEA is not liable for any damage
that may occur during transport. However,
if IKEA delivers the product to the customer's
delivery address, then damage to the prod-
uct that occurs during this delivery will be
covered by this guarantee.
ENGLISH 12

• Cost for carrying out the initial installation of
the IKEA appliance. However, if an IKEA
service provider or its authorized service
partner repairs or replaces the appliance
under the terms of this guarantee, the serv-
ice provider or its authorized service partner
will re-install the repaired appliance or in-
stall the replacement, if necessary.
This restriction do not apply to fault-free work
carried out by a qualified specialist using our
original parts in order to adapt the appliance
to the technical safety specifications of another
EU country.
How country law applies
The IKEA guarantee gives You specific legal
rights, which covers or exceed local demands.
However these conditions do not limit in any
way consumer rights described in the local
legislation
Area of validity
For appliances which are purchased in one EU
country and taken to another EU country, the
services will be provided in the framework of
the guarantee conditions normal in the new
country. An obligation to carry out services in
the framework of the guarantee exists only if
the appliance complies and is installed in ac-
cordance with:
• the technical specifications of the country in
which the guarantee claim is made;
• the Assembly Instructions and User Manual
Safety Information;
The dedicated After Sales Service for IKEA
appliances:
Please do not hesitate to contact IKEA After
Sales Service to:
1. make a service request under this guaran-
tee;
2. ask for clarification on installation of the
IKEA appliance in the dedicated IKEA
kitchen furniture. The service won’t provide
clarifications related to:
– the overall IKEA kitchen installation;
– connections to electricity (if machine
comes without plug and cable), to water
and to gas since they have to be execu-
ted by an authorized service engineer.
3. ask for clarification on user manual con-
tents and specifications of the IKEA appli-
ance.
To ensure that we provide you with the best
assistance, please read carefully the Assembly
Instructions and/or the User Manual section of
this booklet before contacting us.
How to reach us if You need our service
Please refer to the last page of this manual for
the full list of IKEA appointed contacts and rel-
ative national phone numbers.
Important! In order to provide You with a
quicker service, we recommend that You use
the specific phone numbers listed at the end of
this manual. Always refer to the numbers listed
in the booklet of the specific appliance You
need an assistance for. Before calling us,
assure that You have to hand the IKEA article
number (8 digit code) for the appliance of
which you need our assistance.
Important! SAVE THE SALES RECEIPT! It is
Your proof of purchase and required for the
guarantee to apply. Note that the receipt
reports also the IKEA article name and number
(8 digit code) for each of the appliances you
have purchased.
Do You need extra help?
For any additional questions not related to Af-
ter Sales of your appliances, please contact
our nearest IKEA store call centre. We recom-
mend you read the appliance documentation
carefully before contacting us.
ENGLISH 13

Inhalt
Sicherheitshinweise 14
Gerätebeschreibung 15
Täglicher Gebrauch 16
Praktische Tipps und Hinweise 17
Reinigung und Pflege 17
Was tun, wenn … 18
Technische Daten 18
Gerät aufstellen 20
Umwelttipps 23
IKEA GARANTIE 23
Änderungen vorbehalten
Sicherheitshinweise
Lesen Sie diese Bedienungsanleitung bit-
te sorgfältig durch, bevor Sie das Gerät
anschließen und benutzen, um Gefahren zu
vermeiden und einen korrekten Betrieb des
Geräts zu gewährleisten. Bewahren Sie diese
Bedienungsanleitung in der Nähe des Geräts
auf, auch wenn Sie dieses anderswo aufstellen.
Wenn Sie das Gerät verkaufen, geben Sie dem
Käufer die Bedienungsanleitung mit. Jeder,
der dieses Gerät benutzt, sollte mit der Bedie-
nung und den Sicherheitsmerkmalen vertraut
sein.
Bestimmungsgemäße Verwendung
•Lassen Sie das Gerät bei Betrieb nicht un-
beaufsichtigt.
• Dieses Gerät ist ausschließlich zur Verwen-
dung im Haushalt bestimmt.
• Das Gerät darf nicht als Arbeits- oder Ab-
stellfläche verwendet werden.
• Brennbare Flüssigkeiten, leicht entzündliche
Materialien oder schmelzbare Gegenstän-
de (z.B. Folien, Kunststoff, Aluminium) nicht
auf dem Gerät oder in dessen Nähe abstel-
len oder lagern.
• Vorsicht bei Anschluss von Elektrogeräten
an Steckdosen in Gerätenähe. Die An-
schlussleitungen dürfen nicht unter dem Ge-
rät oder heißem Kochgeschirr eingeklemmt
werden oder damit in Berührung kommen.
• Versuchen Sie nicht, selbst Reparaturen aus-
zuführen. Andernfalls besteht Unfallgefahr
und das Gerät könnte beschädigt werden.
Wenden Sie sich stets an Ihren lokalen Kun-
dendienst (siehe hierzu den Abschnitt "War-
tung").
Sicherheit für Kinder
• Nur Erwachsene dürfen dieses Gerät bedie-
nen. Kinder müssen beaufsichtigt werden, so
dass sie nicht mit dem Gerät spielen können.
• Halten Sie das Verpackungsmaterial von
Kindern fern. Andernfalls besteht Ersti-
ckungsgefahr.
• Halten Sie Kinder von dem Gerät fern, wenn
es in Betrieb ist.
Allgemeine Sicherheit
• Personen (einschließlich Kinder), die auf-
grund ihrer physischen, sensorischen oder
geistigen Fähigkeiten oder ihrer Unerfah-
renheit oder Unkenntnis nicht in der Lage
sind, das Gerät sicher zu bedienen, sollten
dieses Gerät nicht ohne Aufsicht oder An-
weisung durch eine verantwortliche Person
benutzen.
• Sorgen Sie dafür, dass beim Gebrauch der
Kochmulde eine kontinuierliche Luftzufuhr
gegeben ist und die Lüftungsöffnungen sich
in gutem Zustand befinden, oder bringen
Sie eine Dunstabzugshaube mit einem Ab-
luftschlauch an. Verbessern Sie die Belüf-
tung, indem Sie ein Fenster öffnen oder eine
höhere Stufe an der Dunstabzugshaube ein-
stellen.
• Dieses Gerät ist mit einer Sicherheitsvorrich-
tung in Form eines Thermoelements ausge-
stattet. Falls das Anzünden fehlschlägt oder
die Gasflamme erlischt, erwärmt sich das
Thermoelement nicht und unterbricht die
Gaszufuhr.
DEUTSCH 14

Aufstellung
• Vergewissern Sie sich, dass das Gerät beim
Transport nicht beschädigt wurde. Schließen
Sie ein beschädigtes Gerät nicht an. Wen-
den Sie sich bei Bedarf an den Kundendienst
(siehe hierzu den Abschnitt "Wartung").
• Das Gerät darf nur von einem Servicetech-
niker einer autorisierten Kundendienststelle
installiert, angeschlossen oder repariert
werden. Dabei dürfen ausschließlich Origi-
nalersatzteile verwendet werden.
• Einbaugeräte dürfen nur nach dem Einbau
in normgerechte, passende Einbauschränke
und Arbeitsplatten betrieben werden.
• Nehmen Sie weder technische noch ander-
weitige Modifikationen am Gerät vor. An-
dernfalls besteht Unfallgefahr und das Ge-
rät könnte beschädigt werden.
Warnung! Beachten Sie genau die
Anweisungen zu den elektrischen und
Gasanschlüssen.
• Das Gerät niemals installieren, wenn es
während des Transports beschädigt wurde.
Sicherheit während der Benutzung
• Entfernen Sie vor der ersten Benutzung des
Geräts sämtliches Verpackungsmaterial so-
wie alle Aufkleber und Folien.
Warnung! Brandgefahr! Überhitzte Fette
und Öle entzünden sich sehr schnell.
• Schalten Sie die Brenner nach jeder Benut-
zung aus.
• Verbrennungsgefahr! Die Brenner und zu-
gängliche Geräteteile werden beim Betrieb
sehr heiß. Achten Sie darauf, dass Töpfe
nicht über den Rand der Kochmulde hinaus-
ragen.
Schäden am Gerät vermeiden
• Das Leerkochen von Töpfen und Pfannen
vermeiden. Es kann Beschädigungen an der
Kochmulde verursachen.
• Brenner nicht mit leerem oder ohne Koch-
geschirr benutzen.
• Legen Sie nie einen Teil des Gerätes mit Alu-
Folie aus. Legen Sie keine Gegenstände aus
Kunststoff oder aus anderem Material, das
schmelzen kann, auf das Gerät.
Gerätebeschreibung
1
2
5
34
1 Starkbrenner
2 Normalbrenner
3 Starkbrenner-Einstellknopf
4 Normalbrenner-Einstellknopf
5 Abnehmbarer Topfträger
Brenner-Einstellknopf
Die Brenner-Einstellknöpfe sitzen vorn an der
Kochmulde.
DEUTSCH 15

Symbol Beschreibung
Keine Gaszufuhr /
Position Aus
Maximale Gaszu-
fuhr / Einstellung der
Zündung
Symbol Beschreibung
Mindest-Gaszufuhr
Täglicher Gebrauch
Zündung der Brenner
Zünden Sie stets zuerst die Brenner und
setzen Sie dann die Töpfe oder Pfannen
auf.
So zünden Sie den Brenner:
1. Drücken Sie den zugehörigen Einstellknopf
ganz hinein und drehen Sie ihn dann nach
links gegen den Uhrzeigersinn auf die ma-
ximale Position, die wie folgt markiert ist
.
2. Halten Sie den Knopf für etwa 5 Sekunden
gedrückt; dies hilft, das Thermoelement zu
erwärmen und das Sicherheitsventil abzu-
schalten, das sonst die Gaszufuhr unter-
brechen würde.
3. Wenn die Flamme regelmäßig brennt, stel-
len Sie sie nach Wunsch ein.
Lässt sich nach einigen Versuchen der
Brenner nicht zünden, überprüfen Sie, ob
die Brennerkrone und der zugehörige Deckel
korrekt sitzen.
1
2
3
4
5
1 Brennerdeckel
2 Brennerkrone
3 Elektrozünder
4 Düse
5 Thermoelement
Warnung! Der Knopf darf höchstens 15
Sekunden lang gedrückt werden.
Sollte der Brenner nach 15 Sekunden nicht
zünden, lassen Sie den Knopf los und drehen
ihn in die Aus-Position. Warten Sie dann min-
destens eine Minute lang, bevor Sie den Bren-
ner erneut zünden.
Wichtig! Bei einem Stromausfall kann der
Brenner auch ohne den Elektrozünder
gezündet werden. Halten Sie in diesem Fall
eine Flamme an den Brenner, drücken Sie den
Knopf hinein und drehen ihn gegen den
Uhrzeigersinn auf die Position mit maximaler
Gaszufuhr.
Warnung! Lassen Sie beim Umgang mit
offenem Feuer äußerste Vorsicht walten.
Der Hersteller übernimmt bei Missachtung der
Sicherheitsbestimmungen beim Umgang mit
offenem Feuer keinerlei Haftung.
Drehen Sie den Knopf in die Aus-Position,
falls die Gasflamme versehentlich erlischt.
Warten Sie dann mindestens eine Minute lang,
bevor Sie den Brenner erneut zünden.
Nach dem Einschalten der Stromversor-
gung, nach der Installation oder nach ei-
nem Stromausfall wird die Funkenzündung au-
tomatisch aktiviert.
Brenner ausschalten
Drehen Sie zum Abschalten des Brenners den
entsprechenden Einstellknopf auf das Symbol
.
DEUTSCH 16

Warnung! Drehen Sie vor dem
Herunternehmen von Kochgeschirr die
Flamme herunter oder drehen Sie sie ab.
Praktische Tipps und Hinweise
Energeinsparungen
• Kochgeschirr, wenn möglich, immer mit ei-
nem Deckel verschließen.
• Drehen Sie, sobald die Flüssigkeit zu kochen
beginnt, die Flamme so weit zurück, dass der
Siedepunkt aufrecht erhalten wird.
Verwenden Sie nur Töpfe und Pfannen, deren
Bodendurchmesser der Größe des Brenners
angepasst ist.
Bren-
ner
Mindestdurch-
messer der
Töpfe und
Pfannen
Maximaler
Durchmesser
der Töpfe und
Pfannen
Stark-
brenner
180 mm 260 mm
Bren-
ner
Mindestdurch-
messer der
Töpfe und
Pfannen
Maximaler
Durchmesser
der Töpfe und
Pfannen
Nor-
malbren-
ner
80 mm 160 mm
Der Boden des Kochgeschirrs sollte so dick und
plan wie möglich sein.
Reinigung und Pflege
Warnung! Schalten Sie das Gerät ab und
lassen Sie es vor dem Reinigen abkühlen.
Warnung! Aus Sicherheitsgründen darf
das Gerät nicht mit einem Dampfstrahl-
oder Hochdruckreiniger gereinigt werden.
Warnung! Verwenden Sie zur Reinigung
keine Scheuermittel, Scheuerschwämme
aus Stahlwolle oder Säuren, da diese das
Gerät beschädigen können.
Reinigen Sie die emaillierten Elemente, die
Brennerkronen und -deckel, in warmem Sei-
fenwasser und entfernen Sie so hartnäckigen
Schmutz.
Edelstahlteile nach Gebrauch gut mit Wasser
abwaschen und mit einem weichen Lappen
abtrocknen.
Dieses Gerät ist mit einer aus Elektrozünder
und Elektrode bestehenden elektrischen Zün-
dung ausgerüstet.
Halten Sie zur Vermeidung von Zündschwie-
rigkeiten diese Bauteile stets sauber.
Lassen Sie regelmäßig vom lokalen Kun-
dendienst den Zustand der Gasan-
schlussleitung und, falls installiert, die Funkti-
onstüchtigkeit des Druckreglers überprüfen
(dieser Service ist nicht kostenlos).
Nach dem Reinigen mit einem weichen Tuch
trockenreiben.
DEUTSCH 17

Was tun, wenn …
Störung Mögliche Ursache Abhilfe
Keine Funken beim Betätigen
der elektrischen Zündung
Kein Strom. Kontrollieren Sie, dass der
Stecker korrekt eingesteckt ist
und das Gerät eingeschaltet
ist.
Die Sicherung in der Hausin-
stallation prüfen.
Brennerdeckel und Brenner-
kranz sitzen nicht gerade.
Kontrollieren, ob der Brenner-
deckel und der Kranz z. B.
nach dem Reinigen richtig ein-
gesetzt wurden.
Gasflamme erlischt sofort
nach dem Entzünden
Thermoelement ist nicht aus-
reichend erwärmt
Halten Sie den Knopf nach
dem Entzünden ca. 5 Sekun-
den lang gedrückt.
Der Gasbrenner brennt un-
gleichmäßig
Speisereste am Brennerkranz Stellen Sie sicher, dass die Dü-
se nicht blockiert und der
Brennerkranz frei von Speise-
resten ist.
Liegt eine Störung am Gerät vor, sollten Sie
zuerst versuchen, selbst die Ursache zu ermit-
teln. Wenden Sie sich an Ihren Fachhändler
bzw. an den Kundendienst, wenn Sie die Ur-
sache nicht selbst finden können.
Wenn das Gerät unsachgemäß bedient
oder die Installation nicht von einem au-
torisierten Kundendiensttechnikers ausgeführt
wurde, kann der Besuch eines Kundendienst-
techniker bzw. Fachhändlers auch während
der Garantiezeit nicht kostenlos erfolgen.
Technische Daten
Kochfeldabmessungen
Breite 290 mm
Tiefe 510 mm
Einbauhöhe 30 mm
Geräteklasse: 3
Gerätekategorie: : II2H3+
Gaszufuhr des Geräts: G20 (2H) 20 mbar
Das Gerät ist für den Betrieb mit Erdgas kon-
zipiert. Es kann jedoch gemäß der folgenden
Tabelle für den Betrieb mit anderen Gasarten
umgerüstet werden.
DEUTSCH 18

Gastyp
Bren-
nertyp
Düsen
1/100
mm
Nenn-
leistung
kW
Nenndurchfluss g/h
Redu-
zierte
Leistung
kW
Neben-
leitung
1/100
mm
G30
28/30
mbar
G31 37
mbar
G20 20 mbar
Stark-
brenner
(groß)
119 3,0 - - 0,75 42
Hilfs-
brenner
(klein)
70 1,0 - - 0,33 28
G30/G31
28-30/37
mbar
Stark-
brenner
(groß)
86 2,8 204 200 0,75 42
Hilfs-
brenner
(klein)
50 1,0 73 71 0,33 28
Typenschild
801-541-59
Made In Italy
© Inter IKEA Systems B.V. 1999
21552
PQM
PNC. 949738167 TYPE H3MF20-G/VI
G20 20mbar = 4 kW
G110 8 mbar = 4 kW
G120 8 mbar = 3.8 kW
G31 37 mbar =271 g/h
G30 28-30 mbar = 276 g/h
G30/G31 30/30 mbar = 276 g/h
II2H3+ (UK-CH-GR)
III1a2H3B/P (DK)
III1ab2H3B/P (SE)
II2H3B/P (NO-FI)
230 V
~
50 Hz
ZO 0694
Die Grafik oben stellt das Typenschild des Ge-
rätes dar (ohne die Seriennummer, da diese
dynamisch während des Produktionsvorgangs
erzeugt wird), das sich an der Gehäuseunter-
seite befindet.
Sehr geehrter Kunde, bitte kleben Sie hier an
dieser Stelle den Aufkleber auf, den Sie im
Plastikbeutel in der Verpackung des Kochfel-
des finden. Anhand dieses Aufklebers lässt sich
Ihr Kochfeld genau identifizieren. So können
wir Ihnen besser helfen, wenn Sie sich in Zu-
kunft mit Fragen an uns wenden. Wir bedan-
ken uns für Ihre Unterstützung!
DEUTSCH 19

Gerät aufstellen
Der Hersteller übernimmt keinerlei Haftung für
Verletzungen von Personen oder Tieren oder
für Schäden an Eigentum, wenn dies auf die
Nichteinhaltung der folgenden Bedingungen
zurückzuführen ist.
Vorsicht! Bitte beachten Sie bei der
Installation die Montageanleitung.
Warnung! Die Montage muss sich nach
den im Einsatzland geltenden Gesetze,
Verordnungen, Richtlinien und Normen
richten! (Sicherheitsbestimmungen und
Vorschriften für Elektrik/Elektronik, sach- und
ordnungsgemäßes Recycling etc.).
Überprüfen Sie vor dem Aufstellen und
Anschließen des Geräts, dass das von Ih-
rem Gaswerk gelieferte Gas (Gasart und
Druck) mit dem Gerät kompatibel ist.
Die entsprechenden Geräteparameter
sind auf dem Typenschild angegeben
(siehe Abschnitt Technische Daten).
Warnung! Das Gerät muss geerdet sein!
Warnung! Schäden durch elektrischen
Strom.
• Die Netzanschlussklemme liegt an Span-
nung.
• Netzanschlussklemme spannungsfrei ma-
chen.
• Lockere und unsachgemäße Steckverbin-
dungen können die Klemme überhitzen.
• Die Klemmverbindungen müssen fachge-
recht ausgeführt werden.
• Kabel zugentlasten.
Wichtig! Die Mindestabstände zu anderen
Geräten und Küchenschränken oder anderen
Möbelstücken sind wie in der
Montageanleitung beschrieben einzuhalten.
Befindet sich unter dem Kochfeld kein Back-
ofen, setzen Sie eine Trennwand mit einem
Mindestabstand von 20 mm von der Untersei-
te des Kochfelds ein.
Schützen Sie die Schnittflächen der Arbeits-
platte mit einem geeigneten Dichtungsmateri-
al (ist im Beipack des Produktes enthalten) vor
Feuchtigkeit. Die Dichtung schließt das Gerät
spaltfrei mit der Arbeitsplatte ab. Tragen Sie
zwischen Gerät und Arbeitsplatte keine Sili-
kon-Dichtungsmasse auf. Installieren Sie das
Gerät nicht direkt neben Türen und unter Fen-
stern. Andernfalls könnte beim Öffnen von
Fenster oder Tür heißes Kochgeschirr von den
Kochfeldern heruntergestoßen werden.
Das Gerät darf nur von einem Servicetechniker
einer autorisierten Kundendienststelle instal-
liert, angeschlossen oder repariert werden.
Dabei dürfen ausschließlich Originalersatztei-
le verwendet werden.
Gas-Anschluss
Warnung! Das Gerät ist nicht an eine
Abluftanlage angeschlossen.
Die Installation muss örtlich geltende Vorschrif-
ten einhalten.
Der Anschluss der Kochmulde an das öffentli-
che Gasnetz oder eine Gasflasche muss mit
einer starren Kupfer- oder Stahlleitung und
Kupplungen gemäß den örtlichen Vorschriften
erfolgen, oder mit einem durchgehenden Edel-
stahl-Schlauch, der den örtlichen Vorschriften
entspricht.
Wenn Ihnen Unregelmäßigkeiten auffal-
len, niemals eigene Reparaturen ausfüh-
ren, sondern Ihr lokales Kundendienstzentrum
verständigen (siehe Abschnitt Service).
Der Anschluss muss korrekt installiert und fest
mit dem Anschlussrohr der Kochmulde verbun-
den werden. Falls dies nicht der Fall ist, kann
Gas austreten.
Warnung! Wenn die Installation
abgeschlossen ist, überprüfen Sie die
Dichtigkeit aller Rohranschlüsse. Dafür
Seifenwasser und kein offenes Feuer
verwenden.
DEUTSCH 20
La page est en cours de chargement...
La page est en cours de chargement...
La page est en cours de chargement...
La page est en cours de chargement...
La page est en cours de chargement...
La page est en cours de chargement...
La page est en cours de chargement...
La page est en cours de chargement...
La page est en cours de chargement...
La page est en cours de chargement...
La page est en cours de chargement...
La page est en cours de chargement...
La page est en cours de chargement...
La page est en cours de chargement...
La page est en cours de chargement...
La page est en cours de chargement...
La page est en cours de chargement...
La page est en cours de chargement...
La page est en cours de chargement...
La page est en cours de chargement...
La page est en cours de chargement...
La page est en cours de chargement...
La page est en cours de chargement...
La page est en cours de chargement...
La page est en cours de chargement...
La page est en cours de chargement...
La page est en cours de chargement...
La page est en cours de chargement...
La page est en cours de chargement...
La page est en cours de chargement...
La page est en cours de chargement...
La page est en cours de chargement...
La page est en cours de chargement...
La page est en cours de chargement...
La page est en cours de chargement...
La page est en cours de chargement...
La page est en cours de chargement...
La page est en cours de chargement...
La page est en cours de chargement...
La page est en cours de chargement...
La page est en cours de chargement...
La page est en cours de chargement...
La page est en cours de chargement...
La page est en cours de chargement...
-
 1
1
-
 2
2
-
 3
3
-
 4
4
-
 5
5
-
 6
6
-
 7
7
-
 8
8
-
 9
9
-
 10
10
-
 11
11
-
 12
12
-
 13
13
-
 14
14
-
 15
15
-
 16
16
-
 17
17
-
 18
18
-
 19
19
-
 20
20
-
 21
21
-
 22
22
-
 23
23
-
 24
24
-
 25
25
-
 26
26
-
 27
27
-
 28
28
-
 29
29
-
 30
30
-
 31
31
-
 32
32
-
 33
33
-
 34
34
-
 35
35
-
 36
36
-
 37
37
-
 38
38
-
 39
39
-
 40
40
-
 41
41
-
 42
42
-
 43
43
-
 44
44
-
 45
45
-
 46
46
-
 47
47
-
 48
48
-
 49
49
-
 50
50
-
 51
51
-
 52
52
-
 53
53
-
 54
54
-
 55
55
-
 56
56
-
 57
57
-
 58
58
-
 59
59
-
 60
60
-
 61
61
-
 62
62
-
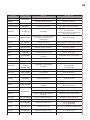 63
63
-
 64
64


dans d''autres langues
- italiano: IKEA FHGA2K Manuale utente
- Deutsch: IKEA FHGA2K Benutzerhandbuch
Documents connexes
-
IKEA MHGA1K 502-371-42 Manuel utilisateur
-
-
-
-
-
-
-
-
-