
©2018 Hestan Commercial Corporation
1
EN
BACKGUARD
INSTALLATION
INSTRUCTIONS
KBGIT / KBGLB / KBGHS
IMPORTANT - READ ALL INSTRUCTIONS BEFORE YOU BEGIN
THE INSTRUCTIONS HEREIN SHOULD BE PERFORMED BY A QUALIFIED SERVICE TECHNICIAN.
THE APPLIANCE MUST BE COMPLETELY COOL AND THE GAS SOURCE MUST BE SHUT OFF. THE
UNIT MUST BE UNPLUGGED FROM THE POWER OUTLET, OR THE ELECTRICAL BREAKER SHUT
OFF. YOU WILL NEED TO MOVE THE APPLIANCE AWAY FROM THE WALL FOR ACCESS.
SOME PARTS INSIDE YOUR APPLIANCE HAVE SHARP EDGES. CARE MUST BE TAKEN WHEN
HANDLING THE VARIOUS COMPONENTS TO AVOID PERSONAL INJURY. WEAR GLOVES WHEN
HANDLING.
TOOLS REQUIRED:
Work gloves
Safety glasses
Phillips screwdriver
5/16” & 3/8” deep socket wrench or nut driver
IF THE INFORMATION IN THIS MANUAL IS NOT FOLLOWED
EXACTLY, A FIRE OR EXPLOSION MAY RESULT CAUSING
PROPERTY DAMAGE, PERSONAL INJURY, OR DEATH.
Flammable Gas - disconnect all propane or natural gas supplies to this
unit before servicing.
Electrical Parts & Components – disconnect all power supplies before
servicing.
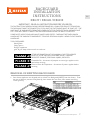
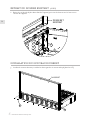
1. Your Hestan appliance was shipped with an Island Trim Backguard (KBGIT) from the factory. From
the rear of the unit, remove screw (Item A), then remove the rear cover, then remove remaining
screws (Item C).
REMOVAL OF EXISTING BACKGUARD
A
C
COVER

©2018 Hestan Commercial Corporation
2
EN
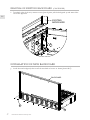
REMOVAL OF EXISTING BACKGUARD
(CONTINUED)
2. From both sides of the unit, remove screws (Item A), then pull the backguard up and toward the
rear of the appliance.
EXISTING
BACKGUARD
A
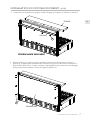
INSTALLATION OF NEW BACKGUARD
3. Install the new backguard, then install the two kinds of screws as shown (Item A & C).
C
BACKGUARD
A

©2018 Hestan Commercial Corporation
3
EN
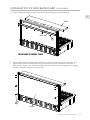
INSTALLATION OF NEW BACKGUARD
(CONTINUED)
4. If your backguard features a shelf, install the shelf and support using screws Item B.
SHELF
B
SUPPORT
HIGH SHELF MODEL ONLY
5. With all internal screws tightened, install the rear cover and secure with screws (Item A). The
appliance may now be reconnected to the gas and electricity and returned to its position in
your kitchen. If your range was moved away from the wall, be sure to re-engage the anti-tipping
bracket at the back of the unit, near the floor.
A
COVER

©2018 Hestan Commercial Corporation
4

FR
©2018 Hestan Commercial Corporation
5
INSTRUCTIONS
D’INSTALLATION
DU DOSSERET
KBGIT / KBGLB / KBGHS
IMPORTANT - LISEZ TOUTES LES INSTRUCTIONS AVANT DE COMMENCER
LES INSTRUCTIONS PRÉVUES DANS CE DOCUMENT DOIVENT ÊTRE EFFECTUÉES PAR UN
TECHNICIEN QUALIFIÉ. L’APPAREIL DOIT ÊTRE COMPLÈTEMENT FRAIS ET LA SOURCE DE GAZ
DOIT ÊTRE ÉTEINTE. L’UNITÉ DOIT ÊTRE DÉBRANCHÉE DE LA PRISE D’ALIMENTATION OU DU
COUPE-CIRCUIT ÉLECTRIQUE. VOUS DEVEZ DÉPLACER L’APPAREIL DU MUR POUR L’ACCÈS.
CERTAINES PIÈCES À L’INTÉRIEUR DE VOTRE APPAREIL ONT DES BORDS TRANCHANTS. IL FAUT
PRENDRE SOIN EN MANIPULANT LES DIFFÉRENTS COMPOSANTS POUR ÉVITER DES BLESSURES
PERSONNELLES. PORTER DES GANTS LORS DE LA MANIPULATION.
OUTILS NÉCESSAIRES:
Gants de travail
Lunettes de protection
Tournevis cruciforme
Clé à douille de 5/16 “ & 3/8” ou tourne-écrou
L’INOBSERVATION DES INFORMATIONS DONNÉES DANS CE MANUEL PEUT
ENTRAÎNER UN INCENDIE OU UNE EXPLOSION DE NATURE À CAUSER DES
DÉGÂTS MATÉRIELS ET DES BLESSURES GRAVES, VOIRE MORTELLES.
Gaz inflammable - débrancher toute alimentation en propane ou gaz naturel de cet
appareil avant de procéder à l’entretien de celui-ci.
Pièces et composants électriques – débrancher les alimentations électriques de
toute nature avant de procéder à une opération d’entretien.
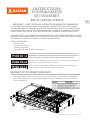
1. Votre appareil Hestan est fournie en usine avec un dosseret Island Trim (à Profilé pour Îlot) KBGIT.
À l’arrière de l’appareil, retirez la vis (Article A), puis retirez le couverture arrière, puis retirez les
autres vis (Article C).
RETRAIT DU DOSSERET EXISTANT
A
C
COUVERTURE

FR
©2018 Hestan Commercial Corporation
6
RETRAIT DU DOSSIER EXISTANT
(SUITE)
2. Retirer les vis (Article A) des deux côtés de l’appareil, puis tirez le dosseret vers le haut et vers
l’arrière de l’appareil.
DOSSERET
EXISTANT
A
INSTALLATION DU NOUVEAU DOSSERET
3. Installez le nouveau dosseret, installez les deux types de vis comme indiqué (Articles A-C).
C
DOSSERET
A

FR
©2018 Hestan Commercial Corporation
7
INSTALLATION DU NOUVEAU DOSSERET
(SUITE)
4. Si votre dosseret comporte une étagère, installez l’étagère et le support à l’aide des vis Article B.
ÉTAGÈRE HAUTE SEULEMENT
ÉTAGÈRE
B
SUPPORT
5. Une fois toutes les vis internes serrées, installez le couverture arrière et fixez-le avec les vis
(Article A). L’appareil peut maintenant être reconnecté au gaz et à l’électricité et retourné à sa
position dans votre cuisine. Si votre cuisinière a été éloignée du mur, assurez-vous de réengager
le dispositif anti-basculement à l’arrière de l’appareil, près du sol.
A
COUVERTURE

Hestan Commercial Corporation
3375 E. La Palma Ave
Anaheim, CA 92806
(888) 905-7463
RETAIN THIS MANUAL FOR FUTURE REFERENCE
CONSERVEZ CE MANUEL POUR UNE RÉFÉRENCE FUTURE
©2018 Hestan Commercial Corporation P/N 022367 REV A
-
 1
1
-
 2
2
-
 3
3
-
 4
4
-
 5
5
-
 6
6
-
 7
7
-
 8
8


Hestan KRT485GDNG Backguard Installation Instructions
- Taper
- Backguard Installation Instructions
- Ce manuel convient également à
dans d''autres langues
- English: Hestan KRT485GDNG
Documents connexes
-
Hestan KRT485GD-NG Le manuel du propriétaire
-
-
-
-
Hestan KRD364GD-NG Guide d'installation
-
-
-
-