Zanussi ZWY51024CI Manuel utilisateur
- Catégorie
- Machines à laver
- Taper
- Manuel utilisateur


SAFETY INFORMATION
Before the installation and use of the appliance, carefully read the
supplied instructions. The manufacturer is not responsible for any
injuries or damages that are the result of incorrect installation or
usage. Always keep the instructions in a safe and accessible
location for future reference.
CHILDREN AND VULNERABLE PEOPLE SAFETY
• This appliance can be used by children aged from 8 years and
above and persons with reduced physical, sensory or mental
capabilities or lack of experience and knowledge if they have
been given supervision or instruction concerning the use of the
appliance in a safe way and understand the hazards involved.
• Children between 3 and 8 years of age and persons with very
extensive and complex disabilities shall be kept away unless
continuously supervised.
• Children of less than 3 years of age should be kept away
unless continuously supervised.
• Do not let children play with the appliance.
• Keep all packaging away from children and dispose of it
appropriately.
• Keep detergents away from children.
• Keep children and pets away from the appliance when the door
is open.
• If the appliance has a child safety device, it should be activated.
• Children shall not carry out cleaning and user maintenance of
the appliance without supervision.
GENERAL SAFETY
• Do not change the specification of this appliance.
• This appliance is intended to be used in household and similar
applications such as:
– staff kitchen areas in shops, offices and other working
environments;
– by clients in hotels, motels, bed & breakfast and other
residential type environments;
2

– areas for communal use in blocks of flats or in launderettes.
• Do not exceed the maximum load of 5.5 kg (refer to the
"Programme chart" chapter).
• The operating water pressure at the water entry point from the
outlet connection must be between 0.5 bar (0.05 MPa) and 8
bar (0.8 MPa).
• The ventilation opening in the base must not be covered by a
carpet, mat, or any floor covering.
• The appliance must be connected to the water mains using the
new supplied hose sets, or other new hose sets supplied by
the Authorised Service Centre.
• Old hose sets must not be reused.
• If the mains power supply cable is damaged, it must be
replaced by the manufacturer, its Authorised Service Centre or
similarly qualified persons to avoid an electrical hazard.
• Before any maintenance operation, deactivate the appliance
and disconnect the mains plug from the socket.
• Do not use high pressure water sprays and/or steam to clean
the appliance.
• Clean the appliance with a moist cloth. Use only neutral
detergents. Do not use abrasive products, abrasive cleaning
pads, solvents or metal objects.
SAFETY INSTRUCTIONS
INSTALLATION
The installation must comply with
relevant national regulations.
• Remove all the packaging and the transit bolts
including rubber bush with plastic spacer.
• Keep the transit bolts in a safe place. If the
appliance is to be moved in the future they must
be reattached to lock the drum to prevent an
internal damage.
• Always take care when moving the appliance as
it is heavy. Always use safety gloves and
enclosed footwear.
• Do not install or use a damaged appliance.
• Follow the installation instructions supplied with
the appliance.
• Do not install or use the appliance where the
temperature can be less than 0°C or where it is
exposed to the weather.
• The floor area on which the appliance is to be
installed must be flat, stable, heat resistant and
clean.
• Make sure that there is air circulation between
the appliance and the floor.
• When the appliance is in its permanent position,
check if it is levelled correctly with the aid of a
spirit level. If it is not, adjust the feet accordingly.
• Do not install the appliance directly above a
floor drain.
• Do not spray water on the appliance and do not
expose it to excessive humidity.
• Do not install the appliance where the appliance
lid cannot be fully opened.
• Do not put a closed container to collect
possible water leakage under the appliance.
Contact the Authorised Service Centre to
ensure which accessories can be used.
3

ELECTRICAL CONNECTION
WARNING! Risk of fire and electric
shock.
• The appliance must be earthed.
• Always use a correctly installed shockproof
socket.
• Make sure that the parameters on the rating
plate are compatible with the electrical ratings
of the mains power supply.
• Do not use multi-plug adapters and extension
cables.
• Make sure not to cause damage to the mains
plug and to the mains cable. Should the mains
cable need to be replaced, this must be carried
out by our Authorised Service Centre.
• Connect the mains plug to the mains socket
only at the end of the installation. Make sure that
there is access to the mains plug after the
installation.
• Do not touch the mains cable or the mains plug
with wet hands.
• Do not pull the mains cable to disconnect the
appliance. Always pull the mains plug.
• This appliance complies with the E.E.C.
Directives.
WATER CONNECTION
• Do not cause damage to the water hoses.
• Before connection to new pipes, pipes not used
for a long time, where repair work has been
carried out or new devices fitted (water meters,
etc.), let the water flow until it is clean and clear.
• Ensure that there are no visible water leaks
during and after the first use of the appliance.
• Do not use an extension hose if the inlet hose is
too short. Contact the Authorised Service
Centre for the replacement of the inlet hose.
• It is possible to see water flowing from the drain
hose. This is due to the testing of the appliance
with the use of water in the factory.
• You can extend the drain hose to maximum 400
cm. Contact the Authorised Service Centre for
the other drain hose and the extension.
USE
WARNING! Risk of injury, electric
shock, fire, burns or damage to the
appliance.
• Follow the safety instructions on the detergent
packaging.
• Do not put flammable products or items that are
wet with flammable products in, near or on the
appliance.
• Make sure that all metal objects are removed
from the laundry.
• Do not wash fabrics which are heavily soiled
with oil, grease or other greasy substances. It
can damage rubber parts of the washing
machine. Prewash such fabrics by hand before
loading them into the washing machine.
SERVICE
• To repair the appliance contact an Authorised
Service Centre.
• Use original spare parts only.
DISPOSAL
WARNING! Risk of injury or
suffocation.
• Disconnect the appliance from the mains
electrical and water supplies.
• Cut off the mains electrical cable close to the
appliance and dispose of it.
• Remove the door catch to prevent children or
pets from becoming trapped in the drum.
• Dispose of the appliance in accordance with
local requirements for the disposal of Waste
Electrical and Electronic Equipment (WEEE).
INSTALLATION
WARNING! Refer to Safety chapters.
4

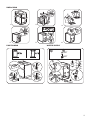
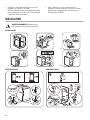
UNPACKING
1.
2.
3.
2
1
4.
5.
1
2
1
2
6.
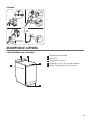
POSITIONING WATER SUPPLY
3/4”
3/4”
90
O
90
O
1
1
2
2
5

DRAINAGE
min.600 mm
max.1000 mm
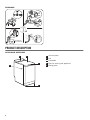
PRODUCT DESCRIPTION
APPLIANCE OVERVIEW
3
1
4
5
2
1
Control panel
2
Lid
3
Lid handle
4
Feet for levelling the appliance
5
Rating plate
6

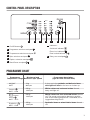
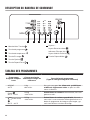
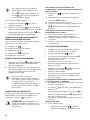
CONTROL PANEL DESCRIPTION
1000
800
600
20°
7 8621 3 4 5
1
On/Off button
2
Programme selection touchpad
3
Temperature selection touchpad
4
Spin selection touchpad
5
Options selection touchpad
6
Start/Pause touchpad
7
Indicators:
Child lock indicator
Extra rinse indicator
Door locked indicator
8
Delay start touchpad
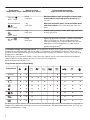
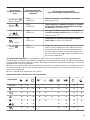
PROGRAMME CHART
Programme
Temperature range
Maximum load
Reference spin speed
Programme description
(Type of load and soil level)
30'@30°
30°C
2 kg
800 rpm
A short cycle for synthetic and delicate items
with light soil level or for items to freshen up.
Cottons
90°C - Cold
5.5 kg
1000 rpm
White cotton and coloured cotton. Normal,
heavy and light soil.
Cotton
ECO
1)
60°C - 40°C
5.5 kg
1000 rpm
White cotton and fast-coloured cotton. Normal
soil. The energy consumption decreases and the
time of the washing programme is extended, ensur-
ing good washing results.
Synthetics
60°C - Cold
2.5 kg
1000 rpm
Synthetic items or mixed fabric items. Normal
soil.
7

Programme
Temperature range
Maximum load
Reference spin speed
Programme description
(Type of load and soil level)
Delicates
40°C - Cold
2.5 kg
1000 rpm
Delicate fabrics such as acrylics, viscose and
mixed fabrics requiring gentler washing. Nor-
mal soil.
Wool/Handwash
40°C - Cold
1 kg
1000 rpm
Machine washable wool, hand washable wool
and other fabrics with «hand washing» care sym-
bol
2)
.
Refresh 20 min
40°C - 30°C
1 kg
1000 rpm
Cotton and synthetic items with light soil level
or worn only once.
Mix 20°
20°C
2.5 kg
1000 rpm
Special programme for cotton, synthetic and mixed
fabrics with light soil. Set this programme to de-
crease the energy consumption. Make sure that the
detergent is for low temperature in order to have
good washing results
3)
.
1) Cottons energy saving programme. This programme at 60ºC with a load of 5.5 kg is the reference
programme for data entered in the energy label, in compliance with 96/60/EC Directive. Set this pro-
gramme to have a good washing results and decrease the energy consumption. The time of the washing
programme is extended.
2) During this cycle the drum rotates slowly to ensure a gentle wash. It can seem that the drum doesn't
rotate or doesn't rotate properly, but this is normal for this programme.
3) No temperature indicator is on .
Programme options compatibility
Programme
1)
30'@30° ■ ■ ■ ■ ■
■ ■ ■ ■ ■ ■ ■ ■ ■ ■
■ ■ ■ ■ ■ ■ ■ ■ ■
■ ■ ■ ■ ■ ■ ■ ■ ■ ■
■ ■ ■ ■ ■ ■ ■ ■ ■
■ ■ ■ ■ ■ ■
■ ■ ■ ■ ■ ■
■ ■ ■ ■ ■ ■
1) When you set this option, we recommend that you decrease the quantity of the laundry. It is possible to
keep the full load but the washing results can be unsatisfactory. Recommended load: cotton: 2.75 kg, syn-
thetics and delicates: 1.5 kg.
8

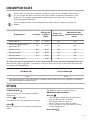
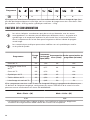
CONSUMPTION VALUES
Stated values are obtained in laboratory conditions with relevant standards. Different cau-
ses can change the data: the quantity and type of laundry and ambient temperature. Wa-
ter pressure, the supply voltage and the temperature of inlet water may also affect the
washing programme duration.
Technical specifications may be changed without prior notice to improve the quality of
product.
Programmes Load (kg)
Energy con-
sumption
(kWh)
Water con-
sumption (litre)
Approximate pro-
gramme duration (mi-
nutes)
Cottons 60°C 5.5 1,20 55 150
Cotton Energy Saving Pro-
gramme 60°C
1)
5.5 0,77 44 224
Cottons 40°C 5.5 0,70 55 120
Synthetics 40°C 2.5 0,55 45 103
Delicates 40°C 2.5 0,50 45 80
Wool/Handwash 30°C 1 0,35 50 70
1) «Cotton Energy Saving programme » at 60°C with a load of 5.5 kg is the reference programme for the
data entered in the energy label, in compliance with EU Commission Directive 95/12/EC and measured
according to EN 60456/2005.
Off Mode (W) Left On Mode (W)
0,48 0,48
The information given in the chart above is compliant with the EU Commission regulation 1015/2010
implementing directive 2009/125/EC .
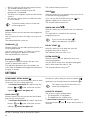
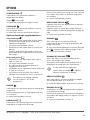
OPTIONS
TEMPERATURE
With this option you can change the default
temperature.
Indicator
= cold water.
The indicator of the set temperature comes on.
SPIN
With this option you can change the default spin
speed.
The indicator of the set speed comes on.
Additional spin options:
No Spin
• Set this option to deactivate all spin phases.
Only the drain phase is available.
• The related indicator comes on.
• Set this option for very delicate fabrics.
• The rinses phase uses more water for some
washing programmes.
Rinse Hold
9

• Set this option to prevent the laundry creases.
• The related indicator comes on.
• There is a water in the drum when the
programme is completed.
• The drum turns regularly to prevent the laundry
creases.
• The lid stays locked. You must drain the water
to unlock the lid.
To drain the water refer to ‘At the end
of the programme’.
QUICK
With this option you can decrease the programme
duration.
Use this option for items with light soil or items to
refresh.
The related indicator comes on.
PREWASH
With this option you can add a prewash phase to a
washing programme.
Use this option for heavy soil. When you set this
option the programme duration increases.
The related indicator comes on.
EASY IRON
The appliance carefully washes and spins the
laundry to prevent the creases.
The appliance decreases the spin speed, uses
more water and adapts the programme duration to
the type of laundry.
The related indicator comes on.
RINSE
With this option you can perform only a last rinse of
a selected washing programme.
If you set also the Extra Rinse function (
) the
appliance adds two or more rinses.
The related indicator comes on.
DRAIN AND SPIN
With this option you can perform the spin and drain
cycle.
This spin phase is suitable to the washing
programme you set.
If you set also the No Spin ( )
option, the appliance only drains.
DELAY START
With this option you can delay the start of a
programme by 9, 6 or 3 hours.
The indicator of the set value is on.
EXTRA RINSE
With this option you can add some rinses to a
washing programme.
Use this option for persons allergic to detergents
and in areas where the water is soft.
The related indicator comes on.
1)
SETTINGS
PERMANENT EXTRA RINSE
With this option you can permanently have an extra
rinse when you set a new programme.
• To activate/deactivate this option touch the
buttons
and at the same time until the
indicator comes on/goes off.
CHILD LOCK
With this option you can prevent that the children
play with the control panel.
• To activate/deactivate this option, touch the
buttons and at the same time until the
indicator comes on/goes off.
Activate this option after you touch the button
:
the buttons are locked (except for the button ) .
This option stays active even when you
switch off the appliance.
ACOUSTIC SIGNALS
The acoustic signals operate when:
• The programme is completed.
• The appliance has a malfunction.
To deactivate/activate the acoustic signals,
touch the buttons and at the same time for 4
seconds.
1) See in "Settings" how to activate this option.
10

If you deactivate the acoustic signals,
they continue operate when the
appliance has a malfunction.
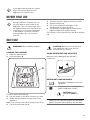
BEFORE FIRST USE
During installation or before first use
you may observe some water in the
appliance. This is residual water left in
the appliance after a full functional test
in the factory to ensure the appliance
is delivered to customers in perfect
working order and is no cause for
concern.
1. Connect the mains plug to the mains socket.
2. Open the water tap.
3. Put a small quantity of detergent in the
compartment for washing phase.
4. Set and start a programme for cotton at the
highest temperature without laundry.
This removes all possible dirt from the drum and the
tub.
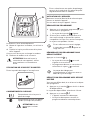
DAILY USE
WARNING! Refer to Safety chapters.
LOADING THE LAUNDRY
1. Open the appliance lid.
2. Push the button A.
A
The drum opens automatically.
3. Put the laundry in the drum, one item at a time.
4. Shake the items before you put them in the
appliance.
Make sure not to put too much laundry in the drum.
5. Close the drum and the lid.
CAUTION! Before you close the lid of
your appliance, make sure that you
close the drum correctly.
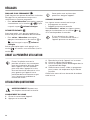
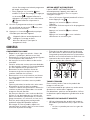
USING DETERGENT AND ADDITIVES
Measure out the detergent and the fabric
conditioner.
DETERGENT COMPARTMENTS
Detergent compartment for wash-
ing phase.
Compartment for liquid additives
(fabric conditioner, starch).
CAUTION! Do not
exceed the MAX lev-
el.
When you set a prewash option, put the deter-
gent for prewash phase directly into the drum.
11

ACTIVATING THE APPLIANCE
Press and hold the On/Off button to activate or
deactivate the appliance.
A tune sounds when the appliance is activated.
SETTING A PROGRAMME
1. Touch the programme button and set the
programme:
• The indicator of the button flashes
slowly.
2. If necessary, change the temperature and the
spin speed or add available options. When you
activate an option, the indicator of the set
option comes on.
If you set something incorrect, the
indicator of the button flashes red
three times.
STARTING A PROGRAMME WITHOUT THE
DELAY START
Touch the button .
• The indicator of the button stops to
flash and stays on.
• The programme starts, the lid locks, the
indicator is on.
The drain pump can operate for a
short time at the beginning of the
washing cycle.
STARTING A PROGRAMME WITH THE DELAY
START
The start of the programme can be delayed by 9, 6
or 3 hours.
1. Touch the button
to choose the delay you
want to set.
The indicator of the selected delay is on.
2. Touch the button :
• The appliance starts the countdown.
• When the countdown is completed, the
programme starts automatically.
You can cancel or change the set of
the delay start before you touch the
button . After touching the button
you can only cancel the delay.
To cancel the delay start:
1. Touch the button
to set the appliance to
pause.
2. Touch the button until the indicator of the
set delay goes off.
Touch the button again to start the
programme immediately.
INTERRUPTING A PROGRAMME AND
CHANGING THE OPTIONS
You can change only some options before they
operate.
1. Touch .
The indicator of this button flashes.
2. Change the options.
3. Touch again.
The programme continues.
CANCELLING A PROGRAMME
1. Press the button for some seconds to
cancel the programme and to deactivate the
appliance.
2. Press the same button again to activate the
appliance. Now, you can set a new washing
programme.
Before starting the new programme
the appliance could drain the water. In
this case, make sure that the detergent
is still in the detergent compartment, if
not fill the detergent again.
OPENING THE LID
While a programme or the delay start operates, the
appliance lid is locked. The indicator is on.
CAUTION! If the temperature and
level of the water in the drum are too
high, you cannot open the lid.
Open the lid during the first 10 minutes of the
cycle and when the delay start operates:
1. Press the to pause the appliance.
2. Wait until the lid lock indicator goes off.
3. You can open the lid.
4. Close the lid and press the again. The
programme (or the delay start) continues.
Open the lid when the programme operates:
1. Turn the programme knob to position On/Off to
deactivate the appliance.
2. Wait for some minutes and then open the
appliance lid.
12

3. Close the lid and set the programme again.
AT THE END OF THE PROGRAMME
• The appliance stops automatically.
• The acoustic signal operates (if it is activated).
• The indicator of the button goes off.
• The lid lock indicator blinks (when the lid is
unlocking) and then goes off.
• You can open the lid.
• Remove the laundry from the appliance. Make
sure that the drum is empty.
• Press the button for some seconds to
deactivate the appliance.
• Close the water tap.
• Keep the lid ajar, to prevent the mildew and
odours.
The washing programme is completed, but
there is water in the drum:
• The drum turns regularly to prevent the creases
in the laundry.
• The indicator flashes to remind you to drain
the water.
• The lid lock indicator is on. The indicator of
button flashes. The lid stays locked.
• You must drain the water to open the lid.
Draining the water:
1. To drain the water.
• Touch the button . The appliance
drains the water and spins with the
maximum spin speed for selected washing
programme.
• Alternatively, touch the button
to change
the spin speed and then touch the button
. The appliance drains the water and
spins. If you set , the appliance only
drains.
2. When the programme is completed and after a
couple of minutes the lid lock indicator
goes off, you can open the lid.
3. Press the button for some seconds to
deactivate the appliance.
The appliance drains and spins
automatically after approximately 18
hours (except for Wool programme).
AUTO-OFF OPTION
The AUTO-OFF stand-by option automatically
deactivates the appliance to decrease the energy
consumption. All the indicators go off when :
• You do not use the appliance for 5 minutes
before you touch .
Press the button to activate the appliance
again.
• After 5 minutes from the end of the washing
programme.
Press the button to activate the appliance
again.
Touch the button
if you want to set a new
cycle.
HINTS AND TIPS
THE LAUNDRY LOAD
• Divide the laundry in: white, coloured,
synthetics, delicates and wool.
• Obey the washing instructions that are on the
laundry care labels.
• Do not wash white and coloured items together.
• Some coloured items can discolour with the first
wash. We recommend that you wash them
separately for the first times.
• Button up pillowcases, close zippers, hooks and
poppers. Tie up belts.
• Turn multilayered fabrics, wool and items with
painted illustrations inside out.
• Remove hard stains with a special detergent.
• Wash and pre-treat heavy soil stains before
putting items in drum
• Be careful with the curtains. Remove the hooks
and put the curtains in a washing bag or
pillowcase.
• Do not wash laundry without hems or with cuts.
Use a washing bag to wash small and/or
delicate items (e.g. underwired bras, belts,
tights, etc. ).
• A very small load can cause balance problems
with the spin phase. If this occurs, adjust
manually the items in the tub and start the spin
phase again.
• Avoid washing garments full of long animal hair
or poor quality garments releasing lots of fluff
that could block the drain circuit and therefore
requiring the Service assistance.
• Empty the pockets and unfold the items.
13

STUBBORN STAINS
For some stains, water and detergent is not
sufficient.
We recommend that you pre-treat these stains
before you put the items in the appliance.
Special stain removers are available. Use the
special stain remover that is applicable to the type
of stain and fabric.
DETERGENTS AND ADDITIVES
• Only use detergents and additives specially
made for washing machines:
– powder detergents for all types of fabric,
– powder detergents for delicate fabrics (40
°C max) and woollens,
– liquid detergents, preferably for low
temperature wash programmes (60 °C max)
for all types of fabric, or special for woollens
only.
• Do not mix different types of detergents.
• To help the environment, do not use more than
the correct quantity of detergent.
• Obey the instructions that you find on the on
packaging of these products.
• Use the correct products for the type and colour
of the fabric, the programme temperature and
the level of soil.
• If your appliance does not have the detergent
dispenser with the flap device, add the liquid
detergents with a dosing ball (supplied by the
detergent's manufacturer).
ECOLOGICAL HINTS
• Set a programme without the prewash phase to
wash laundry with normal soil.
• Always start a washing programme with the
maximum load of laundry allowed.
• If necessary, use a stain remover when you set a
programme with a low temperature.
• To use the correct quantity of detergent, check
the water hardness of your domestic system.
Refer to "Water hardness".
WATER HARDNESS
If the water hardness in your area is high or
moderate, we recommend that you use a water
softener for washing machines. In areas where the
water hardness is soft it is not necessary to use a
water softener.
To know the water hardness in your area, contact
your local water authority.
Use the correct quantity of the water softener.
Obey the instructions that you find on the
packaging of the product.
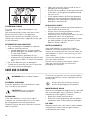
CARE AND CLEANING
WARNING! Refer to Safety chapters.
EXTERNAL CLEANING
Clean the appliance with soap and warm water
only. Fully dry all the surfaces.
CAUTION! Do not use alcohol,
solvents or chemical products.
DESCALING
If the water hardness in your area is high or
moderate, we recommend that you use a water
descaling product for washing machines.
Regularly examine the drum to prevent limescale
and rust particles.
To remove rust particles use only special products
for washing machines. Do this separately from the
laundry wash.
Always obey the instructions that you
find on the packaging of the product.
MAINTENANCE WASH
With the low temperature programmes it is possible
that some detergent stays in the drum. Perform a
maintenance wash regularly. To do this:
• Remove all laundry from the drum.
• Select the cotton programme with the highest
temperature with a small quantity of detergent.
LID SEAL
Regularly examine the seal. Clean it when needed,
using ammonia cream cleanser agent without
scratching the seal surface,
14

Always obey the instructions that you
find on the packaging of the product.
FROST PRECAUTIONS
If the appliance is installed in an area where the
temperature can be less than 0°C, remove the
remaining water from the inlet hose and the drain
pump.
Do this procedure also when you want
to do the emergency drain.
1. Close the water tap.
2. Remove the water inlet hose.
3. Remove the drain hose from the rear support
and unhook it from sink or spigot.
4. Put the ends of each drain and inlet hose in a
container. Let the water flow out of the hoses.
5. Set the Drain programme and let it operate until
the end of the cycle.
6. Turn the programme knob to position On/Off to
deactivate the appliance.
7. Disconnect the appliance from the mains
socket.
WARNING! Make sure that the
temperature is more than 0°C before
you use the appliance again. The
manufacturer is not responsible for
damages caused by low temperatures.
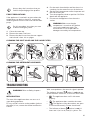
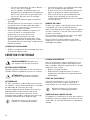
CLEANING THE INLET HOSE AND THE VALVE FILTER
1
2
3
1 2 3
90˚
4
CLEANING THE DETERGENT DISPENSER
1
2
1 2 3 4
TROUBLESHOOTING
WARNING! Refer to Safety chapters.
INTRODUCTION
The start of the appliance does not occur or it
stops during operation.
First try to find a solution to the problem (refer to
the table). If not, contact the Authorised Service
Centre.
With some problems, the acoustic signals operate.
The indicator of button flashes in red and one
of the indicators comes on, to show an alarm code:
•
- The appliance does not fill with water
properly.
• - The appliance does not drain the water.
• - The appliance lid or drum doors are open
or not closed correctly. Please check both!
• The indicator of button flashes in red 11
times and 1 (or 2 or 3) time(s) in yellow: The
15

mains supply is unstable. Wait until the mains
supply is stable.
WARNING! Deactivate the appliance
before you do the checks.
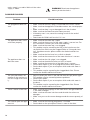
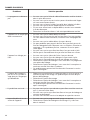
POSSIBLE FAILURES
Problem Possible solution
The programme does not
start.
• Make sure that the mains plug is connected to the mains socket.
• Make sure that the appliance lid and drum doors are closed proper-
ly.
• Make sure that there is not a damaged fuse in the fuse box.
• Make sure that the Start/Pause has been pressed.
• If the delay start is set, cancel the setting or wait for the end of
countdown.
• Deactivate the Child Lock function if it is on.
The appliance does not fill
with water properly.
• Make sure that the water tap is open.
• Make sure that the pressure of the water supply is not too low. For
this information, contact your local water authority.
• Make sure that the water tap is not clogged.
• This problem may be caused by the filter of the inlet hose or the
valve drain filter which may be clogged. Refer to “Care and clean-
ing”. If problem remains please contact the Authorised Service
Centre.
• Make sure that the inlet hose has no kinks or bends.
• Make sure that the connection of the water inlet hose is correct.
The appliance does not
drain the water.
• Make sure that the sink spigot is not clogged.
• Make sure that the drain hose has no kinks or bends.
• Make sure that the connection of the drain hose is correct.
• Set the drain option if you set a programme without drain phase.
• Set the drain option if you set an option which ends with water in
the drum.
• This problem may be caused by the clogged drain filter. Please
contact the Authorised Service Centre.
The spin phase does not
operate or the washing cy-
cle lasts longer than usual-
ly.
• Adjust manually the items in the tub and start the spin phase again.
This problem may be caused by balance problems.
• Set the spin option.
• Set the drain option if you set an option which ends with water in
the drum.
• This problem may be caused by the clogged drain filter. Please
contact the Authorised Service Centre.
There is water on the floor. • Make sure that the couplings of the water hoses are tight and there
is not water leakages.
• Make sure that the water inlet hose and the drain hose have no
damages.
• Make sure you use the correct detergent and the correct quantity of
it.
You cannot open the appli-
ance lid.
• Make sure that the washing programme is finished.
• Set the drain or the spin option if there is water in the drum.
16

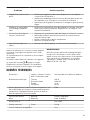
Problem Possible solution
The appliance makes an
unusual noise.
• Make sure the levelling of the appliance is correct. Refer to 'Installa-
tion instruction'.
• Make sure that the packaging and/or the transit bolts are removed.
Refer to 'Installation instruction'.
• Add more laundry in the drum. The load may be too small.
The appliance fills with wa-
ter and drain immediately.
• Make sure that the drain hose is in the correct position. The end of
the hose may be too low. Refer to 'Installation instruction'.
The washing results are
not satisfactory.
• Increase the detergent quantity or use a different detergent.
• Use special products to remove the stubborn stains before you
wash the laundry.
• Make sure that you set the correct temperature.
• Decrease the laundry load.
You cannot set an option. • Make sure that you press only the wanted touch button(s).
After the check, activate the appliance. The
programme continues from the point of interruption.
If the problem occurs again, contact the Authorised
Service Centre.
If the appliance shows other alarm codes (the
indicator of button
flashes in red). Deactivate
and activate the appliance. If the problem
continues, contact the Authorised Service Centre.
SERVICE
We recommend the use of original spare parts.
When contacting the Authorised Service Centre,
make sure that these data are available. You can
find the information on the rating plate: model, PNC
and Serial Number. (Mod., Prod. No., Ser. No.)
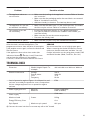
TECHNICAL DATA
Dimension Width/ Height/ Depth/ To-
tal depth
400 mm/ 890 mm/ 600 mm/ 600 mm
Electrical connection Voltage
Overall power
Fuse
Frequency
230 V
2200 W
10 A
50 Hz
Level of protection against ingress of solid particles and
moisture ensured by the protective cover, except where
the low voltage equipment has no protection against
moisture
IPX4
Water supply pressure Minimum
Maximum
0.5 bar (0.05 MPa)
8 bar (0.8 MPa)
Water supply
1) Cold water
Maximum Load Cotton 5.5 kg
Energy Efficiency Class A++
Spin Speed Maximum spin speed 951 rpm
1) Connect the water inlet hose to a water tap with a 3/4'' thread.
17

ENVIRONMENTAL CONCERNS
Recycle materials with the symbol . Put the
packaging in relevant containers to recycle it. Help
protect the environment and human health by
recycling waste of electrical and electronic
appliances. Do not dispose of appliances marked
with the symbol with the household waste.
Return the product to your local recycling facility or
contact your municipal office.
18

INFORMATIONS DE SÉCURITÉ
Avant d'installer et d'utiliser cet appareil, lisez soigneusement les
instructions fournies. Le fabricant ne pourra être tenu pour
responsable des blessures et dégâts résultant d'une mauvaise
installation ou utilisation. Conservez toujours les instructions dans
un lieu sûr et accessible pour vous y référer ultérieurement.
SÉCURITÉ DES ENFANTS ET DES PERSONNES
VULNÉRABLES
• Cet appareil peut être utilisé par des enfants de plus de 8 ans,
ainsi que des personnes dont les capacités physiques,
sensorielles et mentales sont réduites ou dont les
connaissances et l'expérience sont insuffisantes, à condition
d'être surveillés ou d'avoir reçu des instructions concernant
l'utilisation sécurisée de l'appareil et de comprendre les risques
encourus.
• Les enfants entre 3 et 8 ans et les personnes ayant un
handicap très important et complexe doivent être tenus à
l'écart, à moins d'être surveillés en permanence.
• Les enfants de moins de 3 ans doivent être tenus à l'écart, à
moins d'être surveillés en permanence.
• Ne laissez pas les enfants jouer avec l'appareil.
• Ne laissez pas les emballages à la portée des enfants et jetez-
les convenablement.
• Ne laissez pas les détergents à la portée des enfants.
• Tenez les enfants et les animaux éloignés de l'appareil lorsque
la porte est ouverte.
• Si l'appareil est équipé d'un dispositif de sécurité enfants, nous
vous recommandons de l'activer.
• Les enfants ne doivent pas nettoyer ni entreprendre une
opération de maintenance sur l'appareil sans surveillance.
SÉCURITÉ GÉNÉRALE
• Ne modifiez pas les caractéristiques de cet appareil.
• Cet appareil est conçu uniquement pour un usage domestique
et des situations telles que :
19

– dans des cuisines réservées aux employés dans des
magasins, bureaux et autres lieux de travail ;
– pour une utilisation privée, par les clients, dans des hôtels et
autres lieux de séjour ;
– dans les parties communes d'immeubles d'appartements, ou
dans les laveries automatiques.
• Respectez la charge maximale de 5.5 kg (reportez-vous au
chapitre « Tableau des programmes »).
• La pression de l'eau en service au niveau du point d'entrée en
provenance de l'arrivée d'eau doit être comprise entre 0,5 bar
(0,05 MPa) et 8 bar (0,8 MPa).
• Les orifices d'aération situés à la base ne doivent pas être
obstrués par de la moquette, un tapis, ou tout type de
revêtement de sol.
• L'appareil doit être raccordé à l'arrivée d'eau à l'aide des tuyaux
neufs fournis, ou d'autres tuyaux neufs fournis par le service
après-vente agréé.
• Il convient de ne pas réutiliser des ensembles de raccordement
usagés.
• Si le câble d'alimentation est endommagé, il doit être remplacé
par le fabricant, un service de maintenance agréé ou un
technicien qualifié afin d'éviter tout danger lié à l'électricité.
• Avant toute opération d'entretien, éteignez l'appareil et
débranchez la fiche de la prise secteur.
• Ne pulvérisez pas d'eau ni de vapeur à haute pression pour
nettoyer l'appareil.
• Nettoyez l'appareil avec un chiffon humide. Utilisez uniquement
des produits de lavage neutres. N'utilisez pas de produits
abrasifs, de tampons à récurer, de solvants ni d'objets
métalliques.
CONSIGNES DE SÉCURITÉ
INSTALLATION
L'installation doit être confirme aux
réglementations nationales en vigueur.
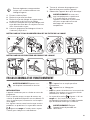
• Retirez l'intégralité de l'emballage et les boulons
de transport, y compris le joint en caoutchouc et
l'entretoise en plastique.
• Conservez les boulons de transport en lieu sûr.
Si l'appareil doit être de nouveau déplacé, les
boulons doivent être réutilisés pour maintenir le
tambour en place et éviter tout dégât interne.
20
La page est en cours de chargement...
La page est en cours de chargement...
La page est en cours de chargement...
La page est en cours de chargement...
La page est en cours de chargement...
La page est en cours de chargement...
La page est en cours de chargement...
La page est en cours de chargement...
La page est en cours de chargement...
La page est en cours de chargement...
La page est en cours de chargement...
La page est en cours de chargement...
La page est en cours de chargement...
La page est en cours de chargement...
La page est en cours de chargement...
La page est en cours de chargement...
La page est en cours de chargement...
La page est en cours de chargement...
La page est en cours de chargement...
La page est en cours de chargement...
-
 1
1
-
 2
2
-
 3
3
-
 4
4
-
 5
5
-
 6
6
-
 7
7
-
 8
8
-
 9
9
-
 10
10
-
 11
11
-
 12
12
-
 13
13
-
 14
14
-
 15
15
-
 16
16
-
 17
17
-
 18
18
-
 19
19
-
 20
20
-
 21
21
-
 22
22
-
 23
23
-
 24
24
-
 25
25
-
 26
26
-
 27
27
-
 28
28
-
 29
29
-
 30
30
-
 31
31
-
 32
32
-
 33
33
-
 34
34
-
 35
35
-
 36
36
-
 37
37
-
 38
38
-
 39
39
-
 40
40


Zanussi ZWY51024CI Manuel utilisateur
- Catégorie
- Machines à laver
- Taper
- Manuel utilisateur
dans d''autres langues
- English: Zanussi ZWY51024CI User manual