
Agras T25
Quick Start Guide
v1.0 2022.12
Aircraft
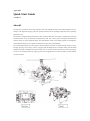
The Agras T25 aircraft has a truss-style body that comes with pitched arms that can be folded, making it easier to
transport. The integrated spraying system can quickly transform into the spreading configuration with a spreading
payload of 25 kg.
The aircraft is equipped with the phased array radar system and binocular vision system, including downward and
forward binocular vision, forward and rear phased array radar. The systems provide 360-degree omnidirectional
obstacle sensing to ensure operational safety. The ultra HD FPV camera with a tiltable gimbal can automatically
collect HD field images for local offline reconstruction to assist precise field planning.
The Coaxial Dual Propeller structure brings a strong wind field. Pesticides can penetrate thick canopies to allow
thorough spraying. The spraying system is equipped with the Magnetic Drive Impeller Pump, Dual Atomized
Sprinkler, Anti-Drip Centrifugal Valve and solenoid valve, to ensure more efficient and precise pesticide spraying,
as well as save liquid pesticide. The spraying system can be upgraded with two more sprinklers to meet different
operation scenarios.

Using the T25
Preparing the Intelligent Flight Battery
Only use official DJI flight batteries. Check the battery level before flying and charge according to the corresponding
manual document.
Preparing the Aircraft
1. Propellers
2. Motors
3. ESCs
4. Aircraft Front Indicators (on two front
arms)
5. Frame Arms
6. Folding Detection Sensors (built-in)
7. Spray Lance
8. Sprinklers
9. Spread Tank
10. Delivery Pumps
11. FPV PTZ camera
12. Downward Binocular Vision
13. Forward Binocular Vision
14. Spotlights
15. Forward Phased Array Radar
16. Rear Phased Array Radar
17. Landing Gear
18. Intelligent Flight Battery
19. Onboard D-RTKTM Antennas
20. Internal OCUSYNCTM Image Transmission Antennas
21. External OcuSync Image Transmission Antennas
22. Aircraft Status Indicators (on two rear arms)

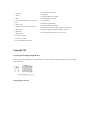
Unfold the M3 and M4 arms, and fasten the two arm locks. Avoid pinching fingers.
Unfold the M1 and M2 arms, and fasten the two arm locks. Avoid pinching fingers.
Unfold the propeller blades.
Insert the Intelligent Flight Battery into the aircraft until you hear a click.
Make sure that the battery is firmly inserted into the aircraft. Only insert or remove the battery when
the aircraft is powered off.
To remove the battery, press and hold the clamp and lift the battery up.
Fold the M1 and M2 arms followed by the M3 and M4 arms. Otherwise, the arms may be damaged.
Getting Ready for Takeoff
A. Place the aircraft on open, flat ground with the rear of the aircraft facing toward you.
B. Make sure that the propellers are securely mounted, there are no foreign objects in or on the motors and propellers,
the propeller blades and arms are unfolded, and the arm locks are firmly fastened.
C. Make sure that the spray tank and flight battery are firmly in place.
E. Power on the remote controller, make sure that the DJI Agras app is open, and power on the aircraft. Tap Start in
the home screen of the app to enter Operation View. Make sure that the GNSS signals are strong and the screen
shows Ready to GO (GNSS) or Ready to GO (RTK). Otherwise, the aircraft cannot take off.
RTK positioning is recommended. In the app, go to Operation View, tap > RTK, and select a
method for receiving RTK signals.
Calibrating the Flow Meter
Make sure to calibrate the flow meter in the following situations:
Change liquid payload with different viscosity.
The difference between the actual area and planned area is more than 15% after the first operation.
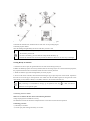
Calibrating procedure
A. Get Ready to Calibrate
① Fill the spray tank with approximately 2 L of water.

② Press the Spray button to start or stop spraying manually in order to exhaust air.
B. Calibrating the flow meter
① In the app, go to Operation View, tap > , then tap Calibration on the right of the flow meter calibration
section.
② Tap Start Calibration and calibration will start automatically. The result of the calibration will be displayed in
the app when completed.
● After calibrating successfully, users can proceed with the operation.
● If calibration fails, tap the reminder to view and resolve the problem. Afterwards, recalibrate and wait for
successful calibration.
Flight
In order for the aircraft to automatically take off and perform an operation, it is recommended to creat a plan for a
field and select an operation before takeoff. Refer to the Starting Operations section for more information. For other
scenarios, take off and land manually as follows.
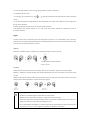
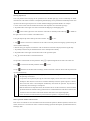
Takeoff
Perform a Combination Stick Command (CSC) and push the throttle stick up to take off.
Landing
Push the throttle stick down until the aircraft lands. There are two methods to stop the motors after landing.
Method 1: When the aircraft has landed, push and hold the throttle stick down. The motors will stop after three
seconds.
Method 2: When the aircraft has landed, push the throttle stick down, and perform the same CSC that was used to
start the motors. Release both sticks once the motors have stopped.
Spinning propellers can be dangerous. Stay away from spinning propellers and motors. DO NOT start
the motors in confined spaced or where there are people nearby.
Maintain control of the remote controller as long as the motors are running.
DO NOT stop the motors mid-flight. Otherwise, the aircraft will be crashed. Stop the motors only in an
emergency situation to reduce the risk of damage or injury.
It is recommended to use Method 1 to stop the motors. When using the Method 2 to stop the motors, the
aircraft may roll over if it is not completely grounded. Use Method 2 with caution.
O
R
Throttle Stick (left stick in Mode 2)

After landing, power off the aircraft before turning off the remote controller.
Starting Operations
Users can perform aerial surveying for the operation area in the DJI Agras app, receive an HD map via offline
reconstruction in the remote controller. Field planning and identifying can be performed on the HD map before route
operation. The following descriptions use Crosshair and Route Mapping and Route Mode as an example.
1. Power on the remote controller and then the aircraft. Enter Operation View in the DJI Agras app.
2. Tap Mode button on the upper left corner and select Route Mapping in the Mapping panel.
3. Tap on the bottom right of the sreen and select Area Route or Boundary Route.Then tap in middle of
the right screen to select Crosshair in the Add Point list.
4. Drag the map and tap Add to add a point at the crosshairs. Tap to save.
5. Tap and move the slider to launch the aircraft. The aircraft will perform the mapping operation along the
route and land automatically.
6. Wait for the app to complete reconstruction. The reconstruction result will be displayed on the original map.
7. Tap Identify Field, then tap an identified field to select it and adjust the boundary.
8. Tap Mode button on the upper left and select Route in the Agriculture panel.
9. Tap on the left and select a field in the field list.
10. Tap Edit to edit field and set route parameters. Drag to adjust the flight direction of the route. Then save.
11. Tap to use the field. Set task parameters and tap to save.
12. Tap , check the aircraft status and task settings, and move the slider to take off. The aircraft will perform the
operation automatically.
Only take off in open areas and set an appropriate Connection Routing and RTH Altitude according to
the operating environment.
An operation can be paused by moving the control stick slightly. The aircraft will hover and record the
breakpoint. After that, the aircraft can be controlled manually. Select the operation again to continue.
The aircraft will return to the breakpoint automatically and resume the operation. Pay attention to
aircraft safety when returning to a breakpoint.
In Route and Fruit Tree Operation modes, the aircraft is able to circumvent obstacles, which is disabled
by default and can be enabled in the app. If the function is enabled and the aircraft detects obstacles, the
aircraft will slow down and circumvent the obstacles and return to the original flight path.
Users can set the action the aircraft will perform after the operation is completed in the app.
More Operation Modes and Functions
Refer to the user manual for more information about the A-B Route Operation, Manual Operation, and Fruit Tree
modes, and on how to use functions such as Connection Routing, Operation Resumption, System Data Protection,
and Empty Tank.

Specifications
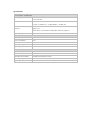
Aircraft (Model: 3WWDZ-20B)
Operating Frequency
2.4000-2.4835 GHz
5.725-5.850 GHz
Transmitter Power (EIRP)
2.4 GHz: <33 dBm (FCC), <20 dBm (CE/SRRC/MIC)
5.8 GHz: <33 dBm (FCC), <23 dBm (SRRC), <14 dBm (CE)
RTK/GNSS Operating
Frequency
RTK: GPS L1/L2, GLONASS F1/F2, BeiDou B1I/B2I/B3I, Galileo E1/E5b,
QZSS L1/L2
GNSS: GPS L1, GLONASS F1, BeiDou B1I, Galileo E1, QZSS L1
Operating Temperature
0° to 45° C (32° to 113° F)
Forward Phased Array Radar (Model: RD241608RF)
Operating Frequency
24.05-24.25 GHz (NCC/FCC/MIC/KC/CE)
Power Consumption
23 W
Transmitter Power (EIRP)
<20 dBm (NCC/MIC/KC/CE/FCC)
Operating Voltage
DC 15 V
Operating Temperature
0° to 45° C (32° to 113° F)
Rear Phased Array Radar (Model: RD241608RB)
Operating Frequency
24.05-24.25 GHz (NCC/FCC/MIC/KC/CE)
Power Consumption
18 W
Transmitter Power (EIRP)
<20 dBm (NCC/MIC/KC/CE/FCC)
Operating Voltage
DC 15 V
Operating Temperature
0° to 45° C (32° to 113° F)

Compliance Information
FCC Statement:
Please take attention that changes or modification not expressly approved by the party responsible
for compliance could void the user’s authority to operate the equipment.
This device complies with Part 15 of the FCC Rules. Operation is subject to the following two
conditions:
(1) This device may not cause harmful interference, and
(2) This device must accept any interference received, including interference that may cause
undesired operation.
ISED Statement:
This device complies with Industry Canada licence-exempt RSS standard(s). Operation is subject
to the following two conditions:
(1) this device may not cause interference, and
(2) this device must accept any interference, including interference that may cause undesired
operation of the device.
Le présent appareil est conforme aux CNR d'Industrie Canada applicables aux appareils
radioexempts de licence. L'exploitation est autorisée aux deux conditions suivantes :
(1) l'appareil ne doit pas produire de brouillage, et
(2) l'utilisateur de l'appareil doit accepter tout brouillage radioélectrique subi, même si le
brouillage est susceptible d'en compromettre le fonctionnement.
This equipment complies with FCC& RSS-102 radiation exposure limits set forth for an
uncontrolled environment. This equipment should be installed and operated with minimum
distance 20cm between the radiator & your body.
ce matériel est conforme aux limites de dose d'exposition aux rayonnements, FCC / CNR-102
énoncée dans un autre environnement.cette eqipment devrait être installé et exploité avec distance
minimale de 20 entre le radiateur et votre corps.
EU Compliance Statement: SZ DJI TECHNOLOGY CO., LTD. hereby declares that this
device(RD241608RF /RD241608RB) is in compliance with the essential requirements and other
relevant provisions of the Directive 2014/53/EU.
A copy of the EU Declaration of Conformity is available online at www.dji.com/euro-compliance
EU contact address: DJI GmbH, Industriestrasse 12, 97618, Niederlauer, Germany
-
 1
1
-
 2
2
-
 3
3
-
 4
4
-
 5
5
-
 6
6
-
 7
7


dans d''autres langues
- English: dji Agras T25 User guide
Documents connexes
-
dji Agras T10 Mode d'emploi
-
-
dji Pilot Guide de démarrage rapide
-
-
dji AGRAS T20 Agriculture Spray Drone Manuel utilisateur
-
-
dji P4 Multispectral Guide de démarrage rapide
-
dji Assistant 2 (Enterprise Series) Mode d'emploi