
B59-2109-00/00 (E)© 2012 JVC KENWOOD Corporation
DNX9210BT
GPS NAVIGATION SYSTEM
Quick Start Guide
SYSTÈME DE NAVIGATION GPS
Guide de démarrage rapide
GPS NAVIGATION SYSTEM
Quick-Start-Anleitung
GPS-NAVIGATIESYSTEEM
Beknopte handleiding

EN 2
Quick Start Guide
About The Quick Start Guide
This Quick Start Guide explains
the basic functions of this unit. For
functions not covered in this guide,
refer to the Instruction Manual (PDF
file) contained in the included CD-
ROM “Instruction Manual”.
To refer to the Instruction Manual
contained in the CD-ROM, a PC
loaded with Microsoft® Windows XP/
Vista/7 or Mac OS X® 10.4 or later
is required in addition to Adobe®
Reader
™ 7.1 or Adobe® Acrobat® 7.1
or later.
The Instruction Manual is subject
to change for modification of
specifications and so forth. You can
download the latest version of the
Instruction Manual from http://
manual.kenwood.com/edition/
im352.
NOTE
t5IFQBOFMTTIPXOJOUIJTHVJEFBSF
FYBNQMFTVTFEUPQSPWJEFDMFBS
FYQMBOBUJPOTPGUIFPQFSBUJPOT'PSUIJT
SFBTPOUIFZNBZCFEJGGFSFOUGSPNUIF
BDUVBMQBOFMT
t*OPQFSBUJPOQSPDFEVSFTCSBDLFUTIBQF
JOEJDBUFTUIFLFZPSCVUUPOZPVTIPVME
DPOUSPM
JOEJDBUFTUIFOBNFPGQBOFMCVUUPOT
<>JOEJDBUFTUIFOBNFPGUPVDILFZT
Contents
Precautions 3
2WARNING _______________________ 3
Cleaning The Unit ___________________ 4
How To Reset Your Unit ______________ 4
Safety Precautions and Important
Information 5
2WARNINGS ______________________ 5
2CAUTIONS _______________________ 5
IMPORTANT INFORMATION ___________ 5
First Step 6
Basic Operations 8
Functions Of The Buttons
On The Front Panel ________________ 8
Common Operations ________________ 10
Detaching The Front Panel ____________ 11
How To Use The Navigation System
12
Other Features _____________________ 14
How To Play Music 15
How To Play Movie/Picture 17
How To Listen To The Radio 18
How To Make A Phone Call 19
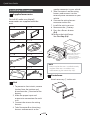
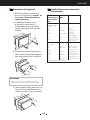
Installation Procedure 21
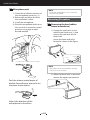
Before Installation __________________ 21
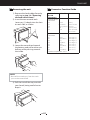
Installation Procedure _______________ 22
Removing Procedure ________________ 24
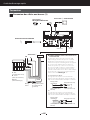
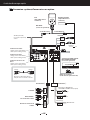
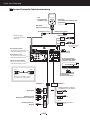
Connection ________________________ 26
About This Unit _____________________ 29

EN 3
DNX9210BT
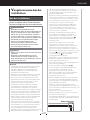
Precautions
2WARNING
To prevent injury or fire, take
the following precautions:
t5PQSFWFOUBTIPSUDJSDVJUOFWFSQVUPSMFBWF
BOZNFUBMMJDPCKFDUTTVDIBTDPJOTPSNFUBM
UPPMTJOTJEFUIFVOJU
t%POPUXBUDIPSGJYZPVSFZFTPOUIFVOJUT
EJTQMBZXIFOZPVBSFESJWJOHGPSBOZFYUFOEFE
QFSJPE
t*GZPVFYQFSJFODFQSPCMFNTEVSJOHJOTUBMMBUJPO
DPOTVMUZPVS,FOXPPEEFBMFS
Precautions on using this unit
t8IFOZPVQVSDIBTFPQUJPOBMBDDFTTPSJFTDIFDL
XJUIZPVS,FOXPPEEFBMFSUPNBLFTVSFUIBU
UIFZXPSLXJUIZPVSNPEFMBOEJOZPVSBSFB
t:PVDBOTFMFDUMBOHVBHFUPEJTQMBZNFOVT
BVEJPGJMFUBHTFUD4FFLanguage setup
(P.67)JOUIF*OTUSVDUJPO.BOVBM
t5IF3BEJP%BUB4ZTUFNPS3BEJP#SPBEDBTU%BUB
4ZTUFNGFBUVSFXPOUXPSLXIFSFUIFTFSWJDFJT
OPUTVQQPSUFECZBOZCSPBEDBTUJOHTUBUJPO
t5IFVOJUNBZOPUGVODUJPOQSPQFSMZJGUIF
DPOOFDUPSTCFUXFFOUIFVOJUBOEGBDFQMBUF
BSFEJSUZ%FUBDIUIFGBDFQMBUFBOEDMFBOUIF
DPOOFDUPSXJUIBDPUUPOTXBCHFOUMZCFJOH
DBSFGVMOPUUPEBNBHFUIFDPOOFDUPS
Protecting the monitor
5PQSPUFDUUIFNPOJUPSGSPNEBNBHFEPOPU
PQFSBUFUIFNPOJUPSVTJOHBCBMMQPJOUQFOPS
TJNJMBSUPPMXJUIUIFTIBSQUJQ
Lens fogging
8IFOZPVUVSOPOUIFDBSIFBUFSJODPME
XFBUIFSEFXPSDPOEFOTBUJPONBZGPSNPO
UIFMFOTJOUIFEJTDQMBZFSPGUIFVOJU$BMMFE
MFOTGPHHJOHUIJTDPOEFOTBUJPOPOUIFMFOT
NBZOPUBMMPXEJTDTUPQMBZ*OTVDIBTJUVBUJPO
SFNPWFUIFEJTDBOEXBJUGPSUIFDPOEFOTBUJPO
UPFWBQPSBUF*GUIFVOJUTUJMMEPFTOPUPQFSBUF
OPSNBMMZBGUFSBXIJMFDPOTVMUZPVS,FOXPPE
EFBMFS
Precautions on handling discs
t%POPUUPVDIUIFSFDPSEJOHTVSGBDFPGUIFEJTD
t%POPUTUJDLUBQFFUDPOUIFEJTDPSVTFBEJTD
XJUIUBQFTUVDLPOJU
t%POPUVTFEJTDUZQFBDDFTTPSJFT
t$MFBOGSPNUIFDFOUFSPGUIFEJTDBOENPWF
PVUXBSE
t8IFOSFNPWJOHEJTDTGSPNUIJTVOJUQVMMUIFN
PVUIPSJ[POUBMMZ
t*GUIFEJTDDFOUFSIPMFPSPVUTJEFSJNIBTCVSST
VTFUIFEJTDPOMZBGUFSSFNPWJOHUIFCVSSTXJUI
BCBMMQPJOUQFOFUD
t%JTDTUIBUBSFOPUSPVOEDBOOPUCFVTFE
tDNJODIEJTDTDBOOPUCFVTFE
t%JTDTXJUIDPMPSJOHPOUIFSFDPSEJOHTVSGBDFPS
EJTDTUIBUBSFEJSUZDBOOPUCFVTFE
t5IJTVOJUDBOPOMZQMBZUIF$%TXJUI
5IJTVOJUNBZOPUDPSSFDUMZQMBZEJTDTXIJDIEP
OPUIBWFUIFNBSL
t:PVDBOOPUQMBZBEJTDUIBUIBTOPUCFFO
GJOBMJ[FE'PSUIFGJOBMJ[BUJPOQSPDFTTTFFZPVS
XSJUJOHTPGUXBSFBOEZPVSSFDPSEFSJOTUSVDUJPO
NBOVBM

EN 4
Quick Start Guide
Acquiring GPS signal
5IFGJSTUUJNFZPVUVSOPOUIJTVOJUZPVNVTU
XBJUXIJMFUIFTZTUFNBDRVJSFTTBUFMMJUFTJHOBMT
GPSUIFGJSTUUJNF5IJTQSPDFTTDPVMEUBLFVQ
UPTFWFSBMNJOVUFT.BLFTVSFZPVSWFIJDMF
JTPVUEPPSTJOBOPQFOBSFBBXBZGSPNUBMM
CVJMEJOHTBOEUSFFTGPSGBTUFTUBDRVJTJUJPO
"GUFSUIFTZTUFNBDRVJSFTTBUFMMJUFTGPSUIFGJSTU
UJNFJUXJMMBDRVJSFTBUFMMJUFTRVJDLMZFBDIUJNF
UIFSFBGUFS
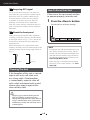
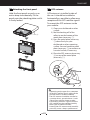
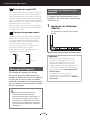
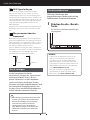
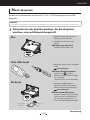
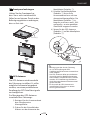
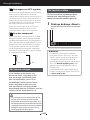
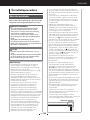
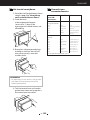
About the front panel
8IFOSFNPWJOHUIFQSPEVDUGSPNUIFCPYPS
JOTUBMMJOHJUUIFGSPOUQBOFMNBZCFQPTJUJPOFE
BUUIFBOHMFTIPXOJO'JH5IJTJTEVFUPUIF
DIBSBDUFSJTUJDTPGNFDIBOJTNUIFQSPEVDUJT
FRVJQQFEXJUI
8IFOUIFQSPEVDUJTGJSTUQPXFSFEPOXPSLT
QSPQFSMZUIFGSPOUQBOFMXJMMBVUPNBUJDBMMZNPWF
JOUPUIFQPTJUJPOJOJUJBMTFUUJOHBOHMFTIPXOJO
'JH
'JH 'JH
Cleaning The Unit
If the faceplate of this unit is stained,
wipe it with a dry soft cloth such
as a silicon cloth. If the faceplate
is stained badly, wipe the stain off
with a cloth moistened with neutral
cleaner, then wipe it again with a
clean soft dry cloth.
tApplying spray cleaner directly to the
unit may affect its mechanical parts.
Wiping the faceplate with a hard cloth or
using a volatile liquid such as thinner or
alcohol may scratch the surface or erase
screened print.
How To Reset Your Unit
If the unit or the connected unit fails
to operate properly, reset the unit.
1
Press the <Reset> button.
The unit returns to factory settings.
NOTE
t%JTDPOOFDUUIF64#EFWJDFCFGPSFQSFTTJOH
UIF3FTFUCVUUPO1SFTTJOHUIF3FTFU
CVUUPOXJUIUIF64#EFWJDFDPOOFDUFEDBO
EBNBHFUIFEBUBTUPSFEJOUIF64#EFWJDF
'PSIPXUPEJTDPOOFDUUIF64#EFWJDFTFF
How To Play Music (P.15)
t8IFOUIFVOJUJTUVSOFEPOBGUFSSFTFUUJOH
UIF*OJUJBM4&561TDSFFOBQQFBST4FF First
Step (P.6)

EN 5
DNX9210BT
3FBEUIJTJOGPSNBUJPODBSFGVMMZCFGPSFTUBSUJOHUP
PQFSBUFUIF,FOXPPE$BS/BWJHBUJPO4ZTUFNBOE
GPMMPXUIFJOTUSVDUJPOTJOUIJTNBOVBM/FJUIFS
,FOXPPEOPS(BSNJOTIBMMCFMJBCMFGPSQSPCMFNT
PSBDDJEFOUTSFTVMUJOHGSPNGBJMVSFUPPCTFSWFUIF
JOTUSVDUJPOTJOUIJTNBOVBM
2WARNINGS
Failure to avoid the following potentially
hazardous situations could result in an
accident or collision resulting in death or
serious injury.
8IFOOBWJHBUJOHDBSFGVMMZDPNQBSFJOGPSNBUJPO
EJTQMBZFEPOUIFOBWJHBUJPOTZTUFNUPBMMBWBJMBCMF
OBWJHBUJPOTPVSDFTJODMVEJOHJOGPSNBUJPOGSPN
TUSFFUTJHOTWJTVBMTJHIUJOHTBOENBQT'PSTBGFUZ
BMXBZTSFTPMWFBOZEJTDSFQBODJFTPSRVFTUJPOT
CFGPSFDPOUJOVJOHOBWJHBUJPO
"MXBZTPQFSBUFUIFWFIJDMFJOBTBGFNBOOFS
%POPUCFDPNFEJTUSBDUFECZUIFOBWJHBUJPO
TZTUFNXIJMFESJWJOHBOEBMXBZTCFGVMMZBXBSF
PGBMMESJWJOHDPOEJUJPOT.JOJNJ[FUIFBNPVOUPG
UJNFTQFOUWJFXJOHUIFTDSFFOPGUIFOBWJHBUJPO
TZTUFNXIJMFESJWJOHBOEVTFWPJDFQSPNQUT
XIFOQPTTJCMF
%POPUFOUFSEFTUJOBUJPOTDIBOHFTFUUJOHTPS
BDDFTTBOZGVODUJPOTSFRVJSJOHQSPMPOHFEVTFPG
UIFOBWJHBUJPOTZTUFNDPOUSPMTXIJMFESJWJOH4UPQ
ZPVSWFIJDMFJOBTBGFBOEMFHBMNBOOFSCFGPSF
BUUFNQUJOHTVDIPQFSBUJPOT
,FFQUIFTZTUFNWPMVNFBUBMPXFOPVHIMFWFMUP
CFBCMFUPIFBSPVUTJEFOPJTFTXIJMFESJWJOH*GZPV
DBOOPMPOHFSIFBSPVUTJEFOPJTFTZPVNBZCF
VOBCMFUPSFBDUBEFRVBUFMZUPUIFUSBGGJDTJUVBUJPO
5IJTNBZDBVTFBDDJEFOUT
5IFOBWJHBUJPOTZTUFNXJMMOPUEJTQMBZUIFDPSSFDU
DVSSFOUQPTJUJPOPGUIFWFIJDMFUIFGJSTUUJNFJUJT
VTFEBGUFSQVSDIBTFPSJGUIFWFIJDMFCBUUFSZJT
EJTDPOOFDUFE(14TBUFMMJUFTJHOBMTXJMMTPPOCF
SFDFJWFEIPXFWFSBOEUIFDPSSFDUQPTJUJPOXJMM
CFEJTQMBZFE
#FDBSFGVMPGUIFBNCJFOUUFNQFSBUVSF6TJOHUIF
OBWJHBUJPOTZTUFNBUFYUSFNFUFNQFSBUVSFTDBO
MFBEUPNBMGVODUJPOPSEBNBHF"MTPOPUFUIBU
UIFVOJUDBOCFEBNBHFECZTUSPOHWJCSBUJPOCZ
NFUBMPCKFDUTPSCZXBUFSHFUUJOHJOTJEFUIFVOJU
2CAUTIONS
Failure to avoid the following potentially
hazardous situations may result in injury or
property damage.
5IFOBWJHBUJPOTZTUFNJTEFTJHOFEUPQSPWJEFZPV
XJUISPVUFTVHHFTUJPOT*UEPFTOPUSFGMFDUSPBE
DMPTVSFTPSSPBEDPOEJUJPOTXFBUIFSDPOEJUJPOT
PSPUIFSGBDUPSTUIBUNBZBGGFDUTBGFUZPSUJNJOH
XIJMFESJWJOH
6TFUIFOBWJHBUJPOTZTUFNPOMZBTBOBWJHBUJPOBM
BJE%POPUBUUFNQUUPVTFUIFOBWJHBUJPOTZTUFN
GPSBOZQVSQPTFSFRVJSJOHQSFDJTFNFBTVSFNFOUPG
EJSFDUJPOEJTUBODFMPDBUJPOPSUPQPHSBQIZ
5IF(MPCBM1PTJUJPOJOH4ZTUFN(14JTPQFSBUFE
CZUIF6OJUFE4UBUFTHPWFSONFOUXIJDIJTTPMFMZ
SFTQPOTJCMFGPSJUTBDDVSBDZBOENBJOUFOBODF5IF
HPWFSONFOUTZTUFNJTTVCKFDUUPDIBOHFTUIBU
DPVMEBGGFDUUIFBDDVSBDZBOEQFSGPSNBODFPGBMM
(14FRVJQNFOUJODMVEJOHUIFOBWJHBUJPOTZTUFN
"MUIPVHIUIFOBWJHBUJPOTZTUFNJTBQSFDJTJPO
OBWJHBUJPOEFWJDFBOZOBWJHBUJPOEFWJDFDBOCF
NJTVTFEPSNJTJOUFSQSFUFEBOEUIFSFGPSFCFDPNF
VOTBGF
IMPORTANT INFORMATION
Vehicle Battery Preservation
5IJTOBWJHBUJPOTZTUFNDBOCFVTFEXIFOUIF
JHOJUJPOLFZJTUVSOFEUP0/PS"$$5PQSFTFSWF
UIFCBUUFSZIPXFWFSJUTIPVMECFVTFEXJUIUIF
FOHJOFSVOOJOHXIFOFWFSQPTTJCMF6TJOHUIF
OBWJHBUJPOTZTUFNGPSBMPOHUJNFXJUIUIFFOHJOF
TXJUDIFEPGGDBODBVTFUIFCBUUFSZUPSVOEPXO
Map Data Information
0OFPGUIFHPBMTPG(BSNJOJTUPQSPWJEF
DVTUPNFSTXJUIUIFNPTUDPNQMFUFBOEBDDVSBUF
DBSUPHSBQIZUIBUJTBWBJMBCMFUPVTBUBSFBTPOBCMF
DPTU8FVTFBDPNCJOBUJPOPGHPWFSONFOUBM
BOEQSJWBUFEBUBTPVSDFTXIJDIXFJEFOUJGZ
JOQSPEVDUMJUFSBUVSFBOEDPQZSJHIUNFTTBHFT
EJTQMBZFEUPUIFDPOTVNFS7JSUVBMMZBMMEBUB
TPVSDFTDPOUBJOTPNFJOBDDVSBUFPSJODPNQMFUF
EBUB*OTPNFDPVOUSJFTDPNQMFUFBOEBDDVSBUF
NBQJOGPSNBUJPOJTFJUIFSOPUBWBJMBCMFPSJT
QSPIJCJUJWFMZFYQFOTJWF
Safety Precautions and Important Information

EN 6
Quick Start Guide
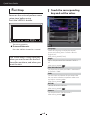
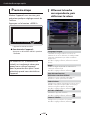
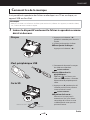
First Step
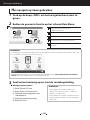
Power on the unit and perform some
setup steps before using.
Press the <MENU> button.
The unit is turned on.
● To turn off the unit:
Press the <MENU> button for 1 second.
The “Initial setup” is only necessary
when you use the unit for the first
time after purchase, and when you
reset the unit.
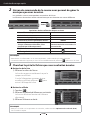
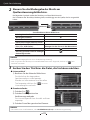
1
Touch the corresponding
key and set the value.
Language
4FMFDUUIFMBOHVBHFVTFEGPSUIFDPOUSPM
TDSFFOBOETFUUJOHJUFNT%FGBVMUJTi#SJUJTI
&OHMJTIFOw
"GUFSTFUUJOHUPVDI<&OUFS>
Angle
"EKVTUUIFQPTJUJPOPGUIFNPOJUPS%FGBVMUJT
iw
"GUFSTFUUJOHUPVDI<
>
iPod AV Interface Use
4FUUIFUFSNJOBMXIJDIZPVSJ1PEJTDPOOFDUFE
UP%FGBVMUJTiJ1PEw
Color
4FUUIFTDSFFOBOECVUUPOJMMVNJOBUJPODPMPS
:PVDBOTFMFDUXIFUIFSUPQFSGPSNDPMPSTDBO
BOEBEKVTUTDBOOJOHDPMPS
"GUFSTFUUJOHUPVDI<
>
EXT SW
$POUSPMUIFFYUFSOBMEFWJDFT
"GUFSTFUUJOHUPVDI<
>
Camera
4FUUIFQBSBNFUFSTGPSUIFDBNFSB
"GUFSTFUUJOHUPVDI<
>

EN 7
DNX9210BT
2
Touch [Finish].
NOTE
t'PSEFUBJMTPOPQFSBUJPOTPGFBDITFUUJOH
SFGFSUPUIF*OTUSVDUJPO.BOVBM
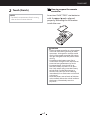
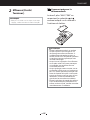
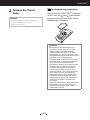
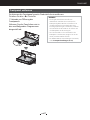
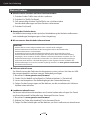
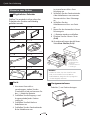
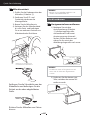
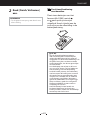
How to prepare the remote
controller
Insert two “AAA”/“R03”-size batteries
with the
and poles aligned
properly, following the illustration
inside the case.
CAUTION
tPut the remote controller in a place where
it will not move during braking or other
operations. A dangerous situation could
result, if the remote controller falls down
and gets wedged under the pedals while
driving.
tDo not leave the battery near fire or
under direct sunlight. A fire, explosion or
excessive heat generation may result.
tDo not recharge, short, break up or
heat the battery or place it in an open
fire. Such actions may cause the battery
to leak fluid. If spilled fluid comes in
contact with your eyes or on clothing,
immediately rinse with water and consult
a physician.
tPlace the battery out of reach of children.
In the unlikely event that a child swallows
the battery, immediately consult a
physician.

EN 8
Quick Start Guide
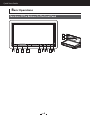
Basic Operations
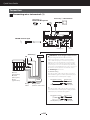
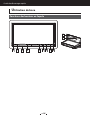
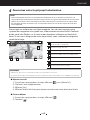
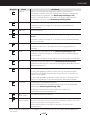
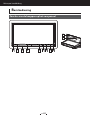
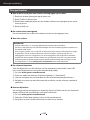
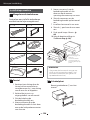
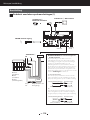
Functions Of The Buttons On The Front Panel
1 2 3 4 5 6 7 8 9
11
10

EN 9
DNX9210BT
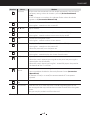
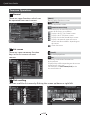
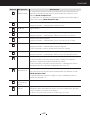
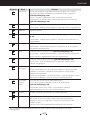
Number Name Motion
1
fi3FTFU t*GUIFVOJUPSUIFDPOOFDUFEVOJUGBJMTUPPQFSBUFQSPQFSMZUIFVOJUSFUVSOT
UPGBDUPSZTFUUJOHTXIFOUIJTCVUUPOJTQSFTTFE(Instruction Manual
P.95)
t*GUIF4*GVODUJPOJTUVSOFEPOUIJTJOEJDBUPSGMBTIFTXIFOUIFWFIJDMF
JHOJUJPOJTPGG(Instruction Manual P.68)
2
AT T t4XJUDIFTBUUFOVBUJPOPGUIFWPMVNFPOPGG
t1SFTTJOHGPSTFDPOEUVSOTUIFTDSFFOPGG
3
∞57PM "EKVTUTWPMVNF
4
"6% t%JTQMBZT(SBQIJD&RVBMJ[FSTDSFFO(Instruction Manual P.82)
t1SFTTJOHGPSTFDPOETXJUDIFTDBNFSBWJFXEJTQMBZPOPGG
5
/"7 t%JTQMBZTUIFOBWJHBUJPOTDSFFO
t1SFTTJOHGPSTFDPOETXJUDIFT"7PVUTPVSDFT
6
.&/6 t%JTQMBZTUIF5PQ.FOVTDSFFO(Instruction Manual P.13)
t1SFTTJOHGPSTFDPOEUVSOTUIFQPXFSPGG
t8IFOUIFQPXFSPGGUVSOTUIFQPXFSPO
7
5&- t%JTQMBZTUIF)BOET'SFFTDSFFO(Instruction Manual P.50)
t1SFTTJOHGPSTFDPOEEJTQMBZTUIF4DSFFO$POUSPMTDSFFO
8
0&KFDU t&KFDUTUIFEJTD
t8IFOUIFQBOFMJTPQFOFEQSFTTJOHDMPTFTUIFQBOFMBOEQSFTTJOHGPS
TFDPOEFKFDUTUIFEJTDGPSDJCMZ
t8IFOUIFQBOFMJTDMPTFEQSFTTJOHGPSTFDPOEGVMMZPQFOTUIFQBOFMUP
UIFMPDBUJPOPGUIF4%DBSETMPU
9
3FNPUF
4FOTPS
t3FDFJWFTUIFSFNPUFDPOUSPMTJHOBM
t:PVDBOFOBCMFPSEJTBCMFUIJTGFBUVSFCZ3FNPUF4FOTPS(Instruction
Manual P.66)
t*G<3FNPUF4FOTPS>JTTFUUPPGGUIFSFNPUFDPOUSPMPG57SFDFQUJPOJT
SFKFDUFE
10
%JTDJOTFSU
TMPU
"TMPUUPJOTFSUBEJTDNFEJB
11
4%DBSETMPU "TMPUUPJOTFSUBO4%DBSE5IFDBSEJTVTFEGPSVQHSBEJOHUIFNBQ'PS
IPXUPVQHSBEFUIFNBQSFGFSUPUIFJOTUSVDUJPONBOVBMPGUIFOBWJHBUJPO
TZTUFN
"MTPZPVDBOQMBZBVEJPWJTVBMGJMFJOUIFDBSE
5IFEJTQMBZNBZOPUTXJUDIUPUIF(SBQIJD&RVBMJ[FSTDSFFOJOTPNFDPOEJUJPOT

EN 10
Quick Start Guide
Common Operations
General
There are some functions which can
be operated from most screens.
[Menu]
3FUVSOTUPUIF5PQ.FOVTDSFFO
(RETURN)
3FUVSOTUPQSFWJPVTTDSFFO
(common menu key)
5PVDIUPEJTQMBZUIFDPNNPONFOV5IF
DPOUFOUPGUIFNFOVBSFBTGPMMPXT
%JTQMBZTUIF&9548$POUSPMTDSFFO
%JTQMBZTUIF4&561.FOVTDSFFO
%JTQMBZTUIF"VEJP$POUSPM.FOVTDSFFO
%JTQMBZTUIFDPOUSPMTDSFFOPGDVSSFOU
TPVSDF*DPOGFBUVSFEJGGFSTEFQFOEJOHPO
UIFTPVSDF
$MPTFTUIFNFOV
List screen
There are some common function
keys in the list screens of most
sources.
(Scroll)
4DSPMMTUIFEJTQMBZFEUFYU
etc.
5PVDILFZTXJUIWBSJPVTGVODUJPOTBSF
EJTQMBZFEIFSF
%JTQMBZFELFZTEJGGFSEFQFOEJOHPOUIFDVSSFOU
BVEJPTPVSDFTUBUVTFUD
'PSFYBNQMFTTFFList screen (P.15)JOUIF
*OTUSVDUJPO.BOVBM
Flick scrolling
You can scroll the list screen by flicking the screen up/down or right/left.

EN 11
DNX9210BT
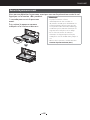
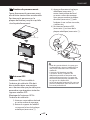
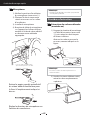
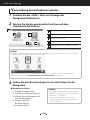
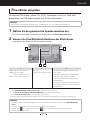
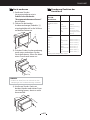
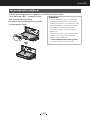
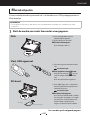
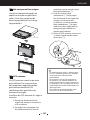
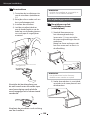
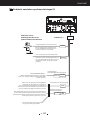
Detaching The Front Panel
You can detach the front panel to prevent theft.
Press the <0> button for 1 second to
open the front panel.
Then, detach the panel as the
diagrams below.
2
3
1
4
NOTE
t5IFBUUBDIJOHQMBUFDMPTFTBVUPNBUJDBMMZ
JOBCPVUTFDPOETBGUFSUIFGSPOUQBOFM
JTSFMFBTFE3FNPWFUIFQBOFMCFGPSFUIJT
IBQQFOT5PQSFWFOUEFUFSJPSBUJPOEP
OPUUPVDIUIFUFSNJOBMTPGUIFVOJUBOE
GBDFQMBUFXJUIZPVSGJOHFST
t*GUIFUFSNJOBMTPOUIFVOJUPSGBDFQMBUFHFU
EJSUZXJQFUIFNXJUIBDMFBOTPGUESZDMPUI
t'PSBUUBDIJOHUIFQBOFMTFFAttaching the
front panel (P.23)

EN 12
Quick Start Guide
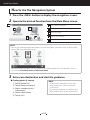
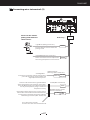
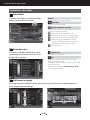
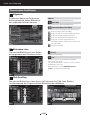
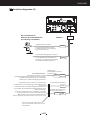
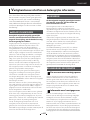
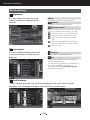
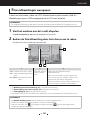
How To Use The Navigation System
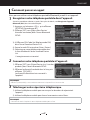
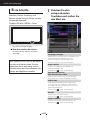
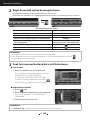
1
Press the <NAV> button to display the navigation screen.
2
Operate the desired function from the Main Menu screen.
1
2
3
4 5
1
(14TBUFMMJUFTUSFOHUI
2
'JOETBEFTUJOBUJPO
3
7JFXTUIFNBQ
4
"EKVTUTUIFTFUUJOHT
5
6TFTUIFUPPMTTVDIBTFDP3PVUFBOE)FMQ
NOTE
t:PVDBOHFUBEEJUJPOBMJOGPSNBUJPOBCPVUVTJOHUIFOBWJHBUJPOTZTUFNGSPN)FMQ5PEJTQMBZ)FMQ
UPVDI<5PPMT>BOEUIFOUPVDI<)FMQ>
t'PSNPSFJOGPSNBUJPOBCPVUZPVSOBWJHBUJPOTZTUFNEPXOMPBEUIFMBUFTUWFSTJPOPGUIF0XOFST
.BOVBMGSPNmanual.kenwood.com/edition/im352
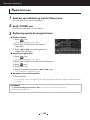
3
Enter your destination and start the guidance.
● Finding points of interest
1) Touch [Where To?].
2) Touch [Points of Interest].
3) Select a category and a
subcategory.
4) Select a destination.
5) Touch [Go!].
NOTE
t5PFOUFSMFUUFSTDPOUBJOFEJOUIFOBNF
UPVDI<8IFSF5P ><1PJOUTPG*OUFSFTU>
<4QFMM/BNF>
t5PTFBSDIGPSBMPDBUJPOJOBEJGGFSFOUBSFB
UPVDI<8IFSF5P >BOEUIFOUPVDI</FBS>

EN 13
DNX9210BT
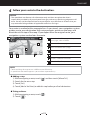
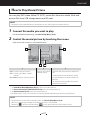
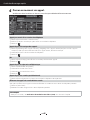
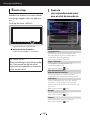
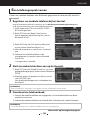
4
Follow your route to the destination.
NOTICE
tThe speed limit icon feature is for information only and does not replace the driver’s
responsibility to abide by all posted speed limit signs and to use safe driving judgment at all
times. Garmin and Kenwood will not be responsible for any traffic fines or citations that you
may receive for failing to follow all applicable traffic laws and signs.
Your route is marked with a magenta line. As you travel, your navigation system
guides you to your destination with voice prompts, arrows on the map, and
directions at the top of the map. If you depart from the original route, your
navigation system recalculates the route.
1 2
3
4
5 6 7
1
7JFXTUIF/FYU5VSOQBHFPSUIFKVODUJPO
WJFXQBHFXIFOBWBJMBCMF
2
7JFXTUIF5VSO-JTUQBHF
3
7JFXTUIF8IFSF"N* QBHF
4
;PPNTJOBOEPVU
5
3FUVSOTUPUIF.BJO.FOV
6
%JTQMBZTBEJGGFSFOUEBUBGJFME
7
7JFXTUIF5SJQ$PNQVUFS
NOTE
t5PVDIBOEESBHUIFNBQUPWJFXBEJGGFSFOUBSFBPGUIFNBQ
t"TQFFEMJNJUJDPODPVMEBQQFBSBTZPVUSBWFMPONBKPSSPBEXBZT
● Adding a stop
1) While navigating a route, touch [ ] and then touch [Where To?].
2) Search for the extra stop.
3) Touch [Go!].
4) Touch [Add as Via Point] to add this stop before your final destination.
● Taking a detour
1) While navigating a route, touch [
].
2) Touch [
].

EN 14
Quick Start Guide
Other Features
● Manually avoiding traffic on your route
1) From the map, touch the traffic icon.
2) Touch [Traffic On Route].
3) If necessary, touch the arrows to view other traffic delays on your route.
4) Touch [Avoid].
● Viewing the traffic map
The traffic map shows color-coded traffic flow and delays on nearby.
● About traffic
NOTICE
tTraffic service is not available in some areas or countries.
tGarmin and Kenwood are not responsible for the accuracy or timeliness of the traffic
information.
With an FM traffic receiver, the navigation system can receive and use traffic information.
When a traffic message is received, you can see the event on the map and change your
route to avoid the incident. The FM TMC subscription activates automatically after your
navigation system acquires satellite signals while receiving traffic signals from the service
provider. Go to www.garmin.com/fmtrafficfor more information.
● Updating the software
To update the navigation system software, you must have a USB mass storage device
and an internet connection.
1) Go to www.garmin.com/Kenwood.
2) Find your model and select [Software Updates] > [Download].
3) Read and accept the terms of the Software License Agreement.
4) Follow the instructions on the Web site to complete the installation of the
software update.
● Updating maps
You can purchase updated map data from Garmin or ask your Kenwood dealer or
Kenwood service center for details.
1) Go to www.garmin.com/Kenwood.
2) Select [Order Map Updates] for your Kenwood unit.
3) Follow the Web site instructions to update your map.

EN 15
DNX9210BT
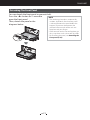
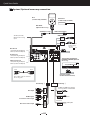
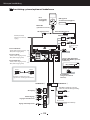
How To Play Music
You can play audio files from music CD, disc media, USB storage device and iPod.
NOTE
t'PSEFUBJMTPOQMBZBCMFGJMFGPSNBUNFEJBGPSNBUJ1PENPEFMFUDSFGFSUPUIF*OTUSVDUJPO.BOVBM
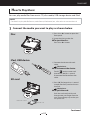
1
Connect the media you want to play as shown below.
Disc
0
iPod, USB device
SD card
0
/PUDIFETFDUJPO
-BCFMFETJEF
1) Press the <0> button to open the
front panel.
2) Insert the disc into the slot.
● To eject the disc:
Press the <0> button.
1) Connect the device with each
cable.
Playback starts.
● To disconnect the device:
Touch [ ] on the screen and
then touch [ 0 ] for 1 second.
Disconnect the device from the
cable.
1) Press [0] for longer than 1 second
to open the front panel and insert
the card.
Playback starts.
● To eject the card:
Push the card until it clicks and
then remove your finger from the
card. The card pops up so that you
can pull it out.
Continued

EN 16
Quick Start Guide
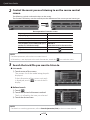
2
Control the music you are listening to on the source control
screen.
The following symbols indicate the keys on the screen.
The functions of the keys are the same despite the difference of the source you are listening to.
Touch [
]
Basic operations from this screen
Plays or pauses:
38
Stops playing:
7
Disconnects the device:
0
Searches the previous/next content: 4 ¢
Fast forwards or Fast backwards (Disc
media, CD, USB device only):
1 ¡ or
move the cursor in the center bar
Repeats current content:
Plays all content in random order:
NOTE
t'PSPUIFSPQFSBUJPOTSFGFSUPUIF*OTUSVDUJPO.BOVBM
t*GEFTJSFELFZJTOPUEJTQMBZFEJOUIFNVMUJGVODUJPOCBSUPVDIUIF<
>UPTXJUDIUIFNFOV
3
Search the track/file you want to listen to.
● List search
1) Touch center of the screen.
5IFDPOUFOUMJTUPGUIFNFEJBCFJOHQMBZFEJT
EJTQMBZFE
*GUIFJOGPSNBUJPOPGUIFDVSSFOUUSBDLPOMZ
JTEJTQMBZFEUPVDI<
>UPTXJUDIUIFMJTU
EJTQMBZ
● Refined search
1) Touch [
].
2) Touch the desired refinement method.
5IFMJTUJTSFGJOFECZUIFJUFNZPVTFMFDUFE
3) Touch the desired item.
NOTE
t'PSEFUBJMTPOTFBSDIJOHPQFSBUJPOTSFGFSUPSearch Operation (P.34)JOUIF*OTUSVDUJPO.BOVBM

EN 17
DNX9210BT
How To Play Movie/Picture
You can play DVD video, Video CD (VCD), movie files from disc media, iPod, and
picture files from USB storage device and SD card.
NOTE
t'PSEFUBJMTPOQMBZBCMFGJMFGPSNBUEFWJDFGPSNBUFUDSFGFSUPUIF*OTUSVDUJPO.BOVBM
1
Connect the media you want to play.
For the method of connecting, see How To Play Music (P.15).
2
Control the movie/picture by touching the screen.
Each area on the screen has a separate function.
1 2
3 3
12 3
DVD%JTQMBZTUIF%7%NFOV
VCD%JTQMBZTUIF;PPN$POUSPM
TDSFFO
Disc media%JTQMBZTUIFEJTDNFOV
%JTQMBZTUIF4PVSDF
$POUSPMTDSFFO
t4FBSDIFTUIFOFYUQSFWJPVTDPOUFOUPS
GJMF
t4DSPMMJOHGSPNDFOUFSPGEJTQMBZUPMFGU
PSSJHIUQFSGPSNTGBTUCBDLXBSEPSGBTU
GPSXBSE
5PTUPQGBTUCBDLXBSEGPSXBSEUPVDI
DFOUFSPGUIFEJTQMBZ
4
4FFDVD Disc Menu Operation (P.21)JOUIF*OTUSVDUJPO.BOVBM
4FFZoom Control For DVD And VCD (P.22)JOUIF*OTUSVDUJPO.BOVBM
4FFMovie Control (P.37)JOUIF*OTUSVDUJPO.BOVBM
4
'PSJ1PE64#4%DBSEUIJTGVODUJPONBZCFVOBWBJMBCMFEFQFOEJOHPOUIFQMBZJOHGJMFGPSNBU
NOTE
t'PSPQFSBUJPOTPOUIFTPVSDFDPOUSPMTDSFFOTFFHow To Play Music (P.15)
)PXFWFSTFBSDIJOHCZDBUFHPSZMJOLBMCVNBSUXPSLJTOPUBWBJMBCMF
t5PVDIJOH<
>EJTQMBZFECZUPVDIJOH< >JOUIFTPVSDFDPOUSPMTDSFFOIJEFTBMMLFZT

EN 18
Quick Start Guide
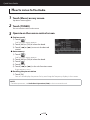
How To Listen To The Radio
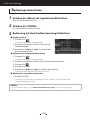
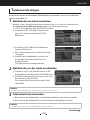
1
Touch [Menu] on any screen.
Top Menu screen appears.
2
Touch [TUNER].
The unit switches to the radio source.
3
Operate on the source control screen.
● Station search
1) Touch [
].
4VCGVODUJPONFOVBQQFBST
2) Touch [AM] or [FM] to select the band.
3) Touch [1] or [¡] to tune in the desired
station.
● Auto memory
1) Touch [
].
4VCGVODUJPONFOVBQQFBST
2) Touch [AM] or [FM] to select the band.
3) Touch [
].
4) Touch [AME].
5) Touch [1] or [¡] in the sub function menu.
"VUPNFNPSZTUBSUT
● Recalling the preset station
1) Touch [P#].
:PVDBOBMTPEJTQMBZUIFQSFTFUMJTUCZUPVDIJOHUIFGSFRVFODZEJTQMBZJOUIFDFOUFS
NOTE
t'PSPUIFSPQFSBUJPOTTFFRadio Basic Operation (P.40)JOUIF*OTUSVDUJPO.BOVBM

EN 19
DNX9210BT
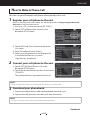
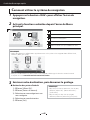
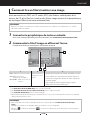
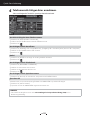
How To Make A Phone Call
You can use your Bluetooth cell-phone when paired to this unit.
1
Register your cell-phone to the unit.
Follow as the procedures shown below. For detailed operation, see Registering the Bluetooth
Unit (P.51) in the Instruction Manual.
1) Press the <TEL> button and touch [BT SETUP].
2) Touch [SET] of [Regist New Device] in the
Bluetooth SETUP screen.
3) Touch [PIN Code Set] in the Searched Device
List screen.
4) Enter PIN code and touch [Enter].
5) Select your cell-phone from the displayed list
in the Searched Device List screen.
Registering is completed.
2
Connect your cell-phone to the unit.
1) Touch [SET] of [Paired Device List] in the
Bluetooth SETUP screen.
2) Touch the desired device from the list and touch
[TEL(HFP)].
The selected device is connected to the unit.
NOTE
t5PVDI<"VEJP"%1>JGZPVXBOUUPDPOOFDUUIFEFWJDFBTBOBVEJPQMBZFS
3
Download your phonebook.
1) Operate the cell-phone to send the phonebook data to this unit.
2) Operate the cell-phone to start the hands-free connection.
NOTE
t4FFUIFJOTUSVDUJPONBOVBMPGZPVSDFMMQIPOFGPSUIFPQFSBUJPO
Continued

EN 20
Quick Start Guide
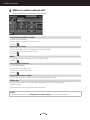
4
Make or receive a phone call.
See the table below for each operation method.
Call by entering a phone number
15PVDI<%JSFDU/VNCFS>
2&OUFSBQIPOFOVNCFSXJUIOVNCFSLFZT
35PVDI< >
Call using call records
15PVDI<*ODPNJOH$BMMT><0VUHPJOH$BMMT>PS<.JTTFE$BMMT>
24FMFDUUIFQIPOFOVNCFSGSPNUIFMJTU
35PVDI<
>
Redial
15PVDI<3FEJBM>UPEJTQMBZUIFQSFWJPVTMZDBMMFEOVNCFS
25PVDI< >
Call using the phonebook
15PVDI<1IPOFCPPL>
24FMFDUUIFOBNFGSPNUIFMJTU
34FMFDUUIFOVNCFSGSPNUIFMJTU
45PVDI<
>
Call using the preset number
15PVDI<1SFTFU>UPTUBSUDBMMJOHUIFDPSSFTQPOEJOHQIPOFOVNCFS
Call by voice
:PVDBONBLFBWPJDFDBMMVTJOHUIFWPJDFSFDPHOJUJPOGVODUJPOPGUIFDFMMQIPOF
15PVDI<7PJDF>
21SPOPVODFUIFOBNFSFHJTUFSFEJOUIFDFMMQIPOF
NOTE
t'PSEFUBJMFEPQFSBUJPOTFFUsing Hands-Free Unit (P.54)JOUIF*OTUSVDUJPO.BOVBM
La page charge ...
La page charge ...
La page charge ...
La page charge ...
La page charge ...
La page charge ...
La page charge ...
La page charge ...
La page charge ...
La page charge ...
La page charge ...
La page charge ...
La page charge ...
La page charge ...
La page charge ...
La page charge ...
La page charge ...
La page charge ...
La page charge ...
La page charge ...
La page charge ...
La page charge ...
La page charge ...
La page charge ...
La page charge ...
La page charge ...
La page charge ...
La page charge ...
La page charge ...
La page charge ...
La page charge ...
La page charge ...
La page charge ...
La page charge ...
La page charge ...
La page charge ...
La page charge ...
La page charge ...
La page charge ...
La page charge ...
La page charge ...
La page charge ...
La page charge ...
La page charge ...
La page charge ...
La page charge ...
La page charge ...
La page charge ...
La page charge ...
La page charge ...
La page charge ...
La page charge ...
La page charge ...
La page charge ...
La page charge ...
La page charge ...
La page charge ...
La page charge ...
La page charge ...
La page charge ...
La page charge ...
La page charge ...
La page charge ...
La page charge ...
La page charge ...
La page charge ...
La page charge ...
La page charge ...
La page charge ...
La page charge ...
La page charge ...
La page charge ...
La page charge ...
La page charge ...
La page charge ...
La page charge ...
La page charge ...
La page charge ...
La page charge ...
La page charge ...
La page charge ...
La page charge ...
La page charge ...
La page charge ...
La page charge ...
La page charge ...
La page charge ...
La page charge ...
La page charge ...
La page charge ...
La page charge ...
La page charge ...
La page charge ...
La page charge ...
La page charge ...
La page charge ...
-
 1
1
-
 2
2
-
 3
3
-
 4
4
-
 5
5
-
 6
6
-
 7
7
-
 8
8
-
 9
9
-
 10
10
-
 11
11
-
 12
12
-
 13
13
-
 14
14
-
 15
15
-
 16
16
-
 17
17
-
 18
18
-
 19
19
-
 20
20
-
 21
21
-
 22
22
-
 23
23
-
 24
24
-
 25
25
-
 26
26
-
 27
27
-
 28
28
-
 29
29
-
 30
30
-
 31
31
-
 32
32
-
 33
33
-
 34
34
-
 35
35
-
 36
36
-
 37
37
-
 38
38
-
 39
39
-
 40
40
-
 41
41
-
 42
42
-
 43
43
-
 44
44
-
 45
45
-
 46
46
-
 47
47
-
 48
48
-
 49
49
-
 50
50
-
 51
51
-
 52
52
-
 53
53
-
 54
54
-
 55
55
-
 56
56
-
 57
57
-
 58
58
-
 59
59
-
 60
60
-
 61
61
-
 62
62
-
 63
63
-
 64
64
-
 65
65
-
 66
66
-
 67
67
-
 68
68
-
 69
69
-
 70
70
-
 71
71
-
 72
72
-
 73
73
-
 74
74
-
 75
75
-
 76
76
-
 77
77
-
 78
78
-
 79
79
-
 80
80
-
 81
81
-
 82
82
-
 83
83
-
 84
84
-
 85
85
-
 86
86
-
 87
87
-
 88
88
-
 89
89
-
 90
90
-
 91
91
-
 92
92
-
 93
93
-
 94
94
-
 95
95
-
 96
96
-
 97
97
-
 98
98
-
 99
99
-
 100
100
-
 101
101
-
 102
102
-
 103
103
-
 104
104
-
 105
105
-
 106
106
-
 107
107
-
 108
108
-
 109
109
-
 110
110
-
 111
111
-
 112
112
-
 113
113
-
 114
114
-
 115
115
-
 116
116


Kenwood DNX 9210 BT Guide de démarrage rapide
- Taper
- Guide de démarrage rapide
- Ce manuel convient également à
Documents connexes
Autres documents
-
LG 43LH510 Manuel utilisateur
-
LG 65UF950V Manuel utilisateur
-
Peavey 24FX Mixer Mode d'emploi
-
-
-
PEAQ PTV551203 Manuel utilisateur
-
PEAQ PTV462403 Le manuel du propriétaire
-
Melitta LOOK® Therm Timer 1011 Mode d'emploi
-
Siemens MQ66020 Manuel utilisateur
-
LG 65UF850V Le manuel du propriétaire