
™
Wire-Free
Smart Switch
Installation Guide
Models
CWLSWDMBWF1
CWLSWCCBWF1

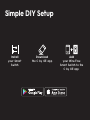
Download
the C by GE app
Install
your Smart
Switch
Add
your Wire-Free
Smart Switch to the
C by GE app
Simple DIY Setup

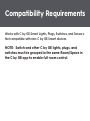
Compatibility Requirements
Works with C by GE Smart Lights, Plugs, Switches, and Sensors.
Not compatible with non-C by GE Smart devices.
NOTE: Switch and other C by GE lights, plugs, and
switches must be grouped in the same Room/Space in
the C by GE app to enable full room control.

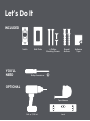
Let’s Do It
INCLUDED
YOU’LL
NEED
OPTIONAL
Switch
Wall Plate 4 Phillips
Mounting Screws
Drywall
Anchors
Adhesive
Tape
Phillips Screwdriver
Drill w/ 7/32 bit Level
Tape Measure

You Got This!
And we’re here to help.
For in-depth instructional videos
and a guided tour through the installation,
go to cbyge.com/wirefree-support.

BEFORE YOU DO ANYTHING: Step 1
Location & Mounting Type
Decide how you want to mount your switch
This switch can be mounted to the wall in two ways, by screws or adhesive tape.
Once you determine which install method is best for you, select one of
the following setup methods.

IMPORTANT
Start by removing the clear plastic tab
from the back of the switch.
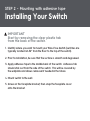
1. Identify where you want to mount your Wire-Free Switch (switches are
typically located 48-52” from the floor to the top of the switch).
2. Prior to installation, be sure that the surface is smooth and degreased.
3. Apply adhesive tape to the middle back of the switch. Adhesive tab
should stick out from the side of the switch. This will be covered by
the wallplate and allows removeal if needed in the future.
4. Mount switch to the wall.
5. Screw on the faceplate bracket, then snap the faceplate cover
onto the bracket.
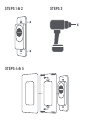
STEP 2 - Mounting with adhesive tape
Installing Your Switch

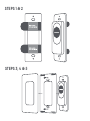
STEPS 1 & 2
STEPS 3, 4 & 5

IMPORTANT
Start by removing the clear plastic tab
from the back of the switch.
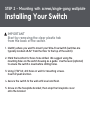
1. Identify where you want to mount your Wire-Free Switch (switches are
typically located 48-52” from the floor to the top of the switch).
2. Mark the location for holes to be drilled. We suggest using the
mounting holes on the switch housing as a guide. Use the level (optional)
to ensure the switch is level before drilling holes.
3. Using 7/32” bit, drill holes in wall for mounting screws.
Insert drywall anchors.
4. Secure the switch to the wall until level and flush.
5. Screw on the faceplate bracket, then snap the faceplate cover
onto the bracket.
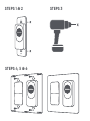
STEP 2 - Mounting with screws/single-gang wallplate
Installing Your Switch

STEPS 1 & 2
STEPS 3
STEPS 4 & 5

IMPORTANT
Start by removing the clear plastic tab
from the back of the switch.
1. Remove existing wallplate.
2. Get multi-gang wallplate (purchased separately).
3. Use new wallplate to mark the location for holes to be drilled.
4. Using 7/32” bit, drill holes in wall for mounting screws.
Insert drywall anchors.
5. Secure the switch to the wall until level and flush.
6. Screw on the faceplate cover onto the bracket.
STEP 2 - Mounting with screws/single-gang wallplate
Installing Your Switch

STEPS 1 & 2
STEPS 3
STEPS 4, 5 & 6

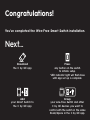
You’ve completed the Wire-Free Smart Switch installation.
Next...
Download
the C by GE app
Press
any button on the switch
to initiate setup.
*LED indicator light will flash blue
until app set up is complete.
Add
your Smart Switch to
the C by GE app
Group
your wire-Free Switch and other
C by GE devices you want to
control with the switch in the same
Room/Space in the C by GE app.
Congratulations!

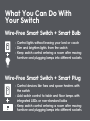
Wire-Free Smart Switch + Smart Bulb
• Control lights without leaving your bed or couch
• Dim and brighten lights from the switch
• Keep switch control entering a room after moving
furniture and plugging lamps into different sockets
Wire-Free Smart Switch + Smart Plug
• Control devices like fans and space heaters with
the switch
• Add switch control to table and floor lamps with
integrated LEDs or non-standard bulbs
• Keep switch control entering a room after moving
furniture and plugging lamps into different sockets
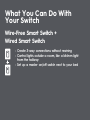
What You Can Do With
Your Switch

Wire-Free Smart Switch +
Wired Smart Switch
• Create 3-way connections without rewiring
• Control lights outside a room, like a kitchen light
from the hallway
• Set up a master on/off switch next to your bed
What You Can Do With
Your Switch

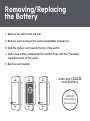
Removing/Replacing
the Battery
1. Remove the switch from the wall.
2. Remove rear housing of the switch using Phillips screwdriver.
3. Slide the battery out, towards the top of the switch.
4. Slide a new battery underneath the contact strap, with the (*) terminal
toward the back of the switch.
5. Replace rear housing.
CR2032
coin battery
(actual size)
Uses one CR2032
coin battery

Additional Information and Warnings
FCC Compliance Statement Compliance Notice:
This equipment has been tested and found to comply with the limits for a Class B
digital device, pursuant to part 15 of the FCC Rules. These limits are designed to
provide reasonable protection against harmful interference in a residential
installation. This equipment generates, uses and can radiate radio frequency
energy and, if not installed and used in accordance with the instructions, may
cause harmful interference to radio communications. However, there is no
guarantee that interference will not occur in a particular installation. If this
equipment does cause harmful interference to radio or television reception, which
can be determined by turning the equipment off and on, the user is encouraged
to try to correct the interference by one or more of the following measures:
• Reorient or relocate the receiving antenna.
• Increase the separation between the equipment and receiver.
• Connect the equipment into an outlet on a circuit different from that to
which the receiver is connected.
• Consult the dealer or an experienced radio/TV technician for help.
This device complies with part 15 of FCC rules. Operation is subject to the
following two conditions:
1. This device may not cause harmful interference.
2. This device must accept any interference received, including
interference that may cause undesired operation.
Any changes or modifications not expressly approved by the party
responsible for compliance could void the user’s authority to operate the
equipment.

RF Exposure Information:
This device complies with FCC radiation exposure limits set forth for an
uncontrolled environment. This equipment must be installed and operated in
accordance with provided instructions and the antenna(s) used for this transmitter
must be installed to provide a separation distance of at least 20cm from all
persons.
Electric Ratings 3V
Operating temperature: 0 to 40°C
Type 1 Enclosure
Indoor use only
The wireless smart switch use one CR2032 battery (pre-installed).
If installing the wireless smart switch to an outlet box, follow National
Electrical Code (NEC) (ANSI/NFPA 70), Canadian Electric Code, Part 1 (CEC),
and local codes by a qualified technician.

This device complies with Industry Canada’s license-exempt RSSs. Operation is
subject to the following two conditions:
1. This device may not cause harmful interference.
2. This device must accept any interference, including interference
that may cause undesired operation of the device.
Le présent appareil est conforme aux CNR d’Industrie Canada applicables aux
appareils radio exempts de licence. L’exploitation est autorisée aus deux
conditions suivantes :
1. l’appareil ne doit pas produire de brouillage;
2. l’utilisateur de l’appareil doit accepter tout brouillage radioélectrique subi,
même si le brouillage est susceptible d’en compromettre le fonctionnement.
This device meets the exemption from the routine evaluation limits in section 2.5 of
RSS 102 and compliance with RSS-102 RF exposure, users can obtain Canadian
information on RF exposure and compliance.
Le dispositif rencontre l’exemption des limites courantes d’évaluation dans la
section 2.5 de RSS 102 et la conformité à l’exposition de RSS-102 rf, utilisateurs
peut obtenir l’information canadienne sur l’expostion et la conformité de rf.
This transmitter must not be co-located or operating in conjunction with any other
antenna or transmitter. This equipment should be installed and operated with a
minimum distance of 20 centimeters between the radiator and your body.
Cet émetteur ne doit pas être Co-placé ou ne fonctionnant en même temps
qu’aucune autre antenne ou émetteur. Cet équipement devrait être installé et
actionné avec une distance minimum de 20 centimètres entre le radiateur et votre
corps.

WARNING: Chemical Burn Hazard.
Keep batteries away from children. This product contains a lithium
button/coin cell battery. If a new or used lithium button/coin cell battery is
swallowed or enters the body, it can cause severe internal burns and can lead
to death in as little as 2 hours. Always completely secure the battery
compartment. If the battery compartment does not close securely, stop using
the product, remove the batteries, and keep it away from children. If you
think batteries might have been swallowed or placed inside any part of the
body, seek immediate medical attention.
The cells shall be disposed of properly, including keeping them away from
children; and even used cells may cause injury.
AVERTISSEMENT: Risque de brûlure chimique.
Garder les piles hors de la portée des enfants. Ce produit contient une pile
bouton au lithium. Si une pile bouton neuve ou usagée est avalée ou pénètre
dans le corps, cela peut causer des brûlures internes graves et entraîner la
mort en aussi peu que 2 heures. Fixer toujours solidement le compartiment de
la pile. Si le compartiment de la pile ne se ferme pas solidement, cesser
d’utiliser le produit, retirer la pile et la garder hors de la portée des enfants.
S’il y a un risque pour qu’une pile ait ét avalée ou placée à l’intérieur d’une
partie du orps, consulter immédiatement un médecin.
Les piles doivent être éliminées de manière appropriée, y compris en les
conservant hors de la portée des enfants; mêeme les piles usagées peuvent
causer des blessures.
La page est en cours de chargement...
La page est en cours de chargement...
-
 1
1
-
 2
2
-
 3
3
-
 4
4
-
 5
5
-
 6
6
-
 7
7
-
 8
8
-
 9
9
-
 10
10
-
 11
11
-
 12
12
-
 13
13
-
 14
14
-
 15
15
-
 16
16
-
 17
17
-
 18
18
-
 19
19
-
 20
20
-
 21
21
-
 22
22


dans d''autres langues
- English: GE 93105004 Installation guide
Autres documents
-
Big Ass Fans I6 Guide d'installation
-
Honeywell WiFi Thermostat Manuel utilisateur
-
TP-LINK Tapo S500 Smart Wi-Fi Light Switch Mode d'emploi
-
Honeywell RTH6580WF Manuel utilisateur
-
-
-
Lutron Caseta Wireless In-Wall Dimmer Guide de démarrage rapide
-
Lutron CASETA-2DIMMER-BNDL Manuel utilisateur
-
-