
PASTA MAKER / PASTA MASCHINE /
MACHINE À PÂTES SPM 220 A1
IAN 408206_2207
PASTA MAKER
Mode d’emploi
PASTA MAKER
Operating instructions
PASTAMACHINE
Gebruiksaanwijzing
VÝROBNÍK TĚSTOVIN
Návod k obsluze
PASTAMASKINE
Betjeningsvejledning
STROJ NA CESTOVINY
Návod na obsluhu
TÉSZTA GÉP
Használati utasítás
PASTA MASCHINE
Bedienungsanleitung
MASZYNKA DO MAKARONU
Instrukcja obsługi
MÁQUINA PARA PASTA
Instrucciones de uso
APARAT ZA TESTENINE
Navodila za uporabo
MACCHINA ELETTRICA
PER PASTA FRESCA
Istruzioni per l'uso
МАШИНА ЗА ПАСТА
Ръководство за експлоатация
MAŞINĂ DE FĂCUT PASTE
Instrucţiuni de utilizare
ΠΑΡΑΣΚΕΥΑΣΤΗΣ ΖΥΜΑΡΙΚΩΝ
Οδηүίες χρήσης
APARAT ZA TJESTENINU
Upute za upotrebu

GB / IE Operating instructions Page 1
DE / AT / CH Bedienungsanleitung Seite 17
FR / BE Mode d’emploi Page 33
NL / BE Gebruiksaanwijzing Pagina 51
CZ Návod k obsluze Strana 67
PL Instrukcja obsługi Strona 83
SK Návod na obsluhu Strana 99
ES Instrucciones de uso Página 115
DK Betjeningsvejledning Side 131
IT Istruzioni per l'uso Pagina 147
HU Használati utasítás Oldal 163
SI Navodila za uporabo Stran 179
HR Upute za upotrebu Stranica 195
RO Instrucţiuni de utilizare Pagina 211
BG Ръководство за експлоатация Cтраница 227
GR Οδηүίες χρήσης Σελίδα 245


GB│IE │ 1 ■
SPM 220 A1
Contents
Introduction ...........................................................2
Information about these operating instructions ............................................2
Intended use ......................................................................2
Unpacking ............................................................2
Package contents .......................................................2
Safety information ......................................................3
Appliance description ...................................................6
Control panel ..........................................................6
Shaping discs ..........................................................6
Assembling the appliance ................................................7
Making pasta ..........................................................8
Kneading and dispensing pasta dough ..................................................8
Making ravioli .....................................................................9
Dismantling the appliance ...............................................10
Cleaning .............................................................10
Cleaning the appliance .............................................................10
Cleaning the accessories ............................................................10
Storage ..............................................................11
Troubleshooting .......................................................11
Recipes ..............................................................12
Basic recipe for durum wheat pasta without egg .........................................12
Basic recipe for wheat pasta without egg ...............................................13
Basic recipe for durum wheat pasta with egg ............................................13
Basic recipe for wheat pasta with egg .................................................13
Disposal .............................................................14
Disposal of the appliance ...........................................................14
Disposal of the packaging ...........................................................14
Technical specifications .................................................14
Kompernass Handels GmbH warranty ....................................15
Service ..........................................................................16
Importer .........................................................................16

■ 2 │ GB│IE SPM 220 A1
Introduction
Information about these operating
instructions
Congratulations on the purchase of your new
appliance.
You have selected a high-quality product.
The operating instructions are part of this product.
They contain important information about safety,
usage and disposal. Before using the product,
please familiarise yourself with all operating and
safety instructions. Use the product only as
described and for the range of applications speci-
fied. Please also pass these operating instructions
on to any future owner.
Intended use
This appliance is intended solely for the prepara-
tion of pasta.
The appliance is intended for use in rain-protected
rooms in private households.
Do not use it outside or in commercial or industrial
applications.
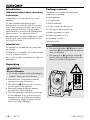
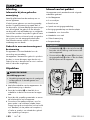
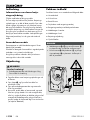
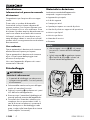
Unpacking
WARNING!
Risk of suffocation!
► Do not allow children to play with packaging
materials. There is a risk of suffocation.
♦ Remove all parts of the appliance and the
operating instructions from the box.
♦ Take off the lid 2 and remove all loose parts
from the interior of the appliance.
♦ Remove all packaging materials and any
protective film from the appliance.
♦ Check the package for completeness and signs
of visible damage. If any items are missing or
damaged as a result of defective packaging
or transportation, please contact the Service
Hotline (see section "Service").
Package contents
The appliance is supplied with the following
components as standard:
▯ Main appliance
▯ 8 shaping discs
▯ Ravioli attachment
▯ Dough scraper with cleaning tool
▯ Cleaning tool with protective cap
▯ Measuring beaker for liquids
▯ Measuring beaker for flour
▯ Operating instructions
▯ Recipe booklet
NOTE
► The measuring beakersu/i and the ravioli
attachmento are located inside the machine
when it is delivered.
► The shaping discs 8, the dough scraper p
and the cleaning tool a can be found in the
drawer on the side of the appliance.

GB│IE │ 3 ■
SPM 220 A1
Safety information
DANGER! RISK OF ELECTRIC SHOCK!
► The appliance must only be connected to a correctly installed mains
power socket. Ensure that the rating for your local power supply
corresponds with the details on the rating plate of the appliance.
► Prior to use, check the appliance for visible external damage. Do not
use the appliance if the mains cable or appliance show any signs of
visible damage or if the appliance itself has been dropped.
► All repairs must be carried out by authorised specialist companies or
by the Customer Service department. Improper repairs may put the
user at risk. It will also invalidate any warranty claims.
► Never immerse the appliance base in water or other liquids!
► The appliance may only be used in dry indoor rooms.
► Ensure that the mains cable never becomes wet or damp when the
appliance is in use. Route the cable so that it cannot be trapped or
damaged in any way.
► Never touch the mains adapter or the appliance base with wet
hands.
► Keep the power cable away from hot surfaces.
► Arrange for defective power plugs and/or cables to be replaced
as soon as possible by a qualified technician or by our Customer
Service Department to avoid the risk of injury.
► The appliance must always be disconnected from the mains when left
unsupervised and before assembly, disassembly, changing accessories
or cleaning, as well as in the event of a fault.
► To completely disconnect the appliance from mains power, the power
plug must be removed from the mains power socket. The appliance
must be positioned so that you have unrestricted access to the mains
socket at all times and can pull out the plug immediately in an emer-
gency.
► When disconnecting the appliance from the mains supply, always
pull on the mains adapter and never on the cable.

■ 4 │ GB│IE SPM 220 A1
WARNING! RISK OF INJURY!
► This appliance may not be used by children.
► The appliance and its mains cable must be kept away from children.
► Do not allow children to use the appliance as a toy.
► This appliance may be used by persons with limited physical, sensory
or mental capabilities or lack of experience and knowledge, provided
that they are under supervision or have been told how to use the
appliance safely and are aware of the potential risks.
► Use only the supplied accessories. Accessory parts from other manu-
facturers may not be suitable, and this may lead to risks or property
damage!
► Never open the casing. This can lead to risks and also invalidates
the warranty.
► Do not change accessories unless the drive unit is entirely at a standstill
and the blender is unplugged from the power supply! The appliance
will run on for a short time after being switched off.
► Never use the appliance for purposes other than those described in
these operating instructions. There is a risk of injury if the appliance
is misused!
► Never touching moving parts. Keep your hands, hair, clothing, the
dough scraper and other objects away from moving parts during
operation.
► Keep the lid closed during operation.

GB│IE │ 5 ■
SPM 220 A1
ATTENTION! PROPERTY DAMAGE!
► Ensure that the appliance, the mains cable and the plug do not
come into contact with heat sources such as hotplates or naked
flames.
► Never place the appliance near sources of heat.
► To avoid overheating during operation, do not cover the appliance.
► Do not overload the appliance. Do not use recipes with more than
500 g flour per batch.
► During operation, add only the ingredients to be processed into the
dough container.
► Do not operate the appliance without ingredients! Risk of overheating!
► Do not use an external timer switch or a separate remote control
system to operate the appliance.
► After approx. 35 minutes of operation, we recommend letting the
appliance cool down for approx. 90 minutes.
NOTE
► No user action is required to switch the product between 50 and
60 Hz. The product switches automatically to either 50 or 60 Hz.

■ 6 │ GB│IE SPM 220 A1
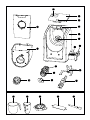
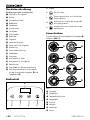
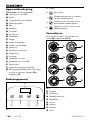
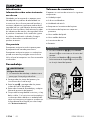
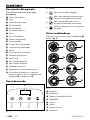
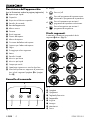
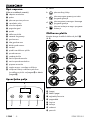
Appliance description
(See fold-out page for illustrations)
1 Opening for liquids
2 Lid
3 Lid release button
4 Control panel
5 Appliance base
6 Drive shaft
7 Drawer
8 Shaping discs
9 Kneading hook
0 Dough shaft
q Dough shaft support
w Bracket for the dough shaft
e Marking
r Shaping disc fixture
t Dough container
z Front panel
u Measuring beaker for flour
i Measuring beaker for liquids
o Ravioli attachment
p Dough scraper with cleaning tool
a Cleaning tool with protective cap (for the
spaghetti A and spaghettoni B shaping
discs)
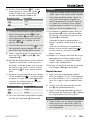
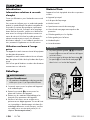
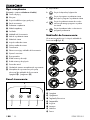
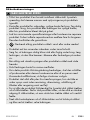
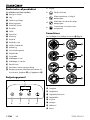
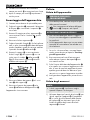
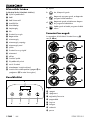
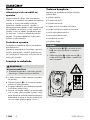
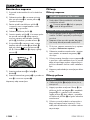
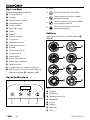
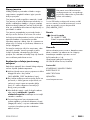
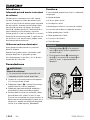
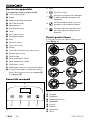
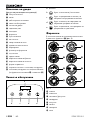
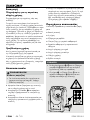
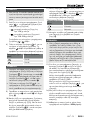
Control panel
a
ce
d
b
Fig. 1
a Display
b On/Off button
c Kneading programme key, for selecting
the kneading programme
d Kneading button to start the selected
kneading programme
e Dispense button to start the dispensing
programme
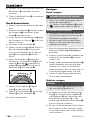
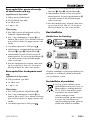
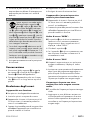
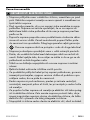
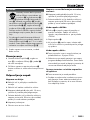
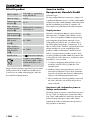
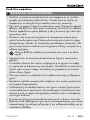
Shaping discs
8 different shaping discs8 are supplied with the
product (fig. 2):
G
F
E
D
C
BA
H
Fig. 2
A Spaghetti
B Spaghettoni
C Tagliatelle/Fettuccine
D Pappardelle
E Linguine
F Lasagne
G Macaroni
H Penne

GB│IE │ 7 ■
SPM 220 A1
Assembling the appliance
NOTE
► Before first use, clean all parts of the appliance
as described in the section Cleaning.
1) Set up the appliance on a flat surface near a
mains socket that is easily accessible. There
should be enough space in front of the appli-
ance for a bowl or similar to catch the pasta.
2) Push the dough containert into the appliance
base5 as far as the stop. The tabs on the
dough containert must be pushed into the
corresponding slots in the rear wall.
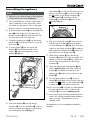
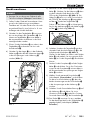
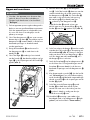
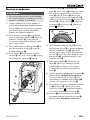
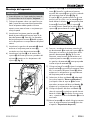
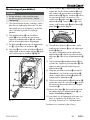
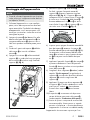
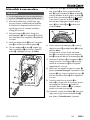
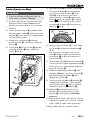
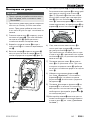
3) Guide the kneading hook9 into the dough
containert from above and insert it into the
drive shaft6.
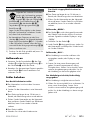
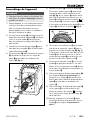
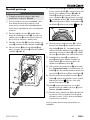
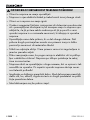
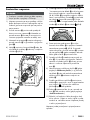
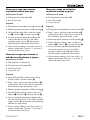
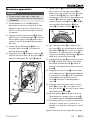
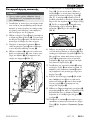
4) Push the supportq into the end of the
bracketw so that the three tabs on the
supportq slide into the grooves on the
bracketw (fig. 3).
0
q
w
9
Fig. 3
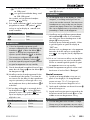
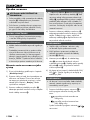
5) Mount the bracketw onto the dough
containert. Push in the bracketw so that its
narrow end goes through the round opening
on the dough containert (fig. 3).
The bracketw only fits into the opening in one
position; the markinge must point towards
the symbol on the dough containert.
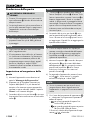
Turn the bracketw clockwise until the
markinge on the bracketw points to the
symbol (fig. 4):
w
e
Fig. 4
6) Then push the dough shaft0 with its narrow
end through the bracketw into the retainer
on the kneading hook9 (fig. 3). If necessary,
reach into the dough containert from above
and wiggle the kneading hook9 a little until
you can push in the dough shaft0.
7) Place the front panelz onto the dough
containert and push it firmly into place. The
catches on the front panelz must slide into in
the corresponding recesses on the dough
containert.
8) Select the appropriate shaping disc8 (see
section Shaping discs) and slide it onto the
bracketw so that the two catches on the
shaping disc8 slide into the recesses on the
bracketw.
9) Push the shaping disc fixturer onto the
bracketw and tighten it by turning it clockwise
towards the symbol. Fix the shaping disc8
in place with your free hand if necessary.
10) Do not fit the lid 2 until after you have placed
the required amount of flour in the dough
containert (see section Making pasta).
11) Insert the plug into an easily accessible mains
socket. You will hear a beep and the display a
lights up briefly. The appliance is now in
standby mode.
The appliance is now assembled and ready for
operation.

■ 8 │ GB│IE SPM 220 A1
Making pasta
WARNING! RISK OF INJURY!
► Never reach into the dough containert
during operation. Danger of injury due to
rotating parts!
► Do not change accessories unless the drive
unit is entirely at a standstill and the blender
is unplugged from the power supply!
The appliance will run on for a short time
after being switched off.
ATTENTION! PROPERTY DAMAGE!
► Do not overload the appliance. Do not use
recipes with more than 500 g flour per batch.
NOTE
► Every press of a button is acknowledged with
a beep.
► Operation is only possible with correctly fitted
accessories. If the accessories have not been
fitted correctly, you will hear several beeps
when the programme starts and OPEN ap-
pears on the display a. Unplug the appli-
ance and check that the accessories are cor-
rectly fitted.
Kneading and dispensing pasta
dough
1) Assemble the appliance as described in the
section Assembling the appliance.
2) Prepare all the ingredients you need for your
pasta dough. Refer to the recipes in this
manual, for example, which are tailored to
this appliance (see section Recipes) or in
the enclosed recipe booklet.
3) Measure the required amount of flour using the
measuring beaker for flouru and fill it into the
dough container t.
NOTE
► 1 measuring beakeru corresponds to ap-
prox. 250 g flour. Fill the measuring beaker u
with flour. If the flour starts to pile up, shake the
measuring beaker u and tap the bottom light-
ly on a firm surface. This will flatten down the
flour. This compacts the flour, which has an
influence on the quantity filled in. If necessary,
use a kitchen scale to measure the weight.
4) Use the measuring beaker for liquidsi to
measure the required amount of liquid or
egg. First, pour the egg into the measuring
beakeri and then add liquid up to the
required total amount.
NOTE
► Always whisk egg with liquid to achieve
a smoother dough.
► For better processing, do not add liquids into
the dough containert until the beginning
of the kneading programme.
5) Fit the lid2 by sliding the two pins of the lid2
into the two slots in the appliance base5.
Then press down the front part of the lid2
until it audibly clicks into place in the front
panelz.
6) Press the On/Off button b to switch on
the appliance. You will hear a beep and
ON will appear on the display a.
NOTE
► If no buttons are pressed for approx.
2 minutes, you will hear several beeps and
the appliance switches off automatically.
7) Use the kneading programme button c
to select the right kneading programme for
your dough:
–: for small dough quantities up to
approx. 250 g flour
–: for large dough quantities from
approx. 250‒500 g flour
The symbol of the selected kneading
programme / lights up.

GB│IE │ 9 ■
SPM 220 A1
8) Press the kneading button d to start the
kneading programme. The symbol also lights
up and the display a shows the remaining
kneading time.
Kneading
programme
Kneading time
3 min
3 min
NOTE
► You can pause the current programme at any
time by pressing the kneading button d
or opening the lid 2. Resume the program-
me by pressing the kneading button d
again and closing the lid2 if necessary.
► Pressing the On/Off button b cancels
the running programme and puts the machine
into standby mode.
9) Slowly pour the required amount of liquid
through the opening1 in the lid 2 into the
dough containert.
10) At the end of the kneading programme, you
will hear several beeps. Check the consistency
of the dough. If the ingredients are still not opti-
mally mixed, start another kneading process
by pressing the kneading button d.
11) When the dough has been sufficiently mixed,
press the dispense button e to start the
dispensing programme. The symbol also
lights up and the display a shows the
remaining dispensing time.
Kneading
programme
Dispensing time
11 min
14 min
12) You can cut the pasta while it is being
dispensed using the dough scraperp.
NOTE
► If OUL appears on the displaya, the pasta
dough is too dry and cannot be processed
properly. Start a new kneading process and
add a little liquid after starting the program-
me. Then start another dispensing process
and check whether the pasta dough is now
better dispensed
13) At the end of the dispensing programme, the
kneading hook9 continues to rotate, changing
direction in order to remove any dough residues
from the dough shaft0.
As soon as the process is completely finished,
you will hear several beeps and OFF appears
on the display a.
If there is any dough left in the appliance,
press the dispense button e again to
start another shortened output process.
14) If no buttons are pressed for about 2 minutes
after the end of the dispensing programme,
you will hear several beeps and the appliance
switches back to standby mode.
15) Clean the appliance after use as described in
the section Cleaning.
Making ravioli
1) Lay out fresh lasagne sheets flat on a chopping
board or similar. The lasagne sheets should
measure at least 7.5 x 7.5 cm, roll them out
slightly with a rolling pin if necessary.
2) Use the underside of the ravioli attachment o
to cut out the dough pockets.
3) Place the dough pockets flush on top of the
ravioli attachmento and put the desired filling
in the middle.
NOTE
► Put the dough left over from the cutting back
into the machine, start a kneading process
and form another lasagne sheet.
4) Carefully close the two halves of the ravioli
attachment o and press them firmly together.
5) Open the ravioli attachmento and remove
the finished ravioli.

■ 10 │ GB│IE SPM 220 A1
Dismantling the appliance
1) Unplug the appliance from the mains socket
(if necessary).
2) Remove the lid 2: To do this, press the catch 3
and take off the lid 2 by pulling it upwards.
3) Turn the shaping disc fixturer anticlockwise
in the direction of the symbol and remove it.
4) Remove the shaping disc8.
5) Remove the front panelz. To do this, pull the
dough containert forward a little from the
appliance base until you can pull the front
panelz off the dough containert.
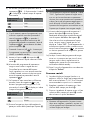
6) Turn the bracketw anticlockwise until the
markinge on the bracketw points towards
the symbol on the dough containert
(fig. 5). Remove the bracketw together
with the dough shaft0.
w
e
Fig. 5
7) Remove the dough shaft0 and supportq
from the bracketw.
8) Remove the kneading hook9 and the dough
containert from the appliance base5.
The appliance is now dismantled.
Cleaning
Cleaning the appliance
DANGER! ELECTRIC SHOCK!
► Before cleaning the appliance, disconnect the
power plug from the mains power socket!
►
Never immerse the appliance base 5
in water or other liquids!
ATTENTION! PROPERTY DAMAGE!
► Do not use abrasive or aggressive cleaning
materials. These can irreparably damage
the surfaces!
► Clean the appliance after each use to avoid
malfunctions caused by food debris.
1) If you have not already done so, dismantle
the appliance as described in the section
Dismantling the appliance.
2) Remove any flour residues from the kneading
hook9 socket with a dry cloth.
3) Clean the inside of the appliance base5 and
the surfaces with a slightly moistened cloth. If
necessary, apply a mild detergent to the cloth
and wipe with a slightly moistened cloth.
4) Dry the appliance thoroughly before reas-
sembling it.
Cleaning the accessories
NOTE
► The shaping discs8 are easiest to clean
when the dough has dried.
1) First, use the cleaning toola (for the spaghetti
A and spaghettoni B shaping discs) or the
lateral cleaning pins of the dough scraperp,
to roughly clean the dough residues out of the
recesses on the used shaping discs8.
2) Clean all removable parts and all accessories
in mild dishwater. Rinse with fresh water to
remove all detergent residues.

GB│IE │ 11 ■
SPM 220 A1
NOTE
► The following parts are also suitable
for cleaning in the dishwasher: lid
2, dough containert, bracketw,
dough shaft0, dough shaft supportq,
kneading hook9, shaping disc fixturer,
shaping discs8, measuring beakeru/i,
dough scraperp, cleaning toola, ravioli
attachmento.
If possible, place all the parts in the upper
basket of the dishwasher and make sure that
they are not jammed in place.
► For stubborn dough residues on the shaping
discs8, try the following method: Place the
shaping discs8 in the freezer for 1–2 hours.
It should then be easy to remove the dough
residues using the cleaning toolsp/a.
3) Dry all parts thoroughly before reassembling
them.
Storage
♦ Store the shaping discs8, the dough
scraperp and the cleaning toola in the
drawer 7 on the side of the appliance.
♦ Store the cleaned appliance in a dust-free
and dry location with the lid2 closed.
Troubleshooting
The appliance is not working:
■ The power plug is not connected to the mains
power.
♦ Insert the plug into a mains power socket.
■ The appliance has been in operation for more
than approx. 35 minutes and the overheating
protection has been activated.
♦ Unplug the appliance from the mains socket and
allow it to cool down for about 90 minutes
before using it again.
■ The appliance is defective.
♦ Contact the Customer Service department.
The machine suddenly stops in the middle
of operation:
■ The appliance has been in operation for more
than approx. 35 minutes and the overheating
protection has been activated.
♦ Unplug the appliance from the mains socket and
allow it to cool down for about 90 minutes
before using it again.
Error code "OPEN":
■ The lid 2 is not closed properly or the accesso-
ries are not mounted correctly. You hear several
beeps when the programme starts and OPEN
appears on the display a.
♦ Now close the lid 2.
♦ If the lid 2 is properly closed, unplug the appli-
ance and check that the accessories are
correctly fitted.
Error code "OUL":
■ The pasta dough is too dry and cannot be
dispensed. OUL appears on the displaya.
♦ Start a new kneading process and add a little
liquid after starting the programme. Then start
another dispensing process and check whether
the pasta dough is now better dispensed.
The pasta dough is not dispensed at all/
not properly dispensed:
■ The pasta dough may be too moist.
♦ Add a little flour and start a new kneading
process. Then start another dispensing process
and check whether the pasta dough is now
better dispensed.

■ 12 │ GB│IE SPM 220 A1
Recipes
NOTE
► All quantities are based on the use of normal
wheat flour (soft flour). Other types of flour,
such as spelt or wholemeal flour, usually
require a little more liquid.
► The quantities stated in the recipes are ap-
proximate values. As a rule, you should stick
to the recommended proportions of flour and
liquid. However, the amount of liquid required
may vary slightly due to various factors. If
your dough is not optimally processed with
the given quantities, add a few millilitres more
or less liquid next time. Please also observe
the information in the section on Trouble-
shooting.
► 1 measuring beakeru corresponds to ap-
prox. 250 g flour. Fill the measuring beaker u
with flour. If the flour starts to pile up, shake the
measuring beaker u and tap the bottom light-
ly on a firm surface. This will flatten down the
flour. This compacts the flour, which has an
influence on the quantity filled in. If necessary,
use a kitchen scale to measure the weight.
► 1 measuring beaker of flour u produces
approx. 325 g pasta.
► You can replace 1 egg with about 50 ml
of liquid.
For optimum processing of the dough, keep to the
following ratio of flour and liquids if possible:
For every 1 measuring beaker of flour u, add
approx. 80 ml of liquid. You can use the 1 and
2 markings on the measuring beaker for
liquidsi as orientation.
When using 1 measuring beaker flour u, add
liquid up to the 1 marking and with 2 measur-
ing beakers of flour u accordingly up to the 2
marking:
Quantity of
flour Quantity of liquid
approx. 80 ml (= 1 )
approx. 160 ml (= 2 )
Use the “1” and “2” markings on the
measuring beaker for liquidsi as an orientation
only for liquids containing no egg.
If the ingredients include eggs, add about 10 ml
more liquid per egg (size M). Place 1 egg in the
measuring beaker for liquidsi and add up to 90
ml of liquid.
Quantity of
flour Quantity of liquid + egg
approx. 90 ml (total)
approx. 180 ml (total)
You can prepare pasta dough with up to a max.
500 g flour in one go. To do so, use 2 measuring
beakers of flour u (around 250 g each). Fill the
measuring beaker for liquidsi 2 times up to 90
ml with egg and liquid. In this way, slowly add two
portions of the whisked water/egg mixture through
the opening1 in the lid 2 into the dough
containert.
Basic recipe for durum wheat pasta
without egg
Ingredients for 2 people
▯ 200 g durum wheat
▯ 50 g wheat flour (soft flour)
▯ approx. 80 ml water
Preparation
♦ Add 200 g durum wheat and 50 g wheat flour
into the dough containert.
♦ Start the kneading programme for 250 g
flour .
♦ Slowly pour approx. 80 ml water through the
opening1 in the lid 2 into the dough
containert.
♦ Dispense the pasta dough at the end of the
kneading programme. You can use the dough
scraperp to cut the pasta to the desired length
during dispensing.
♦ Place the finished pasta in boiling salted water
and stir occasionally. After about 3–4 minutes
the pasta is al dente, i.e. cooked until firm to
the bite.

GB│IE │ 13 ■
SPM 220 A1
Basic recipe for wheat pasta
without egg
Ingredients for 2 people
▯ 250 g wheat flour (soft flour)
▯ approx. 80 ml water
Preparation
♦ Add 250 g wheat flour into the dough
containert.
♦ Start the kneading programme for 250 g
flour .
♦ Slowly pour approx. 80 ml water through the
opening1 in the lid 2 into the dough
containert.
♦ Dispense the pasta dough at the end of the
kneading programme. You can use the dough
scraperp to cut the pasta to the desired length
during dispensing.
♦ Place the finished pasta in boiling salted water
and stir occasionally. After about 3–4 minutes
the pasta is al dente, i.e. cooked until firm to the
bite.
Basic recipe for durum wheat pasta
with egg
Ingredients for 2 people
▯ 200 g durum wheat
▯ 50 g wheat flour (soft flour)
▯ approx. 40 ml Water
▯ 1 egg (size M)
Preparation
♦ Add 200 g durum wheat and 50 g wheat flour
into the dough containert.
♦ Place 1 egg in the measuring beaker for
liquidsi and add approx. 40 ml water.
Together, this should add up to about 90 ml
of liquid. Whisk the egg with the water.
♦ Start the kneading programme for 250 g
flour .
♦ Slowly pour the water/egg mixture through
the opening1 in the lid 2 into the dough
containert.
♦ Dispense the pasta dough at the end of the
kneading programme. You can use the dough
scraperp to cut the pasta to the desired length
during dispensing.
♦ Place the finished pasta in boiling salted water
and stir occasionally. After about 3–4 minutes
the pasta is al dente, i.e. cooked until firm to
the bite.
Basic recipe for wheat pasta with
egg
Ingredients for 2 people
▯ 250 g wheat flour (soft flour)
▯ approx. 40 ml water
▯ 1 egg (size M)
Preparation
♦ Add 250 g wheat flour into the dough
containert.
♦ Place 1 egg in the measuring beaker for
liquidsi and add approx. 40 ml water.
Together, this should add up to about 90 ml
of liquid. Whisk the egg with the water.
♦ Start the kneading programme for 250 g
flour .
♦ Slowly pour the water/egg mixture through the
opening1 in the lid 2 into the dough
containert.
♦ Dispense the pasta dough at the end of the
kneading programme. You can use the dough
scraperp to cut the pasta to the desired length
during dispensing.
♦ Place the finished pasta in boiling salted water
and stir occasionally. After about 3–4 minutes
the pasta is al dente, i.e. cooked until firm to the
bite.

■ 14 │GB│IE SPM 220 A1
Disposal
Applies only to France:
The product, its packaging and the operating
instructions are recyclable. They are subject to an
extended manufacturer responsibility and will be
collected separately.
Disposal of the appliance
T
he adjacent symbol of a crossed-out
dustbin means that this appliance is
subject to Directive 2012/19/EU. This
directive states that this appliance may
not be disposed of in the normal
household waste at the end of its useful
life, but must be taken to specially
set-up collection locations, recycling
depots or disposal companies.
The disposal is free of charge
for the user. Protect the
environment and dispose of
this appliance properly.
If your old appliance has stored any
personal data, you are responsible for
deleting it yourself before returning it.
Your local community or municipal
authorities can provide information on
how to dispose of the worn-out prod-
uct.
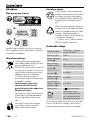
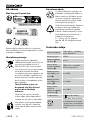
Disposal of the packaging
The packaging materials have been
selected for their environmental friend-
liness and ease of disposal and are
therefore recyclable. Dispose of pack-
aging materials that are no longer
needed in accordance with applicable
local regulations.
Dispose of the packaging in an envi-
ronmentally friendly manner. Note the
labelling on the packaging and sepa-
rate the packaging material compo-
nents for disposal, if necessary. The
packaging material is labelled with
abbreviations (a) and numbers (b)
with the following meanings:
1–7: plastics, 20–22: paper and
cardboard, 80–98:composites.
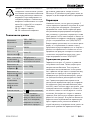
Technical specifications
Nominal voltage 220‒240 V ∼ (AC),
50/60 Hz
Rated power 220 W
Dough container t
capacity approx. 2l
Max. Dough
container t fill
capacity
500g flour + required
liquid per run
Measuring beaker
for flour u
capacity
approx. 250 g
Measuring beaker
for liquids i
capacity
approx. 180 ml
Max. Measuring
beaker for
liquids i fill
capacity
approx. 160 ml
Protection class II/ (double insulation)
All of the parts of this appli-
ance that come into contact
with food are food-safe.

GB│IE │ 15 ■
SPM 220 A1
After approx. 35 minutes of operation, we recom-
mend letting the appliance cool down for approx.
90 minutes. Otherwise, the appliance may over-
heat and activate the overheat protection.
Kompernass Handels GmbH
warranty
Dear Customer,
This appliance has a 3-year warranty valid from the
date of purchase. If this product has any faults, you,
the buyer, have certain statutory rights. Your statu-
tory rights are not restricted in any way by the
warranty described below.
Warranty conditions
The warranty period starts on the date of purchase.
Please keep your receipt in a safe place. This will
be required as proof of purchase.
If any material or manufacturing fault occurs within
three years of the date of purchase of the product,
we will either repair or replace the product for you
or refund the purchase price (at our discretion).
This warranty service requires that you present the
defective appliance and the proof of purchase
(receipt) within the three-year warranty period,
along with a brief written description of the fault
and of when it occurred.
If the defect is covered by the warranty, your prod-
uct will either be repaired or replaced by us. The
repair or replacement of a product does not signify
the beginning of a new warranty period.
Warranty period and statutory
claims for defects
The warranty period is not prolonged by repairs
effected under the warranty. This also applies to
replaced and repaired components. Any damage
and defects present at the time of purchase must be
reported immediately after unpacking. Repairs
carried out after expiry of the warranty period shall
be subject to a fee.
Scope of the warranty
This appliance has been manufactured in accord-
ance with strict quality guidelines and inspected
meticulously prior to delivery.
The warranty covers material faults or production
faults. The warranty does not extend to product
parts subject to normal wear and tear or to fragile
parts which could be considered as consumable
parts such as switches, batteries or parts made of
glass.
The warranty does not apply if the product has
been damaged, improperly used or improperly
maintained. The directions in the operating instruc-
tions for the product regarding proper use of the
product are to be strictly followed. Uses and
actions that are discouraged in the operating
instructions or which are warned against must be
avoided.
This product is intended solely for private use and
not for commercial purposes. The warranty shall be
deemed void in cases of misuse or improper
handling, use of force and modifications / repairs
which have not been carried out by one of our
authorised Service centres.
Warranty claim procedure
To ensure quick processing of your case, please
observe the following instructions:
■ Please have the till receipt and the item number
(IAN)408206_2207 available as proof of
purchase.
■ You will find the item number on the type plate
on the product, an engraving on the product, on
the front page of the operating instructions
(below left) or on the sticker on the rear or
bottom of the product.
■ If functional or other defects occur, please
contact the service department listed either by
telephone or by e-mail.
■ You can return a defective product to us free of
charge to the service address that will be
provided to you. Ensure that you enclose the
proof of purchase (till receipt) and information
about what the defect is and when it occurred.

■ 16 │ GB│IE SPM 220 A1
You can download these instructions
along with many other manuals,
product videos and installation soft-
ware at www.lidl-service.com.
This QR code will take you directly to the Lidl
service page (www.lidl-service.com) where you
can open your operating instructions by entering
the item number (IAN)408206_2207.
Service
Service Great Britain
Tel.: 0800 404 7657
E-Mail: [email protected]
Service Ireland
Tel.: 1800 101010
E-Mail: [email protected]
IAN 408206_2207
Importer
Please note that the following address is not the
service address. Please use the service address
provided in the operating instructions.
KOMPERNASS HANDELS GMBH
BURGSTRASSE 21
44867 BOCHUM
GERMANY
www.kompernass.com

DE│AT│CH │ 17 ■
SPM 220 A1
Inhaltsverzeichnis
Einleitung ............................................................18
Informationen zu dieser Bedienungsanleitung ............................................18
Bestimmungsgemäßer Gebrauch .....................................................18
Auspacken ...........................................................18
Lieferumfang .........................................................18
Sicherheitshinweise ....................................................19
Gerätebeschreibung ...................................................22
Bedienfeld ............................................................22
Formscheiben .........................................................22
Gerät montieren .......................................................23
Nudeln herstellen ......................................................24
Nudelteig kneten und ausgeben lassen. . . . . . . . . . . . . . . . . . . . . . . . . . . . . . . . . . . . . . . . . . . . . . . . . 24
Ravioli formen ....................................................................25
Gerät demontieren ....................................................26
Reinigen .............................................................26
Gerät reinigen ....................................................................26
Zubehör reinigen ..................................................................26
Aufbewahren .........................................................27
Fehler beheben ........................................................27
Rezepte ..............................................................28
Grundrezept für Hartweizengrießnudeln ohne Ei .........................................28
Grundrezept für Weizennudeln ohne Ei ................................................29
Grundrezept für Hartweizengrießnudeln mit Ei ...........................................29
Grundrezept für Weizennudeln mit Ei ..................................................29
Entsorgung ...........................................................30
Gerät entsorgen ...................................................................30
Verpackung entsorgen ..............................................................30
Technische Daten ......................................................31
Garantie der Kompernaß Handels GmbH ..................................31
Service ..........................................................................32
Importeur ........................................................................32
La page est en cours de chargement...
La page est en cours de chargement...
La page est en cours de chargement...
La page est en cours de chargement...
La page est en cours de chargement...
La page est en cours de chargement...
La page est en cours de chargement...
La page est en cours de chargement...
La page est en cours de chargement...
La page est en cours de chargement...
La page est en cours de chargement...
La page est en cours de chargement...
La page est en cours de chargement...
La page est en cours de chargement...
La page est en cours de chargement...
La page est en cours de chargement...
La page est en cours de chargement...
La page est en cours de chargement...
La page est en cours de chargement...
La page est en cours de chargement...
La page est en cours de chargement...
La page est en cours de chargement...
La page est en cours de chargement...
La page est en cours de chargement...
La page est en cours de chargement...
La page est en cours de chargement...
La page est en cours de chargement...
La page est en cours de chargement...
La page est en cours de chargement...
La page est en cours de chargement...
La page est en cours de chargement...
La page est en cours de chargement...
La page est en cours de chargement...
La page est en cours de chargement...
La page est en cours de chargement...
La page est en cours de chargement...
La page est en cours de chargement...
La page est en cours de chargement...
La page est en cours de chargement...
La page est en cours de chargement...
La page est en cours de chargement...
La page est en cours de chargement...
La page est en cours de chargement...
La page est en cours de chargement...
La page est en cours de chargement...
La page est en cours de chargement...
La page est en cours de chargement...
La page est en cours de chargement...
La page est en cours de chargement...
La page est en cours de chargement...
La page est en cours de chargement...
La page est en cours de chargement...
La page est en cours de chargement...
La page est en cours de chargement...
La page est en cours de chargement...
La page est en cours de chargement...
La page est en cours de chargement...
La page est en cours de chargement...
La page est en cours de chargement...
La page est en cours de chargement...
La page est en cours de chargement...
La page est en cours de chargement...
La page est en cours de chargement...
La page est en cours de chargement...
La page est en cours de chargement...
La page est en cours de chargement...
La page est en cours de chargement...
La page est en cours de chargement...
La page est en cours de chargement...
La page est en cours de chargement...
La page est en cours de chargement...
La page est en cours de chargement...
La page est en cours de chargement...
La page est en cours de chargement...
La page est en cours de chargement...
La page est en cours de chargement...
La page est en cours de chargement...
La page est en cours de chargement...
La page est en cours de chargement...
La page est en cours de chargement...
La page est en cours de chargement...
La page est en cours de chargement...
La page est en cours de chargement...
La page est en cours de chargement...
La page est en cours de chargement...
La page est en cours de chargement...
La page est en cours de chargement...
La page est en cours de chargement...
La page est en cours de chargement...
La page est en cours de chargement...
La page est en cours de chargement...
La page est en cours de chargement...
La page est en cours de chargement...
La page est en cours de chargement...
La page est en cours de chargement...
La page est en cours de chargement...
La page est en cours de chargement...
La page est en cours de chargement...
La page est en cours de chargement...
La page est en cours de chargement...
La page est en cours de chargement...
La page est en cours de chargement...
La page est en cours de chargement...
La page est en cours de chargement...
La page est en cours de chargement...
La page est en cours de chargement...
La page est en cours de chargement...
La page est en cours de chargement...
La page est en cours de chargement...
La page est en cours de chargement...
La page est en cours de chargement...
La page est en cours de chargement...
La page est en cours de chargement...
La page est en cours de chargement...
La page est en cours de chargement...
La page est en cours de chargement...
La page est en cours de chargement...
La page est en cours de chargement...
La page est en cours de chargement...
La page est en cours de chargement...
La page est en cours de chargement...
La page est en cours de chargement...
La page est en cours de chargement...
La page est en cours de chargement...
La page est en cours de chargement...
La page est en cours de chargement...
La page est en cours de chargement...
La page est en cours de chargement...
La page est en cours de chargement...
La page est en cours de chargement...
La page est en cours de chargement...
La page est en cours de chargement...
La page est en cours de chargement...
La page est en cours de chargement...
La page est en cours de chargement...
La page est en cours de chargement...
La page est en cours de chargement...
La page est en cours de chargement...
La page est en cours de chargement...
La page est en cours de chargement...
La page est en cours de chargement...
La page est en cours de chargement...
La page est en cours de chargement...
La page est en cours de chargement...
La page est en cours de chargement...
La page est en cours de chargement...
La page est en cours de chargement...
La page est en cours de chargement...
La page est en cours de chargement...
La page est en cours de chargement...
La page est en cours de chargement...
La page est en cours de chargement...
La page est en cours de chargement...
La page est en cours de chargement...
La page est en cours de chargement...
La page est en cours de chargement...
La page est en cours de chargement...
La page est en cours de chargement...
La page est en cours de chargement...
La page est en cours de chargement...
La page est en cours de chargement...
La page est en cours de chargement...
La page est en cours de chargement...
La page est en cours de chargement...
La page est en cours de chargement...
La page est en cours de chargement...
La page est en cours de chargement...
La page est en cours de chargement...
La page est en cours de chargement...
La page est en cours de chargement...
La page est en cours de chargement...
La page est en cours de chargement...
La page est en cours de chargement...
La page est en cours de chargement...
La page est en cours de chargement...
La page est en cours de chargement...
La page est en cours de chargement...
La page est en cours de chargement...
La page est en cours de chargement...
La page est en cours de chargement...
La page est en cours de chargement...
La page est en cours de chargement...
La page est en cours de chargement...
La page est en cours de chargement...
La page est en cours de chargement...
La page est en cours de chargement...
La page est en cours de chargement...
La page est en cours de chargement...
La page est en cours de chargement...
La page est en cours de chargement...
La page est en cours de chargement...
La page est en cours de chargement...
La page est en cours de chargement...
La page est en cours de chargement...
La page est en cours de chargement...
La page est en cours de chargement...
La page est en cours de chargement...
La page est en cours de chargement...
La page est en cours de chargement...
La page est en cours de chargement...
La page est en cours de chargement...
La page est en cours de chargement...
La page est en cours de chargement...
La page est en cours de chargement...
La page est en cours de chargement...
La page est en cours de chargement...
La page est en cours de chargement...
La page est en cours de chargement...
La page est en cours de chargement...
La page est en cours de chargement...
La page est en cours de chargement...
La page est en cours de chargement...
La page est en cours de chargement...
La page est en cours de chargement...
La page est en cours de chargement...
La page est en cours de chargement...
La page est en cours de chargement...
La page est en cours de chargement...
La page est en cours de chargement...
La page est en cours de chargement...
La page est en cours de chargement...
La page est en cours de chargement...
La page est en cours de chargement...
La page est en cours de chargement...
La page est en cours de chargement...
La page est en cours de chargement...
La page est en cours de chargement...
La page est en cours de chargement...
La page est en cours de chargement...
La page est en cours de chargement...
La page est en cours de chargement...
La page est en cours de chargement...
La page est en cours de chargement...
La page est en cours de chargement...
La page est en cours de chargement...
La page est en cours de chargement...
La page est en cours de chargement...
La page est en cours de chargement...
La page est en cours de chargement...
La page est en cours de chargement...
La page est en cours de chargement...
La page est en cours de chargement...
La page est en cours de chargement...
La page est en cours de chargement...
-
 1
1
-
 2
2
-
 3
3
-
 4
4
-
 5
5
-
 6
6
-
 7
7
-
 8
8
-
 9
9
-
 10
10
-
 11
11
-
 12
12
-
 13
13
-
 14
14
-
 15
15
-
 16
16
-
 17
17
-
 18
18
-
 19
19
-
 20
20
-
 21
21
-
 22
22
-
 23
23
-
 24
24
-
 25
25
-
 26
26
-
 27
27
-
 28
28
-
 29
29
-
 30
30
-
 31
31
-
 32
32
-
 33
33
-
 34
34
-
 35
35
-
 36
36
-
 37
37
-
 38
38
-
 39
39
-
 40
40
-
 41
41
-
 42
42
-
 43
43
-
 44
44
-
 45
45
-
 46
46
-
 47
47
-
 48
48
-
 49
49
-
 50
50
-
 51
51
-
 52
52
-
 53
53
-
 54
54
-
 55
55
-
 56
56
-
 57
57
-
 58
58
-
 59
59
-
 60
60
-
 61
61
-
 62
62
-
 63
63
-
 64
64
-
 65
65
-
 66
66
-
 67
67
-
 68
68
-
 69
69
-
 70
70
-
 71
71
-
 72
72
-
 73
73
-
 74
74
-
 75
75
-
 76
76
-
 77
77
-
 78
78
-
 79
79
-
 80
80
-
 81
81
-
 82
82
-
 83
83
-
 84
84
-
 85
85
-
 86
86
-
 87
87
-
 88
88
-
 89
89
-
 90
90
-
 91
91
-
 92
92
-
 93
93
-
 94
94
-
 95
95
-
 96
96
-
 97
97
-
 98
98
-
 99
99
-
 100
100
-
 101
101
-
 102
102
-
 103
103
-
 104
104
-
 105
105
-
 106
106
-
 107
107
-
 108
108
-
 109
109
-
 110
110
-
 111
111
-
 112
112
-
 113
113
-
 114
114
-
 115
115
-
 116
116
-
 117
117
-
 118
118
-
 119
119
-
 120
120
-
 121
121
-
 122
122
-
 123
123
-
 124
124
-
 125
125
-
 126
126
-
 127
127
-
 128
128
-
 129
129
-
 130
130
-
 131
131
-
 132
132
-
 133
133
-
 134
134
-
 135
135
-
 136
136
-
 137
137
-
 138
138
-
 139
139
-
 140
140
-
 141
141
-
 142
142
-
 143
143
-
 144
144
-
 145
145
-
 146
146
-
 147
147
-
 148
148
-
 149
149
-
 150
150
-
 151
151
-
 152
152
-
 153
153
-
 154
154
-
 155
155
-
 156
156
-
 157
157
-
 158
158
-
 159
159
-
 160
160
-
 161
161
-
 162
162
-
 163
163
-
 164
164
-
 165
165
-
 166
166
-
 167
167
-
 168
168
-
 169
169
-
 170
170
-
 171
171
-
 172
172
-
 173
173
-
 174
174
-
 175
175
-
 176
176
-
 177
177
-
 178
178
-
 179
179
-
 180
180
-
 181
181
-
 182
182
-
 183
183
-
 184
184
-
 185
185
-
 186
186
-
 187
187
-
 188
188
-
 189
189
-
 190
190
-
 191
191
-
 192
192
-
 193
193
-
 194
194
-
 195
195
-
 196
196
-
 197
197
-
 198
198
-
 199
199
-
 200
200
-
 201
201
-
 202
202
-
 203
203
-
 204
204
-
 205
205
-
 206
206
-
 207
207
-
 208
208
-
 209
209
-
 210
210
-
 211
211
-
 212
212
-
 213
213
-
 214
214
-
 215
215
-
 216
216
-
 217
217
-
 218
218
-
 219
219
-
 220
220
-
 221
221
-
 222
222
-
 223
223
-
 224
224
-
 225
225
-
 226
226
-
 227
227
-
 228
228
-
 229
229
-
 230
230
-
 231
231
-
 232
232
-
 233
233
-
 234
234
-
 235
235
-
 236
236
-
 237
237
-
 238
238
-
 239
239
-
 240
240
-
 241
241
-
 242
242
-
 243
243
-
 244
244
-
 245
245
-
 246
246
-
 247
247
-
 248
248
-
 249
249
-
 250
250
-
 251
251
-
 252
252
-
 253
253
-
 254
254
-
 255
255
-
 256
256
-
 257
257
-
 258
258
-
 259
259
-
 260
260
-
 261
261
-
 262
262
-
 263
263
-
 264
264


dans d''autres langues
Documents connexes
-
Silvercrest SBB 850 C1 Mode d'emploi
-
Silvercrest SKMP 1300 B3 Operating Instructions Manual
-
Silvercrest SBB 850 B1 Mode d'emploi
-
Silvercrest 282016 Operating Instructions Manual
-
Silvercrest SKM 500 B1 Operating Instructions Manual
-
Silvercrest SKM 550 B1 Operating Instructions Manual
-
Silvercrest SKM 500 A1 Operating Instructions Manual
-
-
-