Faber AGIO24BK Agio Faceplate Install Instructions
- Taper
- Agio Faceplate Install Instructions

Three Screws
Rangehood Body
Front
Strip
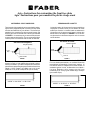
CUSTOMIZING YOUR RANGEHOOD
The front strip of the rangehood can be customized by replac-
ing the factory supplied strip with a custom front strip made
from the same materials as your cabinets. The front strip is
attached to the rangehood by three recessed screws and
three key hole slots on the back side of the strip as indicated
in FIGURE 1. It is necessary only to remove the three lower
screws to remove the front strip. The top screws will slide out
of the key holes once the three lower screws are removed.
Side View of the Rangehood
The front strip dimensions are given in FIGURE 2. For a
custom front strip, a local cabinet shop can make a strip to
match your cabinets. If you wish to keep the frame of the front
panel and only replace the glass panel, the dimensions follow:
Height = 5 11/16", Depth = 1/8", Width = 29 11/16" (for 30"
model) 35 11/16" (for 36" model) 23 5/8" (for 24" model).
FIGURE 1
23 5/8" or 29 15/16" or 35 15/16"
Vue latérale de la hotte
FIGURE 2
PERSONNALISER LA HOTTE
La bande frontale de la hotte peut être personnalisée en
remplaçant la bande fournie par une bande de même
matière que l’armoire. La bande frontale est maintenue à
la hotte par trois vis creuses et trois fentes à l’arrière de la
bande comme il est indiqué à la FIGURE 1. Les vis du des-
sus glisseront hors des fentes lorsque les trois vis creuses
seront enlevées.
Les dimensions de la bande sont données à la FIGURE 16.
Pour une bande personnalisée, un marchand d’armoires
peut fabriquer une bande qui s’assortira aux armoires. Si
vous désirez retenir la charpente de la bande frontale, et
seulement replacer le verre, les dimensions sont Hauter =
5 11/16 po, Épaisseur = 1/8 po, Largeur = 29 11/16" (pour
modèle 30 po) 35 11/16 po (pour modèle 36 po) 23 5/8 po
(pour modèle 24 po).
Bande
frontale
Boîtier de la hotte
Trois vis
FIGURE 1
23 5/8" or 29 15/16" or 35 15/16"
FIGURE 2
Agio - Instructions for customizing the front face plate
Agio - Instructions pour personnaliser le plat de visage avant
-
 1
1

Faber AGIO24BK Agio Faceplate Install Instructions
- Taper
- Agio Faceplate Install Instructions
dans d''autres langues
- English: Faber AGIO24BK