LG GT540R Le manuel du propriétaire
- Catégorie
- Téléphones portables
- Taper
- Le manuel du propriétaire
Ce manuel convient également à

P/N :
MFL67008349(1.0)
H
E N G L I S H
FRANÇAIS
www.lg.com
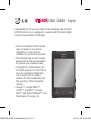
GT540R
User Guide
Printed in Korea
GT540R MR_RGS_Canada Rosers_Cove1 1 2011.1.25 1:50:54 PM

Bluetooth QD ID B016480
GT540R MR_RGS_Canada Rosers_Cove2 2 2011.1.25 1:50:54 PM

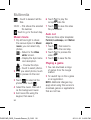
GT540R User Guide - English
• Some of contents of this manual
may not apply to your phone
depending on your phone’s
software or your service provider.
• This handset has a touch screen
keypad and is not recommended
for people with impaired vision.
• Copyright © LG Electronics, Inc.
All rights reserved. LG and the LG
logo are registered trademarks
of LG Group and its related
entities. All other trademarks are
the property of their respective
owners.
• Google™, Google Maps™,
Gmail™, YouTube™, Google
Talk™ and Android Market™ are
trademarks of Google, Inc.
Congratulations on your purchase of the advanced and compact
GT540R phone by LG, designed to operate with the latest digital
mobile communication technology.
GT540R MR_RGS_Canada Rosers_E_011 1 2011.1.25 2:9:4 PM

2
Contents
Important notice .....................6
1. Phone memory ..................6
2. Optimising Battery Life .......
6
3. Installing an Open Source
OS ....................................7
4. Using Unlock pattern ..........8
5. Using Safe Mode and Hard
Reset ................................8
6. Connecting to Wi-Fi
networks ...........................9
7. Using a microSD card .......10
8. Opening and Switching
Applications .....................10
9.
Connecting your phone to a
computer via USB.............11
10. Do not connect your phone
when you power on/off your
PC .................................13
11. When screen freezes ......13
Getting to know your phone .14
Installing the SIM card and
battery ................................16
Charging your phone ............17
Installing the memory card ...18
Formatting the memory card .19
Your Home screen ................20
Touch-screen tips ................20
Touch calibration ..................20
Lock and unlock screen ........21
Using your home screen .......21
Select your default home
screen ................................21
Adding widgets to your home
screen .................................22
Getting back to a recently used
application ...........................23
Notification drawer ...............23
Viewing the status bar ..........23
Google Account Set-up .........25
Creating your Google account .25
Signing in your Google
account ...............................25
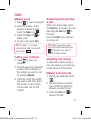
Calls ......................................27
Making a call .......................27
Calling your contacts ............27
Answering and rejecting a
call ......................................27
Adjusting call volume ...........27
Making a second call ...........27
GT540R MR_RGS_Canada Rosers_E_012 2 2011.1.25 2:9:4 PM

3
Viewing your call logs ...........28
Call settings .........................28
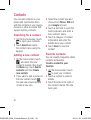
Contacts ................................30
Searching for a contact ........30
Adding a new contact ...........30
Favorite contacts ..................30
Creating a group ..................31
Messaging/E-mail .................32
Messaging ...........................32
Sending a message ..............32
Entering text ........................33
T9 mode .............................33
Abc mode ............................33
123 Mode ...........................
33
Entering accented letters ......34
Example ..............................34
Setting up your email ...........34
Sending an email using your
new account ........................34
Retrieving your email ............35
Changing your email account's
settings ...............................35
Threaded box ......................35
Changing your message
settings ...............................35
Social Networking ...............37
Adding your account to your
phone .................................38
Viewing and updating your
status .................................38
Removing accounts on your
phone .................................38
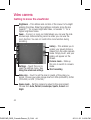
Camera .................................39
Getting to know the
viewfinder ............................39
Using the focus mode ...........40
Taking a quick photo ...........40
Once you’ve taken the photo 41
Using the advanced settings .41
Viewing your saved photos ...43
Video camera ........................44
Getting to know the
viewfinder ............................44
Shooting a quick video .........45
After shooting a video ...........45
Using the advanced settings .45
Watching your saved videos ..46
Your photos and videos ........47
Viewing your photos and
videos .................................47
GT540R MR_RGS_Canada Rosers_E_013 3 2011.1.25 2:9:5 PM

4
Adjusting the volume when
viewing a video ....................47
Setting a photo as wallpaper .47
Editing your photos ..............47
Rotating your photo ..............48
Adding text to a photo ..........48
Adding an effect to a photo ...48
Cropping a photo .................49
Tuning your photo ................49
Adding frames .....................49
Adding clipart ......................49
Using the drawpad ...............50
Adding stamps .....................50
Resizing ..............................50
Editing your videos ...............50
Trimming the length of the
video ...................................50
Selecting transition style .......50
Adding subtitles ...................51
Adding edit effects ...............51
Grabbing a frame .................51
Adding dubbing to your video .52
Multimedia ............................53
Timeline view .......................53
My Images options menu ......53
Sending a photo ...................54
Sending a video ...................54
Using an image ....................54
Creating a slideshow ............54
Checking your photo ............54
Media Player .......................55
Video editor .........................55
Storyboard ...........................55
Music movie .......................56
Auto cut ..............................56
Playing a game ....................56
Transferring files using USB
mass storage devices ...........57
Music ..................................57
Playing a song .....................58
Using the radio ....................58
Searching for stations ..........59
Resetting channels ...............59
Listening to the radio ............59
Google applications ..............60
Google Maps .......................60
Android Market ....................60
Gmail ..................................61
Google Talk ..........................61
Contents
GT540R MR_RGS_Canada Rosers_E_014 4 2011.1.25 2:9:5 PM

5
Rogers ..................................62
Utilities ..................................63
Setting your alarm ................63
Using your calculator ............63
Adding an event to your
calendar ..............................63
Changing your calendar view 64
Quickoffice ..........................64
Voice recorder .....................65
Recording a sound or voice ...65
Browser ................................66
Browser ...............................66
Accessing the Web ...............66
Using options .......................66
Adding and accessing
bookmarks ..........................67
Changing Web browser
settings ...............................67
Settings ................................68
Wireless & networks.............68
Sound & display ...................68
Location & security...............69
To lock your screen by using the
Pattern Lock ........................70
Applications .........................70
Accounts & sync ..................71
Privacy ................................71
SD card & phone storage ......72
Search ................................72
Language & keyboard ..........72
Accessibility .........................72
Text-to-speech .....................73
Date & time .........................73
About phone ........................73
Wi-Fi .....................................74
1. How to set up Wi-Fi .........74
2. Wi-Fi network profile
support ............................74
3. How to obtain the MAC
address ..........................75
Software update ...................76
Phone Software update ........76
DivX Mobile .........................76
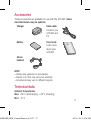
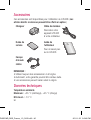
Accessories ..........................77
Technical data.......................77
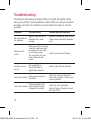
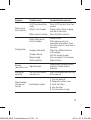
Troubleshooting ....................78
For Your Safety .....................80
Safety Guidelines ..................87
GT540R MR_RGS_Canada Rosers_E_015 5 2011.1.25 2:9:5 PM

6
Important notice
Please check to see if any
problems you have encountered
with your phone are described
in this section, before taking the
phone in for service or calling a
service representative.
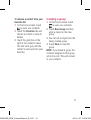
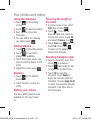
1. Phone memory
When available space on your
phone memory is less than 10%,
your phone can not receive a new
message. You need to check your
phone memory and delete some
data such as applications or
messages to make more memory
available.
To manage the application
1.
On the home screen, touch
Applications
tab and select
Settings
>
Applications
>
Manage applications
.
2.
When all applications
appear, scroll and select
the application you want to
uninstall.
3.
Tap
Uninstall
and touch OK
to uninstall application you
desired.
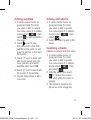
2. Optimising Battery Life
You can extend your battery's
life between charges by turning
off features that you don't
need to run constantly in the
background. You can also
monitor how applications and
system resources consume
battery power.
To extend the life of your
battery
- Turn off radio communications
that you aren't using. If you
aren't using Wi-Fi, Bluetooth
®
,
or GPS, turn them off.
- Turn down screen brightness
and set a shorter screen
timeout.
- Turn off automatic syncing for
Gmail, Calendar, Contacts, and
other applications.
- Some applications you’ve
downloaded may cause your
battery’s life to be reduced.
GT540R MR_RGS_Canada Rosers_E_016 6 2011.1.25 2:9:6 PM

7
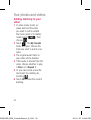
To check the battery charge
level
1.
On the home screen, touch
Applications
tab and select
Settings
>
About phone
>
Status
.
2.
The battery status (charging,
discharging) and level (as a
percentage of fully charged)
are displayed at the top of the
screen.
To monitor and control what
uses the battery
1.
On the home screen, touch
Applications
tab and select
Settings> About phone>
Battery use.
2.
The top of the screen displays
battery usage time. Either how
long since last connected to a
power source or, if connected
to a power source, how long
you were last running on
battery power. The body of the
screen lists applications or
services using battery power
from greatest amount to least.
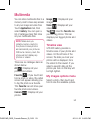
3. Installing an Open
Source OS
If you install an open source
OS on your phone, and do not
use the OS provided by the
manufacturer, this may cause
your phone to malfunction.
WARNING:
If you install
and use an OS other than
the one provided by the
manufacturer, your phone
is no longer covered by the
warranty.
WARNING:
To protect
your phone and personal data,
download applications only
from trusted sources, such
as Android Market. If some
applications are not properly
installed on your phone, your
phone may not work normally
or a serious error can be
occurred. You will need to
uninstall those applications
and all of its data and settings
from the phone.
GT540R MR_RGS_Canada Rosers_E_017 7 2011.1.25 2:9:6 PM

8
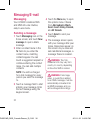
4. Using Unlock pattern
Set unlock pattern to secure your
phone. Opens a set of screens
that guide you through drawing a
screen unlock pattern.
WARNING:
Precautions to
take when using the Pattern
Lock
It is very important that you
remember the unlock pattern
you set. You will not be able to
access your phone if you use
an incorrect pattern 5 times.
After attempting the unlock
pattern 5 times, you can touch
the Forget Pattern Option
and use your Google account
information to unlock your
phone.
If you do not have Google
account, you don't create the
Google account on the phone,
or you forget it, you can use
Hard
Reset
.
5. Using Safe Mode and
Hard Reset
Using Safe mode
* To recover from malfunction
state of your phone
1.
Turn off your phone and
reboot. While your phone is
powering back on, press and
hold the Home key during
Android Logo is displayed.
Your phone will boot all the
way to the main screen and
display "safe mode" in lower
left corner.
2.
Select
Settings
>
Applications
>
Manage
applications
, and choose the
application then select an
Uninstall
icon.
3.
After uninstalling the
application, turn off and
reboot your phone.
* Using Hard Reset (Factory Reset)
If it does not restore to the original
condition, use
Hard Reset
to
initialize your phone.
Important notice
GT540R MR_RGS_Canada Rosers_E_018 8 2011.1.25 2:9:6 PM

9
When your phone turns on and
the lock screen displays, press
and hold the volume up + Home
+ Search keys all at the same time
(for five seconds). When the pop
up screen is shown, choose OK to
reset your phone.
Please note, after you perform
Hard Reset
, all your data and
applications on your phone will be
erased and cannot be reversed.
WARNING:
If you
perform Hard Reset, all user
applications and user data will
be deleted. Please remember
to back up any important data
before performing
Hard Reset
.
6. Connecting to Wi-Fi
networks
To use Wi-Fi on your phone,
you access a wireless access
point, or “hotspot.” Some access
points are open and you can
simply connect to them. Others
are hidden or implement other
security features, so you must
configure your phone so it can
connect to them.
Turn off Wi-Fi when you're not
using it, to extend the life of your
battery.
To turn Wi-Fi on and connect to
a Wi-Fi network
1.
On the home screen, touch
Applications
tab and select
Settings
>
Wireless &
networks
>
Wi-Fi settings
.
2.
Touch
Wi-Fi
to turn it on and
begin scan for available Wi-Fi
networks.
- List of available Wi-Fi
networks is displayed.
Secured networks are
indicated by a lock icon.
3.
Touch a network to connect
to it.
- If the network is open, you
are prompted to confirm
that you want to connect
to that network by touching
Connect
.
- If the network is secured,
you're prompted to enter
GT540R MR_RGS_Canada Rosers_E_019 9 2011.1.25 2:9:6 PM

10
a password or other
credentials. (Ask your network
administrator for details.)
4.
The Status bar displays icons
that indicate Wi-Fi status.
7. Using a microSD card
Pictures, along with Music and
Video files, can only be saved to
external memory.
Before using the built-in camera,
you need to insert a micro SD
memory card to your phone first.
Without inserting a memory
card, you will not be able to
save pictures and videos you
had taken.
NOTE:
Applications can only be
saved to the phone's internal
memory.
WARNING:
Do not insert
or remove the memory
card when the phone is on.
Otherwise, it may damage the
memory card as well as your
phone, and the data stored
on the memory card may be
corrupted. To remove the
memory card safely, please
select Applications > Settings
SD Card&phone storage >
Unmount SD card.
8. Opening and Switching
Applications
Multi-tasking is easy with
Android because open
applications keep running
even when you open another
application. There’s no need
to quit an application before
opening another. Use and
switch among several open
applications. Android manages
each application, stopping and
starting them as needed, to
ensure that idle applications
Important notice
GT540R MR_RGS_Canada Rosers_E_0110 10 2011.1.25 2:9:7 PM

11
don’t consume resources
unnecessarily.
To stop the application you use
1.
On the home screen, touch
Applications
tab and select
Settings
>
Applications
>
Manage applications
.
2.
Scroll to the desire application
and touch
Force stop
to stop
using it.
9.
Connecting your phone
to a computer via USB
NOTE:
You need LG PC Suite to
use GT540R as USB mass storage.
NOTE: Installing the LG PC suite
on your PC
To synchronise your phone via
USB cable with your PC, you
need to install the LG PC suite
program on your PC. You can
download this program from the
LG website (http://www.lg.com).
Go to http://www.lg.com/us/
mobile-phones/mobile-support/
mobile-lg-mobile-phone-support.
jsp and select your region,
country & language. Visit the LG
website for more information on
installing and using the program.
LG PC SUITE
The LG PC Suite IV is a
program that helps you
connect your mobile phone
to a PC using a USB data
communication cable,
so that you can use the
functions of the mobile
phone on your PC.
Major Functions of the LG
PC Suite IV
- Create, edit and delete
phone data conveniently
- Synchronise data from
a PC & phone (contacts,
calendar/task)
- Transfer multimedia files
(photo, video, music)
conveniently with a simple
drag & drop between a PC
and phone
- Transfer the messages
from a phone to a PC
- Use your phone as a
Modem
- S/W update without loosing
your data
GT540R MR_RGS_Canada Rosers_E_0111 11 2011.1.25 2:9:7 PM

12
GT540R does not support:
- PC Connection via
Bluetooth
- LG Air Sync (Web Sync,
R-Click)
- OSP (On Screen Phone)
- To-do in Calendar
- Memo
- E-mail
- Java Application
User’s guide for PC Suite IV
is in Help menu after install
PC Suite IV.
To transfer files using USB
devices:
1.
Install your microSD card on
your phone. ( It may already
be inserted on your phone.)
2.
Before connecting the USB
data cable, make sure that
the
Mass storage only
mode
is enabled on your phone. (On
the applications menu, choose
Settings > SD card & phone
storage
, then select
Mass
storage only
check box.)
3.
Use the USB cable with
your phone to connect the
phone to a USB port on your
computer. You receive a
notification that the USB is
connected.
4.
Open the Notification drawer
and touch USB connected.
5.
Touch
Mount
to confirm
that you want to transfer
files between your phone’s
microSD card and the
computer.
When the phone is connected
as USB storage, you receive
a notification. You phone’s
microSD card is mounted as a
drive on your computer. You can
now copy files to and from the
microSD card.
NOTE:
Unlock screen when
using data connection
Your display will go dark if
untouched for a period of time
when using data connection. To
turn on your LCD screen, just
touch it.
Note:
When uninstalling PC
Suite IV, USB and Bluetooth
Important notice
GT540R MR_RGS_Canada Rosers_E_0112 12 2011.1.25 2:9:7 PM

13
Drivers are not automatically
removed. Therefore, they must
be uninstalled manually.
Tip!
To use a microSD card on
you phone again, you need to
open the Notification drawer and
touch "Turn off USB storage".
During this time, you can’t
access the microSD card from
your phone, so you can’t use
applications that rely on the
microSD card, such as Camera,
Gallery and Music.
To disconnect your phone from
the computer, carefully follow
your computer’s instructions
to disconnect USB devices
correctly, to avoid losing
information on the card.
1.
Safely disconnect the USB
device on your computer.
2.
Open the Notification drawer
and touch
Turn off USB
storage
.
3.
Touch
Turn off
in the dialog
that opens.
10. Do not connect your
phone when you
power on/off your PC
Make sure to disconnect your
phone and PC via data cable as
it might have errors on your PC.
11. When screen freezes
If the phone does not respond to
user input or the screen freezes:
remove the battery, insert it
again and power on the phone.
If it still does not work, please
contact to the service centre.
GT540R MR_RGS_Canada Rosers_E_0113 13 2011.1.25 2:9:7 PM

14
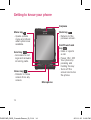
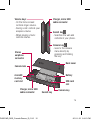
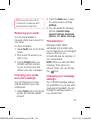
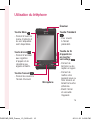
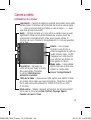
Getting to know your phone
Menu key
- Opens options
menu and check
what options are
available.
Send key
- Accesses to call
logs and answers
incoming calls.
Home key
- Returns to home
screen from any
screen.
Microphone
Earpiece
Back key
- Returns to the
previous screen.
End/Power/Lock
key
- Ends or rejects
a call.
- Power ON / OFF
Your phone by
pressing and
holding the key
- Turns off the
screen and locks
the phone.
GT540R MR_RGS_Canada Rosers_E_0114 14 2011.1.25 2:9:8 PM

15
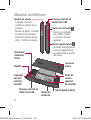
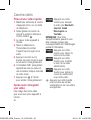
Back cover
Battery
SIM card
slot
Camera key
Search key
Charger, micro USB
cable connector
microSD
memory
card slot
Camera lens
Stereo
earphone
connector
Volume keys
- On the home screen:
controls ringer volume.
- During a call: controls your
earpiece volume.
- When playing a track:
controls volume.
Charger, micro USB
cable connector
Search key
- Searches the web and
contents in your phone.
Camera key
- Goes to the camera
menu directly by
pressing and holding
the key.
GT540R MR_RGS_Canada Rosers_E_0115 15 2011.1.25 2:9:10 PM

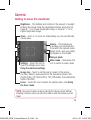
16
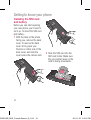
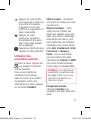
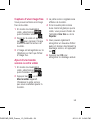
Installing the SIM card
and battery
Before you can start exploring
your new phone, you’ll need to
set it up. To insert the SIM card
and battery:
1
With the back of the phone
facing you, remove the back
cover. To remove the back
cover, firmly press your
thumbs on either side of the
back cover, and slide the
cover below the camera lens.
2
Slide the SIM card into the
SIM card holder. Make sure
the gold contact area on the
card is facing downwards.
Getting to know your phone
GT540R MR_RGS_Canada Rosers_E_0116 16 2011.1.25 2:9:15 PM

17
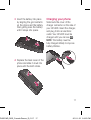
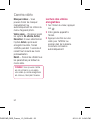
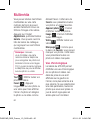
3
Insert the battery into place
by aligning the gold contacts
on the phone and the battery,
then gently press the battery
until it snaps into space.
4
Replace the back cover of the
phone and slide it down into
place until the latch clicks.
Charging your phone
Slide back the cover of the
charger connector on the side of
your GT540R. Insert the charger,
and plug it into an electrical
outlet. Your GT540R must be
charged until you can see .
NOTE:
The battery must be
fully charged initially to improve
battery lifetime.
GT540R MR_RGS_Canada Rosers_E_0117 17 2011.1.25 2:9:20 PM

18
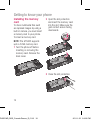
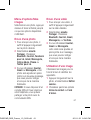
Installing the memory
card
To store multimedia files such
as captured images by using a
built-in camera, you must insert
a memory card to your phone.
To insert a memory card:
NOTE:
The GT540R supports
upto a 32GB memory card.
1
Turn the phone off before
inserting or removing the
memory card. Remove the
back cover.
2
Open the slot protection
and insert the memory card
into the slot. Make sure the
gold contact area is facing
downwards.
3
Close the slot protection.
Getting to know your phone
GT540R MR_RGS_Canada Rosers_E_0118 18 2011.1.25 2:9:26 PM
La page est en cours de chargement...
La page est en cours de chargement...
La page est en cours de chargement...
La page est en cours de chargement...
La page est en cours de chargement...
La page est en cours de chargement...
La page est en cours de chargement...
La page est en cours de chargement...
La page est en cours de chargement...
La page est en cours de chargement...
La page est en cours de chargement...
La page est en cours de chargement...
La page est en cours de chargement...
La page est en cours de chargement...
La page est en cours de chargement...
La page est en cours de chargement...
La page est en cours de chargement...
La page est en cours de chargement...
La page est en cours de chargement...
La page est en cours de chargement...
La page est en cours de chargement...
La page est en cours de chargement...
La page est en cours de chargement...
La page est en cours de chargement...
La page est en cours de chargement...
La page est en cours de chargement...
La page est en cours de chargement...
La page est en cours de chargement...
La page est en cours de chargement...
La page est en cours de chargement...
La page est en cours de chargement...
La page est en cours de chargement...
La page est en cours de chargement...
La page est en cours de chargement...
La page est en cours de chargement...
La page est en cours de chargement...
La page est en cours de chargement...
La page est en cours de chargement...
La page est en cours de chargement...
La page est en cours de chargement...
La page est en cours de chargement...
La page est en cours de chargement...
La page est en cours de chargement...
La page est en cours de chargement...
La page est en cours de chargement...
La page est en cours de chargement...
La page est en cours de chargement...
La page est en cours de chargement...
La page est en cours de chargement...
La page est en cours de chargement...
La page est en cours de chargement...
La page est en cours de chargement...
La page est en cours de chargement...
La page est en cours de chargement...
La page est en cours de chargement...
La page est en cours de chargement...
La page est en cours de chargement...
La page est en cours de chargement...
La page est en cours de chargement...
La page est en cours de chargement...
La page est en cours de chargement...
La page est en cours de chargement...
La page est en cours de chargement...
La page est en cours de chargement...
La page est en cours de chargement...
La page est en cours de chargement...
La page est en cours de chargement...
La page est en cours de chargement...
La page est en cours de chargement...
La page est en cours de chargement...
La page est en cours de chargement...
La page est en cours de chargement...
La page est en cours de chargement...
La page est en cours de chargement...
La page est en cours de chargement...
La page est en cours de chargement...
La page est en cours de chargement...
La page est en cours de chargement...
La page est en cours de chargement...
La page est en cours de chargement...
La page est en cours de chargement...
La page est en cours de chargement...
La page est en cours de chargement...
La page est en cours de chargement...
La page est en cours de chargement...
La page est en cours de chargement...
La page est en cours de chargement...
La page est en cours de chargement...
La page est en cours de chargement...
La page est en cours de chargement...
La page est en cours de chargement...
La page est en cours de chargement...
La page est en cours de chargement...
La page est en cours de chargement...
La page est en cours de chargement...
La page est en cours de chargement...
La page est en cours de chargement...
La page est en cours de chargement...
La page est en cours de chargement...
La page est en cours de chargement...
La page est en cours de chargement...
La page est en cours de chargement...
La page est en cours de chargement...
La page est en cours de chargement...
La page est en cours de chargement...
La page est en cours de chargement...
La page est en cours de chargement...
La page est en cours de chargement...
La page est en cours de chargement...
La page est en cours de chargement...
La page est en cours de chargement...
La page est en cours de chargement...
La page est en cours de chargement...
La page est en cours de chargement...
La page est en cours de chargement...
La page est en cours de chargement...
La page est en cours de chargement...
La page est en cours de chargement...
La page est en cours de chargement...
La page est en cours de chargement...
La page est en cours de chargement...
La page est en cours de chargement...
La page est en cours de chargement...
La page est en cours de chargement...
La page est en cours de chargement...
La page est en cours de chargement...
La page est en cours de chargement...
La page est en cours de chargement...
La page est en cours de chargement...
La page est en cours de chargement...
La page est en cours de chargement...
La page est en cours de chargement...
La page est en cours de chargement...
La page est en cours de chargement...
La page est en cours de chargement...
La page est en cours de chargement...
La page est en cours de chargement...
La page est en cours de chargement...
La page est en cours de chargement...
La page est en cours de chargement...
La page est en cours de chargement...
La page est en cours de chargement...
La page est en cours de chargement...
La page est en cours de chargement...
La page est en cours de chargement...
La page est en cours de chargement...
La page est en cours de chargement...
La page est en cours de chargement...
La page est en cours de chargement...
La page est en cours de chargement...
La page est en cours de chargement...
La page est en cours de chargement...
La page est en cours de chargement...
La page est en cours de chargement...
La page est en cours de chargement...
La page est en cours de chargement...
La page est en cours de chargement...
La page est en cours de chargement...
La page est en cours de chargement...
La page est en cours de chargement...
La page est en cours de chargement...
La page est en cours de chargement...
La page est en cours de chargement...
La page est en cours de chargement...
La page est en cours de chargement...
La page est en cours de chargement...
La page est en cours de chargement...
La page est en cours de chargement...
La page est en cours de chargement...
La page est en cours de chargement...
La page est en cours de chargement...
La page est en cours de chargement...
La page est en cours de chargement...
La page est en cours de chargement...
La page est en cours de chargement...
La page est en cours de chargement...
La page est en cours de chargement...
La page est en cours de chargement...
La page est en cours de chargement...
La page est en cours de chargement...
La page est en cours de chargement...
La page est en cours de chargement...
La page est en cours de chargement...
La page est en cours de chargement...
La page est en cours de chargement...
La page est en cours de chargement...
La page est en cours de chargement...
La page est en cours de chargement...
La page est en cours de chargement...
La page est en cours de chargement...
La page est en cours de chargement...
La page est en cours de chargement...
La page est en cours de chargement...
La page est en cours de chargement...
La page est en cours de chargement...
La page est en cours de chargement...
La page est en cours de chargement...
La page est en cours de chargement...
La page est en cours de chargement...
La page est en cours de chargement...
La page est en cours de chargement...
La page est en cours de chargement...
La page est en cours de chargement...
La page est en cours de chargement...
La page est en cours de chargement...
La page est en cours de chargement...
La page est en cours de chargement...
La page est en cours de chargement...
La page est en cours de chargement...
La page est en cours de chargement...
La page est en cours de chargement...
La page est en cours de chargement...
La page est en cours de chargement...
La page est en cours de chargement...
La page est en cours de chargement...
La page est en cours de chargement...
La page est en cours de chargement...
La page est en cours de chargement...
La page est en cours de chargement...
La page est en cours de chargement...
La page est en cours de chargement...
La page est en cours de chargement...
-
 1
1
-
 2
2
-
 3
3
-
 4
4
-
 5
5
-
 6
6
-
 7
7
-
 8
8
-
 9
9
-
 10
10
-
 11
11
-
 12
12
-
 13
13
-
 14
14
-
 15
15
-
 16
16
-
 17
17
-
 18
18
-
 19
19
-
 20
20
-
 21
21
-
 22
22
-
 23
23
-
 24
24
-
 25
25
-
 26
26
-
 27
27
-
 28
28
-
 29
29
-
 30
30
-
 31
31
-
 32
32
-
 33
33
-
 34
34
-
 35
35
-
 36
36
-
 37
37
-
 38
38
-
 39
39
-
 40
40
-
 41
41
-
 42
42
-
 43
43
-
 44
44
-
 45
45
-
 46
46
-
 47
47
-
 48
48
-
 49
49
-
 50
50
-
 51
51
-
 52
52
-
 53
53
-
 54
54
-
 55
55
-
 56
56
-
 57
57
-
 58
58
-
 59
59
-
 60
60
-
 61
61
-
 62
62
-
 63
63
-
 64
64
-
 65
65
-
 66
66
-
 67
67
-
 68
68
-
 69
69
-
 70
70
-
 71
71
-
 72
72
-
 73
73
-
 74
74
-
 75
75
-
 76
76
-
 77
77
-
 78
78
-
 79
79
-
 80
80
-
 81
81
-
 82
82
-
 83
83
-
 84
84
-
 85
85
-
 86
86
-
 87
87
-
 88
88
-
 89
89
-
 90
90
-
 91
91
-
 92
92
-
 93
93
-
 94
94
-
 95
95
-
 96
96
-
 97
97
-
 98
98
-
 99
99
-
 100
100
-
 101
101
-
 102
102
-
 103
103
-
 104
104
-
 105
105
-
 106
106
-
 107
107
-
 108
108
-
 109
109
-
 110
110
-
 111
111
-
 112
112
-
 113
113
-
 114
114
-
 115
115
-
 116
116
-
 117
117
-
 118
118
-
 119
119
-
 120
120
-
 121
121
-
 122
122
-
 123
123
-
 124
124
-
 125
125
-
 126
126
-
 127
127
-
 128
128
-
 129
129
-
 130
130
-
 131
131
-
 132
132
-
 133
133
-
 134
134
-
 135
135
-
 136
136
-
 137
137
-
 138
138
-
 139
139
-
 140
140
-
 141
141
-
 142
142
-
 143
143
-
 144
144
-
 145
145
-
 146
146
-
 147
147
-
 148
148
-
 149
149
-
 150
150
-
 151
151
-
 152
152
-
 153
153
-
 154
154
-
 155
155
-
 156
156
-
 157
157
-
 158
158
-
 159
159
-
 160
160
-
 161
161
-
 162
162
-
 163
163
-
 164
164
-
 165
165
-
 166
166
-
 167
167
-
 168
168
-
 169
169
-
 170
170
-
 171
171
-
 172
172
-
 173
173
-
 174
174
-
 175
175
-
 176
176
-
 177
177
-
 178
178
-
 179
179
-
 180
180
-
 181
181
-
 182
182
-
 183
183
-
 184
184
-
 185
185
-
 186
186
-
 187
187
-
 188
188
-
 189
189
-
 190
190
-
 191
191
-
 192
192
-
 193
193
-
 194
194
-
 195
195
-
 196
196
-
 197
197
-
 198
198
-
 199
199
-
 200
200
-
 201
201
-
 202
202
-
 203
203
-
 204
204
-
 205
205
-
 206
206
-
 207
207
-
 208
208
-
 209
209
-
 210
210
-
 211
211
-
 212
212
-
 213
213
-
 214
214
-
 215
215
-
 216
216
-
 217
217
-
 218
218
-
 219
219
-
 220
220
-
 221
221
-
 222
222
-
 223
223
-
 224
224
-
 225
225
-
 226
226
-
 227
227
-
 228
228
-
 229
229
-
 230
230
-
 231
231
-
 232
232
-
 233
233
-
 234
234
-
 235
235
-
 236
236
-
 237
237
-
 238
238
-
 239
239
-
 240
240
-
 241
241
-
 242
242


LG GT540R Le manuel du propriétaire
- Catégorie
- Téléphones portables
- Taper
- Le manuel du propriétaire
- Ce manuel convient également à
dans d''autres langues
- English: LG GT540R Owner's manual
Documents connexes
-
LG LGP690.AITABK Manuel utilisateur
-
LG LGP970.ABALTL Manuel utilisateur
-
LG LGP920.ATHAML Manuel utilisateur
-
LG P990HN Manuel utilisateur
-
-
-
LG P970G Manuel utilisateur
-
-
LG GW620R.ARGSBK Le manuel du propriétaire