Hilti WSR 650-A Manuel utilisateur
- Catégorie
- Outils électroportatifs
- Taper
- Manuel utilisateur

Operating instructions en
Mode d’emploi fr
Manual de instrucciones es
WSR 650-A
Printed: 07.07.2013 | Doc-Nr: PUB / 5071405 / 000 / 00

®
WS
R
650-A
1
13 12
2
3
4 5
10 911
8
7
6
1
This Product is Certified
Ce produit est certifié
Este producto esta certificado
Este produto está certificado
CUS
Printed: 07.07.2013 | Doc-Nr: PUB / 5071405 / 000 / 00

min.25mm
1– 6
3
2
min.40mm
2
4
3
5
8
6 7
B
A
9
®
WSR 650
-
A
®
WSR 650-A
®
WSR 650-A
min.40mm
®
W
S
R
650-
A
®
W
S
R
650-
A
®
W
S
R
6
50-
A
®
W
S
R
650
-
A
®
W
SR 6
5
0
-A
®
W
SR 6
5
0
-A
Printed: 07.07.2013 | Doc-Nr: PUB / 5071405 / 000 / 00

10
11
®
WS
R 650
-A
®
WS
R
6
50
-
A
®
WSR 6
5
0-A
12
®
W
S
R
6
5
0
-
A
®
W
S
R650-A
®
WS
R
6
5
0-A
®
W
SR
6
5
0
-
A
Printed: 07.07.2013 | Doc-Nr: PUB / 5071405 / 000 / 00

1
en
It is essential that the operating instructions
are read before the tool is operated for the
first time.
Always keep these operating instructions
together with the tool.
Ensure that the operating instructions
are with the tool when it is given to other
persons.
WSR 650-A cordless reciprocating saw
1. General information
1.1 Signal words and their meaning
-WARNING-
The word WARNING is used to draw attention to a poten-
tially dangerous situation which could lead to severe
personal injury or death.
-CAUTION-
Used to draw attention to a potentially dangerous situa-
tion which could lead to minor personal injury or dam-
age to the equipment or other property .
-NOTE-
Used to draw attention to an instruction or other useful
information.
1.2 Pictograms
Contents Page
1. General information 1
2. General safety rules 2
3. Specific safety rules and symbols 3
4. Functional description 5
5. Assembly 6
6. Operation 7
7. Care and maintenance 8
8. Blades and accessories 8
9. Troubleshooting 9
10. Disposal 9
11. Manufacturer's warranty – tools 10
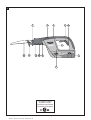
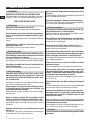
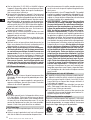
Operating controls and parts
햲 Blade clamp / blade holder
햳 Orbital action selector switch
햴 Stroke rate regulator
햵 Transport lock
햶 Control switch
햷 Type plate
햸 Battery pack
햹 Motor
햺 Gearing section
햻 Front-end grip area (hand guard)
햽 Lockbutton
햾 Contact shoe
햿 Saw blade (insert tool)
These numbers refer to the corresponding illustrations.
The illustrations can be found on the fold-out cover pages.
Keep these pages open while studying the operating instruc-
tions. In these operating instructions, the WSR 650-A
cordless reciprocating saw is referred to as "the tool".
Location of identification data on the tool
The type designation and serial number can be found
on the rating plate on the tool. Make a note of this data
in your operating instructions and always refer to it when
making an enquiry to your Hilti representative or ser-
vice department.
Type:
Serial no.:
Warning signs
Obligation signs
Wear ear
protection
Wear protective
gloves
Wear breathing
protection
Wear eye
protection
Read the operat-
ing instructions
before use
Symbols
General
warning
Warning:
electricity
Warning: caustic
substances
Warning:
hot surface
Return waste material for
recycling
Do not dispose of
batteries with general
refuse
V = volts no = no load stroke rate under
–––
---
= direct current no load
Printed: 07.07.2013 | Doc-Nr: PUB / 5071405 / 000 / 00

2
en
2. General safety rules
2.1 WARNING!
READ AND UNDERSTAND ALL INSTRUCTIONS
Failure to follow all instructions listed below, may result
in electric shock, fire and/or serious personal injury .
SA VE THESE INSTRUCTIONS.
2.2 Work Area
Keep your work area clean and well lit.
Cluttered benches and dark areas invite accidents.
Do not operate power tools in explosive atmospheres,
such as in the presence of flammable liquids, gases,
or dust.
Power tools create sparks which may ignite the dust or
fumes.
Keep bystanders, children, and visitors away while
operating a power tool.
Distractions can cause you to lose control.
2.3 Electrical safety
A battery operated tool with integral batteries or a se-
parate battery pack must be recharged only with the
specified charger for the battery.
A charger that may be suitable for one type of battery
may create a risk of fire when used with another battery .
Use battery operated tool only with specifically des-
ignated battery pack.
Use of any other batteries may create a risk of fire.
2.4 Personal safety
Stay alert, watch what you are doing, and use com-
mon sense when operating a power tool. Do not use
tool while tired or under the influence of drugs, alco-
hol, or medication.
A moment of inattention while operating power tools
may result in serious personal injury.
Dress properly. Do not wear loose clothing or jewel-
ry. Contain long hair. Keep your hair, clothing, and
gloves away from moving parts.
Loose clothes, jewelry, or long hair can be caught in
moving parts.
Avoid accidental starting. Be sure switch is in the
locked or off position before inserting battery pack.
Carrying tools with your finger on the switch or insert-
ing the battery pack into a tool with the switch on invites
accidents.
Remove adjusting keys or wrenches before turning
the tool on.
A wrench or a key that is left attached to a rotating part
of the tool may result in personal injury .
Do not overreach. Keep proper footing and balance at
all times.
Proper footing and balance enable better control of the
tool in unexpected situations.
Use safety equipment. Always wear eye protection.
Dust mask, non-skid safety shoes or hearing protection
must be used for appropriate conditions.
2.5 Tool Use and Care
Use clamps or other practical way to secure and sup-
port the workpiece to a stable platform.
Holding the work by hand or against your body is unsta-
ble and may lead to loss of control.
Do not force tool. Use the correct tool for your application.
The correct tool will do the job better and safer at the
rate for which it is designed.
Do not use tool if switch does not turn it on or off.
A tool that cannot be controlled with the switch is dan-
gerous and must be repaired.
Disconnect battery pack from tool or place the switch
in the locked or off position before making any adjust-
ments, changing accessories, or storing the tool.
Such preventive safety measures reduce the risk of start-
ing the tool accidentally .
Store idle tools out of reach of children and other
untrained persons.
Tools are dangerous in the hands of untrained users.
When battery pack is not in use, keep it away from
other metal objects like: paper clips, coins, keys, nails,
screws, or other small metal objects that can make a
connection from one terminal to another.
Shorting the battery terminals together may cause sparks,
burns, or a fire.
Maintain tools with care. Keep cutting tools sharp and
clean.
Properly maintained insert tools with sharp cutting edge
are less likely to bind and are easier to control.
Check for misalignment or binding of moving parts,
breakage of parts, and any other condition that may
affect the tool’s operation. If damaged, have the tool
serviced before using.
Many accidents are caused by poorly maintained tools.
Use only accessories that are recommended by the
manufacturer for your model.
Accessories that may be suitable for one tool may cre-
ate a risk of injury when used on another tool.
2.6 Service
Tool service must be performed only by qualified repair
personnel.
Printed: 07.07.2013 | Doc-Nr: PUB / 5071405 / 000 / 00

3
en
3. Specific safety rules and symbols
3.1 Basic information concerning safety
In addition to the information relevant to safety given
in each of the sections of these operating instructions,
the following points must be strictly obser ved at all
times.
WARNING! T o reduce the risk of fire, battery leakage and
personal injury, the following basic safety precautions
must be observed when battery-powered tools are used:
Read all these instructions before operating this product
and save these instructions.
3.2 Take the necessary precautions to make the
workplace safe
● Keep the area above and below the cutting line free of
obstacles.
● Wear breathing protection as conditions warrant.
● It is recommended that protective gloves and non-slip
boots or shoes are worn when working outdoors.
● Avoid unusual body positions. Work from a secure
stance and stay in balance at all times.
● Concealed electric cables or gas and water pipes pre-
sent a serious hazard if damaged while you are work-
ing. Accordingly , check the area in which you are work-
ing beforehand (e.g. using a metal detector). Avoid
contact between your body and earthed / grounded
objects, such as pipes or radiators. External metal parts
of the tool may become live, for example, when an elec-
tric cable is sawed into inadvertently.
● Unknown base materials should be examined in order
to avoid personal injury or the possibility of cutting
into pipes or cables. Use the right blade for the mate-
rial being cut.
● Before cutting pipes, always first ensure that the pipes
contain no liquids. Empty the pipes if necessary. The
tool is not water or moisture proof. Liquids running
out may cause a short circuit in the tool. When cutting
pipes, hold the tool so that it is higher than the pipe
being cut.
3.3 General safety precautions
● The contact shoe of the tool must be pressed against
the workpiece .
● Take the influences of your surroundings into account.
Do not expose the tool to rain or snow and do not use
it in damp or wet conditions.
● Keep the grips dry, clean and free from oil and grease
.
● Always hold the tool securely, with both hands on the
grips provided .
● Switch on the tool only after it has been brought into
position where the cut is to be made but before con-
tacting the work surface.
● When cutting, always guide the tool away from the
body.
● Store tools in a safe place when not in use. When not
in use, tools should be stored in a dry, high place or
locked away where they are out of reach of children.
● Avoid unintentional starting. Do not carry the tool with
your finger on the on/off switch.
● Lift the tool away from the workpiece only once the
blade has come to a standstill.
● Do not lay the tool down before the blade has come
to a standstill.
● Never place your hands in front of or on the saw blade.
● Always use saw blades of adequate length. To reduce
kick-back while sawing, the blade must always pro-
ject at least 40 mm (1.6 in) beyond the workpiece at
all times during the stroke cycle .
● Disconnect the tool from its battery pack when the
tool is not in use, during pauses between work, before
maintenance, when changing insert tools and during
transport.
● Pay attention to the supply cord when using the belt
adaptor. It increases the risk of tripping or catching
on things.
3.3.1 Mechanical
● Observe the instructions concerning care and main-
tenance and replacement of insert tools in good time.
● Ensure that the insert tools used are equipped with the
correct connection end system and that they are prop-
erly fitted and secured in the chuck .
3.3.2 Electrical
Service or maintenance performed by unqualified per-
sonnel may result in a risk of injury .
When servicing a tool, use only identical replacement
parts. Follow instructions in the Maintenance section
of this manual.
Use of unauthorized parts or failure to follow Mainte-
nance Instructions may create a risk of shock or injury.
Printed: 07.07.2013 | Doc-Nr: PUB / 5071405 / 000 / 00

4
en
● The tool should be repaired only by a trained electri-
cal specialist (Hilti service centre) using original Hilti
spare parts. Failure to observe this point my result in
a risk of accident to the user.
● Never operate the tool when it is dirty or wet. Dust or
dampness on the surface of the tool make it difficult
to hold and, under unfavorable conditions, may lead
to electric shocks. Accordingly, have the tool checked
regularly at a Hilti service center if it is used frequently
for cutting conductive materials.
● Avoid short circuiting the battery terminals. A short
circuit may cause a fire.
● Ensure that the outer surface of the battery is clean
and dry before inserting the battery in the appropri-
ate charger for charging.
● Check that the battery is securely attached to the tool.
A falling battery could injure you or other persons.
● Batteries that have reached the end of their life must
be disposed of safely.
● Hold tool by insulated gripping surfaces when per-
forming an operation where the cutting tool may con-
tact hidden wiring or its own cord. Contact with a
“live” wire will make exposed metal parts of the tool
“live” and shock the operator.
● Do not charge or continue to use damaged batter-
ies (e.g. batteries with cracks, broken parts, bent
or pushed-in and/or pulled-out contacts).
3.3.3 Thermal
● The insert tool may become hot during use. Y ou should
therefore wear protective gloves when changing insert
tools.
● The cuttings produced when sawing, especially
metal cuttings, may be hot. Wear suitable protective
clothing.
3.3.4 Liquids
● A caustic liquid may leak from defective batteries. Avoid
contact with this liquid. In the event of contact with the
skin, wash the area affected with soap and plenty of
water. Should the liquid come into contact with the
eyes, flush the eyes with water immediately and sub-
sequently consult a doctor.
3.3.5 Dust
● Wear respiratory protection when the work causes dust.
● Reduce the concentration of dust in the air by ensur-
ing good ventilation of the workplace.
● Before beginning work, find out the hazard class of
the dust produced by the work and take appropriate
measures for personal protection.
● Proposition 65 warning: This product contains or pro-
duces an exposure to chemicals known to the State
of California to cause cancer and birth defects (or other
reproductive harm).
● WARNING: Some dust created by grinding, sanding,
cutting and drilling contains chemicals known to
cause cancer, birth defects, infertility or other repro-
ductive harm; or serious and permanent respirato-
ry or other injury. Some examples of these chemicals
are: lead from leadbased paints, crystalline silica from
bricks, concrete and other masonry products and nat-
ural stone, arsenic and chromium from chemical-
lytreated lumber. Y our risk from these exposures varies,
depending on how often you do this type of work. To
reduce exposure to these chemicals, the operator
and bystanders should work in a well-ventilated area,
work with approved safety equipment, such as res-
piratory protection appropriate for the type of dust
generated, and designed to filter out microscopic
particles and direct dust away from the face and body .
Avoid prolonged contact with dust. Wear protective
clothing and wash exposed areas with soap and
water. Allowing dust to get into your mouth, eyes, or
to remain on your skin may promote absorption of
harmful chemicals.
3.4 Requirements to be met by users
● The tool is intended for professional use.
● The tool may be operated, serviced and repaired only
by authorized, trained personnel. This personnel must
be informed of any special hazards that may be encoun-
tered.
● Stay alert. Work carefully and sensibly . Do not use the
tool if your full concentration is not on the job.
● Take breaks between working and do finger exercises
to relax the muscles and improve the blood circula-
tion in your fingers.
3.5 Personal protective equipment
The user and any other persons in the vicinity must wear
suitable eye protection. Ear protection, protective gloves
and respiratory protection should be worn as conditions
warrant.
3.6 Protective devices
Never use the tool without the hand guard fitted.
3.7 Symbols used on the tool
V = volts
–––
---
= direct current
n
o = no load stroke rate under no load
Wear ear
protection
Wear
protective
gloves
Wear
breathing
protection
Wear eye
protection
Printed: 07.07.2013 | Doc-Nr: PUB / 5071405 / 000 / 00

5
en
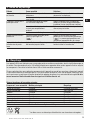
Technical data
Tool
Nominal voltage 24 V
–––
---
Weight of tool with battery 4.7 kg (9.6 lb)
Dimensions (L×B×H) 440×92×214 mm (17.3×3.6×8.4 in)
Stroke rate 1400–2200 min
–1
Stroke 32 mm (1.25 in)
Stroke rate regulation Electronics with variable stroke rate, stroke rate
regulator with 6 positions
Blade clamp Keyless, for standard
1
/
2
″ blades
Orbital action on / off
Vibration-absorbing grip
Battery B24/2.0 NiCd B24/2.4 NiCd B24/3.0 NiMH
Rated voltage 24 V
–––
---
24 V
–––
---
24 V
–––
---
Battery capacity 24 V x 2.0 Ah 24 V x 2.4 Ah 24 V x 3.0 Ah
= 48Wh = 58 Wh = 72 Wh
Weight 1.38 kg (3.0 lb) 1.38 kg (3.0 lb) 1.45 kg (3.2 lb)
Temperature monitoring yes yes yes
Type of cell Nickel-cadmium Nickel-cadmium N ic ke l-me ta lh yd ride
SUBCtype SUBCtype SUBCtype
No. of cells 20 20 20
Right of technical changes reserved!
4. Description
The WSR 650-A is a cordless reciprocating saw for pro-
fessional use. The tool is suitable for use by right or left-
handed persons. The ergonomically designed rubber-
padded grip reduces fatigue and is designed to provide
a secure hold.
The items supplied include:
– Cordless reciprocating saw and saw blade
– Operating instructions
– Toolbox
4.1 Correct use
Typical working environments include rescue services,
general construction, renovation and conversion work,
metal construction, plumbing / heating / air-condition-
ing installation trades, in workshops and on construc-
tion sites, public authorities, farming and forestry.
The tool is designed to cut wood, wood-like materials,
metals and plastics.
● The tool is designed for two-handed operation.
● Use only the blades and accessories listed in the oper-
ating instructions.
● Do not use the batteries as a power source for other
equipment.
● Use of a pipe-cutting adaptor with the tool is not per -
missible.
● Do not cut bricks, concrete, cellular concrete, natur-
al stone or tiles.
● Do not use the tool to cut pipes that still contain liquids.
● Do not cut into unknown materials.
● Use the tool within its intended cutting performance
range and with suitable blades (do not use blades of
the wrong size or reciprocating saw blades not equipped
with a
1
/
2
″ connection end).
● Cutting materials containing asbestos is not permis -
sible.
Printed: 07.07.2013 | Doc-Nr: PUB / 5071405 / 000 / 00

6
en
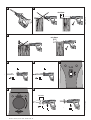
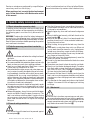
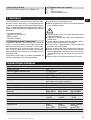
5.3 Adjusting the contact shoe
The contact shoe can be adjusted to ensure optimum
use of the blade length and to improve access in corners.
1. Remove the battery from the tool (the contact shoe
engages at intervals of 2.5 mm / 0.1″).
2. Press the contact shoe lockbutton and hold it in this
position.
3. Slide the contact shoe forward or back into the desired
position.
4. Release the lockbutton.
5. Pull on the contact shoe to check that it has engaged.
5.4 Removing the battery (2-finger operation)
1. Press in both release buttons.
2. Pull the battery downwards out of the tool.
5.5 Fitting the battery
Use only Hilti B24/2.0 NiCd, B24/2.4 NiCd or B24/3.0
NiMH batteries.
1. Push the batter y into the tool from below until it is
heard to engage.
5.6 Charging the battery
The battery cannot be charged through the belt adaptor.
Use only the Hilti C 7/24, C 7/36-ACS chargers.
Incorrect use may lead to electric shocks, overheating of
the battery or leakage of a caustic liquid from the battery.
Read the operating instructions for the charger before
beginning charging.
5. Assembly
It is essential that a new battery is charged correctly
before initial use so that the battery cells can form cor-
rectly. Incorrect initial charging can lead to a permanent
reduction of battery capacity.
– With the C 7/24 charger: Charge for 24 hours in nor-
mal charging mode or for 12 hours in conditioning
(refresh) mode.
– With the C 7/36-ACS charger: The charger detects
automatically whether initial charging or normal charg-
ing is necessary .
-NOTE-
– The tool may be used only with B24/2.0 NiCd, B24/2.4
NiCd or B24/3.0 NiMH batteries.
– Battery performance drops at low temperatures.
– Batteries should be stored at room temperature.
– Never store batteries where they are exposed to the
heat of the sun, on a radiator, behind a motor vehicle
windscreen or at a window.
– Never use the battery until the cells become fully dis-
charged. Change to the second battery as soon as a
drop in performance is noticed and recharge the bat-
tery immediately so that it is ready for re-use.
-CAUTION-
● The cutting edges of the saw blade
are sharp.
● The cutting edges may present a risk
of injury.
● Wear protective gloves.
5.1 Fitting the saw blade
1. Remove the battery from the tool.
2. Check that the connection end of the blade is clean.
The blade clamp should also be kept clean. Use only
saw blades with
1
/
2
″ connection ends .
3. Turn the blade clamp locking sleeve in a counter-
clockwise direction and hold it in this position.
4. Push the saw blade into the blade clamp.
5. Release the locking sleeve and allow it to move back.
It should be heard to engage.
6. Check that the clamp has engaged by pulling on the
blade.
5.2 Removing the saw blade
1. Remove the battery from the tool.
2. Turn the blade clamp locking sleeve in a counter-
clockwise direction and hold it in this position.
3. Pull the blade out of the clamp toward the front of the
tool.
4. Release the locking sleeve.
Printed: 07.07.2013 | Doc-Nr: PUB / 5071405 / 000 / 00

7
en
6. Operation
-NOTE-
● To ensure good cutting performance and ease the load
on the tool, use only saw blades that are in good con-
dition.
● Do not overload the tool.
-CAUTION-
● When working, always guide the tool away from the
body.
● Lift the tool away from the workpiece only once the
blade has come to a standstill.
● Do not lay the tool down before the blade has come
to a standstill.
-CAUTION-
● The saw blade becomes hot when
used for long periods.
● There is a risk of burning if the blade
is touched.
● Wear protective gloves.
6.1 Switching on
Press the transport lock and then press the control switch.
6.1.1 Switching off
Release the control switch.
6.2 Stroke rate
6.2.1 Adjusting the stroke rate
The recommended stroke rate can be selected by turn-
ing the stroke rate regulator.
When the control switch is pressed the tool will then run
at the pre-selected speed. The electronic speed control
system maintains an almost constant stroke rate even
under load. The recommended stroke rate settings and
information concerning the correct choice of saw blade
can be found in the product information and in the cor-
responding table of applications.
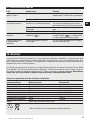
6.2.2 Recommended stroke rates
(1 = low stroke rate, 6 = high stroke rate)
Material to be cut Recommended
stroke rate
Wood 5–6
Wood with embedded nails 5–6
Interior finishing, drywall 3–4
Plastic 3–4
Steel 2–3
Non-ferrous metals 2–3
Aluminum 2–3
Stainless steel 1
The above settings are recommendations intended to
ensure optimum cutting performance. The optimum set-
ting may differ from these recommendations depend-
ing on the saw blade used, the electric supply voltage
and on how the tool is used. Setting the wrong stroke
rate may cause the saw blade to wear more quickly.
6.3 Orbital action
Use of the orbital action can increase cutting per for-
mance in certain materials such as wood or wood mate-
rials. The orbital action can be switched on or off by
moving the orbital action selector switch as far as it will
go in each position. Move the switch only when the motor
has stopped.
6.3.1 Orbital action off
Orbital action off
6.3.2 Orbital action on
Orbital action on
-CAUTION-
● The cutting edges of the saw blade
are sharp.
● The cutting edges may present a risk
of injury.
● Wear protective gloves.
-WARNING
● The sawing operation swirls up dust
and wood chips into the air.
● The dust and wood chips may be harm-
ful to the eyes and respiratory system.
● Wear protective goggles and breath-
ing protection, as appropriate.
-CAUTION-
● Operation of the tool creates noise.
● Excessive noise may damage the
hearing.
● Wear ear protection, as appropriate.
Printed: 07.07.2013 | Doc-Nr: PUB / 5071405 / 000 / 00

8
en
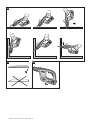
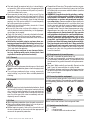
6.4 Plunge sawing
The plunge sawing technique should be used only on
soft materials and when the orbital action is switched
off. A little practice is required in order to be able to
plunge the blade into the material while the tool is run-
ning and thus make cut-outs without first drilling a hole.
Plunge sawing is possible only with short saw blades.
Plunge cuts may be started with the tool in one of two
different positions:
– in the normal position
– or in the reversed position
1. Hold the tool with the front edge of the contact shoe
against the workpiece.
2. Press the transport lock and then press the control
switch.
3. Press the tool firmly against the workpiece and begin
the plunge movement by reducing the angle of the
tool (contact shoe) to the workpiece. It is important
to ensure that the tool is running before the blade is
brought into contact with the workpiece. The tool may
otherwise stall.
4. Once the blade has passed through the workpiece,
bring the tool into the normal working position (the
entire surface of the shoe in contact) and then con-
tinue sawing along the line.
7. Care and maintenance
-NOTE-
Remove the battery from the tool.
7.1 Care of blades
● Clean off dirt and dust deposits and protect your blades
from corrosion by wiping them from time to time with
an oil-soaked rag.
7.2 Care of the tool
● Keep the blade clamp clean.
● The tool was lubricated adequately when it was man-
ufactured. After long periods of heavy use it is rec-
ommended that the tool is inspected at a Hilti work-
shop. This will increase the life expectancy of the tool
and avoid unnecessary repair costs.
● Repairs to the electrical section of the tool may be car -
ried out only by a trained electrical specialist.
The outer casing of the tool is made from impact-resis-
tant plastic. Sections of the grip are made from an elas-
tomer material.
Never operate the tool when the ventilation slots are
blocked. Clean the ventilation slots carefully using a dry
brush. Do not permit foreign objects to enter the interior
of the tool. Clean the outside of the tool at regular intervals
using a slightly damp cloth. Do not use a spray , steam
pressure cleaning equipment or running water for cleaning.
This may negatively affect the electrical safety of the tool.
Always keep the grip surfaces of the tool free from oil and
grease. Do not use cleaning agents which contain silicone.
7.3 Maintenance
Check all external parts of the tool for damage at regular
intervals and check that all controls operate faultlessly.
Do not operate the tool if parts are damaged or when the
controls do not function faultlessly. If necessary, your
electric tool should be repaired at a Hilti repair center.
Repairs to the electrical section of the tool may be car -
ried out only by trained electrical specialists.
7.4 Checks after care and maintenance
After care and maintenance, check that the hand guard
and contact shoe are fitted and that they function fault-
lessly.
8. Blades and accessories
Saw blades (standard
1
/
2
")
Belt adaptor BAP 24
Printed: 07.07.2013 | Doc-Nr: PUB / 5071405 / 000 / 00

9
en
10. Disposal
Most of the materials from which Hilti electric tools are manufactured can be recycled. The materials must be
correctly separated before they can be recycled. In many countries, Hilti has already made arrangements for taking
back your old electric tools for recycling. Please ask your Hilti customer service department or Hilti representa-
tive for further information.
Should you wish to return the electric tool yourself to a disposal facility for recycling, proceed as follows:
Dismantle the electric tool as far as possible without the need for special tools. Use absorbent paper to wipe oily
parts clean and to collect any grease that runs out (total quantity approx. 50 ml). This paper should also be disposed
of correctly . On no account should oil or grease be allowed to enter the waste water system or to find its way
into the ground.
The individual parts should be separated as follows:
Part / assembly Main material Recycling
Toolbox Plastic Plastics recycling
Gear housing Aluminium Scrap metal
Grip Plastic Plastics recycling
Motor housing Plastic Plastics recycling
Fan Plastic Plastics recycling
Motor (rotor and stator) Steel and copper Scrap metal
Gearing parts Steel Scrap metal
Screws, small parts Steel Scrap metal
Battery Nickel-cadmium *
Nickel-metal hydride
* Do not dispose of batteries with general refuse.
Fault Possible cause Remedy
The tool doesn't start. Control switch defective. The switch should be checked and, if neces-
sary , replaced by an electrical specialist.
The battery is not inserted correctly . Insert the battery correctly .
The tool does not achieve Low stroke rate selected Set the stroke rate regulator to the setting
full power. recommended for the material to be cut
(see section "Before use”).
Control switch not pressed fully Press the control switch as far as it will
go.
The battery is discharged. Charge the battery .
No orbital action Orbital action selector switch not Set the orbital action selector switch to
set to
[] []
The orbital action can be felt only
when sawing.
Saw blade cannot be Locking sleeve not turned as far as Turn the locking sleeve as far as it will go
removed from the blade it will go and remove the saw blade.
clamp
9. Troubleshooting
Printed: 07.07.2013 | Doc-Nr: PUB / 5071405 / 000 / 00

Disposal
Batteries
The Hilti B24/2.0 NiCd and B24/2.4 NiCd battery has 20 nickel-cadmium cells.
The Hilti B24/3.0 NiMH battery has 20 nickel-metal hydrid cells.
Both you and Hilti bear the responsibility for recycling of the worn-out batteries in keeping with environmen-
tal protection requirements.
Important: Do not throw worn-out batteries into household waste, a fire or water. Dispose of the batteries in
accordance with national regulations or return them to Hilti.
10
11. Manufacturer's warranty – tools
Hilti warrants that the tool supplied is free of defects
in material and workmanship. This warranty is valid so
long as the tool is operated and handled correctly,
cleaned and serviced properly and in accordance with
the Hilti Operating Instructions, and the technical sys-
tem is maintained. This means that only original Hilti
consumables, components and spare parts may be
used in the tool.
This warranty provides the free-of-charge repair or
replacement of defective parts only over the entire lifes-
pan of the tool. Parts requiring repair or replacement
as a result of normal wear and tear are not covered by
this warranty.
Additional claims are excluded, unless stringent
national rules prohibit such exclusion. In particular,
Hilti is not obligated for direct, indirect, incidental
or consequential damages, losses or expenses in
connection with, or by reason of, the use of, or inabil-
ity to use the tool for any purpose. Implied warranties
of merchantability or fitness for a particular purpose
are specifically excluded.
For repair or replacement, send tool or related parts
immediately upon discovery of the defect to the address
of the local Hilti marketing organization provided.
This constitutes Hilti's entire obligation with regard to
warranty and supersedes all prior or contemporane-
ous comments and oral or written agreements con-
cerning warranties.
Printed: 07.07.2013 | Doc-Nr: PUB / 5071405 / 000 / 00

11
fr
Avant de mettre l'appareil en marche, lire
impérativement son mode d'emploi et bien
respecter les consignes.
Le présent mode d'emploi doit toujours
accompagner l'appareil.
Ne pas prêter ou céder l'appareil à quelqu'un
sans lui fournir le mode d'emploi.
Scie sabre à bloc-accu WSR 650-A
1. Consignes générales
1.1 Termes signalant un danger
-AVERTISSEMENT-
Pour attirer l'attention sur une situation pouvant pré-
senter des dangers susceptibles d'entraîner des bles-
sures corporelles graves ou la mort.
-ATTENTION-
Pour attirer l'attention sur une situation pouvant pré-
senter des dangers susceptibles d'entraîner des bles-
sures corporelles légères ou des dégâts matériels.
-REMARQUE-
Conseils d'utilisation et autres informations utiles.
1.2 Pictogrammes
Table des matières Page
1. Consignes générales 11
2. Règles générales de sécurité 12
3. Règles de sécurité particulières et symboles 13
4. Description 15
5. Mise en service 16
6. Utilisation 17
7. Care and maintenance 18
8. Nettoyage et entretien 18
9. Guide de dépannage 19
10. Recyclage 19
11. Garantie constructeur des appareils 20
Organes de commande et éléments de l'appareil
햲 Dispositif de verrouillage de la lame / porte-lame
햳 Commutateur de coupe pendulaire
햴 Régulateur de la cadence de coupe
햵 Sécurité de transport
햶 Variateur électronique de vitesse
햷 Plaque signalétique
햸 Bloc-accu
햹 Moteur
햺 Réducteur
햻 Partie avant préhensile (protège-main)
햽 Bouton-poussoir
햾 Patin d'appui
햿 Lame de scie
Les chiffres renvoient aux illustrations correspon-
dant au texte et se trouvant sur les pages rabattables.
Pour lire le mode d'emploi, rabattre ces pages de maniè-
re à voir les illustrations.
Dans le présent mode d'emploi, «l'appareil» désigne
toujours la scie sabre à bloc-accu WSR 650-A.
Emplacement des détails d'identification sur l'appareil
La désignation et le numéro de série du modèle se trouvent
sur la plaque signalétique de l'appareil. Inscrire ces ren-
seignements dans le mode d'emploi et toujours s'y référer
pour communiquer avec notre représentant ou agence Hilti.
Type:
N° de série:
Symboles d'avertissement
Symboles d'obligation
Porter un casque
antibruit
Porter des gants
de protection
Utiliser un masque
respiratoire léger
Porter des lunet-
tes de protection
Lire le mode
d'emploi avant
d'utiliser l'appareil
Symboles
Avertissement
danger général
Avertissement tension
électrique dangereuse
Avertissement
matières
corrosives
Avertissement
surface chaude
Les déchets doivent être
recyclés
Les blocs-accus ne doivent
pas être éliminés avec les
ordures ménagères
V=Volt
–––
---
= Courant continu
n
o = Vitesse nominale à vide
Printed: 07.07.2013 | Doc-Nr: PUB / 5071405 / 000 / 00

12
fr
2. Règles générales de sécurité
2.1 AVER TISSEMENT!
Vous devez lire et comprendre toutes les instructions.
Le non-respect, même partiel, des instructions ci-après
entraîne un risque de choc électrique, d’incendie et/ou
de blessures graves.
CONSERVEZ CES INSTRUCTIONS!
2.2 Aire de travail
Veillez à ce que l’aire de travail soit propre et bien
éclairée. Le désordre et le manque de lumière favori-
sent les accidents.
N’utilisez pas d’outils électriques dans une atmos-
phère explosive, par exemple en présence de liquides,
de gaz ou de poussières inflammables. Les outils élec-
triques créent des étincelles qui pourraient enflammer
les poussières ou les vapeurs.
Tenez à distance les curieux, les enfants et les visi-
teurs pendant que vous travaillez avec un outil élec-
trique. Ils pourraient vous distraire et vous faire faire
une fausse manoeuvre.
2.3 Sécurité électrique
Tout bloc-accus équipant un appareil sans fil ou sépa-
ré de celui-ci doit être chargé seulement avec le char -
geur spécifique pour lui. Tout chargeur indiqué pour
un seul type de bloc-accus risque de provoquer un incen-
die s’il est utilisé avec un autre bloc-accus.
N’utilisez un appareil sans fil qu’avec le bloc-accus
spécialement prévu. L’utilisation de tous autres blocs-
accus risque de provoquer un incendie.
2.4 Sécurité des personnes
Restez alerte, concentrez-vous sur votre travail et
faites preuve de jugement. N’utilisez pas un outil élec-
trique si vous êtes fatigué ou sous l’influence de
drogues, d’alcool ou de médicaments. Un instant d’in-
attention suffit pour entraîner des blessures graves.
Habillez-vous convenablement. Ne portez ni vête-
ments flottants ni bijoux. Confinez les cheveux longs.
N’approchez jamais les cheveux, les vêtements ou
les gants des pièces en mouvement. Des vêtements
flottants, des bijoux ou des cheveux longs risquent d’être
happés par des pièces en mouvement.
Evitez tout démarrage involontaire. Avant d’insérer le
bloc-accus dans l’appareil, vérifiez que l’interrupteur
est bien en position bloquée ou arrêt. Ne portez pas
d’appareil en ayant le doigt placé sur l’interrupteur et
n’insérez pas de bloc-accus dans l’appareil avec l’inter-
rupteur en position «marche» (risques d’accidents).
Enlevez les clés de réglage ou de serrage avant de
démarrer l’outil. Une clé laissée dans une pièce tour-
nante de l’outil peut provoquer des blessures.
Ne vous penchez pas trop en avant. Maintenez un bon
appui et restez en équilibre en tout temps. Une bon-
ne stabilité vous permet de mieux réagir à une situation
inattendue.
Utilisez des accessoires de sécurité. Portez toujours
des lunettes ou une visière. Selon les conditions, por-
tez aussi un masque antipoussière, des bottes de sécu-
rité antidérapantes, un casque protecteur et/ou un appa-
reil antibruit.
2.5 Utilisation et entretien des outils
Immobilisez le matériau sur une surface stable au
moyen de brides ou de toute autre façon adéquate. Le
fait de tenir la pièce avec la main ou contre votre corps
offre une stabilité insuffisante et peut amener un déra-
page de l’outil.
Ne forcez pas l’outil. Utilisez l’outil approprié à la
tâche. L’outil correct fonctionne mieux et de façon plus
sécuritaire. Respectez aussi la vitesse de travail qui lui
est propre.
N’utilisez pas un outil si son interrupteur est bloqué.
Un outil que vous ne pouvez pas commander par son
interrupteur est dangereux et doit être réparé.
Avant d’effectuer des réglages, de changer d’acces-
soires ou de ranger l’appareil, débranchez le bloc-
accus de l’appareil ou placez l’interrupteur en posi-
tion bloquée ou arrêt. De telles mesures préventives
de sécurité réduisent les risques de démarrage acci-
dentel de l’appareil.
Rangez les outils hors de la portée des enfants et
d’autres personnes inexpérimentées. Les outils sont
dangereux dans les mains d’utilisateurs novices.
Si vous n’utilisez pas le bloc-accus, tenez le éloigné
de tous autres objets métalliques tels que trombones,
pièces, clés, clous, vis ou tous autres petits objets
qui risquent d’établir une connexion entre deux embouts
terminaux. Tout court-circuit des embouts terminaux
du bloc-accus risque de provoquer des étincelles, des
brûlures ou un incendie.
Prenez soin de bien entretenir les outils. Les outils
de coupe doivent être toujours bien affûtés et propres.
Des outils bien entretenus, dont les arêtes sont bien tran-
chantes, sont moins susceptibles de coincer et plus
faciles à diriger.
Soyez attentif à tout désalignement ou coincement
des pièces en mouvement, à tout bris ou à toute autre
condition préjudiciable au bon fonctionnement de l’ou-
til. Si vous constatez qu’un outil est endommagé,
faites-le réparer avant de vous en servir . De nombreux
accidents sont causés par des outils en mauvais état.
N’utilisez que des accessoires que le fabricant recom-
mande pour votre modèle d’outil. Certains accessoires
peuvent convenir à un outil, mais être dangereux avec
un autre.
Printed: 07.07.2013 | Doc-Nr: PUB / 5071405 / 000 / 00

13
fr
3. Règles de sécurité particulières et symboles
3.1 Consignes de sécurité générales
En plus des consignes de sécurité figurant dans les dif-
férents chapitres du présent mode d'emploi, il importe
de toujours bien respecter les directives suivantes.
ATTENTION! Lors de l'utilisation d'appareils fonction-
nant sur accus, il est impératif de respecter les consignes
de sécurité suivantes afin de réduire les risques d'in-
cendie, de fuite de liquide corrosif du bloc-accu et de
blessures.
3.2 Aménagement correct du poste de travail
● Libérer la surface de coupe de tout obstacle en haut
et en bas.
● Porter des lunettes de protection.
● Pour les travaux à l'extérieur, des gants de protection
et des chaussures à semelle antidérapante sont recom-
mandés.
● Adopter une bonne posture. Veiller à toujours rester
stable et à garder l'équilibre.
● Tous les câbles ou gaines électriques, conduites de
gaz ou d'eau cachés représentent un risque sérieux
s'ils viennent à être endommagés pendant le travail.
C'est pourquoi il est important de toujours contrôler
auparavant l'espace de travail, par exemple à l'aide
d'un détecteur de métaux. Toute pièce métallique exté-
rieure à l'appareil peut devenir conductrice, par exemple
en endommageant par inadvertance un câble électrique.
● Ne pas scier dans des sous-sols de nature inconnue.
Si elle percute un objet, la lame de scie peut provo-
quer un mouvement de recul.
● En cas de séparation de conduites, d'abord s'assurer
que celles-ci ne contiennent plus aucun liquide. L'appa-
reil ne dispose d'aucune protection contre la pénétration
d'humidité. Le liquide s'écoulant peut provoquer un court-
circuit dans l'appareil. En cas de séparation des conduites,
tenir l'appareil plus haut que la conduite à séparer.
3.3 Consignes de sécurité générales
● L'appareil doit être serré contre la pièce travaillée à
l'aide du patin d'appui .
● Prêter attention aux influences d'environnement de
l'espace de travail. Protéger l'appareil des intempé-
ries, ne pas l'utiliser dans un environnement humide
ou mouillé.
● Essuyer les poignées afin d'éliminer toutes traces
d'humidité, enlever toutes traces de graisse ou
d'huile .
● Toujours tenir l'appareil des deux mains par les poi-
gnées prévues à cet effet .
● Mettre l'appareil sous tension seulement après l'avoir
bien positionné sur le poste de travail.
● Lors de la coupe, toujours effectuer des mouvements
s'éloignant de soi.
● Conserver les appareils non utilisés en toute sécurité.
Tous les appareils non utilisés doivent être rangés dans
un endroit sec, en hauteur ou fermé à clé, hors de por -
tée des enfants.
● Eviter tout démarrage intempestif de l'appareil. Ne pas
porter l'appareil en le tenant par le variateur électro-
nique de vitesse.
● Relever l'appareil de la pièce travaillée seulement une
fois qu'il a été arrêté.
● Déposer l'appareil seulement une fois qu'il a été arrêté.
● Ne jamais laisser ses mains devant ou sur la lame de scie.
● Toujours utiliser des lames de scie dont la longueur
dépasse d'au moins 40 mm (1.6 in) les dimensions
de la pièce à découper pour éviter tout à-coup ou recul
important pendant la course complète de la lame .
● Lorsque l'appareil n'est pas utilisé (par ex. pendant une
pause), toujours retirer le bloc-accu de l'appareil avant
de procéder à l'entretien, des réparations, un change-
ment de lame ou le transport.
● Si l'adaptateur pour ceinture est utilisé, faire attention
au câble. Il y a un risque élevé de trébucher ou de res-
ter accroché.
3.3.1 Risques mécaniques
● Bien respecter les instructions relatives à l'entretien et
aux réparations de l'appareil.
● Vérifier que les lames sont bien munies du système d'em-
manchement adapté à l'appareil et qu'elles sont toujours
correctement verrouillées dans le porte-lame
.
3.3.2 Risques électriques
2.6 Réparation
La réparation des outils électriques doit être confiée
à un réparateur qualifié. L’entretien ou la réparation
d’un outil électrique par un amateur peut entraîner un
risque de blessure.
Pour la réparation d’un outil, n’employez que des
pièces de rechange d’origine. Suivez les directives
données à la section «Réparation» de ce manuel.
L’emploi de pièces non autorisées ou le non-respect des
instructions d’entretien peut créer un risque de choc
électrique ou de blessures.
Printed: 07.07.2013 | Doc-Nr: PUB / 5071405 / 000 / 00

14
fr
● Seul un électricien (S.A.V. Hilti) est habilité à réparer
l'appareil, afin que des pièces de remplacement d'ori-
gine soient utilisées. Sinon, des risques d'accident peu-
vent survenir pour l'utilisateur.
● Ne jamais faire fonctionner l'appareil s'il est encrassé
ou mouillé. La poussière accumulée sur les faces de
l'appareil, en particulier celle produite par des matériaux
conducteurs, ou l'humidité risquent, dans des condi-
tions défavorables, de provoquer une décharge élec-
trique. C'est pourquoi il convient de faire réviser les appa-
reils encrassés par le S.A.V. Hilti à intervalles réguliers,
surtout s'ils sont utilisés sur des matériaux conducteurs.
● Eviter tout court-circuit du bloc-accu. Un tel court-cir-
cuit pourrait provoquer un incendie.
● Vérifier que les surfaces extérieures du bloc-accu sont
propres et sèches avant de l'insérer dans le chargeur
approprié pour la recharge.
● Vérifier que le bloc-accu est bien en place dans l'ap-
pareil. Si le bloc-accu tombe, il y a risque de blessures
corporelles.
● Une fois arrivés au terme de leur durée de service, les
blocs-accus doivent être éliminés conformément à la
réglementation en vigueur et en toute sécurité.
● Tenez l’outil par ses surfaces de prise isolées pen-
dant toute opération où l’outil de coupe pourrait venir
en contact avec un câblage dissimulé ou avec son
propre cordon. En cas de contact avec un conducteur
sous tension, les pièces métalliques à découvert de
l’outil transmettraient un choc électrique à l’utilisateur.
● Ses blocs-accus endommagés (par exemple des
blocs-accus fissurés, dont certaines pièces sont
cassées, dont les contacts sont déformés, rentrés
et / ou sortis) ne doivent plus être chargés ni utilisés.
3.3.3 Risques thermiques
● Après utilisation, la lame et le porte-lame peuvent être
très chauds. Se munir de gants de protection pour chan-
ger la lame.
● Lors du sciage, les copeaux produits, notamment les
copeaux métalliques, peuvent être chauds. Porter des
vêtements de sécurité appropriés.
3.3.4 Liquides
● Du liquide corrosif peut s'échapper des blocs-accus
s'ils sont abîmés. Eviter tout contact avec ce liquide.
En cas de contact avec la peau, laver l'endroit concer-
né avec de l'eau et beaucoup de savon. En cas de
contact du liquide avec les yeux, les rincer immédia-
tement à l'eau claire, puis consulter un médecin.
3.3.5 Poussières
● Porter un masque respiratoire pour les travaux pous-
siéreux.
● Veiller à ce que le poste de travail soit suffisamment
aéré afin de réduire la concentration de poussières.
● Avant de commencer à travailler, prendre connaissan-
ce de la classe de risque de la poussière générée lors
des travaux
.
● Avertissement suivant Proposition 65: Ce produit
contient ou produit une exposition à de produits chi-
miques suspectibles, selon l’Etat de California, de pro-
voquer un cancer et des malformations de naissance
(et autres troubles de la reproduction).
● AVERTISSEMENT : Certains types de poussières
générées par ébarbage, meulage, tronçonnage et
perçage contiennent des substances chimiques,
connues pour être cancérogènes, qui risquent d'en-
traîner des malformations congénitales, une infer -
tilité, des lésions permanentes des voies respira-
toires ou d'autres natures. Quelques-unes de ces
substances chimiques sont le plomb contenu dans
les peintures au plomb, le quartz cristallin provenant
desbriques,dubéton,delamaçonnerieoudepierres
naturelles, ou encore l'arsenic ou le chrome prove-
nant de bois de construction traités chimiquement.
Les risques pour l'utilisateur varient en fonction de la
fréquence de ces travaux. Afin de réduire la charge
de ces substances chimiques, l'utilisateur et les
tierces personnes doivent travailler dans une piè-
ce bien ventilée et utiliser les équipements de sécu-
rité homologués. Porter un masque respiratoire
adapté au type de poussière déterminé, qui filtre
les particules microscopiques et permet d'éviter
tout contact de la poussière avec le visage ou le
corps. Éviter tout contact prolongé avec la pous-
sière. Porter des vêtements de protection et laver
à l'eau et au savon la portion de peau qui a été en
contact avec la poussière. L'absorption de pous-
sières par la bouche ou les yeux, ou le contact pro-
longé des poussières avec la peau, risque de favori-
ser l'absorption de substances chimiques nocives
pour la santé.
3.4 Exigences vis-à-vis de l'utilisateur
● L'appareil est destiné à des utilisateurs professionnels.
● L'appareil ne doit être utilisé, entretenu et réparé que
par un personnel agréé et formé à cet effet. Ce per-
sonnel doit être au courant des dangers inhérents à
l'utilisation de l'appareil.
● Soyez toujours attentif. Faites attention à ce que vous
faites. Faites appel à votre bon sens. N'utilisez pas l'ap-
pareil si vous n'êtes pas concentré.
● Faire régulièrement des pauses et des exercices de
relaxation et de massage des doigts pour favoriser l'ir-
rigation sanguine dans les doigts.
3.5 Personal protective equipment
Pendant le fonctionnement de l'appareil, l'utilisateur
et les personnes environnantes doivent porter des
lunettes de protection, un casque antibruit, un masque
respiratoire léger et des gants de protection.
Porter un casque
antibruit
Porter des gants
de protection
Utiliser un masque
respiratoire léger
Porter des lunet-
tes de protection
Printed: 07.07.2013 | Doc-Nr: PUB / 5071405 / 000 / 00

15
fr
3.6 Dispositif de sécurité
Ne jamais installer l'appareil sans protège-main.
Caractéristiques techniques
Appareil
Tension nominale 24 V
–––
---
Poids de l’appareil avec bloc-accu 4,7 kg (9,6 lbs)
Dimensions (L × l × h) 440×92×214 mm (17,3×3,6×8,4 in)
Cadence de coupe 1400–2200 min
–1
Course 32 mm (1,25 in)
Réglage de la cadence de coupe Régulation électronique de coupe variable, régulateur
de la cadence de coupe à 6 positions
Porte-lame Pour lames standard
1
/
2
″ sans clé
Mouvement pendulaire Marche / Arrêt
Poignée antivibrations
Bloc-accu B24/2,0 NiCd B24/2,4 NiCd B24/3,0 NiMH
Tension nominale 24 V
–––
---
24 V
–––
---
24 V
–––
---
Capacité du bloc-accu 24 V x 2,0 Ah 24 V x 2,4 Ah 24 V x 3,0 Ah
=48Wh =58Wh =72Wh
Poids 1,38 kg (3,0 lb) 1,38 kg (3,0 lb) 1,45 kg (3,2 lb)
Contrôle de la température oui oui oui
Type de cellule Nickel Nickel – Nickel – Hydrure
Cadmium Cadmium métallique
Forme SUB C Forme SUB C Forme SUB C
Bloc de cellules 20 20 20
Sous réserve de modifications techniques!
4. Description
La scie WSR 650-A est une scie sabre portative, fonc-
tionnant sur accu, destinée à un usage professionnel.
L'appareil est conçu pour les utilisateurs droitiers et gau-
chers. La poignée élastomère ergonomique réduit la
fatigue et offre une protection supplémentaire contre le
glissement.
La livraison comprend:
– Appareil avec lame de scie
– Mode d'emploi
– Coffret de transport
4.1 Utilisation conforme à l'usage prévu
L'appareil est destiné à être utilisé par les services de
secours, les services publics, dans l'agriculture et l'ex-
ploitation forestière, dans le cadre de la construction,
de la rénovation et de la reconstruction, dans les ate-
liers, sur les chantiers, dans les secteurs de la menui-
serie métallique, du sanitaire, du chauffage, de la cli-
matisation (SHK).
Il est destiné à scier le bois ou matières semblables, les
matières métalliques, ainsi que les plastiques.
● Il doit être tenu avec les deux mains.
● Monter uniquement les outils et accessoires indiqués
dans le mode d'emploi.
● Ne pas utiliser les blocs-accus pour alimenter d'autres
appareils électriques.
● L'appareil ne doit pas être utilisé avec un adaptateur
coupe-tubes.
● Ne pas scier de la brique, du béton, du béton cellulai-
re, de la pierre naturelle ou du carrelage.
● Ne pas utiliser l'appareil pour scier des conduites
contenant encore du liquide.
● Ne pas scier dans des sous-sols de nature inconnue.
● Ne pas scier hors de l'espace de travail et avec des
lames inappropriées (de dimensions incorrectes ou
avec des lames de scie non munies d'un emmanche-
ment
1
/
2
″).
● Ne pas traiter les matières contenant de l'amiante.
3.7 Symboles utilisés sur l’appareil:
V = Volt
–––
---
= Courant continu
n
o = Vitesse nominale à vide
Printed: 07.07.2013 | Doc-Nr: PUB / 5071405 / 000 / 00

16
fr
5.3 Réglage du patin d'appui
Le réglage du patin d'appui permet d'une part d'utiliser
la longueur de lame de manière optimale, et d'autre part,
d'accéder plus facilement dans les coins
.
1.
Séparer le bloc-accu de l'appareil (le patin d'appui se
règle par pas de 2,5 mm).
2. Appuyer sur le bouton-poussoir pour bloquer le patin
d'appui et le maintenir appuyé.
3. Glisser le patin d'appui vers l'avant ou vers l'arrière
pour obtenir la position souhaitée.
4. Relâcher le bouton-poussoir.
5. Vérifier si le patin est bien fixé en tirant dessus.
5.4 Retrait du bloc-accu (avec deux doigts)
1. Appuyer sur les deux boutons de déverrouillage.
2. Tirer le bloc-accu vers l'arrière hors de l'appareil.
5.5 Mise en place du bloc-accu
Utiliser uniquement des blocs-accus Hilti B24 / 2.0 NiCd,
B24 / 2.4 NiCd ou B24 / 3.0 NiMH.
1. Pousser le bloc-accu par l'arrière dans l'appareil jus-
qu'à ce qu'un clic se fasse entendre.
5.6 Recharge du bloc-accu
Le bloc-accu ne doit pas être chargé sur l'adaptateur
pour ceinture.
Utiliser uniquement les chargeurs Hilti C 7 / 24, C 7 / 36-
ACS.
L'utilisation d'un chargeur non conforme entraîne un
risque d'électrocution, de surchauffe ou de fuite de liqui-
de corrosif du bloc-accu.
Avant de recharger le bloc-accu, lire le mode d'emploi
des chargeurs.
5. Mise en service
Avant d'utiliser un bloc-accu neuf, procéder impérative-
ment à une recharge initiale correcte du bloc-accu afin
que les cellules puissent se former de manière optimale.
La capacité d'un bloc-accu neuf qui n'aurait pas été char-
gé correctement la première fois peut se trouver affectée
durablement.
– dans le cas des chargeurs C 7 / 24, charger plus de 24
heures normalement, ou plus de 12 heures à l'aide de
la fonction de recharge de régénération.
– dans le cas du chargeur C 7 / 36-ACS, le chargeur détec-
te automatiquement si une recharge initiale ou une
recharge normale est requise.
-REMARQUE-
– L'appareil doit uniquement être utilisé avec le bloc-accu
B24 / 2.0 NiCd, B24 / 2.4 NiCd ou B24 / 3.0 NiMH.
– A basse température, la capacité du bloc-accu chute.
– Stocker le bloc-accu à température ambiante.
– Ne jamais exposer le bloc-accu au soleil, sur un dispo-
sitif de chauffage ou derrière une vitre.
– Ne pas utiliser le bloc-accu jusqu'à ce que l'appareil
s'arrête complètement. Remplacer le bloc-accu à temps
par le bloc-accu de rechange.Recharger le premier bloc
immédiatement pour qu'il soit de nouveau disponible.
-ATTENTION-
● Les arêtes de coupe de la lame de scie
sont aiguisées.
● L'utilisateur risque de se blesser au
contact des arêtes de coupe.
● Porter des gants de protection.
5.1 Mise en place de la lame
1. Séparer le bloc-accu de l'appareil.
2. Vérifier que l'emmanchement de la lame est bien propre.
Toujours tenir propre la zone du porte-lame. Utiliser
uniquement des lames de scie avec un emmanchement
1
/
2
″ .
3. Tourner la douille de verrouillage de la lame dans le
sens contraire des aiguilles d'une montre et la main-
tenir dans cette position.
4. Pousser la lame par devant dans le porte-lame.
5. Relâcher la douille de verrouillage jusqu'à ce qu'elle se
verrouille (déclic audible).
6. Vérifier que la lame est bien verrouillée en tirant dessus.
5.2 Retrait de la lame
1. Séparer le bloc-accu de l'appareil.
2. Tourner la douille de verrouillage de la lame dans le
sens contraire des aiguilles d'une montre et la main-
tenir dans cette position.
3. Tirer la lame du porte-lame vers l'avant hors du porte-
lame.
4. Relâcher la douille de verrouillage.
Printed: 07.07.2013 | Doc-Nr: PUB / 5071405 / 000 / 00
La page est en cours de chargement...
La page est en cours de chargement...
La page est en cours de chargement...
La page est en cours de chargement...
La page est en cours de chargement...
La page est en cours de chargement...
La page est en cours de chargement...
La page est en cours de chargement...
La page est en cours de chargement...
La page est en cours de chargement...
La page est en cours de chargement...
La page est en cours de chargement...
La page est en cours de chargement...
La page est en cours de chargement...
La page est en cours de chargement...
La page est en cours de chargement...
La page est en cours de chargement...
-
 1
1
-
 2
2
-
 3
3
-
 4
4
-
 5
5
-
 6
6
-
 7
7
-
 8
8
-
 9
9
-
 10
10
-
 11
11
-
 12
12
-
 13
13
-
 14
14
-
 15
15
-
 16
16
-
 17
17
-
 18
18
-
 19
19
-
 20
20
-
 21
21
-
 22
22
-
 23
23
-
 24
24
-
 25
25
-
 26
26
-
 27
27
-
 28
28
-
 29
29
-
 30
30
-
 31
31
-
 32
32
-
 33
33
-
 34
34
-
 35
35
-
 36
36
-
 37
37


Hilti WSR 650-A Manuel utilisateur
- Catégorie
- Outils électroportatifs
- Taper
- Manuel utilisateur
dans d''autres langues
- English: Hilti WSR 650-A User manual
- español: Hilti WSR 650-A Manual de usuario
Documents connexes
-
Hilti SR 6-A22 Mode d'emploi
-
Hilti SR 2-A12 Mode d'emploi
-
Hilti 3614113 Manuel utilisateur
-
-
-
Hilti WSR 36-A Mode d'emploi
-
-
Hilti SR 30 Mode d'emploi
-
-
Hilti WSR 1250-PE Operating