
Marschkompass
Marching compass
1. Bevor Sie mit dem Instrument arbeiten
• Lesen Sie sich bitte die Bedienungsanleitung genau durch.
• Durch die Beachtung der Bedienungsanleitung vermeiden
Sie auch Beschädigungen des Geräts und die Gefährdung
Ihrer gesetzlichen Mängelrechte durch Fehlgebrauch.
• Für Schäden, die aus Nichtbeachtung dieser Bedienungsan-
leitung verursacht werden, übernehmen wir keine Haftung.
• Beachten Sie besonders die Sicherheitshinweise!
• Bewahren Sie diese Bedienungsanleitung gut auf!
2. Zu Ihrer Sicherheit
• Verwenden Sie das Produkt nicht anders, als in dieser Bedie-
nungsanleitung dargestellt wird.
• Das eigenmächtige Reparieren, Umbauen oder Verändern des
Gerätes ist nicht gestattet.
• Dieses Gerät ist nicht zur öffentlichen Information geeignet
und nur für den privaten Gebrauch bestimmt.
• Bewahren Sie das Instrument außerhalb der Reichweite von
Kindern auf.
Wichtige Hinweise zur Produktsicherheit!
• Setzen Sie das Gerät keinen extremen Temperaturen, Vibratio-
nen und Erschütterungen aus.
• Das Gerät ist spritzwassergeschützt, aber nicht wasserdicht.
• Reinigen Sie das Gerät mit einem weichen, leicht feuchten
Tuch. Keine Scheuer- oder Lösungsmittel verwenden! Vor
Feuchtigkeit schützen.
• Um ungewünschte Missweisungen zu vermeiden, ist darauf
zu achten, dass sich keine magnetischen Felder wie Eisentei-
le, Magnetkerne und stromführende Leitungen in unmittelba-
rer Nähe der Kompassmessung befinden.
• Außergewöhnlich hohe Temperatur- und Luftdruckunterschie-
de können eventuell zu Blasenbildung in der flüssigkeitsge-
füllten Kompasskapsel führen, was jedoch die Funktion des
Kompasses nicht beeinträchtigt. Nach Anpassung an normale
Temperatur- und Luftdruckverhältnisse verschwinden diese
Blasen wieder.
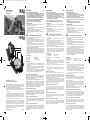
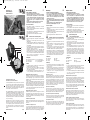
3. Bestandteile
A: Visierdraht B: Peillinie
C: Drehring D: Kimme
E: Peillupe F: Kompassnadel
5. Bedienung
• Das Kompassgehäuse ist mit Öl zur Dämpfung der Skala
gefüllt. Dadurch ist ein leichteres und genaueres Ablesen
gewährleistet.
• Der Kompass muss waagrecht gehalten werden, damit die
Skala frei rotieren kann. Die bewegliche Nadel zeigt mit der
Pfeilspitze immer nach Norden.
• Die Kompass-Skala ist mit einer kombinierten Gradeinstel-
lung von O...36O° und O...64° (NATO-Skala) versehen und
weist die internationale Beschriftung W ➔ S - E auf.
Feststellen des eigenen Standpunktes
Zunächst muss die Karte eingenordet werden. Man legt den
Kompass so auf die Karte, dass der Visierdraht parallel zum Kar-
tenrand verläuft und dreht die Karte so lange, bis Kimme, Nord-
pfeil und Visierdraht eine Linie bilden.
Dann sucht man zwei markante Punkte im Gelände, die auch auf
der Karte eingezeichnet sind. Ohne die Karte zu verschieben
dreht man den Kompass so lange, bis Kimme, Visierdraht, der
betreffende Punkt auf der Karte und das Ziel eine Linie bilden.
Man liest den Winkel ab und überträgt ihn auf die Karte. In glei-
cher Weise verfährt man mit dem anderen Punkt. Am Schnitt-
punkt der beiden Linien ist der eigene Standpunkt.
Bestimmung der Marschrichtung
Das Ziel wird über Kimme und Visierdraht anvisiert. Den Dreh-
ring solange verdrehen, bis der lange grüne Strich gleich mit der
festgestellten Linie verläuft. Unter dem grünen Strich kann man
die Marschrichtungszahl ablesen. Jede Abweichung beim Mar-
schieren ist leicht festzustellen.
Marschieren nach Marschrichtungszahl
Kimme, den langen grünen Strich auf dem Glas und Visierdraht
in eine Linie bringen und dann mit dem Kompass so lange dre-
hen, bis die Marschrichtungszahl unter dem grünen Strich
erscheint.
Marschieren nach Karte und Kompass
Will man eine Marschrichtungszahl aus der eingenordeten Karte
ermitteln, legt man den Kompass so auf die Karte, dass Ziel und
eigener Standpunkt mit der Längsachse des Kompasses eine
Linie bilden. Unter dem grünen Strich ist die Marschrichtungs-
zahl abzulesen.
TFA Dostmann GmbH & Co. KG
Zum Ottersberg 12, D-97877 Wertheim.
Diese Anleitung oder Auszüge daraus dürfen nur mit Zustim-
mung von TFA Dostmann veröffentlicht werden. Die technischen
Daten entsprechen dem Stand bei Drucklegung und können
ohne vorherige Benachrichtigung geändert werden.
Die neuesten technischen Daten und Informationen zu Ihrem
Produkt finden Sie unter Eingabe der Artikel-Nummer auf unse-
rer Homepage.
No part of this manual may be reproduced without written con-
sent of TFA Dostmann. The technical data are correct at the time
of going to print and may change without prior notice. The latest
technical data and information about your product can be found
by entering your product number on our homepage.
La reproduction, même partielle du présent mode d'emploi est
strictement interdite sans l'accord explicite de TFA Dostmann.
Les spécifications techniques de ce produit ont été actualisées
au moment de l'impression et peuvent être modifiées, sans avis
préalable. Les dernières données techniques et des informations
concernant votre produit peuvent être trouvées en entrant le
numéro de l'article sur notre site.
www.tfa-dostmann.de 03/15
1. Before you use this instrument
• Please make sure to read the instruction manual carefully.
• Following and respecting the instructions in your manual
will prevent damage to your instrument and loss of your
statutory rights arising from defects due to incorrect use.
• We shall not be liable for any damage occurring as a result
of non following of these instructions.
• Please take particular note of the safety advice!
• Please keep this instruction manual for future reference.
2. For your safety
• This product should only be used as described within these
instructions.
• Unauthorised repairs, modifications or changes to the pro-
duct are prohibited.
• This product is not to be used for public information, but is
intended solely for home use.
• Keep this instrument out of the reach of children.
Important information on product safety!
• Do not expose the instrument to extreme temperatures, vibra-
tions or shocks.
• The instrument is protected against splash water, but is not
watertight.
• Clean the instrument with a soft damp cloth. Do not use sol-
vents or scouring agents. Protect it from moisture.
• To avoid unwanted deviations care must be taken that no
magnetic fields such as iron particles, magnet cores and cur-
rent-carrying lines are placed in the immediate neighbour-
hood of the compass measure-ment.
• Extremely high differences of temperature and atmospheric
pressure can eventually cause the formation of bubbles in the
liquid filled compass capsule. This, however, is not impairing
the function of the compass. These bubbles disappear when
adapted to normal temperature and atmospheric pressure.
3. Components
A: Sight filament B: Marking line
C: Rotating ring D: Notch
E: Magnifying lens F: Compass needle
5. Operation
• The compass capsule is filled with oil to dampen the compass
dial. Therefore the scale can be read very easily and exactly.
• The compass must be in horizontal position in order to
guarantee a free rotating of the dial.
• The arrow tip of the freely rotating needle always points to the
north.
• The compass dial is provided with a graduation of 0…360°
and 0…64° (NATO-scale) and with the international inscrip-
tion W ➔ S - E.
Determination of the position
At first, the map must be adjusted. The compass is set on the
map, the sigh filament must run parallel with the margin of the
map. Now turn the map until notch and north arrow and sight
filament form one line. Then look for two prominent points in
the area which are also indicated in the map.
Without changing the map in its position, turn the compass until
notch, sight filament, the respective point in the map and the
destination form one line. Read the angle and mark it in the map.
Repeat this procedure and mark the other point in the map. The
intersection of both lines indicates your position.
Determination of the marching direction
Sight on the object you want to reach over notch and sight fila-
ment. Then turn the rotating ring until the long green line is
identical with the line determined. The route figure will be in-
dicated under the green line. Every deviation can be found out
easily.
Marching according to route figures
Notch, long green line and sight filament should be in one line.
Turn with the compass until the route figure will be indicated
under the green line.
Marching according to map and compass
If you want to determine the route figure from the map adjusted,
you have to set the compass on the map so that destination and
position form one line with the longitudinal axis of the compass.
Read the route figure under the green line.
Boussole de marche
1. Avant d'utiliser l'appareil
• Lisez attentivement le mode d'emploi.
• En respectant ce mode d'emploi, vous éviterez d'endom-
mager l'appareil et de perdre vos droits résultant d’un
défaut pour cause d'utilisation non conforme.
• Nous n’assumons aucune responsabilité pour des domma-
ges qui auront été causés par non-respect du présent mode
d’emploi.
• Suivez bien toutes les consignes de sécurité!
• Conservez soigneusement le mode d'emploi!
2. Pour votre sécurité
• Ne l'utilisez jamais à d'autres fins que celles décrites dans le
présent mode d'emploi.
• Vous ne devez en aucun cas réparer, démonter ou modifier
l'appareil par vous-même.
• Cet instrument ne convient pas pour l’information publique, il
est uniquement destiné à un usage privé.
• Gardez l’instrument hors de la portée des enfants.
Conseils importants de sécurité de produit!
• Evitez d’exposer l’appareil à des températures extrêmes,
vibrations ou chocs.
• L’instrument est résistant aux éclaboussures d'eau mais il
n'est pas étanche.
• Pour le nettoyage de l'appareil, utilisez un chiffon doux humi-
de. N’utilisez pas de dissolvants ou d’agents abrasifs! Proté-
ger contre l'humidité
• Pour éviter des déclinations indésirables il faut prendre garde
qu‘il n‘y ait pas de champs magnétiques comme fragments de
fer, noyaux magnétiques et des conduites conductrices à
proximité immédiate de la mesure de boussole.
• Des différences de température et pression atmosphérique
extrêmes hauts peuvent éventuellement causer la formation
de bulles dans la capsule de la boussole remplie de liquide,
mais cela ne gêne pas la fonction de la boussole. Ces bulles
disparaissent avec l‘ajustement normal de ta température et
de la pression atmosphérique.
3. Composants
A: Fil de visée B: Ligne de marquage
C: Anneau tournant D: Mire
E: Loupe F: Aiguille de boussole
5. Opération
• La capsule de la boussole est amortie par huile pour garantir
un amortissement du cadran. La direction de marche peut
être lue très facilement et précisément.
• La position de la boussole doit être horizontale pour garantir
la libre rotation du cadran de la boussole. L’aiguille mobile
avec la pointe de la flèche montre toujours le Nord.
• Le cadran de la boussole est muni d‘une graduation combinée
de 0… 360° et 0…64° (échelle NATO) et présente l‘inscrip-
tion internationale W ➔ S - E.
Détermination de la position
D’abord la carte doit être ajustée. La boussole est mise sur la
carte de manière que le fil de visée soit parallèle au bord de la
carte. La carte est tournée tant que la mire, flèche nord et file de
visée forment une ligne.
Ensuite on cherche dans le territoire deux points marquants qui
figurent aussi dans la carte. Sans changer la carte dans sa posi-
tion on tourne la boussole tant que la mire, le fil de visée, le
point en question sur la carte et le but forment une ligne. On lit
l’angle et le transmet à la carte.
La même méthode doit être pratiquée avec l’autre point. Le point
d’intersection des deux lignes indique la position.
Détermination du chiffre de la direction de marche
Le but est vise par la mire et le fil de visée. Maintenant, on tour-
ne le cadran jusqu’à ce que la longue ligne verte soit identique
avec la ligne déterminée. Au-dessous de la ligne verte il est pos-
sible de lire le chiffre de la direction de marche. Pendant la mar-
che chaque déclination peut être constatée facilement.
Marche d’après chiffre de la direction de marche
La mire, la longue ligne vert sur le verre et le fil de visée doivent
être identiques. Il faut tourner la boussole jusqu’à ce que le chiffre
de la direction de marche apparait au-dessous de la ligne verte.
Marche d’après carte et boussole
Si l’on veut déterminer le chiffre de la direction de marche de la
carte ajustée, on met la boussole sur la carte de manière que le
but et la position forme une ligne avec l’axe longitudinal. Au-
dessous de la ligne verte il est possible de lire le chiffre de la
direction de marche.
Bedienungsanleitung
Instruction manual
Mode d'emploi
Kat. Nr. 42.1004
A
B
C
D
E
F
TFA_No_42.1004_Anleit_03_15 02.03.2015 11:56 Uhr Seite 1
La page est en cours de chargement...
-
 1
1
-
 2
2


dans d''autres langues
- italiano: TFA Marching Compass Manuale utente
- English: TFA Marching Compass User manual
- español: TFA Marching Compass Manual de usuario
- Deutsch: TFA Marching Compass Benutzerhandbuch
- Nederlands: TFA Marching Compass Handleiding
Autres documents
-
Bresser COMPASS Le manuel du propriétaire
-
National Geographic 9079000 Le manuel du propriétaire
-
-
-
-
 Silva Schneider Ranger S Mode d'emploi
-
HQ CP10 Manuel utilisateur
-
Haba 1728 Le manuel du propriétaire
-
Suunto A-40 Le manuel du propriétaire
-
