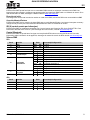
CHAUVET DJ EZLink Par Q6BT Guide de référence
- Taper
- Guide de référence

Quick Reference Guide
Scan to download BTAir App

1
EN
QUICK REFERENCE GUIDE
EZLink Par Q6BT QRG Rev. 6
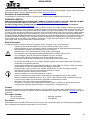
About This Guide
The EZLink Par Q6BT Quick Reference Guide (QRG) has basic product information such as mounting, menu options,
and DMX values. Download the User Manual from www.chauvetdj.com for more details.
Disclaimer
The information and specifications contained in this QRG are subject to change without notice.
LIMITED WARRANTY
FOR WARRANTY REGISTRATION AND COMPLETE TERMS AND CONDITIONS PLEASE VISIT OUR WEBSITE.
For Customers in the United States and Mexico: www.chauvetlighting.com/warranty-registration
.
For Customers in the United Kingdom, Republic of Ireland, Belgium, the Netherlands, Luxembourg, France, and
Germany: www.chauvetlighting.eu/warranty-registration
.
Chauvet warrants that this product shall be free from defects in material and workmanship under normal use, for the
period specified in, and subject to the exclusions and limitations set forth in the full limited warranty on our website. This
warranty extends only to the original purchaser of the product and is not transferable. To exercise rights under this
warranty, you must provide proof of purchase in the form of an original sales receipt from an authorized dealer that shows
the product name and date of purchase. THERE ARE NO OTHER EXPRESS OR IMPLIED WARRANTIES. This
warranty gives you specific legal rights. You may also have other rights that vary from state to state and country to
country. This warranty is valid only in the United States, United Kingdom, Republic of Ireland, Belgium, the Netherlands,
Luxembourg, France, Germany and Mexico. For warranty terms in other countries, please consult your local distributor.
Safety Notes
These Safety Notes include important information about installation, use, and maintenance.
Contact
Outside the U.S., United Kingdom, Ireland, Benelux, France, Germany, or Mexico, contact your distributor to request
support or return a product. Refer to Contact Us at the end of this QRG for contact information.
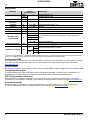
What is Included
To Begin
Unpack your EZLink Par Q6BT and make sure you have received all parts in good condition. If the box or contents
appear damaged, notify the carrier immediately, not Chauvet.
• ONLY connect this product to a grounded and protected circuit.
• DISCONNECT from power before cleaning or replacing the fuse.
• DO NOT look at the light source when the product is on.
• Make sure the power cord is not crimped or damaged.
• Never disconnect this product from power by pulling on the cord.
• When mounting this product overhead, ALWAYS use a safety cable.
• DO NOT allow flammable materials close to the product when it is operating.
• DO NOT touch the product’s housing when it is on because it will be hot.
• The voltage of the outlet to which you are connecting this product must be within the range stated on the
decal or rear panel of the product.
• This product is for indoor use only! (IP20) To prevent risk of fire or shock, do not expose this product to rain
or moisture.
• Always mount this product in a location with adequate ventilation, at least 20 in (50 cm) from adjacent
surfaces.
• Be sure that no ventilation slots on the unit’s housing are blocked.
• Never connect this product to a dimmer or rheostat.
• Replace the fuse with the same type and rating.
• Never carry the product by the power cord. Use only the hanging bracket or handle to carry this product.
• The maximum ambient temperature is 104 °F (40 °C). Do not operate this product at higher temperatures.
• In the event of a serious operating problem, stop using immediately.
• DO NOT open this product. It contains no user-serviceable parts.
• To eliminate unnecessary wear and improve its lifespan, during periods of non-use completely disconnect
the product from power via breaker or by unplugging it.
•EZLinkParQ6BT
• Power cord
• Hanging bracket
• Quick Reference Guide

EN
2
EZLink Par Q6BT QRG Rev. 6
QUICK REFERENCE GUIDE
AC Power
This product has an auto-ranging power supply that works with an input voltage range of 100 to 240 VAC, 50/60 Hz.
Power Linking
For the maximum number of EZLink Par Q6BT products that you can power link at each voltage, see the User Manual or
the sticker on the product.
Fuse Replacement
1. Disconnect the product from power.
2. Wedge the tip of a flat-head screwdriver into the slot of the fuse holder.
3. Pry the safety cap out of the housing.
4. Remove the blown fuse from the clip on the front of the safety cap and replace with a fuse of the exact same
type and rating.
5. Re-insert the fuse holder and reconnect power.
Battery Power
The EZLink Par Q6BT comes with a rechargeable lithium battery for cable free operation.
Charging the Battery
The battery charges whenever the EZLink Par Q6BT is plugged into a power source using the included power cord. If the
product is plugged in and not in operation, make sure the product is turned off.
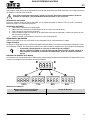
Battery Life Indicator
The indicators on the LED Menu Display show how much battery life remains available. The drawing below provides a
key to reading the battery life indicators.
Battery Run Time
To eliminate wear and improve its lifespan, during periods of non-use completely disconnect the
product from power via breaker or by unplugging it.
• The LED indicator light will flash if you overcharge your units.
• DO NOT use the EZLink Par Q6BT on full power mode (all LEDs at 100%) while
being charged/plugged into a power source, as the unit will get extremely hot.
Maximum Run Time (all colors on) Recharge Time
Up to 8 hours 7.5 hours
100% 75% 50% 25%

3
EN
QUICK REFERENCE GUIDE
EZLink Par Q6BT QRG Rev. 6
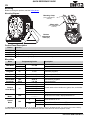
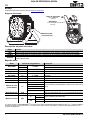
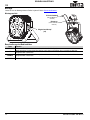
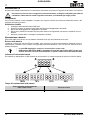
Mounting
Before mounting this product, read the Safety Notes.
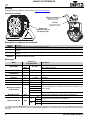
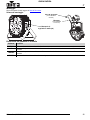
Mounting Diagram
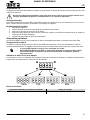
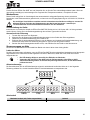
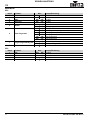
Control Panel Description
Menu Map
*The Bluetooth® word mark and logos are registered trademarks owned by the Bluetooth SIG, Inc. and any use of such marks by
Chauvet & Sons, LLC is under license. Other trademarks and trade names are those of their respective owners.
Button Function
<MENU> Exits from the current menu or function
<UP> Navigates upwards through the menu list and increases the numeric value when in a function
<DOWN> Navigates downwards through the menu list and decreases the numeric value when in a function
<ENTER> Enables the currently displayed menu or sets the currently selected value into the selected function
Mode Programming Levels Description
DMX Mode
4Ch
d 1–509
4-channel DMX mode
8Ch 8-channel DMX mode
Static Colors C-- C 1–15 Static colors
Automatic
Programs
P-- P 1–5 Automatic programs
Auto Speed S-- S. 1–100 Program speed for P 1–5
Dimmer d-- L. 1–255 Dimmer
Sound-
Active Mode
Snd Snd1–5 Sound-active programs
Sensitivity SEnS u 0–100 Sound sensitivity
Custom
Color Mixing
u--
r. 0–255
Custom static colors combine red, green, blue, and amber
G. 0–255
b. 0–255
A. 0–255
S. 0–100 Strobe rate
Bluetooth
Mode*
bLE _ _ _ _ _ Bluetooth control mode, displays Bluetooth ID
Control
Mode
SEt
ir
on
Turns infrared on or off
oFF
out
SLAV Enable Master/Slave with other BT products
dMX Enable Master/Slave with non-BT products
Safety cable
(such as CH-05 from
Chauvet)
Mounting clamp
(such as CLP-15 from
Chauvet)
Bracket
adjustment
knob (x2)

EN
4
EZLink Par Q6BT QRG Rev. 6
QUICK REFERENCE GUIDE
DMX Linking
The EZLink Par Q6BT can work with a DMX controller. Instructions for connecting and configuring this product for DMX
operation are in the User Manual. If you are not familiar with DMX, download the DMX Primer from www.chauvetdj.com
.
Starting Address
To ensure full access to all channels available in each DMX mode, the highest recommended DMX address is 505.
Master/Slave Connection
The EZLink Par Q6BT uses the DMX data connection for its Master/Slave mode. Information about configuring the
EZLink Par Q6BT for Master/Slave operation is in the User Manual, which is available from the Chauvet website.
IRC-6 (Infrared Remote Control)
The EZLink Par Q6BT can be operated with the CHAUVET IRC-6. For more information about the IRC-6, download
instructions for the IRC-6 or the EZLink Par Q6BT User Manual from www.chauvetdj.com
.
Bluetooth Control
The EZLink Par Q6BT can be operated with the BTAir application over a Bluetooth connection. For more information on
using the BTAir app, download the BTAir User Manual from www.chauvetdj.com
.
DMX Values
8Ch
4Ch
Channel Function Value Percent/Setting
1 Red 000
255 0–100%
2 Green 000
255 0–100%
3 Blue 000
255 0–100%
4 Amber 000
255 0–100%
5 Strobe
000
015 No function
016
255 Strobe, slow to fast
6 Auto programs
000
005 No function
006
055 Auto program 1 (programs 2–7)
056
106 Auto program 2
107
157 Auto program 3
158
208 Auto program 4
209
255 Auto program 5
7Auto speed
000
250 Program speed, slow to fast
251
255 Sound-active mode
8 Dimmer 000
255 0–100%
Channel Function Value Percent/Setting
1 Red 000
255 0–100%
2 Green 000
255 0–100%
3 Blue 000
255 0–100%
4 Amber 000
255 0–100%

5
ES
GUIA DE REFERENCIA RÁPIDA
EZLink Par Q6BT GRR Rev. 6
Acerca de esta guía
La Guía de referencia rápida (GRR) del EZLink Par Q6BT contiene información básica sobre el producto, como montaje,
opciones de menú y valores DMX. Descargue el manual de usuario de www.chauvetdj.com para una información más
detallada.
Exención de responsabilidad
La información y especificaciones contenidas en esta GRR están sujetas a cambio sin previo aviso.
GARANTÍA LIMITADA
PARA VER EL REGISTRO DE GARANTÍA Y LOS TÉRMINOS Y CONDICIONES COMPLETOS, VISITE NUESTRO
SITIO WEB.
Para clientes en los Estados Unidos y México: www.chauvetlighting.com/warranty-registration
.
Para clientes en Reino Unido, República de Irlanda, Bélgica, Países Bajos, Luxemburgo, Francia y Alemania:
www.chauvetlighting.eu/warranty-registration
.
Chauvet garantiza que este producto estará libre de defectos de material y mano de obra en condiciones de uso
normales, durante el periodo especificado, sujeto siempre a las exclusiones y limitaciones establecidas en la garantía
limitada completa de nuestro sitio web. Esta garantía se concede únicamente al comprador original del producto y no es
transferible. Para ejercer los derechos que otorga esta garantía, usted debe proporcionar una prueba de compra en
forma de un recibo de compra original, expedido por un distribuidor autorizado, donde figure el nombre del producto y la
fecha de compra. NO EXISTEN OTRAS GARANTÍAS EXPRESAS NI IMPLÍCITAS. Esta garantía le otorga derechos
legales específicos. Es posible que a usted le asistan otros derechos, que variarán dependiendo del estado o del país.
Esta garantía solamente es válida en los Estados Unidos, Reino Unido, República de Irlanda, Bélgica, Países Bajos,
Luxemburgo, Francia, Alemania y México. Para conocer los términos de garantía en otros países, consulte a su
distribuidor local.
Notas de seguridad
Estas notas de seguridad incluyen información importante sobre el montaje, uso y mantenimiento.
Contacto
Fuera de EE. UU., Reino Unido, Irlanda, Benelux, Francia, Alemania o México póngase en contacto con su distribuidor
para solicitar asistencia o devolver un producto. Consulte Contact Us al final de este GRR para información de contacto.
Qué va incluido
Para empezar
Desembale su EZLink Par Q6BT y asegúrese de que ha recibido todas las partes en buen estado. Si la caja o los
componentes parecen dañados, notifíqueselo inmediatamente al transportista, no a Chauvet.
• Conecte este producto SOLO a un circuito con toma de tierra y protegido.
• Desconecte siempre de la alimentación antes de la limpieza o sustitución del fusible.
• NO mire a la fuente de luz cuando el producto esté encendido.
• Asegúrese de que el cable de alimentación no está retorcido ni estropeado.
• Nunca desconecte este producto de la alimentación tirando del cable.
• Cuando monte este producto en alto, use un cable de seguridad.
• NO permita la presencia de materiales inflamables cerca de la unidad cuando esté en funcionamiento.
• NO toque este producto cuando esté en funcionamiento, pues podría estar caliente.
• La tensión del enchufe al que conecte este producto ha de estar en el rango establecido en el grabado o
en el panel posterior del producto.
• ¡Este producto es para uso en interiores solamente! (IP20) Para evitar riesgos de incendio o descarga, no
exponga este producto a la lluvia o la humedad.
• Monte siempre este producto en una ubicación con ventilación adecuada, al menos a 20 in (50 cm) de
superficies adyacentes.
• Asegúrese de que ninguna ranura de ventilación en la carcasa de la unidad queda bloqueada.
• Nunca conecte este producto a un atenuador o reostato.
• Sustituya el fusible con uno del mismo tipo y categoría.
• Use SOLAMENTE los soportes de colgar/montar o el listón para mover este producto.
• La temperatura ambiente máxima es de 104 °F (40 °C). No haga funcionar este producto a temperaturas
más altas.
• En caso de un problema grave de funcionamiento, deje de usarlo inmediatamente.
• NO abra este producto. No contiene piezas reparables por el usuario.
• Para evitar un desgaste innecesario y alargar su vida útil, desconecte completamente el producto mediante
el interruptor o desenchufándolo durante periodos en que no se use.
•EZLinkParQ6BT
• Cable de alimentación
• Soporte para colgar
• Guía de referencia rápida

ES
6
EZLink Par Q6BT GRR Rev. 6
GUIA DE REFERENCIA RÁPIDA
Corriente alterna
Este producto tiene una fuente de alimentación con detección automática que puede funcionar con un rango de tensión
de entrada de 100–240 VCA, 50/60 Hz.
Alimentación en cadena
Para ver el máximo número de EZLink Par Q6BT que se pueden alimentar en cadena a 120 V o a 240 V, consulte el
Manual de usuario o la etiqueta del producto.
Sustitución del fusible
1. Desconecte el producto de la alimentación.
2. Haga cuña con la punta de un destornillador plano en la ranura del portafusibles.
3. Saque la tapa de seguridad de la carcasa.
4. Quite el fusible fundido de la sujeción en la parte frontal de la tapa de seguridad y sustituya el fusible con otro
del mismo tipo y categoría.
5. Vuelva a insertar el portafusibles y conecte de nuevo la alimentación.
Alimentación por batería
El EZLink Par Q6BT viene con una batería de litio recargable para un funcionamiento sin cables.
Cargar la batería
La batería se carga cada vez que el EZLink Par Q6BT está enchufado a una fuente de alimentación utilizando el cable
de alimentación incluido. Si el producto se enchufa y no está funcionando, asegúrese de que el producto esté apagado.
Indicador de duración de la batería
Los indicadores en la pantalla de menú LED muestran cuánto tiempo de batería queda disponible. El dibujo inferior le da
la clave para interpretar los indicadores de vida de la batería.
Duración de la batería
Para evitar un desgaste innecesario y alargar su vida útil, desconecte completamente el producto
mediante el interruptor o desenchufándolo durante periodos en que no se use.
• El indicador LED parpadeará en color rojo si sobrecargar las unidades.
• NO use el EZLink Par Q6BT en modo de potencia total (todos los LED al 100%) mientras se
está cargando / enchufando a una fuente de alimentación, ya que la unidad se calentará
mucho.
Máximo tiempo de funcionamiento
(todos los colores encendidos)
Tiempo de Recarga
Hasta 8 horas 7,5 horas
100% 75% 50% 25%

7
ES
GUIA DE REFERENCIA RÁPIDA
EZLink Par Q6BT GRR Rev. 6
Montaje
Antes de montar este producto, lea las Notas de seguridad.
Diagrama de montaje
Descripción del panel de control
Mapa de menú
*La marca, logotipo y palabra Bluetooth
®
son marcas comerciales registradas propiedad de Bluetooth SIG, Inc. y cualquier utilización
de dichas marcas por Chauvet & Sons, LLC es bajo licencia. Otras marcas comerciales y nombres comerciales pertenecen a sus
respectivos propietarios.
Botón Función
<MENU> Sale del menú o función actual
<UP> Navega hacia arriba por la lista de menú y aumenta el valor numérico cuando está en una función
<DOWN> Navega hacia abajo por la lista de menú y disminuye el valor numérico cuando está en una función
<ENTER>
Habilita el menú actualmente en pantalla o configura el valor seleccionado actualmente dentro de la
función seleccionada
Modo Niveles de programación Descripción
Modo DMX
4Ch
d 1–509
Modo DMX de 4 canales
8Ch Modo DMX de 8 canales
Colores estáticos
C-- C 1–15 Selecciona un color estático
Programas
P-- P 1–5 Programas automáticos
Velocidad
S-- S. 1–100 Velocidad de programa para P 1–5
Atenuador
d-- L. 1–255 Atenuador
Modo sonido
Snd Snd1–5 Programa activado por sonido
Sensibilidad SEnS u 0–100 Sensibilidad al sonido
Mezcla de color
personalizado
u--
r. 0–255
Colores estáticos personalizados combina rojo, verde azul y
ámbar
G. 0–255
b. 0–255
A. 0–255
S. 0–100 Velocidad de estroboscopio
Modo Bluetooth*
bLE _ _ _ _ _ Modo de control Bluetooth, se ve en la pantalla Bluetooth ID
Modo de Control
SEt
ir
on
Activa o desactiva los infrarrojos
oFF
out
SLAV Habilitar Maestro/Esclavo con productos que no sean de BT
dMX Habilitar Maestro/Esclavo con otros productos de BT
Cable de seguridad
(como el CH-05 de
Chauvet)
Abrazadera
(como la CLP-15 de
Chauvet)
Mando de ajuste
del soporte (x2)

ES
8
EZLink Par Q6BT GRR Rev. 6
GUIA DE REFERENCIA RÁPIDA
Enlace DMX
El EZLink Par Q6BT puede funcionar con un controlador DMX cuando se enlaza por conexiones serie DMX. Las
instrucciones para conectar y configurar este producto para funcionamiento DMX están en el Manual de usuario. Si no
está familiarizado con DMX, descargue el Manual DMX de www.chauvetdj.com
.
Dirección de inicio
Para asegurarse acceso total a todos los canales en cada modo DMX, la dirección DMX más recomendable es 505.
Conexión Maestro/Esclavo
El EZLink Par Q6BT usa la conexión de datos DMX para su modo Maestro/Esclavo. Las instrucciones para conectar y
configurar este producto para funcionamiento Maestro/Esclavo están en el Manual de usuario.
IRC-6 (control remoto por infrarrojos)
El EZLink Par Q6BT es totalmente compatible con el control remoto por infrarrojos (IRC-6) de CHAUVET DJ. Para
información adicional sobre el IRC-6 o para descargar las instrucciones, consulte
www.chauvetdj.com
.
Control Bluetooth
El EZLink Par Q6BT se puede hacer funcionar con la aplicación BTAir sobre una conexión Bluetooth. Para más
información sobre la utilización de la app BTAir, descargue el manual de usuario de BTAir desde
www.chauvetdj.com
.
Valores DMX
8Ch
4Ch
Canal Función Valor Porcentaje/Configuración
1 Rojo 000
255 0–100%
2 Verde 000
255 0–100%
3 Azul 000
255 0–100%
4 Ámbar 000
255 0–100%
5 Estroboscopio
000
015 Sin función
016
255 Estroboscopio, lenta a rápida
6
Programas
automáticos
000
005 Sin función
006
055 Programa automático 1 (programas 2–7)
056
106 Programa automático 2
107
157 Programa automático 3
158
208 Programa automático 4
209
255 Programa automático 5
7
Velocidad de
programa
000
250 Velocidad de programa, lenta a rápida
251
255 Programa activa por sonido
8 Atenuador 000
255 0–100%
Canal Función Valor Porcentaje/Configuración
1 Rojo 000
255 0–100%
2 Verde 000
255 0–100%
3 Azul 000
255 0–100%
4 Ámbar 000
255 0–100%

9
FR
MANUEL DE RÉFÉRENCE
EZLink Par Q6BT MdR Rév. 6
A propos de ce manuel
Le Manuel de Référence (MdR) du EZLink Par Q6BT reprend des informations de base sur cet appareil notamment en
matière de montage, d'options de menu et de valeurs DMX. Veuillez télécharger le manuel d'utilisation à partir du site
internet www.chauvetdj.com
pour plus de détails.
Clause de non Responsabilité
Les informations et caractéristiques contenues dans ce MdR sont sujettes à modification sans préavis.
GARANTIE LIMITÉE
VEUILLEZ VISITER NOTRE SITE INTERNET POUR CONSULTER LES MODALITÉES D'ENREGISTREMENT DE LA
GARANTIE ET LES CONDITIONS GÉNÉRALES COMPLÈTES.
Pour les clients aux États-Unis et au Mexique: www.chauvetlighting.com/warranty-registration
.
Pour les clients du Royaume-Uni, de la République d'Irlande, de la Belgique, des Pays-Bas, du Luxembourg, de
la France et de l'Allemagne: www.chauvetlighting.eu/warranty-registration
.
Chauvet garantit que cet appareil est exempt de défauts de matériaux et de fabrication dans des conditions normales
d'utilisation, pendant la période spécifiée dans la garantie limitée complète consultable sur notre site Internet et sous
réserve des exclusions et limitations qui y sont énoncées. Cette garantie ne s'applique qu'à l'acheteur initial du produit et
n'est pas transférable. Pour exercer les droits prévus par cette garantie, vous devez fournir une preuve d'achat sous la
forme d'un reçu de vente original d'un revendeur autorisé qui indique le nom du produit et la date d'achat. IL N'EXISTE
AUCUNE AUTRE GARANTIE EXPRESSE OU IMPLICITE. Cette garantie vous confère des droits légaux spécifique.
Vous pouvez également bénéficier d'autres droits qui varient selon les états et les pays. Cette garantie n'est valable
qu'aux États-Unis, au Royaume-Uni, en République d'Irlande, en Belgique, aux Pays-Bas, au Luxembourg, en France,
en Allemagne et au Mexique. Pour connaître les conditions de garantie dans d'autres pays, veuillez consulter votre
revendeur local.
Consignes de Sécurité
Ces consignes de sécurité contiennent des informations importantes en matière d'installation, d'utilisation et d'entretien.
En dehors des États-Unis, du Royaume-Uni, de l'Irlande, du Benelux, de la France, de l’Allemagne, ou du Mexique,
contactez votre fournisseur si vous avez besoin d'assistance ou pour retourner un appareil. Référez-vous à Contact Us
à
la fin de ce MdR pour obtenir des informations pour nous contacter.
Contenu
Préalable
Déballez votre EZLink Par Q6BT et assurez-vous que vous avez reçu toutes les pièces en bon état. Si la boîte et/ou son
contenu semble endommagés, contactez immédiatement le transporteur, et non pas Chauvet.
• Cet appareil DOIT être relié à un circuit mis à la terre et protégé.
• Toujours débrancher l'appareil de la source d'alimentation avant de le nettoyer ou de remplacer son fusible.
• NE PAS exposer directement les yeux à la source de lumière lorsque le produit est allumé.
• Veillez à ce que le cordon d'alimentation ne soit jamais pincé ou endommagé.
• Ne débranchez jamais cet appareil en tirant sur le cordon d'alimentation.
• En cas de montage de l'appareil en hauteur, veillez à toujours utiliser un câble de sécurité.
• NE PAS laisser de produit inflammable à proximité de l'appareil lorsque celui-ci fonctionne.
• NE PAS toucher au boîtier de l'appareil lorsqu'il est en fonctionnement, celui-ci pouvant être très chaud.
• La tension de la source d'énergie à laquelle est connecté cet appareil doit être dans la plage indiquée sur
l'étiquette ou sur le panneau arrière de l'appareil.
• Cet appareil doit uniquement être utilisé en intérieur! (IP20) Afin d'éviter tout risque d'incendie ou de
décharge électrique, veillez à n'exposer cet appareil ni à la pluie ni à l'humidité.
• Installez toujours cet appareil dans un endroit bien ventilé à au moins 50 cm (20 po) des surfaces
adjacentes.
• Assurez-vous qu'aucune fente de ventilation de l'appareil n'est obstruée.
• Ne connectez jamais cet appareil à un variateur ou un rhéostat.
• Lors du remplacement du fusible, utilisez le même type et le même ampérage.
• Utilisez EXCLUSIVEMENT le support de suspension/fixation pour soulever cet appareil.
• La température ambiante maximale est de 40 °C (104 °F). Ne faites pas fonctionner cet appareil à des
températures plus élevées.
• En cas de sérieux problèmes de fonctionnement, arrêtez l'appareil immédiatement.
• NE PAS ouvrir cet appareil. Il ne contient aucune pièce réparable par l'utilisateur.
• Durant les périodes de non-utilisation, pour éviter tout usure inutile et pour prolonger la durée de vie,
éteignez complètement l'appareil en le débranchant ou en coupant le disjoncteur.
•EZLinkParQ6BT
• Cordon d'alimentation
• Fixation de suspension
• Manuel de Référence

FR
10
EZLink Par Q6BT MdR Rév. 6
MANUEL DE RÉFÉRENCE
Alimentation CA
Cet appareil est doté d'une alimentation universelle qui peut prendre en charge toute tension d'entrée comprise entre 100
et 240 VCA, 50/60 Hz.
Chaînage électrique
Pour savoir combien de projecteurs EZLink Par Q6BT peuvent être chaînés entre eux au maximum sur du 120 V ou du
240 V, veuillez consulter le manuel de l'utilisateur ou l'étiquette sur l'appareil.
Remplacement des fusibles
1. Débranchez l'appareil.
2. Calez la pointe d'un tournevis à tête plate dans la fente du porte-fusible.
3. Soulevez le capuchon de sécurité hors du boîtier.
4. Enlevez le fusible grillé logé dans le clip sur le devant du capuchon de sécurité et remplacez-le par un fusible de
même type et de même ampérage.
5. Remettez le porte-fusible en place puis rebranchez.
Alimentation par batterie
Le EZLink Par Q6BT est livré avec une batterie au lithium rechargeable permettant un fonctionnement sans câble.
Chargement de la batterie
La batterie se recharge chaque fois que le EZLink Par Q6BT est branché sur une source d'alimentation à l'aide du
cordon d'alimentation fourni. Si l'appareil est branché mais qu'il n'est pas utilisé, assurez-vous que le produit est éteint.
Indicateur de durée de vie de la batterie
Les indicateurs du menu sur l'affichage LED montrent la durée de vie restante de la batterie. Le dessin ci-dessous donne
la signification des indicateurs de la durée de vie de la batterie.
Durée de la batterie
Durant les périodes de non-utilisation, pour éviter toute usure inutile et pour prolonger la durée de vie,
éteignez complètement l'appareil en le débranchant ou en coupant le disjoncteur.
• Le voyant LED clignote en rouge si vous surcharger vos unités.
• N'UTILISEZ PAS l'EZLink Par Q6BT en mode pleine alimentation (toutes les DEL à 100%)
tout en étant chargé / branché sur une source d'alimentation, car l'appareil chauffera
extrêmement fort.
Autonomie maximale (avec toutes les couleurs) Temps de recharge
Jusqu'à 8 heures 7,5 heures
100% 75% 50% 25%

11
FR
MANUEL DE RÉFÉRENCE
EZLink Par Q6BT MdR Rév. 6
Montage
Avant de monter cet appareil, veuillez lire les Consignes de Sécurité.
Schéma de montage
Description du panneau de commande
Menu carte
*La marque et les logos Bluetooth
®
sont des marques déposées appartenant à Bluetooth SIG, Inc. et toute utilisation de ces marques
par Chauvet & Sons, LLC est sous licence. Les autres marques déposées et noms commerciaux sont la propriété de leurs détenteurs
respectifs.
Bouton Fonction
<MENU> Permet de sortir du menu ou de la fonction en cours
<UP>
Permet de naviguer vers le haut dans la liste du menu et d'incrémenter une valeur numérique dans une
fonction
<DOWN>
Permet de naviguer vers le bas dans la liste du menu et de décrémenter une valeur numérique dans une
fonction
<ENTER>
Active l'entrée de menu actuellement affichée ou confirme la valeur actuellement sélectionnée pour la
fonction en cours de sélection
Mode
Niveaux de
programmation
Description
Mode DMX
4Ch
d 1–509
Mode DMX à 4 canaux
8Ch Mode DMX à 8 canaux
Couleurs statiques
C-- C 1–15 Couleurs statiques
Programmes
automatiques
P-- P 1–5 Programmes automatiques
Vitesse
S-- S. 1–100 Vitesse de programme pour P 1–5
Gradateur
d-- L. 1–255 Gradateur
Activation par le son
Snd Snd1–5 Programme son-activé
Sensibilité
SEnS u 0–100 Sensibilité sonore
Mélange de couleur
personnalisée
u--
r. 0–255
Couleurs statiques personnalisées combinaison de rouge, vert
bleu et ambre
G. 0–255
b. 0–255
A. 0–255
S. 0–100 La vitesse du stroboscope
Mode Bluetooth*
bLE _ _ _ _ _ Mode de contrôle Bluetooth, affichage de l'ID Bluetooth
Mode de contrôle
SEt
ir
on
Permet d'activer ou désactiver l'infrarouge
oFF
out
SLAV Activer maître/esclave avec les appareils non compatibles BT
dMX Activer maître/esclave avec d'autres appareils compatibles BT
Poignée de
réglage du support
de montage (x2)
Crochet
(par exemple modèle
CLP-15 de Chauvet)
Élingue de sécurité
(par exemple modèle
CH-05 de Chauvet)

FR
12
EZLink Par Q6BT MdR Rév. 6
MANUEL DE RÉFÉRENCE
Chaînage DMX
Le EZLink Par Q6BT peut fonctionner avec un contrôleur DMX. Les instructions pour la connexion et la configuration de
cet appareil pour le fonctionnement en DMX sont indiquées dans le manuel d'utilisation. Si vous n'êtes pas familier avec
le protocole DMX, vous pouvez télécharger l'introduction au DMX à l'adresse www.chauvetdj.com
.
Adresse de départ
Pour permettre un accès à l'ensemble des canaux de chaque mode DMX, l'adresse DMX maximale recommandée est
505
.
Connexion maître/esclave
Le EZLink Par Q6BT utilise une connexion de données DMX pour le fonctionnement de son mode maître/esclave. Les
instructions pour la connexion et la configuration de cet appareil pour le fonctionnement en maître/esclave sont indiquées
dans le manuel d'utilisation.
IRC-6 (Télécommande par infrarouge)
Le EZLink Par Q6BT est compatible avec la télécommande infra-rouge (IRC-6) de CHAUVET DJ. Pour plus
d'informations sur l'IRC-6 ou pour télécharger les instructions, rendez-vous à l'adresse
www.chauvetdj.com
.
Contrôle Bluetooth
Le EZLink Par Q6BT peut être contrôlé avec l'application BTAir par connexion Bluetooth. Pour plus d'informations sur
l'utilisation de l'application BTAir, veuillez télécharger le Manuel d'utilisation BTAir sur
www.chauvetdj.com
.
Valeurs DMX
8Ch
4Ch
Canal Fonction Valeur Pourcentage/Paramétrage
1 Rouge 000
255 0–100%
2 Vert 000
255 0–100%
3 Bleu 000
255 0–100%
4 Ambre 000
255 0–100%
5 Stroboscope
000
015 Aucune fonction
016
255 Stroboscope, lente à rapide
6
Programmes
Automatiques
000
005 Aucune fonction
006
055 Programme automatique 1 (programmes 2–7)
056
106 Programme automatique 2
107
157 Programme automatique 3
158
208 Programme automatique 4
209
255 Programme automatique 5
7
Vitesse du
programme
000
250 Vitesse, lente à rapide
251
255 Programme son-activé
8 Gradateur 000
255 0–100%
Canal Fonction Valeur Pourcentage/Paramétrage
1 Rouge 000
255 0–100%
2 Vert 000
255 0–100%
3 Bleu 000
255 0–100%
4 Ambre 000
255 0–100%

13
DE
SCHNELLANLEITUNG
EZLink Par Q6BT SAL Rev. 6
Über diese Schnellanleitung
In der Schnellanleitung des EZLink Par Q6BT finden Sie die wesentlichen Produktinformationen, wie etwa über die
Montage, Menüoptionen und DMX-Werte des Geräts. Laden Sie für weiterführende Informationen unter
www.chauvetdj.com
das Benutzerhandbuch herunter.
Haftungsausschluss
Die in dieser Anleitung aufgeführten Informationen und Spezifikationen können ohne vorherige Ankündigung geändert werden.
EINGESCHRÄNKTE GARANTIE
ZUR REGISTRIERUNG FÜR GARANTIEANSPRÜCHE UND ZUR EINSICHT IN DIE VOLLSTÄNDIGEN
GESCHÄFTSBEDINGUNGEN BESUCHEN SIE BITTE UNSERE WEBSITE.
Für Kunden in den USA und in Mexiko: www.chauvetlighting.com/warranty-registration
.
Für Kunden im Vereinigten Königreich, in Irland, Belgien, den Niederlanden, Luxemburg, Frankreich und
Deutschland: www.chauvetlighting.eu/warranty-registration
.
Chauvet garantiert für die in der auf unserer Website veröffentlichten vollständigen eingeschränkten Garantie genannten
Dauer und unter Vorbehalt der darin genannten Haftungsausschlüsse und -beschränkungen, dass dieses Produkt bei
normalen Gebrauch frei von Material- und Verarbeitungsfehlern ist. Diese Garantie erstreckt sich nur auf den Erstkäufer
des Produkts und ist nicht übertragbar. Zur Ausübung der unter dieser Garantie gewährten Rechte ist der Kaufbeleg in
Form der Originalrechnung von einem autorisierten Händler vorzulegen, in der die Produktbezeichnung und das
Kaufdatum vermerkt sein müssen. ES BESTEHEN KEINE WEITEREN AUSDRÜCKLICHEN ODER
STILLSCHWEIGENDEN GARANTIEN. Diese Garantie gibt Ihnen besondere gesetzliche Rechte. Und Sie haben
möglicherweise weitere Rechte, die von Land zu Land unterschiedlich sein können. Diese Garantie ist nur in den USA,
im Vereinigten Königreich, in Irland, Belgien, den Niederlanden, Luxemburg, Frankreich, Deutschland und Mexiko gültig.
Bezüglich der Garantiebestimmungen in anderen Ländern wenden Sie sich bitte an Ihren lokalen Händler.
Sicherheitshinweise
Diese Sicherheitshinweise enthalten wichtige Informationen über die Montage, Verwendung und Wartung des Geräts.
Kontakt
Kunden außerhalb der USA, GB, Irland, Benelux, Frankreich, Deutschland oder Mexiko wenden sich an ihren
Lieferanten, um den Kundensupport in Anspruch zu nehmen oder ein Produkt zurückzuschicken. Kontaktinformationen
finden Sie im Contact Us
am Ende dieses QRG.
Packungsinhalt
• Schließen Sie dieses Produkt NUR an einen mit der Erde verbundenen und geschützten Stromkreis an.
• Trennen Sie das Gerät von der Stromquelle, bevor Sie es reinigen oder die Sicherung auswechseln.
• NIEMALS in die Lichtquelle schauen, während das Gerät eingeschaltet ist.
• Stellen Sie sicher, dass das Netzkabel nicht gequetscht oder beschädigt ist.
• Ziehen Sie beim Trennen des Geräts von der Stromversorgung nie am Kabel.
• Bei Montage über Kopf immer ein Sicherungsseil verwenden.
• KEINE entflammbaren Materialien während des Betriebs in der Nähe des Geräts lagern.
• NIEMALS während des Betriebs das Gehäuse berühren, da dies sehr heiß wird.
• Die Spannung der Schukosteckdose, an die Sie das Gerät anschließen, muss sich innerhalb des
Spannungsbereiches befinden, der auf dem Hinweisschild oder dem rückwärtigen Bedienfeld des Geräts
angegeben ist.
• Dieses Gerät darf nur im Innenbereich verwendet werden. (IP20) Um das Risiko von Bränden oder
elektrischen Schlägen zu vermeiden, dürfen Sie das Gerät nicht Regen oder Feuchtigkeit aussetzen.
• Installieren Sie das Gerät an einem Ort mit ausreichender Belüftung und mit einem Abstand von 50 cm zu
den angrenzenden Flächen.
• Stellen Sie sicher, dass die Lüftungsöffnungen im Gehäuse des Geräts nicht verschlossen sind.
• Schließen Sie dieses Gerät niemals an einen Dimmer oder Regelwiderstand an.
• Achten Sie beim Auswechseln der Sicherung darauf, den gleichen Typ mit den gleichen Werten zu
verwenden.
• Das Gerät NUR an den Hänge-/Befestigungsbügeln oder Griffen tragen.
• Die maximal zulässige Umgebungstemperatur beträgt 40 °C. Nehmen Sie das Gerät nicht bei höheren
Temperaturen in Betrieb.
• Bei ernsthaften Betriebsproblemen stoppen Sie umgehend die Verwendung des Geräts.
• Dieses Gerät NICHT öffnen. Die eingebauten Komponenten sind für den Kunden wartungsfrei.
• Um unnötigen Verschleiß zu vermeiden und die Lebensdauer des Geräts zu verlängern, trennen Sie
während längerer Perioden des Nichtgebrauchs das Gerät vom Stromnetz – entweder per Trennschalter
oder durch Herausziehen des Steckers aus der Steckdose.
•EZLinkParQ6BT
• Netzkabel
• Hängebügel
• Schnellanleitung

DE
14
EZLink Par Q6BT SAL Rev. 6
SCHNELLANLEITUNG
Start
Packen Sie Ihren EZLink Par Q6BT aus und überprüfen Sie, ob Sie alle Teile unbeschädigt erhalten haben. Wenn die
Verpackung beschädigt ist, benachrichtigen Sie umgehend das Transportunternehmen, nicht jedoch Chauvet.
Wechselstrom
Dieses Gerät verfügt über ein Vorschaltgerät, das automatisch die anliegende Spannung erkennt, sobald der
Netzstecker in die Schukosteckdose gesteckt wird, und kann mit einer Eingangsspannung von 100~240 V AC, 50/60 Hz
arbeiten.
Serienschaltung der Geräte
Informationen zur maximalen Anzahl der EZLink Par Q6BT IRC-Geräte, die bei 120 V oder 240 V in Serie geschaltet
werden können, finden Sie in der Bedienungsanleitung oder auf dem Typenschild am Gerät.
Auswechseln der Sicherung
1. Trennen Sie das Gerät vom Stromnetz.
2. Klemmen Sie die Spitze eines Flachkopfschraubendrehers in den Schlitz des Sicherungshalters.
3. Hebeln Sie die Sicherheitsabdeckung vom Gehäuse ab.
4. Entfernen Sie die durchgebrannte Sicherung von der Klemme am Vorderteil der Sicherheitsabdeckung, und
ersetzen Sie diese durch eine Sicherung des gleichen Typs und mit den gleichen Werten.
5. Stecken Sie den Sicherungshalter wieder zurück, und schließen Sie das Gerät an das Stromnetz an.
Stromversorgung per Akku
Der EZLink Par Q6BT wird für einen kabelfreien Betrieb mit einem Lithium-Ionen-Akku geliefert.
Laden des Akkus
Der Akku wird immer dann aufgeladen, wenn der EZLink Par Q6BT über das mitgelieferte Netzkabel an eine Stromquelle
angeschlossen wird. Wenn das Produkt angesteckt und nicht in Betrieb ist, stellen Sie sicher, dass das Produkt
ausgeschaltet ist.
Akkustandsanzeige
Die Kontrollleuchten auf der LED-Menüanzeige zeigen die verbleibende Laufzeit der Akkus an. In der folgenden
Zeichnung erfahren Sie, wie die Kontrollleuchten für den Akkuladestand zu interpretieren sind.
Akkulaufzeit
Um unnötigen Verschleiß zu vermeiden und die Lebensdauer des Geräts zu verlängern, trennen Sie
während längerer Perioden des Nichtgebrauchs das Gerät vom Stromnetz – entweder per
Trennschalter oder durch Herausziehen des Steckers aus der Steckdose.
• Die LED-Anzeige blinkt rot, wenn Sie Ihre Einheiten zu überladen.
• Verwenden Sie den EZLink Par Q6BT nicht im Vollstrommodus (alle LEDs zu 100%),
während das Gerät geladen / an eine Stromquelle angeschlossen ist, da das Gerät extrem
heiß werden kann.
Maximale Laufzeit (alle Farben angeschaltet) Ladezeit
Bis zu 8 Stunden 7,5 Stunden
100% 75% 50% 25%

15
DE
SCHNELLANLEITUNG
EZLink Par Q6BT SAL Rev. 6
Montage
Lesen Sie vor der Montage dieses Geräts in jedem Fall die Sicherheitshinweise.
Montageansicht
Beschreibung des Bedienfeldes
Taste Funktion
<MENU> Wählt einen Betriebsmodus oder verlässt die aktuelle Menüoption
<UP>
Damit navigieren Sie durch die Menüpunkte nach oben und erhöhen den numerischen Wert der
entsprechenden Funktionen
<DOWN>
Damit navigieren Sie durch die Menüpunkte nach unten und verringern den numerischen Wert der
entsprechenden Funktionen
<ENTER> Aktiviert eine Menüoption oder einen ausgewählten Wert
Bügeleinstellknopf
(x2)
Klemmen
(wie die CLP-15 von
Chauvet)
Sicherheitskabel
(wie die CH-05 von
Chauvet)

DE
16
EZLink Par Q6BT SAL Rev. 6
SCHNELLANLEITUNG
Menükarte
*Die Wortmarke Bluetooth
®
und die Logos sind eingetragene Marken von Bluetooth SIG, Inc. und werden von Chauvet & Sons, LLC
unter Lizenz verwendet. Andere Marken und Markennamen gehören den jeweiligen Eigentümern.
DMX-Verbindung
Der EZLink Par Q6BT kann mit einem DMX-Controller betrieben werden. Anweisungen zum Zusammenschluss und der
Konfiguration dieses Geräts für den Betrieb im DMX-Modus finden Sie im Benutzerhandbuch. Wenn Sie mit DMX nicht
vertraut sind, laden Sie “DMX - Eine Einführung” unter www.chauvetdj.com
herunter.
Startadresse
Um einen vollständigen Zugang zu allen Kanälen in jedem DMX-Modus zu gewährleisten, beträgt die höchste
empfohlene DMX-Adresse 505.
Master/Slave-Schaltung
Der EZLink Par Q6BT verwendet für seinen Master/Slave-Modus eine DMX-Datenverbindung. Anweisungen zum
Zusammenschluss und der Konfiguration dieses Geräts für den Betrieb im Master/Slave-Modus finden Sie im
Benutzerhandbuch.
IRC-6 (Infrarot-Fernbedienung)
Der EZLink Par Q6BT ist vollständig kompatibel mit der Infrarot-Fernbedienung (IRC-6) von CHAUVET DJ. Weitere
Informationen zur IRC-6 oder herunterladbare Anweisungen finden Sie unter
www.chauvetdj.com
.
Bluetooth-Steuerung
Der EZLink Par Q6BT kann mit der BTAir-App über eine Bluetooth-Verbindung betrieben werden. Für weitere
Informationen zur Verwendung der BTAir-App laden Sie sich die BTAir-Anleitung unter
www.chauvetdj.com
herunter.
Modus Programmierebenen Beschreibung
DMX Mode
4Ch
d 1–509
4-Kanal DMX-Modus
8Ch 8-Kanal DMX-Modus
Statische Farben
C-- C 1–15 Statische Farben
Auto-Programme
P-- P 1–5 Auto-Programme
Geschwind-igkeit
S-- S. 1–100 Programmgeschwindigkeit für P 1–5
Dimmer
d-- L. 1–255 Dimmer
Musik-steuerung
Snd Snd1–5 Musiksteuerungsprogramm
Empfindlichkeit
SEnS u 0–100 Musikempfindlichkeit
Individuelle
Farbmischung
u--
r. 0–255
Benutzerdefinierte statische Farben kombiniert rot, grün
blau und bernstein
G. 0–255
b. 0–255
A. 0–255
S. 0–100 Strobe-frequenz
Bluetooth-Modus*
bLE _ _ _ _ _ Bluetooth-Steuerungsmodus, zeigt die Bluetooth-ID an
Steuermodus
SEt
ir
on
Schaltet Infrarot ein oder aus
oFF
out
SLAV Aktivieren Sie Master/Slave mit Nicht-BT-Geräten
dMX Aktivieren Sie Master/Slave mit anderen BT-Geräten

17
DE
SCHNELLANLEITUNG
EZLink Par Q6BT SAL Rev. 6
DMX-Werte
8Ch
4Ch
Kanal Funktion Wert Prozent/Einstellung
1 Rot 000
255 0–100%
2 Grün 000
255 0–100%
3 Blau 000
255 0–100%
4 Bernstein 000
255 0–100%
5 Strobe
000
015 Keine Funktion
016
255 Strobe, langsam bis schnell
6 Auto-Programme
000
005 Keine Funktion
006
055 Auto-Programm 1 (Programme 2–7)
056
106 Auto-Programm 2
107
157 Auto-Programm 3
158
208 Auto-Programm 4
209
255 Auto-Programm 5
7
Programmgeschwindig-keit
000 250 Geschwindigkeit, langsam bis schnell
251
255 Musiksteuerung
8 Dimmer 000
255 0–100%
Kanal Funktion Wert Prozent/Einstellung
1 Rot 000
255 0–100%
2 Grün 000
255 0–100%
3 Blau 000
255 0–100%
4 Bernstein 000
255 0–100%

IT
18
EZLink Par Q6BT GR Rev. 6
GUIDA RAPIDA
Informazioni sulla Guida
La Guida Rapida EZLink Par Q6BT contiene informazioni di base sul prodotto quali montaggio, opzioni menù e valori DMX.
Per maggiori dettagli, scaricare il Manuale Utente dal sito www.chauvetdj.com.
Esclusione di responsabilità
Le informazioni e le specifiche contenute in questa guida possono essere modificate senza preavviso.
GARANZIA LIMITATA
PER LA REGISTRAZIONE DELLA GARANZIA ED I TERMINI E CONDIZIONI COMPLETI VISITARE IL NOSTRO SITO WEB.
Per clienti di Stati Uniti e Messico consultare: www.chauvetlighting.com/warranty-registration.
Per clienti di Regno Unito, Repubblica di Irlanda, Belgio, Paesi Bassi, Lussemburgo, Francia e Germania:
www.chauvetlighting.eu/warranty-registration
.
Chauvet garantisce che i propri prodotti, in condizioni di utilizzo normale, sono esenti da difetti di materiali e manodopera,
per il periodo specificato e con le esclusioni e limitazioni riportate nella garanzia integrale limitata sul proprio sito Web. Tale
garanzia si applica soltanto all'acquirente originario del prodotto e non può essere trasferita. Per esercitare i propri diritti
secondo i termini della presente garanzia è necessario fornire prova dell'acquisto sotto forma di ricevuta o fattura originale
di un distributore autorizzato che riporti chiaramente il nome del prodotto e la data di acquisto. NON SONO PREVISTE
ALTRE GARANZIE ESPRESSE O IMPLICITE. Questa garanzia prevede diritti legali specifici. È comunque possibile avere
altri diritti che variano da stato a stato e da paese a paese. Questa garanzia si applica soltanto negli Stati Uniti, Regno
Unito, epubblica di Irlanda, Belgio, Paesi Bassi, Lussemburgo, Francia, Germania e Messico. Per i termini di garanzia
vigenti in altri paesi si prega di consultare il distributore locale.
Note di Sicurezza
Le Note di Sicurezza includono informazioni importanti circa il montaggio, l'uso e la manutenzione.
Contatti
Per richiedere assistenza o restituire l'apparecchiatura, al di fuori di Stati Uniti, Regno Unito, Irlanda, Benelux, Francia,
Germania, o Messico contattare il distributore locale. Per informazioni sui contatti, fare riferimento a Contact Us
sul retro di
questo GR.
Che cosa è incluso
Per iniziare
Disimballare EZLink Par Q6BT ed accertarsi di aver ricevuto tutti i componenti integri. Se l'imballo appare danneggiato,
farlo immediatamente presente al trasportatore e non a Chauvet.
• Collegare questa unità SOLTANTO ad un circuito dotato di messa a terra e protetto.
• Prima di effettuare la pulizia o sostituire il fusibile, scollegare sempre l'unità dall'alimentazione elettrica.
• NON guardare la sorgente luminosa quando l'unità è in funzione.
• Assicurarsi che il cavo di alimentazione non sia piegato o danneggiato.
• Non scollegare mai questa apparecchiatura dall'alimentazione elettrica tirando il cavo.
• Per il montaggio in alto dell'unità utilizzare SEMPRE un cavo di sicurezza.
• NON collocare materiale infiammabile vicino all'unità mentre è in funzione.
• NON toccare l'unità durante il funzionamento perché potrebbe essere molto calda.
• La tensione della presa a muro cui si collega l'apparecchiatura deve trovarsi entro il campo specificato
sull'etichetta o sul pannello posteriore.
• Questa apparecchiatura deve essere utilizzata soltanto in interni (IP20)! Per evitare il rischio di incendio o
di folgorazione non esporre l'apparecchiatura alla pioggia o all'umidità.
• Montare sempre l'unità in posizione ben ventilata, ad almeno 50 cm. (20") da qualsiasi superficie.
• Assicurarsi che nessuna apertura di ventilazione dell'unità sia ostruita.
• Non collegare mai ad un dimmer o ad un reostato.
• Sostituire il fusibile con un altro dello stesso tipo e classe.
• Prendere e trasportare l'unità SOLTANTO dalla staffa per il montaggio sospeso o dalle maniglie.
• Massima temperatura ambiente ammessa: 40 °C (104 °F). Non utilizzare l'unità a temperature superiori.
• In caso di gravi problemi di funzionamento sospendere immediatamente l'utilizzo.
• NON aprire l'unità. Non contiene parti riparabili dall'utente.
• Per evitare un consumo inutile ed aumentare la durata, durante i periodi di non utilizzo disconnettere
completamente il prodotto dall'alimentazione con l'interruttore o scollegando il cavo.
•EZLinkParQ6BT
• Cavo di alimentazione
• Staffa per montaggio
• Guida Rapida

19
IT
GUIDA RAPIDA
EZLink Par Q6BT GR Rev. 6
Alimentazione CA
Questa unità è dotata di alimentatore a commutazione automatica con tensione in ingresso di 100–240 V CA, 50/60 Hz.
Collegamento
Per il numero massimo di unità collegabili in cascata a 120 V oppure a 240 V, fare riferimento al Manuale Utente o alla
targhetta collocata sul prodotto.
Sostituzione fusibile
1. Scollegare l'alimentazione elettrica dall'unità.
2. Inserire la punta di un giravite a testa piatta nella fessura ell'alloggiamento del fusibile.
3. Rimuovere dall'alloggiamento il cappellotto di sicurezza.
4. Rimuovere il fusibile bruciato dalla clip sulla parte anteriore del cappellotto di sicurezza e sostituirlo con uno
identico.
5. Reinserire il portafusibile e ricollegare l'alimentazione elettrica.
Alimentazione a batteria
EZLink Par Q6BT viene fornito con una batteria ricaricabile al litio per funzionamento senza cavo.
Ricarica della batteria
La batteria si carica ogni volta che EZLink Par Q6BT viene collegato a una fonte di alimentazione utilizzando il cavo di
alimentazione in dotazione. Se il prodotto è collegata alla presa di alimentazione e non è in funzione, assicurarsi che il
prodotto sia spento.
Indicatore di carica della batteria
Gli indicatori sul display Menu a LED mostrano la carica residua. Lo schema seguente ne fornisce la chiave di lettura.
Tempo di funzionamento della batteria
Per evitarne l'eccessiva usura e migliorarne la durata nel tempo, scollegare l'unità dalla presa elettrica
o disattivare l'alimentazione tramite l'apposito interruttore, se inutilizzata per lunghi periodi.
• La spia LED lampeggia in rosso se si sovraccarica le vostre unità.
• NON utilizzare EZLink Par Q6BT in modalità piena potenza (tutti i LED al 100%) mentre sono
caricati / inseriti in una fonte di alimentazione, in quanto l'unità diventa estremamente calda.
Tempo massimo di funzionamento
(tutti i colori accesi)
Tempo di ricarica
Fino a 8 ore 7,5 ore
100% 75% 50% 25%
La page est en cours de chargement...
La page est en cours de chargement...
La page est en cours de chargement...
La page est en cours de chargement...
La page est en cours de chargement...
La page est en cours de chargement...
La page est en cours de chargement...
La page est en cours de chargement...
-
 1
1
-
 2
2
-
 3
3
-
 4
4
-
 5
5
-
 6
6
-
 7
7
-
 8
8
-
 9
9
-
 10
10
-
 11
11
-
 12
12
-
 13
13
-
 14
14
-
 15
15
-
 16
16
-
 17
17
-
 18
18
-
 19
19
-
 20
20
-
 21
21
-
 22
22
-
 23
23
-
 24
24
-
 25
25
-
 26
26
-
 27
27
-
 28
28


CHAUVET DJ EZLink Par Q6BT Guide de référence
- Taper
- Guide de référence
dans d''autres langues
Documents connexes
-
CHAUVET DJ EZLink Par Q6BT ILS Guide de référence
-
CHAUVET DJ Q4BT ILS Mode d'emploi
-
-
-
-
-
-
-
-