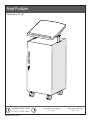
MooreCo Avid Podium Assembly Instructions
- Taper
- Assembly Instructions

Avid Podium
UPDATED AS OF: 2/05/18
Part Number: 91198
1 of 10
INSTRUCCIONES DE ENSEMBLAJE
NO LA TIRE
INSTRUCTIONS DE MONTAGE
NE PAS JETER
ASSEMBLY INSTRUCTIONS
DO NOT THROW AWAY!

UPDATED AS OF: 2/05/18 2 of 10
INSTRUCCIONES DE ENSEMBLAJE
NO LA TIRE
INSTRUCTIONS DE MONTAGE
NE PAS JETER
ASSEMBLY INSTRUCTIONS
DO NOT THROW AWAY!
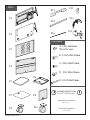
Parts
P3
P1
A- (4x) 4x16mm
Wood Screws
Hardware
P2
P4
P5
P6
P7 P8
P9 P10
P11
P12
P14
P13
B- (30x) M6x12mm
C- (8x) M4x10mm
D- (2x) M4x12mm
E- (2x) M4x30mm
P15
P16

For full product warranty details, please visit:
Para obtener información sobre la garantía del producto, consulte este sitio (ingles):
Pour plus d’informations sur la garantie du produit, consultez ce site (anglais):
For questions on assembly or missing/damaged parts, please contact us using the
following information.
Para preguntas sobre el ensamblaje o piezas faltantes o dañadas, por favor
contáctenos usando la siguiente información.
Pour toute question sur le montage l-assamblage manquantes ou endommagées,
veuillez nous contacter en utilisant les l’information ci-dessous.
To register your product for warranty, please visit:
Para registrar la garantía del producto, vea este sitio (en ingles):
Pour enregistrer la garantie de votre produit, consultez ce site (en anglais):
UPDATED AS OF: 2/05/18
Review full assembly instructions and
check that all parts are present before
beginning assembly. Heavy or large
furniture may require multiple persons in
order to properly assemble. If you have
questions regarding assembly, contact
the manufacturer before continuing.
Damage due to incorrect assembly may
not be covered by warranty. Do not use
product unless all screws are tight. Check
all screws for tightness at least every
six months. If parts are broken, missing,
damaged, or worn, stop use of the produc t
until repairs are made by your deale r using
factory authorized parts.
Previo a comenzar el proceso de
ensamblaje favor de revisar las
instrucciones y asegurarse que cuenta con
todas las partes y materiales necesarios.
Es posible que los muebles grandes o
pesados, requieran mas de una persona
para ensamblarlos correctamente. Por
favor co ntac te a l fab ric ante dire c tam ente
si tiene alguna duda o pregunta antes de
continuar con el proceso de armado del
producto. La garantía no cubrirá daños
que ocurrieron por errores cometidos
durante el proceso de ensamblaje. Todos
los tornillos deben estar ajustados previo
el uso del producto. Debe revisar los
tornillos periódicamente, por lo menos
cada seis meses y asegurarse de que
estén bien ajustados. Por favor detenga
el uso del produc to si partes del produc to
se pierden, rompen, se deterioran por uso
o se rompen. Favor de contactar a su
distribuidor para que le envíen las partes
necesarias o realice las reparaciones
necesarias con partes autorizadas por el
fabricante.
Avant de commencer l’ assamblage
veuillez consulter les instructions
complètes et vérier si vous avez toutes
les pièces nécessaires. Ill est possible que
plusieurs personnes soient nécessaires
pour assemble des meubles grand ou
lourds. En cas de doute sur l assamblage
contactez le fabricant avant de continuer.
Les dommages encourus pendant
l’assamblage ne seront pas couvert par
la garantie. Ne pas utiliser le produit sans
vérier que tous les vis soient serrées.
Vériez que les vis sont serrées au moins
tous le 6 mois. Si aucune pièce se casse,
manque, est endommagée ou usée,
arrêtez d’ utiliser de produit jusqu’à ce
que le vendeur le repaire a l’aide de pièces
autorisées par la fabricant.
WARNINGS AND DISCLAIMERS
WARRANTY
CARE & MAINTENANCE
PRODUCT REGISTRATION
SPANISH TRANSLATION FRENCH TRANSLATION
3 of 10

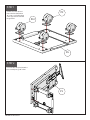
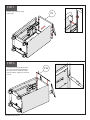
STEP 1
Install the 4 casters (P9 and
P10) to the base (P6) with 16
“B” screws. Locate the locking
casters opposite the side with
the grommet.
UPDATED AS OF: 2/05/18 4 of 10
STEP 2
Secure the rst side panel (P1) to the
base assembly using 2 “B” screws.
P6
P10
P9
P1

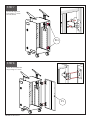
STEP 3
Secure the second side panel
(P2) to the base assembly
using 2 “B” screws.
UPDATED AS OF: 2/05/18 5 of 10
STEP 4
Install the back panel (P3) using 6 “B”
screws.
P2
P3

STEP 5
Install the top panel (P8) using
4 “B” screws.
UPDATED AS OF: 2/05/18 6 of 10
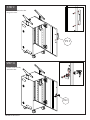
STEP 6
P1
Loosen the set screw on the crossbar
so it can be shortened, then install in
the square slots on both sides of the
podium cabinet. Tighten screw to lock
in place.
P16

STEP 7
Attach the door (P4) to the
hinges using 4 “C” screws.
UPDATED AS OF: 2/05/18 7 of 10
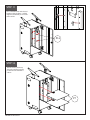
STEP 8
P1
Screw both hinges into
place using 2 “C” screws
on each (4 total).
P15

STEP 9
Install the lock assembly
(P12) to the door.
UPDATED AS OF: 2/05/18 8 of 10
STEP 10
P12
Screw the handle (P11) to the door
using 2 “D” screws.
P11

STEP 11
Slide the shelves (P7) on top
of the tabs with the grommet
positioned to the back of the
cabinet.
UPDATED AS OF: 2/05/18 9 of 10
STEP 12
P7
Place 8 shelf tabs (P14) at the desired
height inside the podium. Carefully
align them horizontally to ensure the
shelves sit at.
P14

STEP 13
Install the book stop (P13) to
the top using 2 “E” screws.
UPDATED AS OF: 2/05/18 10 of 10
STEP 14
P13
Screw the laminate top (P5) to the
adjustable brackets using 4 “A” screws. P5
-
 1
1
-
 2
2
-
 3
3
-
 4
4
-
 5
5
-
 6
6
-
 7
7
-
 8
8
-
 9
9
-
 10
10


MooreCo Avid Podium Assembly Instructions
- Taper
- Assembly Instructions
dans d''autres langues
- English: MooreCo Avid Podium
- español: MooreCo Avid Podium