
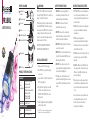
PARTS DIAGRAM
PR160L
A
Power Cord
Bracket & Hook
& Screw x2
B
Intensity Tuning Dial
D
External Controller Port
E
Venting Holes
F
Diuser / Lens
G
H
DC Power Supply
PRODUCT SPECIFICATIONS
Illuminator
Listed Power Supply
Power
Consumption
370nm Gen 2 (max 44W)
370nm (max 43W)
390nm (max 52W)
427nm & 440nm (max 45W)
456nm (max 50W)
467nm (max 44W)
525nm (max 44W)
19-24 VDC ± 5% Input Voltage
Input
Output
100-240 VAC 50-60 Hz
19 VDC, maximum 3.42A
SAFETY INSTRUCTIONSWARNING
1. DO NOT use a power supply that is
outside the specications. This is a re
hazard and may lead to unit failure.
2. DO NOT use outdoors. This unit is
intended for indoor use only.
3. DO NOT expose unit to an extremely
humid environment or submerse unit in
water. This may lead to unit failure.
4. DO NOT block Venting Holes (F). This may
cause unit to overheat.
5. KEEP Diuser / Lens (G) away from sharp
objects. This may break the Diuser / Lens
(G) and lead to unit failure.
6. DO NOT cover or place objects on the
power supply. Power supply should not be
contained in an airtight space.
7. The light source of this luminaire is not
replaceable; when the light source reaches
its end of life the whole luminaire must be
replace.
INSTRUCTIONS DE SECURITE
1. N'UTILISEZ PAS une source d'alimentation
non conforme aux spécications. Ceci est
un risque d'incendie et peut entraîner une
panne de l'unité.
2. NE PAS utiliser à l'extérieur. Cet appareil est
conçu pour une utilisation en intérieur
uniquement.
3. NE PAS exposer l'appareil à un
environnement extrêmement humide ni
l'immerger dans l'eau. Cela peut entraîner
une défaillance de l'unité.
4. NE PAS bloquer les trous d’aération (F). Cela
pourrait provoquer une surchaue de
l'appareil.
5. GARDER le diuseur / objectif (G) à l’écart
des objets pointus. Cela pourrait casser le
diuseur / objectif (G) et entraîner une
panne de l'appareil.
6. NE couvrez pas et ne placez pas d'objets
sur l'alimentation. L'alimentation ne doit
pas être connée dans un espace étanche
à l'air.
7. La source lumineuse de ce luminaire n'est
pas remplaçable. lorsque la source de
lumière arrive en n de vie, il faut
remplacer tout le luminaire.
Mount
C
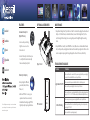
LED Photoreaction Lighting
INSTALLATION GUIDE
Remove contents from package.
Install PR160L to optional mounting
accessories*
Connect Power Cord (B) to the specied
DC Power Supply (A).
Plug the Power Supply into an outlet
with the correct specications (see
PRODUCT SPECIFICATIONS for more
information).
Adjust the light Intensity Tuning Dial (D)
to the desired setting.
1.
2.
3.
4.
5.
PR160L-370 and PR160L-390 contain high
intensity UV light. PR160L-370 is classied as
Group 1 (low risk) in Standard:
Photobiological Safety of Lamps and Lamp
Systems (IEC/EN62471) dened risk group,
measured at 20cm. PR160L-390 is classied
as Group 2 (moderate risk), measured at
20cm. It is cclassied as Exempt risk group
when measured at >360cm.
AVOID EYE & SKIN EXPOSURE. WEAR
PROPER EYE & SKIN PROTECTION.
The PR160L can also be used with two brackets and
metal Hooks (H), and the optional PR160L Rig.
*
USER MANUAL
230713A1

TROUBLESHOOTING GUIDE
Problem
Light doesn’t turn ON
Unit is flickering
Solution
Make sure the unit is connected to the power supply and the power supply is
connected to an outlet with the correct specications.
Make sure you are using a power supply with the correct specications.
Make sure the unit has not overheated by operating at a room temperature
exceeding 104°F / 40°C.
Make sure electrical power is available to the AC outlet being used.
Make sure the power supply has the correct specications.
Make sure the device is operating within the specied operating temperature
range (0 - 40°C / 32 - 104°F. If unit overheats, it will automatically shut down.
Make sure the fan is operating properly.
MAINTENANCEFEATURES OPTIONAL ACCESSORIES
1. Keep the air Venting Holes (F), and fan clear of dust. To clean the fan, unplug the unit and insert
the tip of a CO2 dust blower (or similar dust blower) in one of the Venting Holes (F) on the
unit's housing. Hold and spray. You can also gently vacuum the light through the venting
holes.
2. Keep the Diuser / Lens (G) clean. If the Diuser / Lens (G) becomes contaminated with water,
dust, or other particles, unplug the unit and clean the lens with isopropyl alcohol. Wet a cotton
swab or a napkin in isopropyl alcohol, gently wipe the surface of the lens, and let it dry.
Flexibility & Simplicity
• Intense and penetrating
light decreases reaction
time and costs.
• 4 levels of intensity control allows you
to study the functional relationship
between intensity and yield.
• Easily congure for dierent
geometries (vials, test tubes,
asks, etc…)
• Add more PR160Ls to scale up your
experiment and increase intensity.
• Standardized mounting using PR160L
Rig. Easily adjust spacing and distance.
Rig w/ Fan kit
Increased Intensity for
Higher Efficiency
0
Wavelength(nm)
Radiant Flux (W/nm)
390370 370 Gen 2 427 440 456 467 525
(nm)
390370350 410 430 450 470 490 510 530 550 570
0.8
0.6
0.4
0.2
0
Wavelength(nm)
Radiant Flux (W/nm)
390nm 427nm 440nm 456nm 467nm
390370 420 440 460 480 510
0.8
0.6
0.4
0.2
0
kessil.com
@kessi
@kessilled
kessil.led
kessiltube
This is a LED light source emitting 40 % or more of total radiation
power of the range 250-800 nm in the range of 400-480 nm, and
intended for coral growth.
PR Controller
-
 1
1
-
 2
2


dans d''autres langues
- English: Kessil PR160L User guide
Documents connexes


Autres documents
-
Modine Steam/Hot Water Unit Heaters Heaters Installation & Service Manual
-
Unbranded R6GP Guide d'installation
-
-
Medallion PPG3GD Guide d'installation
-
Vari-Lite VL10 BEAMWASH Manuel utilisateur
-
Miller R8GE, Single Phase Guide d'installation