
• CMP 250 V.V.
• CMP 300 V.V.
• CMP 350 V.V.
• CMP 400 V.V.
• CMP 250 Combi
• CMP 300 Combi
Robot-Coupe
®
USA Inc.
P.O. Box 16625, Jackson, MS 39236-6625 - 264 South Perkins St., Ridgeland, MS 39157
e-mail: [email protected] - website: www.robotcoupeusa.com
Phone : 1-800-824-1646

3
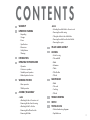
CONTENTS
WARRANTY
IMPORTANT WARNING
• Unpacking
• Storage
• Power
• Specifications
• Dimensions
• Safety features
• Warning
INTRODUCTION
OPERATING THE POWER MIXER
• Operation
• Continuous operation
• Variable speed operation
• Mashed potatoes function
WORKING POSITION
• Mixer operation
• Whisk operation
ASSEMBLY/DISASSEMBLY
-
BLADE
• Attaching the tube to the motor unit
• Removing the tube from the casing
• Attaching the bell to the tube
• Removing the bell from the tube
• Removing the blade
- WHISK
• Attaching the whisk holder to the motor unit
• Removing the whisk casing
• Fitting the whisk into the whisk holder
• Removing the whisk from the whisk holder
• Removing the ejector
SPLASH GUARD ASSEMBLY
CLEANING
• Motor housing
• Tube and bell
• Blade
• Aluminum
• Plastic
• Whisk holder
• Whisks
MAINTENANCE
• Blade
• Tube seal
• Seal ring
• Whisks
TROUBLE SHOOTING
SERVICE
TECHNICAL DATA
• Electrical and wiring diagrams
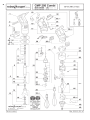
• Exploded views

4
THE FOLLOWING ARE NOT
COVERED BY THE ROBOT COUPE
U.S.A., Inc. LIMITED WARRANTY:
1 -
Damage caused by abuse, misuse,
dropping, or other similar damage caused by
or resulting from failure to follow assembly,
operating, cleaning, user maintenance or
storage instructions.
2 - Labor to sharpen and/or replacements for
blades that have become blunt, chipped or worn
after a normal or excessive period of use.
3 - Materials or labor to replace or repair
scratched, stained, chipped, pitted, dented or
discolored surfaces, blades, knives, attachments
or accessories.
4 - Any alteration, addition, or repair that
has not been carried out by the company or an
approved service agency.
5 - Transportation of the appliance to or from
an approved service agency.
6 - Labor charges to install or test new
attachments or accessories (i.e., bowls, plates,
blades, attachments), which have been replaced
for any reason.
7 - The cost of changing direction-of-rotation
of three-phase electric motors (Installer is
responsible).
8 - SHIPPING DAMAGES. Visible and/or
hidden damage is the responsibility of the freight
carrier. The consignee must inform the carrier
and consignor immediately, or upon discovery in
the case of hidden defects.
KEEP ALL ORIGINAL CONTAINERS AND
PACKING MATERIALS FOR CARRIER
INSPECTION.
Neither ROBOT COUPE U.S.A., Inc. nor its
affiliated companies or any of its distributors,
directors, agents, employees, or insurers will be
liable for indirect damage, losses, or expenses
linked to the appliance or the inability to use it.
The ROBOT COUPE U.S.A., Inc. warranty is
given expressly and in lieu of all other
warranties, expressed or implied, for
merchantability and for fitness toward a
particular purpose and constitutes the only
warranty made by ROBOT COUPE U.S.A., Inc.
YOUR NEW ROBOT COUPE PRODUCT
IS WARRANTED TO THE ORIGINAL
PURCHASER FOR A PERIOD OF ONE
YEAR FROM THE DATE OF PURCHASE.
This LIMITED WARRANTY is against
defects in the material and/or
workmanship, and includes labor
for replacement of defective parts,
provided repairs are performed by
an authorized service agency (see
attached list).
The Customer must inform the Service
Agency of the possibility of warranty
coverage and provide a copy of the
dated sales or delivery receipt BEFORE
WARRANTY REPAIRS ARE BEGUN.
Replacement parts and accessories are
warranted for ninety (90) days from
the date of purchase when purchased
separately and will be verified by
dated sales receipt OR packing slip
which lists that item.
All parts or accessories replaced under
warranty must be returned to the
Service Agency.
ROBOT COUPE U.S.A., Inc. LIMITED WARRANTY

5
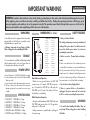
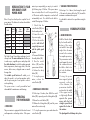
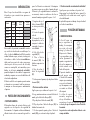
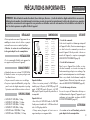
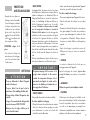
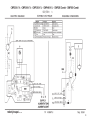
DIMENSIONS (in inches)
WARNING: In order to limit accidents such as electric shocks, personal injury or fire, and in order to limit material damage due to misuse
of the appliance, please read these instructions carefully and follow them strictly. Reading the operating instructions will help you get to
know your appliance and enable you to use the equipment correctly. The operation manual should be kept within easy access to all users for
reference and should be read completely by all first time users of the machine.
IMPORTANT WARNING
UNPACKING
• Carefully remove the equipment from the packa-
ging and take out all the boxes or packets contai-
ning attachments or specific items.
• Warning- Some parts are very sharp e.g. blade.
Wear cutting gloves when handling the blade.
STORAGE
• You are advised to install the wall bracket provided
with the machine and to store your Power Mixer on
it. Hang the mixer with the motor unit UP.
POWER SUPPLY
a. Connect the mixer to 110-120 Volt 60 Hz Power supply.
b. Connect the mixer only to Ground Fault Interrupt (GFI)
Safety type outlet.
c. Do not connect the mixer with extension type power cord.
d. GFI type outlets protect the machine from expensive
damage and protect the operator from serious injury
or death.
SPECIFICATIONS
• CMP 250 V.V. 120V/60Hz / 3 Amp.
• CMP 300 V.V. 120V/60Hz / 3.2 Amp.
• CMP 350 V.V. 120V/60Hz / 3.5 Amp.
• CMP 400 V.V. 120V/60Hz / 4 Amp.
• CMP 250 Combi 120V/60Hz / 3 Amp.
• CMP 300 Combi 120V/60Hz / 3.2 Amp.
Blade Attachment Capacities
• Thanks to a very powerful motor, the CMP 250
can process up to 16 quarts, CMP 300 can process
up to 32 quarts, the CMP 350 up to 50 quarts, the
CMP 400 up to 65 quarts. The quality of the fini-
shed product is outstanding.
Whisk Attachment Capacities
• Using the whisk attachment CMP 250 Combi and
CMP 300 Combi process from 2 to 30 egg whites
and puree 2 to 70 pounds.
• Each power mixer is supplied with a wall support
for easy storage.
SAFETY FEATURES
• Safety on Control Switches
This safety mechanism prevents any unintentional
starting of the power mixer. Two buttons must be
pressed to start the power mixer. See section on
operating the power mixer.
• Safeties on motor : Thermal and overload pro-
tection.
If there is an obstruction in the container (a spoon
or ustensil) or the machine is overused and becomes
hot the power mixer will stop. If the power mixer
stops because of a thermal overload (power mixer
is too hot), wait for a period of up to 30 minutes for
the power mixer to cool down before restarting.
• No volt release safety (Supply failure).
If there is a power failure or the machine is
unplugged, the power mixer will not restart by
itself. See section on operating the power mixer.
WARNING
• Be careful when handling the blades. They are
very sharp! Wear cutting gloves when handling
the blades.
WARNING
KEEP THESE INSTRUCTIONS IN A SAFE PLACE
CMP 300 Combi
A = 3
3
/4
B = 27
9
/16
C = 3
9
/16
D = 13
11
/16
E = 15
3
/8
F = 4
3
/4
CMP 250 Combi
A = 3
3
/4
B = 25
5
/8
C = 3
9
/16
D = 11
3
/4
E = 15
3
/8
F = 4
3
/4
CMP 300 V.V.
A = 3
3
/4
B = 26
C = 3
9
/16
D = 12
CMP 250 V.V.
A = 3
3
/4
B = 24
C = 3
9
/16
D = 8
7
/8
CMP 350 V.V.
A = 3
3
/4
B = 28
1
/4
C = 3
9
/16
D = 14
5
/16
CMP 400 V.V.
A = 3
3
/4
B = 29
1
/2
C = 3
9
/16
D = 16
1
/4
CF
E
D
A
B

6
mixer stops unexpectedly you may try to restart it
by following steps 3-5 below. If the power mixer
does not restart, allow it to cool for a period of up
to 30 minutes and the temperature overload will
automatically reset. You should then be able to
restart following steps 3-5 below.
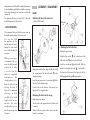
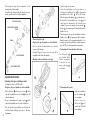
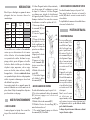
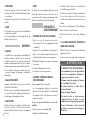
1. Check that the
control button (CB) is in
the released position.
2. Connect the cord to
the power supply
3. Put the tube into the
product with the bell
completely immersed
and the splash guard
in place.
4. Press and hold down
the safety button (SB).
5. Press the control
button (CB) and the
power mixer will start.
6. Release the safety
button (SB).
7. To stop the power
mixer, release the
control button (CB).
• CONTINUOUS OPERATION
8. Follow steps 1-6 above, then: While the control
button (CB) is pressed, press the locking button (LB).
9. Release the control button (CB).
10. Release the locking button (LB), and the power
mixer will run continuously.
11. To stop the power mixer, press and release the
control button (CB).
• VARIABLE-SPEED OPERATION
Follow steps 1 to 6 above, then change the speed
of the motor by turning the button (VS) toward the
maximum or minimum as required.
It is advisable to start at a low speed when using the
whisk.
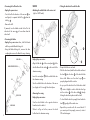
WORKING POSITION
• MIXER OPERATION
Hold the blender firmly
by the handle and the
bottom of the motor
unit and tilt it at a slight
angle. Move the mixer
around in the container
for complete processing.
The power mixer can be
rested against the rim of
the container but must
be tilted so that it does
not touch the bottom of
the container.
If using the power
mixer support (optional
accessory), on the top
of the container, the
power mixer should be
positioned in the middle
of the support and at
a slight angle. Do not
operate the power
mixer with the bell
straight up-and-down
against the bottom of
the container.
The splashguard should always be in place.
INTRODUCTION TO YOUR
NEW ROBOT-COUPE
POWER MIXER
Robot-Coupe has developed a complete line of
power mixers. The features of each are described in
the table below.
VS
SB
CB
LB
The Robot-Coupe Power Mixers perform a host of
culinary feats. The mixer attachment will allow you
to make soups, vegetable purees and pulps while
the whisk attachment is ideal for making pancake
batter, mayonnaise, beaten egg whites, chocolate
mousse, butter sauces, whipped cream or smooth
fromage frais.
The variable speed function will enable you to
adjust the speed to suit each preparation and to
start the processing at a lower speed in order to
reduce splashing.
The power mixer is easily assembled and
disassembled for maintenance and cleaning.
OPERATING
THE POWER MIXER
• OPERATION
The power mixer is equipped with electrical current
and temperature overload protection. If the power
Models
Variable
speed
Mixer
attachment
Whisk
attachment
CMP 250 V.V.
••
CMP 300 V.V.
••
CMP 350 V.V.
••
CMP 400 V.V.
••
CMP 250 Combi
•• •
CMP 300 Combi
•• •

7
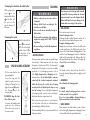
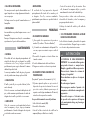
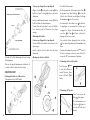
- Unplug the machine then, align the flat side of
A
the conical part of the tube with catch
B
in the
aluminum casing.
- Insert the narrow portion of conical part
C
of the
tube into the aluminum casing.
- Turn the tube in the direction of the arrow (see
figure) until it is snugly in place.
• Removing the tube from the casing
- Unplug the power mixer.
- Turn the tube in the opposite direction of that used
to attach it.
- When it will not go any further, remove the tube
from the conical part.
ASSEMBLY / DISASSEMBLY
- BLADE
• Attaching the tube to the motor unit.
(only for CMP Combi)
Always make sure that the bell is completely immersed
to avoid splashing and that the ventilation openings
in the motor housing do not come into contact with
any liquid!
For optimum efficiency two thirds (
2
/
3
) of the tube
should be immersed in the product.
• WHISK OPERATION
We recommend that you hold the power mixer by
the handle and the bottom of the motor unit.
You can also hold
the appliance by the
handle with one hand,
leaving the other hand
free to hold the bowl, if
necessary.
While processing we
recommend that you
move the whisk around
in the bowl, in order
to ensure that the
mixture is completely
homogeneous. We
strongly advise you to
keep the whisk from
touching the sides of
the bowl. For maximum
efficiency, at least
one-fifth of the whisk
length should be im-
mersed. We also
strongly advise you to
start the processing at a
low speed.
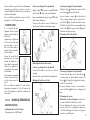
• Attaching the bell to the tube
- Unplug the power mixer.
- Align the flat side of
A
the conical part of the
tube with catch
B
on the inside of the bell.
- Insert the conical part
C
into the bell. With the
washer touching the tube seal
D
, turn the bell in
the direction of the arrow (See figure) to lock the
bell lug
E
and tube lug
F
snugly together.
TURN TO ATTACH
BELL

8
• Removing the bell from the tube
- Unplug the power mixer.
- Turn the bell in the direction of the arrow
1
(see
next figure) to separate the bell lug
E
from the
tube lug
F
.
- Remove the bell.
If jammed, turn the blades inside the bell in the
direction of the arrow
2
to loosen them from the
drive shaft.
• Removing the blades
- Unplug the power mixer then, hold the blades
with the provided blade-locking tool.
- Using the blade-locking tool, unscrew the drive
coupling then remove the blade for easy cleaning.
- WHISK
• Attaching the whisk holder to the motor unit
(only for CMP Combi)
• Fitting the whisk into the whisk holder
C
B
D
E
BLADE LOCKING
BLADES WITH WATERTIGHT SEALS
BELL
DRIVE COUPLING
BLADE REMOVAL
- Unplug the power mixer.
- Align the flat side
A
of the conical part
C
of the
whisk holder with the catch
B
on the inside of the
aluminum casing.
- Insert the conical part
C
of the whisk holder into
the aluminum casing.
- Turn the whisk holder in the direction of the arrow
(see figure) until it is snugly locked into place.
• Removing the casing
- Unplug the power mixer.
- Turn the whisk holder in the opposite direction
from that used to attach it.
- When it will go no further, remove the whisk
holder from the aluminum casing.
- Grasp the holder in one hand.
- With the other hand, take the first whisk and insert
the shaft
A
into the bore
B
of the whisk holder
drive shaft. Make sure the drive lugs
D
are
properly aligned with the notches.
- As you push the whisk into the holder drive shaft
C
, rotate it slightly in order to slide the drive lugs
into the notches
D
of the drive shaft
C
, thereby
locking the whisk into place inside the shaft.
- To check that the whisk is properly fixed inside the
shaft
C
, gently pull the metal wires.
- Repeat this procedure with the second whisk. If
you cannot push it in properly, remove it, rotate it
90° and start again.
A

9
• TUBE AND BELL
There are two ways to proceed:
Simple cleaning procedure
Submerge the tube and bell in water and run for a
few seconds to clean. Unplug the power cord.
Complete cleaning procedure
Unplug the power mixer and rinse the bell under
a water tap. Remove the bell from the tube, then
remove the blade (wear cutting gloves) ! Be
careful to avoid damaging the surface of the blade
shaft and the watertight seals. Always dilute the
detergent/disinfectant (see above). Thoroughly dry
all parts before reassembling.
• BLADE
The blade can be removed from the bell for
thorough cleaning. Always dry thoroughly to avoid
spotting.
• ALUMINUM
Use soft-metal-safe cleaning agents!
• PLASTIC
Be careful, many cleaning agents are corrosive
and are not safe for use on plastics!
Do not use strong alkaline detergent (having a
high concentration of soda or ammonia).
• WHISK HOLDER
Never immerse the whisk holder in water. Clean it
with a cloth lightly dampened (not dripping). Never
run the whisk holder through a dishwasher.
• Removing the whisk from the whisk holder
While griping the
ejector
A
in one
hand and the holder
B
in the other, pull
the ejector in the
opposite direction of
the arrow.
• Removing the ejector
Hold the whisk by the
wires
B
in one hand.
With the other hand,
pull the ejector
A
in
the direction of the
arrow (see figure).
SPLASH GUARD ASSEMBLY
- Put the screw back on the
ring and tighten it.
Cover the ring with the
splash guard protection
sliding it all along the foot
C
in the arrow
1
direction,
the flange
D
must be
oriented down.
BE CAREFUL: align the front
sides of the two parts.
- To remove the splash guard
protection for cleaning
follow these instructions in
the reverse order.
A
B
A
B
CLEANING
• MOTOR HOUSING
The power mixer must be clean through all stages
of production. Clean between each job using a
detergent or disinfectant. Dilute the detergent/
disinfectant following the instructions normally
specified on it’s packaging container. Use a
cloth lightly dampened (not dripping) with the
cleaning solution. Do not allow liquid to come into
contact with the electrical components contained
within the housing. Be careful when cleaning
around vents do not allow liquid to drip or seep
into the housing. Use a cloth lightly dampened
(not dripping) with water to remove detergent/
disinfectant then dry using a clean cloth.
After using the power mixer in a hot mixture,
cool the bottom of the tube in cold water before
disassembling the bell from the tube.
Clean immediately after use to prevent product from
sticking to surfaces.
WARNING
Never immerse motor housing and/or handle
in liquid! The housing contains the electrical
components and is not sealed against liquid.
Contact with liquid can cause damage to the
blender and serious injury to the operator.
WARNING
• Always unplug the power mixer before
cleaning it!
• Always dilute bleach according to the
instructions on the label
• Never run the motor assembly through a
dish machine.
• The type and concentration of the sanitation
agent must comply with 21 CFR 178.1010
regulations.
• Clean according to local health department
regulations.

10
SERVICE
See warranty first then;
Should your unit require service, check with your
distributor to see where local service is available.
If not or if you wish your unit to be serviced at the
factory, call for return instructions and ship the unit
prepaid to our factory address.
PH : 1-800-824-1646
Robot-Coupe USA, Inc
Service Department Repair
264 South Perkins Street
Ridgeland, MS 39157
For service in Canada contact the Robot-Coupe
USA factory for repair instructions.
• THE BLADES ARE SHARP! It is recommended
that cutting gloves be worn when handling
the blades. Handle and store the blades
with safety in mind.
• Never try to defeat the safety mechanisms!
• Never put anything (utensils etc.) but food
material near the blades on the power
mixer!
• Never overload the power mixer!
• Never turn the power mixer on unless the
bell is completely immersed in the product.
• Always unplug the power mixer before
doing any cleaning or maintenance!
WARNING
TROUBLE SHOOTING
• THE POWER MIXER DOES NOT START.
- Did you follow the previous operating instructions?
See section-Operating The Power Mixer.
- Is the machine too hot? Allow the power mixer to
cool. Then retry.
- Pull the plug and try another outlet.
- Check outlet for current (breaker or fuse).
- Call local Robot Coupe authorized service agency.
• THE POWER MIXER STOPS DURING (WHILE)
PROCESSING.
See the section on Operating the power Mixer. The
first paragraph describes the overload protection. It
may be necessary to allow the machine to cool for
up to 30 minutes before restarting.
If you cannot locate the cause of the problem
- Release the control button (CB).
- Unplug the power mixer.
- Are the blades free to rotate in the bell?
- Is the drive shaft free to rotate? To check this,
unplug the power mixer, remove the bell and test
the rotation of the end of the drive shaft manually.
Check the condition of the plug and the power cord.
• THE POWER MIXER STARTS TO SMELL HOT
OR SMOKE.
Turn the power mixer off and unplug it. Call your
local authorized service agency.
• WHISKS
The whisks can be cleaned either by hand or in a
dishwasher.
To ensure effective cleaning, always remove the
whisk ejector.
MAINTENANCE
• BLADE
Over time the blades will become worn and will
need to be replaced. The washer and seals should
also be replaced at this time. A blade service kit is
available.
• TUBE SEAL
In order to maintain a watertight seal between the
tube and bell, inspect the seal for wear and replace
it if necessary.
• SEAL RING
The seal ring can be lubricated using a suitable
food grade grease. In order to maintain a
watertight seal, check the seal ring for wear and
replace it if necessary.
• WHISKS
The performance of the whisks depends on the
condition of the wires. The metal wires may become
worn over time. In order to ensure optimum
performance, they will need to be replaced. Do not
use a defective or damaged whisk!

11
INDICE
GARANTÍA
MEDIDAS DE SEGURIDAD IMPORTANTES
• Desembalaje
• Instalación
• Conexión
• Características eléctricas
• Dimensiones
• Seguridad
• Atención
INTRODUCCÍON
PUESTA EN FUNCIONAMIENTO
• Puesta en marcha
• Puesta en marcha continua
• Puesta en marcha con variacion de velocidad
• Funcion puré
POSICIÓN DE TRABAJO
• Funcion cuchilla
• Funcion mezcladora
MONTAJE/DESMONTAJE
• Funcion cuchilla
• Funcion mezcladora
PROTECCIÓN CONTRA SALPIGADURAS
LIMPIEZA
• Motor
• Pie y campana
• Cuchilla
• Aluminio
• Plástico
• Caja de la mezcladora
• Mezcladora
MANTENIMIENTO
• Cuchilla
• Anillo junta
• Junta del pie
• Mezcladora
PROBLEMAS
REPARACIÓN
DATOS TÉCNICOS
• Gráficos de despiece
• Esquemas eléctricos y de cableado

12
LA GARANTÍA LIMITADA DE ROBOT-COUPE U.S.A., Inc.
SU NUEVO APARATO ROBOT-COUPE TIENE
UNA GARANTÍA DE UN AÑO A PARTIR DE
LA FECHA DE SU COMPRA: ESTA GARANTÍA
AFECTA ÚNICAMENTE AL COMPRADOR DE
ORIGEN.
LA GARANTÍA SE LIMITA a los defectos
relacionados con el material y/o la
fabricación, e incluye la mano de obra para
la sustitución de las piezas defectuosas,
en el caso en que las reparaciones sean
efectuadas por una estación de servicio
posventa agregado (véase la lista adjunta).
El CLIENTE debe informar el Servicio
Posventa de una eventual cobertura de
garantía y entregar una copia de la factura
o del bono de entrega que menciona la
fecha de compra ANTES DE EMPEZAR LAS
REPARACIONES.
Las piezas de sustitución y los accesorios
están garantizados noventa (90) días
a partir de la fecha de compra cuando
han sido compradas separadamente y se
verifican mediante el impreso de venta
fechado O del recibo de embalaje sobre el
cual figura el inventario de las piezas.
Todas las piezas o accesorios sustituidos
bajo garantía deben ser remitidos al
Servicio Posventa.
7 - LOS DAÑOS DEBIDOS AL TRANSPORTE. La
responsabilidad por los vicios, ya sean visibles u
ocultos, incumbe al transportista. Un informe de
reclamación debe ser inmediatamente rellenado
con el transportista o en cuanto se descubra un
defecto, si se trata de un vicio oculto.
CONSERVE TODAS LAS CAJAS Y EMBALAJES
ORIGINALES que serán examinados durante la
inspección del transportista.
ROBOT-COUPE U.S.A., Inc., ROBOT-COUPE SA
así como todas sus filiales o sociedades afiliadas,
sus distribuidores, agentes, gerentes, empleados
o aseguradores no pueden ser considerados
como responsables de los daños, pérdidas o
gastos indirectos relacionales con la utilización
del aparato o con la imposibilidad de utilizarlo.
La garantía ROBOT-COUPE U.S.A., Inc. se da
expresamente y sustituye enteramente cualquier
otra garantía, escrita o tácita, para la venta y
el uso normal del aparato y constituye la única
garantía hecha por ROBOT-COUPE U.S.A. Inc.
LA GARANTíA NO CUBRE LOS
SIGUIENTES PUNTOS:
1 - Cualquier deterioro del material derivado de
una utilización incorrecta o inadecuada o de la
caída del aparato o cualquier deterioro del mismo
tipo derivado o resultante de una mala aplicación
de las instrucciones (montaje mal efectuado, error
de funcionamiento, limpieza y/o mantenimiento
inadecuado, ubicación inadecuada, etc.).
2 - Las piezas de sustitución de un conjunto de
elementos del montaje de una cuchilla y/o la
mano de obra para afilar las hojas desafiladas,
deterioradas o gastadas tras un cierto tiempo de
utilización considerado normal o excesivo.
3 - Las piezas y/o la mano de obra para cambiar
o reparar las superficies rayadas, manchadas
deterioradas abolladas o descoloridas, las hojas,
cuchillas o los accesorios.
4 - El transporte del aparato al servicio posventa
agregado para la reparación.
5 - Los costes de mano de obra para instalar
o probar las piezas o accesorios (cubas, discos,
hojas ...) sustituidos arbitrariamente.
6 - Los costes derivados del cambio de sentido
de rotación de los motores eléctricos trifásicos (LA
RESPONSABILIDAD INCUMBE AL INSTALADOR).

13
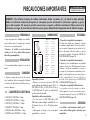
ATENCIÓN : A fin de limitar el número de accidentes (cortocircuitos, heridas o incendios, etc.) y de reducir los daños materiales
debidos a la utilización inadecuada del aparato, le aconsejamos que lea atentamente las instrucciones siguientes y que las
siga en todo momento. Este manual le permitirá conocer mejor su aparato y utilizarlo correctamente. Deberá conservar las
instrucciones en un lugar de acceso fácil para todos los usuarios, quienes deberán leerlas íntegramente antes de utilizar la máquina.
PRECAUCIONES IMPORTANTES
DESEMBALAJE
• Saque el aparato de su embalaje con cuidado y
saque todas las cajas o los paquetes que contienen
los accesorios o material específico.
• Atención : La cuchilla es una herramienta
cortante, por lo cual se deberá utilizar guantes
adecuados para manipularla.
INSTALACIÓN
• Se recomienda instalar el aparato en su soporte
mural.
CONEXIÓN
• Asegúrese siempre de que el tipo de corriente
de su instalación eléctrica corresponde al indicado
en la placa de características del bloque motor y
soporta el amperaje.
CARACTERÍSTICAS ELÉCTRICAS
• CMP 250 VV 120V/60Hz / 3 Amp.
• CMP 300 VV 120V/60Hz / 3.2 Amp.
• CMP 350 VV 120V/60Hz / 3.5 Amp.
• CMP 400 VV 120V/60Hz / 4 Amp.
• CMP 250 Combi 120V/60Hz / 3 Amp.
• CMP 300 Combi 120V/60Hz / 3.2 Amp.
DIMENSIONES
Capacidad con el mixer
• Gracias a un motor muy potente el CMP 250
permite trabajar capacidades de hastá 15 litros, el
CMP 300 de 30 litros, el CMP 350 de 45 litros y
el CMP 400 hastá 65 quarts. La qualidad del
producto final está imparable.
Capacidad con la función mezcladora
• Con esta función, los CMP 250 Combi y CMP
300 Combi permiten trabajar candidades de 2 a
30 claras de huevo y de 2 a 35 kg del producto
final.
• Cada aparato se entrega con un soporte mural
para facilitar su colocación.
SEGURIDAD
• Dispositivo de seguridad de accionamiento
Este dispositivo impide que el aparato se ponga
en marcha intempestivamente. En efecto, para po-
ner en marcha el aparato hay que pulsar los dos
botones de mando. A fin de proceder a su puesta
en marcha, remítase al apartado PUESTA EN
FUNCIONAMIENTO (página 14).
• Dispositivo de seguridad de funcionamiento
El aparato se pone automáticamente en seguridad
térmica cuando tiene dificultad para funcionar
(cuchara o utensilio en la marmita) o se somete a
un tiempo de funcionamiento demasiado prolon-
gado o a sobrecarga. En este caso, espere a que se
enfríe completamente (environ 30 mn) y
proceda a las operaciones de PUESTA EN
FUNCIONAMIENTO (página 14).
• Dispositivo de seguridad de falta de tensión
Si se produce un corte de corriente o se desen-
chufa el aparato, éste sólo se puede volver a poner
en marcha siguiendo los pasos de PUESTA EN
FUNCIONAMIENTO (página 14).
ATENCIÓN
• La cuchilla es una herramienta cortante, por lo
cual se deberá utilizar guantes adecuados para
manipularla.
ATENCIÓN
CONSERVE ESTAS INSTRUCCIONES
CMP 300 Combi
A = 3
3
/4
B = 27
9
/16
C = 3
9
/16
D = 13
11
/16
E = 15
3
/8
F = 4
3
/4
CMP 250 Combi
A = 3
3
/4
B = 25
5
/8
C = 3
9
/16
D = 11
3
/4
E = 15
3
/8
F = 4
3
/4
CMP 300 V.V.
A = 3
3
/4
B = 26
C = 3
9
/16
D = 12
CMP 250 V.V.
A = 3
3
/4
B = 24
C = 3
9
/16
D = 8
7
/8
CMP 350 V.V.
A = 3
3
/4
B = 28
1
/4
C = 3
9
/16
D = 14
5
/16
CMP 400 V.V.
A = 3
3
/4
B = 29
1
/2
C = 3
9
/16
D = 16
1
/4
CF
E
D
A
B

14
• Puesta en marcha con variacion de velocidad
Siga los pasos que se indican en los puntos 1 a 6.
Haga variar la velocidad del motor girando la
moleta (MV) en el sentido mini o maxi, según la
velocidad deseada.
Es preferible empezar a trabajar a baja velocidad
con la función mezcladora.
POSICIÓN DE TRABAJO
• FUNCION CUCHILLA
A fin de lograr una
mejor ergonomía de
trabajo, le aconsejamos
que sujete a la vez el
mango y la base del
bloque motor. Además,
le recomendamos que
incline ligeramente el
aparato asegurándose
de que la campana no
está en contacto con el
fondo del recipiente.
El aparato también se
puede apoyar sobre
el borde de la marmita
siempre que se mantenga
en posición inclinada y
que la campana no esté
en contacto con el fondo
del recipiente.
Si utiliza el soporte
marmita, asegúrese
de que la batidora se
encuentra en el centro del recipiente ligeramente
inclinada y de que la campana no toca el fondo de
la marmita.
La protección contra salpicaduras debería estar
siempre instalada.
pasos 3 a 5 descritos a continuación. Si la máquina
no arranca, espere que se enfríe el aparato durante
30 minutos y la seguridad térmica se anulará. En
ese momento, estará en condiciones de volver a
arrancar la máquina siguiendo los pasos 3 a 5.
1. Asegúrese de que el
botón de mando (BM)
no está en posición de
marcha.
2. Conecte el aparato
a la red.
3. Sumerja el tubo en
la preparación, con la
campana totalmente
sumergida y la protec-
ción instalada.
4. Pulse el botón de
seguridad (BS).
5. Pulse el botón
de mando (BM). La
batidora empezará a
funcionar.
6. Deje de pulsar el
botón de seguridad
(BS).
7. Si desea parar el aparato, deje de pulsar el botón
de mando (BM).
• Puesta en marcha continua
Siga los pasos que se indican en los puntos 1 a 6.
8. Luego, mientras mantiene accionado el botón de
mando, pulse el botón de bloqueo (BB).
9. Deje de pulsar el botón de mando (BM).
10. Deje de pulsar el botón de bloqueo (BB). La
batidora funcionará sola.
11. Si desea parar el aparato, pulse el botón de
mando (BM) y a continuación deje de pulsarlo.
INTRODUCCÌON
Robot-Coupe ha desarrollado una gama de
trituradores cuyas características aparecen a
continuación.
MV
BS
BM
BB
Estos modelos le prestarán innumerables servicios
que usted irá descubriendo a medida que los
utilice. La función batidora (cuchilla) le permitirá
realizar fácilmente sopas, consomés, cremas, purés
de verduras o caldos. La función mezcladora es
ideal para hacer pasta de crêpes, mayonesa,
claras a punto de nieve, mousse de chocolate,
crema con mantequilla, nata montada, quesos
batidos, etc. La función variación de velocidad le
permitirá adaptar la velocidad a la preparación
realizada y empezar con una velocidad lenta a fin
de evitar las salpicaduras.
El diseño sencillo de estos aparatos permite montar
y desmontar en un momento todas las piezas que
se manejan con frecuencia para su mantenimiento
o limpieza.
PUESTA EN FUNCIONAMIENTO
• PUESTA EN MARCHA
El trituradore dispone de corriente eléctrica y está
equipado con un dispositivo de seguridad de
funcionamiento. Si el aparato se detiene súbitamente,
deberá intentar volver a arrancarlo siguiendo los
Modelos
Variación
de velocidad
Accesorio
batidora
Accesorio
mezcladora
CMP 250 V.V.
••
CMP 300 V.V.
••
CMP 350 V.V.
••
CMP 400 V.V.
••
CMP 250 Combi
•• •
CMP 300 Combi
•• •

15
- Asegúrese de que el aparato no está enchufado.
- Alinee el plano
A
de la parte cónica
C
del tubo
con el dedo
B
interior del cárter de aluminio.
- Encaje completamente la parte cónica
C
del tubo
en el cárter de aluminio.
- Gire el tubo en el sentido de la flecha (véase
dibujo) hasta que se bloquee ligeramente.
Procure que la campana esté lo suficientemente
sumergida como para evitar las salpicaduras y que
las ranuras de ventilación del bloque motor no es-
tén en contacto con los líquidos.
Para lograr una eficacia óptima, se deben sumergir
2
/
3
de la longitud del pie de la batidora.
• FUNCION MEZCLADORA
Le aconsejamos que sujete
el aparato a la vez por
el mango y la base del
bloque motor.
También puede sujetarlo
por el mango con una sola
mano, de manera que la
otra mano quede libre
para sujetar eventualmente
el recipiente.
Durante la realización
de la preparación le
recomendamos que mueva
las mezcladoras dentro del
recipiente para garantizar
la perfecta homogeneidad
de la preparación.
Le recomendamos encare-
cidamente que no toque
las paredes del recipiente
con las mezcladoras.
Para lograr una eficacia óptima, debe sumergir
por lo menos
1
/
5
de la longitud de la mezcladora.
También le aconsejamos que empiece con una
velocidad lenta.
MONTAJE/DESMONTAJE
- FUNCION CUCHILLA
• Montaje del tubo en el bloque motor.
(Solamente sobre los CMP Combi)
• Desmontaje del tubo del bloque motor
- Asegúrese de que el aparato no está enchufado.
- Gire el tubo en el sentido inverso al del montaje.
- Al llegar al tope, retire el tubo del cárter de
aluminio.
• Montaje de la campana en el tubo
- Asegúrese de que el aparato no está enchufado.
- Alinee el plano
A
de la parte cónica del tubo con
el dedo
B
interior de la campana.
- Encaje la parte cónica
C
del tubo en la
campana. Cuando el anillo entre en contacto con
la junta del tubo
D
, gire la campana en el
sentido de la flecha (véase dibujo) de manera que
la leva de la campana
E
se ensamble en la leva
del tubo
F
y se bloquee ligeramente.
• Desmontaje de la campana del tubo
SENTIDO DE ROTACIÓN DE
ENSAMBLADURA
- Asegúrese de que el aparato no está enchufado.
- Gire la campana en el sentido de la flecha
1
(véase dibujo) para desensamblar la leva de la
campana
E
de la leva del tubo
F
. Al llegar al
tope, retire la campana del tubo.
Si no consigue extraerla, gire la cuchilla en el
sentido de la flecha
2
para retirarla del eje.
• Desmontaje de la cuchilla
- Desenchufe el trituradore y mantenga la cuchilla
utilizando la herramienta provista a tales efectos.
- Para desmontar la cuchilla de manera segura,
sujétela protegiendo su mano con el instrumento
de bloqueo de la cuchilla, con un guante de
seguridad o con un trapo grueso.

16
ÚTIL DE BLOQUEO CUCHILLA
CAMPANA
CAJA DE ACCIONAMIENTO
ÚTIL DE DESMONTAJE CUCHILLA
CONJUNTO CUCHILLA-GUARNICÍON
DE JUNTA
- Desenrosque la caja de accionamiento con la
herramienta de desmontaje.
- Cuando haya desenroscado la caja de acciona-
miento, podrá sacar la cuchilla y limpiarla.
- FUNCION MEZCLADORA
• Montaje de la caja en el bloque motor
(Solamente sobre los CMP Combi)
- Asegúrese de que el aparato no está enchufado.
- Alinee el plano
A
de la parte cónica
C
de la
caja de la mezcladora con el dedo
B
interior del
cárter de aluminio.
- Encaje completamente la parte cónica
C
de la
caja de la mezcladora en el cárter de aluminio.
- Gire la caja de la mezcladora en el sentido de
la flecha (véase dibujo) hasta que se bloquee
ligeramente.
• Desmontaje de la caja
- Asegúrese de que el aparato no está enchufado.
- Gire la caja de la mezcladora en el sentido
inverso al del montaje.
- Cuando llegue al tope, retire la caja de la
mezcladora del cárter de aluminio.
• Montaje de las mezcladoras en la caja
C
B
E
A
D
- Sujete la caja con una mano.
- Sujete la mezcladora con la otra mano y a
continuación introduzca el eje
A
de la primera
mezcladora en el orificio
B
del eje de la caja.
Alinee los pernos de arrastre
D
con las ranuras.
- Al introducir la mezcladora en el eje
C
de la
caja, haga un movimiento de rotación para
encajar los pernos de arrastre en las ranuras
E
del eje
C
, de manera que la mezcladora quede
fijada en su eje.
- Para asegurarse de que la mezcladora está bien
fijada en el eje
C
, tire ligeramente de los ramales.
- Haga lo mismo con la segunda mezcladora. Si no
consigue encajar la mecladora, sáquela, haga un
giro de 90° y vuelva a empezar la operación.
• Desmontaje de las mezcladoras de la caja
Tire del eyector
A
en el sentido de la
flecha sujetando
el eyector con una
mano y la caja
B
con la otra.
• Desmontaje del eyector
- Sujete la mezcladora
por los ramales
B
con una mano.
- Con la otra, tire
del eyector
A
en el
sentido de la flecha
(véase dibujo).
A
B
B
A

17
PROTECCIÓN CONTRA
SALPIGADURAS
- Vuelva a colocar el tornillo
en el aro y ajústelo.
Cubra el aro con el disco de
protección contra salpicadu-
ras, deslizándolo a lo largo
del tubo
C
en el sentido de la
flecha número
1
, con la brida
orientada hacia abajo.
Atención: alinee las dos
partes.
- Al retirar el disco de pro-
tección para limpiarlo, siga
las instrucciones en sentido in-
verso.
LIMPIEZA
• BLOQUE MOTOR
La máquina deberá limpiarse en cada fase de la
preparación. Límpiela cada vez que termina una
tarea y antes de comenzar la siguiente, utilizando
detergente o desinfectante. Diluya el detergente
o el desinfectante siguiendo las instrucciones que
figuran en el envase correspondiente y sírvase de
una esponja húmeda para aplicar el producto de
limpieza. El líquido no debe entrar en contacto
con los componentes eléctricos que se encuentran
dentro del bloque motor. Cuando limpie
las ventilaciones, cerciórese de que no penetre
líquido dentro de la caja del motor. Utilice un
paño levemente húmedo para retirar el detergente
y seque con un paño limpio. Si ha utilizado el
triturador en una preparación caliente, ponga la
parte inferior del tubo bajo un chorro de agua fría
para enfriarlo antes de desmontar la campana del
tubo.
Limpie la máquina inmediatamente después
de cada uso para evitar que los alimentos queden
adheridos.
• TUBO Y CAMPANA
Existen dos posibilidades :
Procedimiento simplificado de limpieza
No sumerja nunca el bloque motor o el
mango en ningún tipo de líquido. El bloque
motor contiene componentes eléctricos y no
es hermético a la penetración de sustancias
líquidas. El contacto entre el motor y una
sustancia líquida puede provocar daños
graves al usuario.
IMPORTANTE
• Siempre desenchufe el trituradore antes de
lavarlo.
• Siempre diluya la lejía siguiendo las instruc-
ciones (vea el embalaje del fabricante).
• No lave el motor en el lavavajillas.
• El tipo y la concentración del detergente
debe respetar la norma 21 CFR 178 1010.
• Proceda a la limpieza del aparato respe-
tando las reglas establecidas por el servicio
local de sanidad.
ATENCIÓN
- Sumerja el pie con la campana en un recipiente
con agua y póngalo en marcha durante unos
segundos para eliminar los posibles restos de
alimentos de la cuchilla y la campana.
- Después de haber desenchufado el aparato, lave
la campana con el tubo.
Procedimiento completo de limpieza
- Desenchufe el aparato.
- Lave el tubo con la campana utilizando agua del
grifo.
- Desmonte la campana del tubo y después el
cuchillo (utilice guantes apropiados). Actúe con
cuidado para no estropear las superficies del eje
y de la guarnición de junta. Limpie cada pieza
utilizando un detergente que no sea demasiado
agresivo.
- Seque bien las distintas piezas después de
lavarlas para evitar que se oxiden.
• CUCHILLA
Es necesario desmontar la cuchilla de la campana
para limpiar bien el aparato.
Después de limpiar la cuchilla, seque bien las
hojas para evitar que se oxiden.
• ALUMINIO
Utilice agentes de limpieza apropiados para el
metal.
• PLÁSTICO
Verifique que su detergente se puede utilizar con
piezas de plástico. En efecto, algunos detergentes
demasiados alcalinos (con fuerte concentración
de soda o amoníaco por ejemplo) son totalmente
incompatibles con ciertas materias plásticas y las
deterioran muy rápidamente.

18
• MEZCLADORA
El resultado de la preparación depende
principalmente del estado de los ramales y de
su desgaste. Por ello, conviene cambiarlos
periódicamente para obtener un producto final de
óptima calidad.
PROBLEMAS
• EL APARATO NO ARRANCA
1. ¿Ha seguido las operaciones de puesta en
marcha? (Se refiere a “Puesta en Marcha”).
2. ¿Se trata de un recalentamiento del aparato? En
ese caso, espere unos minutos a que se enfríe el
motor.
3. Desenchufe el aparato e intente utilizar otra
toma de corriente.
4. Controle la alimentación de la red eléctrica.
5. Póngase en contacto con el servicio postventa.
• EL APARATO SE PARA CUANDO ESTÁ
FUNCIONANDO
(Ver párrafo “puesta en funcionamiento” p 14).
1. El primer párrafo explica en qué consiste el
dispositivo de protección térmica. En caso de
que éste se active, deberá esperar a que el
aparato se enfríe (aproximadamente 30 minutos)
antes de volver a ponerlo en marcha.
Si no puede determinar la causa del problema:
- Suelte el botón de mando (BM).
- Desenchufe el trituradore.
- Controle la libre rotación de la cuchilla en la
campana (bloqueo debido a un utensilio).
- Controle la rotación del eje de arrastre. Para
ello, desmonte la campana del pie y controle
manualmente la rotación de la salida del eje.
Para proceder a todas estas verificaciones,
desenchufe el trituradore, retire la campana y
ponga a prueba la rotación.
Verifique el estado del enchufe y del cable de
alimentación.
• SI EL TRITURADORE COMIENZA A ECHAR
HUMO O A RECALENTARSE:
Suelte el botón de mando y desenchufe el aparato
de la corriente eléctrica. Póngase luego en contacto
con el servicio de postventa más cercano.
• CAJA DE LA MEZCLADORA
No sumerja nunca la caja de la mezcladora en el
agua. Límpiela con un trapo lígeramente húmedo o
con una esponja.
No limpie nunca la caja de la mezcladora en el
lavavajillas.
• MEZCLADORA
Las mezcladoras se pueden limpiar a mano o en el
lavavajillas.
Para que la limpieza sea eficaz, le recomendamos
que desmonte el eyector de la mezcladora.
MANTENIMIENTO
• CUCHILLA
El resultado del corte depende principalmente del
estado de las hojas y de su desgaste. La cuchilla
se deteriora con el uso y hay que sustituirla
periódicamente para seguir obteniendo la misma
calidad de producto final.
Se aconseja cambiar el anillo de guía y la guarni-
ción de junta al mismo tiempo que la cuchilla.
• ANILLO JUNTA
El anillo junta del pie se puede lubricar (utilice
aceite de mesa).
A fin de conservar una hermeticidad perfecta del
pie, se debe examinar periódicamente el estado de
desgaste de este anillo y sustituirlo si es necesario.
• JUNTA DE PIE
A fin de conservar una hermeticidad perfecta
entre la campana y el pie, hay que examinar
periódicamente el estado de desgaste de esta junta
y sustituirla cuando sea necesario.
• LA CUCHILLA ES UNA HERRAMIENTA
CORTANTE. Se recomienda utilizar guantes
apropiados durante su manipulación.
Manipule y guarde la cuchilla con precaución.
• Nunca intente eliminar los sistemas de
bloqueo y de seguridad.
• Nunca introduzca un objeto en el recipiente
de trabajo.
• No sobrecargue el aparato.
• Nunca ponga en marcha el aparato si la
campana no está totalmente sumergida en la
preparación.
• Desenchufe siempre el triturador antes
de proceder a las operaciones de limpieza
y de mantenimiento.doing any cleaning or
maintenance!
ATENCIÓN

19
REPARACIÓN
Como primera medida, consulte la garantía.
Si el aparato requiere reparación, pregunte al
distribuidor cuál es el servicio de postventa más
cercano a su domicilio.
En caso de que no encontrar ninguno y si usted
desea que el aparato sea reparado en fábrica,
póngase en contacto con nosotros para obtener
un número de autorización de devolución de
mercancía y envíelo asegurado y con porte pago a
la dirección de la siguiente fábrica :
PH : 1-800-824-1646
Robot Coupe U.S.A. Inc.
Service Department
264 South Perkins St.,
Ridgeland, MS 39157
Para el servicio de postventa en el Canada,
contacta la fabrica de Robot-Coupe
en Estados Unidos.

21
SOMMAIRE
GARANTIE
PRÉCAUTIONS IMPORTANTES
• Déballage
• Installation
• Branchement
• Spécifications
• Dimensions
• Sécurité
• Attention
INTRODUCTION
MISE EN FONCTIONNEMENT
• Mise en marche
• Mise en marche en continu
• Mise en marche en variation de vitesse
POSITION DE TRAVAIL
• Fonction couteau
• Fonction fouet
MONTAGE/DÉMONTAGE
• Fonction couteau
• Fonction fouet
PROTECTION ANTI-ÉCLABOUSSURES
NETTOYAGE
• Bloc moteur
• Pied et cloche
• Couteau
• Aluminium
• Plastique
• Boite fouet
• Fouet
ENTRETIEN
• Couteau
• Bague d’étanchéité
• Joint du pied
• Fouet
DIFFICULTÉS DE FONCTIONNEMENT
DÉPANNAGE
DONNÉES TECHNIQUES
• Vues éclatées
• Schémas électriques et de câblage

22
LES POINTS SUIVANTS NE SONT PAS
COUVERTS PAR LA GARANTIE :
1
- Toute détérioration du matériel relevant
d’une utilisation incorrecte ou inappropriée, d’une
chute de l’appareil, ou toute détérioration du
même genre causée ou résultant d’une mauvaise
application des instructions (montage mal effectué,
erreur dans le fonctionnement, nettoyage et/ou
entretien inadaptés, emplacement inapproprié
…).
2 - Les pièces de remplacement d’un ensemble
couteau et/ou la main d’œuvre pour affûter les
lames devenues émoussées, abîmées ou usées
après un certain temps d’utilisation jugé normal
ou excessif.
3 - Les pièces et/ou la main d’œuvre pour
remplacer ou réparer les surfaces rayées, tâchées,
abîmées, bosselées ou décolorées, les lames, les
couteaux ou les accessoires.
4 - Les coûts de transport de ou jusqu’à une
station de service après-vente agréée pour la
réparation d’une machine.
5 - Les coûts de main d’œuvre pour installer ou
essayer des pièces ou accessoires (cuves, disques,
lames …) remplacées arbitrairement.
6 - Les coûts liés au changement du sens de
rotation des moteurs électriques triphasés
(L’INSTALLATEUR EST RESPONSABLE).
7 - LES DÉGÂTS DUS AU TRANSPORT. Les vices
visibles ou cachés incombent au transporteur. Un
dossier de réclamation doit être immédiatement
rempli auprès du transporteur ou dès qu’un défaut
est découvert, s’il s’agit d’un vice caché.
GARDEZ TOUS LES CARTONS ET EMBALLAGES
ORIGINAUX qui serviront lors de l’inspection du
transporteur.
ROBOT-COUPE U.S.A., Inc., ROBOT-COUPE SA
ainsi que toutes ses filiales ou sociétés affiliées,
ses distributeurs, agents, gérants, employés ou
assureurs ne peuvent être tenus responsables des
dommages, pertes ou dépenses indirects liés à
l’utilisation de l’appareil ou à l’impossibilité de
l’utiliser.
La garantie ROBOT-COUPE U.S.A., Inc. est
donnée expressément et en lieu et place de
toutes autres garanties, écrites ou tacites,
pour la vente et l’usage normal de l’appareil
et constitue la seule garantie faite par ROBOT-
COUPE U.S.A., Inc.
VOTRE NOUVELLE MACHINE ROBOT-
COUPE EST GARANTIE UN AN A PARTIR DE
LA DATE D’ACHAT : CETTE GARANTIE NE
CONCERNE QUE L’ACHETEUR D’ORIGINE.
La GARANTIE EST LIMITEE aux défauts liés
aux matériaux et / ou à la fabrication,
et inclut la main d’œuvre pour le
remplacement des pièces défectueuses,
dans le cas où les réparations seraient
effectuées par une station de service après-
vente agréée (voir liste jointe).
Le CLIENT doit informer la Stations de
Service Après-Vente d’une éventuelle
couverture de garantie et fournir une
copie de la facture ou du bon de livraison
mentionnant la date d’achat AVANT QUE
LES REPARATIONS NE SOIENT ENTAMEES ;
Les pièces de remplacement et les
accessoires sont garantis quatre vingt dix
(90) jours à partir de la date d’achat quand
ils sont achetés séparément et sont vérifiés
à l’aide du bordereau de vente daté OU
le récépissé d’emballage sur lequel sont
inventoriées les pièces.
Toutes les pièces ou accessoires remplacés
sous garantie doivent être retournés à la
Station de Service Après-Vente.
GARANTIE LIMITEE DE ROBOT-COUPE U.S.A., Inc.
La page est en cours de chargement...
La page est en cours de chargement...
La page est en cours de chargement...
La page est en cours de chargement...
La page est en cours de chargement...
La page est en cours de chargement...
La page est en cours de chargement...
La page est en cours de chargement...
La page est en cours de chargement...
La page est en cours de chargement...
La page est en cours de chargement...
La page est en cours de chargement...
La page est en cours de chargement...
La page est en cours de chargement...
La page est en cours de chargement...
La page est en cours de chargement...
La page est en cours de chargement...
La page est en cours de chargement...
La page est en cours de chargement...
La page est en cours de chargement...
La page est en cours de chargement...
-
 1
1
-
 2
2
-
 3
3
-
 4
4
-
 5
5
-
 6
6
-
 7
7
-
 8
8
-
 9
9
-
 10
10
-
 11
11
-
 12
12
-
 13
13
-
 14
14
-
 15
15
-
 16
16
-
 17
17
-
 18
18
-
 19
19
-
 20
20
-
 21
21
-
 22
22
-
 23
23
-
 24
24
-
 25
25
-
 26
26
-
 27
27
-
 28
28
-
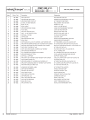 29
29
-
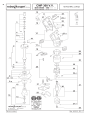 30
30
-
 31
31
-
 32
32
-
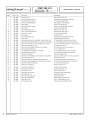 33
33
-
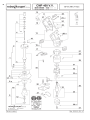 34
34
-
 35
35
-
 36
36
-
 37
37
-
 38
38
-
 39
39
-
 40
40
-
 41
41


