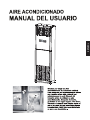
Airwell SBF Le manuel du propriétaire
- Catégorie
- Climatiseurs split-system
- Taper
- Le manuel du propriétaire

ENGLISH

1

2
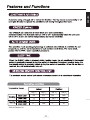
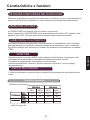
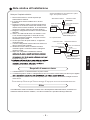
DB[°C]
WB[°C]
DB[°C]
WB[°C]
43
18(-7*)
24 18
-7
32
17
30
0
23
12
NA
NA -8
NA
NA
* With All Season Kit
ENGLISH

3
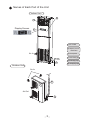
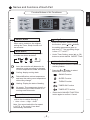
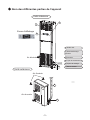
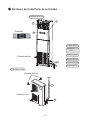
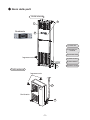
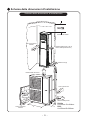
Names of Each Part of the Unit
(1) Air outlet
(2) Display screen
and button
(3) Front panel
(4
) Connecting pipe
(5
) Drainage pipe
(6
) Wrapping tape
Air In
Air In
Air Out
4
6
Display Screen
Indoor Unit
Outdoor Unit
1
2
3
5

●
●
4
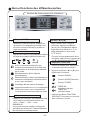
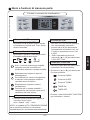
Buttons function and displayer
Names and Functions of Each Part
Function Buttons of Air Conditioner
Press this button, to turn on the unit.
When unit is turned on, the original
setting like Timer, Sleep function will
be canceled.
ON/OFF Button
Mode Button
Press the button, the circulating changes
of mode are shown as below:
Auto: the controller will determine its
operation mode according to changes
of room temperatures under this mode.
Cooling: display cooling state.
Dehumidification: reduce temperature
and keep the setting room temperature
without any change.
Heating: Display the state of heating.
Air supply: The compressor doesn't on
work and only the indoor blower is on
running under this mode.
●
●
Press the or button to select
AUXILIARY FUNCTION.
Use this button to select or cancel the
auxiliary feature
●
Press the AUXILIARY FUNCTION
button again to confirm / Cancel.
“
→
→
→
”
●
Speed Button
AUXILIARY FUNCTION
Press this button, the speed
can
fo gnoma noitalucric eht ni tfihs
Auto Low
High
Auto
Note: You cannot switch the fan speed
in AUTO or Dry mode, it has been
automatically controlled.
and
●
●
Button
Under the situation without setting
the function, press
and
buttons,
the setting temperature goes up
and down 1
, the regulating range
is from 17 to 30
Under Timer Setting, press (▲) or (▼)
button to select desired ON/OFF Timer.
℃
℃ ℃
.
SWING Function
SLEEP Function
TURBO Function
TIMER ON Function
TIMER OFF Function
ENGLISH

●
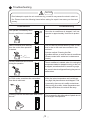
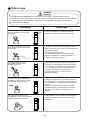
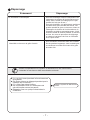
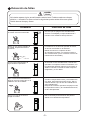
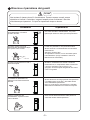
Troubleshooting
CAUTION
Don't attempt to repair the air conditioner by yourself.It may cause the electric shock or
fire. Please check the following items before asking for repair.It can save your time and
money.
Phenomenon
Troubleshooting
Once the air conditioner is stopped, it will not
operate in approximately 3minutes to protect
itself.
Not operate immediately when
the air conditioner is restarted.
There's unusual smell blowing
from the outlet after operation
is started.
The unit has no peculiar smell by itself. If has,
that is due to the smell accumulated in the
ambient.
Solution method: Cleaning the filter.
If problem still has, so need to clean air conditioner.
(Please contact with authorized maintenance
center.)
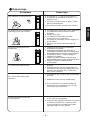
Sound of water flow can be heard
during the operation.
The air conditioner is started, when it is running the
compressor started or stopped running, or the unit
is stopped, sometimes there is swoosh or gurgle,
the sound is due to refrigerant flowing they are not
malfunctions.
In COOL mode, sometimes the mist emitted
from the air outlet vent.
When the indoor temperature and humidity are
very high, this phenomenon would happen. This
is caused by the room air is swiftly cooled down.
After running for a while, indoor temperature and
humidity will fall down, the mist will die away.
Creaking noise can be heard when start or stop
the unit.
This is caused
by the deformation of plastic due to
the changes of temperature.
5
Waiting

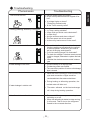
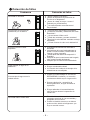
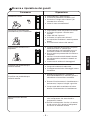
Troubleshooting
Phenomenon
●
Troubleshooting
●
The unit can not run
●
Has the power been shut down?
●
Is the circuit protection device tripped off or
●
not?
●
Break off
●
Is voltage higher or lower?
●
(Tested by professionals)
●
Is the Timer correctly used?
●
Cooling (Heating) efficiency is not good.
●
Is Temp. setting suitable?
●
Were inlet and outlet vents obstructed?
●
Is filter dirty?
●
Are the windows and doors clothed?
●
Did Fan speed set at low speed?
●
Is there any heat sources in the room?
Wireless remote control is not available
●
The unit is interfered by abnormal or frequent
●
functions switchover occasionally the controll-
●
er cannot operate. At this time, you need to
pull out of the plug, and reinsert it.
Is it in its receiving range? Or obstructed?
To check the voltage in wireless remote control
inside is charged, otherwise to replace the batt-
eries.
Whether the wireless remote control is dama-
ged.
If water leakage in the room
The air humidity is on the high side.
Condensing water over flowed.
The connection position of indoor unit drainage
pipe is loosed.
If water leakage in outdoor unit
pipe and connection of pipe would be
condensed due to the water cooled down.
Noise from indoor unit emitted
The sound of fan or compressor relay is
switching on or off.
When the defrosting is started or stop running,
it will sound. That is due to the refrigerant
flowed to the reversed direction.
When the unit is running in COOL mode, the
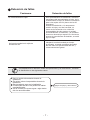
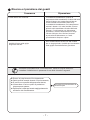
● During heating or defrosting operation, the
●
melted water will blow out.
● The water adhered on the heat exchanger
will drop during heating operation.
6
ENGLISH

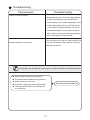
● In heating procedure, when the heat exchanger
temperature of indoor unit is low, it stops blowing
in order to avoid blowing cool air (within 90 s).
▲
▲
▲
▲
▲
Phenomenon Troubleshooting
Indoor unit can not blow
Immediately stop all operations and plug out, contact the dealer in following situations.
There is harsh sound during operation;
The terrible odors emitted during operation;
Water is leaking in the room;
Air switch or protection switch often breaks;
Carelessly splash water or something into
Stop running and pull out of the plug
air conditioner.
● When heating, if the outdoor temperature is low
and in high humidity, there is much frost formed
in the outdoor unit heat exchanger, the unit will
automatically defrost, indoor stop blowing fan
about 10mins, during the defrosting procedure,
there will be water or vapor emitted.
Moisture formed on air inlet grill
If air conditioner is running in a high humidity for a
long time, the moisture may condense on the air
outlet grill and drip off.
Troubleshooting
7

①
②
③
④
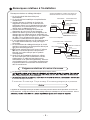
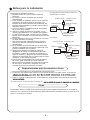
Requirements for earthing
1.The air conditioner is the first class electric appliance:
2.The yellow and green dual color wire in the air conditioner is earth wire, it cannot be used for other purposes, do not cut
off it. Do not fix it by the tapping screw: otherwise, it can cause the electric shock.
3.Please do not connect the earth wire to the place:The power supply must be reliabbly earthed.
Water pipe
Gas pip
e Drainage pipe
The place where is unreliable suggested by the professional.
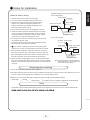
Notes for electric wiring:
1. Special circuit must be used for power supply.
2. The circuit must be installed by special serviceman.
3. Please do the wiring according to the following wiring
diagram. The screws must be tightly fastened, the
slippery screws must be changed, the tapping screw
cannot be used for electric wiring.
4. Please wiring according to the circuit diagram on the unit.
5. Adopts the cables which are attached with the unit, please
do not to change the cables optionally, and do not change
the length and ends of the cable, if need to adjust, please
contact with the local after-sales service center.
6. For the power cord which is without the plug, that cannot be
connected the plug for using.
7. The electric wiring connection of indoor and outdoor should
not be affected by the stretch and bending.
8. is the symbol of earthing, it denotes that the yellow-green
dual wire only can be connected with the place with the symbol.
9. After the electric installation completed, make sure to use wire
clamp to fix the power cord, power supply connection cable and
signal cable tightly, and ensure that there is enough space in the
fix position and each connection terminals of the lead wires.
10.Please use about a half kilogram of force, to check whether each
lead wire is installed well. When checking the air connector, please
enclasp it, and check each lead wire of which is connecting with the
connector.
Notes for Installation
8
Power supply
Air switch
Power cable
Signal control cable
Earth
Indoor
unit
Outdoor
unit
Installation diagram, please refer to the following.
Power supply indoors
and outdoors
Connection cable
Note:the unit should be correctly earthed to
avoid interference to the complete unit
and ensure personal safety.
For the single pahse:
Indoor
Outdoor
Earth
Signal control cable
Power cable
Air switch
Power supply
unit
unit
Connection cable
Power supply indoors
For the three phase:
and outdoors
Other
The auxiliary electric heater is assembled near the back of evaporator in the indoor unit, it is a tubular metal electric
ENGLISH

9
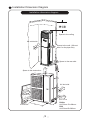
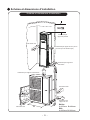
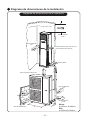
Installation Dimension Diagram
Installation dimension diagram
Space to the ceiling
Space to the rear side
Space to the wall: (30cm at
least for the pipe side)
Air outlet side
Space to the obstruction
Space to the wall
Air outlet side
Space to the wall
Air inlet side
above
above
above
above
above
A
R410a:
A=633mm B=404mm
R22:
A=623mm B=366mm
B
above

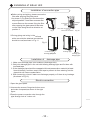
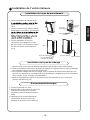
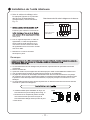
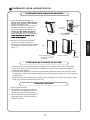
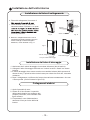
Installation of connection pipe
Before wiring and piping, please remove the
filter after opening the glass panel.
1.As shown in Fig.9,take out the decorative
strip at position 1 and then unscrew the
screws.Remove the screws fixing the filter
after opening the glass panel.At last take
out the filter along the arrow direction at
position 3.
2.During piping and wiring in the left and
at the rear side,the attached accessories
should be used,as shown in Fig.11.
Installation of drainage pipe
1. Make sure drainage pipe is led outdoors (discharge side).
2. Butt-joint drainage pipe in the unit with blowing drainage pipe and fix them with
insulated tape.
3. If the drainage pipe should be wrapped with heat-preservation material (at least
9mm thickness), and then wrap it with tape to prevent air from entering into the
pipe,which will cause condensation.
4. After connecting, check if water can discharge properly or if there is any leakage.
(As shown in Fig.12)
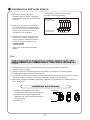
Electric connection
1.Open the glass panel.
2.Unscrew the screws fixing elecrtic box cover
and make it exposed,as shown in the right
figure.
Fig.11
Fig.12
Drainage pipe
Fig.9
Fig.10
Drainage
pipe
Flare-end connection
Connection
pipe
Blowing
drainage pipe
Drainage piping hole
Wrapping tape
Flare-end connection
Connection pipe
3.Pass the power connection wire through the
pipe-through hole of indoor unit.
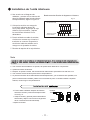
Installation of Indoor Unit
10
ENGLISH

●
●
●
●
●
●
Screws
Hole
Baffle
and drainage pipe according to Fig.14.
11
Fig 13
Installation of Indoor Unit
Installation of baffle
1.Loosen the screws and adjust the baffle position up
and down to clamp connection pipe/drainage pipe
as much as possible.
Fig.14
2.Tighten the screws.
Please install it after installtion of connection pipe
Note:
When the connection wire length isn’t enough, please contact with the appointed service shop for buying a dedicated
electric wire with enough length, the connection isn’t allowed between the wire.
The wrong wiring connection isn’t allowed, it may cause the malfunction of the components.
Tighten the terminal screw.
After tightened the screw, and slightly pull the electric wire to confirm whether it is firmed or not.
Wrong earth wire connection may cause electric shock.
The electric wire covering plate must be fixed well, and tighten the connection wire, if the wire cover-
ing plate isn’t installed well, that may lead the dust, moisture enter in or due to the outside force
impact, it may cause fire or electric shock.
4. According to the diagram for wiring,
according to the marks on wire board
for connection correspondingly,as
shown in Fig.13.
5. Place the section with sleeve of the
power connection wire into the wire
groove, then cover the electric box
cover, tighten the fixing screw, and
tighten the connection wire with clamp.
6. For the unit with signal wire, the signal
wire is connected with indoor unit via
connector. Clasp the section of signal
wire with sleeve with the wire clamp.
7. Recover the electric box cover.
●
An all-pole disconnection switch having a contact separation of at least 3mm in all poles should be
connected in fixed wiring.
Indoor unit terminal board
Outdoor unit terminal board
Power Input
Inter connection
L1 L2 L3 S
N
L1 L2 L3 S
N

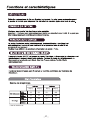
FRANCAIS

1

2
DB[°C]
WB[°C]
DB[°C]
WB[°C]
43
18 (-7*)
24 18
-7
32
17
30
0
23
12
NA
NA -8
NA
NA
* With All Season Kit
FRANCAIS

- 3 -
Nom des différentes parties de l'appareil
(1) Sortie d’air
(2) Ecran d'affichage
et bouton
(3) Panneau
(4
) Tuyau de branchement
(5
) Tuyau de vidange
(6
) Ruban adhésif
Air d'entrée
Air d'entrée
Air de sortie
4
6
Ecran d’affichage
Unité intérieure
Unité extérieure
1
2
3
5

- 4 -
Nom et fonctions des différentes parties
●
●
Fonction des boutons et affichage
Boutons de fonctionnement du climatiseur
Appuyez sur ce bouton pour mettre le
système en marche.Lorsque l'appareil est
en marche, la configuration par défaut des
fonctions comme la Minuterie, la Mise en
veille est annulée.
Bouton ON/OFF
Bouton Mode
Appuyez sur le bouton, les modifications relatives
au mode de circulation s'affichent comme suit:
Auto: La commande détermine son
mode de fonctionnement en fonction des
modifications de la température ambiante
de ce mode.
Refroidissement: affiche l'état de
refroidissement.
Déshumidification: réduit la température et
maintient la température ambiante définie
a une valeur constante.
Chauffage: affiche l'état de chauffage.
Approvisionnement en air: Le compresseur
ne fonctionne pas, seul le ventilateur de
l'unité intérieure fonctionne dans ce mode.
●
●
Utilisez ce bouton pour sélectionner
ou annuler la fonction auxiliaire
●
Appuyez sur Buton FONCTION
AUXILIARTY nouveau sur la touche
pour confirmer / Annuler.
●
Bouton de vitesse
AUXILIARY FUNCTION
Appuyez sur ce bouton, les modifications de
la circulation se présentent comme suit:
Auto → Faible → Haut → Auto
REMARQUE:
Vous ne pouvez pas modifier la vitesse du
ventilateur en mode Auto / Déshumidification.
Elle est définie automatiquement.
●
●
Bouton (▲) et (▼)
Dans cet état, sans configurer
la fonction, appuyez sur Bouton
(▲) et (▼), la température définie
augmente et se réduit de 1° C, la
plage admissible se situe entre
17°C et 30°C.
En vertu de la programmation de la
minuterie, Appuyez sur le bouton (▲)
et (▼) sélectionnez ON/OFF Timer.
Appuyez sur Button (▲) et (▼) pour
sélectionner Fonctions
Fonction
SWING
Fonction SLEEP(Sommeil)
Fonction TURBO
TIMER ON
(minuterie, marche)
TIMER OFF
(minuterie,arrêt)
FRANCAIS

- 5 -
Waiting
Dépannage
Evénement
N'essayez pas de dépanner le climatiseur vous-même. Cela peut provoquer un
incendie ou un choc électrique. Veuillez vérifier les éléments suivants avant de solliciter
le dépannage de votre appareil. Cela peut vous permettre de gagner en temps et
d'économiser de l'argent.
AVERTIS
SEMENT
Dépannage
Le climatiseur ne fonctionne
pas immédiatement lorsqu’il est
redémarré.
Lorsqu'il est arrêté, il ne va pas fonctionner
pendant 3 minutes environ pour se protéger.
L’appareil n’a aucune odeur particulière. S'il en
existe, elle provient des odeurs accumulées dans
le système ambiant.
Solution: Nettoyage du filtre.
Si le problème persiste, il est nécessaire de
nettoyer le climatiseur. (Veuillez contacter un
centre de maintenance agréé.)
Une odeur anormale provient de
la sortie après la mise en marche
du système.
Le climatiseur est mis en marche, au cours du
processus, le compresseur s'est mis en marche
ou s'est arrêté, ou l'appareil s'est arrêté. Parfois
il y a un chuintement ou un bourdonnement.
Ce bruit est provoqué par l'écoulement
du fluide frigorigène, il ne s'agit pas d'un
dysfonctionnement.
L'écoulement de l'eau est
perceptible pendant que le
système fonctionne.
Lorsque la température et l’humidité intérieures
sont très élevées, on observe ce phénomène. Il
est consécutif à un refroidissement rapide de l'air
ambiant.
Après que le système ait fonctionné pendant
quelques instants, la température et l'humidité
intérieures vont baisser, le brouillard va se
dissiper.
En mode REFROIDISSEMENT, le
brouillard est parfois émis à partir
de l'aération de la sortie d'air.
Ce phénomène est provoqué par la déformation
du plastique consécutive aux variations de la
température.
Des grincements peuvent être
perceptibles lorsque vous mettez le
système sous ou hors tension.

- 6 -
Break off
Le climatiseur ne fonctionne pas.
● Le système a - t - il été mis hors tension?
● Le dispositif de protection du circuit a - t - il
sauté ou non?
● La tension est-elle élevée ou faible? (Testé
par les professionnels)
● La minuterie est-elle correctement utilisée?
Le rendement du refroidissement
(chauffage) n'est pas excellent.
●
Le réglage de la température est-il approprié?
● Les évents de sortie et d'entrée sont-ils
obstrués?
● Le filtre est-il sale?
● Les fenêtres et les portes sont-elles
recouvertes par un vêtement?
● La vitesse du ventilateur est-elle réglée à un
niveau faible?
● Existe-t-il une source thermique dans la
pièce?
La télécommande sans fil est
indisponible.
● L'humidité de l'air se trouve sur le côté haute
pression.
● Débordement de l'eau de condensation.Le
raccordement du tuyau de vidange de l'unité
intérieure est desserré. S'il y a fuite d'eau
dans l'unité extérieure.
Il y a fuite d'eau dans la pièce.
● L'humidité de l'air se trouve sur le côté haute
pression.
● Débordement de l'eau de condensation.
● Le raccordement du tuyau de vidange de
l'unité intérieure est desserré. S'il y a fuite
d'eau dans l'unité extérieure.
Emission des bruits à partir de
l'unité intérieure.
● Déclenchement et arrêt du bruit du ventilateur
ou du relais du compresseur.
● Lorsque la décongélation est mise en marche
ou arrête de fonctionner, ce bruit est émis.
Il est consécutif à la circulation du liquide
frigorigène dans le sens opposé.
● L'appareil est soumis à des interférences
anormales ou fréquentes.
● Changement occasionnel des fonctions, la
commande ne fonctionne pas. A ce niveau, vous
devez débrancher la fiche et la remettre en place.
● Le système se trouve- t- il dans sa plage de
réception? Ou obstrué?
● Vérifiez la tension des piles à l'intérieur de la
télécommande sans fil, sinon, remplacez les piles.
● Vérifiez si la télécommande sans fil est
endommagée?
S'il y a fuite d'eau dans l'unité
extérieure.
Dépannage
Evénement Dépannage
FRANCAIS

- 7 -
Le climatiseur ne souffle pas.
● En mode chauffage, lorsque la température de
l'échangeur de chaleur de l'unité intérieure est
faible, celle-ci arrête le soufflage pour ne pas
souffler l'air frais (en 90 sec.).
● En mode chauffage, si la température extérieure
est faible alors que l'humidité est élevée, une
grande quantité de givre se forme au niveau de
l'échangeur de chaleur de l'unité extérieure, le
climatiseur se dégivre automatiquement, l'unité
intérieure arrête de souffler pendant 10 minutes
environ. Au cours du processus de dégivrage,
on observe la présence de l'eau ou l'émission
de la vapeur d'eau.
L’humidité se forme sur la grille d’entrée.
● Si le climatiseur fonctionne dans une humidité
élevée pendant longtemps, cette humidité peut
se condenser et suinter au niveau de la grille
de sortie d'air.
Arrêtez immédiatement le système et débranchez-le de l’alimentation,
contactez le fournisseur dans les scénarios suivants:
▲ Il y a un bruit sourd pendant le fonctionnement
du système;
▲ IDe fortes odeurs se dégagent pendant que le
système est en marche;
▲ Il y a fuite d'eau dans la pièce;
▲ ILe commutateur d'air ou l'interrupteur de
sécurité tombe souvent en panne;
▲ Répandez l'eau ou quelque chose dans le
climatiseur.
Arrêtez le système et débranchez
la fiche.
Dépannage
Evénement Dépannage
La page est en cours de chargement...
La page est en cours de chargement...
La page est en cours de chargement...
La page est en cours de chargement...
La page est en cours de chargement...
La page est en cours de chargement...
La page est en cours de chargement...
La page est en cours de chargement...
La page est en cours de chargement...
La page est en cours de chargement...
La page est en cours de chargement...
La page est en cours de chargement...
La page est en cours de chargement...
La page est en cours de chargement...
La page est en cours de chargement...
La page est en cours de chargement...
La page est en cours de chargement...
La page est en cours de chargement...
La page est en cours de chargement...
La page est en cours de chargement...
La page est en cours de chargement...
La page est en cours de chargement...
La page est en cours de chargement...
La page est en cours de chargement...
La page est en cours de chargement...
La page est en cours de chargement...
La page est en cours de chargement...
La page est en cours de chargement...
-
 1
1
-
 2
2
-
 3
3
-
 4
4
-
 5
5
-
 6
6
-
 7
7
-
 8
8
-
 9
9
-
 10
10
-
 11
11
-
 12
12
-
 13
13
-
 14
14
-
 15
15
-
 16
16
-
 17
17
-
 18
18
-
 19
19
-
 20
20
-
 21
21
-
 22
22
-
 23
23
-
 24
24
-
 25
25
-
 26
26
-
 27
27
-
 28
28
-
 29
29
-
 30
30
-
 31
31
-
 32
32
-
 33
33
-
 34
34
-
 35
35
-
 36
36
-
 37
37
-
 38
38
-
 39
39
-
 40
40
-
 41
41
-
 42
42
-
 43
43
-
 44
44
-
 45
45
-
 46
46
-
 47
47
-
 48
48


Airwell SBF Le manuel du propriétaire
- Catégorie
- Climatiseurs split-system
- Taper
- Le manuel du propriétaire
dans d''autres langues
- italiano: Airwell SBF Manuale del proprietario
- English: Airwell SBF Owner's manual
- español: Airwell SBF El manual del propietario
Autres documents
-
LG P12EN.UA3 Le manuel du propriétaire
-
Tosot TPAC12S-H116A3 Manuel utilisateur
-
Polti CLIMATE FA 15 CS Le manuel du propriétaire
-
LG ARTCOOL (AM09BP) Le manuel du propriétaire
-
Friedrich MM18YJ Mode d'emploi
-
-
Haier AD24MS1ERAD Operating Manual And Instructions
-
-
-