Sony CMT-DX400 Mode d'emploi
- Catégorie
- Lecteurs DVD
- Taper
- Mode d'emploi

Operating Instructions
Mode d’emploi
GB
FR
©2010 S
ony Corporation
4-188-600-01 (1)
Micro HI-FI
Component
System
CMT-DX400

masterpage:Left
filename[D:\Candy.Hong\devia\DEVI(EA3..)4\3272961111CMTDF1SP2\01GB-
CMTDF1SP2\020REG.fm]
2
GB
model name [CMT-DF1]
[3-272-961-11(1)] GB
To reduce the risk of fire or electric shock, do not
expose this apparatus to dripping or splashing, and do
not place objects filled with liquids, such as vases, on
the apparatus,
To reduce the risk of fire or electric shock, do not
expose this apparatus to rain or moisture.
To reduce the risk of fire, do not cover the ventilation
opening of the apparatus with newspapers, tablecloths,
curtains, etc.
Do not place the naked flame sources such as lighted
candles on the apparatus.
As the main plug is used to disconnect the unit from the
mains, connect the unit to an easily accessible AC
outlet. Should you notice an abnormality in the unit,
disconnect the main plug from the AC outlet
immediately.
Do not install the appliance in a confined space, such
as a bookcase or built-in cabinet.
Do not expose batteries or apparatus with battery-
installed to excessive heat such as sunshine, fire or the
like.
The unit is not disconnected from the mains as long as
it is connected to the AC outlet, even if the unit itself
has been turned off.
CAUTION
The use of optical instruments with this product will
increase eye hazard.
This appliance is
classified as a CLASS 1
LASER product. This
marking is located on the
rear exterior.
WARNING
020REG.fm Page 2 Thursday, March 11, 2010 11:27 AM

masterpage:Right
filename[D:\Candy.Hong\devia\DEVI(EA3..)4\3272961111CMTDF1SP2\01GB-
CMTDF1SP2\010COVTOC.fm]
3
GB
model name [CMT-DF1]
[3-272-961-11(1)] GB
GB
How to use this manual...........................4
Playable discs.......................................... 4
Getting Started
Hooking up the system............................ 7
Selecting a language ...............................9
Disc – Basic Play
Loading a disc ....................................... 10
Playing a disc ........................................ 10
— Normal Play
Playing DVD using the menu ...............11
Playing VIDEO CD with PBC
functions (Ver. 2.0)......................... 12
— PBC Play
Playing MP3/JPEG/DivX
®
files ........... 12
Disc – Various Play
Playing repeatedly................................. 14
— Repeat Play
Using the on-screen display to
search ..............................................15
Disc – Various Functions
Changing the sound/subtitle/angle........ 16
Using the sleep time.............................. 17
Changing the language..........................17
— Language
Creating your own program ..................18
— Program Play
Using the setup display .........................18
— Setup Menu
System setup item list ........................... 20
Tuner
Presetting radio stations ........................ 21
Listening to the radio ............................ 21
Sound Adjustment
Adjusting the sound ..............................22
Selecting a preset sound effect..............22
Singing along ........................................22
External Device
Playing from USB device .................... 23
Audio input .......................................... 24
Display
Viewing information about the disc
in the on-screen display.................. 25
Changing the brightness of the front
panel display................................... 25
Controlling the TV with the remote ..... 25
Troubleshooting
Problems and remedies......................... 26
Messages............................................... 29
Additional Information
Precautions............................................ 30
Specifications........................................ 31
Glossary ................................................ 33
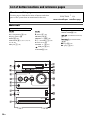
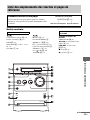
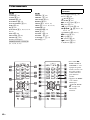
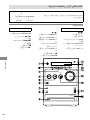
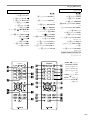
List of button locations and
reference pages ............................... 36
Table of Contents
010COVTOC.fm Page 3 Thursday, March 18, 2010 4:57 PM

masterpage:Left
filename[D:\Candy.Hong\devia\DEVI(CEL.)\3272961111CMTDF1SP2\01GB-
CMTDF1SP2\030PRE.fm]
4
GB
model name [CMT-DF1]
[3-272-961-11(1)] GB
• This manual mainly explains operations using
the remote, but the same operations can also
be performed using the buttons on the unit
having the same or similar names.
• The OSD (on-screen display) may vary
depending on the country model.
• The description in this manual might be
different from the OSD (on-screen display)
because of the display restriction.
• The English OSD screen (on-screen display)
is used for illustration purposes only.
• “DVD” may be used as a general term for
DVD VIDEO, DVD+RW/DVD+R and
DVD-RW/DVD-R.
• The following symbols are used in this
manual.
*MP3 (MPEG1 Audio Layer 3) is a standard format
defined by ISO/MPEG which compresses audio
data.
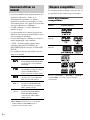
You can play back the following discs on this
system. Other discs cannot be played back.
List of playable discs
“DVD+RW,” ”DVD-RW,” ”DVD + R,” “DVD
VIDEO,” and the “CD” logos are trademarks.
How to use this manual
Symbol Meaning
Functions available for DVD
VIDEO, DVD-R/DVD-RW in
video mode, and DVD+R/
DVD+RW
Functions available for VIDEO
CD (including Super VCDs or
CD-R/CD-RWs in video CD
format or Super VCD format)
Functions available for music CD
or CD-R/CD-RW in music CD
format
Functions available for DATA
CD (CD-ROM/CD-R/CD-RW
containing MP3* files, JPEG files
and DivX files)
Functions available for DATA
DVD (DVD-R/DVD-RW/
DVD+R/DVD+RW) containing
MP3* files, JEPG files and DivX
files
Playable discs
Format of discs Disc logo
DVD VIDEO
DVD-RW/
DVD-R
DVD+RW/
DVD+R
VIDEO CD
CD-R/CD-RW
030PRE.fm Page 4 Monday, March 8, 2010 3:18 PM

masterpage:Right
filename[D:\Candy.Hong\devia\DEVI(CEL.)\3272961111CMTDF1SP2\01GB-
CMTDF1SP2\030PRE.fm]
5
GB
model name [CMT-DF1]
[3-272-961-11(1)] GB
Region code of DVD you can
play on this system
Your system has a region code printed on the
back of the unit and will only play DVD labeled
with identical region code.
DVD labeled will also be played on this
system.
If you try to play any other DVD, the message
“Wrong Region” will appear on the TV screen.
Depending on the DVD, no region code
indication may be labeled even though playing
the DVD is prohibited by area restrictions.
Discs that this system cannot
play
• CD-ROM (except for extension “.MP3”,
“.JPG” or “.JPEG”)
• CD-R/CD-RW other than those recorded in
the following formats:
– music CD format
– video CD format
– MP3 (MPEG1 Audio Layer-3)/JPEG/DivX
format that conforms to ISO9660*
Level 1/
Level 2 or Joliet
• CD-ROM recorded in PHOTO CD format.
• Data part of CD-Extras
• Super Audio CD
• DVD-ROM/DVD-R/DVD-RW/DVD+R/
DVD+RW recorded in Multi Session
•DVD-RAM
• DVD Audio discs
• A DVD with a different region code.
• DVD+R DL (Double layer) discs
• Discs with non-standard shapes (e.g., heart,
square, star) cannot be played on this unit.
Attempting to do so may damage the unit. Do
not use such discs.
• A disc with paper or stickers on it.
• A disc that has the adhesive, cellophane tape,
or a sticker still left on it.
* A logical format of files and folders on a CD-ROM,
defined by ISO (International Organization for
standardization).
Notes about CD-R/CD-RW/
DVD-R/DVD-RW (Video mode)/
DVD+R/DVD+RW
• In some cases, CD-R, CD-RW, DVD-R,
DVD-RW (Video mode) (DVD-RW created
in video mode have the same format as a
DVD VIDEO), DVD+R or DVD+RW cannot
be played on this system depending upon the
recording quality or physical condition of the
disc, or the characteristics of the recording
device. Furthermore, the disc will not play if
it has not been correctly finalized. For more
information, see the operating instructions for
the recording device. Note that some
playback functions may not work with some
DVD+RW/DVD+R, even if they have been
correctly finalized.
• A disc recorded in packet write format cannot
be played.
Note on playback operations
of DVDs and VIDEO CDs
Some playback operations of DVD and VIDEO
CD may be intentionally set by software
producers. Since this system plays DVD and
VIDEO CD according to the disc contents the
software producers designed, some playback
features may not be available. Also, refer to the
instructions supplied with the DVD or VIDEO
CD.
Music discs encoded with
copyright protection
technologies
This product is designed to playback discs that
conform to the Compact Disc (CD) standard.
And various music discs encoded with copyright
protection technologies are marketed by some
record companies. Please be aware that among
those discs, there are some that do not conform
to the CD standard and may not be playable by
this product.
ALL
continued
030PRE.fm Page 5 Wednesday, January 27, 2010 2:36 PM

masterpage:Left
filename[D:\Candy.Hong\devia\DEVI(CEL.)\3272961111CMTDF1SP2\01GB-
CMTDF1SP2\030PRE.fm]
6
GB
model name [CMT-DF1]
[3-272-961-11(1)] GB
Note on DualDiscs
A DualDisc is a two sided disc product which
mates DVD recorded material on one side with
digital audio material on the other side.
However, since the audio material side does not
conform to the Compact Disc (CD) standard,
playback on this product is not guaranteed.
Cautions when playing a disc
that is recorded in Multi
Session
• This system can play Multi Session CD when
an MP3 file (JPEG file) is contained in the
first session. Any subsequent MP3 files
(JPEG files) recorded in later sessions can
also be played back.
• If audio tracks and images in music CD
format or video CD format are recorded in the
first session, only the first session will be
played back.
• When playing a disc which contains audio
tracks in music CD format, MP3 files and
JPEG files, only the audio tracks in music CD
format can be played back.
• CD-R and CD-RW discs recorded in multi-
session that have not ended by “closing the
session” are not supported.
Copyrights
This product incorporates copyright protection
technology that is protected by U.S. patents and
other intellectual property rights. Use of this
copyright protection technology must be
authorized by Macrovision, and is intended for
home and other limited viewing uses only unless
otherwise authorized by Macrovision. Reverse
engineering or disassembly is prohibited.
• This system incorporates Dolby Digital.
• Manufactured under license from Dolby
Laboratories. Dolby and the double-D symbol are
trademarks of Dolby Laboratories.
• MPEG Layer-3 audio coding technology and patents
licensed from Fraunhofer IIS and Thomson.
•DivX
®
, DivX Certified
®
and associated logos are
registered trademarks of DivX, Inc. DivX grants
licensees the right to use the DivX trademark.
ABOUT DIVX VIDEO: DivX
®
is a digital video
format created by DivX, Inc. This is an official DivX
Certified device that plays DivX video. Visit
www.divx.com for more information and software
tools to convert your files into DivX video.
ABOUT DIVX VIDEO-ON-DEMAND: This DivX
Certified
®
device must be registered in order to play
DivX Video-on-Demand (VOD) content. To
generate the registration code, locate the DivX VOD
section in the device setup menu. Go to
vod.divx.com with this code to complete the
registration process and learn more about DivX
VOD.
• Windows Media is a registered trademark of
Microsoft Corporation in the United States and/or
other countries.
• THIS PRODUCT IS LICENSED UNDER THE
MPEG-4 VISUAL PATENT PORTFOLIO
LICENSE FOR THE PERSONAL AND NON-
COMMERCIAL USE OF A CONSUMER FOR
(i) ENCODING VIDEO IN COMPLIANCE WITH
THE MPEG-4 VISUAL STANDARD (“MPEG-4
VIDEO”)
AND/OR
(ii) DECODING MPEG-4 VIDEO THAT WAS
ENCODED BY A CONSUMER ENGAGED IN A
PERSONAL AND NON-COMMERCIAL
ACTIVITY AND/OR WAS OBTAINED FROM A
VIDEO PROVIDER LICENSED BY MPEG LA TO
PROVIDE MPEG-4 VIDEO.
NO LICENSE IS GRANTED OR SHALL BE
IMPLIED FOR ANY OTHER USE. ADDITIONAL
INFORMATION INCLUDING THAT RELATING
TO PROMOTIONAL, INTERNAL AND
COMMERCIAL USES AND LICENSING MAY
BE OBTAINED FROM MPEG LA, LLC.
SEE http://www.mpegla.com/
030PRE.fm Page 6 Monday, March 1, 2010 11:52 AM

Getting Started
masterpage:Right
filename[D:\Candy.Hong\devia\DEVI(AU.)4\3272961111CMTDF1SP2\01GB-
CMTDF1SP2\040CON.fm]
7
GB
model name [CMT-DF1]
[3-272-961-11(1)] GB
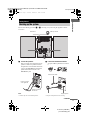
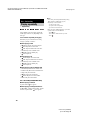
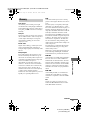
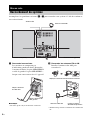
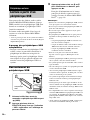
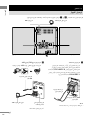
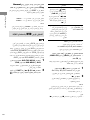
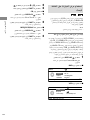
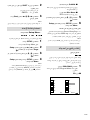
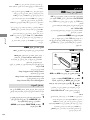
Perform the following procedures 1 to 7 to hook up your system using the supplied cords and
accessories.
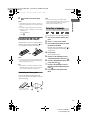
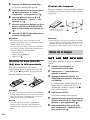
1 Connect the speakers.
There is no right or left designation for the
speakers. Connect the speaker located on
the right side as viewed from the front of the
system to the SPEAKERS R jack, and the
speaker located on the left side to the
SPEAKERS L jack.
Note
• Connect only one set of attached speakers.
2 Connect the FM and AM antennas.
Set up the AM loop antenna, then connect
it.
Getting Started
Hooking up the system
FM antenna AM loop antenna
Front speaker (Right) Front speaker (Left)
From the speaker
on the right side
From the speaker on
the left side
Extend the FM lead
antenna horizontally
AM loop antenna
Insert only the
stripped portion*
* Strip off an end-portion of wire covering.
ANTENNA
continued
040CON.fm Page 7 Tuesday, February 2, 2010 4:12 PM

masterpage:Left
filename[D:\Candy.Hong\devia\DEVI(EA3..)4\3272961111CMTDF1SP2\01GB-
CMTDF1SP2\040CON.fm]
8
GB
model name [CMT-DF1]
[3-272-961-11(1)] GB
Note
• Keep the antennas away from the speaker cords.
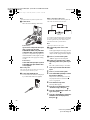
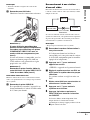
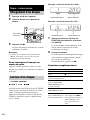
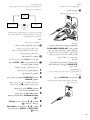
3 Connect a TV.
Select one of the following connections.
Connection A
If your TV has component video input
jacks, connect your TV to the
COMPONENT VIDEO OUT jacks with a
component video cord (not supplied).
If your TV is compatible with progressive
format file (480P or 576P) signals, use this
connection and set the progressive setting
to “ON”.
Connection B
Connect the video input jack of your TV
to the VIDEO OUT jack with the video
cord (supplied).
When using a TV
Turn on the TV and select the video input so that you
can view the pictures from this system.
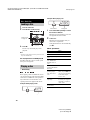
4 Connect the AUDIO IN jack.
You can connect the unit to a media player
by a 3.5mm audio cable (not supplied).
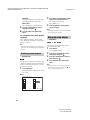
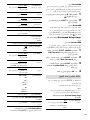
When connecting a video deck
Connect the TV and the video deck using video and
audio cords (not supplied) as shown below.
If you connect a video deck between this system and the
TV, you may experience video leakage when watching
the video signal from this system. Do not connect a
video deck between this system and the TV.
Note
• Do not place the TV on this system.
5 Connect the power cord to a wall
outlet.
If the supplied adapter on the plug does not
fit your wall outlet, detach it from the plug
(only for models equipped with an adapter).
6 Press ?/1 to turn on the system.
“HELLO” appears on the front panel.
7 Set the color system to PAL or NTSC
depending on the color system of your
TV.
The color system in factory is set to PAL.
1 Turn on your TV and select the video
input.
2 Press ?/1 to turn on the system.
3 Press FUNCTION repeatedly to switch
the function to DVD/CD.
Playback starts automatically if a disc with
auto playback function is loaded. Press x
twice to stop playback.
4 Press SETUP in stop mode.
The S
etup Menu appears.
5 Press < or , repeatedly to select
“Preference Page”, then press .
6 Press M or m repeatedly to select “TV
Type”, then press .
7 Press M or m repeatedly to select PAL/
Multi/NTSC from the displayed list,
then press .
A
B
TV
Video deck System
Do not connect
directly.
040CON.fm Page 8 Thursday, March 11, 2010 11:29 AM

Getting Started
masterpage:Right
filename[D:\Candy.Hong\devia\DEVI(EA3..)4\3272961111CMTDF1SP2\01GB-
CMTDF1SP2\040CON.fm]
9
GB
model name [CMT-DF1]
[3-272-961-11(1)] GB
8 Press SETUP to turn off the Setup
Menu.
Notes
• A disturbance on the TV screen may be present for a
moment after changing the color system as described
above.
• If you find the picture image may be distorted, you
can operate as below to default color system setting:
– Open the tray.
–Press DISPLAY.
–Press .
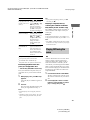
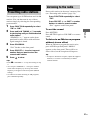
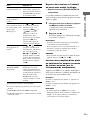
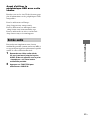
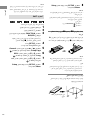
Inserting two R6 (size AA)
batteries into the remote
Slide and remove the battery compartment lid,
and insert the two R6 (size AA) batteries, E side
first, matching the polarities shown below.
Note
• If you do not use the remote for a long period of time,
remove the batteries to avoid possible damage from
battery leakage and corrosion.
Tip
• With normal use, the batteries should last for about
six months. When the remote no longer operates the
system, replace both batteries with new ones.
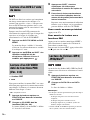
Attaching the foot pads
To attach the supplied speaker pads at each
corner on the bottom of the speakers to prevent
them from slipping.
Note
• Use caution when placing the speakers and/or
speaker stands attached to the speakers on a specially
treated (waxed, oiled, polished, etc.) floor, as
staining or discoloration may result.
You can change the on-screen display language.
1 Turn on your TV and select the video
input.
2 Press ?/1 to turn on the system.
3 Press FUNCTION repeatedly to switch
the function to DVD/CD.
Playback starts automatically if a disc with
auto playback function is loaded. Press x to
stop playback.
4 Press SETUP.
The Setup Menu appears.
5 Press < or , repeatedly to select
“General Setup Page”, then press .
6 Press M or m repeatedly to select “OSD
Lang”, then press .
7 Press M or m repeatedly to select a
language from the displayed list, then
press .
8 Press SETUP to turn off the Setup
Menu.
Remove the foot pads
from the protective cover.
Selecting a language
040CON.fm Page 9 Thursday, January 21, 2010 1:38 PM

masterpage:Left
filename[D:\Candy.Hong\devia\DEVI(EA3..)4\3272961111CMTDF1SP2\01GB-
CMTDF1SP2\050CDP.fm]
10
GB
model name [CMT-DF1]
[3-272-961-11(1)] GB
1 Press Z on the unit.
2 Place the disc on the disc tray.
3 Press N.
The disc tray closed. The player starts
playback.
Note
• Do not use a disc with tape, seals or paste on it as this
may cause malfunction.
To save power in standby mode
Press "/1 while the system is on. The system
enters power saving mode.
Before playing a DVD or VIDEO CD, turn on
your TV and select the video input. Depending
on the DVD or VIDEO CD, some operations
may be different or restricted. Refer to the
operating instructions supplied with the disc.
Example: When playing a DVD
Example: When playing a CD
1 Press FUNCTION repeatedly to switch
the function to DVD/CD.
Playback starts automatically if a disc with
auto playback function is loaded.
2 Load a disc.
Playback starts automatically when you
close the disc compartment.
If the playback does not start automatically,
press N.
Other operations
Disc – Basic Play
Loading a disc
Playing a disc
—Normal Play
Playback side
facing down.
Playing time
Chapter number
To Press
Stop x
Pause X
Resume play after stop/
pause
N/X
Go to the next chapter,
track, MP3/WMA/
JPEG/DivX files or
scene
>
Go back to the
preceding MP3/WMA/
JPEG files
.
Go back to the
preceding chapter,
track, DivX files or
scene
. twice.
When you press . once,
you can go to the beginning
of the current chapter,
track, or scene.
Turn off the sound
temporarily
MUTING.
To cancel, press it again or
VOLUME + to adjust the
sound volume.
Stop play and remove
the desired disc
Z
Playing timeTrack number

Disc – Basic Play
masterpage:Right
filename[D:\Candy.Hong\devia\DEVI(EA3..)4\3272961111CMTDF1SP2\01GB-
CMTDF1SP2\050CDP.fm]
11
GB
model name [CMT-DF1]
[3-272-961-11(1)] GB
1)
Except for JPEG image files.
2)
Scan speeds may differ with some discs.
3)
DVD VIDEO, DivX, VIDEO CD only.
4)
Only DVD Video: the operation of Slow Reverse.
Resuming playback from the
point you stopped the disc
— Resume Play (DVD/VIDEO CD/CD only)
This system memorizes the point where you
stopped the disc so you can resume from that
point.
1 While playing a disc, press x to stop
playback.
“Press Play Key To Continue” appears on
the TV.
2 Press N.
The system starts playback from the point
where you stopped the disc in Step 1.
Notes
• Resume Play may not work properly with some
discs.
• Depending on where you stop the disc, the system
may not resume playback from exactly the same
point.
TIP
• To play from the beginning of the disc, press x
twice, then press
N.
Playing a chapter/track by
entering the number in Normal
Play mode (on the remote only)
Press SHIFT + number buttons with 2 digits to
enter the number of the chapter or track you
want to play.
Example:
To play chapter/track number 5, press SHIFT + 0 + 5.
To play chapter/track number 30, press SHIFT + 3 + 0.
Note
• Press SHIFT + number buttons with 2 digits to enter
the number of the chapter or track may not properly
work with some discs.
A DVD is divided into a lot of sections, which
make up a picture or music feature. These
sections are called “titles.” When you play a
DVD which contains several titles, you can
select the title you want using DVD
TOP MENU.
When you play a DVD that allow you to select
items such as the language for the subtitles and
the language for the sound, select these items
using DVD MENU.
1 Press DVD TOP MENU or DVD MENU.
The disc’s menu appears on the TV screen.
The contents of the menu vary from disc to
disc.
2 Press </M/m/, or SHIFT + number
buttons to select the item you want to
play or change, then press .
Locate a point quickly
by playing a disc in fast
forward or fast reverse
(Scan)
1)2)
M/ or /m while
playing a disc. Each time
you press M/ or /
m during scan, the
playback speed changes.
To return to normal speed,
press N. Actual speeds
may differ with some discs.
Watch frame by frame
(Slow-motion Play)
3)
M/ or /m
4)
while the system is in pause
mode. Each time you press
M/ or /m
4)
during Slow-motion Play,
the playback speed
changes. To return to
normal playback speed,
press N.
Enlarge the pictures
(DVD/VIDEO CD
only)
Press ZOOM. Each time
you press the button, the
zoom scale changes. To
return to the normal size,
press ZOOM repeatedly
until the scale returns to the
normal size.
To Press
Playing DVD using the
menu

masterpage:Left
filename[D:\Candy.Hong\devia\DEVI(EA3..)4\3272961111CMTDF1SP2\01GB-
CMTDF1SP2\050CDP.fm]
12
GB
model name [CMT-DF1]
[3-272-961-11(1)] GB
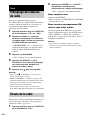
You can use PBC* menus on your TV screen to
enjoy the disc’s interactive software. The menu
format and structure may differ depending on
each disc.
* PBC: Playback Control
1 Press FUNCTION repeatedly to switch
the function to DVD/CD.
2 Load a VIDEO CD with PBC functions
(Ver. 2.0).
Playback starts and the PBC menu appears
on the TV screen.
3 Press SHIFT + number buttons with 2
digits to select the item number you
want.
4 Continue playback according to the
instructions on the menus to enjoy
interactive playback.
Refer to the operating instructions supplied
with the disc, as the operating procedure
may differ according to the VIDEO CD.
To go back to a previous menu
Press O.
To cancel playback with PBC
functions
Press SHIFT + number buttons to select the item
number you want in stop mode.
To return to PBC playback, press
x twice, then
press
N.
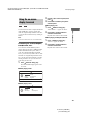
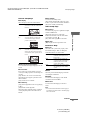
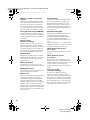
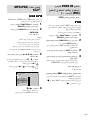
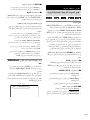
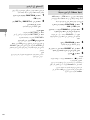
Before playing MP3 files, JPEG files or DivX
files, turn on your TV and select the video input.
1 Press FUNCTION repeatedly to switch
the function to DVD/CD.
2 Load a DATA CD or DATA DVD.
The file list appears.
Notes
• The following discs take a longer time to start
playback.
– a disc recorded with complicated tree structure.
– a disc recorded in Multi Session.
– a disc to which data can be added (non-finalized
disc).
• Some CD-R or CD-RW cannot be played on this
system depending on file format.
3 Press </M/m/, repeatedly to select
the file you want to play.
Press M or m repeatedly to browse up and
down through the contents in the folder.
Select a folder and press or
, to go
inside the folder.
Select and press or
< to return
to the parent folder.
4 Press N/ .
Playback starts from the selected file.
If you selected a JPEG file, the slide show
starts.
Playing VIDEO CD with
PBC functions (Ver. 2.0)
—PBC Play
Playing MP3/JPEG/DivX
®
files
\mp3\
MP3
Abcdefghijklmn 01
MP3
MP3
MP3
Abcdefghijklmn 02
Abcdefghijklmn 03
Abcdefghijklmn 04
..
x
001/015 Folder
MP3
Abcdefghijklmn 05
..

Disc – Basic Play
masterpage:Right
filename[D:\Candy.Hong\devia\DEVI(EA3..)4\3272961111CMTDF1SP2\01GB-
CMTDF1SP2\050CDP.fm]
13
GB
model name [CMT-DF1]
[3-272-961-11(1)] GB
Other operations
Notes on files
• The system include albums that do not contain audio
files and JPEG image files. When more than 648 files
(including folders) + 2 default folders (‘.’ and ‘..’),
300 folders Max (including ‘.’ and ‘..’) are in the
USB device, folders that are recognized by the
system differ depending on the folder configuration.
• The system can play back the following files.
The system will play back any data with the
extension above, even if it is not MP3/WMA/JPEG
format. Playing this data may generate a loud noise
which could damage your speaker system. The
system can play back to a depth of 25 folders only.
Notes on MP3/JPEG files
• The system supports MP3 files recorded with a bit
rate of 32 to 320 kbps and a sampling frequency of
32/44.1/48 kHz for MPEG1 Audio Layer-3.
• If you put the extension “. MP3” to data not in MP3
format, the system cannot recognize the data
properly and will generate a loud noise which could
damage your speaker system.
Notes on DivX files
• The system may not play a DivX file when the file has
been combined from two or more DivX files.
• The system cannot play a DivX file of size more than
640 (width) × 480 (height).
• Depending on the DivX file, the picture may be
unclear or the sound may skip.
• The system cannot play some DivX files that are
longer than 3 hours.
• Depending on the DivX file, the picture may pause or
be unclear. In which case, it is recommended that you
create the file at a lower bit rate. If the sound is still
noisy, MP3 is the recommended audio format. Note,
however, this system does not conform to WMA
(Windows Media Audio) format.
• Because of the compression technology used for
DivX files, it may take some time after you press N
for the picture to appear.
• Depending on the DivX file, the sound may not match
the pictures on the screen.
• The playback order may differ depending on the
software used for creating the DivX file.
To Do this
Stop play Press x when playing an MP3 file or
DivX file.
Press DVD MENU when playing a
JPEG file.
Pause Press X.
Press N/X to resume play.
Digest Press x when playing a JPEG file.
File Extension of the file
MP3 file “.mp3”
WMA file “.wma”
JPEG image file “.jpg” or “.jpeg”
MPEG “.MPG”
DivX “.DivX” or “.AVI”

masterpage:Left
filename[D:\Candy.Hong\devia\DEVI(AU.)4\3272961111CMTDF1SP2\01GB-
CMTDF1SP2\050CDP.fm]
14
GB
model name [CMT-DF1]
[3-272-961-11(1)] GB
The available of the repeat play options and
shuffle play mode are vary depending on the
disc type.
Press REPEAT repeatedly during play.
Each time you press the button, the setting
changes cyclically as follows:
x When playing a DVD
• Chapter: Repeats the current chapter.
• Title: Repeats the current title.
• ALL: Repeats all the titles on the disc.
• Shuffle: Play a disc in shuffle order.
• Shuffle: Repeats shuffle play.
• Off: Repeats off.
x When playing a CD
• Track: Repeats the current track.
• ALL: Repeats all the tracks on the disc.
• Shuffle: Play a disc in shuffle order.
• Shuffle: Repeats shuffle play.
• Off: Repeats off.
x When playing a DATA CD/DATA DVD
• Shuffle: Play all the files in shuffle order.
• Random: Play all the files in random order.
• Single: Play the current file.
• One: Repeats the current file.
• Folder: Repeats the current folder.
• Folder: Play the current folder.
To cancel Repeat/Shuffle Play
x When playing a DVD/CD
It pushes until “ Off” appears.
x When playing an MP3/JPEG/DivX file
In MP3/JPEG, it pushes until “Folder” appears.
In DivX, it pushes until “ Off” appears.
Notes
• You cannot perform Repeat/Shuffle Play during
PBC playback of VIDEO CD (page 12).
• Repeat Play is canceled when:
– you turn off the system.
– you open the disc compartment.
– you switch to other functions.
• When playing the VIDEO CD/SVCD, you need to
operate as below to default PBC Off:
–Press x twice.
– Press SHIFT + number buttons you want.
–Press .
Disc – Various Play
Playing repeatedly
— Repeat Play

Disc – Various Play
masterpage:Right
filename[D:\Candy.Hong\devia\DEVI(EA3..)4\3272961111CMTDF1SP2\01GB-
CMTDF1SP2\050CDP.fm]
15
GB
model name [CMT-DF1]
[3-272-961-11(1)] GB
You can search for a title or chapter (DVD) and
track (VIDEO CD). As titles, chapters and
tracks are assigned unique numbers on the disc,
so you can select the desired one by entering its
number.
Note
• The search function does not work in Shuffle Play.
Searching for a title/chapter/
track/scene, etc.
You can search a DVD VIDEO by title or
chapter, and you can search a VIDEO CD/CD/
DATA CD/DATA DVD by track, index, or
scene. For a DATA CD/DATA DVD/USB
device, you can search by folder or file. As titles
and tracks are assigned unique numbers on the
disc, you can select the desired title or track by
entering its number. Or, you can search for a
scene using the time code.
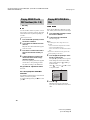
1 Press DISPLAY during play.
The Control Menu display appears on the
TV screen.
x When playing a DVD.
x When playing a VCD.
2 Press M or m to select an option, then
press
.
3 Press SHIFT +number to jump to the
selected option.
x When playing a CD
1 Press DISPLAY during play.
“Select Track:--/--” appears on the TV.
2 Press SHIFT + number buttons to
select the desired track.
Playback starts from the selected track.
x When playing an MP3/JPEG/DivX file
1 Press DISPLAY during play.
“Select:---” appears on the TV.
2 Press SHIFT + number buttons to
select the desired track.
Playback starts from the selected track.
Using the on-screen
display to search
Audio
Subtitle
01/01
03/13
2CH English
English
Menu
Title Elapsed 0:08:54
B
Title
Chapter
06/14
O
Menu
Total Elapsed 0:21:24
B
Track
Time Disp.
Total Elapsed
Repeat

masterpage:Left
filename[D:\Candy.Hong\devia\DEVI(EA3..)4\3272961111CMTDF1SP2\01GB-
CMTDF1SP2\050CDP.fm]
16
GB
model name [CMT-DF1]
[3-272-961-11(1)] GB
Changing the sound
When playing a DVD or DATA CD/DATA
DVD (DivX files) recorded in multiple audio
formats (PCM, Dolby Digital, MPEG audio),
you can change the audio format. If the DVD is
recorded with multilingual tracks, you can also
change the language.
With VIDEO CD or CD, you can select the
sound from the right or left channel and listen to
the sound of the selected channel through both
the right and left speakers. For example, when
playing a disc containing a song with the vocals
on the right channel and the instruments on the
left channel, you can hear the instruments from
both speakers by selecting the left channel.
Press AUDIO repeatedly during play.
Each time you press the button, the setting
changes cyclically as follows:
x When playing a DVD
Depending on the DVD, the choice of the
language and audio format varies.
When the same language is displayed twice or
more times, the DVD is recorded in multiple
audio formats.
x When playing a VIDEO CD/CD
• Mono Left: The sound of the left channel
(monaural).
• Mono Right: The sound of the right channel
(monaural).
• Stereo: The standard stereo sound.
x SVCD (only audio track 1)
• [Stereo]: The standard stereo sound.
• [Mono Left]: The sound of the left channel
(monaural).
• [Mono Right]: The sound of the right channel
(monaural).
x SVCD (audio track 1-2)
• [Audio 1]: The stereo sound of audio track 1.
• [Audio 2]: The stereo sound of audio track 2.
x When playing a DivX file
The choice of DATA CD or DATA DVD audio
signal formats differ, depending on the DivX file
contained on the disc. The format is shown in the
TV screen.
To preset the desired audio track
You can preset the system to the desired audio
track with the operations described under
“Changing the language”(page 17).
Notes
• When you play a DVD with the audio other than
2 channels, the sound is composed into 2 channels
and output from the system speakers. However,
sound is not output in “Multi Channel PCM” format.
• For discs not recorded in multiple audio format, you
cannot change the sound.
• Depending on the DVD, you may not be able to
change the sound even if the DVD is recorded in
multiple audio format.
• For VIDEO CD and CD, the setting returns to
“Stereo” when you turn off the system or open the
disc compartment.
• During DVD playback, the sound may change
automatically.
Displaying the audio
information of the disc (DVD/
DivX only)
When you press AUDIO repeatedly during play,
the audio signal format (PCM, Dolby Digital) is
displayed on the TV screen.
For example, in Dolby Digital format, multiple
signals ranging from monaural to 5.1 channel
signals can be recorded on a DVD. Depending
on the DVD, the number of recorded channels
may differ.
Disc – Various Functions
Changing the sound/
subtitle/angle
Audio 1/3: Dolby Digital English
Audio format

Disc – Various Functions
masterpage:Right
filename[D:\Candy.Hong\devia\DEVI(EA3..)4\3272961111CMTDF1SP2\01GB-
CMTDF1SP2\050CDP.fm]
17
GB
model name [CMT-DF1]
[3-272-961-11(1)] GB
Displaying the subtitles (DVD/
DivX only)
With DVD/DivX disc on which multilingual
subtitles are recorded, you can change the
subtitle language while playing the DVD/DivX,
or turn the subtitles on or off whenever you
want.
Press SUBTITLE repeatedly during play.
Each time you press the button, the language
changes.
To cancel the subtitle setting
Press SUBTITLE repeatedly to select “Subtitle
Off.”
Notes
• Depending on the DVD/DivX, you may not be able
to change the subtitles even if multilingual subtitles
are recorded on the DVD/DivX.
• For the languages are not supported in this model,
LANG will be displayed “OTHERS”.
Changing the angles (DVD
only)
When playing a DVD on which various angles
(multi-angles) for a scene are recorded, you can
change the viewing angle.
Press ANGLE repeatedly during play.
Each time you press the button, the angle
changes.
Notes
• Depending on the DVD, you may not be able to
change the angles even if multi-angles are recorded
on the DVD.
• If there is only one angle, then pressing of angle key,
INVALID sign “ ” appears on the TV.
You can set the system to turn off at a preset
time, so you can fall asleep listening to music.
You can preset the time in 10 minutes
decrements.
Press SLEEP.
Each time you press this button, the minute
display (the remaining time) changes in the front
panel display as follows:
There is a countdown of 20 seconds on the front
panel display.
To check the remaining time
Hold SLEEP 3 seconds, you can view the
remaining time on the front panel.
To change the remaining time
Press SLEEP repeatedly to select the desired
time.
To cancel the sleep time function
Press SLEEP repeatedly until “OFF” appears on
the front panel display.
.
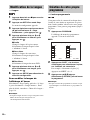
1 Press x twice to cancel Resume Play.
2 Press SETUP in stop mode.
The Setup Menu appears.
3 Press < or , repeatedly to select
“Preference Page”, then press .
4 Press M or m repeatedly to select an
item, then press .
x Audio
Switches the language of the sound track.
Select the language from the displayed list.
Using the sleep time
Changing the language
—Language
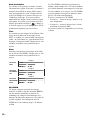
SLEEP 10 t SLEEP 20 t SLEEP 30
R r
OFF T SLEEP 90 ............... SLEEP 40
continued

masterpage:Left
filename[D:\Candy.Hong\devia\DEVI(EA3..)4\3272961111CMTDF1SP2\01GB-
CMTDF1SP2\050CDP.fm]
18
GB
model name [CMT-DF1]
[3-272-961-11(1)] GB
x Subtitle
Switches the language of the subtitle. Select
the language from the displayed list.
x Disc Menu
Select the language for the DVD menu.
5 Press M or m repeatedly to select a
language, then press .
6 Press SETUP to turn off the Setup
Menu.
To change the on-screen display
language
Select “General Setup Page” in step 3, then
select “OSD Lang”. For details, see “Selecting a
language” (page 9).
Note
• When the selected language is not recorded on the
DVD, one of the recorded languages is automatically
selected.
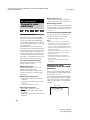
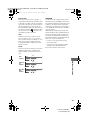
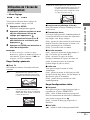
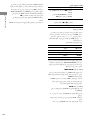
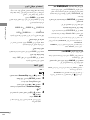
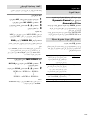
You can play the contents of a disc in the order
you want by arranging the order of the tracks on
the disc to create your own program. You can
program up to 20 tracks.
1 Press PROGRAM.
The Program Menu display appears on the
TV screen.
x CD
2 Press SHIFT + number buttons with 2
digits to select the desired track.
For example, select track [2].
Press SHIFT + 0 + 2.
3 Press </M/m/, to select [Start] to
play the Program.
Note
• When the program play is stopped or selected Repeat
option, the program is canceled.
You can make various adjustments of items
such as picture and sound.
1 Press SETUP.
The Setup Menu appears.
2 Press < or , repeatedly to select
Setup Page, then press .
3 Press M or m repeatedly to select an
item, then press .
4 Press SETUP to turn off the Setup
Menu.
Note
• If you are not able to access the [Preference Page],
press SETUP to exit the menu. Then press x twice
before you press the SETUP again.
Creating your own program
— Program Play
1
2
3
4
5
6
7
8
9
1 0
Exit Start
NEXT
M[
Program:Track (01-13)
02
01
11
04
09
03
_ _
_ _
_ _
_ _
Using the setup display
— Setup Menu

Disc – Various Functions
masterpage:Right
filename[D:\Candy.Hong\devia\DEVI(EA3..)4\3272961111CMTDF1SP2\01GB-
CMTDF1SP2\050CDP.fm]
19
GB
model name [CMT-DF1]
[3-272-961-11(1)] GB
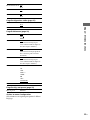
General Setup Page
x TV Display
Select the aspect ratio of the connected TV.
x OSD Lang (On-Screen Display)
You can switch the display language on the TV
screen.
x Screen Saver
The screen saver prevents damage to the TV
screen by avoiding exposure to a static image for
too long.
[On]: Switch to TV screen saver mode when
playback has been stopped or paused for more
than 15 minutes.
[Off]: Screen Saver is canceled.
x Last Memory
[On]: Resume playback last disc if stop playing
by [/1.
[Off]: Disable resume playback.
When the resume playback memory is full, the
resume playback point for the earliest disc is
deleted.
x Auto Standby
You can set the standby mode.
[On]: Standby automatically when stop, pause,
no disc or eject mode for more than 30 minutes.
[Off]: Don’t standby automatically.
Video Setup Page
x Progressive
You can set the progressive signal that is output
from the VIDEO OUT.
[On]: Turn on progressive scan mode.
Read the instructions on the TV and confirm
your action by pressing .
[Off]: Turn off the progressive scan mode.
x DivX VOD
[,]: Display the DivX registration code.
Preference Page
x TV Type
Select the color system when you play a disc.
The default setting is “PAL” for European
model and “NTSC” for other models.
x Audio
Select the preferred audio language for DVDs
with multiple sound tracks.
x Subtitle
You can switch the language of the subtitle
recorded on the DVD VIDEO.
x Disc Menu
You can switch the language for the disc’s
menu.
Note
• If the selected audio/subtitle/disc menu language is
not available on the DVD, the disc’s default language
will be used instead.
16:9 Select this when you connect a wide-
screen TV or a TV with a wide mode
function.
4:3 Letter
Box
Select this when you connect a 4:3
screen TV. Displays a wide picture
with bands on the upper and lower
portions of the TV screen.
4:3 Pan
Scan
.Select this when you connect a 4:3
screen TV. The system automatically
displays the wide picture on the entire
screen and cuts off the portions that do
not fit.
PAL Changes the video signal of an
NTSC disc and outputs it in the
PAL system.
Multi Outputs the video signal in the
system of the disc, either PAL or
NTSC. If your TV uses a dual
system, select “Multi.”
NTSC Changes the video signal of a PAL
disc and outputs it in the NTSC
system.
continued

masterpage:Left
filename[D:\Candy.Hong\devia\DEVI(EA3..)4\3272961111CMTDF1SP2\01GB-
CMTDF1SP2\050CDP.fm]
20
GB
model name [CMT-DF1]
[3-272-961-11(1)] GB
x Parental
This is to prohibit viewing of discs that had
exceeded the limits you set. It works only on the
DVDs with parental level assigned to the
complete disc or to certain scenes on the disc.
1 Press M or m repeatedly to select a
rating level from 1 to 8, then press .
2 Press SHIFT + the number buttons to
enter your 6-digit password.
x Default
This feature enables you to reset all the setup
menu option and your personal settings to the
factory defaults, except for [Password] and
[Parental] setting.
Press to confirm the default reset.
Password Setup Page
x Password
Follow the instructions on the TV to set or
change the password for locked discs and play
restricted DVDs.
1 Press “SHIFT +000000” or your last set
6-digit password at “Old Password”
section.
2 Press SHIFT + a new 6-digit password
at “New Password” section.
3 Press SHIFT + the new 6-digit
password again at “Confirm PWD”
section to confirm.
4 Select “OK” to exit the menu.
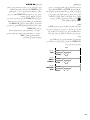
When you press SETUP in stop mode, the
following settings are displayed.
The default settings are underlined.
Note
• To select “Preference Page”, first cancel Resume
Play (page 11).
General Setup Page (page 19)
Video Setup Page (page 19)
Preference Page(page 19)
Password Setup Page (page 20)
Exit Setup Menu
Select to exit the Setup Menu.
System setup item list
TV Display 16:9
4:3 Letter Box
4:3 Pan Scan
OSD Lang ENG
(Select the language you want to
use from the displayed language
list.)
Screen Saver On
Off
Last Memory On
Off
Auto Standby On
Off
Progressive On
Off
DivX VOD ,
TV Type PAL
Multi
NTSC
Audio ENG
(Select the language you want to
use from the displayed language
list.)
Subtitle ENG
(Select the preferred subtitle
language for DVD playback.)
Disc Menu ENG
(Select the language you want to
use from the displayed language
list.)
Parental 1 KID SAF
2 G
3 PG
4 PG 13
5 PGR
6 R
7 NC 17
8 ADULT
Default Reset
Password Change
La page charge ...
La page charge ...
La page charge ...
La page charge ...
La page charge ...
La page charge ...
La page charge ...
La page charge ...
La page charge ...
La page charge ...
La page charge ...
La page charge ...
La page charge ...
La page charge ...
La page charge ...
La page charge ...
La page charge ...
La page charge ...
La page charge ...
La page charge ...
La page charge ...
La page charge ...
La page charge ...
La page charge ...
La page charge ...
La page charge ...
La page charge ...
La page charge ...
La page charge ...
La page charge ...
La page charge ...
La page charge ...
La page charge ...
La page charge ...
La page charge ...
La page charge ...
La page charge ...
La page charge ...
La page charge ...
La page charge ...
La page charge ...
La page charge ...
La page charge ...
La page charge ...
La page charge ...
La page charge ...
La page charge ...
La page charge ...
La page charge ...
La page charge ...
La page charge ...
La page charge ...
La page charge ...
La page charge ...
La page charge ...
La page charge ...
La page charge ...
La page charge ...
La page charge ...
La page charge ...
La page charge ...
La page charge ...
La page charge ...
La page charge ...
La page charge ...
La page charge ...
La page charge ...
La page charge ...
La page charge ...
La page charge ...
La page charge ...
La page charge ...
La page charge ...
La page charge ...
La page charge ...
La page charge ...
La page charge ...
La page charge ...
La page charge ...
La page charge ...
La page charge ...
La page charge ...
La page charge ...
La page charge ...
La page charge ...
La page charge ...
La page charge ...
La page charge ...
La page charge ...
La page charge ...
La page charge ...
La page charge ...
La page charge ...
La page charge ...
La page charge ...
La page charge ...
La page charge ...
La page charge ...
La page charge ...
La page charge ...
-
 1
1
-
 2
2
-
 3
3
-
 4
4
-
 5
5
-
 6
6
-
 7
7
-
 8
8
-
 9
9
-
 10
10
-
 11
11
-
 12
12
-
 13
13
-
 14
14
-
 15
15
-
 16
16
-
 17
17
-
 18
18
-
 19
19
-
 20
20
-
 21
21
-
 22
22
-
 23
23
-
 24
24
-
 25
25
-
 26
26
-
 27
27
-
 28
28
-
 29
29
-
 30
30
-
 31
31
-
 32
32
-
 33
33
-
 34
34
-
 35
35
-
 36
36
-
 37
37
-
 38
38
-
 39
39
-
 40
40
-
 41
41
-
 42
42
-
 43
43
-
 44
44
-
 45
45
-
 46
46
-
 47
47
-
 48
48
-
 49
49
-
 50
50
-
 51
51
-
 52
52
-
 53
53
-
 54
54
-
 55
55
-
 56
56
-
 57
57
-
 58
58
-
 59
59
-
 60
60
-
 61
61
-
 62
62
-
 63
63
-
 64
64
-
 65
65
-
 66
66
-
 67
67
-
 68
68
-
 69
69
-
 70
70
-
 71
71
-
 72
72
-
 73
73
-
 74
74
-
 75
75
-
 76
76
-
 77
77
-
 78
78
-
 79
79
-
 80
80
-
 81
81
-
 82
82
-
 83
83
-
 84
84
-
 85
85
-
 86
86
-
 87
87
-
 88
88
-
 89
89
-
 90
90
-
 91
91
-
 92
92
-
 93
93
-
 94
94
-
 95
95
-
 96
96
-
 97
97
-
 98
98
-
 99
99
-
 100
100
-
 101
101
-
 102
102
-
 103
103
-
 104
104
-
 105
105
-
 106
106
-
 107
107
-
 108
108
-
 109
109
-
 110
110
-
 111
111
-
 112
112
-
 113
113
-
 114
114
-
 115
115
-
 116
116
-
 117
117
-
 118
118
-
 119
119
-
 120
120


Sony CMT-DX400 Mode d'emploi
- Catégorie
- Lecteurs DVD
- Taper
- Mode d'emploi
dans d''autres langues
Documents connexes
Autres documents
-
Packard Bell 450 PRO Manuel utilisateur
-
JVC CA-EXD1 Manuel utilisateur
-
-
Yamaha DVD-S559 Le manuel du propriétaire
-
-
Yamaha DVD-S661 Le manuel du propriétaire
-
-
-
-