Sports Art Industrial Co., Ltd. TUV-CERT ISO 9001/9002/14000 Certied Quality Products 2013.01.15
ICARE E872MA
Elliptical Trainer Owner’s Manual

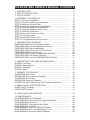
ICARE E872MA OWNER’S MANUAL CONTENTS
1. INTRODUCTION .............................................................................. 2
2. SAFETY PRECAUTIONS ................................................................ 3
3. LIST OF PARTS ............................................................................... 9
4. ASSEMBLE THE PRODUCT .......................................................... 12
STEP 1 Secure the Pedestal................................................................ 12
STEP 2 Install the Safety Key Mechanism........................................... 13
STEP 3 Install the Moving Parts .......................................................... 14
STEP 4 Install the Supports and Handlebars ...................................... 16
STEP 5 Install the Stationary Handlebars .......................................... 18
STEP 6 Install the Stoppers and Covers ............................................. 19
STEP 7 Install the Footplates .............................................................. 20
STEP 8 Move the Product into Place .................................................. 21
STEP 9 Level the Product .................................................................. 22
STEP 10 Install the Power Cord .......................................................... 23
STEP 11 Fuse Replacement Instructions ............................................ 24
5. PREPARE FOR A WORKOUT ........................................................ 25
PREPARATIONS Secure the Safety Straps ........................................ 25
PREPARATIONS Access Adjustment Controls ................................... 26
PREPARATIONS Adjust Handlebars .................................................. 27
PREPARATIONS Keep Clear of Moving Parts ................................... 28
PREPARATIONS Avoid Pinching ........................................................ 28
PREPARATIONS Prevent Unauthorized Operation ........................... 29
PREPARATIONS Use Safety Features .............................................. 30
PREPARATIONS Use the ICARE E872MA Checklist ........................ 31
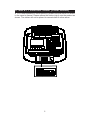
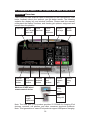
6. UNDERSTAND THE ICARE E872MA DISPLAY ............................. 32
DISPLAY Overview .............................................................................. 32
DISPLAY Specications ....................................................................... 33
DISPLAY Windows ............................................................................... 33
DISPLAY Keys ...................................................................................... 33
7. OPERATE THE PRODUCT ............................................................. 35
OPERATION Quick Start ..................................................................... 35
OPERATION Start a Workout Program ............................................... 35
OPERATION Cool Down ..................................................................... 36
OPERATION Workout Programs ......................................................... 37
OPERATION User Preferences and Component Versions................... 40
8. ABOUT HEART RATE DETECTION ................................................ 41
HEART RATE Telemetry ...................................................................... 41
HEART RATE Contact ......................................................................... 41
9. GUIDELINES FOR EXERCISE ....................................................... 42
10. MAINTENANCE ............................................................................. 43
MAINTENANCE Error Messages ........................................................ 43
MAINTENANCE Infrared Sensor Angle Adjustment ............................ 43
MAINTENANCE Lubrication ................................................................ 45
MAINTENANCE Cleaning the Glide Rails ........................................... 46
MAINTENANCE Schedule ................................................................... 47
MAINTENANCE Task List (Elliptical Trainers) ..................................... 48
MAINTENANCE One-Year Maintenance Log ...................................... 49
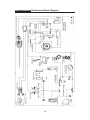
MAINTENANCE Electronics Block Diagram ........................................ 50

2
1. INTRODUCTION
Congratulations on your purchase of the SportsArt ICARE E872MA physical rehabil-
itation elliptical trainer. Made through a partnership between Madonna ICARE and
SportsArt Fitness, this product was built specically for physical rehabilitation.
Before this product is assembled or operated, we recommend that you famil-
iarize yourself with this manual. Understanding the correct methods of assembly
and operation will help ensure that exercisers obtain their goals safely and
successfully.

3
2. SAFETY PRECAUTIONS
Safety was an important consideration in the design of the SportsArt Fitness ICARE
E872MA elliptical trainer. However, during the use of this physical rehabilitation
elliptical trainer, you must pay careful attention to the safety.
● Please read the instruction manual before assembly and operation. Also, please
note the following safety precautions:
● For safety, operate this product only as instructed, and install only SportsArt parts
onto this product.
● Assemble and operate the elliptical trainer on a solid, level surface; DO NOT use
it outdoors or near water.
● Check the elliptical trainer before every use. Make sure all parts are assembled,
and all fasteners are tightened. DO NOT use the elliptical trainer if the unit is not fully
assembled.
● Wear proper workout clothing; DO NOT wear loose clothing. DO NOT wear
shoes with leather soles or high heels. Tie all long hair back. Do not go barefoot on
this product.
● Please keep away from moving parts. Do not place hands on any moving or
operating parts. The product may not stop immediately if foreign objects block
moving parts.
● Before turning off the power, please let this physical rehabilitation elliptical trainer
stop completedly. Do not unplug the power cord during operation.
● Do not rock this product. Please be careful in mounting and dismounting
the unit.
● If this product is damaged in any way, stop operating it. If this product has
any issue or is broken, notify the SportsArt service department.
● DO NOT use accessories or parts that are not specically recommended
by the manufacturer. Such parts might cause injuries or cause the unit to
fail.
● Never drop or insert any object into any opening of the product.
● Please operate this product in an area with good air circulation. Keep it
away from chemicals and ammable items. Keep it far from sprinklers and
damp areas.
● All users must be supervised at all times while using this product.
● Children should never be allowed to play on or near the product.
● Maximum user weight for this product is 205 kg, 450 lb.
● This product requires an adequate power outlet and power supply of
20A/110VAC (for 10A/220V). Do not use the power strip with multiple power
cords plugged in nor use an extension cord for this product. Keep the power
cord free from hot surfaces.

4
2. SAFETY PRECAUTIONS (CONTINUED)
● Inproper grounding presents a shock hazard. If you have any ques-
tions, have a qualied electrician inspect the power supply outlet for proper
grounding.
● Please do not attempt to modify the power cord. Adequate power supply
must be provided. If the plug does not match the outlet, have a qualied
electrician inspect and modify the power supply.
● Before using this product, secure the safety straps in place. Hold the
handles and stand erect.
● Use the safety key when operating this physical rehabilitation elliptical
trainer.
● After exercising, please pull the power cord from the power outlet. To
avoid the risk of electrical shock, remove the power cord from the power
outlet before cleaning or performing maintenance work.
Warning
● If you feel any pain or abnormal sensation, STOP YOUR WORKOUT
and consult your physician immediately. Work within your recommended
exercise level. DO NOT work to exhaustion. Before beginning any exercise
program, you should consult with your doctor. It is recommended that you
undergo a complete physical examination. DO NOT step onto the highest
footplate rst. While holding onto supports for stability, step onto the lowest
footplate.
● Only qualied technicians are permitted to contact electrical components,
for instance, circuit boards. This product can carry an electrical charge even
when the product is not in use and the power cord has been removed from
the power source. After turning off the product, wait for ve minutes before
disconnecting the power cord from the power outlet. Only after taking such
precautions should one remove the cover and contact components.
Note:
● Heart rate values are for reference only and may show some variations
or inaccuracies. Excessive exercise can cause serious injuries and even
death. If you feel uncomfortable or experience abnormal physical symp-
toms, please immediately stop exercising and consult a physician.
● This equipment has been tested and found to comply with the limits for
a Class B digital device, pursuant to part 15 of the FCC Rules. These limits
are designed to provide reasonable protection against harmful interference
in a residential installation. This equipment generates, uses and can radiate
radio frequency energy and, if not installed and used in accordance with
the instructions, may cause harmful interference to radio communications.
However, there is no guarantee that interference will not occur in a particu-
lar installation.

5
2. SAFETY PRECAUTIONS (CONTINUED)
● For French speakers in North America, please note that there is a sticker
in the owner’s manual. Please adhere the sticker (right) onto the product as
shown. The sticker will not be placed in manuals sent to other areas.

6
2. CONSIGNES DE SÉCURITÉ
La sécurité a été un facteur important dans la conception de la machine
elliptique SportsArt Fitness ICARE E872MA pour la réadaptation physique.
Toutefois, lors de l’utilisation de cette machine elliptique pour la réadapta-
tion physique, vous devez porter une attention particulière à la sécurité.
● Lisez le manuel d’instruction avant le montage et l’utilisation. Prenez note aussi
des précautions suivantes :
● Par mesure de sécurité, utilisez cet appareil uniquement selon les instructions, et
n’installez que des pièces détachées SportsArt sur ce produit.
● Assemblez et utilisez ce produit sur une surface solide et plane, ne l’utilisez
JAMAIS à l’extérieur ou à proximité de l’eau.
● Vériez la machine elliptique avant chaque utilisation. Assurez-vous que toutes les
pièces sont assemblées, et que toutes les xations sont bien serrées. N’UTILISEZ
PAS la machine elliptique si l’appareil est démonté de quelque façon.
● Portez des vêtements de séance d’entraînement. NE PORTEZ PAS de vêtements
amples. NE PORTEZ PAS de chaussures avec des semelles en cuir ou avec des
talons hauts. Attachez les cheveux longs. Ne marchez pas pieds nus sur ce produit.
● Tenez vous à l’écart des pièces en mouvement. Ne mettez jamais la main sur
les pièces en mouvement ou en fonctionnement. Le produit pourrait ne pas s’arrêter
immédiatement si un objet bloque des pièces en mouvement.
● Avant de mettre l’appareil hors tension, veuillez arrêter d’utiliser la ma-
chine elliptique. Ne tirez pas sur le cordon d’alimentation pendant le fonc-
tionnement de la machine.
● Ne vous basculez pas d’un côté à l’autre sur ce produit. Soyez prudent
lorsque vous montez et descendez de la machine.
● Si ce produit est endommagé de n’importe quelle façon, arrêtez de
l’utiliser. Si ce produit a un problème ou est en panne, contactez le service
après-vente de SportsArt.
● N’UTILISEZ PAS des accessoires qui ne sont pas spéciquement recom-
mandés par le fabricant. Ces pièces pourraient provoquer des blessures ou
endommager la machine.
● Ne laissez jamais tomber et n’introduisez jamais d’objet dans les ouver-
tures.
● Utilisez ce produit dans un endroit bien aéré. Tenez le à distance de
produits chimiques et de matières inammables. Gardez-le loin des extinc-
teurs automatiques et des zones humides.
● Les enfants, les patients, les personnes handicapées et les personnes
non familières avec ce produit doivent être supervisées.
● Les enfants doivent être surveillés par des adultes pour les empêcher de
jouer sur ou à proximité du produit.

7
2. CONSIGNES DE SÉCURITÉ (SUITE)
● Le poids maximum de l’utilisateur pour ce produit est de 205kg, 450lbs
● Ce produit nécessite une prise de courant adéquate et une alimentation
de 20A/110VAC (pour 10A/220V). N’utilisez pas le cordon d’alimentation
pour tirer ou déplacer ce produit. Gardez le cordon d’alimentation loin des
surfaces chaudes.
● Une prise de terre inadéquate peut causer un risque d’électrocution. Si
vous avez des questions, demandez à un électricien qualié d’inspecter la
prise de courant et la prise de terre.
● N’essayez pas de modier le cordon d’alimentation. Une alimentation
adéquate doit être fournie. Si la che ne correspond pas à la prise, deman-
dez à un électricien qualié d’inspecter et de réviser le cordon d’alimentation.
● Avant toute utilisation, attachez bien les sangles de sécurité. Tenez les
poignées et tenez-vous droit.
● Utilisez la clé de sécurité lorsque vous utilisez cette machine elliptique.
● Après l’exercice, débranchez la che d’alimentation de la prise de cou-
rant. Pour éviter tout risque de décharge électrique, débranchez le cordon
d’alimentation de la prise de courant avant de nettoyer ou d’effectuer des
travaux d’entretien sur la machine.
Avertissement
● Si vous ressentez une douleur ou une sensation anormale, ARRETEZ
VOTRE SEANCE D’ENTRAINEMENT et consultez votre médecin immé-
diatement. Travaillez au sein de votre niveau d’exercice recommandé. NE
TRAVAILLEZ PAS jusqu’à l’épuisement. Avant de commencer tout pro-
gramme d’exercice, vous devriez consulter votre médecin. Il est recomman-
dé de faire un examen physique complet. NE MONTEZ PAS sur la plaque
d’appui la plus haute en premier. En vous tenant à des supports pour la
stabilité, montez sur la plaque d’appui la plus basse.
● Seuls les techniciens qualiés sont autorisés à toucher les composants
électriques, par exemple, les cartes de circuits imprimés. Ce produit peut
être soumis à une charge électrique même si le produit n’est pas utilisé et le
cordon d’alimentation a été débranché. Après avoir éteint le produit, atten-
dez cinq minutes avant de débrancher le cordon d’alimentation de la prise
de courant. Seulement après avoir pris de telles précautions peut-on retirer
le couvercle et toucher les composants électriques.
Remarque :
● Les valeurs de fréquence cardiaque sont fournies à titre indicatif et peu-
vent présenter des variations ou des inexactitudes. L’exercice excessif peut
provoquer des blessures graves, voire mortelles. Si vous vous sentez mal
à l’aise ou ressentez des symptômes physiques anormaux, arrêtez immédi-
atement l’exercice et consultez un médecin.

8
2. CONSIGNES DE SÉCURITÉ (SUITE)
● Cet équipement a été testé et jugé conforme aux limites établies pour un
dispositif numérique de classe B, conformément à la partie 15 de la régle-
mentation FCC. Ces limites sont conçues pour fournir une protection raison-
nable contre les interférences nuisibles dans une installation résidentielle.
Cet équipement génère, utilise et peut émettre une énergie de fréquence
radio et, s’il n’est pas installé et utilisé conformément aux instructions, peut
causer des interférences nuisibles aux communications radio. Cependant,
il n’existe aucune garantie que des interférences ne se produiront pas dans
une installation particulière.

9
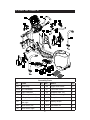
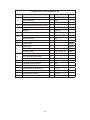
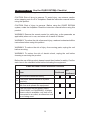
3. LIST OF PARTS
Assembly Parts
No. Name Qty. No. Name Qty.
A1 Main body 1 A6 Right roller cover 2
A1a Left handlebar 1 A7 Left roller cover 2
A1b Right hadlebar 1 A8 Support tube, left 1
A2 Stationary handlebar 1 A9 Support tube, right 1
A2a Saftey key assembly 1 A10 Footplate set 2
A3
Pedestal cover, left
and right
1 A11 Safety straps 2
A4
Joint cover, left
1 A12
Hardware kit
2
A5 Joint cover, right 1

10
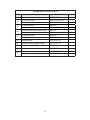
Components in the Hardware Kit
No. Name Qty. Specication Notes
10
Mushroom top inner hex screw 6 M10*P1.5*L25
Spring washer 6 M10
Washer 6 D21*d10.5*t1.5
11
Stride adjustment linkage cover 2
12
Hex nut 2 M10*P1.5
Stopper 2 ø30-30
13 Phillips screw 4 M4*L12
14
Inner hex screw 4 M8*P1.25*L25
Spring washer 4 M8
15 Mushroom top Phillips screw 6 M4*L16
16
Screw insert 3 Spare
17
Spring clip 2 Spare
Flat washer 2 D13*d4.7*t1.0 Spare
Phillips screw 2 M5*P0.8*L12 Spare
18
Secondary roller bolt 2 øD9.96*L54
Self lubricating bushing 4
Guide roller 2 D23*L45
L-shaped Allen wrench 1 M4
L-shaped Allen wrench 1 M5
T-shaped Allen wrench 1 M6
Double open-end wrench 1 (8*17)
Double open-end wrench 1 (14*15)
Screwdriver handle 1 Green
Screwdriver bit 1 Phillips and at

11
Components on the Product
No. Name Specication Notes
21 Phillips screw M4*P0.7*L8
22
Inner hex screw 5/16”*L2-1/4 inch
Flat washer D20*d8*t2.0
23
Inner hex screw M6*L15
Handlebar washer D20*d7*t2.0
24
Mushroom top inner hex screw M8*L15
Spring washer M8
25
Inner hex screw M6*L15
Handlebar washer D20*d7*t2.0
26 Phillips screw M5*P0.8*L15
27 Mushroom top Phillips screw M5*P0.8*L12
28 Mushroom top Phillips screw M5*L16
29 Phillips screw M4*P0.7*L8
30
Phillips screw M5*P0.8*L12
Flat washer D13*d4.7*t1.0

12
4. ASSEMBLE THE PRODUCT
Follow instructions below to assemble this product. Note that in this manual
the words “left” and “right” are used to refer to the product and its parts. As
such, these designations correspond to the “left” and “right” sides of a person
in position to exercise on this product. Also, for brevity, the word “screws” is
used where screws, washers, and other hardware may be involved.
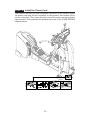
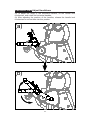
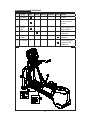
STEP 1 Secure the Pedestal
Please follow instructions (a) through (b) to secure the pedestal.
(a) Lift the pedestal (A1).
(b) Secure screws (10) in sequence. Secure screws in area A, followed by
those in area B. Then secure screws in area C, followed by those in area D.
(a)
(b)

13
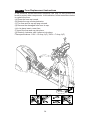
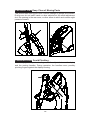
STEP 2 Install the Safety Key Mechanism
Follow instructions (a) through (c) to install the safety key mechanism.
(a) Separate the safety key mechanism (A2a) upper and lower covers. Use
screws (15) to secure the lower cover onto the main body (A1). Insert screw
insert (16) into the square hole. Connect wires and tuck them downward to
avoid pinching them.
(b) Hold the upper cover onto the safety key mechanism (A2a) and use
screws (15) to secure it into place.
(c) After securing the safety key mechanism, unwrap the wire and secure the
remote control device on the hook on the display lower cover.
(c)
(b)
(a)

14
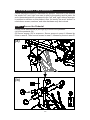
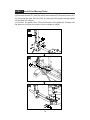
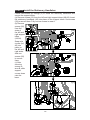
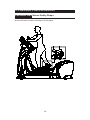
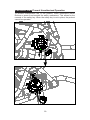
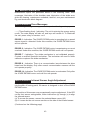
STEP 3 Install the Moving Parts
Follow instructions (a) through (e) to install the moving parts.
(a) Remove screws (21) from the stride arm attached to the main frame (A1).
(b) Once slip the glide rail into (Part A), then place the pedal carriage lightly
on the glide rail support.
(c) Connect the guide roller (18) on the bottom of the glide rail. (Please note
the direction to insert the screw is from outside to inside)

15
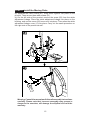
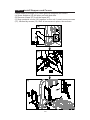
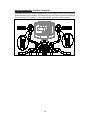
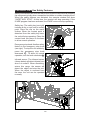
STEP 3 Install the Moving Parts
(d) Separate the roller covers (A7). Snap them together into place on the
product. Then secure them with screws (21).
(e) On the left side of the product, remove the screw (22) from the stride
adjustment linkage. Place the stride adjustment linkage into place on the
bushing, and use the screw (22) to secure it into place. Then press the stride
adjustment linkage cover (11) into place. Carry out the same procedure on
the right side of the product as well.
Warning: Consult the manual and follow all assembly instructions
carefully. Please note that incorrect assembly may present a
danger to the exerciser, will damage the elliptical and void the
warranty.

16
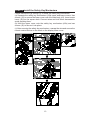
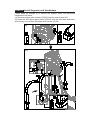
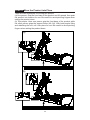
STEP 4 Install Supports and Handlebars
Follow steps (a) through (c) to secure the support tubes and horizontal
handlebars into place.
(a) Remove support tube screws (23)(24) from the main frame (A1).
(b) Insert left and right support tubes (A8,A9) onto the axle area and base,
and loosely secure them into place with screws (23,24).
(b)
(a)

17
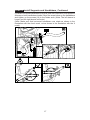
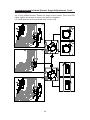
STEP 4 Install Supports and Handlebars, Continued
(c) Attach horizontal handlebars (A1a,A1b) onto the rotator axle, then push the
sleeves on both handlebars inward. Align the screw holes on the handlebars
and tighten up the screws (14) to the rotator axle. (Note: The left sleeve is
longer and the right sleeve is shorter.)
(Note: Make sure that horizontal handlebars can rotate as shown in the
illustration with the check mark, not as shown in the illustration with the X
mark).

18
(c)
(a)
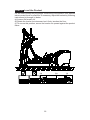
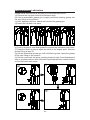
STEP 5 Install the Stationary Handlebar
Follow instructions (a) through (c) to install the stationary handlebar and
secure the support tubes.
(a) Remove screws (25) from the left and right support tubes (A8,A9). Insert
the stationary handlebar (A2) into place on the support tubes. Use screws
(25) to secure them. Fully secure screws in area A.
(b) Remove
screws (26)
from the
sides of
the left and
right support
tubes
(A8,A9).
Snap axle
covers (A4,
A5) into
place on
the left and
right sides.
And use
screws (26)
to secure
them.
(c) After
securing
screws in
area B, slide
support
covers down
onto the
base.

19
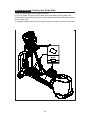
STEP 6 Install Stoppers and Covers
Follow steps (a) through (c) to install glide rail stoppers and covers.
(a) Screw stoppers (12) into place on both glide rails.
(b) Remove screws (27) from the frame (A1).
(c) Snap pedestal covers (A3) together on the unit. Loosely secure screws
(27), followed by screws (13). After all screws are in place, secure them.
(c)
(b)
(a)
La page est en cours de chargement...
La page est en cours de chargement...
La page est en cours de chargement...
La page est en cours de chargement...
La page est en cours de chargement...
La page est en cours de chargement...
La page est en cours de chargement...
La page est en cours de chargement...
La page est en cours de chargement...
La page est en cours de chargement...
La page est en cours de chargement...
La page est en cours de chargement...
La page est en cours de chargement...
La page est en cours de chargement...
La page est en cours de chargement...
La page est en cours de chargement...
La page est en cours de chargement...
La page est en cours de chargement...
La page est en cours de chargement...
La page est en cours de chargement...
La page est en cours de chargement...
La page est en cours de chargement...
La page est en cours de chargement...
La page est en cours de chargement...
La page est en cours de chargement...
La page est en cours de chargement...
La page est en cours de chargement...
La page est en cours de chargement...
La page est en cours de chargement...
La page est en cours de chargement...
La page est en cours de chargement...
La page est en cours de chargement...
-
 1
1
-
 2
2
-
 3
3
-
 4
4
-
 5
5
-
 6
6
-
 7
7
-
 8
8
-
 9
9
-
 10
10
-
 11
11
-
 12
12
-
 13
13
-
 14
14
-
 15
15
-
 16
16
-
 17
17
-
 18
18
-
 19
19
-
 20
20
-
 21
21
-
 22
22
-
 23
23
-
 24
24
-
 25
25
-
 26
26
-
 27
27
-
 28
28
-
 29
29
-
 30
30
-
 31
31
-
 32
32
-
 33
33
-
 34
34
-
 35
35
-
 36
36
-
 37
37
-
 38
38
-
 39
39
-
 40
40
-
 41
41
-
 42
42
-
 43
43
-
 44
44
-
 45
45
-
 46
46
-
 47
47
-
 48
48
-
 49
49
-
 50
50
-
 51
51
-
 52
52


SportsArt E872MA Le manuel du propriétaire
- Taper
- Le manuel du propriétaire
- Ce manuel convient également à
dans d''autres langues
- English: SportsArt E872MA Owner's manual
Documents connexes
-
SportsArt G862 Le manuel du propriétaire
-
-
-
-
-
-
-
-
-