Ariston AQM9D 49 X (EX) Mode d'emploi
- Catégorie
- Machines à laver
- Taper
- Mode d'emploi

EN
1
Contents
Installation, 2-3
Unpacking and levelling
Connecting the electricity and water supplies
Technical data
Description of the machine, 4-5
Touch control panel
How to run a wash cycle or a drying
cycle, 6
Wash cycles and options, 7
Table of wash cycles
Wash options
Detergents and laundry, 8
Detergent
Preparing the laundry
Washing recommendations
Load balancing system
Precautions and advice, 9
General safety
Disposal
Opening the porthole door manually
Care and maintenance, 10
Cutting off the water and electricity supplies
Cleaning the machine
Cleaning the detergent dispenser drawer
Caring for your appliance drum
Cleaning the pump
Checking the water inlet hose
Trouble shooting, 11
Assistance, 12
WASHER-DRYER
AQUALTIS
AQM9D 49 X
Instructions for
installation and use
English,1
EN
Français,33
F
! This symbol reminds you to read this instruction manual.
, 13
AR

EN
2
! This instruction manual should be kept in a safe place
for future reference. If the washing machine is sold, given
away or moved, please ensure the manual is kept with
the machine, so that the new owner may benefit from the
advice contained within it.
! Read these instructions carefully: they contain vital
information relating to the safe installation and operation of
the appliance.
! Inside the pack containing this manual, you will also find
the guarantee and all the details necessary for installation.
Unpacking and levelling
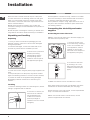
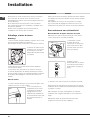
Unpacking
1. Once you have removed all the packaging from the
washing machine, make sure it has not been damaged
during transportation.
If it has been damaged, contact the retailer and do not
proceed any further with the installation process.
2. Remove the 4 protective
screws (used during
transportation) and the
corresponding spacer,
located on the rear part of
the appliance (see figure).
3. Close off the holes using the plastic plugs supplied in the
pack.
4. Keep all the parts in a safe place; they will be needed
again if the washing machine is moved to another location,
to prevent the inside of the appliance being damaged.
! Packaging materials should not be used as toys for
children.
Levelling
1. Place the washing machine on a flat sturdy floor, without
resting it up against walls or cabinets.
2. If the floor is uneven, the
front feet of the machine
may be adjusted until
it reaches a horizontal
position (the angle of
inclination must not exceed
2 degrees).
! If the appliance is levelled correctly, it will be more stable
and much less likely to cause vibrations and noise while it
is operating, particularly during the spin cycle.
! If it is placed on carpet or a rug, adjust the feet in such a
way as to allow a sufficient ventilation space underneath
the washing machine.
Connecting the electricity and water
supplies
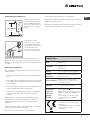
Connecting the water inlet hose
! Before connecting the inlet hose to the water supply, run
the water until it is perfectly clear.
1. Connect the inlet hose
to the machine by screwing
it onto the cold water inlet
of the appliance, which is
situated on the top right-
hand side of the rear part of
the appliance (see figure).
2. Connect the inlet hose
by screwing it to a cold
water tab using a 3/4 gas
threaded connection (see
figure).
3. Make sure that the hose is not folded over or bent.
! The water pressure at the tap must fall within the values
indicated in the Technical data table (see next page).
! If the inlet hose is not long enough, contact a specialised
shop or an authorised technician.
! Never use second-hand or old inlet hoses; use the
products supplied with the machine.
Installation

EN
3
65 - 100 cm
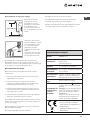
Connecting the drain hose
Connect the drain hose to
drain duct piping or a wall
drain located between 65
and 100 cm above the floor,
making sure it is not bent
at all.
Alternatively, rest the
drain hose on the side of
a washbasin or bathtub,
fastening the duct supplied
to the tap (see figure).
The free end of the hose
should not be underwater.
! We advise against the use of hose extensions; if it is
absolutely necessary, the extension must have the same
diameter as the original hose and must not exceed 150 cm
in length.
Electrical connections
Before plugging the appliance into the electricity socket,
make sure that:
• the socket is earthed and complies with all applicable
laws;
• the socket is able to withstand the maximum power load
of the appliance as indicated in the Technical data table
(see opposite);
• the power supply voltage falls within the values indicated
in the Technical data table (see opposite);
• the socket is compatible with the plug of the appliance.
If this is not the case, have the socket or the plug
replaced.
! The machine must not be installed outdoors, even in
covered areas. It is extremely dangerous to leave the
appliance exposed to rain, storms and other weather
conditions.
! The mains socket must remain within easy reach after the
washing machine has been installed.
! Do not use extension cords or multiple sockets.
! The cable should not be bent or compressed.
! The power supply cable and plug must only be replaced
by authorised technicians.
Warning! The company shall not be held responsible in the
event that these regulations are not respected.
Technical data
Model
AQM9D 49 X
Dimensions
width 59.5 cm
height 85 cm
depth 64.5 cm
Capacity
from 1 to 9 kg for the wash programme
from 1 to 6 kg for the drying programme
Electrical
connections
please refer to the technical data plate
fixed to the machine
Water connections
maximum pressure 1 MPa (10 bar)
minimum pressure 0.05 MPa (0.5 bar)
drum capacity 62 litres
Spin speed
up to 1400 rotations per minute
Energy rated
programmes
according to
regulation
EN 50229
Wash: programme
; temperature 60°C;
using a load of 9 kg.
Drying: first drying cycle performed with
3 kg load, by selecting the “IRON” dryness
level;
the second drying cycle performed with
6 kg load, by selecting the “EXTRA”
dryness level.
This appliance conforms to the following
EC Directives:
- 2004/108/EC (Electromagnetic Compatibility)
- 2006/95/EC (Low Voltage)
- 2002/96/EC

EN
4
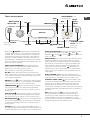
CONTROL
PANEL
3
1
2
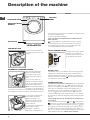
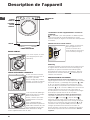
Description of the machine
PORTHOLE DOOR
Always use the handle to
open the porthole door (see
figure).
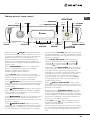
DETERGENT DISPENSER DRAWER
The detergent dispenser
drawer is located inside
the machine and can be
accessed by opening the
door.
For more information on
detergent measures, please
refer to the chapter entitled
“Detergents and laundry”.
Note: stick the label showing
the wash cycle descriptions
and options on the front of the detergent dispenser drawer.
You will find the sticker in the pack containing this manual.
1. pre-wash compartment:
use powder detergent.
! Before pouring in the
detergent, make sure that
extra compartment 3 has
been removed.
2. main wash compartment:
use powder or liquid
detergent. If using the
latter type of detergent, we
recommend it is poured into the drawer immediately before
you start the washer-dryer.
3. extra compartment: Bleach
! The use of extra compartment 3 excludes the pre-
wash function.
washing additives compartment: for fabric softener
or liquid additives. We recommend that the maximum
level indicated by the grille is not exceeded, and that
concentrated fabric softeners are diluted.
TOUCH CONTROL PANEL
To adjust the settings, gently
press the icon inside the
sensitive (touch control) area
as illustrated in the figure.
Standby mode
This washer-dryer, in compliance with new energy saving
regulations, is fitted with an automatic standby system
which is enabled after about 30 minutes if no activity is
detected. Press the ON-OFF button briefly and wait for
the machine to start up again.
CHANGE LANGUAGE
The first time the machine is switched on, the first language
will flash on the display. The “ “, “OK” and “V” symbols will
appear on the display, in line with the 3 buttons on the right-
hand side. The languages change automatically every 3”;
alternatively, they can be changed by pressing the buttons
next to the “ “ and “V” symbols. Use the “OK” button to
confirm the language, which will be set after 2”. If no buttons
are pressed, the automatic language change will begin again
after 30”.
The language may only be changed while the machine is
switched off.
Press and hold the temperature +spin +delayed start
buttons for 5’’; a short beep sounds and the set language
flashes on the display. Press the buttons next to the “ “ and
“V” symbols to change the language. Use the button next to
the “OK” symbol to confirm the language, which will be set
after 2”. If no buttons are pressed, the language set previously
will be displayed after 30”. Switch on the machine.
PORTHOLE DOOR
PORTHOLE DOOR
HANDLE
ADJUSTABLE FEET
KICK STRIP

EN
5
WASH CYCLE
SELECTOR knob
Button with ON/OFF
indicator light
Touch control panel
Button with ON/OFF indicator light: press this briefly
to switch the machine on or off. The green indicator light
indicates that the machine is switched on. To switch off
the washer-dryer during the wash cycle, press and hold
the button for approximately 3 seconds; if the button is
pressed briefly or accidentally the machine will not switch
off. If the machine is switched off during a wash cycle, this
wash cycle will be cancelled.
WASH CYCLE SELECTOR knob: may be turned in
either direction. To select the most suitable wash cycle,
please refer to the “Table of wash cycles”.
The knob will not move during the wash cycle.
M1-M2 buttons: press and hold one of the buttons to
store a cycle with your own set preferences in the memory
of the machine. To recall a previously-stored cycle, press
the corresponding button.
DRYING button : press to decrease or exclude drying;
the selected drying level or time will appear on the display
(see “How to run a wash cycle or a drying cycle”).
TEMPERATURE button: press to modify or exclude
the temperature setting; the value selected will appear
on the display above (see “How to run a wash cycle or a
drying cycle”).
SPIN CYCLE button: press to modify or exclude the
spin cycle; the value selected will appear on the display
above (see “How to run a wash cycle or a drying cycle”).
DELAYED START button: press to set a delayed start
for the selected wash cycle; the set delay time will appear
on the display above (see “How to run a wash cycle or a
drying cycle”).
OPTION buttons: press to select the available options.
The indicator light corresponding to the selected option will
remain lit (see “How to run a wash cycle or a drying cycle”).
WASH CYCLE PHASE icons: these illuminate to indicate
the progress of the wash cycle (Wash – Rinse –
Spin/Drain – Drying ). The text lights up when the
cycle is complete.
START/PAUSE button with indicator light: when the green
indicator light flashes slowly, press the button to start a
wash cycle. Once the cycle has begun the indicator light
will remain lit in a fixed manner. To pause the wash cycle,
press the button again; the indicator light will flash in an
orange colour. If the “Door locked” indicator light is
switched off, the door may be opened. To start the wash
cycle from the point at which it was interrupted, press the
button again.
DOOR LOCKED indicator light: indicates that the
porthole door is locked. To open the door, pause the wash
cycle (see “How to run a wash cycle or a drying cycle”).
CONTROL PANEL LOCK button with indicator light:
to activate or deactivate the control panel lock, press and
hold the button for approximately 2 seconds. when the
indicator light is illuminated, the control panel is locked.
This means it is possible to prevent wash cycles from being
modified accidentally, especially where there are children in
the home.
ECO indicator light: the icon lights up when, after
altering the washing parameters, an energy saving of
at least 10% is made. Furthermore, before the machine
enters “Standby” mode, the icon will light up for a few
seconds; when the machine is switched off the estimated
energy saving will be around the 80% mark.
TEMPERATURE
button
OPTION
buttons
SPIN
button
DISPLAY
M1
DRYING
ECO
indicator light
DELAYED START
button
START/PAUSE button
with indicator light
DOOR LOCKED indicator light
WASH
CYCLE
PHASE
icons
CONTROL PANEL
LOCK button with
indicator light
M2

EN
6
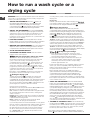
WARNING: before you use the washer-dryer for the first time,
run a wash cycle with detergent and no laundry, using the 90°
cottons cycle without pre-wash.
1. SWITCH THE MACHINE ON. Press the button. All
the indicator lights will illuminate for 1 second and the text
AQUALTIS will appear on the display; the indicator light
corresponding to the button will then remain lit in a constant
manner and the START/PAUSE indicator light will flash.
2. SELECT THE PROGRAMME. Turn the PROGRAMME
KNOB left or right, until the required programme has been
selected; the name of the programme will appear on the
display. A temperature and spin speed is set for each
programme; these may be adjusted. The cycle duration will
also appear on the display.
3. LOAD THE LAUNDRY. Open the porthole door. Load the
laundry, making sure you do not exceed the maximum load value
indicated in the table of wash cycles on the following page.
4. MEASURE OUT THE DETERGENT. Pull out the detergent
dispenser drawer and pour the detergent into the relevant
compartments as described in “Description of the machine”.
5. CLOSE THE PORTHOLE DOOR.
6. CUSTOMISE THE WASH CYCLE. Use the relevant
buttons on the control panel:
Modify the temperature and/or spin speed.
The machine automatically displays the maximum
temperature and spin speed values set for the selected
cycle, or the most recently-used settings if they are
compatible with the selected cycle. The temperature can
be decreased by pressing the button, until the cold
wash “OFF” setting is reached. The spin speed may be
progressively reduced by pressing the button, until it is
completely excluded “OFF”. If these buttons are pressed
again, the maximum values are restored.
! Exception: if the “Cottons” programme is selected, the
temperature can be increased up to a value of 90°C.
Setting the drying cycle
The first time the button is pressed, the machine will
automatically select the maximum drying cycle which is
compatible with the selected wash cycle. Subsequent presses
will decrease the drying level and then the drying time, until
the cycle is excluded completely (“OFF”). If these buttons are
pressed again, the maximum values are restored.
Drying may be set as follows:
A - Based on a set time period: between 20 and 180 minutes.
B- Based on the desired laundry dryness level:
Iron: suitable for clothes which will need ironing afterwards.
the remaining dampness softens creases, making them
easier to remove.
Hanger: ideal for clothes which do not need to be dried fully.
Cupboard: suitable for laundry which can be put back in a
cupboard without being ironed.
Extra: suitable for garments which need to be dried
completely, such as sponges and bathrobes.
If your laundry load to be washed and dried is much greater
than the maximum stated load (see adjacent table), perform
the wash cycle, and when the cycle is complete, divide
the garments into groups and put some of them back in
the drum. At this point, follow the instructions provided
for a “Drying only” cycle. Repeat this procedure for the
remainder of the load.
A cooling-down period is always added to the end of each
drying cycle.
Drying only
Use the cycle selector knob to select a drying cycle ( - - )
in accordance with the type of fabric. The desired drying level or
time may also be set using the DRYING button .
Setting a delayed start.
To set a delayed start for the selected cycle, press the
corresponding button repeatedly until the required delay period
has been reached. During the setting procedure, the delay period
and the text “Starts in”: will be displayed, along with the
flashing symbol. After the delayed start has been set,
the symbol will remain fixed on the display, which will
also indicate the duration of the selected cycle with the text
“Ends in”: and the cycle duration. Press the DELAYED START
button just once to display the delay time set previously. After the
countdown has begun, the display will show the text “Starts in”:
and the delay period. Once the set delay time has elapsed,
the machine will begin its cycle and the display will show
“Ends in”: and the time remaining until the end of the cycle. To
remove the delayed start option, press the button until the display
shows the text OFF; the symbol will disappear.
Modify the cycle settings.
• Press the button to activate the option; the name
of the option will then appear on the display and the
corresponding indicator light will illuminate.
• Press the button again to deactivate the option; the
name of the option will then appear on the display
followed by the text OFF, and the corresponding
indicator light will switch off.
! If the selected option is not compatible with the selected
wash cycle, this incompatibility will be signalled by the
flashing of the indicator light and a sound alert (3 beeps);
the option will not be activated.
! If the selected option is not compatible with another
option that has been selected previously, the indicator light
corresponding to the first option selected will flash and
only the second option will be activated; the indicator light
corresponding to the button will remain lit in a constant manner.
! The options may affect the recommended load value and/
or the duration of the cycle.
7. START THE PROGRAMME. Press the START/PAUSE
button. The corresponding indicator light remains lit in a fixed
manner and the porthole door locks (the DOOR LOCKED
indicator light illuminates). The icons corresponding to the wash
cycle phases will light up during the cycle to indicate which
phase is currently in progress. To change a wash cycle once
it has already started, pause the washer-dryer by pressing the
START/PAUSE button; then select the desired cycle and press
the START/PAUSE button again. To open the door during a
wash cycle, press the START/PAUSE button; if the DOOR
LOCKED indicator light is switched off you may open the
door. Press the START/PAUSE button again to restart the wash
cycle from the point at which it was interrupted.
8. THE END OF THE WASH CYCLE. This is indicated by
the illuminated text END. The porthole door may be opened
immediately. If the START/PAUSE indicator light is flashing,
press the button to end the cycle. Open the door, unload
the laundry and switch off the machine.
! If you wish to cancel a cycle which has already begun, press and
hold the button until the cycle stops and the machine switches off.
How to run a wash cycle or a
drying cycle

EN
7
Wash options
Super Wash
This option offers a high-
performance wash due to
the greater quantity of water
used in the initial phase
of the cycle, and due to
the increased wash cycle
duration, is particularly useful
for the removal of stubborn
stains. It can be used with or
without bleach. If you desire
bleaching, insert the extra
tray compartment (3) into
compartment 1. When pouring in the bleach, be careful
not to exceed the “max” level marked on the central pivot
(see figure). To bleach laundry without carrying out a full
wash cycle, pour the bleach into the extra compartment 3,
select the “Rinse” cycle and activate the “Super Wash”
option .
! It cannot be used in conjunction with , , , , , ,
, , , , .
Easy Iron
By selecting this option, the wash and spin cycles will be
modified in order to reduce the formation of creases.
At the end of the cycle the washer-dryer drum will rotate
slowly; the “Easy Iron” and START/PAUSE indicator lights
will flash. To end the cycle press the START/PAUSE button
or the “Easy Iron” button.
For the Silk wash cycle, the machine will end the cycle
while the laundry is soaking and the “Easy Iron” indicator
light will flash. To drain the water so that the laundry may
be removed, press the START/PAUSE button or the “Easy
Iron” button.
! It cannot be used in conjunction with , , , , , ,
, , .
Note: If you also want to run the drying cycle, this option is
enabled only if combined with level “Iron”.
Time Saver
If you select this option, the wash cycle duration will be
reduced by 30%-50%, depending on the selected cycle,
thereby guaranteeing simultaneous water and energy
saving. Use this cycle for lightly soiled garments.
! It cannot be used in conjunction with , , , , , ,
, , , , .
Extra rinse
By selecting this option, the efficiency of the rinse is
increased and optimal residual detergent removal is
guaranteed. It is particularly useful for skin which is
sensitive to detergents. We recommend this option is used
with a full load of washing, or when a large amount of
detergent is required.
! It cannot be used in conjunction with , , , , , , .
3
1
2
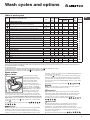
(*) Note: 10 minutes after the START, the machine will recalculate the time remaining until the end of the wash cycle on the basis of the load inside it; this
value will then be shown on the display.
Wash cycles and options
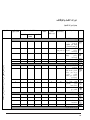
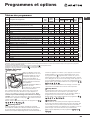
Table of wash cycles
For all Test Institutes:
1) Test wash cycle in compliance with regulation EN 50229: set wash cycle with a temperature of 60°C.
2) Long wash cycle for cottons: set wash cycle with a temperature of 40°C.
3) Short wash cycle for cottons: set wash cycle with a temperature of 40°C.
Icon Description of the wash cycle
Max. temp.
(°C)
Max.
speed
(rpm)
Drying
Detergent and additives
Max.
load
(kg)
Cycle
duration
Wash
Fabric
softener
Bleach
Cottons wash cycles
Cottons with pre-wash
(Add detergent to the relevant compartment).
90° 1400
- 9
Cotton (1): heavily soiled whites and resistant colours.
60°
(Max. 90°C)
1400
9
Cotton (2): heavily soiled whites and delicate colours. 40° 1400
9
Coloured Cotton (3) 40° 1400
9
Jeans
40° 800
- 4
Special wash cycles
Baby: heavily soiled delicate colours 40° 800
4
Mix 30': to refresh lightly soiled garments quickly (not suita-
ble for wool, silk and clothes which require washing by hand)
30° 800
- 3,5
Durable Synthetics 60° 800
4
Silk: for garments in silk and viscose, lingerie. 30° 0 -
- 2
Wool: for wool, cashmere, etc. 40° 800
- 2
Drying cycles
Wash&dry
30° 1400
- 1
Drying Cottons
- -
- - - 6
Drying Synthetics
- -
- - - 4
Drying Wool
- -
- - - 1,5
Partials cycles
Rinse - 1400
-
9
Spin - 1400
- - - 9
Drain - 0 - - - - 9
(*) The duration of the wash cycles can be checked on the display.
The length of cycle shown on the display or in this booklet is an estimation only and is calculated assuming standard working conditions. The actual duration can vary according to factors such as
water temperature and pressure, the amount of detergent used, the amount and type of load inserted, load balancing and any wash options selected.

EN
8
Detergents and laundry
Detergent
The type and quantity of detergent required depend on
the type of fabric you are washing (cotton, wool, silk, etc.),
as well as its colour, the washing temperature, the level of
soiling and the hardness of the water in the area.
Measuring out the detergent carefully will avoid wastage
and help to protect the environment: although they are
biodegradable, detergents still contain ingredients which
alter the balance of nature.
We recommend the following:
• use powder detergents for white cotton garments and
pre-washing.
• use liquid detergents for delicate cotton garments and
for all low-temperature wash cycles.
• use gentle liquid detergents for wool and silk garments.
The detergent should be poured into the relevant
compartment - or the dispenser placed directly inside the
drum - before the wash cycle begins. In the latter case, it
will not be possible to select the Cottons with pre-wash
cycle.
! Do not use hand washing detergents because these
create too much foam.
Preparing the laundry
• Shake out the garments before loading them into the
machine.
• Divide the laundry according fabric type (symbol on the
washing instruction label) and colour, making sure you
separate the coloured garments from the white ones;
• Empty all pockets and check the buttons;
• Do not exceed the values listed in the “Table of wash
cycles”, which refer to the weight of the laundry when
dry.
How much does your laundry weigh?
1 sheet 400-500 g
1 pillowcase 150-200 g
1 tablecloth 400-500 g
1 bathrobe 900-1200 g
1 towel 150-250 g
1 pair of jeans 400-500 g
1 shirt 150-200 g
Washing recommendations
Jeans: use the special “Jeans” wash cycle for all denim
garments; turn inside out before washing and use a liquid
detergent.
Baby: use the special “Baby” wash cycle to remove
the remove the soiling typically caused by babies, while
removing all traces of detergent from nappies in order to
prevent the delicate skin of babies from suffering allergic
reactions. The cycle has been designed to reduce the
amount of bacteria by using a greater quantity of water
and optimising the effect of special disinfecting additives
added to the detergent. At the end of the wash cycle, the
machine will slowly rotate the drum; to end the cycle press
the START/PAUSE button.
Silk: use the special “Silk” wash cycle to wash all silk
garments. We recommend the use of special detergent
which has been designed to wash delicate clothes.
Curtains: use the “Silk” wash cycle. Fold curtains and
place them in a pillow case or mesh bag.
Wool: Ariston is the only washer-dryer brand to have
been awarded the prestigious Woolmark Platinum Care
endorsement (M.0508) by the Woolmark Company, which
means that all woollen garments may be washed in the
washer-dryer, even those which state “hand wash only”
on the label. The “Wool” wash cycle can be used
to wash all woollen garments in the washer-dryer while
guaranteeing optimum performance.
Bedlinen and towels: use the “Bed & Bath” cycle to
wash laundry from all over the house; this optimises fabric
softener performance and helps you save time and energy.
We recommend the use of powder detergent.
Stubborn stains: it is wise to treat stubborn stains with
solid soap before washing, and to use the Cottons with
pre-wash cycle.
Wash&Dry was designed to wash and dry lightly soiled
garments quickly. This cycle may be used to wash and dry
a laundry load of up to 1 kg in just 60 minutes.
To achieve optimum results, use liquid detergent and pre-
treat cuffs, collars and stains.
Load balancing system
Before every spin cycle, to avoid excessive vibrations
before every spin and to distribute the load in a uniform
manner, the drum rotates continuously at a speed which
is slightly greater than the washing rotation speed. If,
after several attempts, the load is not balanced correctly,
the machine spins at a reduced spin speed. If the load is
excessively unbalanced, the washer-dryer performs the
distribution process instead of spinning. To encourage
improved load distribution and balance, we recommend
small and large garments are mixed in the load.

EN
9
• Make sure that the water tap is turned on during
the drying cycles.
Disposal
• Disposing of the packaging materials: observe local
regulations so that the packaging may be re-used.
• The European Directive 2002/96/EC relating to Waste
Electrical and Electronic Equipment (WEEE) states
that household appliances should not be disposed of
using the normal solid urban waste cycle. Exhausted
appliances should be collected separately in order to
optimise the cost of re-using and recycling the materials
inside the machine, while preventing potential damage
to the atmosphere and to public health. The crossed-out
dustbin is marked on all products to remind the owner
of their obligations regarding separated waste collection.
For more information relating to the correct disposal of
household appliances, owners should contact their local
authorities or appliance dealer.
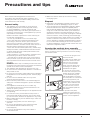
Opening the porthole door manually
In the event that it is not possible to open the porthole door
due to a powercut, and if you wish to remove the laundry,
proceed as follows:
1. remove the plug from the
electrical socket.
2. make sure the water level
inside the machine is lower
than the door opening; if
it is not, remove excess
water using the drain hose,
collecting it in a bucket as
indicated in the figure.
3. remove the cover panel
on the lower front part of the
washer dryer (see overleaf).
4. pull outwards using the
tab as indicated in the figure,
until the plastic tie-rod is freed
from its stop position; pull
downwards until you hear a
“click”, which indicates that
the door is now unlocked.
5. open the door; if this is
still not possible repeat the
procedure.
6. reposition the panel,
making sure the hooks are
securely in place before you
push it onto the appliance.
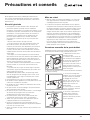
Precautions and tips
! The machine was designed and constructed in
accordance with international safety regulations. The
following information is provided for safety reasons and
must therefore be read carefully.
General safety
• This appliance is not intended for use by persons
(including children) with reduced physical, sensory
or mental capabilities, or lack of experience and
knowledge, unless they have been given supervision or
instruction concerning use of the appliance by a person
responsible for their safety.
Children should be supervised to ensure that they do
not play with the appliance.
– Do not dry unwashed items in the tumble dryer.
– Items that have been soiled with substances such
as cooking oil, acetone, alcohol, petrol, kerosene,
spot removers, turpentine, waxes and wax removers
should be washed in hot water with an extra amount of
detergent before being dried in the tumble dryer.
– Items such as foam rubber (latex foam), shower caps,
waterproof textiles, rubber backed articles and clothes
or pillows fitted with foam rubber pads should not be
dried in the tumble dryer.
– Fabric softeners, or similar products, should be used
as specified by the fabric softener instructions.
– The final part of a tumble dryer cycle occurs without
heat (cool down cycle) to ensure that the items are left
at a temperature that ensures that the items will not be
damaged.
WARNING: Never stop a tumble dryer before the end of
the drying cycle unless all items are quickly removed and
spread out so that the heat is dissipated.
• This appliance was designed for domestic use only.
• Do not touch the machine when barefoot or with wet or
damp hands or feet.
• Do not pull on the power supply cable when unplugging
the appliance from the electricity socket. Hold the plug
and pull.
• Do not touch the drained water as it may reach
extremely high temperatures.
• Never force the porthole door. This could damage the
safety lock mechanism designed to prevent accidental
opening.
• If the appliance breaks down, do not under any
circumstances access the internal mechanisms in an
attempt to repair it yourself.
• Always keep children well away from the appliance while
it is operating.
• If it must be moved, proceed with the help of two or
three people and handle it with the utmost care. Never
try to do this alone, because the appliance is very heavy.
• Before loading laundry into the washer dryer, make sure
the drum is empty.
• During the drying phase, the door tends to get
quite hot.
• Do not use the appliance to dry clothes that have
been washed with flammable solvents (e.g.
trichlorethylene).
• Do not use the appliance to dry foam rubber or
similar elastomers.

EN
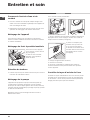
10
Cutting off the water and electricity
supplies
• Turn off the water tap after every wash cycle. This will
limit wear on the hydraulic system in the machine and
help to prevent leaks.
• Unplug the appliance when cleaning it and during all
maintenance work.
Cleaning the machine
The outer parts and rubber components of the appliance
can be cleaned using a soft cloth soaked in lukewarm
soapy water. Do not use solvents or abrasives.
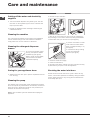
Cleaning the detergent dispenser
drawer
To remove the drawer, press
lever (1) and pull the drawer
outwards (2) (see figure).
Wash it under running water;
this procedure should be
repeated frequently.
Caring for your appliance drum
• Always leave the door ajar to prevent unpleasant odours
from forming.
Cleaning the pump
The washer dryer is fitted with a self-cleaning pump which
does not require any maintenance. Sometimes, small items
(such as coins or buttons) may fall into the protective pre-
chamber at the base of the pump.
! Make sure the wash cycle has finished and unplug the
appliance.
To access the pre-chamber:
1. take off the cover panel on the front of the machine by
first pressing it in the centre and then pushing downwards
on both sides until you can remove it (see figures);
2. position a container so that
it will collect the water which
flows out (approximately 1.5 l)
(see figure);
3. unscrew the lid by rotating
it in an anti-clockwise
direction (see figure);
4. clean the inside thoroughly;
5. screw the lid back on;
6. reposition the panel, making sure the hooks are securely
in place before you push it onto the appliance.
Checking the water inlet hose
Check the inlet hose at least once a year. If there are any
cracks, it should be replaced immediately: during the wash
cycles, water pressure is very strong and a cracked hose
could easily split open.
Care and maintenance
1
2
1
2

EN
11
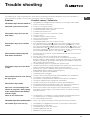
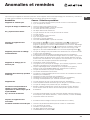
Trouble shooting
Your washer-dryer could occasionally fail to work. Before contacting the Technical Assistance Centre (see “Assistance”),
make sure that the problem cannot be not solved easily using the following list.
Problem:
The washer-dryer does not switch on.
The wash cycle does not start.
The washer-dryer does not fill
with water.
The washer-dryer door remains
locked.
The machine continuously fills
with water and drains.
The washer-dryer does not drain
or spin.
The machine vibrates a lot during
the spin cycle.
The washer-dryer leaks.
The icons corresponding to the
“Phase in progress” flash rapidly
at the same time as the ON/OFF
indicator light.
There is too much foam.
The washer-dryer door remains locked.
The washer-dryer does not dry.
Possible causes / Solutions:
• The appliance is not plugged into the socket fully, or not enough to make contact.
• There is no power in the house.
• The door is not closed properly.
• The START/PAUSE button has not been pressed.
• The water tap has not been opened.
• A delayed start has been set.
• The water inlet hose is not connected to the tap.
• The hose is bent.
• The water tap has not been opened.
• There is no water supply in the house.
• The pressure is too low.
• The START/PAUSE button has not been pressed.
• If you have selected the “Baby ” cycle or the “Easy iron ” option, when
the wash cycle has finished the machine will slowly rotate the drum; to end
the cycle press the START/PAUSE button or the “Easy iron ” button. If you
have selected the “Silk ” wash cycle, the machine will end the cycle while
the laundry is soaking; to drain the water so that the laundry may be removed,
press the START/PAUSE button or the “Easy iron ” button.
• The drain hose is not fitted at a height between 65 and 100 cm from the floor
(see “Installation”).
• The free end of the hose is under water (see “Installation”).
• If the dwelling is on one of the upper floors of a building, there may be
problems relating to water drainage, causing the washer-dryer to fill with water
and drain continuously. Special anti-draining valves are available in shops and
help to prevent this inconvenience.
• The wall drainage system is not fitted with a breather pipe.
• The wash cycle does not include draining: Some wash cycles require the drain
phase to be started manually (see “Wash cycles and options”).
• The “Easy iron” option is enabled: to complete the wash cycle, press the
START/PAUSE button (“Wash cycles and options”).
• The drain hose is bent (see Installation).
• The drainage duct is clogged.
• The drum was not unlocked correctly during installation (see “Installation”).
• The machine is not level (see “Installation” ).
• The machine is trapped between cabinets and walls (see “Installation”).
• The load is unbalanced (see “Detergents and laundry”).
• The water inlet hose is not screwed on properly (see “Installation”).
• The detergent dispenser is blocked (to clean it, see “Care and maintenance”).
• The drain hose is not fixed in place properly (see “Installation”).
• Switch off the machine and unplug it, wait for approximately 1 minute and
then switch it back on again. If the problem persists, contact the Technical
Assistance Service.
• The detergent is not suitable for machine washing (it should display the text
“for washer-dryers” or “hand and machine wash”, or the like).
• Too much detergent was used.
• Perform the manual unlocking procedure (see “Precautions and tips”).
• The appliance is not plugged into the socket, or not enough to make contact.
• There has been a power failure.
• The appliance door is not shut properly.
• A DELAY TIMER has been set.
• DRYING is in the OFF position.

EN
12
Before calling for Assistance:
• Check whether you can solve the problem by yourself (see “Trouble shooting”);
• Restart the wash cycle to check whether the problem has been solved;
• If it has not, contact the Authorised Technical Assistance Service.
! If the washer-dryer has been installed or used incorrectly, you will have to pay for the call-out service.
! Always request the assistance of authorised technicians.
Please have the following information to hand:
• the type of problem;
• the appliance model (Mod.);
• the serial number (S/N).
The above information can be found on the data plate located on the appliance itself.
Assistance
! Note: To exit “Demo mode”, press and hold the two “ON/OFF” and “START/PAUSE” buttons simultaneously for 3 seconds.

لﺎﻤﻌﺘﺳﻻاو ﺐﻴآﺮﺘﻟا تﺎﻤﻴﻠﻌﺗ ﺐّﻴﺘآ
ﺔﻟﺎﺴﻏ– ﺔﻓﺎﺸﻧ
! تﺎﻴﻤﻠﻌﺘﻟا ﺐﻴﺘآ ةءاﺮﻘﺑ كﺮﻴآﺬﺘﻟ ﻮه ﺰﻡﺮﻟا اﺬه
تﺎیﻮﺘﺤﻤﻟا
ﺐﻴآﺮﺘﻟا،
و ﻚﻔﻟاﺔﻳﻮﺴﺘﻟا
و ﺔﻴﺋﺎﺑﺮﻬﻜﻟا تاداﺪﻣﻹﺎﺑ ﻞﺻﻮﻟاﻩﺎﻴﻤﻟا
ﻟا تﺎﻣﻮﻠﻌﻤﻟاﺔّﻴﻨﻘﺘ
،ﺔﻟﻵا ﻒﺻو
ﻢﻜﺤﺘﻟا رارزأ ﺔﺣﻮﻟ ﺲﻤﻠﻟا ﺔﻄﺱاﻮﺑ
ﺔﻴﻔﻴآ ﻞﻴﺴﻏ ةرود ﻞﻴﻐﺸﺗ وأﻒﻴﻔﺠﺗ
AQUALTIS
AQM9D 49 X
و ﻞﻴﺴﻐﻟا تارودﻒﺋﺎﻇﻮﻟا
ﻞﻴﺴﻐﻟا تارود لوﺪﺟ
ﻒﺋﺎﻇو ﻞﻴﺴﻐﻟا
ﻞﻴﺴﻐﻟاو ﻒﻴﻈﻨﺘﻟا داﻮﻡ
ﻒﻴﻈﻨﺘﻟا داﻮﻣ
ﻞﻴﺴﻐﻟا ﺮﻴﻀﺤﺕ
لﻮﺣ ﺢﺋﺎﺼﻥ ﻞﻴﺴﻐﻟا
ﺔﻟﻮﻤﺤﻟا نزاﻮﺕ مﺎﻈﻥ
تاﺮیﺬﺤﺘﻟا ﺢﺋﺎﺼﻨﻟاو
ﺔﻣﺎﻌﻟا ﺔﻣﻼﺴﻟا
ﻒﻳﺮﺼﺘﻟا
ﺢﺘﻓﻟاﺎﻳوﺪﻳ بﺎﺒ
و ﺔیﺎﻨﻌﻟاﺔﻧﺎﻴﺼﻟا
ﻓﻞﺼ ﺔﻟﻵا ﻦﻋ ﻩﺎﻴﻤﻟاو ءﺎﺑﺮﻬﻜﻟا
ﺔﻟﺎﺴﻐﻟا ﻒﻴﻈﻨﺕ
ﻒﻴﻈﻨﺘﻟا داﻮﻣ ءﺎﻋو ﻒﻴﻈﻨﺕ
ﺑ ﺔﻳﺎﻨﻌﻟاضﻮﺤ ﺔﻟﻵا
ﺔﺨﻀﻤﻟا ﻒﻴﻈﻨﺕ
ﺪﻘﻔﺕبﻮﺒﻥأ لﺎﺥدإ ﻩﺎﻴﻤﻟا
ﻪﺡﻼﺻإو ﻞﻠﺨﻟا
ةﺪﻋﺎﺴﻤﻟا
13

ﺐﻴآﺮﺘﻟا
! ﻪﻴﻟإ ةدﻮﻌﻠﻟ ﻦﻣﺁ نﺎﻜﻣ ﻲﻓ ﺐﻴﺘﻜﻟا اﺬﻬﺑ ﻆﻔﺘﺣا
ﻖﺣﻻ ﺖﻗو ﻲﻓ . وأ ﺎﻬﺤﻨﻣ وأ ﺔﻟﻵا ﻊﻴﺑ ﺪﻨﻋ
ﺮﻟا ،ﺎﻬﻠﻘﻥ ﺎﻬﻌﻣ ﺐّﻴﺘﻜﻟا دﻮﺟو ﻦﻣ ﺪّآﺄﺘﻟا ءﺎﺟ
ﻰﺘﺣ ﺢﺋﺎﺼﻨﻟا ﻦﻣ ﺪﻳﺪﺠﻟا ﻚﻟﺎﻤﻟا ﺪﻴﻔﺘﺴﻳ
ﻪﻴﻓ ةدﻮﺟﻮﻤﻟا.
! تﺎﻤﻴﻠﻌﺘﻟا ﻩﺬه ةءاﺮﻗ ءﺎﺟﺮﻟاﺔﻗﺪﺑ :ﻬﻓﻲ
ﺕ ﺔﻘﻳﺮﻃ ﻦﻋ ﺔّﻤﻬﻣ تﺎﻣﻮﻠﻌﻣ ﻰﻠﻋ يﻮﺘﺤ
ﺐﻴآﺮّﺘﻟا ﻦﻣﻵاﻞﻴﻐﺸﺘﻟاو.
! ﺪﺠﺕأًﺎ ﻀ ﻳ اﺬه ﻰﻠﻋ يﻮﺘﺤﺕ ﻲﺘﻟا ﺔﺒﻠﻌﻟا ﻞﺥاد
ﻼﻟا ﻞﻴﺻﺎﻔﺘﻟا ﺔﻓﺎآو ﺔﻟﺎﻔآ ،ﺐﻴﺘﻜﻟا ﺔﻣز
ﺐﻴآﺮﺘﻠﻟ.
ﺔیﻮﺴﺘﻟا و ﻚﻔﻟا
ﻚﻔﻟا
1-
ﻣ عﺰﻥ ﻢﺕ ﻰﺘﻦﻋ ﻒﻴﻠﻐﺘﻟا قاروأ ﺔﻓﺎآ
ﺪآﺄﺕ ،ﺔﻟﺎﺴﻐﻟا رﺮﻀﺘﺕ ﻢﻟ ﺎﻬﻥأ ﻦﻣ لﻼﺥ
ﻞﻘﻨﻟا . اذإترﺮﻀﺕ ﺎﻬﺒﻴآﺮﺘﺑ ﻢﻘﺕ ﻻ ،
ﺔﺋﺰﺠﺘﻟﺎﺑ ﻊﺋﺎﺒﻟﺎﺑ ﻞﺼﺕاو.
2-
ﺮﻴﻣﺎﺴﻤﻟا عﺰﻥا
ﺔﻴﺋﺎﻤﺤﻟا ﻊﺑرﻷا
) لﻼﺥ ﺔﻠﻤﻌﺘﺴﻤﻟا
ﻞﻘﻨﻟا (و ﻞﺻﺎﻔﻟا
دﻮﺟﻮﻤﻟا ﻲﻓ
ةﺮﺥﺆﻣﻵاﻟﺔ
)
ﺟارةرﻮﺼﻟا ﻊ
.(
3-
ﻞﻔﻗا تاداﺪﺴﻟا ًﻼ ﻤ ﻌ ﺘ ﺴ ﻣ تاﻮﺠﻔﻟا
ةدوﺰﻤﻟا ﺔﻴﻜﻴﺘﺱﻼﺒﻟاﺔﺒﻠﻌﻟا ﻲﻓ.
4-
ﻦﻣﺁ نﺎﻜﻣ ﻲﻓ ﻊﻄﻘﻟا ﺔﻓﺎﻜﺑ ﻆﻔﺘﺣا : ﺪﻗ جﺎﺘﺤﺕ
لﺎﺣ ﻲﻓ ًا د ﺪ ﺠ ﻣ ﺎﻬﻴﻟإ ﻞﻘﻥ ﻢﺕﺔﻟﺎّﺴﻐﻟا ﻰﻟإ
ﺔﻟﻵا ﻞﺥاد رﺮﻀﺕ يدﺎﻔﺘﻟ ﺮﺥﺁ ﻊﻗﻮﻣ.
! داﻮﻣ ﻒﻴﻠﻐﺘﻟالﺎﻔﻃﻸﻟ ﺎﺑﺎﻌﻟأ ﺖﺴﻴﻟ.
ﺔیﻮﺴﺘﻟا
1-
ﺔﻟﺎﺴﻐﻟا ﺐﻴآﺮﺘﺑ ﻢﻗ رأ ﻰﻠﻋ ٍض ﺔﺤﻄﺴﻣ
ﺔﻨﻴﺘﻣ ﻦﻣ ﻰﻠﻋ ﺎهدﺎﻨﺱإ نود نارﺪﺠﻟا وأ
ﻦﺋاﺰﺨﻟا .
2-
ضرﻷا ﺖﻥﺎآ اذإ
ﺮﻴﻏﺔﺤﻄﺴﻣ ،
ﻞﻳﺪﻌﺕ ﻦﻜﻤُﻳا ﺔﻟﻵ
نأ ﻰﻟإ ﻲﻓ ﺢﺒﺼﺕ
ﻲﻘﻓأ ىﻮﺘﺴﻣ) ﻻ
ىّﺪﻌﺘﺕ نأ ﺐﺠﻳ
ﻦﻴﺘﺟرّﺪﻟا راﺪﺤﻥﻻا ﺔﻳواز.(
!ﺎﻬﻟ ﻦﻣﺆﻴﺱ ﺐﺱﺎﻨﻤﻟا ىﻮﺘﺴﻤﻟا ﻲﻓ ﺔﻟﻵا ﻊﺽو
ﺔﺠﺽ وأ تﺎﺟﺎﺠﺕرا يأ ﻚﻟﺬﺑ ىدﺎﻔﺘﺕو تﺎﺒﺜﻟا
ﺪﻨﻋﻞﻴﻐﺸﺘﻟا ناروﺪﻟا لﻼﺥ ًﺎﺻﻮﺼﺥو
.
!
لﺎﺣ ﻲﻓﻰﻠﻋ ﺔﻟﻵا ﻊﺽو ﻢﺕ وأ ﺔﺘﺑﺎﺙ ةدﺎﺠﺱ
ﺔﺋﻮﻬﺘﺑ ﺢﻤﺴﺕ ﺔﻘﻳﺮﻄﺑ ﻢﺋاﻮﻘﻟا لﺪﻋ ،ﺔﺘﺑﺎﺙ ﺮﻴﻏ
ﺔﻟﺎﺴﻐﻟا ﺖﺤﺕ ﺔﺒﺱﺎﻨﻣ.
ﻩﺎﻴﻤﻟاو ﺔﻴﺋﺎﺑﺮﻬﻜﻟا تاداﺪﻡﻹﺎﺑ ﻞﺻﻮﻟا
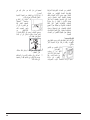
ﻞﺻوبﻮﺒﻧأ إﺥدﺎﻩﺎﻴﻤﻟا ل
!
ﻞﺻو ﻞﺒﻗ ﻩﺎﻴﻤﻟا لﺎﺥدإ بﻮﺒﻥأ رﺪﺼﻤﺑ
ﻩﺎﻴﻤﻟا كﺮﺕا ،ﻩﺎﻴﻤﻟايﺮﺠﺕ ﺘﺣ ﺔﻴﻘﻥ ﺢﺒﺼﺕ ﻰ
ًﺎﻣﺎﻤﺕ.
1- ﻢﻗ ﻞﺻﻮﺑ بﻮﺒﻥأ
لﺎﺥدإ ﻩﺎﻴﻤﻟا
ﺎﺑﺔﻟﺎّﺴﻐﻟ لﻼﺥ ﻦﻣ
بﻮﺒﻥﺄﺑ ﻪﻠﺻو
ةدرﺎﺒﻟا ﻩﺎﻴﻤﻟا لﺎﺥدإ
دﻮﺟﻮﻤﻟا ﻰﻠﻋأ ﻲﻓ
ﻲﻓ ﻦﻤﻳﻷا ﺐﻥﺎﺠﻟا ﺔﻬﺠﻟا ﻟا ﺔﻴﻔﻠﺨﻟ ﺔﻟﻶ
)
ةرﻮﺼﻟا ﻊﺟار
.(
2- ﻞﺻﻮﺑ ﻢﻗﻷا بﻮﺒﻥ
ﺑ ﻩﺎﻴﻤﻟا ﺔﻴﻔﻨﺤ
ةدرﺎﺒﻟا ﺔﻄﺱاﻮﺑ
ﺔﻠﺻو زﺎﻏ
سﺎﻴﻗ ﺔﺒﻟﻮﻠﻣ3/4 )
ةرﻮﺼﻟا ﻊﺟار
.(
3- ﺕ ﻦﻣ ﺪآﺄًﺎ ﻳ ﻮ ﺘ ﻠ ﻣ وأ ًﺎﻴﻨﺜﻣ ﺲﻴﻟ بﻮﺒﻥﻷا نأ .
! ﺐﺠﻳنأ ﻦﻤﺽ ﺔﻴﻔﻨﺤﻟا ﻲﻓ ﻩﺎﻴﻤﻟا ﻂﻐﺽ نﻮﻜﻳ
ﻲﻓ ﺎﻬﻴﻟإ رﺎﺸﻤﻟا ﻢﻴﻘﻟا تﺎﻣﻮﻠﻌﻤﻟا ﺔﺣﻮﻟ ﺔﻴﻨﻘﺘﻟا
)
ﺔﻴﻟﺎﺘﻟا ﺔﺤﻔﺼﻟا ﻲﻓ
.(
! ،ﺔﻳﺎﻔآ ًﻼ ﻳ ﻮ ﻃ ﻩﺎﻴﻤﻟا بﻮﺒﻥأ ﻦﻜﻳ ﻢﻟ لﺎﺣ ﻲﻓ
ﺔﻣﺪﺥ ﻞﻣﺎﻋ وأ ﺺﺼﺨﺘﻣ ﺮﺠﺘﻤﺑ ﻞﺼﺕا
ﻪﻟ حﺮﺼﻣ.
! ﻞﻤﻌﺘﺴﺕ ﻻأﻴﺑﺎﻥأ ًا ﺪ ﺑﺔﻠﻤﻌﺘﺴﻣ ﺐ ﺔﻤﻳﺪﻗ وأ
واﺔﻟﻵا ﻊﻣ ةدوﺰﻤﻟا تﺎﺠﺘﻨﻤﻟا ﻞﻤﻌﺘﺱ.
و ﻞﺻبﻮﺒﻧأ ﻒیﺮﺼﺘﻟا
14

ﻞﺻﻮﺑ ﻢﻗبﻮﺒﻥأ
ﻒﻳﺮﺼﺘﻟا نود ﻦﻣ
ﻪﻴﻨﺙ ىﺮﺠﻤﺑ
ﻂﺋﺎﺣ وأ ﻒﻳﺮﺼﺕ
ﻦﻴﺑ ﻊﻘﻳ ﻒﻳﺮﺼﺕ65
و100 ﺱﺘﻨﻤﺮﺘ ﻦﻣ
ضرﻷا.
،ﻞﻳﺪﺑ ﻞﺤآ ﻊﺽ
ﻒﻳﺮﺼﺘﻟا بﻮﺒﻥأ
ﻰﻠﻋ ﺔﻓﺎﺣﻟا ضﻮﺤ
وأﻟا ،ﺔﻠﺴﻐﻤ ﻞﺻو
دوﺰﻤﻟا بﻮﺒﻥﻷا
ﺔﻴﻔﻨﺤﻟﺎﺑ)
ﻊﺟار
ةرﻮﺼﻟا
.( ﺐﺠﻳ ﻻ
نأ ءﺎﻤﻟا ﺖﺤﺕ فﺮﻃ نﻮﻜﻳ.
! ﻻ ﺢﺼﻨﻥﺑﺐﻴﺑﺎﻥﻸﻟ تاداﺪﻣإ لﺎﻤﻌﺘﺱﺎ؛ ﺪﻨﻋ
ىﻮﺼﻘﻟا ةروﺮﻀﻟا ﺐﺠﻳ ،نأ تاداﺪﻣﻹا نﻮﻜﺕ
ﻪﻨﻴﻋ ﺮﻄﻘﻟﺎﺑو ﻲﻠﺻﻷا بﻮﺒﻥﻸﻟ ﺐﺠﻳأ ىﺪﻌﺘﺕ ﻻ
150 ًﻻ ﻮ ﻃ ﻢﺱ.
ﻞﺻﻮﻟا ﻲﺋﺎﺑﺮﻬﻜﻟا
ﺔﻴﻟﺎﺘﻟا رﻮﻣﻷا ﻦﻣ ﺪآﺄﺕ ﻲﻓ ﺔﻟﻵا ﻊﺽو ﻞﺒﻗ
ءﺎﺑﺮﻬﻜﻟا ﺲﺒﻘﻣ:
• ﻘﻤﻟا ﻰﻠﻋ ضرﻷﺎﺑ ًﻻ ﻮ ﺻ ﻮ ﻣ نﻮﻜﻳ نأ ﺲﺒ
وﺎﺑ ﺪﻴﻘﺘﻳﻮﻘﻟﻴﻥاﻘﺒﻄﻤﻟا ﻦﺔ؛
• ﺔﻟﻵا ةﻮﻗ ﻞﻤﺤﺘﻳ نأ ﺲﺒﻘﻤﻟا ﻰﻠﻋ ىﻮﺼﻘﻟا
ﻰﻠﻋ ةرﻮآﺬﻤﻟا تﺎﻣﻮﻠﻌﻤﻟا ﺔﺣﻮﻟ ﺔﻴﻨﻘﺘﻟا
)
ﻊﺟارﻩﺎﻥدأ
(.
• ﻢﻴﻘﻟا ﻦﻤﺽ نﻮﻜﺕ نأ ﺔﻴﻄﻠﻔﻟا ةﻮﻗ ﻰﻠﻋ
ﻰﻠﻋ ةرﻮآﺬﻤﻟاﺔﻴﻨﻘﺘﻟا تﺎﻣﻮﻠﻌﻤﻟا ﺔﺣﻮﻟ
)ﻊﺟار
ﻩﺎﻥدأ
(.
• نأ ﺲﺒﻘﻤﻟا ﻰﻠﻋ ﻣ ًﺎﺒﺱﺎﻨﺘﻣ نﻮﻜﻳ ﺲﺑﺎﻗ ﻊ
ﺔﻟﻵا . وأ ﺲﺑﺎﻘﻟا لﺪﺒﺘﺱا ،ﺲﻜﻌﻟا ﺪﻨﻋ
ﺲﺒﻘﻤﻟا.
! ﻮﻟو ﻰﺘﺣ جرﺎﺨﻟا ﻲﻓ ﺔﻟﻵا ﺐﻴآﺮﺕ ﺐﺠﻳ ﻻ
ًﺎﻓﻮﻘﺴﻣ نﺎﻜﻤﻟا نﺎآ .ﺮﻌﺕ ًا ﺪ ﺟ ﺮﻴﻄﺨﻟا ﻦﻣ ﺎﻬﻀﻳ
ﻒﺻاﻮﻌﻟا وأ ﺮﻄﻤﻠﻟ تﻻﺎﺤﻟا ﻦﻣ ﺎهﺮﻴﻏو
ﺔﻳﻮﺠﻟا.
! ﻰﻟإ لﻮﺻﻮﻟا ﺐﺠﻳ ،ﺔﻟﻵا ﺐﻴآﺮﺕ ﻢﺕ ﻰﺘﻣ
ﺔﻟﻮﻬﺴﺑ ﺔﻴﺱﺎﺱﻷا ﺔﻴﺋﺎﺑﺮﻬﻜﻟا ﺲﺑﺎﻘﻤﻟا.
!ﺕ ﻻةدﺪﻌﺘﻣ ﺲﺑﺎﻘﻣ وأ تﻼﺻو كﻼﺱأ ﻞﻤﻌﺘﺴ
سوؤﺮﻟا.
! ﻲﻨﺙ ﺐﺠﻳ ﻻ كﻼﺱﻷا وأﺎﻬﻴﻠﻋ ﻂﻐﻀﻟا.
! ﺐﺠﻳنأ ﻦﻣ تﻼﺻﻮﻟا كﻼﺱأ لاﺪﺒﺘﺱا ﻢﺘﻳ
ﻞﺒﻗ ﻦﻴﻴﻨﻘﺕ ﺮﻣﺥﺺ ﻟﻢﻬ.
ﺮﻳﺬﺤﺕ ! ﻲﻓ ﺔﻴﻟوﺆﺴﻣ يأ ﻞﻤﺤﺘﺕ ﻻ ﺔآﺮﺸﻟا نإ
ﺪﻋاﻮﻘﻟا ﻩﺬه ىﺪﺣﺈﺑ ﺪّﻴﻘﺘﻟا ﻢﺘﻳ ﻢﻟ لﺎﺣ.
15

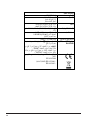
ﻟاتﺎﻡﻮﻠﻌﻤ ﺔﻴﻨﻘﺘﻟا
جذﻮﻤﻨﻟا
AQM9D 49 X
مﺎﺠﺡﻷا
ضﺮﻌﻟا59.5 ﺱﺘﻨﻤﺮﺘ
عﺎﻔﺕرﻻا85 ﺮﺘﻤﺘﻨﺱ
ﻖﻤﻌﻟا64،5ﺮﺘﻤﺘﻨﺱ
ﺔﻌﺴﻟا
ﻦﻣ1 ﻰﻟإ ﻎﻠآ9 ﻎﻠآﻞﻴﺴﻐﻟا ﺞﻣﺎﻥﺮﺒﻟ
ﻦﻣ1ﻰﻟإ ﻎﻠ
آ
6ﻎﻠآﻒﻴﻔﺠﺘﻟا ﺞﻣﺎﻥﺮﺒﻟ
تاداﺪﻡﻹا ﺎﺑﺮﻬﻜﻟاﺔﻴﺋ
ﺔﺣﻮﻟ ﺔﻌﺟاﺮﻣ ءﺎﺟﺮﻟا تﺎﻣﻮﻠﻌﻤﻟا ﻰﻠﻋ ﺔﺘﺒﺜﻤﻟا ﺔﻴﻨﻘﺘﻟا
ﺔﻟﻵا
ﻩﺎﻴﻤﻟا تاداﺪﻡإ
ا ﻰﺼﻗﻷا ﻂﻐﻀﻟ
1 MPa (10 bar)
ﻰﻥدﻷا ﻂﻐﻀﻟا
0.05 MPa (0.5 bar)
ضﻮﺤﻟا ﺔﻌﺱ62ﺮﺘﻴﻟ
ﻊیﺮﺴﻟا ناروﺪﻟا ﺔﻋﺮﺳ
ﺔﻳﺎﻐﻟ1400ةرود/ﺔﻘﻴﻗﺪﻟﺎﺑ
ﺞﻡاﺮﺑﺔﻗﺎﻄﻟا ﺐﺴﺤﺑ ﻪﻴﺝﻮﺘﻟا
EN 50229
ﻞﻴﺴﻐﻟا : ﺞﻣﺎﻥﺮﺑ
ةراﺮﺤﻟا ؛60 ؛ﺔﻳﻮﺌﻣ ﺔﺟرد
ﺑ ﺔﻟﻮﻤﺤ ﻦﻣ9 ﻎﻠآ
ﻒﻴﻔﺠﺘﻟا : ﻰﻟوﻷا ﻒﻴﻔﺠﺘﻟا ةرودﺑﻦﻣ ﺔﻟﻮﻤﺤ 3 ﻦﻣ ﻎﻠآ
ﻒﻴﻔﺠﺘﻟا ىﻮﺘﺴﻣ رﺎﻴﺘﺥا لﻼﺥ"
IRON"؛
ﻦﻣ ﺔﻟﻮﻤﺣ ﻦﻣ ﺔﻴﻥﺎﺜﻟا ﻒﻴﻔﺠﺘﻟا ةرود6 لﻼﺥ ﻦﻣ ﻎﻠآ
ﻒﻴﻔﺠﺘﻟا ىﻮﺘﺴﻣ رﺎﻴﺘﺥا"
EXTRA"؛
ﻊﻣ ﺔﻟﻵا ﻩﺬه ﻰﺵﺎﻤﺘﺕ ﻲﺑوروﻷا ﻊﻤﺘﺠﻤﻟا تﺎﻬﻴﺟﻮﺕ
ﺔﻴﻟﺎﺘﻟا:
108/2004/
EC
- 2006/95/
EC )ﺔﻴﻥﺪﺘﻤﻟا ﺔﻴﻄﻠﻔﻟا(
- 2002/96/
EC
16

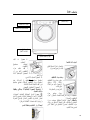
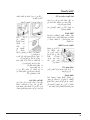
ﺔﻟﻵا ﻒﺻو
ﻟا بﺎﺒ تاذ ﺔﺤﺘﻔﻟا
ﺢﺘﻔﻟ ﺔﻜﺴﻤﻟا ًﺎ ﻤ ﺋ ا د ﻞﻤﻌﺘﺱا
ﻟا بﺎﺒ)
ﻊﺟارةرﻮﺼﻟا
(
ﻒﻴﻈﻨﺘﻟا داﻮﻡ ءﺎﻋو
ﻒﻴﻈﻨﺘﻟا داﻮﻣ ءﺎﻋو ﻊﻘﻳ
و ﺔﻟﻵا ﻞﺥاد ﻦﻜﻤﻳ
ﻪﻴﻟإ لﻮﺻﻮﻟا لﻼﺥ ﻦﻣ
بﺎﺒﻟا ﺢﺘﻓ.
ﻟﻠ تﺎﻣﻮﻠﻌﻤﻟا ﻦﻣ ﺪﻳﺰﻤ
داﻮﻣ ﺮﻴﻳﺎﻌﻣ لﻮﺣ
ءﺎﺟﺮﻟا ،ﻒﻴﻈﻨﺘﻟا ﺔﻌﺟاﺮﻣ ﻞﺼﻔﻟا نﻮﻨﻌﻤﻟا"داﻮﻣ
ﻈﻨﺘﻟاﻞﻴﺴﻐﻟاو ﻒﻴ
."
ﺔﻈﺡﻼﻡ: أ ﺔﻌﻗﺮﻟا ﻖﺼﻟﺑ ﺔﻘﻠﻌﺘﻤﻟا ﻒﺻﻮ ةرود
ﻞﻴﺴﻐﻟا وﻒﺋﺎﻇﻮﻟا ءﺎﻋو ﻦﻣ ﺔﻴﻣﺎﻣﻷا ﺔﻬﺠﻟا ﻰﻠﻋ
ﻒﻴﻈﻨﺘﻟا داﻮﻣ . ﻲﺘﻟا ﺔﺒﻠﻌﻟا ﻲﻓ ﻖﺼﻠﻤﻟا نوﺪﺠﺕ
ﺐﻴﺘﻜﻟا اﺬه يﻮﺤﺕ .
1-
ﺠﺣﻴ ﻞﺒﻗ ﺎﻣ ةﺮ
ﺴﻐﻟاﻴﻞ
:
ﺱا ﻞﻤﻌﺘ ﻖﻴﺣﺎﺴﻣ
ﻒﻴﻈﻨﺘﻟا.
! داﻮﻣ ﺐﻜﺱ ﻞﺒﻗ
ﻒﻴﻈﻨﺘﻟا، ﻦﻣ ﺪآﺄﺕنأ
ﺠﺤﻟاﻴ ﺔﻴﻓﺎﺽﻹا ةﺮ3 ﺪﻗ
ﺎﻬﺘﻟازإ ﻢﺕ.
2-
ﺠﺣﻴﺴﻐﻟا ةﺮﻴﻲﺱﺎﺱﻷا ﻞ
:
ﻞﻤﻌﺘﺱا ﻖﻴﺣﺎﺴﻣ وأ ﻒﻴﻈﻨﺘﻟاﻟاﺴﻮﻞﺋا .ﺪﻨﻋ
لﺎﻤﻌﺘﺱا داﻮﻣﻟاﻒﻴﻈﻨﺘ ﺔﻠﺋﺎﺴﻟاﻬﺒﻜﺴﺑ ﺢﺼﻨﻥ ،ﺎ
ًا ر ﻮ ﻓﺴﻐﻟا ﻞﻴﻐﺸﺕ ﻞﺒﻗﺎﻟﺔﻓﺎﺸﻨﻟا ﺔ.
3-
اﺠﺤﻟﻴﺔﻴﻓﺎﺽﻹا ةﺮ
:ﻟا ﺾﻴﻴﺒﺘ
!ﺠﺤﻟا لﺎﻤﻌﺘﺳاﻴ ﺔﻴﻓﺎﺿﻹا ةﺮ3 ﺔﻔﻴﻇو ﻲﻨﺜﺘﺴی
ﺴﻐﻟا ﻞﺒﻗ ﺎﻡﻴﻞ.
ﺠﺣﻴﺔﻓﺎﻀﻤﻟا داﻮﻤﻟا ةﺮ ﺴﻐﻠﻟﻴﻞ
:
ﻤﻌﻨﻤﻟتﺎ
ﺔﺸﻤﻗﻷاﺔﻠﺋﺎﺴﻟا ﺔﻓﺎﻀﻤﻟا داﻮﻤﻟا وأ
.ﺑ ﺢﺼﻨﻥﺄ ﻢﺘﻳ ﻻ
ﻪﻴﻟإ رﺎﺸﻤﻟا ﻰﺼﻗﻷا ىﻮﺘﺴﻤﻟا زوﺎﺠﺕلوﺪﺠﻟا ﻲﻓ
وأ ن ﺔﺑاذإ ﻢﺘﻳ تﺎﻤﻌﻨﻣ ﺔﺸﻤﻗﻷاةﺰآﺮﻤﻟا.
ﺔﻄﺳاﻮﺑ ﻢﻜﺤﺘﻟا رارزأ ﺔﺡﻮﻟﺲﻤﻠﻟ
ﻟا بﺎﺒﺔﺤﺘﻔﻟا تاذ
ﺔﻜﺴﻣ تاذ بﺎﺒﻟاﺔﺤﺘﻔﻟا
ﻢﻜﺤﺘﻟا ﺔﺣﻮﻟ
ﻦﻣ قاو ﻂﻳﺮﺵ
ﻷا تﺎﻣﺪآﺪﻗام
ﻢﺋاﻮﻘﻟا ﻞﻳﺪﻌﺘﻠﻟ ﺔﻠﺑﺎﻘﻟا
17

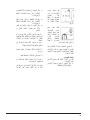
ﺔﻘﻄﻨﻤﻟا ﻞﺥاد ﺰﻣﺮﻟا ﻰﻠﻋ ﻂﻐﺽا ،ﻂﺒﻀﻟا ﻞﻳﺪﻌﺘﻟ
ﺔﺱﺎﺴﺤﻟا)ﺲﻤﻠﻟا ﺔﻄﺱاﻮﺑ رﺰﻟا (ﻬﻈﻳ ﺎﻤآ ﻲﻓ ﺮ
ةرﻮﺼﻟا.
دﺎﻤﺘﻋﻻا ﺔﻐﻴﺻ
نإ ﺔﻟﺎﺴﻐﻟا ﺔﻓﺎﺸﻨﻟا دﺎﻤﺘﻋا مﺎﻈﻨﺑ ةﺰﻬﺠﻣ
ﻜﻴﺕﺎﻣﻮﺕوأﻲ ﺔﻗﺎﻄﻟا ﺮﻴﻓﻮﺕ ﺔﻤﻈﻥأ ﻊﻣ ﻖﺑﺎﻄﺘﻳ
ﻢﺘﻳ ﻢﻟ لﺎﺣ ﻲﻓ ةﺪﻳﺪﻋ ﻖﺋﺎﻗد ﺪﻌﺑ ﻞﻤﻌﻳ ةﺪﻳﺪﺠﻟا
طﺎﺸﻥ يأ ﻂﺒﺽ . ﻞﻴﻐﺸﺘﻟا رز ﻰﻠﻋ ﻂﻐﺽا
/ءﺎﻔﻃﻹا
و ةﺰﻴﺟو ةﺮﺘﻔﻟ ﺮﻈﺘﻥا نأ ﺔﻟﻵا ﻞﻤﻌﺕ
ًادﺪﺠﻣ.
ﺔﻐﻠﻟا ﺮﻴﻴﻐﺗ
ةﺮﻤﻟا ﻲﻓﺔﻟﻵا ﻞﻴﻐﺸﺗ ﺎﻬﻴﻓ ﻢﺘی ﻲﺘﻟا ﻰﻟوﻷا،
ﺔﺵﺎﺸﻟا ﻰﻠﻋ ﻰﻟوﻷا ﺔﻐﻠﻟا ﺮﻬﻈﺕ . زﻮﻣﺮﻟا ﺮﻬﻈﺕ
" "و"
OK" و" " ﻊﻣ ﻖﻓاﻮﺘﻳ ﺎﻤﺑ ﺔﺵﺎﺸﻟا ﻰﻠﻋ
ﻰﻨﻤﻴﻟا ﺔﻬﺠﻟا ﻰﻠﻋ ﺔﺙﻼﺜﻟا رارزﻷا . تﺎﻐﻠﻟا ﺮﻴﻐﺘﺕ
ًﺎﻴﺋﺎﻘﻠﺕ ﻞآ3 ناﻮﺙ ﻦﻣ ﺎهﺮﻴﻴﻐﺕ ﻦﻜﻤﻳ ،ﻞﻳﺪﺑ ﻞﻜﺸﺑ ؛
لﻼﺥﻐﻀﻟاﻂ ﻦﻳﺰﻣﺮﻟا ﺐﻥﺎﺠﺑ رارزﻷا ﻰﻠﻋ" "
و"" . رز ﻰﻠﻋ ﻂﻐﺽا"
OK" ﻲﺘﻟا ﺔﻐﻠﻟا ﺪﻴآﺄﺘﻟ
ﻦﻴﺘﻴﻥﺎﺙ ﻞآ ﺎﻬﻄﺒﺽ ﻢﺘﻴﺱ . ﻂﻐﻀﻟا ﻢﺘﻳ ﻢﻟ لﺎﺣ ﻲﻓ
ﺪﻌﺑ ًادﺪﺠﻣ ﺮﻴﻴﻐﺘﻟﺎﺑ ﺔﻐﻠﻟا أﺪﺒﺘﺱ ،رز يأ ﻰﻠﻋ30
ﺔﻴﻥﺎﺙ . ﺔﻟﻵا نﻮﻜﺗ ﺎﻡﺪﻨﻋ ﻂﻘﻓ ﺔﻐﻠﻟا ﺮﻴﻴﻐﺗ ﻦﻜﻤی
ةﺄﻔﻄﻡ.
ةراﺮﺤﻟا رازأ ﻰﻠﻋ ﻂﻐﺽا
ناروﺪﻟاو
ﺮﺥﺄﺘﻤﻟا ﻞﻴﻐﺸﺘﻟاو
ةﺪﻤﻟ5 ناﻮﺙ . رﺪﺼﻴﺱ
نﺎﻨﻃ ﻰﻠﻋ ﺎﻬﻄﺒﺽ ﻢﺕ ﻲﺘﻟا ﺔﻐﻠﻟا ﺾﻣﻮﺘﺱو ﺮﻴﺼﻗ
ﺔﺵﺎﺸﻟا . ﺐﻥﺎﺠﺑ ﻦﻳرﺰﻟا ﻰﻠﻋ ﻂﻐﺽا ﻦﻳﺰﻣﺮﻟا
" "و" "ﺔﻐﻠﻟا ﺮﻴﻴﻐﺘﻟ . رﺰﻟا ﻰﻠﻋ ﻂﻐﺽا
ﺐﻥﺎﺠﺑ ﺰﻣﺮﻟا"
OK" ﻢﺘﻴﺱ ﻲﺘﻟا ﺔﻐﻠﻟا ﺪﻴآﺄﺘﻟ
ﺪﻌﺑ ﺎﻬﻄﺒﺽﻴﺘﻴﻥﺎﺙﻦ . ﻰﻠﻋ ﻂﻐﻀﻟا ﻢﺘﻳ ﻢﻟ لﺎﺣ ﻲﻓ
ﻰﻠﻋ ًﺎ ﻘ ﺒ ﺴ ﻣ ﺎﻬﻄﺒﺽ ﻢﺕ ﻲﺘﻟا ﺔﻐﻠﻟا ﺮﻬﻈﺘﺱ ،رز يأ
ﺪﻌﺑ ﺔﺵﺎﺸﻟا30 ﺎﺙﺔﻴﻥ .ﺄﻔﻃأ ﺔﻟﻵا.
18

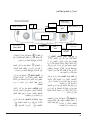
ﻢﻜﺤﺘﻟا رارزأ ﺔﺡﻮﻟﺲﻤﻠﻟا ﺔﻄﺳاﻮﺑ
ﻞﻴﻐﺸﺘﻟا ﺮﺵﺆﻡ ءﻮﺿ ﻊﻡ رز/ءﺎﻔﻃﻹا :
ﻂﻐﺽا ًﻼ ﻴ ﻠ ﻗ رﺰﻟا اﺬه ﻰﻠﻋ وأ ﺔﻟﻵا ﻞﻴﻐﺸﺘﻟ
ﺎﻬﺋﺎﻔﻃإ . ﻰﻟإ ﺮﻀﺥﻷا ﺮﺵﺆﻤﻟا ءﻮﺽ ﺮﻴﺸﻳنأ
ﺔﻠﻐﺸﻣ ﺔﻟﻵا . ﺔﻟﺎﺴﻐﻟا ءﺎﻔﻃﻹ ﺔﻓﺎﺸﻨﻟا ةرود لﻼﺥ
ﺴﻐﻟاﻴا ،ﻞﻠﻋ ﻂﻐﺽﻟ رﺰﻟا ﻰةﺪﻤ 3 لﺎﺣ ﻲﻓ ؛ناﻮﺙ
ًﻼ ﻴ ﻠ ﻗ رﺰﻟا ﻰﻠﻋ ﻂﻐﻀﻟا ﻢﺕأو ﺕ ﻦﻟ ،ًﺎﻴﺽﺮﻋﻨ ﺊﻔﻄ
ﺔﻟﻵا. ةرود لﻼﺥ ﺔﻟﻵا ءﺎﻔﻃإ ﻢﺕ لﺎﺣ ﻲﻓﻟاﺴﻐﻴ ،ﻞ
ﺴﻐﻟا ةرود ءﺎﻐﻟإ ﻢﺘﻴﺱﻴﻩﺬه ﻞ.
رﺎﻴﺘﺥا رزﻞﻴﺴﻐﻟا ةرود: ﻲﻠآ ﻲﻓ ﻪﺕرادإ ﻦﻜﻤﻳ
ﻦﻴهﺎﺠﺕﻻا .ﺴﻐﻟا ةرود رﺎﻴﺘﺥﻻﻴ ،ﺔﻤﺋﻼﻣ ﺮﺜآﻷا ﻞ
ءﺎﺟﺮﻟا ﺔﻌﺟاﺮﻣ"
لوﺪﺟدﺴﻐﻟا تاروﻴﻞ
." رﺰﻟا نإ
ﻞﻴﺴﻐﻟا ةرود ءﺎﻨﺙأ كﺮﺤﺘﻳ ﻦﻟ.
يرزم1 وم2 : ﻞﻴﺠﺴﺘﻟ ﻦﻳرﺰﻟا ﺪﺣأ ﻰﻠﻋ ﻂﻐﺽا
ﻲﻓ ةروﺪﻟا ﻲﻓ ﺔﻠﻀﻔﻤﻟا ﻚﺕارﺎﻴﺘﺥا ﻦﻣ ﺔﻋﻮﻤﺠﻣ
ﺔﻟﻵا ةﺮآاذ .ءﺎﻐﻟﻹ ﻂﻐﺽا ،ًﺎﻘﺒﺴﻣ ﺔﻠﺠﺴﻣ ةرود
ﻢﺋﻼﻤﻟا رﺰﻟا ﻰﻠﻋ .
ﻒﻴﻔﺠﺘﻟا رز: ﻂﻐﺽا ﺾﻴﻔﺨﺘﻟ رﺰﻟا اﺬه ﻰﻠﻋ
؛ﻒﻴﻔﺠﺘﻟا دﺎﻌﺒﺘﺱا وأ ﻴﺱ ىﻮﺘﺴﻣ ﺔﺵﺎﺸﻟا ﻰﻠﻋ ﺮﻬﻈ
ﺖﻗﻮﻟا وأ رﺎﺘﺨﻤﻟا ﻒﻴﻔﺠﺘﻟا)
ﻊﺟار ﺔﻴﻔﻴآ ﻞﻴﻐﺸﺕ
ﺴﻏ ةرودﻴﻞ ﻒﻴﻔﺠﺕ ةرود وأ
.(
ةراﺮﺤﻟا رز : ﻂﻐﺽاﻠﻋرﺰﻟا اﺬه ﻰ وأ ﻞﻳﺪﻌﺘﻟ
ءﺎﻐﻟاةراﺮﺤﻟا ﻂﺒﺽ ةرﺎﺘﺨﻤﻟا ﺔﻤﻴﻘﻟا ﺮﻬﻈﺘﺱ ؛ ﻰﻠﻋ
ﺔﺵﺎﺸﻟا)
ﻊﺟار ﺔﻴﻔﻴآﺴﻏ ةرود ﻞﻴﻐﺸﺕﻴﻞ
.(
رزناروﺪﻟا
:رﺰﻟا اﺬه ﻰﻠﻋ ﻂﻐﺽا ﻞﻳﺪﻌﺘﻟ
أ و ةرﺎﺘﺨﻤﻟا ﺔﻤﻴﻘﻟا ﺮﻬﻈﺘﺱ ؛ناروﺪﻟا ةرود ءﺎﻐﻟا
ﺔﺵﺎﺸﻟا ﻰﻠﻋ)
ﻊﺟار ﺔﻴﻔﻴآﺴﻏ ةرود ﻞﻴﻐﺸﺕﻴﻞ
.(
رزﻤﻟا ﻞﻴﻐﺸﺘﻟاﺮﺥﺄﺘ : ﻂﻐﺽا رﺰﻟا اﺬه ﻰﻠﻋ
ﺴﻐﻟا ةروﺪﻟ ﺮﺥﺄﺘﻣ ﻞﻴﻐﺸﺕ ﻂﺒﻀﻟﻴةرﺎﺘﺨﻤﻟا ﻞ.
ﻬﻈﻴﺱﺮ ﻪﻄﺒﺽ ﻢﺕ يﺬﻟا ﺮﻴﺥﺄﺘﻟا ﺖﻗو ﺔﺵﺎﺸﻟا ﻰﻠﻋ
)
ﻊﺟار ﺔﻴﻔﻴآﺴﻏ ةرود ﻞﻴﻐﺸﺕﻴﻞ ةرود وأ
ﻒﻴﻔﺠﺕ
.(
زأ رارﻒﺋﺎﻇﻮﻟا : ﻂﻐﺽا رﺰﻟا اﺬه ﻰﻠﻋ رﺎﻴﺘﺥﻻ
ﻒﺋﺎﻇﻮﻟاةﺮﻓﻮﺘﻤﻟا . ﻰﻘﺒﻴﺱﻟا ﺮﺵﺆﻤﻟا ءﻮﺽﺐﺱﺎﻨﻤ
ةرﺎﺘﺨﻤﻟا ﺔﻔﻴﻇﻮﻠﻟ ءﺎﻀﻣ)
ﻊﺟار ﺔﻴﻔﻴآ ﻞﻴﻐﺸﺕ
ﺴﻏ ةرودﻴﻞ ﻒﻴﻔﺠﺕ ةرود وأ
(.
زﻮﻡر ﺔﻠﺡﺮﻡﻞﻴﺴﻐﻟا ةرود : ﻩﺬه ءﺎﻀﺕ زﻮﻣﺮﻟا
ﺴﻐﻟا ةرود مﺪﻘﺕ ﻰﻟإ ةرﺎﺵﻺﻟﻴ ﻞ)ﺴﻐﻟاﻴ ﻞ
-
ﻒﻴﻄﺸﺘﻟا
- ناروﺪﻟا /ﺼﺘﻟا ﻒﻳﺮ -
رز رﺎﻴﺘﺥاﻞﻴﺴﻐﻟا ةرود
ﻒﻴﻔﺠﺘﻟا
ﻟاﺔﺵﺎﺸ
رز ﻞﻴﻐﺸﺘﻟا/فﺎﻘیﻹا
ﻊﻣﻟا ءﻮﺽﺮﺵﺆﻤ
ﺮﺵﺆﻣ ءﻮﺽ ﻊﻣ رز
و ﻞﻴﻐﺸﺘﻟاﻃﻹاءﺎﻔ
رزةراﺮﺤﻟا
رز ﻞﻴﻐﺸﺘﻟا
ﺮﺥﺄﺘﻤﻟا
ﺮﺵﺆﻣ ءﻮﺽ
بﺎﺒﻟا لﺎﻔﻗإ
ﺮﺵﺆﻣ ءﻮﺽ
ﺮﻴﻓﻮﺘﻟا
زﻮﻣر ﺔﻠﺡﺮﻡﻞﻴﺴﻐﻟا ةرود
رزإﻔﻗﺎﻢﻜﺤﺘﻟا ﺔﺡﻮﻟ ل ﻊﻣ
ﻟا ءﻮﺽﺮﺵﺆﻤ
رارزأﻒﺋﺎﻇﻮﻟا
م2 م1
رزناروﺪﻟا
19

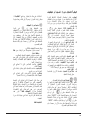
ﻒﻴﻔﺠﺘﻟا .( ءﺎﻀﺕ ﺔﻤﻠآEND لﺎﻤﺘآا ﺪﻨﻋ
ةروﺪﻟا.
ﻞﻴﻐﺸﺘﻟا رز/ فﺎﻘیﻹاﺮﺵﺆﻤﻟا ءﻮﺽ ﻊﻣ: ﺎﻣﺪﻨﻋ
ﻂﻐﺽا ،ءﻂﺒﺑ ﺮﻀﺥﻷا ﺮﺵﺆﻤﻟا ءﻮﺽ ﺾﻣﻮﻳ
رﺰﻟا ﻰﻠﻋﺴﻏ ةرود ﻞﻴﻐﺸﺘﻟﻴﻞ . ﻰﺘﻣأﺪﺑت ،ةروﺪﻟا
ﺱﺮﻄﺑ ءﺎﻀﻣ ﺮﺵﺆﻤﻟا ءﻮﺽ ﻰﻘﺒﻴﺔﺘﺑﺎﺙ ﺔﻘﻳ . فﺎﻘﻳﻹ
ﻞﻴﺴﻐﻟا ةرود ًادﺪﺠﻣ رﺰﻟا ﻰﻠﻋ ﻂﻐﺽا ،ًﺎﺘﻗﺆﻣ؛
ﺱﻲﻟﺎﻘﺕﺮﺒﻟا نﻮﻠﻟﺎﺑ ﺮﺵﺆﻤﻟا ءﻮﺽ ﺾﻣﻮﻴ . لﺎﺣ ﻲﻓ
ﺮﺵﺆﻣ ءﻮﺽ نﺎآ"بﺎﺒﻟا لﺎﻔﻗإ "
ﻔﻄﻣﺄ ،
بﺎﺒﻟا ﺢﺘﻓ ﻦﻜﻤﻳ . ةدوﺎﻌﻤﻟ ةرودﻟاﺴﻐﻴ ﻦﻣ ﻞ ﺚﻴﺣ
ﺖﻔﻗﻮﺕًادﺪﺠﻣ رﺰﻟا ﻰﻠﻋ ﻂﻐﺽا ،.
رز ﻢﻜﺤﺘﻟا ﺔﺡﻮﻟ لﺎﻔﻗإ ﺮﺵﺆﻤﻟا ءﻮﺽ ﻊﻣ :
ءﺎﻔﻃإ وأ ﻞﻴﻐﺸﺘﻟ لﺎﻔﻗإ ﻰﻠﻋ ﻂﻐﺽا ،ﻢﻜﺤﺘﻟا ﺔﺣﻮﻟ
ﺘﻴﻥﺎﺙ ﻲﻟاﻮﺤﻟ رﺰﻟاﻦﻴ . نﻮﻜﻳ ،ءﻮﻀﻟا ءﺎﻀﻳ ﺎﻣﺪﻨﻋ
ﻢﻜﺤﺘﻟا ﺔﺣﻮﻟ لﺎﻔﻗإ ﻢﺕ ﺪﻗ .ﻥا ﻲﻨﻌﻳ ﻚﻟذﻪ ﻦﻜﻤﻤﻟا ﻦﻣ
ﺐﻨﺠﺕ ﻢﺘﻳ نأﺴﻐﻟا تارود ﻞﻳﺪﻌﺕﻴ ،ًﺎﻴﺽﺮﻋ ﻞ
ًﺎﺻﻮﺼﺥلﺰﻨﻤﻟا ﻲﻓ دﻻوأ كﺎﻨه نﻮﻜﻳ ﺎﻣﺪﻨﻋ.
ﺮﺵﺆﻣ ءﻮﺽ ﺮﻴﻓﻮﺘﻟا ECO :ﻳ ءﺎﻀ ﺰﻣرECO
ﻣﺪﻨﻋﺎ ﺔﺒﺴﻨﺑ ﺔﻗﺎﻄﻟا ﺮﻴﻓﻮﺕ ﻢﺘﻳ10 % ،ﻞﻗﻷا ﻰﻠﻋ
ﺕ ﺪﻌﺑﺮﻴﻴﻐ ﺴﻐﻟا ﻢﻴﻗﻴﻞ. ﻞﺒﻗ ،ﻚﻟذ ﻰﻟإ ﺔﻓﺎﺽﻹﺎﺑنأ
ﺔﻟﻵا ﻞﺥﺪﺕ"دﺎﻤﺘﻋﻻا ﺔﻐﻴﺻ"ﺱ ،ﻴ ءﺎﻀ ﺰﻣﺮﻟا
ناﻮﺙ ﻊﻀﺒﻟ. ﻴﻓﻮﺕ نﻮﻜﻳ ،ﺔﻟﻵا ﺊﻔﻄﺕ ﺎﻣﺪﻨﻋ ﺮ
رﺪﻘﻤﻟا ﺔﻗﺎﻄﻟا ﺪﻗ برﺎﻗ ﺔﺒﺴﻥ80%.
20
La page est en cours de chargement...
La page est en cours de chargement...
La page est en cours de chargement...
La page est en cours de chargement...
La page est en cours de chargement...
La page est en cours de chargement...
La page est en cours de chargement...
La page est en cours de chargement...
La page est en cours de chargement...
La page est en cours de chargement...
La page est en cours de chargement...
La page est en cours de chargement...
La page est en cours de chargement...
La page est en cours de chargement...
La page est en cours de chargement...
La page est en cours de chargement...
La page est en cours de chargement...
La page est en cours de chargement...
La page est en cours de chargement...
La page est en cours de chargement...
La page est en cours de chargement...
La page est en cours de chargement...
La page est en cours de chargement...
La page est en cours de chargement...
-
 1
1
-
 2
2
-
 3
3
-
 4
4
-
 5
5
-
 6
6
-
 7
7
-
 8
8
-
 9
9
-
 10
10
-
 11
11
-
 12
12
-
 13
13
-
 14
14
-
 15
15
-
 16
16
-
 17
17
-
 18
18
-
 19
19
-
 20
20
-
 21
21
-
 22
22
-
 23
23
-
 24
24
-
 25
25
-
 26
26
-
 27
27
-
 28
28
-
 29
29
-
 30
30
-
 31
31
-
 32
32
-
 33
33
-
 34
34
-
 35
35
-
 36
36
-
 37
37
-
 38
38
-
 39
39
-
 40
40
-
 41
41
-
 42
42
-
 43
43
-
 44
44


Ariston AQM9D 49 X (EX) Mode d'emploi
- Catégorie
- Machines à laver
- Taper
- Mode d'emploi
dans d''autres langues
- English: Ariston AQM9D 49 X (EX) User guide