Yamaha VL1 Manuel utilisateur
- Catégorie
- Pianos numériques
- Taper
- Manuel utilisateur

Owner's Manual 1
Getting Started

Owner’s Manual 1
Getting Started

2
Getting Started
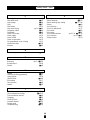
Contents
Precautions . . . . . . . . . . . . . . . . . . . . . . . . . . . . . . . . . . . . . . . . . . . . . . . . 4
About the Manuals . . . . . . . . . . . . . . . . . . . . . . . 6
■ The Getting Started Manual (this manual) . . . . . . . . . . . . . . . . . . . . . . . . 6
■ The Feature Reference Manual . . . . . . . . . . . . . . . . . . . . . . . . . . . . . . . . . 7
■ Conventions . . . . . . . . . . . . . . . . . . . . . . . . . . . . . . . . . . . . . . . . . . . . . . . . . 7
VL1 Basics . . . . . . . . . . . . . . . . . . . . . . . . . . . . . . 8
Essential Concepts for the VL1 User
■ What Are the Advantages? . . . . . . . . . . . . . . . . . . . . . . . . . . . . . . . . . . . . . 9
■ The VL1 Model . . . . . . . . . . . . . . . . . . . . . . . . . . . . . . . . . . . . . . . . . . . . 10
The Instrument . . . . . . . . . . . . . . . . . . . . . . . . . . . . . . . . . . . . . . . . 10
The Controllers . . . . . . . . . . . . . . . . . . . . . . . . . . . . . . . . . . . . . . . . 12
The Modifiers . . . . . . . . . . . . . . . . . . . . . . . . . . . . . . . . . . . . . . . . . 13
■ There’s More … . . . . . . . . . . . . . . . . . . . . . . . . . . . . . . . . . . . . . . . . . . . . 15
The Controls & Connectors . . . . . . . . . . . . . . . 16
A Brief Introduction To the VL1 Interface
■ Front Panel . . . . . . . . . . . . . . . . . . . . . . . . . . . . . . . . . . . . . . . . . . . . . . . . 17
■ Rear Panel . . . . . . . . . . . . . . . . . . . . . . . . . . . . . . . . . . . . . . . . . . . . . . . . . 20
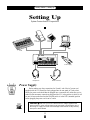
Setting Up . . . . . . . . . . . . . . . . . . . . . . . . . . . . . 22
System Connections & Preparation
■ Power Supply . . . . . . . . . . . . . . . . . . . . . . . . . . . . . . . . . . . . . . . . . . . . . . 22
■ Controllers . . . . . . . . . . . . . . . . . . . . . . . . . . . . . . . . . . . . . . . . . . . . . . . . . 23
Breath Controller . . . . . . . . . . . . . . . . . . . . . . . . . . . . . . . . . . . . . . 23
Foot Controllers . . . . . . . . . . . . . . . . . . . . . . . . . . . . . . . . . . . . . . . 23
Foot Switches . . . . . . . . . . . . . . . . . . . . . . . . . . . . . . . . . . . . . . . . . 23
■ Audio Connections . . . . . . . . . . . . . . . . . . . . . . . . . . . . . . . . . . . . . . . . . . 23
Headphones . . . . . . . . . . . . . . . . . . . . . . . . . . . . . . . . . . . . . . . . . . . 23
Stereo Sound System . . . . . . . . . . . . . . . . . . . . . . . . . . . . . . . . . . . 24
■ MIDI Connections . . . . . . . . . . . . . . . . . . . . . . . . . . . . . . . . . . . . . . . . . . . 24
■ Power-on Procedure . . . . . . . . . . . . . . . . . . . . . . . . . . . . . . . . . . . . . . . . . 25
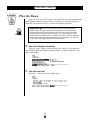
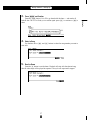
■ Play the Demo . . . . . . . . . . . . . . . . . . . . . . . . . . . . . . . . . . . . . . . . . . . . . . 26
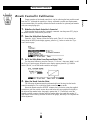
■ Breath Controller Calibration . . . . . . . . . . . . . . . . . . . . . . . . . . . . . . . . . . 29
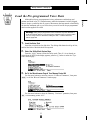
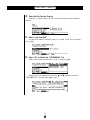
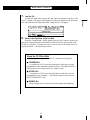
■ Load the Pre-programmed Voice Data . . . . . . . . . . . . . . . . . . . . . . . . . . 31

3
Getting Started
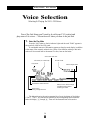
Voice Selection . . . . . . . . . . . . . . . . . . . . . . . . . 34
Selecting & Playing the VL1’s 128 Voices
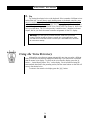
■ Using the Voice Directory . . . . . . . . . . . . . . . . . . . . . . . . . . . . . . . . . . . . 36
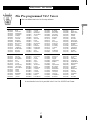
■ The Pre-programmed VL1 Voices . . . . . . . . . . . . . . . . . . . . . . . . . . . . . . 37
The Controllers . . . . . . . . . . . . . . . . . . . . . . . . . 38
Natural Musical Nuance and Expressive Control
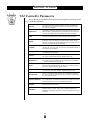
■ Physical Controllers . . . . . . . . . . . . . . . . . . . . . . . . . . . . . . . . . . . . . . . . . 39
■ VL1 Controller Parameters . . . . . . . . . . . . . . . . . . . . . . . . . . . . . . . . . . . . 40
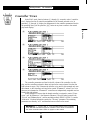
■ Controller Views . . . . . . . . . . . . . . . . . . . . . . . . . . . . . . . . . . . . . . . . . . . . 41
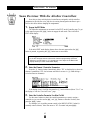
■ Some Exercises With the AltoSax Controllers . . . . . . . . . . . . . . . . . . . . 42
■ Controller Envelopes . . . . . . . . . . . . . . . . . . . . . . . . . . . . . . . . . . . . . . . . 46
■ Other Controller Views . . . . . . . . . . . . . . . . . . . . . . . . . . . . . . . . . . . . . . . 47
Mixing & The Modifiers . . . . . . . . . . . . . . . . . . 48
Creating New Timbres and Original Voices
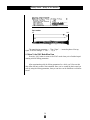
Mixing . . . . . . . . . . . . . . . . . . . . . . . . . . . . . . . . . . . . . . . . . . . . . . . . . . . 48
■ An Exercise: Remix the Pan Pipes Voice . . . . . . . . . . . . . . . . . . . . . . . . 49
The Modifiers . . . . . . . . . . . . . . . . . . . . . . . . . . . . . . . . . . . . . . . . . . . . . 51
■ Harmonic Enhancer . . . . . . . . . . . . . . . . . . . . . . . . . . . . . . . . . . . . . . . . . . 51
■ Dynamic Filter . . . . . . . . . . . . . . . . . . . . . . . . . . . . . . . . . . . . . . . . . . . . . 54
■ Frequency Equalizer . . . . . . . . . . . . . . . . . . . . . . . . . . . . . . . . . . . . . . . . . 55
■ Impulse Expander . . . . . . . . . . . . . . . . . . . . . . . . . . . . . . . . . . . . . . . . . . . 56
■ Resonator . . . . . . . . . . . . . . . . . . . . . . . . . . . . . . . . . . . . . . . . . . . . . . . . . . 57
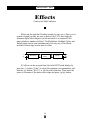
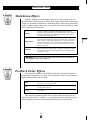
Effects . . . . . . . . . . . . . . . . . . . . . . . . . . . . . . . . 58
Creating the Right Ambience
■ Modulation Effects . . . . . . . . . . . . . . . . . . . . . . . . . . . . . . . . . . . . . . . . . . 59
■ Feedback Delay Effects . . . . . . . . . . . . . . . . . . . . . . . . . . . . . . . . . . . . . . 59
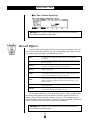
■ Reverb Effects . . . . . . . . . . . . . . . . . . . . . . . . . . . . . . . . . . . . . . . . . . . . . . 60
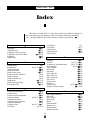
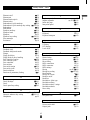
Index . . . . . . . . . . . . . . . . . . . . . . . . . . . . . . . . . 62

4
Getting Started
Precautions
!! PLEASE READ THIS BEFORE PROCEEDING !!
■ Location
Do not expose the instrument to the following
conditions to avoid deformation, discoloration, or more
serious damage.
• Direct sunlight (e.g. near a window).
• High temperatures (e.g. near a heat source,
outside, or in a car during the daytime).
• Excessive humidity.
• Excessive dust.
• Strong vibration.
■ Power Supply
• Turn the power switch OFF when the instrument
is not in use.
• The power supply cord should be unplugged from
the AC outlet if the instrument is not to be used
for an extended period of time.
• Unplug the instrument during electric storms.
• Avoid plugging the instrument into the same AC
outlet as appliances with high power consumption,
such as electric heaters or ovens. Also avoid using
multi-plug adaptors since these can result in
reduced sound quality and possibly damage.
■ Turn Power OFF When Making Connections
• To avoid damage to the instrument and other
devices to which it is connected (a sound system,
for example), turn the power switches of all
related devices OFF prior to connecting or discon-
necting audio and MIDI cables.
■ MIDI Connections
• When connecting the VL1 to MIDI equipment, be
sure to use high-quality cables made especially for
MIDI data transmission.
• Avoid MIDI cables longer than about 15 meters.
Longer cables can pick up electrical noise that can
causes data errors.
■ Handling and Transport
• Never apply excessive force to the controls,
connectors or other parts of the instrument.
• Always unplug cables by gripping the plug firmly,
not by pulling on the cable.
• Disconnect all cables before moving the instru-
ment.
• Physical shocks caused by dropping, bumping, or
placing heavy objects on the instrument can result
in scratches and more serious damage.
■ Cleaning
• Clean the cabinet and panel with a dry soft cloth.
• A slightly damp cloth may be used to remove
stubborn grime and dirt.
• Never use cleaners such as alcohol or thinner.
• Avoid placing vinyl objects on top of the instru-
ment (vinyl can stick to and discolor the surface).
■ Electrical Interference
• This instrument contains digital circuitry and may
cause interference if placed too close to radio or
television receivers. If this occurs, move the
instrument further away from the affected equip-
ment.
■ Data Backup
• The VL1 contains a special long-life battery that
retains the contents of its internal memory even
when the power is turned OFF. The backup
battery should last for several years. When the
backup battery needs to be replaced “Change
battery!” will appear on the display when the
power is turned on. When this happens, have the
backup battery replaced by qualified Yamaha
service personnel. DO NOT ATTEMPT TO
REPLACE THE BACKUP BATTERY YOUR-
SELF!

5
Getting Started
• Internal memory data can be corrupted due to
incorrect operation. Be sure to save important data
to floppy disk frequently so you have a backup to
revert to if something happens to damage the data
in memory. Also note that magnetic fields can
damage data on the disk, so it is advisable to
make a second back-up copy of disks that contain
very important data, and keep backup disks in a
safe place away from stray magnetic fields (i.e.
away from speakers, appliances containing mo-
tors, etc.).
■ Handle Floppy Disks and the Disk Drive With
Care
• Use only 3.5” 2HD or 2DD type floppy disks.
• Do not bend or apply pressure to the floppy disk.
Do not open the shutter and touch the surface of
the floppy disk inside.
• Do not expose the disk to high temperatures. (e.g.
direct sunlight)
• Do not expose the disk to magnetic fields. Mag-
netic fields can partially or totally erase data on
the disk, rendering the disk unreadable.
• To eject a floppy disk, press the eject button
slowly as far as it will go then, when the disk is
fully ejected, remove it by hand.
The disk may not be ejected properly if the eject
button is pressed too quickly, or it is not pressed
in as far as it will go (the eject button may be-
come stuck in a half-pressed position and the disk
extends from the drive slot by only a few
millimeters). If this happens, do not attempt to
pull out the partially ejected disk. Using force in
this situation can damage the disk-drive mecha-
nism or the floppy disk. To remove a partially
ejected disk, try pressing the eject button once
again, or push the disk back into the slot and then
repeat the eject procedure carefully.
• Do not insert anything but floppy disks into the
disk drive. Other objects may cause damage to the
disk drive or the floppy disk.
■ Service and Modification
• The VL1 contains no user serviceable parts.
Opening it or tampering with it in any way can
lead to irreparable damage and possibly electric
shock. Refer all servicing to qualified YAMAHA
personnel.
■ Third-party Software
• Yamaha can not take any responsibility for
software produced for this product by third-party
manufacturers. Please direct any questions or
comments about such software to the manufac-
turer or their agents.
YAMAHA is not responsible for damage caused by improper handling or operation.

6
Getting Started
About the Manuals
The VL1 comes with two manuals — Getting Started and Feature
Reference.
The Getting Started Manual (this manual)
The Getting Started manual contains seven chapters that take you through
essential information and procedures you will need to know to become familiar
with your VL1:
1. VL1 Basics [≥ Page 8]
Basic concepts you’ll need to understand in order to get the
most out of the VL1.
2. The Controls & Connectors [≥ Page 16]
Brief descriptions of the VL1 controls and connectors, and their
functions.
3. Setting Up [≥ Page 22]
System connections, powering up, playing the demo, calibrating
the Breath Controller, and loading the pre-programmed voices.
4. Voice Selection [≥ Page 34]
Several ways to select and play the VL1’s 128 voices.
5. The Controllers [≥ Page 38]
The VL1 controllers and how they can be assigned and edited
for optimum control.
6. Mixing & The Modifiers [≥ Page 48]
Customizing the sound to suit your own personal needs.
7. Effects [≥ Page 58]
An overview of the built-in digital effects that you can use to
add depth and ambience to the VL1 sound.
We recommend that you go through the chapters in sequence and actually
try out the various operations described. Once you’ve gone through the entire
Getting Started manual in this way, you should be familiar enough with the VL1
to need only the VL1 Feature Reference manual in future.

7
Getting Started
The Feature Reference Manual
The Feature Reference manual is the “nuts and bolts” reference for
the VL1, individually describing its many functions in detail. The Feature
Reference manual is divided into five main sections, each describing the
various functions within a particular VL1 edit or utility mode.
1. General Operation [
≥ Page 7]
2. Play Mode [
≥ Page 13]
3. Edit Mode [≥ Page 21]
4. Utility Mode [≥ Page 151]
5. Appendix [≥ Page 177]
Once you have become familiar with the way the VL1 works by
going through the Getting Started manual, you should only need to refer to
the Feature Reference manual from time to time to get details on functions
you’ve never used before, or refresh your memory about functions that
you don’t use very often.
Each section of the Feature Reference manual has its own table of
contents, so you should be able to locate any particular function quickly
and easily. Functions and references can also be located by referring to the
index at the back of the manual.
Conventions
The following conventions are used through the VL1 manuals to
avoid confusion and make the text easier to read.
Buttons & Controls
Button and control names used on the VL1 panel appear in the text
in capital letters within a border: “the [ button”, for example.
Parameter Names
Parameter names and other labels which appear on the VL1 display
are printed in the courier typeface for easier identification: for
example, “adjust the “Balance” parameter as required”.
Parameter Ranges
An ellipsis is used to indicate a range of parameter values: e.g. “0 …
127”. This minimizes the confusion sometimes caused by the use of
a hyphen or dash for this purpose.

8
Getting Started
T
he Yamaha VL1 Virtual Acoustic Synthesizer produces sound in an
entirely new way. It has no oscillators or function generators, no
preset waveforms or samples. In fact, it uses none of the sound
generation concepts employed in conventional synthesizers. The VL1
represents the world’s first practical application of computer-based “physi-
cal modeling” in musical sound synthesis.
In the same way that computer models are used to simulate weather
systems or the flight characteristics of aircraft in the design stage, the VL1
simulates the very complex vibrations, resonances, reflections and other
acoustic phenomena that occur in a real wind or string instrument. This
requires a tremendous amount of computer processing power (weather and
aerodynamic modeling require room-filling super computers), and radical
advances in microprocessor speed and capability plus some very sophisti-
cated Yamaha technology were necessary to achieve the real-time sound
generation capabilities exhibited by the ground-breaking VL1 Virtual
Acoustic Synthesizer.
VL1 Basics
Essential Concepts for the VL1 User

9
Getting Started
T
he VL1 offers many advantages in terms of musical performance.
Not just in terms of sound, but also in terms of the “behavior” that
makes acoustic instruments so … well, musical! But this is not
because someone has programmed a certain sound or pattern of behavior
into it. The physical model can be programmed to have certain attributes
— the length of a pipe or the stiffness of a reed, for example — but the
actual sound produced by any configuration can only be accurately deter-
mined by playing it. Of course, the same applies to the design of acoustic
instruments. Because of its natural acoustic behavior the VL1 is undoubt-
edly a little harder to play than conventional synthesizers, but when mas-
tered this is the very characteristic that is its greatest strength. The Yamaha
VL1 is the most musical synthesizer ever made. A soloist’s dream!
• The VL1 sounds better, has more depth, and is more realistic in
the musical sense than any other synthesizer system.
• Simply pressing a key in the same way does not always produce
precisely the same sound. The instrument is responsive and
“alive”.
• Note-to-note transitions have the same continuity exhibited by
acoustic instruments. What goes on in between the notes is just as
important musically as the notes themselves.
• It has extraordinary expressive capability. Rather than simply
controlling parameters like volume or pitch, you can control
characteristics such as breath and reed pressure with appropriate
complex effects on the timbre of the sound.
What Are the Advantages?

10
Getting Started
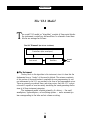
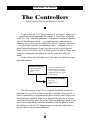
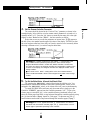
The VL1 Model
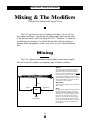
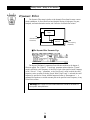
T
he overall VL1 model or “algorithm” consists of three main blocks:
the instrument, controllers, and modifiers. In schematic form these
blocks are arranged as follows:
●
The Instrument
The key block in this algorithm is the instrument, since it is here that the
fundamental tone or “timbre” of the sound is defined. The extreme complexity
of this portion of the model makes it unsuitable for user programming, so vari-
ous instruments for the VL1 are provided in the form of pre-programmed voices.
These are primarily woodwind, brass, and string voices, since the VL1’s physi-
cal model is capable of most accurately simulating the sound-generating mecha-
nism of all three instrument categories.
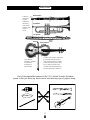
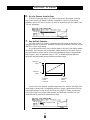
The instrument model consists primarily of a driver — the reed/
mouthpiece, lip/mouthpiece, or bow/string system — and a resonant sys-
tem corresponding to the tube and air column or string.
Controllers (also envelopes)
Instrument
Modifiers
Sound
out.
One VL "Element"
(the VL has 2 of these)

11
Getting Started
Reed vibration.
Lip vibration.
Air vibration.
String vibration.
In all these
instruments
pressure
applied here
(the driving
point) causes
vibration which
results in
sound.
The pitch of the sound is determined
by the length of the air column or
string, and the timbre is a complex
product of the driving source (reed,
lip, air, string), the shape of the
resonant cavity, the materials from
which the instrument is made, etc.
The sound thus
produced is amplified
and sustained
by the body of
the instrument.
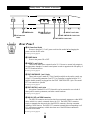
One of the remarkable features of the VL1’s Virtual Acoustic Synthesis
system is that just about any driver can be used with any type of pipe or string.
Drivers Pipes/String

12
Getting Started
●
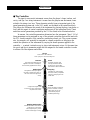
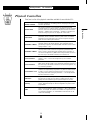
The Controllers
The input to an acoustic instrument comes from the player’s lungs, trachea, oral
cavity, and lips. In a string instrument it comes from the players arm movement, trans-
mitted to the string via a bow. These elements actually form an important part of the
sound generating system and, in the VL1 model, are included in the controllers block.
The player also influences the sound of the instrument by playing the keys, tone holes, or
frets, and this aspect of control constitutes another part of the controllers block. These
and other control parameters provided by the VL1 are listed in the illustration below.
In essence, the controller parameters determine how the instrument “plays”. All of
these parameters can be assigned to any of the external controllers that can be used with
the VL1: breath controller, foot controller, modulation wheels, etc. The pressure param-
eter, for example, will normally be assigned to a breath controller so the player can
control the dynamics of the instrument by varying the breath pressure applied to the
controller — a natural, instinctive way to play wind-instrument voices. At the same time
the growl and throat parameters might also be assigned to the breath controller in order
to achieve life-like response and effects.
Pressure
The amount of breath pressure
applied to the reed or mouthpiece,
or bow velocity applied to the string".
Embouchure
The tightness of the lips against
the reed or against each other, or
the force of the bow against the
string.
Pitch
Changes the length of the
air column or string, and thereby
the pitch of the sound.
Tonguing
Simulates the half-tonguing
technique used by saxophone
players by changing the "slit"
of the reed.
Scream
Drives the entire system into
chaotic oscillation, creating
effects that can only be
achieved with physical
modelling technology.
Growl
A periodic pressure (bow
velocity) modulation which
produces the "growl" effect
often heard in wind instruments.
Throat
Controls the characteristics
of the "player's" throat or bowing arm.
Damping & Absorption
Simulate the effects of air friction
in the pipe or on the string,
and of high-frequency losses
at the end of the pipe or string.

13
Getting Started
●
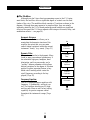
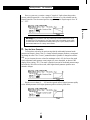
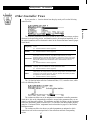
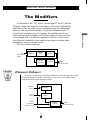
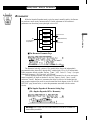
The Modifiers
Although you don’t have direct programming access to the VL1 instru-
ment block, the modifiers allow a significant degree of control over the final
timbre of the voice. The modifiers block consists of 5 sections as shown in the
diagram. Although these may appear to be simple effects, they are actually
intimately related to the VL1’s sound-producing model and have a significant
effect on the sound (the VL1 has a separate effects stage with reverb, delay, and
modulations effects — see page 58).
Harmonic Enhancer
The Harmonic Enhancer allows you to
manipulate the harmonic structure of the
sound to the extent that you can create
radical timbral variations within the current
instrument “family” (e.g. saxes). [Page 51]
Dynamic Filter
This section is similar to the dynamic filters
found in many conventional synthesizers. It
has selectable high-pass, bandpass, band
elimination, and low-pass modes, and a
“wet/dry” balance parameter which allows
delicate variations in the degree of filtration
applied. Another important feature is key-
board cutoff tracking which varies the
cutoff frequency according to the key
played. [Page 54]
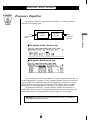
Frequency Equalizer
This is a 5-band parametric equalizer with
frequency, Q (bandwidth), and level con-
trol. The equalizer also has pre-EQ high-
and low-pass filters as well as key scaling
capability for precise response control
throughout the instrument’s range. [Page
55]
In
Out
Impulse
Expander
Frequency
Equalizer
Dynamic
Filter
Harmonic
Enhancer
Resonator

14
Getting Started
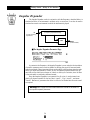
Impulse Expander
The Impulse Expander works in conjunction with the Resonator, described
below, to simulate the effect of an instrument’s resonant cavity or sound
box. It can also be used to simulate the acoustic environment in which the
instrument is played. In contrast to the Resonator, the Impulse Expander is
more suited to the simulation of metallic resonances and is thus invaluable
for refining the sound of brass and metal-bodied woodwinds. Other impor-
tant effects are the ability to diffuse sharp attack sounds and to give depth
and realism to vibrato. [Page 56]
Resonator
While the Impulse Expander and even the Harmonic Enhancer tend to give
the sound a metallic quality, the Resonator produces a more woody reso-
nance effect. Careful adjustment of the resonator’s parameters can often
bring a not-quite-right voice to life. [Page 57]

15
Getting Started
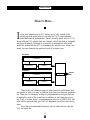
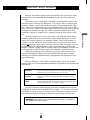
There’s More …
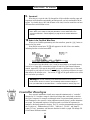
I
n this brief introduction to VL1 basics we’ve only looked at the
central physical model which is the key the VL1’s unprecedented
sound and musical performance. There’s actually much more to it. To
begin with the VL1 actually has two elements which function as independ-
ent physical models. Although it is basically a monophonic solo instru-
ment, this means that the VL1 can produce two notes at once. More com-
monly the two elements are used as layers of a single voice.
There’s also an extensive range of other functions and features that
are similar to those you may be familiar with from conventional synthesiz-
ers. There are, for example, a range of programmable envelopes that can
be applied to most of the controllers in addition to real-time player con-
trol. And, of course, there’s a comprehensive selection of MIDI, disk, and
other utility functions that give the VL1 maximum versatility and conven-
ience.
Now that you understand the basics, dive in and find out what the
VL1 can really do.
Sound
out.
Effects
Controllers
Instrument Modifiers
Element 1
Element 2
Controllers
Instrument Modifiers

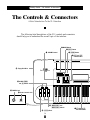
The Controls & Connectors
The following brief descriptions of the VL1 controls and connectors
should help you to understand the overall logic of the interface.
A Brief Introduction To the VL1 Interface
F1 F2 F3 F4 F5 F6 F7 F8 CONT
MODE
COMPARE
PLAY
EDIT UTILITY COPY STORE
PITCH MODULATION 1 MODULATION 2
OC TAVE
DOWN UP
VOLUME CS1 CS2
LR
OUTPUT
12
FOOT CONTROLLER
FOOT SWITCH
1
2
IN THRU
MIDI
OUT
!9
Breath Controller Jack
!8
PHONES Jack
PHONES
BREATH
q MODE Buttons
w
C Button
e
S Button
t
– and ≠
Control Sliders
r
VOLUME Control
u
¡ through •
Function Buttons
!7
“ and
!6
π Wheel
!5
OCTAVE _
and + Buttons
@0
Floppy Disk Drive
‘ Wheels
16
Getting Started
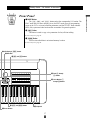
●
The Controls & Connectors

ENTEREXIT
INCDEC
POWER
ON / OFF
A
1
E1
9
ALL
B
2
E2
10
HE
C
3
E1
11
DF
D
4
E2
12
EQ
E
5
ALL
13
IE
F
6
MOD
14
RSN
G
7
FBD
15
H
8
REV
16
EFFECT ON / OFF
ELEMENT ON / OFFELEMENT SELECT
MODIFIER ON / OFF
!1 ] and [ Buttons
i Data Dial
!2 Bank a through
h Buttons
!3 Voice Number 1
through ^ Buttons
o Cursor Buttons
!4 Keyboard
!0 = and - Buttons
y LCD Display & ÷ Control
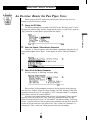
Front Panel
q MODE Buttons
The P, E, and U buttons select the corresponding VL1 modes. The
PLAY mode lets you select and play voices, the EDIT mode gives you programming
access to the VL1’s voice and controller parameters, and the UTILITY mode includes
MIDI, disk, system and other functions that are essential for general operation.
w C Button
This button is used to copy voice parameters for fast, efficient editing.
☛ Feature Reference page 25.
e S Button
Used to store edited data to an internal memory location.
☛ Feature Reference page 28.
17
Getting Started
●
The Controls & Connectors
The Controls & Connectors

18
Getting Started
●
The Controls & Connectors
r VOLUME Control
Adjusts the volume of the sound delivered via the rear-panel OUTPUT L and R
jacks as well as the PHONES jack.
☛ Getting Started page 25.
t – and ≠ Control Sliders
These controls can be assigned to a range of controller parameters for real-time
expressive control.
☛ Getting Started page 47. Feature Reference page 19.
y LCD Display & ÷ Control
This large multi-function liquid crystal display panel shows all parameters and
prompts you need to operate the VL1 with optimum ease and efficiency.
Use the ÷ (contrast) control located near the lower right-hand corner of the
display to achieve the best display visibility (LCD visibility varies greatly with viewing
angle and lighting).
☛ Getting Started page 34. Feature Reference page 14.
u ¡ through • Function Buttons
The functions of these buttons depend on the selected mode. They are used to
engage a function indicated on the display immediately above the button, select a page of
parameters, scroll through a list of parameters, and more.
☛ Getting Started page 26. Feature Reference page 9.
i Data Dial
The data entry dial provides a fast, efficient way to cover a broad range of voice
numbers when, for example, you’re looking for a voice but don’t know the voice number.
It’s also handy for making large value changes in any of the edit modes.
The data dial is “speed sensitive”, allowing accurate single step selection when
rotated slowly as well as large value “jumps” when rotated quickly.
☛ Getting Started page 35. Feature Reference page 16.
o Cursor Buttons
These 4 buttons move the “cursor” around the display screen, highlighting the
various items that are available for selection or parameters that are available for editing
(the VL1 cursor appears as a dark block with inverse characters).
☛ Getting Started page 32. Feature Reference page 10.
!0 = and - Buttons
Used to select voices and edit parameter values in any of the VL1 edit modes.
Either button can be pressed briefly for single stepping in the specified direction, or held
for continuous scrolling. These buttons are also used to respond “Yes” or “No” to the
“Are you sure?” confirmation prompt when saving, loading data.
☛ Getting Started page 35. Feature Reference page 16.
!1 ] and [ Buttons
The ] button can generally be used to exit from any sub-mode or function,
while the [ button is used to engage a variety of modes and functions.
☛ Getting Started page 27. Feature Reference page 10.

19
Getting Started
●
The Controls & Connectors
The Controls & Connectors
!2 Bank a through h Buttons
The VL1 has 128 internal voice memory locations arranged in 8 banks of 16 voices
each. These buttons select the voice bank from which an individual voice will be se-
lected.
☛ Getting Started page 35. Feature Reference page 15.
!3 Voice Number 1 through ^ Buttons
The voice number buttons are used in conjunction with the bank buttons to select
any of the VL1’s 128 internal voice memory locations. When editing voice parameters
they are also used to select and mute elements, an to turn effects and modifiers on or off.
☛ Getting Started page 35. Feature Reference page 15.
!4 Keyboard
The VL1 has a 49-key keyboard that is both velocity and after-touch sensitive for
broad, intimate expressive control.
!5 OCTAVE _ and + Buttons
Shift the pitch of the keyboard up or down one octave. A utility “Octave Hold”
function (page 153 of the Feature Reference manual) provides two modes: shift only
while the button is held, or press once to shift and again to release. MIDI note output
data is also shifted.
!6 π Wheel
This self-centering pitch wheel allows realistic upward and downward pitch bends.
!7 “ and ‘ Wheels
Can be assigned to any of the VL1’s extensive range of controller parameters for
extraordinary expressive control.
☛ Getting Started page 41.
!8 PHONES Jack
Accepts a standard pair of stereo headphones (1/4" stereo phone plug) for
headphone monitoring of the VL1 sound without the need for external amplification
equipment.
☛ Getting Started page 23.
!9 Breath Controller Jack
Plug the Yamaha BC2 Breath Controller supplied with the VL1 in here (an optional
BC1 Breath Controller may also be used).
☛ Getting Started page 23.
@0 Floppy Disk Drive
The VL1’s built-in floppy disk drive allows easy, economical, high-volume storage
of voice data. The disk-in-use indicator below the drive slot lights while any disk opera-
tion is in progress (
NEVER attempt to remove a disk or turn the power off while a disk
operation is in progress). The eject button, also below the disk slot, is used to remove
disks from the drive.
☛ Feature Reference page 162.
La page charge ...
La page charge ...
La page charge ...
La page charge ...
La page charge ...
La page charge ...
La page charge ...
La page charge ...
La page charge ...
La page charge ...
La page charge ...
La page charge ...
La page charge ...
La page charge ...
La page charge ...
La page charge ...
La page charge ...
La page charge ...
La page charge ...
La page charge ...
La page charge ...
La page charge ...
La page charge ...
La page charge ...
La page charge ...
La page charge ...
La page charge ...
La page charge ...
La page charge ...
La page charge ...
La page charge ...
La page charge ...
La page charge ...
La page charge ...
La page charge ...
La page charge ...
La page charge ...
La page charge ...
La page charge ...
La page charge ...
La page charge ...
La page charge ...
La page charge ...
La page charge ...
La page charge ...
La page charge ...
-
 1
1
-
 2
2
-
 3
3
-
 4
4
-
 5
5
-
 6
6
-
 7
7
-
 8
8
-
 9
9
-
 10
10
-
 11
11
-
 12
12
-
 13
13
-
 14
14
-
 15
15
-
 16
16
-
 17
17
-
 18
18
-
 19
19
-
 20
20
-
 21
21
-
 22
22
-
 23
23
-
 24
24
-
 25
25
-
 26
26
-
 27
27
-
 28
28
-
 29
29
-
 30
30
-
 31
31
-
 32
32
-
 33
33
-
 34
34
-
 35
35
-
 36
36
-
 37
37
-
 38
38
-
 39
39
-
 40
40
-
 41
41
-
 42
42
-
 43
43
-
 44
44
-
 45
45
-
 46
46
-
 47
47
-
 48
48
-
 49
49
-
 50
50
-
 51
51
-
 52
52
-
 53
53
-
 54
54
-
 55
55
-
 56
56
-
 57
57
-
 58
58
-
 59
59
-
 60
60
-
 61
61
-
 62
62
-
 63
63
-
 64
64
-
 65
65
-
 66
66


Yamaha VL1 Manuel utilisateur
- Catégorie
- Pianos numériques
- Taper
- Manuel utilisateur
dans d''autres langues
- italiano: Yamaha VL1 Manuale utente
- English: Yamaha VL1 User manual
- español: Yamaha VL1 Manual de usuario
- Deutsch: Yamaha VL1 Benutzerhandbuch
- русский: Yamaha VL1 Руководство пользователя
- Nederlands: Yamaha VL1 Handleiding
- português: Yamaha VL1 Manual do usuário
- dansk: Yamaha VL1 Brugermanual
- polski: Yamaha VL1 Instrukcja obsługi
- čeština: Yamaha VL1 Uživatelský manuál
- svenska: Yamaha VL1 Användarmanual
- Türkçe: Yamaha VL1 Kullanım kılavuzu
- suomi: Yamaha VL1 Ohjekirja
- română: Yamaha VL1 Manual de utilizare
Documents connexes
-
Yamaha VL1-m Le manuel du propriétaire
-
-
-
-
Yamaha VL Version2 Le manuel du propriétaire
-
-
-
-
-