
®
Directional Destratication Fans 1
®
Document 486130
Model DDF
Directional Destratication Fans
Installation, Operation and Maintenance Manual
Please read and save these instructions for future reference. Read carefully before attempting to assemble, install,
operate or maintain the product described. Protect yourself and others by observing all safety information. Failure
to comply with these instructions will result in voiding of the product warranty and may result in personal injury
and/or property damage.
Important Safety Instructions
Read and save these instructions.
1. Only mount fan to building structure.
2. Read and follow all instructions, cautionary markings
and make sure power source conforms to the
requirement of the equipment.
3. Follow all local electrical and safety codes, as
well as the National Electrical Code (NEC) and the
Occupational Safety and Health Act (OSHA) in the
United States, including re rated construction.
Ground motor in accordance with NEC Article 250
(grounding).
4. Do not use an extension cord with this fan.
5. Do not kink power cord or allow it to contact oil,
grease, hot surfaces, sharp objects or chemicals.
Replace worn or damaged cord immediately.
Model DDF directional destratication fans provide improved comfort
and reduced energy costs by efciently mixing air from oor to ceiling
to improve temperature uniformity. Fans are ideal for a variety of
commercial, industrial and institutional applications, especially in
buildings with high ceilings. Features include an aerodynamically
optimized housing, high efciency corrosion resistant propeller with
aluminum blades, electronically commutated (EC) Vari-Green® motor,
and 10 foot wiring pigtail with plug. Universal mounting bracket
includes steel hanging cable and secondary steel safety cable with
Gripple® installation hardware.
WARNING
To reduce the risk of fire, electrical shock, or injury to
persons, observe the following:
a. Use this unit only in the manner intended by the
manufacturer. If you have questions, contact the
manufacturer.
b. Before servicing or cleaning unit, switch power off
at service panel and lock the service disconnecting
the means to prevent power from being switched
on accidentally. When the service disconnecting
means cannot be locked, securely fasten a
prominent warning device, such as a tag, to the
service panel.
c. Do not use this fan with any solid-state speed
control device.
d. Do not use replacement parts that have not been
recommended by the manufacturer.
e. Installation work and electrical wiring must be
done by a qualied person(s) in accordance with
all applicable codes and standards, including re-
rated construction.
f. When cutting or drilling into wall or ceiling, do not
damage electrical wiring and other hidden utilities.
WARNING
Always disconnect, lock and tag power source before
servicing. Failure to disconnect power source can
result in fire, shock or serious injury. Always unplug
the power cord.
Do not insert foreign objects in between rotating fan
blades.
To reduce the risk of electric shock, do not expose to
water or rain.
Do not use general purpose fans in flammable,
explosive, chemical-laden, or wet or rainy
atmospheres. Do not attach fan to ductwork.

Directional Destratification Fans2
®
AVERTISSEMENT
Pour écarter tout risque d’incendie, d’électrocution
ou de blessures graves, veiller à toujours débrancher,
verrouiller et étiqueter la source d’alimentation avant
toute intervention. Veiller à toujours débrancher le
cordon d’alimentation.
Ne pas insérer de corps étranger entre les pales en
rotation du ventilateur.
Pour réduire le risque de choc électrique, ne pas
exposer à l’eau ou à la pluie.
Ne pas utiliser de ventilateurs d’usage général dans
des milieux inflammables, explosifs, chargés de
substances chimiques, ou bien humides ou pluvieux.
Ne pas fixer le ventilateur au système de gaines.
AVERTISSEMENT
Pour réduire le risque d’incendie, de choc électrique
ou de blessure corporelle, respecter ce qui suit :
a. Utiliser cet appareil exclusivement comme prévu
par le fabricant. En cas de questions, communiquer
avec le fabricant.
b Avant tout entretien ou nettoyage de l’appareil,
couper l’alimentation sur le tableau électrique et
verrouiller le dispositif de sectionnement pour
empêcher toute mise sous tension accidentelle.
Si le dispositif de sectionnement ne peut pas être
verrouillé, attacher un moyen de mise en garde
bien visible, tel qu’un panonceau, au tableau
électrique.
c. Ne pas utiliser ce ventilateur avec un quelconque
dispositif de régulation de vitesse à semi-
conducteurs.
d. Ne pas utiliser de pièces de rechange qui n’ont pas
été recommandées par le fabricant.
e. La pose et le câblage électrique doivent être
effectués par des personnes qualiées en
conformité avec les codes et normes en vigueur, y
compris pour la résistance au feu du bâtiment.
f. Lors de la découpe ou du perçage de murs
ou plafonds, ne pas endommager les câbles
électriques et autres conduites masquées.
Receiving
Upon receiving the product check to ensure all items
are accounted for by referencing the delivery receipt or
packing list. Inspect each crate or carton for shipping
damage before accepting delivery. Alert the carrier
of any damage detected. The customer will make
a notation of damage (or shortage of items) on the
delivery receipt and all copies of the bill of lading which
is countersigned by the delivering carrier. If damaged,
immediately contact your local representative. Any
physical damage to the unit after acceptance is not the
responsibility of the manufacturer.
Unpacking
Verify that all required parts and the correct quantity of
each item have been received. If any items are missing,
report shortages to your local representative to arrange
for obtaining missing parts. Due to availability of
transportation and truck space all items for the unit may
not be shipped together. Conrmation of shipment(s)
must be limited to only items on the bill of lading.
Storage
Fans are protected against damage during shipment. If
the unit cannot be installed and operated immediately,
precautions need to be taken to prevent deterioration of
the unit during storage. The user assumes responsibility
of the fan and accessories while in storage. The
manufacturer will not be responsible for damage during
storage. These suggestions are provided solely as a
convenience to the user.
Storage Environment
The ideal environment for the storage of fans and
accessories is indoors, above grade, in a low humidity
atmosphere which is sealed to prevent the entry of
blowing dust, rain or snow. Temperatures should be
evenly maintained between 30° to 110°F (-1° to 43°C)
(wide temperature swings may cause condensation
and “sweating” of metal parts). All accessories must be
stored indoors in a clean, dry atmosphere.
The unit should be stored at least 3-1/2 inches off the
floor on wooden blocks covered with moisture proof
paper or polyethylene sheathing. Aisles between parts
and along all walls should be provided to permit air
circulation and space for inspection.
Inspection and Maintenance During Storage
While in storage, inspect fans once per month. Keep a
record of inspection and maintenance performed.
If moisture or dirt accumulations are found on parts,
the source should be located and eliminated. At each
inspection, rotate the propeller by hand ten to fifteen
revolutions to distribute lubricant in motor.
Removing From Storage
As fans are removed from storage to be installed in their
final location, they should be protected and maintained
in a similar fashion until the fan equipment goes into
operation.
Prior to fully assembling and installing the fan inspect
the fan assembly to make sure it is in working order.
1. Check all fasteners and set screws on the fan, motor
base, and accessories for tightness.
2. Rotate the propeller by hand to ensure no parts are
rubbing.

Directional Destratification Fans 3
®
Typical Installation
WARNING
Installation and troubleshooting to be performed only
by qualified person(s).
WARNING
Use only GFCI receptacles.
Not for outdoor applications.
AVERTISSEMENT
La pose et le dépannage ne doivent être effectués que
par des personnes qualifiées.
AVERTISSEMENT
Utiliser uniquement des prises comportant un
disjoncteur différentiel (GFCI).
Ne pas utiliser à l’extérieur.
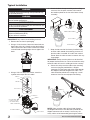
IMPORTANT: Only mount fan to building structure.
1. Remove the fan from its packaging.
2. Using a 3/8 inch socket, loosen the lower bolts on
both sides of the fan’s handle so that the handle is
able to pivot from side to side. Position the handle
at the desired mounting angle, then re-tighten the
bolts.
3. Using a 9/16 inch deep well socket, attach the
eyebolt to the top of the fan handle.
SPEED CONTROLLER
FACTORY WIRED,
3 CONDUCTOR CORD
(115V, SINGLE PHASE)
SAFETY CABLE
HOUSING ASSEMBLY
HANDLE
EYEBOLT
EYEBOLT
NUT
WASHER
NYLOCK NUT
4. Attach the beam clamp assembly to the ceiling
structure. Use the quick connect link to mount
the handle eyebolt on the fan to the beam clamp
assembly.
BEAM CLAMP ASSEMBLY
QUICK CONNECT
HANDLE EYEBOLT
7. Wrap the loose end of the factory-installed safety
restraint cable around the mounting structure so
that the cable is installed 45º to 60º from vertical.
Do not allow the cable to come in contact with any
sharp edges.
IMPORTANT: Safety restraint cable must be installed
for proper function of the fan. Failure to install the safety
retention cable will result in voiding of the fan warranty.
8. Secure the safety restraint cable to the mounting
structure using the provided No. 2 Gripple
connector. Pull the loose end of the cable through
the Gripple connector to tighten the cable. The
cable should be pulled taut, leaving only a small
amount of slack to ensure proper functioning.
1.
2.
3.
45°-60°
NOTE: Safety restraint cable will only feed through
the Gripple connector in one direction (marked on the
Gripple connector with an arrow). If necessary, the
safety cable can be loosened by pressing the release

Directional Destratification Fans4
®
WARNING
Always disconnect, lock and tag power source before
servicing. Failure to disconnect power source can
result in fire, shock or serious injury.
Always unplug the power cord.
AVERTISSEMENT
Pour écarter tout risque d’incendie, d’électrocution
ou de blessures graves, veiller à toujours débrancher,
verrouiller et étiqueter la source d’alimentation avant
toute intervention.
Veiller à toujours débrancher le cordon d’alimentation.
IMPORTANT: When making repairs, use only authorized
repair parts from the manufacturer.
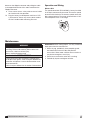
1. With a dry rag, periodically clean propeller, guard,
and motor when excessive dirt and particles
accumulate. Allow motor sufcient time to cool as it
may be hot enough to cause injury.
2. Check for unusual noises when fan is running.
3. Periodically inspect and tighten all bolts.
Maintenance
button on the Gripple connector and pulling the cable
in the opposite direction of the arrow marked on the
Gripple connector.
9. Cut or secure excess safety cable to ensure it does
not interfere with fan operation.
10. Plug the factory-installed power cord into a 115V,
1 phase outlet. Secure any excess power cord to
the fan’s handle and/or mounting structure.
Operation and Wiring
Balance Dial
The speed control dial (P/N 385806) is factory-installed
in the 9-pin connector on the motor. To increase speed,
rotate the dial clockwise. To decrease speed, rotate the
dial counterclockwise.The motor will be off from 0-1.9V
and will operate in the 2-10V range.

Directional Destratification Fans 5
®
Each fan bears a manufacturer’s nameplate with the model number and serial number. This information will assist the
local representative and the factory in providing service and replacement parts. Before taking any corrective action,
make certain unit is not capable of operation during repairs.
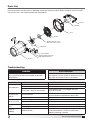
Parts List
OVAL MOUNTING PLATE
JUNCTION BOX
PROPELLER
INLET
MOTOR
HANDLE
HANDLE MOUNTING PLATE
GUARD
OUTLET
MOTOR ADAPTER PLATE
(ONLY ON SELECT SIZES)
PROBLEM CAUSE CORRECTIVE ACTION
Fan Inoperative
Blown fuse or open circuit breaker Replace or repair
Defective motor or switch Replace or repair
Balance dial is loose or not installed Ensure balance dial is fully plugged into 9-pin
connector on motor
Fan Cycles On
and Off
Thermal protector Check for obstructions to airow, low or high voltage,
excessive intake air temperatures above 140ºF
Faulty wiring or balance dial Replace or repair
Excessive Noise
While Operating
Loose or damaged propeller Tighten or replace
Motor not secure Tighten motor nuts
Insufcient Air
Flow
Guard excessively dirty Clean guard
Balance dial set too low Rotate balance dial clockwise to increase fan speed
Propeller
Rubbing Improper location
Loosen (4) bolts connecting motor to guard and
recenter the propeller. 1/8 inch clearance from
propeller to housing is desired.
WARNING
Before taking any corrective action, make certain
unit is not hot to the touch and capable of operation
during repairs.
Troubleshooting
AVERTISSEMENT
Avant d’entreprendre toute action corrective, s’assurer
que l’appareil n’est pas chaud au toucher et qu’il ne
pourra pas fonctionner durant les réparations.

Directional Destratification Fans6
®
Date ___________________Time _____________ AM/PM
Notes: ___________________________________________
_________________________________________________
_________________________________________________
_________________________________________________
_________________________________________________
Date ___________________Time _____________ AM/PM
Notes: ___________________________________________
_________________________________________________
_________________________________________________
_________________________________________________
_________________________________________________
Date ___________________Time _____________ AM/PM
Notes: ___________________________________________
_________________________________________________
_________________________________________________
_________________________________________________
_________________________________________________
Date ___________________Time _____________ AM/PM
Notes: ___________________________________________
_________________________________________________
_________________________________________________
_________________________________________________
_________________________________________________
Date ___________________Time _____________ AM/PM
Notes: ___________________________________________
_________________________________________________
_________________________________________________
_________________________________________________
_________________________________________________
Date ___________________Time _____________ AM/PM
Notes: ___________________________________________
_________________________________________________
_________________________________________________
_________________________________________________
_________________________________________________
Date ___________________Time _____________ AM/PM
Notes: ___________________________________________
_________________________________________________
_________________________________________________
_________________________________________________
_________________________________________________
Date ___________________Time _____________ AM/PM
Notes: ___________________________________________
_________________________________________________
_________________________________________________
_________________________________________________
_________________________________________________
Date ___________________Time _____________ AM/PM
Notes: ___________________________________________
_________________________________________________
_________________________________________________
_________________________________________________
_________________________________________________
Date ___________________Time _____________ AM/PM
Notes: ___________________________________________
_________________________________________________
_________________________________________________
_________________________________________________
_________________________________________________
Date ___________________Time _____________ AM/PM
Notes: ___________________________________________
_________________________________________________
_________________________________________________
_________________________________________________
_________________________________________________
Date ___________________Time _____________ AM/PM
Notes: ___________________________________________
_________________________________________________
_________________________________________________
_________________________________________________
_________________________________________________
Maintenance Log

Directional Destratification Fans 7
®
Date ___________________Time _____________ AM/PM
Notes: ___________________________________________
_________________________________________________
_________________________________________________
_________________________________________________
_________________________________________________
Date ___________________Time _____________ AM/PM
Notes: ___________________________________________
_________________________________________________
_________________________________________________
_________________________________________________
_________________________________________________
Date ___________________Time _____________ AM/PM
Notes: ___________________________________________
_________________________________________________
_________________________________________________
_________________________________________________
_________________________________________________
Date ___________________Time _____________ AM/PM
Notes: ___________________________________________
_________________________________________________
_________________________________________________
_________________________________________________
_________________________________________________
Date ___________________Time _____________ AM/PM
Notes: ___________________________________________
_________________________________________________
_________________________________________________
_________________________________________________
_________________________________________________
Date ___________________Time _____________ AM/PM
Notes: ___________________________________________
_________________________________________________
_________________________________________________
_________________________________________________
_________________________________________________
Date ___________________Time _____________ AM/PM
Notes: ___________________________________________
_________________________________________________
_________________________________________________
_________________________________________________
_________________________________________________
Date ___________________Time _____________ AM/PM
Notes: ___________________________________________
_________________________________________________
_________________________________________________
_________________________________________________
_________________________________________________
Date ___________________Time _____________ AM/PM
Notes: ___________________________________________
_________________________________________________
_________________________________________________
_________________________________________________
_________________________________________________
Date ___________________Time _____________ AM/PM
Notes: ___________________________________________
_________________________________________________
_________________________________________________
_________________________________________________
_________________________________________________
Date ___________________Time _____________ AM/PM
Notes: ___________________________________________
_________________________________________________
_________________________________________________
_________________________________________________
_________________________________________________
Date ___________________Time _____________ AM/PM
Notes: ___________________________________________
_________________________________________________
_________________________________________________
_________________________________________________
_________________________________________________
Maintenance Log

486130 • DDF Directional Destratification Fans, Rev. 1, July 2023 Copyright 2023 © Greenheck Fan Corporation8
As a result of our commitment to continuous improvement, Greenheck reserves the right to change specications
without notice.
Product warranties can be found online at Greenheck.com, either on the specic product page or in the literature
section of the website at Greenheck.com/Resources/Library/Literature.
®
Phone: 715.359.6171 • Fax: 715.355.2399 • Parts: 800.355.5354 • E-mail: [email protected] • Website: www.greenheck.com
Our Commitment
Greenheck’s ARC submittal provides additional information describing the equipment, fan performance, available accessories,
and specication data.
-
 1
1
-
 2
2
-
 3
3
-
 4
4
-
 5
5
-
 6
6
-
 7
7
-
 8
8


dans d''autres langues
Documents connexes
Autres documents
-
 Zoo Fans H30 Guide d'installation
-
Big Ass Fans Isis Guide d'installation
-
-
-
-
Nortek REZNOR DS6-4 Guide d'installation
-
 Skyblade STOL Series Guide d'installation
-

