Greenheck 485229 QEID FJ Mixed Flow FumeJet Manuel utilisateur
- Taper
- Manuel utilisateur

®
Mixed Flow FumeJet 1
®
Document 485229
Model QEID FJ
Mixed Flow FumeJet®
Installation, Operation and Maintenance Manual
Please read and save these instructions for future reference. Read carefully before attempting to assemble, install,
operate or maintain the product described. Protect yourself and others by observing all safety information. Failure
to comply with these instructions will result in voiding of the product warranty and may result in personal injury
and/or property damage.
General Safety Information
Only qualified personnel should install this fan.
Personnel should have a clear understanding of these
instructions and should be aware of general safety
precautions. Improper installation can result in electric
shock, possible injury due to coming in contact with
moving parts, as well as other potential hazards. Other
considerations may be required if high winds or seismic
activity are present. If more information is needed,
contact a licensed professional engineer before moving
forward.
1. Follow all local electrical and safety codes, as well as
the National Electrical Code (NEC) and the National
Fire Protection Agency (NFPA), where applicable.
Follow the Canadian Electrical Code (CEC) in
Canada.
2. The rotation of the wheel is critical. It must be free
to rotate without striking or rubbing any stationary
objects.
3. Motor must be securely and adequately grounded.
4. Do not spin fan wheel faster than max cataloged fan
rpm. Adjustments to fan speed significantly effects
motor load.
5. Do not allow the power cable to kink or come in
contact with oil, grease, hot surfaces or chemicals.
Replace cord immediately if damaged.
6. Verify that the power source is compatible with the
equipment.
7. Never open access doors to a duct while the fan is
running.
DANGER
Always disconnect, lock and tag power source before
installing or servicing. Failure to disconnect power
source can result in fire, shock or serious injury.
CAUTION
When servicing the fan, motor may be hot enough
to cause pain or injury. Allow motor to cool before
servicing.
CAUTION
Precaution should be taken in explosive atmospheres.
DANGER
Pour écarter les risques d’incendie, de choc électrique
ou de blessure grave, veiller à toujours débrancher,
verrouiller et étiqueter la source de courant avant
l’installation ou l’entretien.
ATTENTION
Lors de toute intervention sur la soufflante, le moteur
peut être suffisamment chaud pour provoquer une
douleur voire une blessure. Laisser le moteur refroidir
avant toute maintenance.
ATTENTION
Faire preuve de précaution dans les atmosphères
explosives.

Mixed Flow FumeJet2
®
Receiving
Upon receiving the product check to make sure all
items are accounted for by referencing the delivery
receipt or packing list. Inspect each crate or carton
for shipping damage before accepting delivery. Alert
the carrier of any damage detected. The customer will
make a notation of damage (or shortage of items) on the
delivery receipt and all copies of the bill of lading which
is countersigned by the delivering carrier. If damaged,
immediately contact your local sales representatives.
Any physical damage to the unit after acceptance is not
the responsibility of manufacturer.
Unpacking
Verify that all required parts and the correct quantity
of each item have been received. If any items are
missing, report shortages to your local representative to
arrange for obtaining missing parts. Sometimes it is not
possible that all items for the unit be shipped together
due to availability of transportation and truck space.
Confirmation of shipment(s) must be limited to only
items on the bill of lading.
Handling
Handle the fan in such a manner as to keep from
scratching or chipping the coating. Damaged finish may
reduce the ability of the fan to resist corrosion.
Fans should be lifted by the fan housing.
Storage
Fans are protected against damage during shipment. If
the unit cannot be installed and operated immediately,
precautions need to be taken to prevent deterioration of
the unit during storage. The user assumes responsibility
of the fan and accessories while in storage. The
manufacturer will not be responsible for damage during
storage. The following suggestions are provided solely
as a convenience to the user.
The ideal environment for the storage of fans is
indoors, above grade, in a low humidity atmosphere
which is sealed to prevent the entry of blowing
dust, rain, or snow. Temperatures should be evenly
maintained between 30°F (-1°C) and 110°F (43°C) (wide
temperature swings may cause condensation and
“sweating” of metal parts).
Remove any accumulations of dirt, water, ice or snow
and wipe dry before moving to indoor storage. To avoid
“sweating” of metal parts allow cold parts to reach room
temperature. To dry parts and packages use a portable
electric heater to get rid of any moisture build up.
The unit should be stored at least 3-1/2 inches (89 mm)
off the floor on wooden blocks covered with moisture
proof paper or polyethylene sheathing. Leave coverings
loose to permit air circulation and to allow for periodic
inspection. Aisles between parts and along all walls
should be provided to permit air circulation and space
for inspection.
Inspection & Maintenance During Storage
While in storage, inspect fans once per month. Keep a
record of inspection and maintenance performed.
If moisture or dirt accumulations are found on parts,
the source should be located and eliminated. At each
inspection, rotate the wheel by hand ten to fifteen
revolutions to distribute lubricant on motor.
REMOVING FROM STORAGE
As fans are removed from storage to be installed in their
final location, they should be protected and maintained
in a similar fashion, until the fan equipment goes into
operation.
QEID FJ Installation
Duct Hanger Bracket and Strap
Below are our suggestions
for mounting the fan using
a duct hanger bracket and
strap. This can be with or
without isolation.
Duct Hanger
1. Threaded rod
2. Sturdy bracket
made of
galvanized steel
3. Galvanized coiled
strip or strips
cut from waste
material may be
used. If hanger
is installed prior to fan duct connection, the installed
strap length should account for unit flanges passing
through and clearance to access duct hanger.
4. Self-locking concept securing the metal strip.
5. Rubber Isolator with molded-on washer (optional).
The QEID FJ is designed to be flanged mounted to
duct in either a vertical with wheel down (upblast)
or horizontal configuration. Pre-punched holes are
provided in the flanges. The speed control dial may be
mounted in any orientation.
If additional support is desired, the following additional
methods of support can be used. All additional items for
alternative methods of support are provided by others.
Follow the manufacturer’s recommended installation
procedures.
Pre Start-Up Checks
1. Before starting up or operating fan, check all
fasteners for tightness. Remove dirt and debris that
may have accumulated.
2. While in the OFF position or before connecting the
fan to power, turn the fan wheel by hand to be sure
it is not striking the venturi or any obstacle.
3. When the fan is started, observe the operation and
check for any unusual noises.

Mixed Flow FumeJet 3
®
Additional Spring Hanging Isolator
If a hanging spring isolator such as a Kinetics SH is
needed, a section of the hanging rod, as illustrated
in the section above, can be replaced with the
spring isolator housing. Follow the manufacturer’s
recommended installation procedures.
Electrical and Controls Connections
NOTE
Verify blower motor voltage matches line voltage 110-
120V 50/60 Hz, 208-230/277V 50/60 Hz.
Soft start
All motors feature soft-start technology which eliminates
inrush current at start-up. The motors will reliably start
at any speed setting.
Overload protection
If the motor becomes overloaded, it will automatically
reduce its speed until it is no longer overloaded. This
means that the motor will never operate in the “service
factor” which is possible with many AC motors.
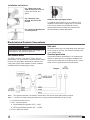
Installation Instructions
Fig. 1 Both ends of the
strip are bent over 8-10cm.
Protect your hands with
gloves.
Fig. 2 Hook the ends
through the slots in the
bracket.
Fig. 3 Hang on threaded rod
or ceiling bracket.
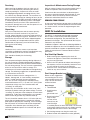
Note 1 The speed control dial is located on junction box. Turn dial for speed adjustments to motor.
Note 2 0-10 VDC fan motor control by others for 0-10 input, speed control dial must be set to 0.
• 0-1.9 VDC fan motors are off
• 2 VDC - minimum speed
ON threshold (from previous OFF) - 2 VDC
OFF threshold (from previous ON) - 1.5 VDC
• 10 VDC - Maximum speed
Vari-Green® Motor
The QEID FJ utilizes a Vari-Green® motor. The Vari-
Green motor is an electronically commutated (EC) motor
that uses AC input power and internally converts it to
a DC power supply which provides an 80% turndown
capability and increased energy savings.

485229 • QEID FJ, Rev. 2, October 2023 Copyright 2023 © Greenheck Fan Corporation4
As a result of our commitment to continuous improvement, Greenheck reserves the right to change specifications
without notice.
Product warranties can be found online at Greenheck.com, either on the specific product page or in the literature
section of the website at Greenheck.com/Resources/Library/Literature.
®
Phone: 715.359.6171 • Fax: 715.355.2399 • Parts: 800.355.5354 • E-mail: [email protected] • Website: www.greenheck.com
Our Commitment
AMCA Publication 410-96, Safety Practices for Users and
Installers of Industrial and Commercial Fans, provides
additional safety information. This publication can be obtained
from AMCA International, Inc. at www.amca.org.
Greenheck models QEI and QEID catalog provides additional
information describing the equipment and available
accessories.
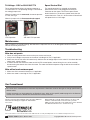
Tri-Voltage: 115V or 208-230/277V
The tri-voltage feature allows the motor to operate at
115/208-230/277V. The operating voltage is selected via
the voltage jumper wire.
When the jumper wire is connected, the motor operates
at 115V, see Fig 4.
When the jumper wire is disconnected and capped,
the motor operates at 208-230/277V, see Fig. 5.
Fig. 4
115V Operation
Fig. 5
208-230/277V Operation
Speed Control Dial
The speed control dial is mounted on the power
pack bracket and is to be plugged into the 9-pin
connector on the motor. To increase speed, rotate
the dial clockwise. To decrease speed, rotate the dial
counterclockwise. From 0-1.9V the motor will be off and
will operate in the 2-10V range.
Troubleshooting
Motor does not operate.
1. Check all wiring connections to ensure they are correct and secure.
2. Verify that all voltages are present at the motor, including 0-10 VDC, if applicable.
3. Make sure that the fan wheel will rotate freely and there are no foreign objects in the wheel. If fan wheel does not
rotate freely, contact factory.
4. If motor has both the dial on the motor and 0-10 VDC control option, control wiring issues can be tested by
disconnecting the control wires from the motor. The motor should then operate using the dial on the motor for
speed control.
Motor will not reach maximum speed.
1. Make sure dial is rotated full clockwise, if applicable.
2. Make sure motor is receiving 10 VDC, if applicable.
Maintenance
QEID FJ motor uses sealed bearings. No lubrication is required. This fan is not designed to be disassembled.
Consult the factory with issues.
-
 1
1
-
 2
2
-
 3
3
-
 4
4


Greenheck 485229 QEID FJ Mixed Flow FumeJet Manuel utilisateur
- Taper
- Manuel utilisateur
dans d''autres langues
Documents connexes
-
Greenheck 453905 TAUD/TAUB Mode d'emploi
-
-
-
-
-
-
-
-