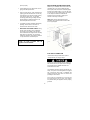
Fagor WC46DZ Le manuel du propriétaire
- Catégorie
- Boissons glacées
- Taper
- Le manuel du propriétaire

WC-46 DZ
WINE COOLER
INSTRUCTION MANUAL

2
CONTENTS
Please read this manual carefully before installing and starting up. Store it
in a safe place. If you give this product to another person, be sure to also
give them this instruction manual along with it.
APPLIANCE SAFETY 3
DISPOSAL 4
PRODUCT FEATURES 5
INSTALLATION 5
OPERATING YOUR APPLIANCE 8
CARE AND MAINTENANCE 12
TROUBLESHOOTING GUIDE 14
FRANÇAIS 16

3
APPLIANCE SAFETY
Your safety and the safety of others is very
important. We have provided important safety
information in this manual. Always read and obey all
safety information and warnings.
Safety Alert Symbols
This symbol alerts you to potential hazards that may
harm you and/or others. All safety messages will
follow the Safety Alert Symbol and either the words
"DANGER" or "WARNING".
Danger means that failure to follow this safety
information may result in severe personal injury or
death.
Warning means that failure to follow this safety
information may result in extensive product damage,
serious personal injury or death.
General Safety
Before the appliance is used, it must be properly
positioned and installed as described in this manual.
To reduce the risk of fire, electric shock or injury
when using the appliance, follow basic precautions,
including the following:
Plug into a grounded 3-prong outlet, do not
remove grounding prong, do not use an adapter,
and do not use an extension cord.
A separate circuit serving only your appliance
must be provided. Use an outlet that cannot be
turned off by a light switch or pull chain.
Never clean appliance parts with flammable
fluids. These fumes can create a fire hazard or
explosion.
Do not store or use gasoline or other flammable
vapors and liquids in the vicinity of this or any
other appliance. The fumes can create a fire
hazard or explosion.
Before proceeding with cleaning and
maintenance operations, make sure the power
line of the unit is disconnected.
Do not connect or disconnect the electric plug
when your hands are wet.
Unplug the appliance or disconnect power
before cleaning or servicing. Failure to do so
can result in electric shock or death.
Do not attempt to repair or replace any part of
your appliance unless it is specifically
recommended in this manual. All other servicing
should be performed by a qualified technician.
Be sure that all components are in their proper
place before operating.
This appliance is CFC and HFC-free and
contains small quantities of Isobutane (R600a)
which is environmentally friendly, but flammable.
It does not damage the ozone layer, nor does it
contribute to greenhouse gases. Care must be
taken during transportation and set up of the
appliance. Make sure to check that no parts of
the cooling system are damaged. Leaking
coolant can ignite and may cause personal injury.
In the event of any damage:
- Avoid open flames and anything that creates a
spark.
- Disconnect from the mains.
- Air the room in which the appliance is located
for several minutes.
- Contact the Service Department for advice.
The more coolant there is in an appliance, the
larger the room it should be installed in. In the
event of a leak, if the appliance is in a small
room, there is the danger of combustible gases
building up. For every ounce of coolant at least
325 cubic feet of room space is required. The
amount of coolant in the appliance is stated on
the data plate inside the appliance. It is
hazardous for anyone other than an Authorised
Service Person to carry out servicing or repairs
to this appliance.
Take serious care when handling, moving, and
using the appliance to avoid either damaging
the refrigerant tubing, or increasing the risk of a
leak.
Replacing component parts and servicing must
be done by manufacturer authorized service
personnel, so as to minimize the risk of possible
ignition due to incorrect parts or improper
service.
Use two or more people to move and install
appliance. Failure to do so can result in back or
other injury.
Do not store or install the appliance outdoors.
To ensure proper ventilation for your appliance,
the front of the unit must be completely
unobstructed. Choose a well-ventilated area
with temperatures above 60°F (16°C) and below

4
95°F (35°C). This unit must be installed in an
area protected from the elements, such as wind,
rain, water spray or drips.
The appliance should not be located next to
ovens, grills or other sources of high heat.
The appliance must be installed with all
electrical, water and drain connections in
accordance with state and local codes. A
standard electrical supply (115 V AC only, 60
Hz), properly grounded in accordance with the
National Electrical Code and local codes and
ordinances is required.
Do not bend, crush or pinch the power supply
cord of the appliance.
The size of the fuse (or circuit breaker) should
be 15 amps.
Never allow children to operate, play with or
crawl inside the appliance.
Do not use solvent-based cleaning agents or
abrasive cleaners on the interior. These
cleaners may damage or discolor the interior.
Use this appliance only for its intended purpose
as described in this manual.
Keep fingers out of the “pinch point” areas.
Clearances between the doors and cabinet are
fairly small. Be careful closing doors when
children are present.
If your model requires defrosting, never use an
ice pick or other sharp instrument to help speed
up defrosting. These instruments can puncture
the inner lining and damage the cooling
component.
DISPOSAL
Dispose of your appliance packaging properly.
Ensure that any plastic wrappings, bags etc. are
disposed of safely and kept out of reach of babies
and young children. Failure to do so may result in
suffocation!
Refrigeration equipment must be properly disposed
of in a professional and appropriate way, in
accordance with the current local regulations and
laws which protect the environment. This applies to
your old appliance and to your new unit once it has
reached the end of its service life.
WARNING: Please ensure that old, worn appliances
are unusable before disposal by removing the plug,
cutting the network cable, and removing or
destroying any snap fastenings or bolts. You will
thus prevent children from locking themselves in the
appliance during play (risk of suffocation) or
endangering their lives in any other way.
Risk of child entrapment!
Junked or abandoned appliances are still dangerous,
even if they will “just sit in the garage a few days”.
Before discarding your old appliance:
Take off the doors.
Leave the shelves in place so that children
cannot easily crawl into the unit.
- SAVE THESE INSTRUCTIONS -

5
PRODUCT FEATURES
Built-in or free-standing installation with dual
temperature zones.
Temperature can be set from 41°F to 68°F (5°C
to 20°C) and can be displayed in either
Fahrenheit or Celsius.
Can be set to long time storage maturing
temperatures or a specific serving temperature
for red/white/sparkling wines.
Dynamic compressor type cooling to ensure
interior air circulation with even distribution of
temperature and humidity.
Soft White LED Interior Light with ON/OFF
switch making it easier to view your wines
without opening the door.
Open-door and malfunction warning system.
Sabbath mode will allow the lights to remain off
during certain religious observances.
Temperature memory function - If power is
interrupted (power surge, breaker switch, etc.)
and then powered up again, the unit will operate
at the last temperature set-point.
Automatic defrosting function. Defrosted water is
collected and evaporated through the
compressor discharge pipe.
Reversible tempered double pane light gray
glass door protects your wine from UV light and
creates an attractive display with little
condensation and minimal noise.
Black coated matte steel outer frame and black
plastic interior liner which prevents excessive
light from damaging the maturity process.
Vibration Neutralization System offers triple
layer protection against harmful exterior
vibrations that might otherwise damage your
bottles
.
Stainless steel-framed glass door with stainless
steel handle.
Roll-out and adjustable shelves allow for
maximum convenience and flexibility to
accommodate various sized bottles.
Refrigerant and foaming insulation glass are all
CFC, HCFC and HFC free, making them
environmentally friendly.
Active charcoal air filter.
INSTALLATION
BEFORE USING YOUR APPLIANCE
Remove all exterior and interior packing. Clean
the interior surface with lukewarm water using a
soft cloth. The unit may have residual odors at
first; they will disappear as the unit cools.
IMPORTANT: Before connecting the unit to the
power source, let it stand upright for
approximately 24 hours. This will reduce the
possibility of a malfunction in the cooling system
caused by handling during transportation.
The door on this appliance can be opened from
either the left or the right side. The unit is
delivered with the door opening on the right side.
Should you wish to open the door from the left,
follow the instructions in the section titled
Reversing the door Hinge.
Install the handle on the door.
INSTALLATION OF YOUR APPLIANCE
The appliances are designed to be built-in or
free standing.
CAUTION: This appliance is designed for
storing and cooling wines. Do not store
perishable food, medicine or other medical
products in this unit.
Place your appliance on a floor that is strong
enough to support it when it is fully loaded. To
level your unit, adjust the front adjustable legs at
the bottom of the unit.
For freestanding installation, 5 inches (127mm)
of space between the back and sides of the unit
are suggested, which allows the proper air
circulation to cool the compressor and
condenser for energy saving. Even for built-in
installation, you must keep ¼” (5mm) space on
each side and at the top to ensure proper
service access and ventilation. The air vent at
the front of the appliance must never be
covered or blocked in any way!
Install the unit away from direct sunlight and
sources of heat (stove, heater, radiator, etc.).
Direct sunlight may affect the acrylic coating and
heat sources may increase electrical
consumption. Extreme cold ambient
temperatures may also cause the unit not to

6
perform properly.
Avoid installing the unit in damp areas such as
garages and damp basements.
Plug the unit into its own, easily accessible and
properly grounded wall outlet. Do not under any
circumstances cut or remove the third (ground)
prong from the power cord. Any questions
concerning power and/or grounding should be
directed towards a qualified electrician or an
authorized products service center.
The appliance must be installed to all electrical,
plumbing, water and drain connections in
accordance with state and local codes.
IMPORTANT: HIGH HUMID CLIMATE. During
periods of high humidity, some condensation
may appear on the outside of the glass door.
This condensation will disappear when humidity
levels drop. For prevention, we recommend
installing the appliance with sufficient ventilation
in a dry and/or an air conditioned place.
BUILT-IN INSTALLATION INSTRUCTIONS
Make sure your installation does not block the front
ventilation grille.
If the unit is installed for fitting
kitchen plinth, make sure that the ventilation gaps in
the plinth are at least 2 23⁄64” x 19 11⁄16” (60 x 500
mm) and remove the ventilation grilles, so that warm
air can disperse unhindered. Otherwise the
appliance has to work harder, resulting in an
increase in electricity consumption.
NOTE: When pushing the appliance into the
installation area, make sure that the mains cable
does not get trapped.
ELECTRICAL CONNECTION
Check that the voltage marked on the product
corresponds with your supply voltage.
Improper use of the grounded plug can result in the
risk of electric shock. If the power cord is damaged,
have it replaced by a qualified electrician or an
authorized service center.
This appliance should be properly grounded for your
safety. The power cord of this appliance is equipped
with a three-prong plug which is compatible with
standard three-prong wall outlets to minimize the
possibility of electric shock.
Do not under any circumstances cut or remove the
third (ground) prong from the power cord supplied.
For personal safety, this appliance must be properly
grounded.
NOTE: Make sure that the outlet and ON/OFF
switch are easily accessible after the
appliance has been installed.

7
This appliance requires a standard 115/120 Volt AC
~ 60Hz three-prong grounded electrical outlet. Have
the wall outlet and circuit checked by a qualified
electrician to make sure the outlet is properly
grounded. When a standard 2-prong wall outlet is
encountered, it is your responsibility and obligation
to have it replaced with a properly grounded 3-prong
wall outlet.
To prevent accidental injury, the cord should be
secured behind the appliance and not left exposed
or dangling.
The appliance should always be plugged into its
own individual electrical outlet that has a voltage
rating that matches the rating label on the appliance.
This provides the best performance and also
prevents overloading house wiring circuits that could
cause a fire hazard from overheating. Never unplug
the appliance by pulling on the power cord. Always
grip the plug firmly and pull straight out from the
outlet. Immediately repair or replace all power cords
that have become frayed or otherwise damaged. Do
not use a cord that shows cracks or abrasion
damage along its length or at either end. When
moving the appliance, be careful not to damage the
power cord.
THIS APPLIANCE MUST BE
EARTHED.
EXTENSION CORD
Because of potential safety hazards under certain
conditions, it is strongly recommended that you do
not use an extension cord with this appliance.
However, if you must use an extension cord it is
absolutely necessary that it be a UL/CUL-Listed, 3-
wire grounding type appliance extension cord
having a grounding type plug and outlet and that the
electrical rating of the cord be 115 volts and at least
10 amps.
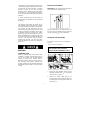
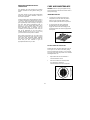
INSTALLING THE HANDLE
IMPORTANT: Do not over tighten the screws and do
not use power tools to install the handle.
Place the handle
○
1 over the fixing pins
○
3 of the
door and, using the supplied Allen key, tighten the
securing grub screws
○
2 to secure the handle.
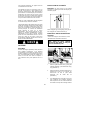
REVERSING THE DOOR HINGE
It is possible to reverse the door on this appliance, if
required.
To do so, follow the steps below:
1. Remove the front ventilation grille
○
2 and the
adjustable ventilation grille
○
1 by unscrewing
the screws
○
3 &
○
4 . (Fig. 1)
2. Remove the bottom hinge plate
○
5 by
unscrewing the four lock screws
○
6 . Make sure
to hold the glass door firmly after removing the
screws. (Fig. 2)
Note: All parts removed must be
saved to do the reinstallation of door.

8
3. Gently pull down to remove the glass door from
the right top hinge and place it on a padded
surface to avoid the risk of damage. Then
remove the right top hinge
○
7 . (Fig. 3 & 4)
4. Unscrew and transfer the hinge pin of the
bottom hinge plate
○
5 to the opposite side.
5. Pop out the cover caps on the left side of
cabinet and use them to cover the screw holes
on the right hand side.
6. Screw the alternative left top hinge
○
9 , included
in the fittings, on the left hand side of cabinet.
(Fig. 4)
7. Rotate the door 180° and then relocate the door
to the designated position. Then screw the
bottom hinge assembly on the left designated
position and tighten it after the door is leveled.
(Fig. 2)
8. Reassembly the ventilation grilles.
ATTENTION!
Only store wine in unopened bottles. Always lay
bottles on their side for storage.
Do not overload the cabinet.
Do not open the door unless necessary.
Do not cover shelves with aluminum foil or any
other material which may prevent air circulation.
Should the wine cooler be left empty for a long
period of time, we recommend you unplug the
appliance and after careful cleaning, leave the
door ajar to allow air to circulate inside the
cabinet in order to prevent possible
condensation, mold or odors from forming.
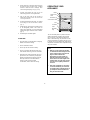
OPERATING YOUR
APPLIANCE
Digital Control
Panel
Door
Full Shelves (5)
Handle
Ventilation
Grille
Adjustable
Legs
Active Charcoal Filter
The unit should be placed in a position where the
ambient temperature is between 60ºF and 95ºF
(16°C and 35°C). If the ambient temperature is
above or below this range, the performance of the
unit may be affected. For example, placing your unit
in extreme cold or hot conditions may cause interior
temperatures to fluctuate and the temperature range
may not be reached.
Note:
When you use the unit for the first time
or restart the unit after having been shut
off for a long time, there could be a few
degrees variance between the
temperature you select and the one
indicated on the LED readout. This is
normal and it is due to the length of the
activation time. Once the unit is running
for a few hours everything will be back
to normal.
If the unit is unplugged, has lost power,
or has been turned off, you must wait 3
to 5 minutes before restarting the unit. If
you attempt to restart before this time
delay, the unit will not start.

9
USE AND CONTROL
The Controls of Your Unit
POWER
To turn the appliance on or off, press and hold the
button for 1 second.
NOTE: Pressing the
button once can switch off
the audible alarm when the alarm is on.
UP
Used to increase (warm) the set temperature by 1°F
or 1ºC.
DOWN
Used to decrease (cool) the set temperature by 1°F
or 1ºC.
LIGHT
Used to turn the inner light on and off.
Display
Displays the temperature and service indicators.
is for the UPPER temperature zone and is for
the LOWER temperature zone.
ºF/ºC Selector
Program the temperature display in either
Fahrenheit or Celsius. To change the temperature
from Fahrenheit to Celsius or from Celsius to
Fahrenheit, press and hold the LIGHT button for 5
seconds.
Setting the Temperature Control
The unit has two separate temperature zones.
The temperature of both zones can be set
between 41ºF and 68ºF (5ºC and 20ºC).
When the unit is plugged in for the first time, the
unit will power up automatically to the preset
defaults. The default temperature for the
UPPER temperature zone is 50ºF (10ºC) and
for the LOWER temperature zone is 60ºF
(16ºC).
You can press the left side UP and DOWN
buttons to control the internal temperature of
the UPPER temperature zone and press the
right side UP and DOWN buttons to control the
internal temperature of the LOWER
temperature zone. When you press the UP or
DOWN buttons, the displayed temperature will
change accordingly.
NOTE: The temperature set for the LOWER
temperature zone must always be just as high,
or higher, than that of the UPPER temperature
zone. For optimal performance, the set
temperature of the two zones should differ by at
least 7°F or 4°C.
The temperature that you desire to set will
increase 1ºF or 1ºC if you press the UP button
once. The temperature will decrease 1ºF or 1ºC
if you press the DOWN button once. The
display will flash while you make your selection.
TEMPERATURE DISPLAY
During normal operation, the temperature display on
the control panel always shows the SET
temperature. The temperature display will flash if:
- A different temperature is being set.
- The temperature in the zone deviates by more
than 9°F or 5°C from the set temperature.
The temperature display flashing ensures that the
temperature cannot rise or fall un-noticed.
TEMPERATURE MEMORY FUNCTION
In the event of a power interruption (power surge,
breaker switch failure, etc.), the unit will remember
the last temperature settings and, when the power is
recovered, the cabinet temperature will go back to
the same set temperature as before the power
interruption.
TEMPERATURE ALARM
An alarm will sound if the temperature in one of the
zones rises or falls outside the temperature range.
The relevant temperature display will flash at the
same time.
The temperature the appliance is set at determines
the temperature the appliance recognizes as being
too warm or too cool.
The alarm will sound and the temperature display
will flash:
- If the temperature inside the appliance is very
different from the temperature set.
- When there has been a lengthy interruption to
the power supply.
- When too many items have been put into the
unit at one time. This can be as a result of
holding the door open too long or from
overloading the unit past its recommended
capacity.
- When the door is not been closed tightly.
THE ALARM CAN BE DEACTIVATED BY
PRESSING THE POWER BUTTON

10
DOOR ALARM
If the door has been left open for more than 60
seconds, the alarm will sound.
Once the set temperature has been reached in the
appliance, the alarm stops and the relevant
temperature display stops flashing. However, if the
noise disturbs you, you can switch the alarm off
before this if you wish by pressing the POWER
button once. The alarm will stop. The relevant
temperature display continues to flash until the set
temperature has been reached. The display then
lights up constantly and the alarm system is fully
active again.
INTERIOR LIGHT
The interior light makes it easy to view your wine
labels and enhances the display of your collection.
Touching the LIGHT button toggles between 2
modes of operation for the internal lights: functional
(default) mode and showcase mode. If you are in
functional (default) mode, the lights will turn on only
when the door is open. If you are in showcase mode,
the lights will remain on whether or not the door is
open.
The unit is equipped with a LED light fitting system.
To change the LED light fitting please contact the
service department.
NOTE: Please use only the original LED light fittings
provided by the manufacturer.
DYNAMIC CLIMATE / SILENT MODE
The Dynamic Climate mode distributes the relative
humidity inside the unit and the temperature evenly
throughout the interior so you can store all your wine
under exactly the same conditions. If you would like
to use the unit to store wine long term, the dynamic
climate mode must be used. This will create a
continuous climate in the unit which imitates that of
a wine cellar.
In the Dynamic Climate mode, the interior fan
circulates the inside air evenly as the set
temperature is reached. Dynamic Climate mode is
NOT the factory preset mode because of the
elevated noise level and increased energy
consumption. To change to Dynamic Climate mode,
touch and hold the DOWN button for approximately
five seconds. The unit will beep five times to confirm
Dynamic Climate mode is on. To change back to the
default (Silent) mode (also called Energy Saving
Mode), touch and hold the UP button for
approximately five seconds. The unit will beep three
times to confirm default (Silent) mode is on.
SABBATH MODE
Sabbath mode is available for the observance of
certain religious holidays. This mode turns off the
displays, interior light and audible alarms and
prevents them from turning on again. Normal cooling
operations will still take place.
To initiate Sabbath mode, press and hold the
POWER and LIGHT
buttons at the same time for at
least 5 seconds. A small red light at the bottom right
of the display will flash four times and confirm the
Sabbath mode is ON.
Sabbath mode can be deactivated by repeating the
above process. The Sabbath Mode will
automatically turn off after 96 hours.
CABINET SHELVES
IMPORTANT - Do not cover any part of the
shelves with aluminum foil or any other material
that will prevent adequate air circulation within
the cabinet.
To prevent damaging the door gasket, make
sure the door is fully open (at least 90 degree)
when pulling shelves out on the rails.
For easy access to the bottles stored, pull the
shelves out approximately 1/3 of the way. The
shelves are designed with an emergency stop to
prevent them from being pulled out too far when
loaded.
OPERATING NOISES
The unit is cooled by a compressor. The compressor
pumps coolant through the cooling system, causing
operating noise. Even when the compressor cuts out,
noises caused by changes in temperature and
pressure are unavoidable. Operating noise will be
most audible immediately after the compressor cuts
in. It becomes quieter as the operating period
continues.
The following noises are normal and occur from time
to time:
- Gurgling sound, caused by the refrigerant flowing
through the appliance’s coils.
- Humming noise made by the motor compressor.
This noise can get louder for brief periods when
the motor is switching on.
- Cracking/popping sounds, resulting from the
materials contracting and expanding due to
temperature variations.
- Fan operating sound, to circulate the air within

11
the wine cabinet.
Unusual noise is normally the result of improper
installation. Under no circumstances must tubing
come into contact with a wall, other furniture or with
other tubing.
If this wine cooler is placed in an open kitchen or
next to partition walls, the operating noise will echo
and feel louder. This is only due to its surroundings
and not the unit itself. To lessen the amount of noise,
we recommend placing this unit next to structure
walls.
DEFROSTING
Your wine cooler is designed with Automatic defrost
system. When the compressor on your unit is off,
the evaporator behind the rear wall of the unit
defrosts automatically. The condensate collects in
the drain trough behind the rear wall of the unit and
flows through the drainage hole into the drip tray
by/above the compressor. The heat is transferred
from the discharge pipe or compressor and
evaporates any condensation that has collected in
the tray.
NOTE: The frost may be accumulated on the
evaporator if the unit is repeatedly opened in a high
heat or high humidity location. If this frost pattern
does not clear within 24 hours, your unit will require
manual defrosting.
BOTTLE STORAGE
Capacity: 16 standard wine bottles in the upper zone
and 30 standard wine bottles in the lower zone.
Please note that many bottles may differ in size and
dimensions. As a result, the actual number of bottles
you will be able to store may vary.
Bottle capacities are approximate maximums when
storing traditional Bordeaux 750 ML bottles and
include bulk storage.
You may load your wine bottles in a single row or by
stacking. If you do not have enough bottles to fill
your unit, it is better to distribute the load throughout
the unit so as to avoid “all on top” or “all below” type
storage.
- Remove or relocate adjustable wooden
shelves to accommodate larger type of bottles
or increase the capacity of the cellar by
stacking the bottles up when necessary. (See
Removing Shelves section on page 12).
- Keep small gaps between the walls and the
bottles to allow air circulation. Like an
underground cellar, air circulation is important
for preventing mold and for a better
temperature within the cellar.
- Do not over load your unit in order to better
facilitate air circulation.
- Avoid obstructing the internal fans (located
inside at the back of the wine cellar).
- Do not try to slide the shelves outwards
beyond the fixed position to prevent the bottles
from falling.
- Do not pull out more than one loaded shelf at
a time as this may cause the wine cellar to tilt
forward if not properly installed.
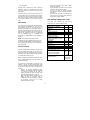
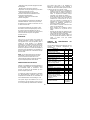
WINE SERVING TEMPERATURE CHART
The below chart indicates the best serving
temperature for a variety of different wines.
Wine Style ºC ºF
Champagne NV, Sparkling,
Spumante.
6º 43º
Dry White Semillon, Sauvignon
Blanc.
8º 46º
Vintage Champagne. 10º 50º
Dry White Chardonnay. 10º 50º
Dry White Gewürztraminer,
Riesling, Pinot grigio.
10º 50º
Sweet White Sauternes,
Barsac, Montbazillac, Ice Wine,
Late Harvest.
10º 50º
Beaujolais. 13º 55º
Sweet White Vintage:
Sauternes.
14º 57º
White Vintage Chardonnay. 14º 57º
Red Pinot Noir. 16º 61º
Red Grenache, Syrah. 16º 61º
Red Vintage Pinot Noir. 18º 65º
Cabernet & Merlot: French,
Australian, New Zealand,
Chilean, Italian, Spanish,
Californian, Argentinean.
20º 68º
Vintage Bordeaux.
Room
temperature
not exceeding
20ºC/68ºF

12
IMPORTANT INFORMATION ABOUT
TEMPERATURE
Your appliance has been designed to guarantee
optimum conditions for storing and/or serving your
wines.
Fine wines require long and gentle developmental
periods and need specific conditions in which to
reach their full potential.
All wines mature at the same temperature, which is
a constant temperature set between 52ºF to 57ºF or
11ºC to 14ºC. Only the temperature of “dégustation”
(wine appreciation) varies according to the type of
wine (see “Wine Serving Temperature Chart” on
page 11). As it is for natural cellars used by wine
producers for long periods of storage, it is not the
exact temperature that is important, but the
consistency of the temperature. In other words, as
long as the temperature of your wine cellar is
constant (between 52ºF to 57ºF or 11ºC to 14ºC)
your wines will be stored in perfect conditions.
Not all wines will improve over the years. Some
should be consumed at an early age (2 to 3 years)
while others have tremendous ageing capability
(50+ years). All wines have a peak in maturity. Do
check with your wine merchant to get the
appropriate information for your wine.
CARE AND MAINTENANCE
WARNING: Failure to unplug the appliance during
service and cleaning could result in electric shock or
other personal injury.
REMOVING SHELVES
To remove any of the shelves from the rail
compartment, move the shelf to the position
where the notch of wooden shelf is exactly
under the plastic post and then lift it up and out.
In order to replace the shelf, repeat steps
described above in reverse. Make sure to
engage the shelves with the small pegs of the
extended rails when the model is equipped with
roller system.
ACTIVE CHARCOAL AIR FILTER
Replace the active charcoal air filter with a new one
once a year. You can order a new filter by calling
Fagor Technical Service Center at: 1-877-743-2467,
or by going to the online shop section of our website:
www.fagoramerica.com.
Grip the filter and turn it 90°clockwise or
counterclockwise to remove.
Insert the new filter in the vertical position.
Turn the filter 90° clockwise or
counterclockwise until it clicks into position.

13
CLEANING YOUR APPLIANCE
Turn off the power, unplug the appliance, and
remove all interior items including shelves and
racks.
Wash the inside surfaces with a warm water and
baking soda solution. The solution should be
about 2 tablespoons of baking soda and 2 cups
of water.
Wash the shelves with warm soapy water.
Wring excess water out of your sponge or cloth
when cleaning any area of the control panel.
Wash the outside cabinet with warm water and
warm soapy water. Rinse well and wipe dry with
a clean soft cloth.
Do not clean the stainless steel with steel
wool pads. We suggest using an all-in-one
stainless steel cleaner to clean the stainless
steel parts of the unit. Test the cleaner on a
small area before you apply it to the entire
surface. Follow the manufacturer’s instructions
closely.
POWER FAILURE
In the event of a power outage/failure, all
previous temperature settings are automatically
memorized and reinstated. If power is
interrupted and then powered up again, the unit
will operate with the last temperature set-point.
Most power failures are corrected within a few
hours and should not affect the interior
temperature of your appliance provided that the
door remains shut. If the power is going to be off
for a longer period of time, you need to take the
proper steps to protect the contents of your unit.
VACATION TIME
Short absences: Leave the Wine Cooler in
operation for absences of less than three weeks.
Long absences: If the appliance will not be
used for over a month, remove all items, turn off
the appliance and unplug. Clean and dry the
interior thoroughly. To prevent odor and mold
growth, leave the door slightly open, propping it
open if necessary.
MOVING YOUR APPLIANCE
Remove all items from inside the unit.
Securely tape down all loose parts (shelves)
inside your appliance. We recommend using
masking tape or any tape with an easily
removable adhesive so as to not ruin any finish
on your unit.
Turn the adjustable leg up towards the base to
avoid damage.
Tape the door shut.
Make sure the appliance stays secure in the
upright position during transportation. Also,
protect the outside of the appliance with a thick
blanket or similar item.
ENERGY SAVING TIPS
The appliance should be located in the coolest
area of the room, away from heat producing
appliances and out of direct sunlight.
Ensure that the unit is adequately ventilated.
Never cover air vents. Clean dust and dirt from
the condenser regularly.
Only open the door for as long as necessary and
for as short a time as possible.
Store your contents in an organized way.
Do not over-fill the appliance in order to better
allow air to circulate.

14
PROBLEMS WITH YOUR APPLIANCE
You can solve many common problems easily, saving you the cost of a possible service call.
Try the suggestions below to see if you can solve the problem before calling customer service.
TROUBLESHOOTING GUIDE
PROBLEM POSSIBLE CAUSE REMEDY
Appliance does not
operate.
1. Appliance is not connected to a power supply.
2. The appliance is turned off.
3. The circuit breaker tripped or blew fuse.
1. Connect the appliance.
2. Switch on the appliance.
3. Switch on circuit breaker or
replace fuse.
Appliance is not cold
enough.
1. The temperature is not set correctly.
2. The ambient temperature could require an
adjusted temperature setting.
3. The door was opened too often or held open for
too long.
4. The door was not closed completely.
5. Door is not sealed tight enough.
6. The condenser is too dirty.
7. The ventilation opening is blocked or too dusty.
1. Check the set temperature.
2. Set a higher temperature.
3. Do not open the door more than
necessary.
4. Close door properly.
5. Check that the door seal is
clean and replace if necessary.
6. Clean the condenser when
necessary.
7. Clear the obstructions and clean
the dust.
Appliance turns itself
on and off frequently.
1. The room temperature is higher than average.
2. A large amount of bottles has been added to
the unit.
3. The door is opened too often.
4. The door is not closed completely.
5. The door gasket does not seal properly.
1. Put the appliance in a cooler
place.
2. Leave the appliance untouched
for a while until the set
temperature has been reached.
3. Do not open the door more often
than necessary.
4. Close door properly.
5. Check that the door seal is
clean and replace if necessary.
The light does not
work.
1. Appliance is not connected to a power supply.
2. The circuit breaker tripped or blew a fuse.
3. The light was switched off on the control panel.
1. Connect the appliance.
2. Switch on circuit breaker or
replace fuse.
3. Switch on the light.
Vibrations.
1. The appliance is not properly leveled. 1. Level the appliance with the
adjustable feet.
The appliance seems
to make too much
noise.
The rattling noise may come from the flow of the refrigerant, which is normal. As each cycle
ends, you may hear gurgling sounds caused by the flow of refrigerant in your appliance.
If temperature fluctuations occur, the contraction and expansion of the inner walls may
cause popping and cracking noises.
1. The appliance is not properly level. 1. Level the appliance with the
adjustable feet.
The door will not
close properly.
1. The appliance is not properly leveled.
2. The door was reversed and not properly
installed.
3. The gasket is dirty.
4. The shelves are out of position.
1. Level the appliance with the
adjustable feet.
2. Check the door hinge and
reassemble correctly (See
Reversing the Door Hinge
section on page 7).
3. Clean the door gasket.
4. Check the shelves and
reposition correctly.
Display shows “E1”.
“E2” or “E7”.
1. “E1” or “E2” indicates that the air temperature
sensor is failed.
2. E7” indicates the door switch failure.
Call for service.

15
The alarm sounds
and the temperature
display flashes.
Has the appliance door been open for longer than
60 seconds? If yes, close the door. If not, then the
temperature has risen higher or fallen lower than
the temperature that has been set. This could be
due to:
1. The appliance door being opened too often.
2. The ventilation opening being covered or too
dusty.
3. A lengthy interruption to the power supply.
4. A large amount of bottles has been added to
the unit.
1. Do not open the door more often
than necessary.
2. Clear the obstructions and clean
the dust.
3&4.Leave the appliance untouched
for a while until the set temperature
has been reached.
The display
shows “--”.
1. The display temperature is out of the range. 1. Only temperatures within the
range 16~99°F/-9~37°C will be
shown. If the temperature is not
within this range, the icon “--”
will be displayed instead. That is
normal.
Rev. A V20140305(USA)

16
WC-46 DZ
CAVE A VIN
MANUEL D’UTILISATION

17
INDEX
Veuillez lire ce manuel avec attention avant le montage et la mise en service,
puis le conserver. En cas de revente du produit, veuillez le transmettre au
nouvel acquéreur.
SÉCURITÉ RELATIVE À L’APPAREIL 18
ELIMINATION 19
CARACTÉRISTIQUES DU PRODUIT 20
INSTALLATION 20
FONCTIONNEMENT DE L'APPAREIL 23
NETTOYAGE ET ENTRETIEN 27
DÉPANNAGE 29

18
SÉCURITÉ RELATIVE À
L’APPAREIL
Votre sécurité et celle des autres nous importe
au plus au point. Ce manuel ainsi que votre
appareil contiennent des signaux de sécurité dont
vous devez tenir compte et que vous devez
respecter en tout temps.
SYMBOLE DE SÉCURITÉ
Ce symbole vous prévient des dangers potentiels
susceptibles de vous tuer ou de vous blesser ainsi
que votre entourage. Tous les signaux de sécurité
seront précédés de ce symbole ainsi que des
termes «DANGER» et «AVERTISSEMENT».
«Danger» signifie que le fait de ne pas tenir compte
de ce signal de sécurité pourrait entraîner des
blessures corporelles ou la mort.
« Avertissement » signifie que le fait de ne pas tenir
compte de ce signal peut causer des dommages
matériels importants au produit, des blessures
corporelles graves et même la mort.
SÉCURITÉ GÉNÉRALE
Avant toute utilisation, le cellier doit être
convenablement positionné et installé comme il est
décrit dans ce manuel qu’il est donc nécessaire de
lire attentivement. Pour réduire les risques
d’incendie, d’électrocution ou de blessure lors de
l’utilisation de l’appareil, nous vous recommandons
de suivre les mesures de sécurité suivantes :
Branchez l’appareil à une prise triphasée mise à
la terre, ne retirez pas la broche de masse, ne
pas utiliser d’adaptateur ni de rallonge.
Il est recommandé de ne pas brancher cet
appareil dans la prise d’un autre appareil ni dans
une prise qui peut être éteinte par un
interrupteur ou par une chaîne de traction.
Ne nettoyez jamais les pièces de l’appareil avec
des liquides inflammables. Les vapeurs
provoquées par ces liquides risquent de
déclencher un incendie ou une explosion
dangereuse.
Ne placez pas l’appareil près d’essence ou de
tout autre produit liquide ou vaporeux
inflammable. La fumée que ces
produits
dégagent pourrait déclencher un incendie ou
une explosion dangereuse.
Évitez les risques d’électrocution en
débranchant l’appareil avant de procéder à son
nettoyage ou à sa réparation.
Lorsque vous branchez ou
débranchez l’appareil, assurez-vous que vos
mains sont bien sèches.
Ne tentez pas de réparer l’appareil ni d’en
remplacer une pièce à moins que ce ne soit
spécifiquement recommandé dans ce manuel.
Laisser à un technicien qualifié le soin de
procéder à toute réparation non recommandée.
Replacez tous les panneaux avant mettre en
marche l’appareil.
Cet appareil est exempt de CFC et de HFC et
contient de petites quantités d'isobutane
(R600a), un réfrigérant respectueux de
l'environnement mais qui est inflammable. Il ne
détruit pas la couche d'ozone et ne produit pas
de gaz à effet de serre. Pendant le transport et
l'installation de l'appareil, veillez à ne pas
endommager les pièces du système de
refroidissement. La fuite de refrigérant est
dangereuse pour les yeux.
En cas de dommage :En cas de dommage:
- Évitez les flammes nues et tout objet
pouvant créer une étincelle.
- Débranchez l'appareil.
- Aérez plusieurs minutes la pièce dans
lequel il se trouve.
- Consultez le Service de dépannage.
Si l'appareil contient une quantité importante
de réfrigérant, installez-le dans une pièce
plus grande, afin d'éviter toute accumulation
de gaz combustible dangereux. Prévoyez un
espace d'1 mètre cube pour 8 g de réfrigérant.
La quantité de réfrigérant est indiquée sur la
plaque signalétique, à l'intérieur de l'appareil.
Laissez à un technicien qualifié le soin de
procéder à toute réparation ou remplacement
de pièce.
Prenez sérieux soin lors de la manipulation, le
déplacement et l'utilisation de l'appareil pour
éviter d'endommager soit la tuyauterie du
réfrigérant, ou en augmentant le risque d'une
fuite.
Le remplacement de pièces détachées et
d'entretien doit être effectué par le personnel
de service autorisé de l'usine, de façon à
minimiser le risque d'une éventuelle
inflammation due à des mauvaises pièces ou
service incorrect.

19
Déplacez l'appareil à deux ou à plusieurs
personnes afin d’éviter les blessures.
Ne pas stocker ou installer appareil à
l'extérieur.
Pour assurer la ventilation convenable de
l’appareil, laissez en devant complètement
dégagé. Choisissez une pièce bien aérée
d’une température de 16 à 35 °C, à l’abri des
éléments tels que le vent et la pluie ainsi que
l’eau pulvérisée et en gouttes.
Ne placez pas l’appareil à proximité d’un four,
d’une cuisinière ou de toute autre source de
chaleur.
Installez l’appareil avec tous les branchements
électriques requis par les codes provinciaux.
Une alimentation électrique standard (115
Volts CA uniquement et 60Hz)
convenablement reliée à la terre et conforme
au Code canadien de l’électricité et aux codes
et aux ordonnances locaux est requise.
Faites attention de ne pas plier ni coincer le
cordon d’alimentation de l’appareil.
L’intensité du fusible (ou du disjoncteur) doit
être de 15 ampères.
Ne laissez pas d’enfants jouer avec l’appareil.
Pour nettoyer l’appareil, n’utilisez pas d’agents
abrasifs à base de solvant qui pourraient en
endommager ou en décolorer les surfaces.
N’utilisez l’appareil qu’aux fins auxquelles il a
été conçu.
Gardez vos doigts éloignés des « points de
pincement ». Le dégagement entre les portes
ou celui entre les portes et le cellier est
nécessairement petit. Soyez prudent lorsque
vous refermez la porte si des enfants se
trouvent à proximité.
Si votre modèle d’appareil nécessite un
dégivrage, n’utilisez jamais un pic à glace ou
un autre instrument pointu pour accélérer le
dégivrage. Ces instruments peuvent perforer
le revêtement intérieur ou endommager le
dispositif de refroidissement.
ELIMINATION
Eliminez l'emballage de votre appareil de manière
adéquate. Assurez-vous que tous les matériaux
d'emballage sont éliminés et hors de portée des
bébés et jeunes enfants afin d'éviter tout risque
d'étouffement..
Pour des raisons de protection de l'environnement, il
est indispensable d'éliminer les appareils
frigorifiques de manière conforme. Cela concerne
votre présent appareil à la fin de son utilisation, ainsi
que votre nouvel appareil.
Avertissement! Rendre inutilisables les appareils
usagés qui sont hors service avant de les mettre au
rebut. Retirer la prise, sectionner le câble
d'alimentation, enlever ou détruire les éventuelles
serrures à déclic ou à verrou. Vous éviterez ainsi
que les enfants qui jouent ne s'enferment dans
I'appareil (risque d'étouffement) ou ne tombent dans
des situations dangereuses.
Risque d’enfermement pour les enfants!
Les risques d’enfermement ou de suffocation pour
les enfants demeurent une réalité. Les appareils
abandonnés ou jetés demeurent un danger, même
s’ils ne sont placés dans le garage que pour
quelques jours.
Avant de jeter votre ancien appareil:
Enlevez les portes.
Laissez les tablettes à leur place afin que les
enfants ne puissent pas se glisser facilement à
l’intérieur.
- CONSERVER CES INSTRUCTIONS -

20
CARACTÉRISTIQUES DU
PRODUIT
Installation encastrée ou libre à deux zones
tempérées.
Température réglable de 5°C à 20°C (41°F à
68°F) pouvant être affichée en degrés
Fahrenheit ou en degrés Celsius.
Réglable à une température d’entreposage à
long terme pour le vieillissement du vin ou à une
température précise de service de vins
rouges/blancs/mousseux.
Refroidissement dynamique à compression
assurant une circulation intérieure d’air et une
distribution uniforme de la température et de
l’humidité.
Éclairage intérieur à DEL blanc doux avec
interrupteur marche/arrêt (ON/OFF)
vous
permettant de voir vos vins sans avoir à ouvrir la
porte.
Système d’alerte lorsque la porte est ouverte ou
en cas d’anomalie.
Le mode Shabbat permet aux lumières de
demeurer éteintes durant certaines pratiques
religieuses.
Fonction de mémorisation de la température : si
le courant est interrompu (saute de puissance,
disjoncteur de surcharge, etc.) et rétabli,
l’appareil se remettra en marche à la dernière
température programmée.
Dégivrage automatique par évaporation de l’eau
de dégivrage.
La porte réversible à double vitres de verre
trempé fumé protège votre vin de la lumière UV
et crée une vitrine attrayante avec peu de
condensation et un fonctionnement silencieux.
Le cadre extérieur en acier mat noir et le
revêtement intérieur de plastique noir offrent
performance et stabilité pour toute sa durée de
vie. Le revêtement noir empêche la lumière
excessive de nuire au processus de
vieillissement du vin
.
Un système de neutralisation des vibrations
offre une triple protection contre les vibrations
extérieures qui pourraient endommager vos
bouteilles
.
Porte vitrée avec cadre en acier inoxydable et
poignée en acier inoxydable.
Les tablettes sur roues de hêtre verni, réglables
et robustes, munissent le cellier d’une
commodité et d’une flexibilité maximales lui
permettant de loger des bouteilles de différentes
tailles.
Gaz d’isolation moussant et réfrigérant
écologique.
Filtre à air au charbon actif.
INSTALLATION
PRÉPARATION
Retirez l‘emballage extérieur et intérieur.
Nettoyez les surfaces intérieures avec un chiffon
doux imbibé d’eau tiède. L'appareil peut avoir
des odeurs résiduelles qui s'estomperont
progressivement lorsque l'appareil refroidit.
IMPORTANT: Placez l’appareil à l’endroit qui lui
est réservé puis attendez environ deux heures
avant de le brancher. Vous éviterez ainsi des
troubles de fonctionnement au niveau du
système de refroidissement possiblement
occasionnés lors du transport.
La porte de cet appareil peut être ouverte depuis
la gauche ou la droite. L’appareil est livré avec
l’ouverture de porte depuis la droite. Si vous
souhaitez inverser le sens d’ouverture vers la
gauche, suivez les instructions « Inverser le
sens d’ouverture de votre cave à vin ».
Installez la poignée sur la porte si nécessaire.
INSTALLATION
Cet appareil autoportant est aussi encastrable.
ATTENTION! Ce cellier est conçu pour
entreposer des vins. Il n'est pas prévu pour
l'entre Ce cellier est conçu pour entreposer des
vins. Il n'est pas prévu pour l'entreposage de
nourriture, de médicaments ou de tout autre
produit pharmaceutique.posage de nourriture,
de médicaments ou de tout autre produit
pharmaceutique.
Cet appareil doit être placé sur une surface
solide qui en supportera le poids une fois rempli.
Mettez-le à niveau en ajustant les pieds
réglables à l’avant de l’appareil.
Dans le cas d’une installation libre, il est
suggéré de laisser un espace de 5 pouces
(127 mm) à l’arrière et de chaque côté de
l’appareil. Cette action permet une circulation
d’air adéquate pour refroidir le compresseur et
le condensateur, entraînant ainsi une économie
d’énergie. Même dans le cas d’une installation
encastrée, il est de rigueur de garder un espace
d’un quart de pouce (5 mm) de chaque côté et
sur le dessus de l’appareil afin d’assurer une
ventilation et un point d’accès adéquats.
Assurez-vous que la grille d’aération avant
de l’appareil ne soit jamais couverte ou
obstruée d’une quelconque façon.
La page est en cours de chargement...
La page est en cours de chargement...
La page est en cours de chargement...
La page est en cours de chargement...
La page est en cours de chargement...
La page est en cours de chargement...
La page est en cours de chargement...
La page est en cours de chargement...
La page est en cours de chargement...
La page est en cours de chargement...
La page est en cours de chargement...
-
 1
1
-
 2
2
-
 3
3
-
 4
4
-
 5
5
-
 6
6
-
 7
7
-
 8
8
-
 9
9
-
 10
10
-
 11
11
-
 12
12
-
 13
13
-
 14
14
-
 15
15
-
 16
16
-
 17
17
-
 18
18
-
 19
19
-
 20
20
-
 21
21
-
 22
22
-
 23
23
-
 24
24
-
 25
25
-
 26
26
-
 27
27
-
 28
28
-
 29
29
-
 30
30
-
 31
31


Fagor WC46DZ Le manuel du propriétaire
- Catégorie
- Boissons glacées
- Taper
- Le manuel du propriétaire
dans d''autres langues
- English: Fagor WC46DZ Owner's manual
Documents connexes
Autres documents
-
Haier WINE BANK 50 SERIES 7 - HWS77GDAU1 Le manuel du propriétaire
-
Haier HWS42GDAU1 Manuel utilisateur
-
ROSIERES HWCB 45/1 Manuel utilisateur
-
Electrolux ERW1573AOA Manuel utilisateur
-
Avintage AVI48CDZA Le manuel du propriétaire
-
LA SOMMELIERE TR2V120 Le manuel du propriétaire
-
-
CONTINENTAL EDISON CECWC90 Manuel utilisateur
-
Liebherr WS17800 Mode d'emploi
-
VINOSPHERE CVD 121 V Le manuel du propriétaire