Weber 89796 Manuel utilisateur
- Catégorie
- Barbecues
- Taper
- Manuel utilisateur
Ce manuel convient également à

BUILT-IN LP SIDE BURNER INSTALLATION/OWNER'S GUIDE
89796 US 01/24/07
LP
DANGER
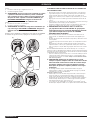
If you smell gas:
1. Shut off gas to the appliance.
2. Extinguish any open fl ames.
3. Open lid.
4. If odor continues, keep away from the
appliance and immediately call your gas
supplier or your fi re department.
Leaking gas may cause a fi re or explosion
which can cause serious bodily injury or
death, or damage to property.
WARNING:
1. Do not store or use gasoline or other
fl ammable liquids or vapors in the vicinity
of this or any other appliance.
2. An LP cylinder not connected for use shall
not be stored in the vicinity of this or any
other appliance.
WARNING: Follow all leak-check
procedures carefully in this manual prior
to barbecue operation. Do this even if the
barbecue was dealer-assembled.
NOTICE TO INSTALLER: These instructions
must be left with the owner and the owner
should keep them for future use.
THIS GAS APPLIANCE IS DESIGNED FOR
OUTDOOR USE ONLY.
WARNING: Do not try to light this appliance
without reading the “Lighting Instructions”
section of this manual.
#
42376
Built-In LP Side Burner Installation/Owner’s Guide
#89796
YOU MUST READ THIS OWNER’S GUIDE
BEFORE OPERATING YOUR GAS GRILL
THESE ACCESSORIES MAY BE PURCHASED SEPARATELY.
Guía del propietario del asador de gas licuado de propano - Pg 15
Guide de l’utilisateur du grill à gaz PL - Pg 29

2
WWW.WEBER.COM
®
DANGER
Failure to follow the Dangers, Warnings and Cautions contained in this Owner’s Manual may result in serious bodily injury or
death, or in a fi re or an explosion causing damage to property.
WARNINGS
Do not store a spare or disconnected liquid propane cylinder under or near this barbecue.
Improper assembly may be dangerous. Please follow the assembly instructions carefully.
After a period of storage, and/or nonuse, the Weber
®
gas barbecue should be checked for gas leaks and burner obstructions
before use. See instructions in this manual for correct procedures.
Do not operate the Weber
®
gas barbecue if there is a gas leak present.
Do not use a fl ame to check for gas leaks.
Combustible materials should never be within 24 inches (61 cm) of the back or sides of your Weber
®
gas barbecue.
Do not put a barbecue cover or anything fl ammable on, or in the storage area under the barbecue.
Your Weber
®
gas barbecue should never be used by children. Accessible parts of the barbecue may be very hot. Keep young
children away while it is in use.
You should exercise reasonable care when operating your Weber
®
gas barbecue. It will be hot during cooking or cleaning and
should never be left unattended, or moved while in operation.
Should the burners go out while in operation, turn all gas valves off. Open the lid and wait fi ve minutes before attempting to
relight, using the lighting instructions.
Do not use charcoal or lava rock in your Weber
®
gas barbecue.
Never lean over open grill or place hands or fi ngers on the front edge of the cooking box.
Should a grease fi re occur, turn off all burners and leave lid closed until fi re is out.
Do not enlarge valve orifi ces or burner ports when cleaning the valves or burners.
The Weber
®
gas barbecue should be thoroughly cleaned on a regular basis.
Liquid propane gas is not natural gas. The conversion or attempted use of natural gas in a liquid propane unit or liquid
propane gas in a natural gas unit is dangerous and will void your warranty.
Do not attempt to disconnect any gas fi tting while your barbecue is in operation.
Use heat-resistant barbecue mitts or gloves when operating barbecue.
Keep any electrical supply cord and the fuel supply hose away from any heated surfaces.
Combustion byproducts produced when using this product contain chemicals known to the state of California to cause cancer,
birth defects, or other reproductive harm.
Do not use this barbecue unless all parts are in place. The unit must be properly assembled according to the assembly
instructions.
LIQUID PROPANE GAS UNITS ONLY:
Use the pressure regulator and hose assembly that is supplied with your Weber
®
gas barbecue.
Do not attempt to disconnect the gas regulator and hose assembly or any gas fi tting while your barbecue is in operation.
A dented or rusty liquid propane cylinder may be hazardous and should be checked by your liquid propane supplier. Do not
use a liquid propane cylinder with a damaged valve.
Although your liquid propane cylinder may appear to be empty, gas may still be present, and the cylinder should be
transported and stored accordingly.
If you see, smell or hear the hiss of escaping gas from the liquid propane cylinder:
1. Move away from liquid propane cylinder.
2. Do not attempt to correct the problem yourself.
3. Call your fi re department.
DANGERS & WARNINGS

WWW.WEBER.COM
®
3
WARRANTY
Weber-Stephen Products Co. (Weber) hereby warrants to the ORIGINAL PURCHASER of this Weber
®
gas grill that it will be free of defects in material and workmanship from the date of purchase as follows:
Stainless Steel Lid, 10 years
All Remaining Parts, 5 years
When assembled and operated in accordance with the printed instructions accompanying it.
Weber may require reasonable proof of your date of purchase. THEREFORE, YOU SHOULD RETAIN
YOUR SALES SLIP OR INVOICE.
This Limited Warranty shall be limited to the repair or replacement of parts that prove defective under
normal use and service and which on examination shall indicate, to Weber’s satisfaction, they are
defective. Before returning any parts, contact the Customer Service Representative in your area
using the contact information on our website. If Weber confi rms the defect and approves the claim,
Weber will elect to replace such parts without charge. If you are required to return defective parts,
transportation charges must be prepaid. Weber will return parts to the purchaser, freight or postage
prepaid.
This Limited Warranty does not cover any failures or operating diffi culties due to accident, abuse,
misuse, alteration, misapplication, vandalism, improper installation or improper maintenance or
service, or failure to perform normal and routine maintenance, including but not limited to damage
caused by insects within the burner tubes, as set out in this owner’s manual.
Deterioration or damage due to severe weather conditions such as hail, hurricanes, earthquakes
or tornadoes, discoloration due to exposure to chemicals either directly or in the atmosphere, is not
covered by this Limited Warranty.
There are no other express warrants except as set forth herein and any applicable implied warranties
of merchantability and fi tness are limited in duration to the period of coverage of this express written
Limited Warranty. Some regions do not allow limitation on how long an implied warranty lasts, so this
limitation may not apply to you.
Weber is not liable for any special, indirect or consequential damages. Some regions do not allow the
exclusion or limitation of incidental or consequential damages, so this limitation or exclusion may not
apply to you.
Weber does not authorize any person or company to assume for it any other obligation or liability in
connection with the sale, installation, use, removal, return, or replacement of its equipment; and no
such representations are binding on Weber.
This Warranty applies only to products sold at retail.
WEBER-STEPHEN PRODUCTS CO.
Customer Service Center
1890 Roselle Road, Suite 308
Schaumburg, IL 60195
USA
For replacement parts call:
1-800-446-1071
www.weber.com
®
OPERATING
Liquid Propane (LP) gas supply is easy to use and gives you more cooking control than
charcoal fuel.
• These instructions will give you the minimum requirements for assembling your
Weber® gas barbecue. Please read the instructions carefully before using your
Weber® gas barbecue. Improper assembly can be dangerous.
• Not for use by children.
• If there are local codes that apply to portable gas grills, you will have to conform to
them. Installation must conform with local codes or, in the absence of local codes,
with either the National Fuel Gas Code, ANSI Z223.1/NFPA 54, Natural Gas and
Propane Installation Code, CSA B149.1, or Propane Storage and Handling Code,
B149.2 as applicable.
• The pressure regulator supplied with the Weber® gas barbecue must be used.
This regulator is set for 11 inches of water column (pressure).
• This Weber® gas barbecue is designed for use with liquid propane (LP) gas only.
Do not use with natural (piped in city) gas. The valves, orifi ces, hose and regulator
are for LP gas only.
• Do not use with charcoal fuel.
• Check that the area under the control panel and the bottom tray are free from
debris that might obstruct the fl ow of combustion or ventilation air.
• The areas around the LP cylinder must be free and clear from debris.
• Replacement pressure regulators and hose assemblies must be those specifi ed
by Weber-Stephen Products Co.
FOR INSTALLATION IN CANADA
These instructions, while generally acceptable, do not necessarily comply with the
Canadian Installation codes, particularly with piping above and below ground. In
Canada the installation of this appliance must comply with local codes and/or Standard
CSA-B149.2 (Propane Storage and Handling Code).
WARNING: Only use this barbecue outdoors in a well-
ventilated area. Do not use in a garage, building, breezeway
or any other enclosed area.
WARNING: Your Summit
®
Built-In gas barbecue shall not be
used under an unprotected combustible roof or overhang.
WARNING: Do not use the barbecue within 24 inches (610
mm) of combustible materials, top, bottom, back or sides of
the grill.
WARNING: The entire cooking box gets hot when in use. Do
not leave unattended.
WARNING: Keep any electrical supply cord and the fuel
supply hose away from any heated surface.
WARNING: Keep the cooking area clear of fl ammable vapors
and liquids such as gasoline, alcohol, etc., and combustible
materials.
WARNING: Never store an extra (spare) LP cylinder under or
near the Weber
®
gas barbecue.
WARNING: Keep the ventilation openings of the cylinder
enclosure free and clear of debris.
WARNING: Turn off the gas at the LP gas supply cylinder
when the outdoor cooking gas appliance is not in use.
WARNING: Never store an outdoor cooking gas appliance
indoors unless the LP cylinder is disconnected and
removed from the outdoor cooking gas appliance.
WARNING: LP cylinders must be stored outdoors out of
the reach of children and must not be stored in a building,
garage, or any other enclosed area.
WARRANTY

4
WWW.WEBER.COM
®
LOCATING YOUR BUILT-IN SIDE BURNER
When determining a suitable location for your Built-In Side Burner installation, give
attention to concerns such as exposure to wind, proximity to traffi c paths, and keeping
any gas supply lines as short as possible. Never locate the Summit
®
Built-In Side Burner
in a garage, breezeway, shed, under an unprotected overhang, or other enclosed area.
Locate the Side Burner and structure so there is enough room to safely evacuate the
area in case of a fi re.
CLEARANCE FROM COMBUSTIBLE SURFACES OR STRUCTURES
WARNING: Clearance from the outside walls of the sides and
back of the LP Tank Cabinet must be a minimum of 24 inches
(61 cm) any surface. Refer to “Typical Gas Supply Installation”
before starting installation.
WARNING: The structure, “island” counter tops and adjacent
work areas for the LP Tank Cabinet installation must be built
from noncombustible materials only.
NOTE: If you have questions on what materials are considered noncombustible, contact
you local building supplier or fi re department.
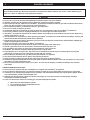
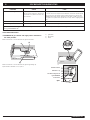
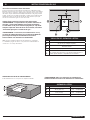
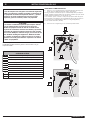
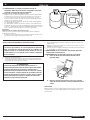
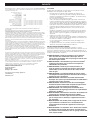
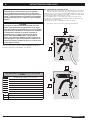
BUILT-IN SRUCTURE CUTOUT DIMENSIONS
All dimensions are to fi nished surfaces.
WARNING: All counter top fi nished surfaces must be
constructed of a noncombustible material.
SIDE BURNER
Cut out Dimensions Tolerances
A 10 1/2” (26.7 cm) + 1/4” - 1/4” (6.35mm)
B 3 3/4” (9.5 cm) + 1/4” - 1/4” (6.35mm)
C 16 1/4” (41.3 cm) + 1/4” - 1/4” (6.35mm)
1
2
C
ABB
B
A
SIDE BURNER LOCATION
A Any Surface
B 24” (61 cm) From Any Surface
C Side Burner
1 24” ( 61 cm) Minimum Lid Clearance
2
Note: For a countertop treatment: Recommended 3/4” (19 mm)
overhang. Notch front edge for frame to fully slide in.
GAS INSTRUCTIONS

WWW.WEBER.COM
®
5
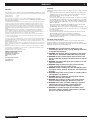
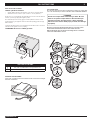
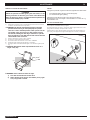
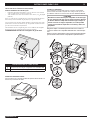
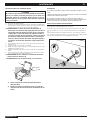
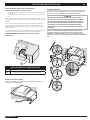
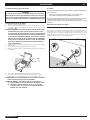
MOUNTING THE SIDE BURNER
Connect the corrugated gas line to the side burner valve located on the back right
hand side of side burner.
TEST CONNECTIONS
All connections and joints must be thoroughly tested for leaks in accordance with
local codes and all listed procedures in the latest edition of ANSI Z223.1/NFPA 54.
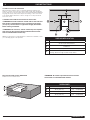
BUILT-IN GAS LINE LOCATIONS
GENERAL CONSTRUCTION DETAILS
• Summit
®
Built-In side burner unit should be on site before construction begins.
• All dimensions have a tolerance of plus or minus +/-
1
/
4
” inch (6.35 mm).
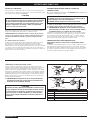
Provide access for a corrugated gas line depending on the location of the side burner in
relation to your main gas supply and regulator position.
Area should be kept clear of sharp, jagged, or extremely abrasive surfaces to avoid
possible damage to gas supply lines. Exercise caution when pulling gas lines through
built-in structure.
A 3/8 inch (9.52 mm) stainless steel corrugated gas line should be used to connect the
side burner to the regulator accessory coupling.
WARNING: Do not use a rubber gas hose.
DANGER
Do not use an open fl ame to check for gas leaks. Be sure
there are no sparks or open fl ames in the area while you
check for gas leaks. This will result in a fi re or explosion
which can cause serious bodily injury or death, and damage
to property.
Be sure to secure the side burner unit with non corrosive screws
anchored into the fi nished surface of the “island structure”.
Replace the plastic plug on the front mounting hole to conceal the
screw once side burner is secure.
GAS LINE LOCATIONS
1 3/8” (9.52 cm) SAE Stainless Corrugated Gas Line
2 Typical Tank Cabinet Location
2
1
GAS INSTRUCTIONS

6
WWW.WEBER.COM
®
TYPICAL BULK PROPANE GAS SUPPLY INSTALLATION
We recommend that this installation be done by a LICENSED professional.
General Specifi cations for Piping
Note - Contact your local municipality for building codes regulating outdoor gas grill
installations. In absence of Local Codes, you must conform to the latest edition of the
National Fuel Gas Code ANSI Z223.1/NFPA 54.
• This grill is designed to operate at 11 inches of water column pressure. An LP in
line regulator may be necessary for this pressure.
CAUTION: If young children are in the area, a
locking valve should be considered.
• Pipe compound should be used which is resistant to the action of liquid propane
gas when gas connections are made.
• The gas connections must be fi rmly attached to rigid, permanent construction.
Note: The information provided in this manual is general for typical installations. We
cannot cover all possible installation ideas. We recommend, prior to installation, that
you contact your municipality for local building codes and your local fi re department for
installation verifi cation.
If you have any questions, contact Customer Service at 1-800-446-1071.
GAS LINE PIPING
• Refer to the piping chart at the bottom of previous page.
• The corrugated gas line from the manifold is 58 inches (147.3 cm) long. Do not
extend the gas line.
• We have provided the means to make an SAE 45° fl are connection. Do not use
pipe sealant on this connection.
• If the length of line required does not exceed 50 feet (15.42 m), use a 5/8” (15.87
mm) O.D. tube. One size larger should be used for lengths greater than 50 feet
(15.42 m). Refer to piping chart.
• Gas piping may be copper tubing, type K or L; polyethylene plastic tube, with a
minimum wall thickness of .062 inch (1.57 mm); or standard weight (schedule 40)
steel or wrought iron pipe.
• Copper tubing must be tin-lined if the gas contains more than 0.3 grams of
hydrogen sulfi de per 100 cubic feet (30.48 cubic meters) of gas.
• Plastic tubing is suitable only for outdoor, underground use.
• Gas piping in contact with earth, or any other material which may corrode the
piping, must be protected against corrosion in an approved manner.
• Underground piping must have a minimum of 18” (45.7 cm) cover.
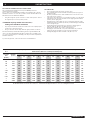
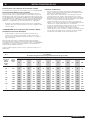
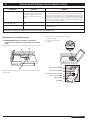
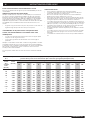
Table
10-1
Maximum Capacity of Pipe in Cubic Feet of Gas per Hour for Gas Pressures of 0.5 psi or Less and a Pressure Drop of 0.3 Inch
Water Column. (Based on a 0.60 Specifi c Gravity Gas)
Nominal
Iron Pipe
Size
(Inches)
Internal
Diameter
(Inches)
Length of Pipe (Feet)
10 20 30 40 50 60 70 80 90 100 125 150 175 200
1/4 .364 32 22 18 15 14 12 11 11 10 98876
3/8 .493 72 49 40 34 30 27 25 23 22 21 18 17 15 14
1/2 .622 132 92 73 63 56 50 46 43 40 38 34 31 28 26
3/4 .824 278 190 152 130 115 105 96 90 84 79 72 64 59 55
1 1.049 520 350 285 245 215 195 180 170 160 150 130 120 110 100
1 1/4 1.380 1050 730 590 500 440 400 370 350 320 305 275 250 225 210
1/12 1.160 1600 1100 890 760 670 610 560 530 490 460 410 380 350 320
2 2.067 3050 2100 1650 1450 1270 1150 1050 990 930 870 780 710 650 610
2 1/2 2.469 4800 3300 2700 2300 2000 1850 1700 1600 1500 1400 1250 1130 1050 980
3 3.068 8500 5900 4700 4100 3600 3250 3000 2800 2600 2500 2200 2000 1850 1700
4 4.026 17500 12000 9700 8300 7400 6800 6200 5800 5400 5100 4500 4100 3800 3500
© 1997 National Fire Protection Association, Inc. and International Approval Services - U.S., Inc. All Rights Reserved.
GAS INSTRUCTIONS

WWW.WEBER.COM
®
7
TYPICAL 20 LP PROPANE GAS SUPPLY INSTALLATION
We strongly recommend that you use the Summit
®
Built-In
Tank Cabinet (#21280) for installations using a 20 lb LP cylinder, mounted remotely in
an “island” structure.
The Summit
®
Built-In Tank Cabinet is a CSA listed accessory for installing a remote
mounted 20 lb LP cylinder, in an “island” structure. Summit
®
Built-In Tank Cabinet has
a hose and regulator assembly and gas connections, for connecting a remote mounted
LP cylinder to the Summit
®
Built-In gas grill. The hose and regulator is listed as a
required part of the CSA listed Summit
®
Built-In gas grill.
The Summit
®
Built-In Tank Cabinet also meets the requirements for venting, tank
retention and separation of the LP cylinder from a heat source as outlined in the ANSI
Standard for Outdoor Cooking Gas Appliances, Z21.58/CSA 1.6 for LP enclosures.
The Summit
®
Built-In Tank Cabinet has its own installation guide.
If you do not use the Summit
®
Built-In Tank Cabinet, you need to hire a licensed
contractor or licensed plumber and they need to follow the requirements described
in the ANSI Standard for Outdoor Cooking Gas Appliances, Z21.58/CSA 1.6 for LP
enclosures.
The requirements described in the Standard for Outdoor Cooking Gas Appliances,
Z21.58/CSA 1.6. are as follows;
A remote enclosure for an LP gas cylinder shall be ventilated by openings at both
the upper and lower levels of the cylinder. This shall be accomplished by one of the
following:
a). One side of the remote LP cylinder enclosure shall be completely open; or
b). If the remote LP cylinder enclosure is designed to have four sides, a top and a
bottom, ventilation is required for the remote LP cylinder enclosure;
1). There should be at least two ventilation openings, (a hole or group of
holes, for the purpose of ventilation) in the sidewalls of the island structure.
The openings should be located within 5 inches (127mm) of the top of the
enclosure. The ventilation openings should be equally sized and spaced at
a minimum of 90 degrees, and be unobstructed. The openings shall have
a total free open area of not less than 20 square inches. (This relates to 1
square inch of ventilation area, per pound of stored fuel capacity).
2). Ventilation openings (a hole or group of holes, for the purpose of ventilation)
should be provided at fl oor level. The ventilation openings should have a total
free area of not less than 10 square inches. (This relates to 1/2 square inch
of ventilation area, per pound of stored fuel capacity). There should be at
least two ventilation openings if the ventilation openings at fl oor level are in
the sidewall. The ventilation openings should be within 5 inches (127mm) of
the fl oor. The ventilation openings should be of equal size and be spaced at a
minimum of 90 degrees, and should be unobstructed.
3). The minimum size of the ventilation hole (s) should not be less than 1/4 inch.
4). The ventilation openings in the sidewalls should not allow venting into
the empty or “hollow” area of the “island”. If a gas leak should occur or
the LP cylinder should vent in the LP cylinder enclosure, the gas should
not be allowed to vent or migrate into the empty or “hollow” area of the
“island”. Ventilation openings in the sidewalls of the enclosure should only
communicate with the outside of the “island” structure, so that the gas can
dissipate outside of the “island” structure.
c). If the remote LP cylinder enclosure has four sides, a top and a bottom, and is
intended for installation in a built-in “island” enclosure;
1). At least one ventilation opening (a hole or group of holes, for the purpose
of ventilation) needs to be on one side of the enclosure that communicates
with the outside of the “island” structure. If a gas leak should occur or the
LP cylinder should vent in the LP cylinder enclosure, the gas should not be
allowed to vent or migrate into the empty or “hollow” area of the “island”.
Ventilation openings should only communicate with the outside of the “island”
structure, so that the gas can dissipate outside of the “island” structure. The
ventilation opening should be located within 5 inches (127mm) of the top of
the enclosure, and should have a total free area of 20 square inches. (This
relates to 1 square inch of ventilation area, per pound of stored fuel).
2). At least one ventilation opening (a hole or group of holes, for the purpose
of ventilation) needs to be on one side of the enclosure that communicates
with the outside of the “island” structure, at the bottom. If a gas leak should
occur or the LP cylinder should vent in the LP cylinder enclosure, the gas
should not be allowed to vent or migrate into the empty or “hollow” area of
the “island”. Ventilation openings should only communicate with the outside
of the “island” structure, so that the gas can dissipate outside of the “island”
structure. The ventilation opening should be located within 5 inches (127mm)
of the bottom of the enclosure, and should have a total free area of 10
square inches. (This relates to 1/4 square inch of ventilation area, per pound
of stored fuel).
3). The minimum size of the ventilation hole (s) should not be less than 1/4 inch
(6.35mm).
d). The remote LP cylinder enclosure should be constructed with non-combustible
materials. The remote LP cylinder enclosure should isolate the LP cylinder from the
burner compartment, so that it provides shielding from radiation, be a fl ame barrier
and provide protection from foreign material such as hot drippings.
e). There should be a minimum of 2 inches (50.8mm) between the ground and the fl oor
of the remote LP cylinder enclosure.
f). The LP cylinder valve should be readily accessible for hand operation. A door on the
remote LP cylinder enclosure to gain access to the LP cylinder valve is acceptable,
provided it is non-locking and can be opened without the use of tools.
TEST CONNECTIONS
All connections and joints must be thoroughly tested for leaks in accordance with local
codes and all listed procedures in the latest edition of the National Fuel Gas Code ANSI
Z223.1/NFPA 54.
DANGER
Do not use an open fl ame to check for gas leaks. Be sure
there are no sparks or open fl ames in the area while you
check for gas leaks. This will result in a fi re or explosion
which can cause serious bodily injury or death, and damage
to property.
GAS INSTRUCTIONS

8
WWW.WEBER.COM
®
DANGER
Use of any other hose and regulator assembly could be
dangerous, and may not provide adequate gas supply to
the Summit
®
Built-In gas grill, and could result in a fi re or
an explosion causing serious bodily injury or death, and
damage to property.
DANGER
Failure to use the Summit
®
Built-In Tank Cabinet for a 20 lb
cylinder or failure to build a LP cylinder enclosure for a 20 lb
cylinder following the requirements for ventilation, cylinder
retention and separation of the LP cylinder from a heat
source, listed in the ANSI Standard for Outdoor Cooking Gas
Appliances, ANSI Z21.58 CSA 1.6, could be dangerous, and
could result in a fi re or an explosion causing serious bodily
injury or death and damage to property.
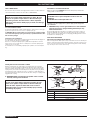
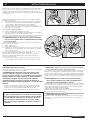
CONNECT GAS SUPPLY
1) Uncap the fl are fi tting from the optional side burner connection located inside the
Summit
®
Built-In
Tank Cabinet (#21280).
Note: We strongly recommend that you use the Summit
®
Built-In Tank Cabinet (#21280)
for installations using a 20 lb LP cylinder, mounted remotely in an “island” structure.
If your, licensed contractor or licensed plumber, builds an LP cylinder enclosure
following the guidelines in the ANSI Standard for Outdoor Cooking Gas Appliances,
Z21.58 CSA 1.6, you need to order kit number (#21287).
2) Connect the corrugated gas line to the side burner Connection.
If you do not follow the DANGER statements exactly, the Warranty on the Summit
®
Built-
In gas grill will be voided.
a.
c.
b.
1
3
4
5
6
2
SIDE BURNER LP SUPPLY CONNECTIONS
1
Corrugated Gas Line to Manifold
2
Plug unused hole with supplied plug
3
Use bushing for gas line hole
4
1/2” (12.7mm) Flared Gasket
5
90° Fitting
6
Cap (Optional Side Burner)
7
To SIde Burner
8
Connection to LP Tank
a
Top of Box
b
Back of Box
c
Side View
b.
a.
2
5
7
8
c.
GAS INSTRUCTIONS

WWW.WEBER.COM
®
9
IMPORTANT LP CYLINDER INFORMATION
Failure to follow these DANGER statements exactly may result in a fi re
causing death or serious injury.
DANGER
NEVER store a spare LP Cylinder under or near this
barbecue.
NEVER fi ll the tank beyond 80% full.
Your Weber
®
gas grill is equipped for a cylinder supply system designed for
vapor withdrawal.
WARNING: Only use this grill outdoors in a well-ventilated
area. Do not use in a garage, building, breezeway or any
other enclosed area.
The proper fi lling methods for the fi lling of your cylinder are by weight or volume, as
described in NFPA 58. Please make sure your fi lling station fi lls your LP cylinder by
weight or volume. Ask your fi lling station to read purging and fi lling instructions on the
LP cylinder before attempting to fi ll.
LEAK CHECK PREPARATION
CHECK THAT ALL BURNER VALVES ARE OFF
Valves are shipped in the “OFF” position, but you should check to be sure that they are
turned off. Check by pushing down and turning clockwise. If they do not turn, they are
off. Proceed to the next step. If they do turn continue turning them clockwise until they
stop, then they are off. Proceed to the next step.
TEST CONNECTIONS
All connections and joints must be thoroughly tested for leaks in accordance with local
codes and all listed procedures in the latest edition of AS5601/AG601.
DANGER
Do not use an open fl ame to check for gas leaks. Be sure
there are no sparks or open fl ames in the area while you
check for gas leaks. This will result in a fi re or explosion
which can cause serious bodily injury or death, and damage
to property.
FILL LIQUID PROPANE CYLINDER
To fi ll, take the liquid propane cylinder and fi ller adapter to an RV center or look up gas-
propane in the phone book for other sources of liquid propane gas.
WARNING: We recommend that your liquid propane cylinder be fi lled
at an authorized liquid propane gas dealer by a qualifi ed attendant, who
fi lls the tank by weight.
IMPROPER FILLING IS DANGEROUS.
The liquid propane cylinder must be installed, transported and stored in an upright posi-
tion, and should not be dropped or handled roughly.
Never store or transport the liquid propane cylinder where temperatures can reach
125°F / 51°C (too hot to hold by hand – for example: do not leave the liquid propane
cylinder in a car on a hot day).
For full instructions on safe handling of liquid propane cylinders, see Section “Operat-
ing”.
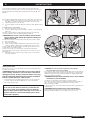
CONNECTING THE LIQUID PROPANE CYLINDER
All Weber
®
liquid propane gas grill regulators are equipped with a UL-Listed tank
connection as per the latest edition of ANSI Z21.58. This will require a liquid propane
tank that is similarly equipped with a Type 1 connection in the tank valve. This Type 1
coupling allows you to make a fast and totally safe hookup between your gas grill and
your liquid propane tank. It eliminates the chance of leaks due to a POL fi tting that is
not properly tightened. Gas will not fl ow from the tank unless the Type 1 coupling is fully
engaged into the coupling.
WARNING: Make sure that the LP cylinder valve is closed.
Close by turning valve clockwise.
DANGER
Do not use an open fl ame to check for gas leaks. Be sure
there are no sparks or open fl ames in the area while you
check for leaks. Sparks or fl ames will result in a fi re or
explosion which can cause serious bodily injury or death,
and damage to property.
4
3
2
1
5
4
3
2
1
5
TYPE 1 CONNECTIVE COUPLING
1
Type 1 Valve
2
Hand Wheel
3
External Thread
4
Thermally Sensitive Nut
5
Propane Regulator
GAS INSTRUCTIONS

10
WWW.WEBER.COM
®
CHECK FOR GAS LEAKS
After a period of nonuse, we recommend that you perform the following maintenance
procedures for your safety.
WARNING: Check the hose before each use of the grill for
nicks, cracking, abrasions or cuts. If the hose is found to be
damaged in any way, do not use the grill. Replace using only
Summit
®
authorized replacement hose. Contact the Summit
®
Built-In Customer Service at 1-800-446-1071.
• Inspect the burner for correct fl ame pattern. Clean if necessary, following the
procedures outlined in the “General Maintenance” section of this manual.
• Check all gas fi ttings for leaks.
DANGER
Do not use an open fl ame to check for gas leaks. Be sure
there are no sparks or open fl ames in the area while you
check for leaks. Sparks or open fl ames will result in a fi re or
explosion, which can cause serious bodily injury or death
and damage to property.
WARNING: You should check for gas leaks every time you
disconnect and reconnect a gas fi tting.
Note - All factory-made connections have been thoroughly checked for gas leaks. The
burners have been fl ame-tested. As a safety precaution however, you should recheck
all fi ttings for leaks before using your Weber Gas Barbecue. Shipping and handling
may loosen or damage a gas fi tting.
WARNING: Perform these leak checks even if your barbecue
was dealer or store assembled.
You will need: a soap and water solution, and a rag or brush to apply it.
Note - Since some leak test solutions, including soap and water, may be slightly cor-
rosive, all connections should be rinsed with water after checking for leaks.
Make sure side burner is OFF.
To perform leak checks: open cylinder valve by turning the cylinder valve hand-wheel
counterclockwise.
WARNING: Do not ignite burners when leak checking.
Check for leaks by wetting the connections with the soap and water solution and
watching for bubbles. If bubbles form or if a bubble grows, there is a leak.
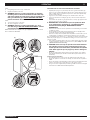
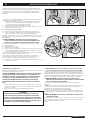
Some LP tanks have differing top collar assembles. (The top collar is the metal
protective ring around the valve.) One series of tanks mount with the valve facing front
(a). The other tanks mount with the valve facing away from the fuel scale (b). See
Illustration.
The LP cylinder is installed inside the tank enclosure or tank cabinet, on the tank scale.
1) Turn the LP cylinder so the opening of the valve is either to the front, side or rear
of the Weber
®
gas barbecue. Lift and hook the cylinder onto the fuel gauge.
2) Lift tank up into position on the tank scale.
3) Loosen the cylinder lock wing nut. Swing the cylinder lock down. Tighten the wing
nut.
To Connect the hose to the cylinder:
4) Remove the plastic dust cover from the valve.
5) Screw the regulator coupling onto the tank valve, clockwise, or to the right. Hand-
tighten only.
Note: This connection tightens clockwise and will not allow gas to fl ow unless the
connection is tight. The connection requires tightening by hand only.
WARNING: Do not use a wrench to tighten the connection.
Using a wrench could damage the regulator coupling and
could cause a leak.
You will need: LP cylinder, a soap and water solution and a rag or brush to apply it.
6) Mix soap and water.
7) Turn on the cylinder valve.
8) Check for leaks by wetting the fi tting with the soap and water solution and
watching for bubbles. If bubbles form, or if a bubble grows, there is a leak.
If there is a leak, turn off the gas and tighten the fi tting. Turn the gas back on and
recheck with the soap and water solution.
If leak does not stop do not use the barbecue. Contact the Customer Service
Representative in your area using the contact information on our web site. Log onto
www.weber.com
®
.
9) When leak checking is complete, turn gas supply off at the source and rinse
connections with water.
(a)
(b)
GAS INSTRUCTIONS

WWW.WEBER.COM
®
11
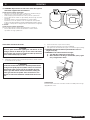
Check:
1) Corregated gas line-to-Accessory “T” Connection
2) Regulator-to-Cylinder connection.
WARNING: If there is a leak at connection (1), retighten
the fi tting with a wrench and recheck for leaks with soap
and water solution. If a leak persists after re-tightening the
fi tting, turn OFF the gas. DO NOT OPERATE THE GRILL.
Contact Customer Service 1-800-446-1071.
Check:
3) “T” Connection-to-Hose connections.
4) The hose-to-Regulator connection.
WARNING: If there is a leak at connections (2,3, or 4),
turn OFF the gas. DO NOT OPERATE THE GRILL. Contact
Customer Service 1-800-446-1071.
When leak checks are complete, turn gas supply OFF at the source and
rinse connections with water.
(2)
(4)
(3)
(1)
SAFE HANDLING TIPS FOR LIQUID PROPANE GAS CYLINDERS
• Liquid Propane (LP) gas is a petroleum product as are gasoline and natural gas.
LP gas is a gas at regular temperatures and pressures. Under moderate pressure,
inside a cylinder, LP gas is a liquid. As the pressure is released, the liquid readily
vaporizes and becomes gas.
• LP gas has an odor similar to natural gas. You should be aware of this odor.
• LP gas is heavier than air. Leaking LP gas may collect in low areas and prevent
dispersion.
• To fi ll, take the LP cylinder to a gas propane dealer, or look up “gas-propane” in the
phone book for other sources of LP gas.
WARNING: We recommend that your LP cylinder be fi lled
at an authorized LP gas dealer, by a qualifi ed attendant,
who fi lls the tank by weight. IMPROPER FILLING IS
DANGEROUS.
• Air must be removed from a new LP cylinder before the initial fi lling. Your LP dealer
is equipped to do this.
• The LP cylinder must be installed, transported and stored in an upright position.
LP cylinders should not be dropped or handled roughly.
• Never store or transport the LP cylinder where temperatures can reach 125° F (too hot
to hold by hand - for example: do not leave the LP cylinder in a car on a hot day).
Note: A refi ll will last about 18-20 hours of cooking time at normal use. The fuel scale will
indicate the propane supply so you can refi ll before running out. You do not have to run
out before you refi ll.
• Treat “empty” LP cylinders with the same care as when full. Even when the LP tank
is empty of liquid there still may be gas pressure in the cylinder. Always close the
cylinder valve before disconnecting.
CAUTION: Place dust cap on cylinder valve outlet whenever
the cylinder is not in use. Only install the type of dust cap
on the cylinder valve outlet that is provided with the cylinder
valve. Other types of caps or plugs may result in leakage of
propane.
• Do not use a damaged LP cylinder. Dented or rusty LP cylinders or LP cylinders
with a damaged valve may be hazardous and should be replaced with a new one
immediately.
Liquid Propane (LP) Cylinder(s)
• The joint where the hose connects to the LP cylinder must be leak tested each
time the LP cylinder is reconnected. For example, test each time the LP cylinder is
refi lled.
• Be sure the regulator is mounted with the small vent hole pointed downward so that
it will not collect water. This vent should be free of dirt, grease, bugs etc.
• The gas connections supplied with your Weber
®
gas barbecue have been designed
and tested to meet 100% CSA and ANSI requirements.
OPERATING

12
WWW.WEBER.COM
®
1) Open the side burner lid.
2) Check that the side burner valve is turned OFF. (Push knob in and turn clockwise
to ensure that it in the off position.)
WARNING:
The burner control knob must be in the OFF position before
turning on the liquid propane cylinder valve. If it is not in the
OFF position, when you turn on the LP cylinder valve, the
“excess gas fl ow control” feature will activate, limiting the
fl ow of gas from the LP cylinder. If this should occur, turn
OFF the LP tank valve and burner control knobs. Then start
over.
WARNING: Replacement LP tanks must match the regulator
connection supplied with this barbecue.
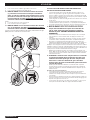
Liquid Propane Cylinder requirements
• Check to be sure cylinders have a D.O.T. certifi cation (1), and date tested (2) is
within fi ve years. Your LP gas supplier can do this for you.
• All LP tank supply systems must include a collar to protect the cylinder valve.
• The LP cylinder must be a 20-lb. size approximately (18¼ inches high, 12¼ inches
in diameter).
• The cylinder should be constructed and marked in accordance with the
Specifi cations for LP - Gas Cylinders of the U.S. Department of Transportation
(D.O.T.) or the National Standard of Canada, CAN/CSA-B339, Cylinders, Spheres
and Tubes or Transportation of Dangerous Goods; and Commission, as applicable.
In Canada
Liquid Propane Cylinder requirements
Note: Your retailer can help you match a replacement tank to your barbecue.
• The LP cylinder must be constructed and marked in accordance with the
specifi cations for LP gas cylinders, T.C.
DOT 4BA240
00/02
(1)
(2)
SIDE BURNER LIGHTING INSTRUCTIONS
DANGER
Failure to open the lid while igniting the side burner, or not
waiting 5 minutes to allow the gas to clear if the side burner
does not light, may result in an explosive fl ame-up which can
cause serious bodily injury or death.
3) Turn the LP tank valve on (turn counter-clockwise).
4) Push in and turn the side burner control valve to START/HI.
5) Push igniter button and hold until burner ignites. You will hear the igniter sparking.
CAUTION: Side burner fl ame may be diffi cult to see on a
bright sunny day.
WARNING: If the side burner does not light:
1) Turn OFF the side burner control valve.
2) Wait 5 minutes to let the gas clear before you try again
or try to light with a match.
TO EXTINGUISH
Push down and turn each burner control knob clockwise to the OFF position. Turn gas
supply OFF at the source.
OPERATING

WWW.WEBER.COM
®
13
IGNITER
If the Ignition system fails to ignite the side burner, light the burner with a match.
• Check that both ignition wires(1,2) are attached properly.
• You should hear the igniter sparking.
If the ignition system still fails to light, contact the Customer Service
Representative in your area using the contact information on our web site. Log
onto www.weber.com
®
.
REPLACE IGNITER BATTERIES
Parts required: 1 AA alkaline battery per igniter.
Unscrew igniter button from front of control panel. Remove igniter button and contact
spring. Remove old battery and replace with a new AA
alkaline battery. Positive end (1) of battery faces inward as shown in illustration. Re-
place spring contact (2) and screw igniter button (3) back onto battery compartment.
MANUALLY LIGHTING THE SIDE BURNER
DANGER
Failure to open the lid while igniting the side burner, or not
waiting 5 minutes to allow the gas to clear if the side burner
does not light, may result in an explosive fl ame-up which can
cause serious bodily injury or death.
1) Open the side burner lid.
2) Check that the side burner valve is turned OFF. (Push the knob down and turn
clockwise to ensure that it is in the off position.)
WARNING: The burner control knob must be in the OFF
position before turning on the liquid propane cylinder
valve. If it is not in the OFF position, when you turn on the
LP cylinder valve, the “excess gas fl ow control” feature
will activate, limiting the fl ow of gas from the LP cylinder.
If this should occur, turn OFF the LP tank valve and burner
control knobs. Then start over.
3) Turn the LP tank valve on (turn counter-clockwise).
4) Put match in a match holder and strike match.
5) Push down and turn the side burner control valve to START/HI.
6) Hold match holder and lit match by right side of side burner.
7) Push igniter button and hold until burner ignites. You will hear the igniter spark-
ing.
CAUTION: Side burner fl ame may be diffi cult to see on a
bright sunny day.
WARNING: If the side burner does not light:
1) Turn OFF the side burner control valve.
2) Wait 5 minutes to let the gas clear before you try again
or try to light with a match.
MAINTENANCE

14
WWW.WEBER.COM
®
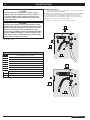
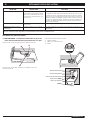
SIDE BURNER MAINTENANCE
WARNING: All gas controls and supply valves should be in
the “OFF” position.
Make sure black wire is connected between the igniter and electrode.
Make sure white wire is connected between the igniter and grounding clip.
Spark should be a white/blue color, not yellow.
1) Igniter Wire
2) Ground wire
3) Burner
(3)
n
er Grate
rner Cap
g
& Head
E
lectrode
t
rol Knob
Igniter
PROBLEM CHECK CURE
Side Burner does not light.
Is gas supply off?
The excess fl ow safety device, which is part
of the barbecue to cylinder connection, may
have activated.
Turn supply on.
To reset the excess fl ow safety device turn all burner control knobs and the cylinder
valve off. Disconnect the regulator from the cylinder. Turn burner control knobs to
START/HI. Wait at least 1 minute. Turn burner control knobs to “OFF”. Reconnect
the regulator to the cylinder. Turn cylinder valve on slowly. Refer to “Lighting Instruc-
tions”.
Flame is low in “HI” position.
Is the fuel hose bent or kinked? Straighten hose.
Push button ignition does not work.
Does burner light with a match? If match lights burner, check igniter (see Sideburner Maintenance).
If problems cannot be corrected by using these methods, please contact the Customer Service Representative in your area using the contact information on our web
site. Log onto www.weber.com
®
.
Side Burner Grate
Side Burner cap
Side Burner Ring & Head
Igniter Electrode
Control Knob
Igniter
SIDE BURNER TROUBLESHOOTING

BUILT-IN LP SIDE BURNER INSTALLATION/OWNER'S GUIDE
ESNA -Spanish (N. America)
LP
BARBACOA DE GAS
PELIGRO
Si usted huele gas:
1. Cierre el suministro de gas al artefacto.
2. Apague cualquier llama encendida.
3. Abra la tapa.
4. Si el olor continuase, aléjese del artefacto e
inmediatamente llame a su suplidor de gas
o al cuerpo de bomberos.
Una fuga de gas puede provocar un incendio
o explosión que puede resultar en lesiones
corporales serias o la muerte, o daños a la
propiedad.
ADVERTENCIA:
1. No almacene gasolina u otros líquidos
o vapores infl amables cerca de éste o
cualquier otro artefacto doméstico.
2. Ningún cilindro de propano licuado que
no esté conectado para su uso deberá
almacenarse cerca de éste o cualquier otro
artefacto doméstico.
ADVERTENCIA:
Antes de poner a funcionar
la barbacoa, siga cuidadosamente todos los
procedimientos en este manual para verifi car
que no existan fugas. Haga esto aun y cuando
la barbacoa haya sido ensamblada por el
distribuidor.
AVISO AL INSTALADOR: Estas instrucciones
deben permanecer con el propietario, quien
las deberá guardar para un futuro uso.
ESTE ARTEFACTO A GAS ESTÁ DISEÑADO
PARA USARSE SOLAMENTE AL AIRE LIBRE.
ADVERTENCIA: No trate de encender
este artefacto sin antes leer la sección
“Instrucciones para encender la barbacoa”
de este manual.
#
42376
Instalación del quemador lateral empotrado de gas
propano licuado/Guía del Propietario
#89796
DEBE LEER ESTA GUÍA DEL PROPIETARIO
ANTES DE PONER A FUNCIONAR LA
ESTOS ACCESORIOS PUEDEN ADQUIRIRSE POR SEPARADO.

16
WWW.WEBER.COM
®
PELIGRO
El hacer caso omiso de los avisos de peligros, advertencias y precauciones contenidos en este Manual del Propietario pudiera
resultar en lesiones corporales serias o la muerte, o en un fuego o explosión que cause daños a la propiedad.
ADVERTENCIAS
No almacene un tanque de propano licuado desconectado o de repuesto debajo o cerca de este asador.
El ensamblaje incorrecto puede ser peligroso. Por favor siga cuidadosamente las instrucciones de ensamblaje.
Tras haber estado guardada o sin uso por algún tiempo, antes de usar la barbacoa de gas Weber
®
verifi que que no existan
fugas de gas o obstrucciones en el quemador. Vea en este manual las instrucciones para los procedimientos correctos.
No opere la barbacoa de gas Weber
®
si existe una fuga de gas.
No utilice una llama abierta para comprobar la existencia de fugas de gas.
Nunca debe haber materiales combustibles a una distancia menor de 24 pulgadas (60 cm) de la parte superior, inferior, trasera
o lateral de su asador de gas Weber
®
.
No coloque una funda para barbacoas ni cualquier otra artículo infl amable sobre o dentro del área de almacenaje ubicada
debajo del asador.
Nunca permita que los niños usen la barbacoa de gas Weber
®
. Algunas partes accesibles de la barbacoa pudieran estar muy
calientes. Mantenga alejados a los niños pequeños mientras ésta se esté usando.
Usted debe proceder con razonable cuidado al usar su barbacoa de gas Weber
®
. Ésta estará caliente al cocinarse en ella o al
limpiarla, y nunca deberá dejarse desatendida o moverse mientras esté funcionando.
Si llegasen a apagarse los quemadores, cierre todas las válvulas de gas. Abra la tapa y espere cinco minutos antes de tratar de
volver a encender la barbacoa, usando las instrucciones de encendido en este manual.
No use carbón o piedra pómez en su barbacoa de gas Weber
®
.
No se incline sobre la barbacoa abierta o coloque las manos o dedos en el borde delantero de la caja de cocción.
Si la grasa llegase a agarrar fuego, apague todos los quemadores y mantenga la tapa cerrada hasta que se haya apagado el
fuego.
Al limpiar las válvulas o los quemadores, no ensanche los orifi cios de las válvulas o las aberturas de los quemadores.
La barbacoa de gas Weber
®
deberá limpiarse a fondo regularmente.
El propano licuado no es gas natural. El uso de gas natural en una unidad de propano licuado o viceversa, propano licuado en
una de gas natural, es peligroso y anulará su garantía.
Mientras opere la barbacoa, utilice guantes resistentes al calor.
Mantenga alejados de todas las superfi cie calientes a todo cordón eléctrico y a la manguera de suministro de combustible.
Los subproductos de la combustión producidos al usar este producto contienen sustancias químicas que son conocidas por
el Estado de la California como causantes de cáncer, defectos de nacimiento, u otros daños reproductivos.
No use esta barbacoa a menos que todas sus partes estén colocadas en su sitio. La unidad debe ensamblarse correctamente
de acuerdo con las instrucciones de ensamblaje.
ÚNICAMENTE UNIDADES DE GAS PROPANO LICUADO
Use el regulador que se suministra con la barbacoa de gas Weber
®
.
No trate de desconectar el regulador de gas o ninguna conexión de gas mientras esté funcionando la barbacoa.
Un cilindro de propano licuado abollado u oxidado pudiera ser peligroso y deberá ser revisado por su suplidor de propano
licuado. No utilice ningún cilindro de propano licuado con una válvula dañada.
Aunque el cilindro de propano licuado pudiera aparentar estar vacío, algo de gas pudiera aún estar presente, por lo que el
cilindro deberá transportarse y almacenarse tomando esta posibilidad en consideración.
Si usted ve, huele o escucha el silbido de un escape de gas del cilindro de propano licuado:
1. Apártese del cilindro de propano licuado.
2. No trate de corregir el problema usted mismo.
3. Llame al cuerpo de bomberos local.
PELIGROS Y ADVERTENCIAS

WWW.WEBER.COM
®
17
GARANTÍA
Weber-Stephen Products Co. (Weber) por este medio le garantiza al COMPRADOR ORIGINAL de
esta barbacoa de gas Weber
®
que la misma estará libre defectos en cuanto a materiales y fabricación
a partir de la fecha de compra según lo siguiente:
Tapa de acero inoxidable, 10 años
Todas las demás partes 5 años
Cuando se ensambla y opera de acuerdo a las instrucciones impresas que lo acompañan.
Weber pudiese requerir prueba razonable de la fecha de compra. POR LO TANTO, DEBERÁ
GUARDAR SU RECIBO O FACTURA DE VENTA.
Esta garantía limitada está limitada a la reparación o reemplazo de piezas que se resultasen
defectuosas bajo uso y servicio normal y las cuales al examinarse indiquen, a la plena satisfacción
de Weber, que son defectuosas. Antes de devolver cualquier parte, contacte al Representante de
Atención al Cliente en su área geográfi ca, cuya información de contacto la encontrará en nuestro
sitio web. Si Weber confi rma el defecto y aprueba el reclamo, ésta elegirá reparar o reemplazar
tal pieza sin cargo alguno. Si usted tiene que retornarnos las partes defectuosas, los gastos de
transporte deben ser prepagados. Weber retornará las partes al comprador con transporte o franqueo
prepagado.
Esta Garantía Limitada no cubre ninguna falla o problema de operación a causa de accidentes,
abuso, mal uso, alteración, uso en aplicaciones indebidas, vandalismo, instalación inapropiada o
mantenimiento o servicio inapropiados, o por no llevar a cabo el mantenimiento normal y rutinario,
entre los que se incluyen, pero sin limitación, los daños causados por insectos dentro de los tubos
quemadores, según se detalla en este manual del propietario.
Esta Garantía Limitada no cubre el deterioro o daños a causa de condiciones de tiempo inclementes
tales como granizo, huracanes, terremotos o tornados ni tampoco la decoloración por exposición a
sustancias químicas bien sea por contacto directo o por las mismas contenidas en la atmósfera.
No existe ningunas otras garantías expresas que no sean las las acá indicadas y cualesquier
garantías implícitas de comerciabilidad y aptitud de uso están limitadas en duración al tiempo de
cobertura de esta expresa Garantía Limitada por escrito. Algunas regiones no permiten limitación
alguna en el tiempo que una garantía implícita pueda durar, por lo que esta limitación pudiera no
aplicarle a usted.
Weber no se hace responsable de ningún daño especial, indirecto o emergente. Algunas regiones
no permiten la exclusión o limitación de daños incidentales o emergentes, por lo que esta limitación o
exclusión pudieran no aplicarle a usted.
Weber no autoriza a persona o empresa alguna a asumir en su nombre ninguna obligación o
responsabilidad en relación con la venta, instalación, uso, retiro, devolución o reemplazo de sus
equipos, y ninguna tal representación será vinculante para Weber.
Esta Garantía aplica solo a aquellos productos vendidos al por menor.
WEBER-STEPHEN PRODUCTS CO.
Customer Service Center
1890 Roselle Road, Suite 308
Schaumburg, IL 60195
USA
Para partes de repuesto llame a:
1-800-446-1071
www.weber.com
®
OPERACIÓN
El suministro de gas propano licuado es fácil de usar y le da más control al cocinar que
el carbón.
• Estas instrucciones le indicarán los requisitos mínimos para ensamblar su
barbacoa de gas Weber
®
. Por favor lea cuidadosamente las instrucciones antes
de utilizar su barbacoa de gas Weber
®
. Un ensamblaje incorrecto puede ser
peligroso.
• No debe ser usada por niños.
• Si existiesen códigos locales que aplicasen para barbacoas de gas portátiles,
usted deberá acatarlos. La instalación debe acatar los códigos locales o, en la
ausencia de estos, bien sea con el código nacional de gases combustibles “
National Fuel Gas Code, ANSI Z223.1/NFPA 54”, el código para las instalaciones
de gas natural y propano “Natural Gas and Propane Installation Code, CSA
B149.1” o el código de manejo y almacenaje de propano “Propane Storage and
Handling Code, B149.2”, según apliquen.
• Debe usarse el regulador de presión suministrado con la barbacoa de gas Weber
®
Este regulador está ajustado para una presión de 11 pulgadas de columna de
agua.
• Esta barbacoa de gas Weber
®
está diseñada para ser usada exclusivamente con
gas propano licuado (LP). No lo use con gas natural (suministrado a través de
tuberías en las ciudades). Las válvulas, los orifi cios, la manguera y regulador son
solamente para gas propano licuado.
• No la use con combustible de carbón.
• Asegúrese de que el área debajo del panel de control y la bandeja inferior
no tenga desechos que pudiesen obstruir el fl ujo de aire de combustión o de
ventilación.
• Las áreas alrededor del cilindro de gas de propano licuado deben estar libres y
sin acumulación de desperdicios.
• Los reguladores de presión y los ensambles de manguera de reemplazo deberán
ser los especifi cados por Weber-Stephen Products Co..
PARA LA INSTALACIÓN EN CANADÁ
Esta instrucciones, aunque de manera general son aceptables, no necesariamente
cumplen con los códigos de instalación canadienses, en particular en lo que respecta
a tuberías bajo y sobre tierra. En Canadá la instalación de este artefacto debe cumplir
con los códigos locales y/o la Norma CSA-B149.2 (Código de instalación de artefactos
y equipos que queman propano).
ADVERTENCIA: Sólo use esta barbacoa al aire libre en
un área bien ventilada. No la use en un garaje, edifi cio,
pasadizo techado o en cualquier otra área cerrada.
ADVERTENCIA: La barbacoa empotrada de gas Summit
®
no
deberá usarse debajo de un techo o saliente combustible
desprotegido.
ADVERTENCIA: No utilice la barbacoa con la parte superior,
inferior, posterior, o lateral de la misma a menos de 24
pulgadas (610 mm) de distancia de materiales combustibles.
ADVERTENCIA: La caja de cocción entera se calienta al
usarse. No la deje desatendida.
ADVERTENCIA: Mantenga a cualquier cordón eléctrico y a la
manguera de suministro de gas alejados de toda superfi cie
caliente.
ADVERTENCIA: Mantenga el área de cocinar libre de vapores
y líquidos infl amables tales como gasolina, alcohol, etc. y de
materiales combustibles.
ADVERTENCIA: Nunca almacene cilindros de propano
licuado extra (de repuesto) debajo o cerca del asador de gas
Weber
®
.
ADVERTENCIA: Mantenga limpios los orifi cios de ventilación
de la caja del cilindro.
ADVERTENCIA: Cierre el suministro de gas en el cilindro
de propano licuado cuando el artefacto para cocinar al aire
libre no esté en uso.
ADVERTENCIA: Nunca guarde adentro un artefacto de gas
para cocinar al aire libre sin haber antes desconectado y
sacado del artefacto el cilindro de propano licuado.
ADVERTENCIA: Los tanques de propano licuado deben
almacenarse al aire libre fuera del alcance de los niños y no
deben almacenarse en edifi caciones, garajes o cualquier
otra área cerrada.
GARANTÍA

18
WWW.WEBER.COM
®
UBICACIÓN DEL QUEMADOR LATERAL EMPOTRADO
Al seleccionar una ubicación adecuada para la instalación de su Quemador Lateral
Empotrado, preste atención a tales asuntos como la exposición al viento, la proximidad
al paso de la gente y en mantener cualquier línea de suministro de gas lo más corta po-
sible. Nunca coloque el Quemador Lateral Empotrado Summit
®
en un garaje, pasadizo
techado, cobertizo, bajo un voladizo desprotegido o cualquier área encerrada. Coloque
el Quemador Lateral y la estructura de tal forma que exista sufi ciente espacio para
evacuar la zona de manera segura en caso de un incendio.
SEPARACIÓN DE SUPERFICIES O ESTRUCTURAS COMBUSTIBLES
ADVERTENCIA: La separación de las paredes exteriores de
los lados y anverso del Gabinete para Tanques de Propano
Licuado debe ser de por lo menos 24 pulgadas (61 cm) desde
cualquier superfi cie. Antes de iniciar la instalación, consulte la
“Instalación típica para el suministro de gas”.
ADVERTENCIA: La estructura, las encimeras de la “isla” y
las áreas de trabajo adyacentes a la instalación del Gabinete
para Tanques de Propano Licuado deben construirse
exclusivamente con materiales no combustibles.
NOTA: Si tuviese cualquier pregunta sobre que materiales son considerados
no combustibles, póngase en contacto con su proveedor local de materiales de
construcción o con el cuerpo de bomberos.
DIMENSIONES DE CORTE DEL EMPOTRAMIENTO
Todas las dimensiones son con respecto a las superfi cies acabadas.
ADVERTENCIA: Todas las superfi cies de acabado de las
encimeras deben construirse con materiales no combustibles.
QUEMADOR LATERAL
Dimensiones seccionales Tolerancias
A 10 1/2” (26.7 cm) + 1/4” - 1/4” (6.35mm)
B 3 3/4” (9.5 cm) + 1/4” - 1/4” (6.35mm)
C 16 1/4” (41.3 cm) + 1/4” - 1/4” (6.35mm)
1
2
C
ABB
B
A
UBICACIÓN DEL QUEMADOR LATERAL
A Cualquier superfi cie
B 24” (61 cm) de cualquier superfi cie
C Quemador lateral
1 24” ( 61 cm) Espacio libre mínimo para la tapa
2
Nota: Para conformar la encimera: Se recomienda una saliente de
3/4” (19 mm). Haga una muesca en el borde frontal para que el
bastidor puede deslizarse completamente hacia adentro.
INSTRUCCIONES PARA EL GAS

WWW.WEBER.COM
®
19
MONTAJE DEL QUEMADOR LATERAL
Conecte la línea de gas corrugada a la válvula del quemador lateral ubicada en el
lado derecho posterior del éste último.
PRUEBE LAS CONEXIONES
Para confi rmar que no tengan fugas, todas las conexiones y juntas deben
probarse a fondo de acuerdo a las pautas de los códigos locales y todos los
procedimientos indicados en la más reciente edición de ANSI Z223.1/NFPA 54.
UBICACIONES DE LAS LÍNEAS DE GAS EMPOTRADAS
DETALLES GENERALES DE CONSTRUCCIÓN
• El quemador lateral empotrado Summit
®
y todos los demás accesorios deberán
estar en el lugar antes de comenzar la construcción.
• Todas las dimensiones tienen una tolerancia de más o menos (+/-)
1
/
4
de pulgada
(6.35 mm).
Deje acceso para una línea corrugada de gas en la ubicación del quemador lateral en
función de la posición del suministro de gas principal y el regulador del mismo.
La zona no deberá tener superfi cies afi ladas, dentadas o muy abrasivas a fi n de evitar
posibles daños a las líneas de suministro de gas. Tenga cuidado al halar las líneas de
gas a través de la estructura de empotramiento.
Deberá utilizarse una línea corrugada de gas de acero inoxidable de 3/8 de pulgada
(9.52 mm) para conectar el quemador lateral al acople del regulador.
ADVERTENCIA: No utilice una manguera de gas de hule.
PELIGRO
No utilice una llama abierta para comprobar si existen fugas
de gas. Asegúrese de que no haya chispas o llamas abiertas
en el área mientras comprueba si existen fugas. Chispas o
llamas causarán un fuego o explosión, las cuales pueden
causar serias lesiones corporales o la muerte, y daños a la
propiedad.
Asegúrese de fi jar la unidad del quemador lateral con tornillos no
corrosivos clavados en la superfi cie terminada de la “estructura tipo
isla”.
Vuelva a colocar el tapón plástico sobre el orifi cio frontal de montaje
para ocultar el tornillo una vez se haya fi jado el quemador lateral.
UBICACIONES DE LA LÍNEA DE GAS
1 3/8” (9.52 cm) Linea de gas corrugada de acero inoxidable SAE
2 Ubicación típica del gabinete para tanques
2
1
INSTRUCCIONES PARA EL GAS

20
WWW.WEBER.COM
®
INSTALACIÓN TÍPICA DE SUMINISTRO DE GAS PROPANO A GRANEL
Recomendamos que esta instalación sea ejecutada por un profesional CERTIFICADO
ESPECIFICACIONES GENERALES PARA LA TUBERÍA
Nota - Póngase en contacto con la municipalidad de la localidad para obtener los
códigos de construcción que regulan las instalaciones de las barbacoas a gas al aire
libre. En la ausencia de códigos locales, debe acatar la más reciente edición del código
nacional “National Fuel Gas Code ANSI Z223.1/NFPA 54”, del código “Natural Gas and
Propane Installation Code, CSA B149.1”, o del código “Propane Storage and Handling
Code, B149.2”, o de las normas “Standard for Recreational Vehicles, ANSI A 119.2/
NFPA 1192”, y “CSA Z240 RV Series, Recreational Vehicle Code”, según aplique.
• Esta barbacoa está diseñada para operar bajo una presión de 11 pulgadas de
columna de agua. Para esta presión, pudiera ser necesario un regulador en línea
del propano licuado.
PRECAUCIÓN: Si en la zona hay niños presentes, debería
considerarse una válvula de bloqueo.
• Se deberá utilizar un compuesto para el pegado de las tuberías que sea
resistente a la acción del gas propano cuando se haga la conexión al gas.
• Las conexiones de gas deben fi jarse fi rmemente a elementos de construcción
rígidos y permanentes.
Nota: La información provista en este manual es una información general para
instalaciones típicas. No podemos cubrir todas las ideas posibles de instalación. Le
recomendamos, previo a la instalación, que se ponga en contacto con su municipalidad
para averiguar los códigos de construcción pertinentes y con el departamento de
bomberos para que verifi quen la instalación.
Si tuviese cualquier pregunta, póngase en contacto con Atención al Cliente por el 1-
800-446-1071.
TUBERÍA DE LA LÍNEA DE GAS
• Refi érase al cuadro de las tuberías en la parte inferior de la página anterior.
• La línea corrugada de gas proveniente del múltiple tiene 58 pulgadas (1,473.2
mm) de largo. No extienda la línea de gas.
• Hemos proporcionado los medios para hacer una conexión tipo asiento de
compresión (“fl are”) de 45°. No utilice sellante de tubería en esta conexión.
• Si la longitud de la línea requerida no excede los 50 pies, utilice un tubo de 5/8”
de diámetro externo. Se deberá usar el siguiente tamaño mayor para longitudes
superiores a los 50 pies. Refi érase al cuadro de la tubería.
• La tubería de gas deberá ser de tubo de cobre, tipo K o L; tubo plástico de
polietileno, con un espesor de pared de por lo menos 0.062 pulgadas (1.57 mm);
o tubería de peso estándar (cédula 40) de acero o de hierro dulce.
• Los tubos de cobre deberán estar revestidos de estaño si el gas contiene más de
0.3 gramos de sulfuro de hidrógeno por 100 pies cúbicos de gas.
• La tubería de plástico es sólo apta para uso subterráneo en exteriores.
• La tubería de gas en contacto con la tierra, o cualquier otro material que pudiera
corroerla, debe estar protegida contra la corrosión de una manera aprobada.
• Las tuberías bajo tierra deberá tener una cubierta mínima de 18”.
Cuadro
10-1
Capacidad máxima de la tubería en pies cúbicos de gas por hora para presiones de gas de 0.5 psi o menos y caídas de presión de
0.3 pulgadas
de columna de agua (basado en una gravedad específi ca del gas de 0.60)
Nominal
Tubería de
hierro
Tamaño
(pulga-
das)
Diámetro
interno
(pulga-
das)
Longitud de tubería (pies)
10 20 30 40 50 60 70 80 90 100 125 150 175 200
1/4 .364 32 22 18 15 14 12 11 11 10 98876
3/8 .493 72 49 40 34 30 27 25 23 22 21 18 17 15 14
1/2 .622 132 92 73 63 56 50 46 43 40 38 34 31 28 26
3/4 .824 278 190 152 130 115 105 96 90 84 79 72 64 59 55
1 1.049 520 350 285 245 215 195 180 170 160 150 130 120 110 100
1 1/4 1.380 1050 730 590 500 440 400 370 350 320 305 275 250 225 210
1/12 1.160 1600 1100 890 760 670 610 560 530 490 460 410 380 350 320
2 2.067 3050 2100 1650 1450 1270 1150 1050 990 930 870 780 710 650 610
2 1/2 2.469 4800 3300 2700 2300 2000 1850 1700 1600 1500 1400 1250 1130 1050 980
3 3.068 8500 5900 4700 4100 3600 3250 3000 2800 2600 2500 2200 2000 1850 1700
4 4.026 17500 12000 9700 8300 7400 6800 6200 5800 5400 5100 4500 4100 3800 3500
© 1997 National Fire Protection Association, Inc. e International Approval Services - U.S., Inc. Todos los derechos reservados.
INSTRUCCIONES PARA EL GAS
La page charge ...
La page charge ...
La page charge ...
La page charge ...
La page charge ...
La page charge ...
La page charge ...
La page charge ...
La page charge ...
La page charge ...
La page charge ...
La page charge ...
La page charge ...
La page charge ...
La page charge ...
La page charge ...
La page charge ...
La page charge ...
La page charge ...
La page charge ...
La page charge ...
La page charge ...
La page charge ...
La page charge ...
-
 1
1
-
 2
2
-
 3
3
-
 4
4
-
 5
5
-
 6
6
-
 7
7
-
 8
8
-
 9
9
-
 10
10
-
 11
11
-
 12
12
-
 13
13
-
 14
14
-
 15
15
-
 16
16
-
 17
17
-
 18
18
-
 19
19
-
 20
20
-
 21
21
-
 22
22
-
 23
23
-
 24
24
-
 25
25
-
 26
26
-
 27
27
-
 28
28
-
 29
29
-
 30
30
-
 31
31
-
 32
32
-
 33
33
-
 34
34
-
 35
35
-
 36
36
-
 37
37
-
 38
38
-
 39
39
-
 40
40
-
 41
41
-
 42
42
-
 43
43
-
 44
44


Weber 89796 Manuel utilisateur
- Catégorie
- Barbecues
- Taper
- Manuel utilisateur
- Ce manuel convient également à
dans d''autres langues
- English: Weber 89796 User manual
- español: Weber 89796 Manual de usuario
