Brandt KV1140A Le manuel du propriétaire
- Catégorie
- Plaques de cuisson
- Taper
- Le manuel du propriétaire

Cuisinière
GUIDE D'INSTALLATION ET D'UTILISATION
GUIDE FOR INSTALLATION AND USE
FR
EN
Electric cooker

1
2.1.1
3.4.1
3.7.1
4.8.1
4.8.2
4.4.4

2
5.1.1
5.1.2
7.2.1
7.3.1
7.4.1
7.5.1
7.5.2
7.5.3
7.5.4

3
8.1.1
8.1.2 8.1.3
8.2.1
8.2.2
8.6.1
8.6.2
8.6.3
8.6.4
9.2.1
9.2.2

4
9.3.1
9.3.2
10.1.1

english
5
IMPORTANT !
KEEP THIS MANUAL WITH THE APPLIANCE. IF YOU SELL OR •
GIVE THE APPLIANCE TO ANOTHER PERSON, MAKE SURE YOU
ALSO PASS ON THE USER MANUAL. READ THESE ISTRUCTIONS
CAREFULLY WHEN USING AND INSTALLING THE APPLIANCE.
THEY ARE DESIGNED TO PROTECT YOUR OWN AND OTHERS’
SAFETY.
This appliance is designed for normal household use only. Do not •
use it for commercial or industrial purposes. Used exclusively for
cooking food products.
This appliance may be used by children aged 8 years and older, •
and by persons with impaired physical sensorial or mental capa-
cities, or without experience or knowledge, if they are supervised
or have received prior instructions on how to use the appliance
safely and have understood the risks involved. Children must not
be allowed to play with the appliance. Cleaning and maintenance
operations must not be carried out by children without supervi-
sion.
This appliance is not intended for use by persons (including chil-•
dren) with impaired physical, sensory or mental capacities, or by
inexperienced or untrained persons, unless they have received
prior instruction or supervision in its operation by a person re-
sponsible for their safety.
Children must be supervised to prevent them from playing with •
the appliance.
If the power cable is damaged, it should be replaced by the manu-•
facturer, its after-sales service department or by a similarly quali-

english
6
edpersoninordertoavoiddanger.
The power cable may not be replaced. If the cable is damaged, the •
appliance should be discarded.
WARNING: If a crack appears in the surface of the glass, disconnect •
your appliance from the power supply to avoid electric shock.
WARNING: The accessible parts of the appliance may become hot •
during use. Be careful not to touch the heating elements located
inside the oven. It is advisable to keep small children away from
the appliance.
WARNING: The appliance and the accessible parts of it will beco-•
me hot during use. Be careful not to touch the heated elements.
Children under the age of 8 years must not be allowed to touch
the appliance, unless they are supervised continually.
Do not use abrasive cleaning products or hard metal scrapers for •
cleaning the oven’s glass door, as they could scratch the surface
and cause the glass to shatter.
The inside of the storage drawer may become hot under normal •
conditions of use.
Before beginning a pyrolysis cleaning cycle in your oven, remove •
all parts of your grids, trays and accessories and remove major
spill residue.
During cleaning, the surfaces may become warmer than under •
normal conditions of use. It is advisable to keep small children
away from the appliance.
Before removing the back wall, the appliance must be powered •
off. After cleaning, the back wall must be put back in place in ac-
cordance with the instructions.
Use only the thermal probe recommended for this oven.•
Do not use a steam cleaner.•
WARNING: Make sure the appliance is disconnected from the po-•

english
7
wer before replacing the lamp in order to avoid the risk of elec-
tric shock. Change the lamp only when the appliance has cooled
down. To unscrew the view port and the light, use a rubber glove,
which will make disassembly easier.
This unit is not intended to be operated using an external timer or •
a separate remote control system.
The instructions must include a list of containers that may be •
used.
If the cooker is mounted on a base, measures must be taken to •
ensure that it does not slip off the base.
The cooker may not be mounted on a base.•
The insert must indicate how the stabilization device is to be in-•
stalled in order to keep the appliance from tipping,
WARNING: In order to avoid any danger resulting from uninten-•
tionally resetting the thermal cut-out, this appliance by not be po-
wered by an external switch, such as a timer, or be connected
to a circuit which is normally switched on and off by the utility
company.
This appliance is designed to cook with the door closed.•
WARNING: If the door or door seal is damaged, the oven should •
not be used until it has been repaired by an authorised person.
WARNING:Itisdangerousforanyoneotherthanaqualiedper-•
son to perform maintenance or repairs that requires the removal
of the cover providing protection against exposure to microwave
power.
WARNING: Liquids and other foods must not be heated in sealed •
containers, as they may explode.
Only use utensils suitable for usage in microwave ovens.•
While heating food items in plastic or paper containers, monitor •
the micro-wave’s contents, since there is a risk of spontaneous

english
8
combustion.
If smoke appears, stop or unplug the oven and leave the door clo-•
sedtosmotheranyamesthatmayappear.
It is recommended that you clean your oven regularly and to re-•
move any food build-up.
If the appliance is not cleaned regularly, its surface could become •
damaged, permanently affecting the appliance’s lifespan and po-
ssibly causing a safety hazard.
WARNING: Only allow children to use the oven without supervi-•
sion if adequate instructions have been given so that the child is
able to use the oven safely and understands the dangers of incor-
rect use.
ATTENTION: the accessible parts of the appliance may become •
hot when the grill is used. Keep put of the reach of young chil-
dren.
After using the cooker, make sure that all the controls are in the •
off position.
Do not try to modify the characteristics of the appliance. It could •
be dangerous.
Overheated fats or oils can ignite easily. Therefore prepare this •
kind of foods only under supervision !
Never lift the cooker by taking hold of the oven door handle.•
To ensure its appliances are always at the state of the art and to •
allow con-stant improvement, the manufacturer reserves the right
tomakemodicationswithoutnotice,althoughwithoutcreating
difcultiesforusers.

english
9
The appliances comply with the following Directives:
2006/95/WE – The Low Voltage Directive
2004/108/WE – Electromagnetic Compatibility
NOTE!
Before installing and operating the appliance, please read this instruc-
tion manual carefully. All graphic illustrations contained in this instruc-
tion manual are numbered. The numbers appearing on illustrations
correspond to the numbers in the text.
Your appliance is shown on Fig. 2.1.1
3.1 Purpose
The cooker is designed for the preparation of meals in a house-
hold only. It must not be used for other purposes !
3.2 Class of appliance 1 (stand-alone)
3.3 Supply voltage: 400V 3N ~50z
3.4 Cooker rated power 7800W
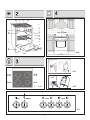
3.5 Construction and accessories (2.1.1)
1 – ceramic hob
2 – electric oven
3 – oven door
4 – drawer
5 – cooking zone control knobs D
6 – cooking zone control knobs C
7 – cooking zone control knobs B
8 – cooking zone control knobs A
9 – temperature control knob
10 – oven function control knob
11 – wire shelf
12 – tray
3.6 Ceramic Hob Cooking Zone Rated Wattage
(3.6.1)
Cooking zone f145mm - 1200W Standard
Cooking zone f180mm - 1700W Standard
3.7 Control panel (3.7.1)
1 - red pilot light
Red pilot light indicates that the temperature control is in op-
eration. The light comes on after setting the oven to a desired
temperature. When the oven reaches that temperature, the light
goes out. When the temperature decreases below the set value,
it come on again.
4.1 After unpacking, the cooker should be positioned in a manner
ensuring easy access to the ceramic hob and oven. Placing
the cooker on a platform is not recommended.
4.2 The kitchen should be dry and have efcient ventilation sys-
tem.
4.3 Remove all advertising stickers from the cooker. Clean all the
parts thoroughly to remove all remnants of glue.
4.4 When positioning the cooker between kitchen cabinets, a dis-
tance of minimum 20mm should be left between the cooker’s
side walls and adjacent kitchen cabinet walls (4.4.4).
4.5 There should be an open space above the appliance to allow
kitchen odours to disperse. If a cooker hood is installed, the
distance between the ceramic hob and the hood should not
be shorter than 650mm.
4.6 The main switch or the wall socket to which the cooker will be
connected must be easily accessible to the user.
4.7 The cooker is equipped with adjustable feet designed for
levelling in the event of an uneven oor and for adjusting
the upper edge of the cooker to furniture level. The level-
ling should be carried out by means of one of the methods
presented below:
4.8 The cooker is tted with levelling feet which allow adjusting
the level of the appliance. The feet are accessible after re-
moving the drawer (g. 4.8.1) or tilting the cooker (g. 4.8.2).
Rotate the feet one way or other, as required.

english
10
Warning !
The cooker must be properly connected to
the mains supply by a qualied electrician.
Do not modify or change the cooker’s electri-
cal system in any way.
The connection panel is installed on the rear side of the cook-•
er and has six terminals, including three live terminals marked
with symbols L1 – L2 – L3 and two neutral terminals marked
with letters N-N (5.1.1), which should be shorted. Three clamps
are provided with the connection panel. The earth terminal is
marked with a symbol
.
It is possible to connect the cooker to the single-phase mains •
but the system to which the cooker is to be connected should
be adjusted to the current of 42A.
Select an appropriate connector depending on the type of con-•
nection (one- or three-phase) and the cooker’s power rating.
The electric system supplying the cooker should be equipped •
with double pole switch to allow the user to cut off electricity
in an emergency situation. The minimum contact separation
between the poles should be 3 mm.
Connect the AC power cable 1 (5.1.2) to the terminal strip 2 •
in accordance with the data plate (5.1.1). Place the lead in
clamping ring 4. The gaps under openings 6 give access to
the screws fastening cable 1 in clamping ring 4.
Once the cooker has been connected, the terminal strip should •
be secured.
To do so unbolt screws 5 which fasten the plate 3 on the left •
side of the cooker 7 turn the plate 3 through an angle of 180
0
on its vertical axis and then put it in openings 6 with the catch-
es 8, press to the cooker 7 and screw down with screws 5.
Wipe the enamel and glass surfaces with a soft damp cloth.•
Clean the oven accessories with a hot solution of dish-wash-•
ing liquid.
Before the rst use of the cooker, individual cooking zones •
should be heated for ca. 3 minutes. In this case, exceptionally,
do not put any pans on them.
Switch on the oven for ca. 1 hour and set the highest tempera-•
ture. The emerging smoke and smell will be slight, if proper
care is taken to ventilate the room correctly, e.g. by opening
the windows. Allow the oven to cool down and then clean and
dry it.
7.1 General rules of using the ceramic hob
1. Be careful not to drop hard objects on the hob as it may
crack.
2. Care should be taken to avoid scratching the hob with sharp
edges of pans or other objects.
3. Pans should be placed centrally on the graphically marked
cooking zone. Pans should not be dragged but gently lifted
and moved in order not to scratch the hob.
4. A cooking zone may be switched on only after placing a pan
with food on it. Do not switch on the zone, if an empty or
distorted pan is placed on it, as it may result in damaging the
zone.
5. Never prepare food in aluminium foil or in plastic containers
on the hob. Do not place any plastic objects on the hob.
7.2 OPERATING COOKING ZONES
Before turning on a cooking zone, make sure the knob you in-
tend to operate corresponds to the zone you are going to use.
Fig. 7.2.1 shows which knobs correspond to which cooking
zones.
7.3 Cooking zone knob
The knob allows for power control with 6 grades and it can be
turned in both directions from 0 – 360
0
(7.3.1).
The greatest power is delivered by turning the hob clockwise
and setting in on the position “1”. In order to heat or boil a dish
quickly we recommend to set the hob on position “6”, and then
to reduce power.
7.4 Cooking zone indicator
WARNING!
1. If the ceramic hob surface is cracked, the
cooker must be switched off to avoid an
electric shock.
2. Cooking zones are still hot for some time
after being switched off, which is shown
by the cooking zone indicator.
The zones’ heating status is shown by the indicator “A”. The •
indicator comprises four lights corresponding to the individual
cooking zones (7.4.1).
When a zone’s temperature exceeds 50•
0
C, the indicator light
corresponding to that zone comes on.

english
11
When a cooking zone is switched off, its colour changes. How-•
ever, this does not mean that the zone is cooling down so fast.
The zone remains hot and the indicator light corresponding to
it is still on.
The indicator lights may burn out and then there will be no •
indication that the zone is hot. In such a case an authorised
service centre should be called.
7.5 Choice of utensils
The right choice of utensils is a fundamental condition for cor-•
rect use of a ceramic hob.
Utensils should be always clean and dry as they will then con-•
duct and retain heat well.
Any cookware should have a thick, at and smooth base of the •
same diameter or slightly bigger than the cooking zone. If the
cookware diameter is smaller than the cooking zone, a lot of
heat will be wasted.
An uneven base of a pan extends cooking time and increases •
the consumption of electricity.
During cooking, well-tting pan lids should be used. Lids •
should not project beyond the pan’s rim so that nothing drips
on the hob.
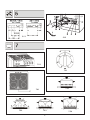
Correct pan (7.5.1)
Low power consumption •
Good heat transfer•
the pan is slightly larger than the cooking zone –
even base –
pan correctly covered with lid –
Wrong pan
High power consumption•
Poor heat transfer•
Longer cooking time•
Pan too small (7.5.2) –
Uneven pan bottom (7.5.3) –
The lid does not t the pan (7.5.4) –
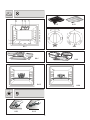
8.1 Features and accessories (8.1.1)
[1], [2], [3], [4], [5] – runner guides
1 – upper heating element
2 – grill heating element
3 – bottom heating element
4 – ladder guide
5 – oven light
6 – temperature sensor
Roasting tray (8.1.2) can be used as a drip tray to catch drip-
ping fat and liquids when roasting directly on the wire shelf, on
a higher level.
Wire shelf (8.1.3) is designed for placing standard oven utensils
on it. You can also place dishes such as meat, poultry or sh
directly on it.
8.2 Oven operation control
To operate the oven you use:
function selector knob, –
temperature selector knob, –
Oven function control knob •
The function control knob (8.2.1) may be turned in both direc-
tions from the position 0 to 360
0
. The oven functions are repre-
sented by graphic symbols placed on the knob.
The function control knob has the following settings:
- lower heater
- upper heater
- Lower and upper heater turned on (conventional baking)
Temperature control knob•
Temperature control knob (8.2.2) enables the user to set and au-
tomatically maintain the temperature in the oven at the required
level.
The following settings are marked on the knob - 50, 100, 150,
200 and 250, corresponding to the selected temperatures in the
oven in [
0
C].
When setting the temperature, turn the knob clockwise to the
setting corresponding to the required value. When switching off,
turn the knob counter-clockwise.
Oven light
For your safety and comfort, a light is permanently on inside the
oven when the oven is working, to enable you to see the pre-
pared food.
8.3 Switching the oven on and off
Switching the oven on
1. Turn the function control knob to a desired setting of oven
heating,
2. Turn the temperature control knob to a desired temperature
setting,

english
12
Switching the oven off
Set the function control knob and the temperature control knob
to the zero position.
8.4 What happens after switching on the oven
Selecting any function of the oven causes the turning on of:
the oven light, –
After the temperature is set, the following elements turn on:
oven heating elements (depending on the selected func- –
tion),
the red pilot light. –
If culinary recipes recommend putting a dish into the preheated
oven, it should be done after the red pilot light goes off for the
rst time.
8.5 Heating options
Heating with the bottom heating element
The bottom heating element, located under the oven oor,
heats the oven. With this function you can extra bake the
base of a cake (e.g. when baking fruit cake). It is recom-
mended for the last 10-15 minutes of the baking process.
Heating with the upper and bottom heating elements
Both heating elements are on and heat the inside of the
oven. Dishes should be placed on a single, preferably mid-
dle level of the oven. This kind of heating is ideal for prepa-
ring pastry, meat, sh, bread and pizza.
Heating with the upper heating element
The upper heating element heats the oven. With this func-
tion you can brown the top of the cooked dish. This method
may be also used to cook such dishes as toasts, vegeta-
bles, casseroles etc.
8.6 General cookery tips
For baking cakes you may use traditional baking tins or Teon-•
coated, ceramic, glass and aluminium foil ones (8.6.1). Bak-
ing tins are the most universal ones due to their versatility of
shapes and possibilities of use. Before the rst use, a new
baking tin should be heated up in a strongly heated oven.
When temperature in the oven reaches a desired value, the •
red pilot light goes out.
If, apart from the baking tray supplied with the cooker, other •
baking tins are used, they should be placed centrally on the
wire shelf.
When selecting the baking temperature follow the rules stated •
below:
Thinly rolled dough – higher power, shorter baking time, –
Thick layer of dough and runny dough – lower power, longer –
baking time.
Fill the tins 2/3 full of dough, leaving enough space for it to •
rise.
For roasting meat you may use ceramic, glass, steel, enam-•
elled and iron utensils with heat-resistant handles (8.6.2).
Oven preheating guidelines should be closely followed, as the •
requirements are different for different types of cakes.
During baking, the dough should be evenly heated. This con-•
dition is fullled when the function
is selected.
If the top of the cake is too dark, next time place the baking tin •
at a lower level, select lower temperature and bake the cake
a little longer.
If the bottom of the cake is too dark, next time place it higher •
and select lower temperature.
During baking avoid too high temperatures, otherwise the •
cake will not rise and it may be doughy. If you keep cake in a
heated oven for too long, it may get burnt and dry up.
When selecting the baking time and temperature take into ac-•
count the weight and consistency of the pastry.
Utensils with food may be placed at any level of the oven; •
we recommend level two. However, on the basis of his/her
observations and experience, the user should select the most
optimum level for various dishes.
When baking for the rst time, start with the medium values of •
temperatures stated in recipes. If it is necessary, next time set
higher temperature. Lower temperature allows the baked dish
to be more evenly browned.
In order to check if the baked dish is ready, put a small wood-•
en stick in it a few minutes before switching off the oven. If the
pastry does not stay stuck on the stick – the dish is ready. After
baking, leave the cake in the oven for ca. 5 more minutes.
When using the oven, follow the guidelines stated below:•
do not keep unnecessary accessories in the oven, –
put the baking and casserole tins and utensils for roasting –
meat on the wire shelf and not on the tray, in the centre of
the oven (8.6.3 and 8.6.4),
when selecting baking or roasting parameters, factor in the –
type of utensil; depending on the type of material, thickness
of walls and colour, utensils conduct heat differently.
In the tables below you may nd estimated cooking tempera-•
tures and times for various dishes. In reality, there may be
some differences which the user should correct on the basis
of experience. The best solution is to carry out several tests
for each dish and then write down the optimum time and tem-
perature.

english
13
Clean the hob with special cleaning agents designed for that •
purpose. Do not use scouring pads, powders or creams.
Remove slight spillage with damp cloth or sponge (9.2.1) •
wrung out in warm water with soft cleaning agent, then dry.
Remove strong spillage with special cleaning agents designed •
for ceramic hobs.
To remove remnants of food from the ceramic hob use a •
wooden spatula or a special tool (9.2.2), taking care not to
scratch the glass surface of the hob
NOTE !
Do not use oven cleaning agents to clean the
ceramic hob as they are very aggressive and
may cause a permanent damage of the hob
surface.
Materials that can melt, such as aluminium foil or plastics, •
should be kept away from the hot cooking zones. However,
if such materials happen to melt on the hob, they should be
removed from the hob immediately (when they are still hot).
Act similarly if any liquid including a lot of sugar spills; on the
hot hob surface sugar melts very quickly, which may result in
permanent stains. Discolouring of the hob does not affect its
proper functioning.
After cleaning, the hob may be covered with a protection •
agent, e.g. CERA FIX.
Utensils used for cooking on the ceramic hob should always •
be clean and dry. Pay special attention to the pans’ bases as
Food Baking time [hour : min] Temperature [0C]
Wheat & potato our cake 1:15 – 1:20 160 – 175
Yeast cake 0:50 – 1:00 175 – 190
Sponge cake 0:30 – 0:40 170 – 180
Shortcrust base for fruit 0:10 – 0:25 Preheated oven (210 – 220)
Yeast plait cake 0:30 – 0:40 190 – 200
Crumble pie 0:20 – 0:30 200 – 220
For roasting meat in gravy, best use the function
, especially for lean meat.
Roasting meat Table 2
Food Temperature [0C] Cooking time [hour : min]
Beef 220 – 250 2:00 – 2:30
Pork 210 – 225 1:30 – 2:00
Veal 210 – 225 1:45 – 2:00
Mutton 210 – 225 1:30 – 2:00
Chicken 225 – 250 0:45 – 1:00
Fish 210 - 225 0:45 – 1:00
Estimated baking parameters Table 1
NOTE !
Before cleaning the cooker disconnect the
cooker from the mains supply and wait until
it cools down.
9.1 General information
Clean the cooker regularly to ensure its proper technical con-•
dition and aesthetic appearance.
When cleaning the cooker do not use harsh abrasives, wire •
pads, powders, caustic cleaners and sharp objects.
Clean the stainless steel elements, knobs and control panel •
with soft cleaners not containing abrasives, as they might
damage information imprints.
Put baking trays and tins as well as trays and other utensils for •
roasting meat in warm water with dish-washing liquid for some
time, then thoroughly clean them and dry them carefully.
Ensure that the oven seal is clean.•
9.2 Cleaning the ceramic hob
Clean the ceramic hob regularly after each use as even the •
smallest spillage will burn during the next use.

english
14
food remnants sticking to it may get burnt during the next use
of the hob.
9.3 Oven cleaning
The oven interior is covered with ceramic enamel.•
Before cleaning you should wait until oven cools down. Hot •
heaters may cause burns.
To facilitate cleaning of the oven enamel elements you can •
remove the oven door and the guides.
CAUTION !
1. Cleaning the oven with the use of applian-
ces for steam generation under pressure
is not allowed.
2. It is best to clean the bottom of the oven
after each use, not to allow the remains of
food and spots of oil to roast again.
Disassembly of the oven door
Open the door entirely, –
Lock hinges on both sides of the door by placing the clamp- –
ing ring 1 on the catch 2 of the hinge bow 3 (9.3.1),
Next grasp the door with both hands, turn it in the closing –
direction through an angle of 45
0
and take out the hinges.
CAUTION !
1. The hinge bow is tense with a big strength,
therefore while taking out the door a spe-
cial care must be taken not to cut one’s
ownngers.
2. During cleaning the upper wall of the oven
you should pay attention to electric he-
aters, temperature sensor and lamp of the
oven illumination; do not change position
of sensor setting.
3. Do not pour water onto the bottom of oven
otherwise it may trickle through some po-
ssible leakage and get on the lower he-
ater.
Removing the guides:
press down the top bar of guides – 1 in order to release catch
2 from hole 3, (9.3.2)
tilt guides 1 toward the inside of the oven and release the –
lower bars from holes 4,
steep the guides in a solution of warm water and deter- –
gent, and then brush them with the use of a sponge or soft
brush.
Cleaning of chamber interior:
Clean the enamelled surfaces with agents intended for clean-
ing cookers. In order to clean baked stains you can use special
detergent intended for cleaning ovens. Since these detergents
are caustic, you should use them in minimal amounts and with
a great caution, observing the recommendations of detergent
manufacturer.
WARNING !
Before proceeding with the troubleshooting,
disconnect the cooker from the electric ma-
ins.
If there are any disturbances during the use of the appliance,
follow the guidelines below to check if you can repair the defect
yourself.
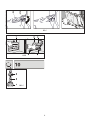
Oven light does not work (10.1.1)
To avoid electrical shock, make sure that the cooker is discon-
nected from the mains supply before changing the bulb.
If the oven has been used and is hot, wait until it cools down.
The bulb is not turned tight – unscrew the glass cover of the •
light and turn the bulb tight.
Burnt out bulb – unscrew the light cover and replace the bulb •
with a new one with the following parameters: type E14, 230V,
25W, resistance to temperature 300
0
C.
This appliance’s packaging material is recyclable. Help recycle
it and protect the environment by dropping it off in the municipal
receptacles provided for this purpose.
This way, the appliance recycling organised by your manufac-
turer will be done under the best possible conditions, in compli-
ance with European Directive 2002/96/EC on Waste Electrical
and Electronic Equipment.
Contact your town hall or your retailer for the used appliance
collection points closest to your home.
We thank you doing your part to protect the environment.
Your appliance also contains a great amount of
recyclable material. It is marked with this label to
indicate the used appliances that should not be
mixed with other waste.

français
15
IMPORTANT !
CONSERVEZ CETTE NOTICE D’UTILISATION AVEC VOTRE AP-•
PAREIL. SI L’APPAREIL DEVAIT ÊTRE VENDU OU CÉDÉ À UNE
AUTRE PERSONNE, ASSUREZ-VOUS QUE LA NOTICE D’UTILI-
SATION L’ACCOMPAGNE. MERCI DE PRENDRE CONNAISSANCE
DE CES CONSEILS AVANT D’INSTALLER ET D’UTILISER VOTRE
APPAREIL. ILS ONT ÉTÉ RÉDIGÉS POUR VOTRE SÉCURITÉ ET
CELLE D’AUTRUI.
Cet appareil est destiné à un usage domestique normal. Ne pas •
l’utiliseradesns commercialesniindustrielles.Il estdestine
exclusivement à la cuisson de denrées alimentaires.
Cet appareil peut être utilisé par des enfants âgés de 8 ans et •
plus, et par des personnes aux capacités physiques, sensorielles
ou mentales réduites, ou dénuées d’expérience et de connaissan-
ce,siellesontpubénécierd’unesurveillanceoud’instructions
préalables concernant l’utilisation de l’appareil de façon sûre et
en ont compris les risques encourus. Les enfants ne doivent pas
jouer avec l’appareil. Les opérations de nettoyage et de mainte-
nance ne doivent pas être faites par des enfants laissés sans su-
rveillance
Cet appareil n’est pas prévu pour être utilisé par des personnes •
(y compris les enfants) dont les capacités physiques, sensoriel-
les ou mentales sont réduites, ou des personnes dénuées d’e-
xpérienceoudeconnaissance,saufsiellesontpubénécier,par
l’intermédiaire d’une personne responsable de leur sécurité, d’u-
ne surveillance ou d’instructions préalables concernant l’utilisa-
tion de l’appareil.

français
16
Il convient de surveiller les enfants pour s’assurer qu’ils ne jouent •
pas avec l’appareil.
Si le câble d’alimentation est endommagé, il doit être remplacé •
par le fabricant, son service après vente ou une personne de qu-
alicationsimilaireand’éviterundanger.
Le câble d’alimentation ne peut pas être remplacé. Si le câble est •
endommagé, il convient de mettre l’appareil au rebut.
MISE EN GARDE : Si la surface est fêlée, déconnectez l’appareil •
de l’alimentation pour éviter un risque de choc électrique.
MISE EN GARDE : Les parties accessibles de l’appareil peuvent •
devenir chaudes au cours de l’utilisation. Faire attention à ne pas
toucher les éléments chauffants situés à l’intérieur du four. Il est
recommandé d’éloigner les jeunes enfants.
MISE EN GARDE : L’appareil et ses parties accessibles devien-•
nent chaudes au cours de l’utilisation. Faire attention à ne pas
toucher les éléments chauffants. Les enfants de moins de 8 ans
doivent être tenus à l’écart à moins qu’ils ne soient surveillés en
permanence
Ne pas utiliser de produits d’entretien abrasifs ou de grattoirs •
métalliques durs pour nettoyer la porte en verre du four, ce qui
pourraitéraerlasurfaceetentraînerl’éclatementduverre.
L’intérieur du tiroir de stockage peut devenir chaud en usage nor-•
mal.
Avant de procéder à un nettoyage pyrolyse de votre four, retirez •
tous les éléments de casserolerie et enlevez les éclaboussures
importantes.
Dans la fonction de nettoyage, les surfaces peuvent devenir plus •
chaudes qu’en usage normal. Il est recommandé d’éloigner les
jeunes enfants.
Avant de retirer la paroi du fond, l’appareil doit être mis hors ten-•

français
17
sion. Après le nettoyage, le protecteur doit être remis en place
conformément aux instructions.
Utilisez uniquement la sonde thermique recommandée pour ce •
four.
Ne pas utiliser d’appareil de nettoyage à la vapeur.•
MISE EN GARDE : S’assurer que l’appareil est déconnecté de l’a-•
limentation avant de remplacer la lampe pour éviter tout risque
de choc électrique. Intervenez lorsque l’appareil est reroidi. Pour
devisser le hublot et la lampe, utilisez un gant de caoutchouc qui
facilitera le demontage.
L’appareil n’est pas destiné à être mis en fonctionnement au moy-•
en d’une minuterie externe ou d’un système de commande à di-
stance séparé.
Les instructions doivent comporter une liste des récipients qui •
peuvent être utilisés.
Si la cuisinière est placée sur un socle, des dispositions doivent •
être prises pour éviter que l’appareil ne glisse du socle.
La cuisinière ne doit pas être placée sur un socle.•
La notice doit indiquer comment installer le dispositif de stabili-•
sation pour éviter le basculement de l’appareil
ATTENTION:And’évitertoutdangerdûauréarmementintem-•
pestif du coupe-circuit thermique, cet appareil ne doit pas être ali-
menté par l’intermédiaire d’un interrupteur externe, comme une
minuterie, ou être connecté à un circuit qui est régulièrement mis
sous tension et hors tension par le fournisseur d’électricité.
Cet appareil est conçu pour faire des cuissons porte fermée.•
Cet appareil est conçu pour faire des cuissons porte fermée.•
Centrez le four dans le meuble de façon à garantir une distance •
minimum de 10mm avec le meuble voisin. La matière du meuble
d’encastrement doit résister à la chaleur (ou être revêtu d’une

français
18
tellematière).Pourplusdestabilité,xezlefourdanslemeuble
par 2 vis au travers des trous prévus à cet effet sur les montants
latéraux.
MISE EN GARDE: Si la porte ou le joint de porte sont endomma-•
gés, le four ne doit pas être mis en fonctionnement avant d’avoir
été réparé par une personne compétente.
MISE EN GARDE: Les liquides et autres aliments ne doivent pas •
être chauffés dans des récipients fermés hermétiquement car ils
risquent d’exploser.
N’utiliser que des ustensiles appropriés à l’usage dans les fours •
micro-ondes.
Pendant le chauffage de denrées alimentaires dans des conte-•
nants en plastique ou en papier, gardez un œil sur le four en ra-
isondelapossibilitéd’inammation.
Sidelafuméeapparaît,arrêtezoudébranchezlefouretgardezla•
porteferméepourétoufferlesammeséventuelles.
Le chauffage des boissons par micro-ondes peut provoquer un •
jaillissement brusque et différé de liquide en ébullition, pour cette
raison des précautions doivent elles être prises lors de la mani-
pulation du récipient.
Le contenu des biberons et des pots d’aliments pour bébé doit •
êtreremuéouagitéetlatempératuredoitenêtrevériéeavant
consommation, de façon à éviter les brûlures.
Il n’est pas recommandé de chauffer les œufs dans leur coquille •
et les œufs durs entiers dans un four micro-ondes car ils risquent
d’exploser,mêmeaprèslandecuisson.
Il est recommandé de nettoyer le four régulièrement et d’enlever •
tout dépôt alimentaire.
Si l’appareil n’est pas maintenu dans un bon état de propreté, sa •
surface pourrait se dégrader et affecter de façon inexorable la du-

français
19
rée de vie de l’appareil et conduire à une situation dangereuse.
MISE EN GARDE : N’autorisez les enfants à utiliser le four sans •
surveillance que si des instructions appropriées leur ont été don-
nées, permettant à l’enfant d’utiliser le four de façon sûre et de
comprendre les dangers d’une utilisation incorrecte.
ATTENTION : les parties accessibles peuvent être chaudes quand •
le grilloir est utilisé. Eloigner les jeunes enfants.
Aprés utilisation du cuisinière, assurez-vous que toutes les com-•
mandes se trouvent sur la position arrêt.
N’essayezpasdemodierlescaractéristiquesdel’appareil,cela•
représenterait un danger.
Les graisses et les huiles chaudes peuvent prendre feu. C’est •
pour cela qu’il faut toujours surveiller la cuisson de ces plats.
Il est interdit de soulever la cuisinière en tirant sur la porte de •
four.
Leconstructeurseréserveledroitdeprocéderadesmodica-•
tions sans préavis sur ses produits dans le but de toujours offrir
des appareils en adéquation avec les nouvelles tech-niques et
répondantademeilleurscritèresdequalité.Cesmodications
n’auront bien entendu aucun préjudice pour les utilisateurs.
La page charge ...
La page charge ...
La page charge ...
La page charge ...
La page charge ...
La page charge ...
La page charge ...
La page charge ...
-
 1
1
-
 2
2
-
 3
3
-
 4
4
-
 5
5
-
 6
6
-
 7
7
-
 8
8
-
 9
9
-
 10
10
-
 11
11
-
 12
12
-
 13
13
-
 14
14
-
 15
15
-
 16
16
-
 17
17
-
 18
18
-
 19
19
-
 20
20
-
 21
21
-
 22
22
-
 23
23
-
 24
24
-
 25
25
-
 26
26
-
 27
27
-
 28
28


Brandt KV1140A Le manuel du propriétaire
- Catégorie
- Plaques de cuisson
- Taper
- Le manuel du propriétaire
dans d''autres langues
- English: Brandt KV1140A Owner's manual