Waring Commercial WSM7L Manuel utilisateur
- Catégorie
- Mélangeurs
- Taper
- Manuel utilisateur

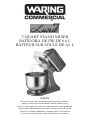
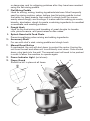
7-QUART STAND MIXER
For your safety and continued enjoyment of this product,
always read the instruction book carefully before using.
WSM7L
BATIDORA DE PIE DE 6.6 L
Para su seguridad y para disfrutar plenamente de este producto,
siempre lea cuidadosamente las instrucciones antes de usarlo.
BATTEUR SUR SOCLE DE 6,6 L
Toutes les marques déposées, commerciales ou de service
ci-incluses appartiennent à leurs propriétaires respectifs.

2
IMPORTANT SAFEGUARDS
When using an electrical appliance, especially when children are present,
basic safety precautions should always be taken to reduce the risk of re,
electric shock and/or injury, including the following:
1. R
EAD ALL INSTRUCTIONS BEFORE USING.
2. Switch off and unplug before tting or removing tools and/or
attachments, after use and before cleaning.
3. C lose supervision is necessary when any appliance is used by or
near children or individuals with certain disabilities. Waring does not
recommend the use of this appliance by children.
4. A void contact with moving parts and tted attachments. Keep hands,
hair, clothing, as well as spatulas and other utensils, away from beaters
during operation to reduce the risk of injury to persons and/or damage
to the mixer.
5. The use of attachments not recommended or sold by Waring may
cause re, electric shock or injury.
6. Do not use more than one attachment at a time.
7. Do not exceed the maximum capacities listed in this use and care
instruction book.
8. D o not use the stand mixer if it is damaged or if the cord is damaged.
Have the stand mixer checked and serviced before resuming use.
9. W hen using an attachment, make sure that you have read the safety
instructions that come with the particular attachment.
10. Do not use outdoors.
11. Keep stainless steel bowl away from heat sources such as stovetops,
ovens or microwaves.
12. T o protect against the risk of electric shock, do not put the power
unit in water or other liquids.
13. Remove all attachments and accessories from stand mixer
before washing.
14. Do not let cord hang over edge of table or counter.
SAVE THESE INSTRUCTIONS
FOR COMMERCIAL USE ONLY

3
NOTE: The maximum rating is based on the attachment that draws the
greatest power. Other recommended attachments may draw signicantly
less power.
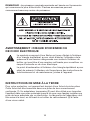
WARNING: RISK OF FIRE OR ELECTRIC SHOCK
The lightning ash with an arrowhead symbol within an
equilateral triangle is intended to alert the user to the presence
of uninsulated, dangerous voltage within the product’s enclosure
that may be of sufcient magnitude to constitute a risk of re or
electric shock to persons.
The exclamation point within an equilateral triangle is intended
to alert the user to the presence of important operating
and maintenance (servicing) instructions in the literature
accompanying the appliance.
GROUNDING INSTRUCTIONS
This appliance must be grounded while in use to protect the operator from
electric shock. The appliance is equipped with a 3-conductor cord and a
3-prong, grounding-type plug to t the proper grounding-type receptacle.
The appliance has a plug that looks like the plug in drawing (1). An adapter,
as in drawing (2), should be used for connecting the appliance plug to two-
prong receptacles. The grounding lug, which extends from the adapter, must
be connected to a permanent ground, such as a properly grounded outlet
box as shown in drawing (3), using a metal screw.

4
GROUNDING METHOD
SPECIAL CORD SET INSTRUCTIONS
A short power-supply cord is provided to reduce the risks resulting from
becoming entangled in or tripping over a longer cord.
Longer extension cords are available and may be used if care is exercised
in their use.
If a long extension cord is used, the marked electrical rating of the extension
cord must be at least as great as the electrical rating of the appliance,
and the longer cord should be arranged so that it will not drape over the
countertop or tabletop where it can be pulled on by children or tripped over.
EXTENSION CORDS
Use only 3-wire extension cords that have 3-prong, grounding-type plugs
and 3-pole cord connectors that accept the plug from the appliance. Use
only extension cords that are intended for indoor use. Use only extension
cords having an electrical rating not less than the rating of the appliance.
Do not use damaged extension cords. Examine extension cord before using
and replace if damaged. Do not abuse extension cord and do not yank on
any cord to disconnect. Keep cord away from heat and sharp edges.
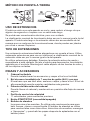
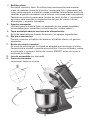
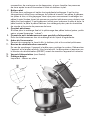
PARTS & ACCESSORIES
1. Tilt-Back Head
Makes it easy to attach accessories and scrape sides of bowl.
2. 7-Quart Stainless Steel Bowl with Handle
Handle makes the bowl easy to hold, scrape and remove. Oversized
bowl lets you mix larger quantities.
3. Head-Lift Release Lever
Securely locks stand mixer head into raised, tilt-back position and into
lowered, mixing position.
4. Speed Control Dial
11 speeds for precision mixing.
5. START/STOP Button
6. Chef’s Whisk
Used for incorporating air into ingredients/mixtures. Most frequently
used for whipping eggs, egg whites or heavy cream. The chef’s whisk
would be used in recipes for angel food cake, chiffon cake, meringue

5
or dacquoise, and for whipping potatoes after they have been mashed
using the at mixing paddle.
7. Flat Mixing Paddle
Used for stirring, mixing, beating ingredients/mixtures. Most frequently
used for mixing cookies, cakes, batters (use at mixing paddle to start
the batter for yeast breads, then switch to dough hook for a more
evenly mixed dough), and frostings. It is also used for making pie crusts,
biscuits, shortcakes, dough for pasta, combining ingredients for meatloaf
or meatballs, and mashing potatoes.
8. Dough Hook
Used for the nal mixing and kneading of yeast doughs for breads,
rolls, pizza/focaccia, and yeast-raised coffee cakes.
9. Splash Guard with Feed Chute
Prevents spattering when mixing and adding ingredients.
10. Accessory Shaft
For use with chef’s wisk, mixing paddle and dough hook.
11. Manual Reset Button
If overloaded, the unit will shut down to protect the motor. Unplug the
unit from the wall and allow unit to sufciently cool down. Once cooled
down, plug back into the wall. The manual reset will need to be pushed
in order to allow the machine to operate again.
12. Power Indicator Light (not shown)
13. Finger Guard
Should be left in place at all times.
8
7
2
6
9
4
3
1
10
11
512
13

6
ASSEMBLY INSTRUCTIONS
1. R aise Mixer Head – Rotate the head-lift release lever counterclockwise
and raise the stand mixer head. Lock by rotating lever clockwise.
2. Attach Accessory – Press at mixing paddle, chef’s whisk or dough hook
rmly onto the accessory shaft. Turn counterclockwise until it locks. Turn
clockwise to remove.
3. P lace Bowl on Base – Turn clockwise to secure.
4. Lower Mixer Head – Rotate lever counterclockwise to loosen and fully
lower the mixer head. Rotate lever clockwise to lock head into mixing
position.
5. T o Attach Splash Guard – Before attaching an accessory, raise stand
mixer head. Position tabs and slide splash guard onto mixer hub, then
rotate to lock into position.
To remove: Raise the stand mixer head. Rotate, then slide splash
guard down.
NOTE: You do not need to remove splash guard to change accessories.
OPERATING INSTRUCTIONS
To Turn Stand Mixer ON
1. Turn control dial to desired speed – 1 through 11 (see speed control
section on page 7).
2. Press the START/STOP button.
To Turn Stand Mixer OFF
1. Press the START/STOP button – mixing process stops and unit shuts off.
CLEANING AND MAINTENANCE
Unplug your Waring Commercial® Stand Mixer before cleaning.
Power Unit: Wipe with a damp cloth and dry. Never use abrasives or
immerse in water.
Bowl: Wash by hand and dry thoroughly or put in dishwasher. Never use a
wire brush, steel wool or bleach.
Mixing Attachments: These are made of stainless steel and are dishwasher
safe.
Splash Guard with Feed Chute: Top rack dishwasher safe; you may also
wash it by hand and dry it thoroughly.
NOTE: Any other servicing should be performed by an authorized service
representative.

7
SUGGESTED SPEED CONTROL
• Gentle start – stirring and starting all mixing/ • Whipping potatoes
1whipping tasks 7• W hipping cream, cream cheese,
• Adding dry ingredients (flour) to batters, and or butter for easy spreading
liquids to dry ingredients or batters
• Begin creaming fats with sugars
• Rubbing fat into flour for pie crusts, biscuits
and scones
• Begin to whip eggs or cream
• S tirring ingredients to blend without adding air
• Making crumb toppings
• Stirring • Whipping cream
2• Adding dry ingredients such as nuts, chocolate 8• Whipping potatoes
morsels or dried fruits • Whipping egg whites – add sugar
• Kneading yeast doughs to whipped egg whites
• C reaming batters without adding air
– such as cheesecake
• Begin mashing potatoes
• Mixing some pastry doughs
• Mixing muffins
• Creaming • Whipping egg whites
3• Mixing batters and cookie doughs • Whipping cream
• Adding eggs to batter/dough 9
• M ixing heavy, ground meat mixtures (meatloaf,
meatballs, pâté)
• Mixing frostings
• Mixing packaged cake mixes • Whipping cream – using gradual
4• Mixing batters and cookie doughs increase from Speed 1
• Creaming mixtures until light and fluffy 10 • Whipping egg whites
• Adding eggs to batter/dough • Whipping butter to make
• Mixing frostings compound or whipped butters
• Mixing egg/sugar mixtures until
light and fluffy
• Creaming mixtures until light and fluffy • Whipping frostings until fluffy
5• Adding eggs to creamed mixtures 11 • Whipping potatoes/vegetables
• Mixing frostings • Whipping cream and egg whites
(gradually increasing speed)
• Adding eggs to creamed mixtures
6• Mashing potatoes
• Whipping egg whites until frothy
• Beating whole egg yolks until ribbons form

8
MAXIMUM CAPACITIES FOR YOUR LUNA 7
WARING COMMERCIAL
®
STAND MIXER
The following maximum capacities are intended as a guideline only. Varying
factors, such as the type of our used, temperature of water used and other
conditions may require the batch to be reduced.
Some helpful weights and measures follow: 2.0 lb. = 1 quart & 8.3 lb. =
1 gallon water
Product Description Accessory Speed Max. Capacity
Bread and roll dough (nal weight) Dough hook 1st speed only 4 lb.
Pizza dough (nal weight) Dough hook 1st speed only 3 lb.
Pie crust Flat beater 4–6 4 lb.
Mashed potatoes Flat beater 5–9 4 lb.
Cake batter Flat beater 6–9 6 qt.
Wafe or pancake batter Flat beater 6–9 6 qt.
Pound cake batter Flat beater All speeds 6 qt.
Whipped egg whites Chef’s whisk 11 1 dozen
Meringue Chef’s whisk 11
1 dozen egg whites
Whipped cream Chef’s whisk 10 2 qt.
*NOTE: The mixer capacity depends on the moisture content of the
dough. When mixing doughs (pizza, bread, or bagel), check your
AR% (% Absorption Ratio) = Water weight divided by our weight.
The capacities listed above are based on our at room temperature
and 70°F water temperature. (1 gallon of water weighs 8.3 lb.).
Maximum mixing time - 7 minutes.
If high-gluten our is used, reduce the batch size by 10%.
If using chilled our, water below 70° F, or ice, reduce batch size by 10%.
2nd speed should never be used on 50% AR or lower.

9
LIMITED ONE YEAR WARRANTY
(U.S. and CANADA Only)
Waring warrants every new Waring® Commercial Luna 7 Stand Mixer to be
free from defects in materials and workmanship for a period of one year
from the date of purchase when used with foodstuffs, nonabrasive liquids
(other than detergents) and nonabrasive semiliquids, providing it has not
been subject to loads in excess of the indicated rating. Under this warranty,
Waring will repair or replace any part which, upon our examination, is
defective in materials or workmanship, provided the product is delivered
prepaid to the Waring Service Center at 314 Ella T. Grasso Ave., Torrington,
CT 06790, or any Factory Approved Service Center. This warranty does
not: a) apply to any product that has become worn, defective, damaged or
broken due to use or due to repairs or servicing by other than the Waring
Service Center or a Factory Approved Service Center, or due to abuse,
misuse, overloading or tampering; or b) cover incidental or consequential
damages of any kind.
Warning: This warranty is void if appliance is used on Direct Current (DC).
WARING COMMERCIAL
314 Ella T. Grasso Ave.
Torrington, CT 06790

10
MEDIDAS DE SEGURIDAD
IMPORTANTES
Al usar aparatos eléctricos, especialmente en presencia de niños, siempre
debe tomar precauciones básicas de seguridad para reducir el riesgo de
incendio, descarga eléctrica o heridas, entre ellas las siguientes:
1. L
EA TODAS LAS INSTRUCCIONES
ANTES DE USARLO.
2. Apague y desenchufe el aparato antes de instalar/retirar accesorios o
aditamentos, después del uso y antes de la limpieza.
3. S upervise el uso de este aparato cuidadosamente cuando sea usado
por o cerca de niños o personas con ciertas discapacidades. Waring
no recomienda que los niños usen este aparato.
4. E vite el contacto con las piezas móviles y los accesorios/aditamentos.
Para evitar el riesgo de heridas o daños al aparato, mantenga los
dedos, cabello, ropa, espátulas y otros utensilios lejos de los batidores
durante el funcionamiento.
5. El uso de accesorios/aditamentos no recomendados o provistos por
Waring presenta un riesgo de incendio, descarga eléctrica o heridas.
6. No use más de un accesorio/aditamento a la vez.
7. No exceda las capacidades máximas indicadas en este manual de
instrucciones.
8. N o utilice el aparato si el cable está dañado; hágalo chequear y reparar
antes de volver a usarlo.
9. Le a todas las instrucciones de seguridad de cada accesorio/
aditamento antes de usarlo.
10. No lo utilice en exteriores.
11. Mantenga el bol de acero inoxidable alejado de las fuentes de calor
tales como las estufas, los hornos o los hornos de microondas.
12. P ara reducir el riesgo de descarga eléctrica, no coloque la base del
aparato en agua ni en ningún otro líquido.
13. Quite todos los accesorios/aditamentos del aparato antes de limpiarlo.
14. No permita que el cable cuelgue del borde de la mesa o de la
encimera.
GUARDE ESTAS INSTRUCCIONES
PARA USO COMERCIAL SOLAMENTE

11
NOTA: la potencia nominal máxima está basada en el accesorio/aditamento
que consume más electricidad. Otros accesorios/aditamentos pueden
utilizar menos electricidad.
ADVERTENCIA: RIESGO DE INCENDIO
O DESCARGA ELÉCTRICA
El símbolo de relámpago con punta de flecha dentro de un
triángulo equilátero tiene como fin alertar al usuario de la
presencia de voltajes peligrosos no aislados en el interior del
aparato, los cuales pueden ser de suficiente magnitud para
constituir un riesgo de incendio o descarga eléctrica.
El signo de exclamación dentro de un triángulo equilátero tiene
como fin alertar al usuario de la presencia de instrucciones
importantes de operación y mantenimiento (servicio) en la
documentación que acompaña al equipo.
INSTRUCCIONES DE PUESTA A TIERRA
Para su protección, este aparato debe estar puesto a tierra. Este aparato
está equipado con un cable/enchufe con puesta a tierra, el cual debe ser
conectado a una toma de corriente debidamente puesta a tierra (1). Si
una toma de corriente puesta a tierra no está disponible, se podrá usar un
adaptador para conectar el aparato a una toma de corriente polarizada (2).
El adaptador debe ser puesto a tierra mediante un tornillo de metal que
conecte la lengüeta del mismo a la caja eléctrica (3).

12
MÉTODO DE PUESTA A TIERRA
USO DE EXTENSIONS
El cable provisto con este aparato es corto, para reducir el riesgo de que
alguien se enganche o tropiece con un cable más largo.
Se podrá usar una extensión eléctrica, pero con cuidado.
La clasificación nominal de la extensión debe ser por lo menos igual a la del
aparato. El cable más largo o la extensión deben ser acomodados de tal
manera que no cuelguen de la encimera/mesa, donde pueden ser jalados
por niños o causar tropiezos.
TIPO DE EXTENSIONES
Use solamente extensiones/cables alargadores con puesta a tierra. Utilice
solamente extensiones para uso en interiores La clasificación nominal de la
extensión debe ser por lo menos igual a la del aparato.
No utilice extensiones dañadas. Examine la extensión antes de usarla y
reemplácela si está dañada. No jale el cable para desconectar la extensión;
agárrela por el enchufe. Mantenga el cable alejado de las fuentes de calor y
de los objetos cortantes.
PIEZAS Y ACCESORIOS
1. Cabezal inclinable
Permite instalar/sacar los accesorios y raspar el bol con facilidad.
2. Bol de acero inoxidable de 7 cuartos de galón (6.6 L) con asa
El asa hace que sea fácil alzar, sostener, raspar y sacar el bol. El bol de
alta capacidad permite mezclar cantidades más grandes.
3. Palanca de liberación del cabezal
Permite liberar el cabezal y mantenerlo en posición alta/baja de manera
segura.
4. Perilla de control de velocidad
11 velocidades, para resultados precisos.
5. Botón START/STOP (encendido/apagado)
6. Batidor de alambre
Incorpora aire a las mezclas. Se utiliza más comúnmente para para
batir huevos, claras o crema líquida. El batidor de alambre se utiliza
para recetas tales como bizcochos, bizcochos de muselina, merengue
o “dacquoise”, y para batir las papas después de aplastarlas con el
batidor plano.

13
7. Batidor plano
Revuelve, mezcla y bate. Se utiliza más comúnmente para mezclar
masa de galletas, masa de bizcocho, masa para freír y glaseados, así
como para empezar a mezclar masas leudadas/fermentadas (antes de
cambiar al gancho amasador para obtener una masa más homogénea).
También es perfecto para hacer fondos de tarta, bollos y “shortcakes”,
así como para mezclar los ingredientes del pan de carne o de las
albóndigas, y aplastar las papas.
8. Gancho amasador
Utilizado para la mezcla final y el amasado de las masas leudadas/
fermentadas (pan, panecillos, pizza/focaccia, “coffee cakes”).
9. Tapa antisalpicaduras con boca de alimentación
Evita las salpicaduras durante la mezcla y al agregar ingredientes.
10. Eje para accesorios
Permite conectar el batidor de alambre, el batidor plano y el gancho
amasador.
11. Botón de reinicio manual
En caso de sobrecarga, la unidad se apagará para proteger el motor.
Desenchufe la unidad y permita que se enfríe. Una vez enfriada, vuelva
a enchufarla y oprima el botón de reinicio (RESET) antes de volver a
encender la unidad.
12. Luz de encendido (no ilustrada)
13. Protector de dedos
Importante: déjelo en su sitio.
8
7
2
6
9
4
3
1
10
11
512
13

14
INSTRUCCIONES DE ENSAMBLAJE
1. L evante el cabezal – Gire la palanca de liberación del cabezal en sentido
antihorario e incline el cabezal hacia atrás. Gire la palanca en sentido
horario para bloquear el cabezal.
2. Instale el accesorio – conecte el batidor plano, el batidor de alambre o
el gancho amasador al eje para accesorios. Gire en sentido antihorario
hasta que se bloquee. Nota: para sacarlo, gírelo en sentido horario.
3. C oloque el bol en la base – Gire el bol en sentido horario para sujetarlo.
4. Baje el cabezal – Gire la palanca de liberación del cabezal en sentido
antihorario y baje completamente el cabezal de la batidora. Gire la
palanca en sentido horario para bloquear el cabezal en la posición baja.
5. Ins talar la tapa antisalpicaduras – Levante el cabezal de la batidora.
Alinee las muescas en la tapa antisalpicaduras con las muescas en el
cabezal y deslice la tapa antisalpicaduras en el eje para accesorios; gire
para bloquear.
Remoción: levante el cabezal de la batidora. Gire, y luego deslice la tapa
antisalpicaduras hacia abajo.
NOTA: no es necesario quitar la tapa antisalpicaduras para cambiar los
accesorios.
INSTRUCCIONES DE OPERACIÓN
Para encender la unidad
1. Gire la perilla de control de velocidad al nivel deseado, desde 1 hasta 11
(véase la sección “Velocidad sugerida” en la página 15).
2. Oprima el botón START/STOP.
Para apagar la unidad
1. Oprima el botón START/STOP; el mezclado se detendrá y la unidad se
apagará.
LIMPIEZA Y MANTENIMIENTO
Siempre apague y desenchufe el aparato antes de limpiarlo.
Bloque-motor: limpie la carcasa del aparato con un paño ligeramente
humedecido, y luego séquela bien. Nunca utilice limpiadores/materiales
abrasivos, ni sumerja el aparato en agua.
Bol: lave el bol a mano y séquelo bien, o métalo en el lavavajillas. Nunca use
cepillos de metal, lana de acero o cloro para limpiar el bol.
Accesorios: los accesorios están hechos de acero inoxidable y pueden
lavarse en el lavavajillas.
Tapa antisalpicaduras con boca de alimentación: lave a mano y seque
bien, o coloque en el lavavajillas (bandeja superior solamente).
NOTA: cualquier otro servicio debe ser realizado por un técnico autorizado.

15
VELOCIDAD SUGERIDA
1a mezclar/batir aplastarlas (para hacer puré)
• Para agregar ingredientes secos (p. ej., harina) 7• Para batir crema, queso crema
a mezclas líquidos, o ingredientes líquidos a o mantequilla
ingredientes secos o mezclas
• Para empezar a acremar grasa con azúcar
• Para añadir grasa a la harina y hacer masa para
pasteles, galletas o bollos.
• Para empezar a batir huevos o crema
• Para mezclar ingredientes sin incorporar aire
• Para preparar coberturas crujientes
• Para revolver • Para batir crema
2• Para añadir ingredientes secos tales como • P ara batir papas después de
nueces, trozos de chocolate o frutas secas 8aplastarlas (para hacer puré)
• Para amasar masa de levadura • P ara montar claras (añadir un
• Para batir mezclas espesas (p. ej., mezcla poco de azúcar)
de tarta de queso) sin añadir aire
• Para empezar a aplastar las papas
• Para mezclar ciertas masas de hojaldre
• Para mezclar mezcla de “muffins”
• Para acremar • Para montar claras
3• Para mezclar mezclas fluidas y masas para • Para batir crema
galletas 9
• Para agregar huevos a las mezclas/masas
• P ara mezclar mezclas de carne molida (pastel
de carne, albóndigas, paté)
• Para mezclar glaseados
• Para mezclar preparados para pastel • Para batir crema (aumentar
4• P ara mezclar mezclas fluidas y masas para 10 gradualmente la velocidad desde
galletas el nivel 1)
• Para acremar hasta obtener una mezcla ligera • Para montar claras
y espumosa • P ara batir mantequilla para hacer
• Para agregar huevos a las mezclas/masas mantequillas aromatizadas o
• Para mezclar glaseados batidas
• Para mezclar huevos y azúcar
hasta obtener una mezcla ligera
y espumosa
• P ara acremar hasta obtener una mezcla ligera • P ara batir los glaseados hasta
5y espumosa que estén ligeros
• Para añadir huevos a las mezclas acremadas 11 • P ara batir papas/vegetales
• Para mezclar glaseados después de aplastarlos (para
hacer puré)
• Para batir crema y montar claras
(aumentando progresivamente
la velocidad)
• Para añadir huevos a las mezclas acremadas
6• Para aplastar papas
• Para batir huevos hasta que estén espumosos
• Para batir yemas hasta el punto cinta
• Arranque lento; para revolver y comenzar • Para batir papas después de

16
CAPACIDADES MÁXIMAS
Las siguientes capacidades máximas se facilitan a título informativo. Es
posible que sea necesario reducir la carga según factores tales como el tipo
de harina utilizada, la temperatura del agua utilizada, etc.
Conversiones útiles: 1 lb = 455 g; 1 cuarto de galón = 945 ml; 1 galón = 3.8 L
Capacidad
Descripción Accesorio Velocidad máxima
Masa de pan (peso final) Gancho amasador 1 (solamente) 4lb (1.8 kg)
Masa de pizza (peso final) Gancho amasador 1 (solamente) 3lb (1.8 kg)
Masa de tarta Batidor plano 4 a 6 4lb (1.35 kg)
Puré de papas Batidor plano 5 a 9 4lb (1.8 kg)
Mezcla de pastel Batidor plano 6 a 9 6qt (5.65 L)
Mezcla para waffles/gofre o Batidor plano 6 a 9 6qt (5.65 L)
panqueque
Mezcla para ponqué/bizcocho Batidor plano Todas 6qt (5.65 L)
Batidor de
Claras mondadas 11 1 docena
alambre
Batidor de 1 docena
Merengue 11
alambre de claras
2cuartos de
Batidor de galón (1.9 L)
Crema batida 10
alambre de nata/crema
para montar
NOTA: la capacidad del bol depende de la tasa de humedad de la masa.
Al amasar masa (pizza, pan, panecillos), compruebe la tasa de humedad de
la masa, dividiendo el peso del agua por el peso de la harina y multiplicando
por 100. Las capacidades indicadas arriba están basadas en harina a
temperatura ambiente y agua a 70 °F (21 °C). Nota: 1 L de agua pesa 1 kg.
Tiempo máximo de mezcla: 7 minutos.
Si utiliza harina rica en gluten, reduzca las cantidades en un 10 %.
Si utiliza harina refrigerada, agua inferior a 21 °C (70 °F) o hielo, reduzca la carga en un 10%
N unca utilice la velocidad media (velocidad 2) para amasar masa con un contenido
de humedad del 50% o menos.

17
GARANTÍA LIMITADA DE UN AÑO
(válida en los EE.UU. y en Canadá solamente)
Waring garantiza este producto Waring® Commercial contra todo defecto
de materiales o fabricación durante un año a partir de la fecha de compra,
siempre que haya sido usada con alimentos, líquidos no abrasivos (a
excepción de detergentes) y semilíquidos no abrasivos, y que no haya sido
sujeta a cargas que excedan su máxima capacidad. Bajo esta garantía,
Waring reparará o reemplazará toda pieza que, tras estar inspeccionada
por nuestro servicio posventa, demuestre defectos de fabricación o fallas
de materiales, siempre que el producto se regrese a un centro de servicio
autorizado o se entregue con franqueo pagado a: 314 Ella T. Grasso Ave.,
Torrington, CT 06790. Esta garantía: a) no se aplica a ningún producto
desgastado, defectuoso, dañado o roto debido a uso, reparaciones/
servicio realizados por personas no autorizadas, o abuso, mal uso,
sobrecarga eléctrica o daños intencionales; b) no cubre daños incidentales o
consecuentes de ningún tipo.
Advertencia: utilizar este aparato con corriente continua (C.C./DC)
invalidará la garantía.
WARING COMMERCIAL
314 Ella T. Grasso Ave.
Torrington, CT 06790

18
IMPORTANTES CONSIGNES
DE SÉCURITÉ
L'utilisation d'appareils électriques, notamment en présence d’enfants,
requiert la prise de précautions élémentaires an de réduire le risque de
brûlures, de choc électrique, d’incendie ou de blessures, parmi lesquelles
les suivantes :
1. L
IRE TOUTES LES INSTRUCTIONS AVANT
L'UTILISATION.
2. Éteindre et débrancher l'appareil avant d’installer ou de retirer des
accessoires, après l’utilisation et avant le nettoyage.
3. I l convient d'exercer une surveillance étroite lorsque l’appareil est utilisé
par ou près d’enfants ou de personnes atteintes de certains handicaps.
Waring déconseille l’utilisation de cet appareil par des enfants.
4. É viter tout contact avec les éléments en mouvement ou les
accessoires. An d'éviter tout risque de blessure ou de dommage,
garder les mains, les cheveux, les vêtements et les ustensiles éloignés
des batteurs pendant l'utilisation.
5. L’utilisation d’accessoires non recommandés ou vendus par Waring
peut présenter un risque d'incendie, de choc électrique ou de blessure.
6. Remarque : ne pas utiliser plus d’un accessoire à la fois.
7. Ne pas dépasser les capacités maximales indiquées dans ce manuel
d'utilisation.
8. N e pas utiliser le batteur su socle si l’appareil ou le cordon est
endommagé ; le faire réparer avant de le remettre en service.
9. L ire les consignes de sécurité qui accompagnent les accessoires avant
de les utiliser.
10. Ne pas utiliser l'appareil à l’extérieur.
11. Tenir le bol en acier inoxydable à l'écart des sources de chaleur comme
les plaques de cuisson, les fours ou les micro-ondes.
12. A n de réduire les risques de choc électrique, ne jamais placer le
socle-moteur dans l’eau ou tout autre liquide.
13. Retirer tous les accessoires de l’appareil avant de le nettoyer.
14. Ne pas laisser le cordon pendre d'une table ou d'un plan de travail.
CONSERVER CES INSTRUCTIONS
POUR USAGE COMMERCIAL UNIQUEMENT

19
REMARQUE : la puissance nominale maximale est basée sur l'accessoire
qui consomme le plus d'électricité. D'autres accessoires peuvent
consommer beaucoup moins de puissance.
AVERTISSEMENT : RISQUE D’INCENDIE OU
DE CHOC ÉLECTRIQUE
Le symbole composé d’une èche en forme d’éclair à l'intérieur
d'un triangle équilatéral, a pour objet d'alerter l'utilisateur de la
présence d'une tension dangereuse non-isolée à l'intérieur du
boîtier, qui peut être d'une ampleur sufsante pour constituer un
risque d'incendie ou de choc électrique.
Le point d'exclamation à l'intérieur d'un triangle équilatéral a pour
objet de prévenir l'utilisateur de l'importance des instructions de
fonctionnement et de maintenance, jointes à l'appareil.
INSTRUCTIONS DE MISE À LA TERRE
Pour votre protection, cet appareil est équipé d'une che à trois broches.
Cette che doit être branchée dans une prise de terre correctement
congurée (1). Un adaptateur temporaire (2) peut être utilisé pour brancher
l’appareil dans une prise polarisée jusqu’à ce que vous fassiez installer une
prise de terre adéquate par un électricien. La languette de l’adaptateur doit
être mise à la terre, en la xant à un boîtier de raccordement (3) à l'aide
d'une vis en métal.

20
MÉTHODE DE MISE À LA TERRE
UTILISATION DE RALLONGES ÉLECTRIQUES
Pour des raisons de sécurité, cet appareil est équipé d’un cordon
d’alimentation court.
Une rallonge pourra être utilisée au besoin, à condition que les précautions
nécessaires soient prises.
Veillez à ce que les spécications électriques de la rallonge soient au moins
égales à celles de l'appareil, ne la laissez pas pendre au bord d’une table ou
d’un plan de travail et veillez à ce qu’elle soit placée de telle manière qu’un
enfant ou un animal ne puisse pas trébucher dessus ou la tirer.
TYPE DE RALLONGES ÉLECTRIQUES
S’il est nécessaire d’utiliser une rallonge électrique, utiliser une rallonge
munie d’une che de terre à trois broches compatible avec la che du
cordon. Utiliser une rallonge d’intérieur uniquement. Veiller à ce que la
tension nominale de la rallonge soit égale ou supérieure à celle de l’appareil.
Ne pas utiliser une rallonge si elle est abîmée. Vérier l’état de la rallonge
avant de l’utiliser; la remplacer en cas de dommage. Ne pas tirailler la
rallonge ou le cordon pour les débrancher. Maintenir la rallonge éloignée des
surfaces chaudes ou coupantes.
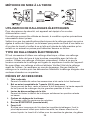
PIÈCES ET ACCESSOIRES
1. Tête inclinable
Permet d’installer/de retirer les accessoires et de racler le bol facilement.
2. B ol en acier inoxydable de 7 quarts (6,6 L) avec anse
L’anse permet de tenir, racler et enlever le bol facilement. La haute capacité
du bol permet de mélanger de plus grandes quantités à la fois.
3. L evier de déverrouillage de la tête
Permet de libérer la tête et de la bloquer solidement en position relevée
ou basse.
4. Cadran de réglage de la vitesse
11 vitesses, pour un maximum de précision.
5. Bouton START/STOP (marche/arrêt)
6. F ouet à fil
S’utilise pour incorporer de l'air dans les ingrédients/mélanges. Il est le
plus fréquemment utilisé pour battre les œufs, les blancs d'œufs ou la
crème liquide. Le fouet à l s’utilise pour les recettes de génoise, de gâteau
La page est en cours de chargement...
La page est en cours de chargement...
La page est en cours de chargement...
La page est en cours de chargement...
La page est en cours de chargement...
La page est en cours de chargement...
La page est en cours de chargement...
La page est en cours de chargement...
-
 1
1
-
 2
2
-
 3
3
-
 4
4
-
 5
5
-
 6
6
-
 7
7
-
 8
8
-
 9
9
-
 10
10
-
 11
11
-
 12
12
-
 13
13
-
 14
14
-
 15
15
-
 16
16
-
 17
17
-
 18
18
-
 19
19
-
 20
20
-
 21
21
-
 22
22
-
 23
23
-
 24
24
-
 25
25
-
 26
26
-
 27
27
-
 28
28


Waring Commercial WSM7L Manuel utilisateur
- Catégorie
- Mélangeurs
- Taper
- Manuel utilisateur
dans d''autres langues
- English: Waring Commercial WSM7L User manual
- español: Waring Commercial WSM7L Manual de usuario
- português: Waring Commercial WSM7L Manual do usuário