Gyration Cyberview2000 Smart PTZ Camera Manuel utilisateur
- Taper
- Manuel utilisateur

Smart PTZ Camera
User manual
Cyberview2000

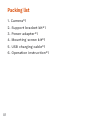
1. Camera*1
2. Support bracket kit*1
3. Power adapter*1
4. Mounting screw kit*1
5. USB charging cable*1
6. Operation instruction*1
01
Packing list

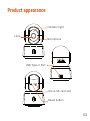
Product appearance
Lens Microphone
Indicator light
USB Type-C Port
02
Micro-SD card slot
Reset button

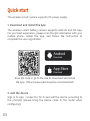
Quick start
The wireless smart camera supports DC power supply.
The wireless smart battery camera supports Android and iOS App.
For your best experience, please scan the QR code below with your
mobile phone, install the app, and follow the instruction to
complete the user registration.
Sign in to App connect to Wi-Fi and add the device according to
the prompts (please bring the device close to the router when
configuring).
1. Download and install the App
2. Add the device
Scan QR code or go to the link to download and install
the App https://www.cyberviewplus.com/download/
Android
Download
Download
App Store
03

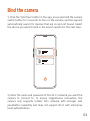
Bind the camera
1) Click the "Add Now" button in the app, press and hold the camera
switch button for 3 seconds to turn on the camera, and the app will
automatically search for devices that are on and not bound. Select
the device you want to bind in the search results for the next step.
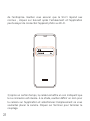
2) Enter the name and password of the Wi-Fi network you want the
camera to connect to. To ensure longdistance connection, the
camera only supports 2.4GHz WiFi network with stronger wall
penetration capability and does not support Wi-Fi with enterprise
level authentication.
04

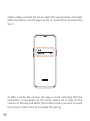
3) After a while, the camera will play a sound indicating that the
connection is successful. At this point, please set a name for the
camera on the app and select the location where you want to place
the camera. Click Finish to complete the pairing.
Please make sure that the Wi-Fi meets the requirements, click Next
after completion, and the app can try to connect the camera to the
Wi-Fi.
05

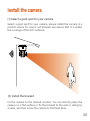
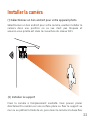
Install the camera
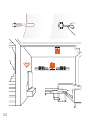
(1) Select a good spot for your camera
Select a good spot for your camera, please install the camera in a
position where its view is not blocked and ensure that it is within
the coverage of the WiFi network.
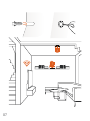
(2) Install the bracket
Fix the camera to the desired location. You can directly place the
camera on a flat surface or fix the bracket to the wall or ceiling by
screws, and then screw the camera to the fixed base.
06

07

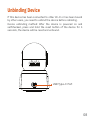
Unbinding Device
If this device has been connected to other Wi-Fi or has been bound
by other users, you need to unbind the device before rebinding.
Device unbinding method: After the device is powered on and
selfchecked, press and hold the reset button of the device for 5
seconds, the device will be reset and unbound.
08
USB Type-C Port

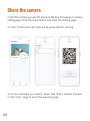
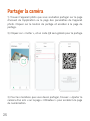
3) For the members you need to share, find "Add a Friend's Camera"
on the "User" page to enter the scanning page.
2) Click "Invite",and a QR code will be generated for sharing.
Share the camera
1) Find the camera you want to share on the App homepage or camera
setting page. Click the share button and enter the sharing page.
09

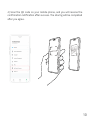
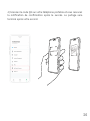
4) Scan the QR code on your mobile phone, and you will receive the
confirmation notification after success. The sharing will be completed
after you agree.
10

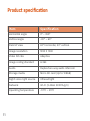
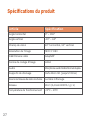
Product specification
11
Horizontal angle
Vertical angle
Field of view
Image resolution
Video bit rate
Image coding standard
Audio
Storage media
Night vision light source
Network
Operating temperature
0° ~ 355°
-20° ~ 60°
63° horizontal, 50° vertical
1920 X 1080
Adaptive
H.264
Duplex two-way audio intercom
Micro SD card (Up to 128GB)
Infrared light
Wi-Fi (2.4GHz 802.11b/g/n)
-10°C ~ 45°C
Item Specification

12
Regulatory Compliance
FCC Statements
This device complies with Part 15 of the FCC Rules. Operation is
subject to the following two conditions: (1) this device may not
cause harmful interference, and (2) this device must accept any
interference received, including interference that may cause
undesired operation.
Cautiont: The user is cautioned that changes or modifications not
expressly approved by the party responsible for compliance could
void the user's authority to operate the equipment.
NOTE: This equipment has been tested and found to comply with
the limits for a Class A digital device, pursuant to part 15 of the FCC
Rules. These limits are designed to provide reasonable protection
against harmful interference when the equipment is operated in a
commercial environment. This equipment generates, uses, and can
radiate radio frequency energy and, if not installed and used in
accordance with the instruction manual, may cause harmful
interference to radio communications. Operation of this equipment
in a residential area is likely to cause harmful interference in which
case the user will be required to correct the interference at his own
expense.

RF Radiation Exposure Statement:
This equipment complies with FCC radiation exposure limits set
forth for an uncontrolled environment. This equipment should be
installed and operated with a minimum distance of 20cm between
the radiator and any part of your body.
LVD/EMC Directive
This product complies with the European Low Voltage
Directive 2014/35/EU and EMC Directive 2014/30/EU.
WEEE Directive-2012/19/EU
The product this manual refers to is covered by the Waste
Electrical & Electronic Equipment (WEEE) Directive and
must be disposed of in a responsible manner.
13

Disclaimer and Safety Warnings
Copyright Statement
No part of this manual may be copied, reproduced, translated or
distributed in any form by any means without prior content in
writing from our company (referred to as us hereafter).
The product described in this manual may contain proprietary
software owned by our company and its possible licensors. Unless
permitted, no one is allowed to copy, distribute, modify, abstract,
decompile, disassemble, decrypt, reverse engineer, rent, transfer, or
sublicense the software in any form by any means.
Export Compliance Statement
Our company complies with applicable export control laws and
regulations worldwide, including that of the People's Republic of
China and the United States, and abides by relevant regulations
relating to the export, re-export and transfer of hardware, software
and technology. Regarding the product described in this manual, our
company asks you to fully understand and strictly abide by the
applicable export laws and regulations worldwide.
Privacy Protection Reminder
Our company complies with appropriate privacy protection laws and
is committed to protecting user privacy. You may want to read our
full privacy policy at our website and get to know the ways we
process your personal information. Please be aware, using the
product described in this manual may involve the collection of
personal information such as face, fingerprint, license plate number,
email, phone number, GPS. Please abide by your local laws and
regulations while using the product.
14

Power Requirements
Installation and use of the device must be in strict accordance
with your local electrical safety regulations.
Use a UL certified power supply that meets LPS requirements if an
adapter is used.
Use the recommended cordset (power cord) in accordance with
the specified ratings.
Only use the power adapter supplied with your device.
Use a mains socket outlet with a protective earthing (grounding)
connection.
Ground your device properly if the device is intended to be
grounded.
Battery Use Caution
When battery is used, avoid.
High or low extreme temperatures during use, storage and
transportation.
Extremely low air pressure, or low air pressure at high altitude.
Battery replacement.
Use the battery properly. Improper use of the battery such as the
following may cause risks of fire, explosion or leakage of flammable
liquid or gas.
Replace battery with an incorrect type.
Dispose of a battery into fire or a hot oven, or mechanically
crushing or cutting of a battery.
Dispose the used battery according to your local regulations or the
battery manufacturer's instructions.
15

Caméra PTZ intelligente
Manuel de l'Utilisateur
Cyberview2000
16

Liste de colisage
1. Caméra*1
2. Kit de support*1
3. Adaptateur secteur*1
4. Kit de vis de montage*1
5. Câble de chargement USB*1
6. Instructions d’utilisation*1
17

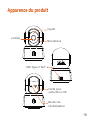
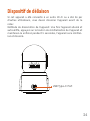
Apparence du produit
18
Lentille Microphone
Voyant
USB Type-C Port
Fente pour
carte Micro-SD
Bouton de
réinitialisation

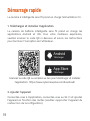
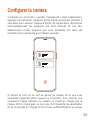
Démarrage rapide
La caméra à intelligente sans fil prend en charge l’alimentation CC.
La caméra de batterie intelligente sans fil prend en charge les
applications Android et iOS. Pour votre meilleure expérience,
veuillez scanner le code QR ci-dessous et suivre les instructions
pour terminer l’inscription de l’utilisateur.
Connectez-vous à l’application, connectez-vous au Wi-Fi et ajoutez
l’appareil en fonction des invites (veuillez rapprocher l’appareil du
routeur lors de la configuration).
1. Téléchargez et installez l’application
2. Ajouter l’appareil
Scannez le code QR ou accédez au lien pour télécharger et installer
l’application: https://www.cyberviewplus.com/download/
Android
Télécharger
Télécharger
App Store
19
La page est en cours de chargement...
La page est en cours de chargement...
La page est en cours de chargement...
La page est en cours de chargement...
La page est en cours de chargement...
La page est en cours de chargement...
La page est en cours de chargement...
La page est en cours de chargement...
La page est en cours de chargement...
La page est en cours de chargement...
La page est en cours de chargement...
La page est en cours de chargement...
-
 1
1
-
 2
2
-
 3
3
-
 4
4
-
 5
5
-
 6
6
-
 7
7
-
 8
8
-
 9
9
-
 10
10
-
 11
11
-
 12
12
-
 13
13
-
 14
14
-
 15
15
-
 16
16
-
 17
17
-
 18
18
-
 19
19
-
 20
20
-
 21
21
-
 22
22
-
 23
23
-
 24
24
-
 25
25
-
 26
26
-
 27
27
-
 28
28
-
 29
29
-
 30
30
-
 31
31
-
 32
32


Gyration Cyberview2000 Smart PTZ Camera Manuel utilisateur
- Taper
- Manuel utilisateur
dans d''autres langues
Autres documents
-
LG LGK557 Le manuel du propriétaire
-
-
Fujitsu Stylistic M532 Manuel utilisateur
-
LG LGH831.AAVCTN Le manuel du propriétaire
-
-
-
 Ctronics 680C 2K 4MP Light Bulb Security Camera Manuel utilisateur
-
 ROAD EYES RECSMART Le manuel du propriétaire

