Hilti DX 6-GR Manuel utilisateur
- Catégorie
- Outils électroportatifs
- Taper
- Manuel utilisateur


1

2

3
4
5
6

7
8
9
10

11
12


*2253454* 2253454 English 1
Original operating instructions
1 Information about the documentation
1.1 About this documentation
• Read this documentation before initial operation or use. This is a prerequisite for safe, trouble-free
handling and use of the product.
• Observe the safety instructions and warnings in this documentation and on the product.
• Always keep the operating instructions with the product and make sure that the operating instructions
are with the product when it is given to other persons.
1.2 Explanation of symbols used
1.2.1 Warnings
Warnings alert persons to hazards that occur when handling or using the product. The following signal words
are used:
DANGER
DANGER !
▶Draws attention to imminent danger that will lead to serious personal injury or fatality.
WARNING
WARNING !
▶Draws attention to a potential threat of danger that can lead to serious injury or fatality.
CAUTION
CAUTION !
▶Draws attention to a potentially dangerous situation that could lead to personal injury or damage to the
equipment or other property.
1.2.2 Symbols in the operating instructions
The following symbols are used in these operating instructions:
Comply with the operating instructions
Instructions for use and other useful information
Dealing with recyclable materials
Do not dispose of electric equipment and batteries as household waste
1.2.3 Symbols in illustrations
The following symbols are used in illustrations:
These numbers refer to the illustrations at the beginning of these operating instructions.
The numbering reflects the sequence of operations shown in the illustrations and may deviate
from the steps described in the text.
Item reference numbers are used in the overview illustration and refer to the numbers used in
the key in the product overview section.
These characters are intended to specifically draw your attention to certain points when handling
the product.

2 English 2253454 *2253454*
1.3 Product-dependent symbols
1.3.1 Symbols
The following symbols are also used:
If applied on the product, the product has been certified by this certification body for the US and
Canadian markets according to the applicable standards.
1.3.2 Obligation symbols
The following obligation symbols are used on the product:
Warning! Observe the instructions.
Wear a hard hat
Wear eye protection
Wear ear protection
1.3.3 Information shown on the display
The following information may be shown on the display:
This symbol indicates the battery’s state of charge. When the battery is empty, the maintenance
symbol appears.
The "maintenance" symbol indicates that maintenance is due. It appears after 5 years, when
30,000 fasteners have been driven, or when the battery is empty. Our recommendation: Consult
Hilti Service.
The "fasteners driven" counter indicates when the next service is due. One segment stands for
500 fasteners driven. There are 5 segments in total, representing 2,500 fasteners driven.
This symbol indicates whether Bluetooth is switched on. If the symbol is not shown on the display
then Bluetooth is switched off.
1.4 Product information
products are designed for professional users and only trained, authorized personnel are
permitted to operate, service and maintain the products. This personnel must be specifically informed about
the possible hazards. The product and its ancillary equipment can present hazards if used incorrectly by
untrained personnel or if used not in accordance with the intended use.
The type designation and serial number are printed on the rating plate.
▶Write down the serial number in the table below. You will be required to state the product details when
contacting Hilti Service or your local Hilti organization to inquire about the product.
Product information
Fastening tool DX 6-GR
Generation 01
Serial no.
2 Safety
2.1 Safety instructions
Basic safety precautions
WARNING! Read all safety instructions and other instructions. Failure to comply with the safety
instructions and instructions can cause serious injuries.
Keep all safety instructions and instructions for future reference.
▶Do not tamper with or modify the fastening tool in any way.
▶Use only items of equipment that are compatible with each other (fastener guide or magazine, piston and
fasteners).

*2253454* 2253454 English 3
▶Check the fastening tool and accessories for damage.
▶Moving parts must be in full working order; make sure that they cannot jam. Keep moving parts oiled.
▶All parts must be correctly installed to ensure faultless operation of the fastening tool. Damaged
parts must be properly repaired or replaced by Hilti Service unless otherwise stated in the operating
instructions.
▶Use only Hilti DX- cartridges, or other suitable cartridges that meet the minimum safety requirements.
→ page 6
▶Do not attempt to drive fasteners into unsuitable base materials, for example material that is too thin, too
hard, or too brittle. Driving a fastener into these materials can cause the fastener to break, splinter the
material or be driven right through. Examples of unsuitable materials are:
▶Weld seams in steel, cast iron, glass, marble, plastic, bronze, brass, copper, insulating material,
hollow brick, ceramic brick, thin sheet metal (< 4 mm) and cellular concrete.
▶Comply with the 'Direct Fastening Technology Manual', the 'Technical Guide' and the operating
instructions of the fastener to be driven.
Requirements to be met by users
▶Only appropriately trained persons who have been duly authorized and informed of the possible hazards
are allowed to operate or service this fastening tool.
▶Wear your personal protective equipment while the tool is in use.
▶Wear suitable eye protection and a hard hat.
▶Wear protective gloves. The fastening tool can get hot in use.
▶Wear ear protectors. The ignition of a propellant charge can damage the hearing.
▶Wear non-skid shoes.
Requirements to be met by the workplace
▶Keep the workplace tidy. Objects which could cause injury should be removed from the working area.
Disorder in the working zone can lead to accidents.
▶Make sure that the working area is well lit and, when working in an enclosed space, make sure it is
adequately ventilated.
Personal safety
▶WARNING! Never press the nosepiece of the fastening tool against your hand or any other part of
the body! Never point the fastening tool toward other persons! → page 7
▶Do not compress the fastening tool with your hand on the magazine, the fastener guide or a loaded
fastener.
▶Compressing the fastening tool by hand can make the fastening tool ready to fire, endangering you
and others.
▶Everyone in the vicinity must wear ear protection, eye protection and a hard hat.
▶Stay alert, watch what you are doing and use common sense when operating a direct fastening tool. Do
not use the fastening tool when you are tired or under the influence of drugs, alcohol or medication. Stop
working if you experience pain or feel unwell. A moment of inattention while operating the fastening tool
can result in serious injury.
▶Avoid working in awkward body positions. Make sure you work from a safe stance and stay in balance
at all times.
▶Keep the arms slightly bent while operating the fastening tool, do not straighten the arms.
▶Keep other people away from the working area, especially children.
Use and care of direct fastening tools
▶Use the fastening tool only for its intended use and only when it is in faultless condition. Do not attempt
to use the tool for purposes for which it is not intended.
▶Do not use the fastening tool in places where there is a risk of fire and explosion.
▶Before driving fasteners, check that there is no electrical wiring, water piping or gas piping behind the
surface into which you want to drive them. For detailed information, request a copy of the 'Direct
Fastening Technology Manual' and the 'Technical Guide' from the local Hilti Store.
▶Before driving fasteners, check behind the object to make sure that no-one is present in line with the
fasteners to be driven. Danger of fasteners penetrating right through!
▶Make sure that the nosepiece of the fastening tool is never pointed toward yourself or other persons.
▶Always use the splinter guard (accessory) for tasks that can produce flying splinters.
▶Hold the fastening tool only by the grip surfaces provided for the purpose.
▶Keep the grip surfaces dry, clean and free from oil and grease.
▶Pull the trigger only when the fastening tool is at right angles to and pressed fully against the work
surface.

4 English 2253454 *2253454*
▶Before starting work, check the selected energy setting.
▶Carry out a test by driving 2 fasteners into the base material you are working on → page 8.
▶When driving fasteners, always hold the fastening tool at right angles to the work surface. This reduces
the risk of a fastener being deflected by the base material.
▶Do not drive fasteners into existing holes unless this is recommended by Hilti (e.g. DX-Kwik).
▶Do not re-use a fastener that was used beforehand - risk of injury! Use a new fastener.
▶Do not attempt to re-drive a fastener that was not driven in deeply enough! The fastener could break.
▶Never leave a loaded fastening tool unattended.
▶Always unload the fastening tool (remove cartridges and fasteners) before cleaning, maintenance,
changing the fastener guide, before work breaks and before storing the tool.
▶Transport and store the fastening tool in the Hilti case intended for the purpose.
▶Store fastening tools that are not in use in a dry, secure place where they are inaccessible to children.
▶Always position the nosepiece of the fastening tool on smooth, flat surfaces free of obstructions and fully
supported by the sub-structure.
▶Comply with the specifications for edge distances and center-to-center distances (see the section
headed 'Minimum distances and edge distances → page 6').
Thermal safety rules
▶Do not exceed the maximum fastener driving rate recommended in the section headed "Technical data".
▶If the fastening tool overheats or if the cartridge strip deforms or melts, remove the cartridge strip and
allow the fastening tool to cool down.
▶Do not dismantle the fastening tool while it is hot. Allow the fastening tool to cool down.
Risk of explosion with cartridges
▶Use only cartridges that are suitable and approved for use with the fastening tool.
▶Remove the cartridge strip when you are going to take a break and when you have finished the job, and
before you transport the fastening tool.
▶Do not use force to remove fasteners and/or cartridges from the magazine strip or the fastening tool.
▶Store unused cartridges in accordance with the storage specifications for PAT cartridges (e.g. dry,
temperature between 5 °C and 25 °C) in a locked storage facility. Follow the instructions for storage in
the safety data sheet of the cartridges.
▶Do not leave unused or partly used cartridge strips lying around. Collect the used cartridge strips and
store the cartridge strips at a suitable location (see also 'Storage of unused cartridges').
3 Description
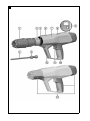
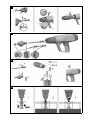
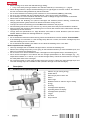
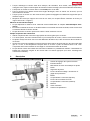
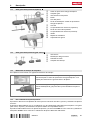
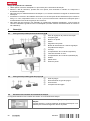
3.1 Product overview (fastening tool) 1
@Selector ring for driving energy
;Guide sleeve
=Exhaust gas piston return unit
%Piston
&Piston rings
(Release button for selector ring for driving
energy
)Housing
+Cartridge barrel (ejection)
§Operating button at display
/Cartridge barrel (insertion)
:Trigger
∙Air vents
$Grip surfaces

*2253454* 2253454 English 5
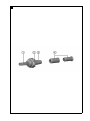
3.2 Product overview (fastener guides) 2
@Fastener guide
;Fastener guide release button
=Buffer
%Centering sleeve
3.3 Controls on the fastening tool
The controls on the fastening tool are as follows:
Release button for selector ring for driving energy
The button unlocks the selector ring for driving energy or is used for
removal of the exhaust gas piston return unit.
Release button for fastener guide (A)
The button unlocks the fastener guide so that the fastener guide can
be changed or the fastening tool cleaned.
3.4 Intended use
The product described is a fastening tool for driving nails, studs and fasteners into steel.
Use the product only in combination with the equipment designed for use with the fastening tool. Fastener
guides, piston and fasteners must be compatible with one another.
Use the product only with spare parts and accessories from Hilti and with cartridges and fasteners from
Hilti, or other suitable cartridges and fasteners.
3.5 Bluetooth®
The Bluetooth ®word mark and logos are registered trademarks owned by Bluetooth SIG, Inc and any use
of such marks by Hilti Corporation is under license.
Bluetooth is a wireless data transfer system by which the two Bluetooth-enabled products can communicate
with each other over a short distance.
This product has a Bluetooth Low Energy module. The module enables communication and data transfers
between smart phones and Hilti gateway. The module is used for checking the status of the product and can
submit data attributes such as location of the receiving device, runtime, total application count, application
count during interval and timestamp of transfer.
Information about the connectivity functions offered can be found in the respective Hilti application
(app).
3.5.1 Data transmission via Bluetooth
The data transmission interval can vary, depending on the available power source of the product. The signal
range can vary greatly depending on external conditions, including the receiving device used. The Bluetooth
range can be significantly less inside closed rooms and through metallic barriers (e g. walls, shelving units,
cases, etc.). Depending on ambient conditions, several transmission intervals may be required before the
product is detected.
If the product is not detected, check the following:
• Is the distance to the mobile terminal device too great?
→ Reduce the distance between the mobile terminal device and the product.
3.5.2 Installing and setting up the app
In order to be able to use the connectivity functions, you first have to install the respective Hilti app.

6 English 2253454 *2253454*
(1.) Download the app from the corresponding app store (Apple App Store, Google Play Store).
You will require a user account on the corresponding app store to do this.
(2.) When you start the app for the first time, either log in with your account or register.
(3.) The display of your mobile terminal device will show you all the subsequent steps required to connect
the product to the mobile device.
In addition, be sure to study all the notes on operation in the app. This will give you a better overview
of how the connection is made and how the functions are used.
3.6 Information about the app
To find out more about the app, to download it and start it, scan the QR code in the case.
3.7 Requirements to be met by cartridges
Use only the Hilti DX cartridges listed in this table, or other suitable cartridges that are compliant with the
minimum safety requirements:
• It is a requirement for EU and EFTA countries that the cartridges must be CE-compliant and must bear
the CE mark of compliance.
• It is a requirement for the USA that the cartridges must be compliant with the stipulations set out in
ANSI A10.3-2020.
• It is a requirement for the non-European member states of the C.I.P. that the cartridge must have C.I.P.
approval for the DX fastening tool used.
• It is a requirement for the remaining countries that the cartridges must have passed the firing-residues
test in accordance with EN 16264 and must have a manufacturer's declaration to this effect.
WARNING! Use of cartridges that do not meet the minimum safety requirements can lead to a build-
up of unburned powder. A sudden explosion and severe injuries to the operator and bystanders can
result. A build-up of unburned powder can be prevented only by professional cleaning by Hilti Service.
Cartridges
Ordering designation Color Power level
DX 6 cartridge titanium-gray strong
DX 6 cartridge black extra-strong
3.8 Minimum distances and edge distances
WARNING! You must always observe certain minimum distances and spacing when driving
fasteners. They can differ, depending on the product.
For detailed information, request a copy of the Direct Fastening Technology Manual from the local
Hilti Store Store.
Fastening to steel
Always observe the following minimum distances and spacing when fastening to steel:
• The minimum distance from the edge of the base material to the fastener must be at least 15 mm.
• The minimum center-to-center distance between two fasteners is 20 mm.
• The base material must have a thickness of at least 6 mm.
3.9 Information about the field of applications
See the Hilti product page for more information about the areas of application.

*2253454* 2253454 English 7
4 Technical data
WARNING! Always remove the cartridge strip whenever work is interrupted. In this way you avoid
deformation of the plastic strip and the risk of injury due to self-firing in an overheated fastening tool.
When you work at the maximum fastener driving rate, allow the fastening tool to cool down after one hour of
constant work.
DX 6-GR
Weight 3.42 kg
(7.54 lb)
Length (fastening tool) 491 mm
(19.3 in)
Recommended maximum fastening
rate
700 rev/h
Required contact pressure 174 N … 200 N
(39 lbf… 45 lbf)
Compression stroke 19 mm
(0.7 in)
Ambient temperature (storage and
use)
−15 ℃ … 50 ℃
(5 ℉ … 122 ℉)
4.1 Bluetooth
Frequency 2,400 MHz … 2,483.5 MHz
Maximum emitted transmission power −27.2 dBm
5 Preparations at the workplace
▶Before you start driving fasteners, always check that you are using the correct combination of fastener
guide, piston, fasteners and cartridge.
▶Before commencing work, check that all safety devices are fitted and that they are functioning correctly.
In order to ensure faultless operation of the fastening tool, all parts must be fitted correctly and must
meet the necessary requirements.
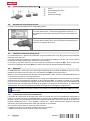
5.1 Assembling the fastening tool 3
1. Make sure that there are no cartridge strips in the fastening tool.
2. Bring the arrow marks into alignment and insert the exhaust gas piston return unit into the housing.
3. Insert the fastener guide centered into the exhaust gas piston return unit.
4. Fit the piston.
5. Fit the buffer onto the fastener guide.
6. Insert the fastener guide centered and not tilted into the exhaust gas piston return unit.
7. Turn the fastener guide clockwise until it engages.
▶The fastener guide is locked.
6 Operation
WARNING
Hazard due to hot surfaces! The fastening tool can become hot in use.
▶Wear protective gloves.
WARNING! If resistance is unusually high when you insert the cartridge strip, check whether the cartridge
strip is compatible with this fastening tool.
Observe the safety instructions and warnings in this documentation and on the product.

8 English 2253454 *2253454*
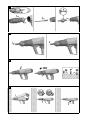
Safety-related instructions for use
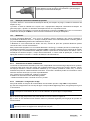
Illustration showing
example
Description
Do not press the nosepiece of the fastening tool against any part of the
body!
Pressing the nosepiece against a part of the body (a hand, for example) can
make the fastening tool ready to fire. As a result, there would be the risk of a
fastener being fired into a part of the body.
6.1 Loading the single-fastener tool 4
1. Push the fastener into the fastener guide from the front until the washer of the fastener is held in place in
the fastener guide.
2. Push the cartridge strip, narrow end first, into the grip of the fastening tool from below until the full length
of the cartridge strip is inside the fastening tool.
To use a cartridge strip in which some cartridges have already been used:
Pull the fully inserted cartridge strip by hand up and out of the fastening tool until the first unused
cartridge is in position in the cartridge chamber
6.2 Setting driving energy 5
Select the energy setting that suits the application. If no empirical values are available, always start with the
minimum driving energy.
1. Press and hold down the release button for the selector ring for driving energy.
2. Turn the selector ring for driving energy to the desired energy level.
Energy levels:
• 1 = lowest energy
• 8 = highest energy
3. Check whether the fastener was correctly driven in accordance with the operating instructions of the
fastener.
6.3 Driving fasteners 6
1. Position the fastening tool.
2. Hold the fastening tool perpendicular to the working surface and then press it at right angles against the
surface.
3. Press the trigger to drive the fastener.
6.4 Unloading the single-fastener tool
1. Pull the cartridge strip up and out of the fastening tool.
2. Pull the fastener out of the fastening tool.
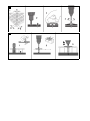
6.5 Driving X-FCM grating fasteners 12
1. Drive the threaded stud into the steel beam.
Use the centering sleeve to help ensure easy centering of the fastener.
2. Position the X-FCM retaining flange.
3. Follow the instructions in the installation instructions of the fastener.

*2253454* 2253454 English 9
6.6 Driving the X-FCP checker plate fasteners 11
1. Drill or punch the holes in the checker plate.
Observe the following minimum dimensions and distances:
A = 18-20 mm (0,70''-0,7'')
B ≥ 25 mm (≥ 0,98'')
2. Drive the threaded stud through the predrilled or punched hole.
3. Position the X-FCP retaining flange.
4. Follow the instructions in the installation instructions of the fastener.
6.7 Driving the X-GR grating fasteners 10
1. Insert the grating fastener into the fastener guide.
2. Drive the grating fastener through the grating into the supporting steel.
3. Follow the instructions in the installation instructions of the fastener.
6.8 Resetting the cleaning indicator
The cleaning indicator consists of 5 bars. Each bar stands for 500 fastenings.
The cleaning indicator is designed to indicate the correct cleaning intervals when the following
cartridges are used:
• DX 6 cartridge titanium-gray
• DX 6 cartridge, black
▶Press the operating button at the display and hold it down for 10-12 seconds.
▶The cleaning indicator is reset.
7 Troubleshooting
WARNING
Risk of explosion! Cartridges may fire (explode) if handled improperly.
▶Do not use force to remove cartridges from the fastening tool or the magazine strip.
WARNING
Hazard due to hot surfaces! The fastening tool can become hot in use.
▶Wear protective gloves.
7.1 Fastening tool jams and does not extend
WARNING! If it jams in the compressed state, the fastening tool might be loaded with the safety off.
1. Keep the fastening tool pressed against the work surface for at least 10 seconds and trigger the fastening
tool again.
2. Lift the fastening tool away from the working surface.
▶Be sure not to point it toward yourself or other persons!
3. Try to pull the fastener guide to its initial position by hand.
▶Take your hand off the trigger and do not hold your hand in front of the muzzle!
4. Immediately pull the cartridge strip out of the fastening tool.
If the cartridge strip cannot be removed, allow the fastening tool to cool down sufficiently under
observation. Make sure that the fastening tool is not pointed at yourself or other persons while it
is cooling down.
Contact Hilti service.
5. Service the tool. → page 11

10 English 2253454 *2253454*
7.2 Cartridge does not fire when fastening tool is hot (above design-base maximum operating
temperature)
1. Keep the fastening tool pressed against the work surface for at least 10 seconds and trigger the fastening
tool again.
2. If the cartridge still does not fire, lift the fastening tool away from the work surface.
▶Be sure not to point it toward yourself or other persons!
3. Immediately pull the cartridge strip out of the fastening tool.
If the cartridge strip cannot be removed, allow the fastening tool to cool down sufficiently under
observation. Make sure that the fastening tool is not pointed at yourself or other persons while it
is cooling down.
Contact Hilti service.
4. Move the cartridge to a safe location.
5. Dispose of the cartridges that have not fired.
▶Comply with the locally applicable disposal regulations.
6. Allow the fastening tool to cool down and resume work with a new cartridge strip.
7.3 The cartridge does not fire when the fastening tool is at operating temperature
1. Stop using the tool immediately.
2. Unload and dismantle the fastening tool.
3. Check that you are using the correct combination of fastener guides, piston, fasteners and cartridge.
4. Check the buffer, piston and fastener guides for wear; replace the components as necessary.
5. Clean the fastening tool.
▶If the problem persists after the measures described above have been taken, further use of the
fastening tool is not permissible.
▶Have the fastening tool checked and, if necessary, repaired by Hilti Service.
Dirt and residues build up in the tool under normal operating conditions and functional parts are
also subject to wear.
Service the tool at regular intervals. Check the piston and buffer daily if the fastening tool is used
intensively, or at the latest after every 2500 to 3000 fasteners. The interval corresponds to the
regular cleaning cycle of the fastening tool. The service and cleaning cycles are based on typical
tool use.
The fastener counter shows how many fasteners have been driven since the cleaning indicator
was last reset. One segment stands for 500 fasteners driven.
When 30,000 fasteners have been driven, have the tool serviced by Hilti Service.
8 Care and maintenance
8.1 Care of the fastening tool
For cleaning, use only the cleaning accessories supplied by Hilti, or material of equivalent quality. Do not,
under any circumstances, use spray cleaning equipment, compressed air, high-pressure cleaning equipment,
solvents or water for cleaning.
CAUTION
Risk of damage to the fastening tool! Foreign bodies can jam in the fastening tool and damage the
fastening tool when a cartridge is fired.
▶Prevent foreign bodies from penetrating into the interior of the fastening tool.
▶Clean the exterior of the fastening tool with a slightly damp cloth at regular intervals.

*2253454* 2253454 English 11
8.2 Maintenance
WARNING
Dangerous substances The deposits inside DX tools contain substances that may present a health hazard.
▶Do not inhale dust or dirt while cleaning.
▶Keep dust and dirt away from foodstuffs.
▶Wash your hands after cleaning the tool.
▶Never use grease to clean or lubricate tool components. This may lead to malfunctions. To avoid
malfunctions caused by the use of unsuitable cleaning agents, use Hilti spray.
1. Regularly check all external parts of the fastening tool for damage.
2. Regularly check all operating controls to ensure that they work properly.
3. Use the fastening tool only with suitable cartridges and the recommended energy setting → page 8.
▶Use of the wrong cartridges or excessively high power settings can lead to premature failure of the
fastening tool.
8.3 Servicing the tool
Service the tool in the following situations:
1. If energy fluctuations occur (evidenced by irregularities in fastener penetration depth).
2. If cartridge misfires occur (the cartridge is not fired).
3. If the tool becomes noticeably less easy to operate.
▶If the required contact pressure increases noticeably.
▶If the trigger resistance increases.
▶If the selector ring for driving energy has become difficult to turn.
▶If the cartridge strip is difficult to remove.
4. If the fastener counter indicates that a tool service is necessary.
8.3.1 Disassembling the fastening tool 7
WARNING! Make sure that there are no cartridges or fasteners in the fastening tool. If there are cartridges
or fasteners in the fastening tool, pull the cartridge strip up and out of the fastening tool by hand and remove
the fasteners from the fastening tool.
1. Press and hold down the release button of the fastener guide.
2. Turn the fastener guide counter-clockwise as far as it will go.
3. Pull out the fastener guide with piston.
4. Pull the piston out of the fastener guide.
5. Remove the buffer by bending it sharply out of the fastener guide.
6. Press and hold down the release button for the selector ring for driving energy.
7. Turn the selector ring for driving energy counter-clockwise to the removal position.
8. Pull the exhaust gas piston return unit out of the housing.
8.3.2 Checking piston and buffer 8
WARNING
Risk of injury! A faulty buffer or piston or a faulty base plate leads to an increased risk of malfunctions.
▶Check the piston and buffer for wear and replace them if damaged.
▶Do not tamper with or modify the piston.
▶Do not attempt to repair a faulty piston yourself, for example by grinding the tip.
1. The piston must be replaced in the following cases:
▶The piston is broken.
▶The piston is badly worn or chipped (e.g. a segment of more than 90° of the circumferential
ring-shaped elevation at the piston tip broken away)
▶The piston rings are cracked or missing.
▶The piston is bent (check by rolling the piston on a smooth, flat surface).
2. The buffer must be replaced in the following cases:
▶The metal ring of the buffer is loose or broken.
▶The buffer no longer holds on the fastener guide.
▶The rubber is badly worn at certain points under the metal ring.

12 English 2253454 *2253454*
8.3.3 Cleaning and oiling fastening tool 9
Use only Hilti spray. The use of other lubricants can cause malfunctions or damage the fastening tool.
1. Disassemble the fastening tool. → page 11
2. Use the flat brush supplied for the purpose to clean the piston rings until the piston rings move freely.
3. Use the flat brush to clean the lock of the fastener guide.
4. Oil the lock of the fastener guide and then wipe the lock lightly with a cloth.
5. Use the large round brush supplied for the purpose to clean the inside of the exhaust gas piston return
unit.
6. Oil the lock of the exhaust gas piston return unit on the inside.
7. Use the flat brush to clean the back end of the exhaust gas piston return unit and the pins.
8. Oil the pins and then wipe the pins lightly with a cloth.
9. Use the tapered brush supplied for the purpose to clean the tapered cartridge chamber.
10. Clean the cartridge barrel with the cleaning rod supplied for the purpose.
8.3.4 Final check of the fastening tool
1. After carrying out care and maintenance, check that all protective and safety devices are fitted and that
they function faultlessly.
2. Reset the cleaning indicator. → page 9
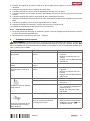
9 Problems with the fastening tool
WARNING! Risk of injury! Before you start troubleshooting, make sure there are no cartridges in the
fastening tool. If the cartridges cannot be removed, contact Hilti Service
If the trouble you are experiencing is not listed in this table or you are unable to remedy the problem by
yourself, please contact Hilti Service.
Trouble or fault Possible cause Action to be taken
Higher force required to press
the tool against the surface
Build-up of combustion residues. ▶Service the tool.
▶Clean the cartridge chamber.
▶Insert new cartridge strip.
Trigger resistance increases Build-up of combustion residues. ▶Contact Hilti Service.
Selector ring for driving en-
ergy is difficult to turn
Build-up of combustion residues. ▶Service the tool.
▶Clean the cartridge chamber.
▶Insert new cartridge strip.
The fastener is not driven
deep enough
The fastener is too long. ▶Use a shorter fastener.
Bad cartridge. ▶Pull the cartridge strip through
to the next cartridge.
Driving energy too low ▶Turn the selector ring for driving
energy to increase driving
energy.
▶Use an extra-strong cartridge.
Piston jamming in exhaust
gas piston return unit
The piston is damaged. ▶Change the piston.
Abraded material from buffer inside
the exhaust gas piston return unit.
▶Check the piston and buffer and
replace if necessary.
▶Contact Hilti Service if the
problem persists.
Build-up of combustion residues. ▶Service the tool.
▶Clean the cartridge chamber.
▶Insert new cartridge strip.
La page est en cours de chargement...
La page est en cours de chargement...
La page est en cours de chargement...
La page est en cours de chargement...
La page est en cours de chargement...
La page est en cours de chargement...
La page est en cours de chargement...
La page est en cours de chargement...
La page est en cours de chargement...
La page est en cours de chargement...
La page est en cours de chargement...
La page est en cours de chargement...
La page est en cours de chargement...
La page est en cours de chargement...
La page est en cours de chargement...
La page est en cours de chargement...
La page est en cours de chargement...
La page est en cours de chargement...
La page est en cours de chargement...
La page est en cours de chargement...
La page est en cours de chargement...
La page est en cours de chargement...
La page est en cours de chargement...
La page est en cours de chargement...
La page est en cours de chargement...
La page est en cours de chargement...
La page est en cours de chargement...
La page est en cours de chargement...
La page est en cours de chargement...
La page est en cours de chargement...
La page est en cours de chargement...
La page est en cours de chargement...
La page est en cours de chargement...
La page est en cours de chargement...
La page est en cours de chargement...
La page est en cours de chargement...
La page est en cours de chargement...
La page est en cours de chargement...
La page est en cours de chargement...
La page est en cours de chargement...
La page est en cours de chargement...
La page est en cours de chargement...
La page est en cours de chargement...
La page est en cours de chargement...
La page est en cours de chargement...
La page est en cours de chargement...
La page est en cours de chargement...
La page est en cours de chargement...
La page est en cours de chargement...
La page est en cours de chargement...
La page est en cours de chargement...
La page est en cours de chargement...
-
 1
1
-
 2
2
-
 3
3
-
 4
4
-
 5
5
-
 6
6
-
 7
7
-
 8
8
-
 9
9
-
 10
10
-
 11
11
-
 12
12
-
 13
13
-
 14
14
-
 15
15
-
 16
16
-
 17
17
-
 18
18
-
 19
19
-
 20
20
-
 21
21
-
 22
22
-
 23
23
-
 24
24
-
 25
25
-
 26
26
-
 27
27
-
 28
28
-
 29
29
-
 30
30
-
 31
31
-
 32
32
-
 33
33
-
 34
34
-
 35
35
-
 36
36
-
 37
37
-
 38
38
-
 39
39
-
 40
40
-
 41
41
-
 42
42
-
 43
43
-
 44
44
-
 45
45
-
 46
46
-
 47
47
-
 48
48
-
 49
49
-
 50
50
-
 51
51
-
 52
52
-
 53
53
-
 54
54
-
 55
55
-
 56
56
-
 57
57
-
 58
58
-
 59
59
-
 60
60
-
 61
61
-
 62
62
-
 63
63
-
 64
64
-
 65
65
-
 66
66
-
 67
67
-
 68
68
-
 69
69
-
 70
70
-
 71
71
-
 72
72


Hilti DX 6-GR Manuel utilisateur
- Catégorie
- Outils électroportatifs
- Taper
- Manuel utilisateur
dans d''autres langues
- English: Hilti DX 6-GR User manual
- español: Hilti DX 6-GR Manual de usuario
- português: Hilti DX 6-GR Manual do usuário