Hilti DX 5 Manuel utilisateur
- Catégorie
- Outils électroportatifs
- Taper
- Manuel utilisateur


1

2
3
4
5

6
7
8
9

10
11
12

13
14

15
16


*2147990* 2147990 English 1
Original operating instructions
1 Information about the operating instructions
1.1 About these operating instructions
• Read these operating instructions before the product is used or operated for the first time. This is a
prerequisite for safe, trouble-free handling and use of the product.
• Observe the safety instructions and warnings in these operating instructions and on the product.
• Always keep the operating instructions with the product and make sure that the product is accompanied
by these operating instructions only, when the product is given to other persons.
1.2 Explanation of symbols
1.2.1 Warnings
Warnings alert persons to hazards that occur when handling or using the product. The following signal words
are used:
DANGER
DANGER !
▶Draws attention to imminent danger that will lead to serious personal injury or fatality.
WARNING
WARNING !
▶Draws attention to a potential threat of danger that can lead to serious injury or fatality.
CAUTION
CAUTION !
▶Draws attention to a potentially dangerous situation that could lead to personal injury or damage to the
equipment or other property.
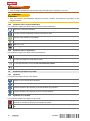
1.2.2 Symbols in the operating instructions
The following symbols are used in these operating instructions:
Comply with the operating instructions
Instructions for use and other useful information
Dealing with recyclable materials
Do not dispose of electric equipment and batteries as household waste
Hilti Liion battery
Hilti charger
1.2.3 Symbols in illustrations
The following symbols are used in illustrations:
These numbers refer to the illustrations at the beginning of these operating instructions.
The numbering reflects the sequence of operations shown in the illustrations and may deviate
from the steps described in the text.
Item reference numbers are used in the overview illustration and refer to the numbers used in
the key in the product overview section.
These characters are intended to specifically draw your attention to certain points when handling
the product.

2 English 2147990 *2147990*
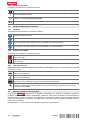
1.3 Product-dependent symbols
1.3.1 Symbols
The following symbols are also used:
Warning! Observe the instructions.
Wear a hard hat while working with the tool.
Wear protective goggles while working with the tool.
Wear ear protection while working with the tool.
1.3.2 Symbols on the product
The following symbols are used on the product:
Black lock on a red background on the tool casing: On the release button for removing the ex-
haust gas piston return unit.
White lock on a black background on the fastener guide or on the magazine: On the fastener
guide release button.
1.3.3 Information shown on the display
Bluetooth is not available in all markets. The following information may be shown on the display:
This symbol indicates the battery’s state of charge. When the battery is empty, the maintenance
symbol is shown.
This symbol indicates whether Bluetooth is switched on. If the symbol is not shown on the display
then Bluetooth is switched off.
This symbol indicates when the tool requires cleaning. One segment stands for 500 fasteners
driven. There are 5 segments in total, which means that 2,500 fasteners can be driven before
cleaning is required.
This symbol indicates when servicing is due. It appears after 5 years, when 30,000 fasteners have
been driven, or when the battery is empty. Our recommendation: Please contact Hilti Service.
1.4 Product information
products are designed for professional users and only trained, authorized personnel are
permitted to operate, service and maintain the products. This personnel must be specifically informed about
the possible hazards. The product and its ancillary equipment can present hazards if used incorrectly by
untrained personnel or if used not in accordance with the intended use.
The type designation and serial number are printed on the rating plate.
▶Write down the serial number in the table below. You will be required to state the product details when
contacting Hilti Service or your local Hilti organization to inquire about the product.
Product information
Fastening tool DX 5
DX 5 GR
DX 5 SM
Generation 01
Serial no.

*2147990* 2147990 English 3
1.5 Declaration of conformity
We declare, on our sole responsibility, that the product
described here complies with the applicable directives
and standards. A copy of the declaration issued by the
certification department can be found at the end of this
documentation.
The technical documentation is filed here:
Hilti Entwicklungsgesellschaft mbH | Tool Certification |
Hiltistrasse 6 | 86916 Kaufering, Germany
2 Safety
2.1 Safety instructions
Basic information concerning safety
WARNING! Read all safety precautions and other instructions. Failure to observe the safety
precautions and other instructions may result in electric shock, fire and/or serious injury.
Keep all safety precautions and instructions for future reference.
Using cartridges
▶Use only Hilti cartridges or cartridges of equivalent quality.
▶Use of cartridges of inferior quality in Hilti tools may lead to a build-up of unburned powder, which
may suddenly explode and cause severe injuries to operators and bystanders. The cartridges must
be either verifiably tested by the manufacturer in accordance with EU standard EN 16264 or they
must bear the CE conformity marking.
Requirements to be met by users
▶Only authorized, appropriately trained persons may operate or service this tool.
Personal protective equipment
▶You and any other persons in the vicinity must wear suitable eye protection and a hard hat while the tool
is in use.
▶Wear ear protectors.
▶The fastener driving action is initiated by ignition of a propellant charge. Exposure to noise can cause
hearing loss.
Personal safety
▶Observe the information printed in the operating instructions concerning operation, care and maintenance.
▶Stay alert, watch what you are doing and use common sense when operating a direct fastening tool.
Don’t use the tool when you are tired or under the influence of drugs, alcohol or medication. Take a
break if you experience pain or feel unwell. A moment of inattention while operating tools may result in
serious personal injury.
▶Avoid working in awkward body positions. Make sure you work from a safe stance and stay in balance
at all times.
▶Wear non-skid shoes.
▶Never pull back the magazine, fastener guide or fastener by hand.
▶Under certain circumstances, the tool could be made ready to fire by pulling back the magazine,
fastener guide or the fastener by hand. When the tool is ready to fire, fasteners or the piston could
be driven inadvertently into parts of the body.
▶Keep the arms slightly bent while operating the tool (do not straighten the arms).
▶Keep other people away from the working area, especially children.
Use and care of direct fastening tools
WARNING! Danger of fasteners penetrating right through. Before driving fasteners, check to make
sure that no one is present behind or below the object into which the fastener is to be driven.
▶Before beginning the work, check the cartridge power level and the power regulator setting.
▶Carry out a test by driving 2 fasteners into the material you are working on.
▶Use the right tool for the work you are carrying out. Do not use the tool for purposes for which it was not
intended. Use it only as directed and when in faultless condition.
▶Use a spall stop / protective cap when the application permits.

4 English 2147990 *2147990*
▶Never leave a loaded tool unattended.
▶Transport and store the tool in a secured toolbox.
▶Always unload the tool (remove cartridges and fasteners) before cleaning, maintenance, changing the
fastener guide, before work breaks and before storing the tool.
▶When not in use, the tool should be unloaded and stored in a locked, dry place where it is inaccessible
to children.
▶Check the tool and the accessories for any damage. Check that moving parts function faultlessly, without
sticking, and that no parts are damaged.
▶All parts must be fitted correctly and fulfill all conditions necessary for correct operation of the tool.
Damaged parts must be properly repaired or replaced by Hilti Service unless otherwise stated in the
operating instructions.
▶Before driving fasteners, check that there is no electrical wiring behind the surface into which you want
to drive them.
▶Do not attempt to drive fasteners into unsuitable materials.
▶Unsuitable materials include welded steel and cast steel, cast iron, glass, marble, plastic, bronze,
brass, copper, insulating material, hollow brick, ceramic brick, thin sheet metal (< 4 mm) and cellular
concrete. Driving a fastener into these materials may cause the fastener to break, shatter or to be
driven right through.
▶Pull the trigger only when the tool is fully pressed against the working surface at right angles.
▶When driving fasteners, always hold the fastening tool at right angles to the working surface in order to
prevent the fastener being deflected by the surface.
▶Keep the grips dry, clean and free from oil and grease.
▶Do not use the tool in places where there is a risk of fire or explosion unless the tool is specially approved
for this type of use.
▶Never drive fasteners into existing holes unless this is recommended by Hilti (e.g. DX-Kwik).
Workstation
▶Keep the workplace tidy. Objects which could cause injury should be removed from the working area.
▶Untidiness in the working area can lead to accidents.
▶Make sure that the working area is well lit and well ventilated.
Mechanical safety rules
▶Do not tamper with or modify the tool or parts of it, especially the piston.
▶Use only fasteners of a type approved for use with the tool.
Thermal safety rules
▶Do not exceed the recommended maximum fastener driving rate.
▶If the tool has overheated, allow it to cool down.
▶Do not dismantle the tool while it is hot. Allow the tool to cool down.
▶Allow the tool to cool down if the plastic cartridge strip begins to melt.
Risk of explosion with cartridges
▶Use only cartridges of a type approved for use with the tool.
▶Remove the cartridge strip from the tool when you have completed the work or before transporting the
tool.
▶Never attempt to forcibly remove cartridges from the magazine strip or tool.
▶Store unused cartridges in a secure place where they are not exposed to dampness or excessively high
temperatures.

*2147990* 2147990 English 5
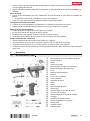
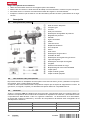
3 Description
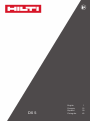
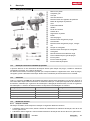
3.1 Overview of the product 1
@Exhaust gas piston return unit
;Guide sleeve
=Casing
%Cartridge guideway
&Power regulation wheel release button
(Power regulation wheel
)Display
+Hand pad
§Trigger
/Operating button
:Air vents
∙Piston rings
$Piston
£Fastener guide
|Fastener guide release button
¡Buffer
QRelease button for the fastener guide and
magazine
WMagazine cover
EMagazine cover release button
RMagazine
TLoad status indicator
ZInterchangeable fastener guide nosepiece
UFlat brush
ILarge round brush
OSmall round brush
3.2 Intended use
The product described is a fastening tool for use in applications in which nails, threaded studs and
combination fasteners are driven into concrete, steel and sand-lime block.
When using the tool, always ensure that the correct equipment is used. The fastener guide, magazine, piston
and fasteners must be compatible with one another.
3.3 Cartridges
All Hilti cartridges for powder-actuated tools have been tested successfully in accordance with EN 16264.
These tests are carried out by the certification authorities using specific combinations of cartridges and
tools. The tool designation, the name of the certification authority and the system test number are printed on
the cartridge packaging.
Ordering designation Color Power level
6.8/11 M green green light
6.8/11 M yellow yellow medium
6.8/11 M red red heavy
6.8/11 M black Black extra heavy
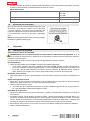
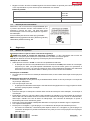
3.4 Minimum distances and spacing
3.4.1 Fastening to concrete
Always observe the following minimum distances and spacing when fastening to concrete:
• The minimum distance from the edge of the working surface to the fastener must be at least 70 mm.
• The minimum center-to-center distance between two fasteners must be at least 80 mm.
• The working surface must be at least 100 mm thick.

6 English 2147990 *2147990*
3.5 Information about the app
To find out more about the app, to download it and start it, scan the QR code in the case.
3.6 Information about the field of applications
Please refer to the Hilti product page for more information about the field of applications.
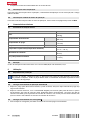
4 Technical data
4.1 Direct fastening tool
DX 5
Weight 7.41 lb
(3.36 kg)
Tool length DX 5 19.0 in
(483 mm)
Nail length DX 5 ≤ 2.8 in
(≤ 72 mm)
Recommended maximum fastening rate DX 5 700 rev/h
Application temperature (ambient temperature) 5 ℉ … 122 ℉
(−15 ℃ … 50 ℃)
Compression stroke 1.3 in
(32 mm)
Pressure required DX 5 ≥ 39 lbf
(≥ 174 N)
4.2 Vibration
The vibration value that must be specified in accordance with 2006/42/EC does not exceed 2,5 m/s².
5 Operation
5.1 Safety devices
Before commencing work, check that all safety devices are fitted and that they are functioning correctly.
All parts must be fitted correctly and fulfill all conditions necessary for the correct operation of the tool.
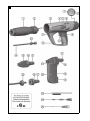
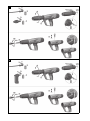
5.2 Loading the single-fastener tool 2
1. Push the fastener into the tool from the front until it is held in place in the tool by the fastener’s washer.
2. Push the cartridge strip, narrow end first, into the grip of the tool from below until the full length of the
cartridge strip is inside the tool. If you wish to use a cartridge strip in which some of the cartridges have
already been used, start pulling the strip up and out the top of the tool by hand until the first unused
cartridge is in place in the cartridge chamber.
5.3 Loading the magazine tool 3
1. Pull the magazine cover down and insert the fastener strip (strip of ten) in the tool.
2. Push the cartridge strip, narrow end first, into the grip of the tool from below until the full length of the
cartridge strip is inside the tool. If you wish to use a cartridge strip in which some of the cartridges have
already been used, start pulling the strip up and out the top of the tool by hand until the first unused
cartridge is in place in the cartridge chamber.
If the loading status indicator is partly or completely red, there are 3 or less fasteners in the
magazine. The magazine may then be reloaded with a strip of ten nails.
All fasteners in the magazine must be of the same length.

*2147990* 2147990 English 7
5.4 Setting the power level 4
1. Press the power regulator release button.
2. Turn the power regulating wheel to set the power level you require.
3. Check the quality of the fastening in accordance with Hilti standards.
Select a cartridge power level and power setting to suit the application.
If you have no previous experience of using the tool, always begin with the lowest power.
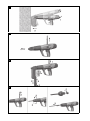
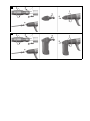
5.5 Driving fasteners with the single-fastener tool 5
1. Position the tool.
2. Hold the tool perpendicular to the working surface and then press it against the surface.
3. Press the trigger to drive the fastener.
5.6 Driving fasteners with the magazine tool 6
1. Position the tool.
2. Hold the tool perpendicular to the working surface and then press it against the surface.
3. Press the trigger to drive the fastener.
5.7 Unloading the single-fastener tool 7
1. Pull the cartridges out of the tool.
2. Pull the fastener out of the tool.
5.8 Unloading the magazine tool 8
1. Pull the cartridges out of the tool.
2. Pull the magazine cover down and remove the fastener strip.
5.9 Switching Bluetooth on and off
▶Press and hold the pushbutton for 1-2 seconds to switch on Bluetooth.
Bluetooth switches itself off automatically after 2 minutes.
5.10 Resetting the cleaning indicator
▶Press and hold the pushbutton for 10-12 seconds to reset the cleaning indicator.
The cleaning indicator consists of 5 bars. Each bar stands for 500 fastenings.
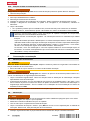
5.11 Procedure if a cartridge fails to fire
1. Keep the nose of the tool pressed at right angles against the working surface for 30 seconds.
2. If the cartridge still fails to fire, lift the tool away from the working surface. Take care to avoid pointing it
at yourself or other persons.
3. Pull the cartridge strip by hand to advance it to the next cartridge and use up the remaining cartridges
on the strip.
5.12 Tool misfires (cartridge doesn't fire)
WARNING
Hazard due to hot surfaces! The fastening tool can become hot in use.
▶Wear protective gloves.
1. Stop using the tool immediately.
2. Unload and dismantle the tool.
3. Check that you are using the correct combination of magazine, piston and fasteners.

8 English 2147990 *2147990*
4. Check the buffer, piston and magazine for wear, and replace the parts if necessary.
5. Clean the tool.
▶If the problem persists after taking the measures described above, further use of the tool is not
permissible.
▶Have the tool checked and, if necessary, repaired by Hilti Service.
Dirt and residues build up in the tool under normal operating conditions and functional parts are
also subject to wear.
Carry out regular inspections and servicing. Servicing must be carried out after 30,000 fasteners
have been driven.
Clean the tool after every 2,500 - 3,000 fastenings. The fastener counter shows how many fasteners
have been driven since the cleaning indicator was last reset. One bar stands for 500 fasteners.
Check the piston and the buffer daily when the tool is subjected to intensive use, or at the very
least, before the end of the recommended regular cleaning interval of 2,500 - 3,000 fastenings.
The inspections, service intervals and cleaning intervals are based on typical tool use. If you find
that the tool is not functioning correctly before a scheduled interval is reached, service the tool
immediately.
6 Care and maintenance
6.1 Care of the tool
CAUTION
Risk of damage to the fastening tool! Foreign bodies can jam in the fastening tool and damage the
fastening tool when a cartridge is fired.
▶Prevent foreign bodies from penetrating into the interior of the fastening tool.
WARNING
Risk of injury due to deflagration Powder residue in the tool may ignite and cause uncontrolled triggering
or fragmentation.
▶Clean the tool regularly. Comply with all maintenance and cleaning information and instructions in this
documentation.
▶If inferior-quality cartridges are used, cleaning the tool will not reduce the risk of powder residue inside
the exhaust gas piston return unit igniting and causing uncontrolled triggering or fragmentation. This can
only be reduced by having the tool taken to Hilti Service for maintenance.
▶Clean the exterior of the tool with a slightly damp cloth at regular intervals.
6.2 Maintenance
WARNING
Dangerous substances The deposits inside DX tools contain substances that may present a health hazard.
▶Do not inhale dust or dirt while cleaning.
▶Keep dust and dirt away from foodstuffs.
▶Wash your hands after cleaning the fastening tool.
▶Clean the fastening tool and use Hilti spray as stated in the operating instructions. This will help prevent
malfunctions.
1. Regularly check all external parts of the tool for damage.
2. Regularly check all operating controls to ensure that they work properly.
3. Use the tool only with the recommended cartridges and at the recommended power settings.
▶Use of the wrong cartridges or excessively high power settings may lead to premature failure of the
tool.
6.3 Servicing the tool
▶Service the tool in the following situations:
▶If power fluctuations occur.
▶If cartridge misfires occur.
▶If the tool becomes noticeably less easy to operate.

*2147990* 2147990 English 9
▶If the required contact pressure increases noticeably.
▶If the trigger resistance increases.
▶If the power regulation wheel is stiff.
▶If the cartridge strip is difficult to remove.
▶If the maintenance indicator shows that a tool service is necessary.
6.4 Dismantling the single-fastener tool 9
1. Check that there is no cartridge strip or fastener in the tool. If there is a cartridge strip or fastener in
the tool, pull the cartridge strip up out of the tool by hand from above and remove the fastener from the
fastener guide.
2. Press the release button on the side of the fastener guide to unscrew the fastener guide.
3. Unscrew and remove the exhaust gas piston return unit.
4. Remove the buffer by bending it sharply out of the fastener guide. Remove the buffer.
5. Remove the piston.
6.5 Dismantling the magazine tool 10
1. Check that there is no cartridge strip or fastener in the tool. If there is a cartridge strip or fastener in
the tool, pull the cartridge strip up out of the tool by hand from above and remove the fastener from the
fastener guide.
2. Press the release button on the side of the fastener guide to unscrew the magazine.
3. Unscrew and remove the exhaust gas piston return unit.
4. Remove the buffer by bending it sharply out of the magazine. Remove the buffer.
5. Remove the piston.
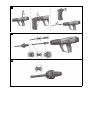
6.6 Check of buffer and piston 11
WARNING
Risk of injury! A faulty buffer or piston or a faulty base plate leads to an increased risk of malfunctions.
▶Check the piston and buffer for wear and replace them if damaged.
▶Do not tamper with or modify the piston.
▶Do not attempt to repair a faulty piston yourself, for example by grinding the tip.
1. The piston must be replaced in the following cases:
▶The piston is broken.
▶The piston is badly worn or chipped (e.g. a 90° segment broken away)
▶The piston rings are cracked or missing.
▶The piston is bent (check by rolling the piston on a smooth, flat surface).
2. The buffer must be replaced in the following cases:
▶The metal ring of the buffer is loose or broken.
▶The buffer no longer holds on the fastener guide.
▶The rubber is badly worn at certain points under the metal ring.
6.7 Checking the fastener guide for wear 12
1. Check the fastener guide for wear and replace it if part of it is damaged (e.g. broken, bent, widened or
cracked).
2. Contact Hilti Service if necessary.
6.8 Cleaning and lubricating the single-fastener tool 13
1. Spray the piston rings lightly with oil and then use the flat brush to clean them using the flat brush until
the rings are free to move.
2. Use the flat brush to clean the thread on the fastener guide.
3. Use the large round brush to clean the inside of the housing.
4. Dismantle the exhaust gas piston return unit.
5. Clean the exhaust gas piston return unit.

10 English 2147990 *2147990*
6. Spray the cleaned parts with the supplied Hilti lubricant spray.
Use only Hilti lubricant spray or a product of comparable quality. Use of other lubricants may
damage the tool.
7. Fit the exhaust gas piston return unit.
8. Assemble the tool.
6.9 Cleaning and lubricating the magazine tool 14
1. Spray the piston rings lightly with oil and then use the flat brush to clean them using the flat brush until
the rings are free to move.
2. Use the flat brush to clean the thread on the fastener guide.
3. Use the large round brush to clean the inside of the housing.
4. Dismantle the exhaust gas piston return unit.
5. Clean the exhaust gas piston return unit.
6. Spray the cleaned parts with the supplied Hilti lubricant spray.
Use only Hilti lubricant spray or a product of comparable quality. Use of other lubricants may
damage the tool.
7. Fit the exhaust gas piston return unit.
8. Assemble the tool.
6.10 Assembling the single-fastener tool 15
1. Check whether there is a cartridge in the tool, and remove it if there is.
2. Fit the exhaust gas piston return unit.
3. Fit the piston.
4. Fit the buffer onto the fastener guide.
5. Screw on the fastener guide.
6.11 Assembling the magazine tool 16
1. Check whether there is a cartridge in the tool, and remove it if there is.
2. Fit the exhaust gas piston return unit.
3. Fit the piston.
4. Fit the buffer onto the fastener guide.
5. Screw on the fastener guide.
6.12 Final check of the tool
1. After carrying out care and maintenance work, check that all safety devices are fitted and that they are
functioning correctly.
2. After checking the tool, press and hold the pushbutton for 10 - 12 seconds to reset the maintenance
counter.
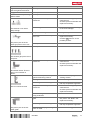
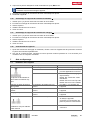
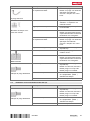
7 Troubleshooting
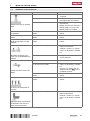
7.1 Problems with the tool
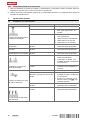
Malfunction Possible cause Action to be taken
The piston gets stuck in the
base material.
The fastener is too short. ▶Use a longer fastener.
The fastener has no washer. ▶Use a fastener with washer for
applications on wood.
Driving power is too high. ▶Reduce driving power (adjust
the power regulating wheel).
▶Use a less powerful cartridge.
▶Use the nails with a "top hat".
▶Use the nails with a washer.

*2147990* 2147990 English 11
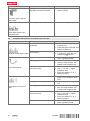
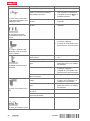
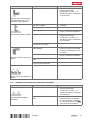
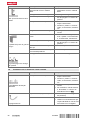
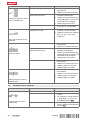
Malfunction Possible cause Action to be taken
Higher force required to press
the tool against the surface.
Build-up of combustion residues. ▶Service the tool.
Trigger resistance increases. Build-up of combustion residues. ▶Service the tool.
Stiff movement of power reg-
ulation wheel
Build-up of combustion residues. ▶Service the tool.
The fastener is not driven
deep enough.
The piston is incorrectly
positioned.
▶Remove the cartridge strip and
clean the tool.
▶Check the piston and buffer and
replace if necessary.
Bad cartridge. ▶Pull the cartridge strip through
to the next cartridge.
The piston jams in the ex-
haust gas piston return unit.
The piston is damaged. ▶Change the piston.
Rubber dust or debris in the piston
return unit.
▶Check the piston and buffer and
replace if necessary.
▶Contact Hilti Service if the
problem persists.
Build-up of combustion residues. ▶Service the tool.
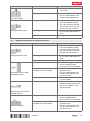
The exhaust gas piston return
unit jams.
Build-up of combustion residues. ▶Service the tool.
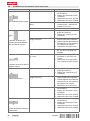
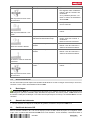
No fastener driven: The tool
fires, but no fastener is
driven.
The piston is incorrectly
positioned.
▶Remove the cartridge strip and
clean the tool.
▶Check the piston and buffer and
replace if necessary.
The tool cannot be fired.
The tool was not pressed fully
against the working surface.
▶Press the tool fully against the
working surface.
The magazine is not loaded. ▶Load the magazine.
Plastic fragments in the magazine. ▶Open the magazine, remove the
nail strip and plastic fragments.
The piston is incorrectly
positioned.
▶Remove the cartridge strip and
clean the tool.
▶Check the piston and buffer and
replace if necessary.
Nails in the magazine are not cor-
rectly positioned.
▶Reload the tool.
The piston jams in the fas-
tener guide.
The piston and/or buffer are dam-
aged.
▶Unscrew the magazine, check
the piston and buffer and
replace if necessary.
Plastic fragments in the magazine. ▶Open the magazine, remove the
nail strip and plastic fragments.
Use of excessively high driving
power on steel.
▶Reduce the driving power.

12 English 2147990 *2147990*
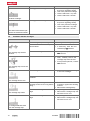
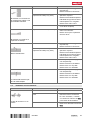
Malfunction Possible cause Action to be taken
The piston jams in the fas-
tener guide.
Firing the tool at a high power set-
ting without a fastener loaded.
▶Avoid firing the tool without a
fastener loaded.
The fastener guide in the
magazine jams.
The magazine is damaged. ▶Replace the magazine.
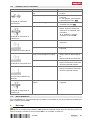
7.2 Problems with fasteners to be driven into concrete
Malfunction Possible cause Action to be taken
Fastener driving depth varies.
The piston is incorrectly
positioned.
▶Remove the cartridge strip and
clean the tool.
▶Check the piston and buffer and
replace if necessary.
The tool has too much built-up dirt
and residues.
▶Service the tool.
▶If necessary, have the tool
checked by Hilti Service.
The fastener bends.
Hard surface (steel, concrete). ▶Increase driving power (adjust
power regulating wheel).
Hard aggregates in concrete ▶Use a more powerful cartridge.
▶Use the single-fastener tool
instead of the magazine tool.
A rebar is located just below the
concrete surface.
▶Use a shorter nail.
▶Use a nail with a higher
application limit.
▶Drive the fastener in at a
different position.
The fastener is not driven
flush.
Wrong fastener. ▶Use a fastener of the correct
length for the insulation thick-
ness.
Wrong power setting. ▶Adjust the power setting on the
tool.
Hard aggregates in concrete ▶Use a more powerful cartridge.
▶Use the single-fastener tool
instead of the magazine tool.
A rebar is located just below the
concrete surface.
▶Use a shorter nail.
▶Use a nail with a higher
application limit.
▶Drive the fastener in at a
different position.
Hard surface (steel, concrete). ▶Increase driving power (adjust
power regulating wheel).
La page est en cours de chargement...
La page est en cours de chargement...
La page est en cours de chargement...
La page est en cours de chargement...
La page est en cours de chargement...
La page est en cours de chargement...
La page est en cours de chargement...
La page est en cours de chargement...
La page est en cours de chargement...
La page est en cours de chargement...
La page est en cours de chargement...
La page est en cours de chargement...
La page est en cours de chargement...
La page est en cours de chargement...
La page est en cours de chargement...
La page est en cours de chargement...
La page est en cours de chargement...
La page est en cours de chargement...
La page est en cours de chargement...
La page est en cours de chargement...
La page est en cours de chargement...
La page est en cours de chargement...
La page est en cours de chargement...
La page est en cours de chargement...
La page est en cours de chargement...
La page est en cours de chargement...
La page est en cours de chargement...
La page est en cours de chargement...
La page est en cours de chargement...
La page est en cours de chargement...
La page est en cours de chargement...
La page est en cours de chargement...
La page est en cours de chargement...
La page est en cours de chargement...
La page est en cours de chargement...
La page est en cours de chargement...
La page est en cours de chargement...
La page est en cours de chargement...
La page est en cours de chargement...
La page est en cours de chargement...
La page est en cours de chargement...
La page est en cours de chargement...
La page est en cours de chargement...
La page est en cours de chargement...
La page est en cours de chargement...
La page est en cours de chargement...
La page est en cours de chargement...
La page est en cours de chargement...
La page est en cours de chargement...
La page est en cours de chargement...
La page est en cours de chargement...
La page est en cours de chargement...
-
 1
1
-
 2
2
-
 3
3
-
 4
4
-
 5
5
-
 6
6
-
 7
7
-
 8
8
-
 9
9
-
 10
10
-
 11
11
-
 12
12
-
 13
13
-
 14
14
-
 15
15
-
 16
16
-
 17
17
-
 18
18
-
 19
19
-
 20
20
-
 21
21
-
 22
22
-
 23
23
-
 24
24
-
 25
25
-
 26
26
-
 27
27
-
 28
28
-
 29
29
-
 30
30
-
 31
31
-
 32
32
-
 33
33
-
 34
34
-
 35
35
-
 36
36
-
 37
37
-
 38
38
-
 39
39
-
 40
40
-
 41
41
-
 42
42
-
 43
43
-
 44
44
-
 45
45
-
 46
46
-
 47
47
-
 48
48
-
 49
49
-
 50
50
-
 51
51
-
 52
52
-
 53
53
-
 54
54
-
 55
55
-
 56
56
-
 57
57
-
 58
58
-
 59
59
-
 60
60
-
 61
61
-
 62
62
-
 63
63
-
 64
64
-
 65
65
-
 66
66
-
 67
67
-
 68
68
-
 69
69
-
 70
70
-
 71
71
-
 72
72


Hilti DX 5 Manuel utilisateur
- Catégorie
- Outils électroportatifs
- Taper
- Manuel utilisateur
dans d''autres langues
- English: Hilti DX 5 User manual
- español: Hilti DX 5 Manual de usuario
- português: Hilti DX 5 Manual do usuário
Documents connexes
-
Hilti 2142655 Manuel utilisateur
-
Hilti DX 5 GR Manuel utilisateur
-
-
Hilti DX 6-GR Manuel utilisateur
-
-
-
Hilti DX 462 Operating Instruction
-
-
-