Thermo Fisher Scientific Ion S5 and Ion S5 XL Mode d'emploi
- Taper
- Mode d'emploi

For Research Use Only. Not for use in diagnostic procedures.
Ion S5™ and Ion S5™ XL Instrument
USER GUIDE
Catalog Numbers A27211, A27213
Publication Number MAN0010811
Revision C.0

Manufacturer: Life Technologies Holdings Pte Ltd | Block 33 | Marsiling Industrial Estate Road 3 | #07-06, Singapore 739256
The information in this guide is subject to change without notice.
DISCLAIMER: TO THE EXTENT ALLOWED BY LAW, LIFE TECHNOLOGIES AND/OR ITS AFFILIATE(S) WILL NOT BE LIABLE FOR SPECIAL, INCIDENTAL,
INDIRECT, PUNITIVE, MULTIPLE, OR CONSEQUENTIAL DAMAGES IN CONNECTION WITH OR ARISING FROM THIS DOCUMENT, INCLUDING YOUR
USE OF IT.
Revision history: Pub. No. MAN0010811
Revision Date Description
C.0 May 2017 Update for Torrent Suite™ Software 5.4.
• new troubleshooting for solid-state buffer leak and reagent check failure
• updates to Appendix A
• include pulse clean, and instrument reset run protocols
B.0 August 2016 Update for Torrent Suite™ Software 5.2.
A.0 August 2015 Instrument user guide that includes instructions for instrument operation and
maintenance.
Important Licensing Information: These products may be covered by one or more Limited Use Label Licenses. By use of these products, you accept
the terms and conditions of all applicable Limited Use Label Licenses.
Trademarks: All trademarks are the property of Thermo Fisher Scientific and its subsidiaries unless otherwise specified. MAXYMum Recovery is a
trademark of Axygen, Inc.
©2017 Thermo Fisher Scientific Inc. All rights reserved.

Contents
About this guide ............................................................ 6
Purpose of the guide ............................................................ 6
■CHAPTER 1 Product information ....................................... 7
Contents ....................................................................... 7
Required materials and equipment ................................................ 8
Instrument installation by trained personnel only ................................... 9
Nucleic acid contamination ....................................................... 9
Instrument vibration and clearances ............................................... 9
■CHAPTER 2 System components ...................................... 10
Internet connectivity ............................................................ 11
Ion S5™ System component positions ............................................. 12
Ion S5™ and Ion S5™ XL Sequencer input and output connections ..................... 13
■CHAPTER 3 Instrument operation .................................... 14
Power the Ion S5™ or Ion S5™ XL Sequencer on or off ............................... 14
Power on ................................................................. 14
Power off ................................................................. 14
Update the Ion S5™ System Software ............................................. 14
Maintain the sequencer ......................................................... 15
Required materials ........................................................ 15
Clean or decontaminate the sequencer ....................................... 15
Perform the sequencer cleaning manually .................................... 16
Perform an instrument reset run with an initialized, unused Sequencing
Reagents cartridge ........................................................ 17
Ion S5
™
and Ion S5
™
XL Instrument User Guide
3

■APPENDIX A Touchscreen reference ................................. 18
Clean, Initialize, and Run ........................................................ 18
Settings ....................................................................... 19
Network Settings .......................................................... 19
System Tools .............................................................. 22
Check for software updates ................................................. 27
Data Management ......................................................... 28
Manually delete run data ................................................... 30
Perform the instrument Clean operation ...................................... 31
Instrument Settings ........................................................ 32
Touchscreen icons ............................................................. 35
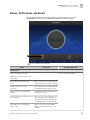
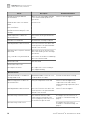
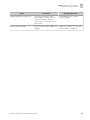
Alarms, Notifications, and Events ................................................ 37
■APPENDIX B Troubleshooting ......................................... 40
Ion S5™ Sequencer alarms and events ............................................ 40
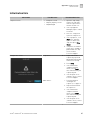
Initialization fails ............................................................... 41
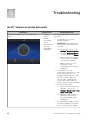
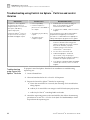
Troubleshooting using Control Ion Sphere™ Particles and control libraries ............ 42
Troubleshooting using Control Ion Sphere™ Particles ........................... 42
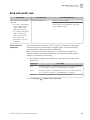
Solid-state buffer leak .......................................................... 43
Pulse clean the sequencer .................................................. 43
■APPENDIX C Supplemental procedures .............................. 45
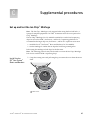
Set up and test the Ion Chip™ Minifuge ............................................ 45
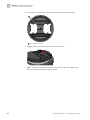
Install the Ion S5™ /Ion Proton™ Rotor and Buckets ............................ 45
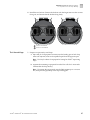
Test the minifuge .......................................................... 47
■APPENDIX D Instrument warranty .................................... 49
■APPENDIX E Safety ..................................................... 51
Safety alerts on this instrument .................................................. 51
Location of safety labels on this instrument ................................... 52
Safety information for instruments not manufactured by Thermo Fisher Scientific ..... 52
Instrument safety .............................................................. 53
General .................................................................. 53
Electrical ................................................................. 53
Cleaning and decontamination ............................................... 54
Safety and electromagnetic compatibility (EMC) standards .......................... 55
Safety .................................................................... 55
EMC ...................................................................... 55
Environmental design ...................................................... 56
Chemical safety ................................................................ 57
Contents
4
Ion S5
™
and Ion S5
™
XL Instrument User Guide


About this guide
CAUTION! ABBREVIATED SAFETY ALERTS. Hazard symbols and hazard
types specied in procedures may be abbreviated in this document. For the
complete safety information, see the “Safety” appendix in this document.
IMPORTANT! Before using this product, read and understand the information in the
“Safety” appendix in this document.
Purpose of the guide
The Ion S5™ and Ion S5™ XL Instrument User Guide (Pub. No. MAN0010811) provides
reference information for using the Ion S5™ or Ion S5™ XL Sequencer (Cat. Nos.
A27211 and A27213).
6
Ion S5
™
and Ion S5
™
XL Instrument User Guide

Product information
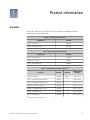
Contents
The Ion S5™ and Ion S5™ XL Systems (Cat. Nos. A27212, or A27214) contain the
following boxes and components.
Ion S5™ System (Cat. No. A27212)
Components Part No.
Ion S5™ Sequencer A27211
Ion S5™ Installation Kit A27215
Ion S5™ XL System (Cat. No. A27214)
Components Part No.
Ion S5™ XL Sequencer A27213
Ion Torrent™ Server A28563
Ion S5™ Installation Kit A27215
Ion S5™ Installation Kit (Part No. A27215)[1]
Contents Part No. Quantity Shipping and
storage
Ion 540™ Chip Kit A27765 4 pack 15°C to 30°C
Ion S5™ Sequencing Solutions Kit A27767 1 15°C to 30°C
Ion S5™ Sequencing Reagents Kit A27768 1 –30°C to –10°C
Ion 540™ Control Ion Spheres A28195 1 –30°C to –10°C
Ion 540™ Loading Reagents OT2 A27897 1 –30°C to –10°C
Ion S5™ Cartridge Tool A28308 2 –20°C to 30°C
Ion S5™ Chip Balance A29022 1 –20°C to 30°C
[1] Not available for separate purchase.
1
Ion S5
™
and Ion S5
™
XL Instrument User Guide
7

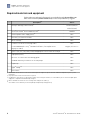
Required materials and equipment
Unless otherwise indicated, all materials are available through thermosher.com.
MLS: Fisher Scientic (sherscientic.com) or other major laboratory supplier.
3Description[1] Source
Ion Chip™ Minifuge (120 V or 230 V)[2] 4479672 (120V)
or
4479673 (230V)
Ion S5™/Ion Proton™ Rotor and Buckets Kit[2] 4482578
Uninterruptible Power Supply (UPS) [3] MLS
Thermal cycler with a heated lid MLS
Microcentrifuge[4] MLS
1.5-mL or 1.7-mL microcentrifuge tubes MLS
0.2-mL MAXYMum Recovery™ Thin Wall PCR Tubes, Flat Cap (do not use
polystyrene tubes)
Axygen, PCR-02-L-C
Pipettes (P2, P10, P20, P200, P1000) and appropriate low-retention filtered tips MLS
Isopropanol (100%) MLS
Nuclease-free water molecular biology grade MLS
Standard laboratory vacuum line or vacuum pump MLS
Liquid trap MLS
Tygon® tubing [5] MLS
Vortex mixer MLS
[1] IMPORTANT! Thermo Fisher Scientific has verified this protocol using these specific materials. Substitution may adversely affect system
performance.
[2] Only required for use with the Ion OneTouch™ 2 System.
[3] For laboratories that experience frequent power outages or line voltage fluctuations, we recommend that you use an uninterruptible power
supply that is compatible with 2500 W output or higher.
[4] Must fit standard 1.5- and 0.2-mL microcentrifuge tubes and generate 15,500 ×
g
.
[5] As needed to connect laboratory vacuum to liquid trap and liquid trap to P200 pipette tip.
Chapter 1 Product information
Required materials and equipment
1
8
Ion S5
™
and Ion S5
™
XL Instrument User Guide

Instrument installation by trained personnel only
IMPORTANT! The Ion S5™ System is installed by trained service personnel and must
not be relocated without assistance from trained service personnel. See “Customer
and technical support“ on page 59.
Nucleic acid contamination
IMPORTANT! A primary source of contamination is DNA fragments from previously
processed samples. Do not introduce amplied DNA into the library preparation
laboratory or work area.
Instrument vibration and clearances
IMPORTANT! Signicant vibration during sequencing may add noise and reduce the
quality of the measurements. The Ion S5™ System must be installed on a bench that is
free from vibrations or in contact with equipment that can cause vibrations to the
bench (freezers, pumps, and other similar equipment).
IMPORTANT! Place the instrument at least 40 in. (1 meter) away from major sources
of electronic noise such as refrigerators or microwaves.
Chapter 1 Product information
Instrument installation by trained personnel only
1
Ion S5
™
and Ion S5
™
XL Instrument User Guide
9

System components
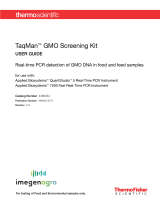
We support the layout in which the Torrent Server is directly connected to the Ion
S5™ XL Sequencer, rather than through the local area network from a remote location
such as a server room. Data are most robustly transferred from the Ion S5™ XL
Sequencer to the Torrent Server when they are directly connected by a standard
Category 6 Ethernet cable provided with the installation materials.
IMPORTANT! The Ion S5™ System must be connected to the Torrent Server by a
standard Category 6 Ethernet cable. We do not troubleshoot data transfer issues
associated with an indirect connection between the Ion S5™ XL Sequencer and the
Torrent Server.
6
5
4
2
1
3
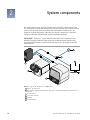
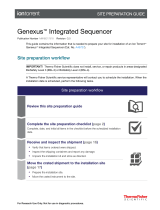
Figure 1 Ion S5™ XL Sequencer configuration
1Ion S5™ XL Sequencer
2Ion template preparation instrument (Ion Chef™ Instrument (shown) or Ion OneTouch™ 2
System)
3Torrent Server
4Local area network
5Internet
6Client computer
2
10
Ion S5
™
and Ion S5
™
XL Instrument User Guide

5
3
4
1
2
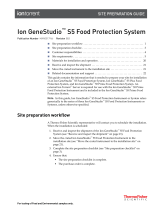
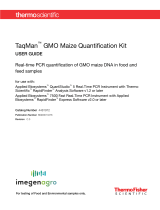
Figure 2 Ion S5™ Sequencer configuration
1Ion S5™ Sequencer
2Ion template preparation instrument (Ion Chef™ Instrument (shown) or Ion OneTouch™ 2
System)
3Local area network
4Internet
5Client computer
Internet connectivity
The Ion S5™ Sequencer or the Torrent Server should be connected to a network with
internet access. Connecting to the internet allows you to easily update your software
and access remote system support. Software updates through the network/internet are
free. If you choose not to connect your instrument or server to a network, software
updates will need to be manually installed via USB.
IMPORTANT! The USB method for updating is not supported by Thermo Fisher
Scientic.
Any issues (le corruption, incomplete updates, etc.) updating the sequencer or server
in this manner requiring correction of the faulty update is not covered by your Ion
S5™ or Ion S5™ XL Sequencer warranty or any service contract you may have
purchased. You will be required to schedule an on-site Time and Materials visit by a
Thermo Fisher Scientic eld service engineer to correct the problem at your own
expense.
In providing outbound access to the internet from the server, you enable the Thermo
Fisher Scientic support team to provide inbound support. Both the Ion S5™
Sequencer and the Torrent Server run a remote monitor agent that can provide service
personnel with critical system information, such as installed software versions and
instrument alarms. With your permission, the agent also allows service personnel to
remotely log into the Ion S5™ Sequencer and the Torrent Server, which is required for
system support. Without remote access, service personnel cannot access, view, and
troubleshoot issues regarding machine performance.
Chapter 2 System components
Internet connectivity
2
Ion S5
™
and Ion S5
™
XL Instrument User Guide
11

To enable full support, the Torrent Server must have outbound internet access (ports
22, 80, and 443) and be behind an appropriately congured rewall. While not
recommended, you can enable access to the Torrent Browser (the web server running
on the Torrent Server from the Internet). If you provide such access, you must restrict
access to the server using HTTP and AUTH rewall rules, or a combination of the
two. Implementing and maintaining such restrictions is the responsibility of the
customer's server administrator and not of Thermo Fisher Scientic.
Note: For answers to common questions about Torrent Server network access
requirements, refer to the frequently asked questions (FAQ) and the Torrent Server
Administrator Guide in the Torrent Suite section of the Ion Community website (hp://
ioncommunity.thermosher.com). The FAQ provides information that you can use to
prepare Ion S5™ Systems and servers within the umbrella policies of your site.
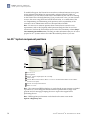
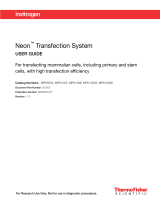
Ion S5™ System component positions
7
2
3
5
6
4
1
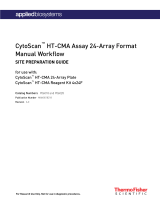
1Touchscreen
2Power button
3Ion S5™ Sequencing Reagents Kit cartridge
4Chip clamp
5Ion S5™ Wash Solution bottle. Waste reservoir located behind the Wash Solution bottle
(shown on the right).
6Ion S5™ Cleaning Solution bottle
7Waste reservoir
Note: The system uses RFID technology to verify that the proper reagents are loaded
in positions 3, 5, and 6. Reagents that exceed their expiration date or usage count
generate an error message prompting the user to replace the reagent before
performing the run.
Note: RFID regulatory information can be found on the main screen under
Options4Regulatory info.
Chapter 2 System components
Ion S5
™
System component positions
2
12
Ion S5
™
and Ion S5
™
XL Instrument User Guide

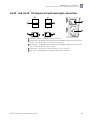
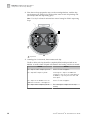
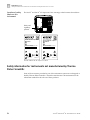
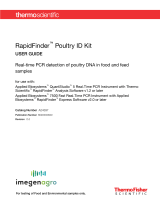
Ion S5™ and Ion S5™ XL Sequencer input and output connections
5
4
2
1
3
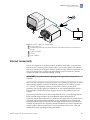
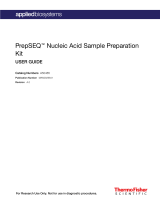
1
1USB ports – Connects a USB device to the instrument.
2Ethernet port – An RJ45 port that provides Ethernet (Gigabit) communication between the
Ion S5™ or Ion S5™ XL Sequencer and a local area network.
3Ethernet port – An RJ45 port that provides Ethernet (Gigabit) communication with the Ion
Chef™ Instrument (Ion S5™ Sequencer only).
4On/off switch – Power switch, where the states are on ( | ) or off ( O ).
5Power port – 100-240VAC port that provides power to the instrument.
Chapter 2 System components
Ion S5
™
and Ion S5
™
XL Sequencer input and output connections
2
Ion S5
™
and Ion S5
™
XL Instrument User Guide
13

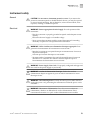
Instrument operation
Power the Ion S5™ or Ion S5™ XL Sequencer on or off
Note: If the Ion S5™ Sequencer is powered on, and the touchscreen is blank, touch the
screen to "wake" the touchscreen.
1. Locate the power switch on the back of the instrument and turn to the on (|)
position.
2. Press the power buon on the left side of the instrument. The buon should
illuminate. When the instrument touchscreen Main Menu appears, the
instrument is ready for use.
It is not necessary to power o the instrument overnight or over the weekend. If the
instrument will not be used for more than 3 days, power o the instrument as follows:
1. In the Main Menu, touch Seings4System Tools4Shut Down.
2. Select either Shut Down or Reboot.
Note: If you select Shut Down, a pop-up message will ask you to conrm that
you want to shut down the instrument. If you select Yes, the instrument will
power o.
Note: Do not press the power buon during a run. Interrupting power to the
instrument during a run may result in sequencing run failure and loss of sample.
Update the Ion S5™ System Software
Note: An internet connection is required for the Ion S5™ System to receive alerts that
software updates are available.
If an update to the Ion S5™ Sequencer software is available, the Notications/Alarms
buon will illuminate red in the touchscreen Main Menu to alert you. Press the red
Alarms buon to see the detailed messages. If a message states New Software
Available, update the software as follows:
1. In the Main Menu, press Seings4Check for Updates.
2. Press Update to automatically download and install the updates.
3. Press Done.
The instrument will automatically reboot when the software update is complete.
3
Power on
Power off
14
Ion S5
™
and Ion S5
™
XL Instrument User Guide

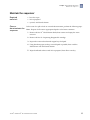
Maintain the sequencer
• Lint-free wipes
• 70% isopropanol
•(optional) 10% bleach solution
In the event of a spill or leak on or inside the instrument, perform the following steps.
Note: Dispose of all waste in appropriate liquid or solid waste containers.
1. Remove the Ion S5™ Wash Solution bole, then remove and empty the waste
reservoir.
2. Remove the Ion S5™ Sequencing Reagents Kit cartridge.
3. Inspect the waste and nucleotide reagent bays for liquid.
4. Using absorbent paper soak up as much liquid as possible, then wash the
aected area with 10% bleach solution.
5. Wipe the aected surfaces with 70% isopropanol, then allow to air-dry.
Required
materials
Clean or
decontaminate the
sequencer
Chapter 3 Instrument operation
Maintain the sequencer
3
Ion S5
™
and Ion S5
™
XL Instrument User Guide
15

The Ion S5™ Sequencer and Ion S5™ XL Sequencer require cleaning before
initialization. Cleaning is normally performed automatically at the completion of the
previous sequencing run. To enable two sequencing runs on a single initialization,
you must deselect the "Enable post-run clean" checkbox for the rst sequencing run.
The post-run cleaning is then performed normally after the second sequencing run.
However, if the "Enable post-run clean" checkbox is deselected for the second run, the
cleaning is not performed after either run. If the second sequencing run is not
performed, or the cleaning is not performed automatically after the second run, the
instrument will not allow the subsequent initialization to proceed until a manual
cleaning has been performed.
If an Ion S5™ Sequencer or an Ion S5™ XL Sequencer is initialized and a sequencing
run is not started within 24 hours, or a run is not started or completed due to a power
failure or an abort, do not perform a manual cleaning. An instrument reset run is
required before reinitialization. See “Perform an instrument reset run with an
initialized, unused Sequencing Reagents cartridge“ on page 17 for more
information.
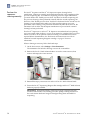
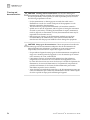
When a cleaning is necessary, follow the listed steps:
1. On the home screen, select Seings4Clean Instrument.
The instrument door unlocks allowing access to the consumables.
2. Remove the Ion S5™ Wash Solution bole to access the waste reservoir, then
remove and empty the waste reservoir.
1
2
3
3. Reinstall the empty waste reservoir and a used Ion S5™ Wash Solution bole.
4. Ensure the Ion S5™ Sequencing Reagents Kit cartridge and Ion S5™ Wash Solution
bole are properly installed.
IMPORTANT! Perform the cleaning with a used reagent cartridge and wash
solution bole installed. The cleaning procedure pumps cleaning solution into
the wash solution bole and reagent cartridge making them unsuitable for
sequencing.
Perform the
sequencer
cleaning manually
Chapter 3 Instrument operation
Maintain the sequencer
3
16
Ion S5
™
and Ion S5
™
XL Instrument User Guide

5. Place a used sequencing chip in the chip clamp, then push the chip clamp in all
the way to engage.
6. Close the instrument door, then press Next.
Cleaning takes ~35 minutes to complete. On completion the instrument door
automatically unlocks and the chip and cartridge clamps disengage.
Cleaning is normally performed at completion of a sequencing run automatically. If
an Ion S5™ Sequencer or an Ion S5™ XL Sequencer is initialized and
• a sequencing run is not started within 24 hours after initialization, or
• a sequencing run is not completed due to a power failure or an abort, and <200
ows occurred before the stoppage
an instrument reset run is required to ensure proper cleaning before reinitialization.
Do NOT perform a manual cleaning with an unused, initialized Ion S5™ Sequencing
Reagents Kit cartridge.
Note:
·If a power failure or abort occurs during the second of two runs started after a
single initialization, a manual cleaning (page 16) is sucient.
·If the number of ows that occurred before a power failure or abort is unknown,
perform an instrument reset run.
To perform an instrument reset run, use the following procedure before
reinitialization:
1. In the instrument touchscreen main menu, press Run.
The instrument door and chip clamp unlocks.
2. Ensure that a used sequencing chip is in the chip clamp, then push the chip
clamp in all the way to engage.
3. Close the instrument door, then press Next.
4. When prompted, select Planned Run (none). Ensure that the Enable post-run
clean checkbox is selected, then press Review.
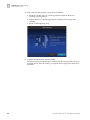
5. In the Select Run screen, press Edit, then in the Detail screen set the number of
ows to 200 manually. Ensure that the Post-Run/Clean checkbox is selected, then
press Close.
6. Press Start run, then press Accept to conrm that Post-Run Clean is enabled, and
to start the run.
When the instrument reset run completes, the instrument automatically performs the
cleaning procedure. After cleaning, the touchscreen returns to the main menu.
Perform an
instrument reset
run with an
initialized, unused
Sequencing
Reagents
cartridge
Chapter 3 Instrument operation
Maintain the sequencer
3
Ion S5
™
and Ion S5
™
XL Instrument User Guide
17

Touchscreen reference
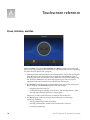
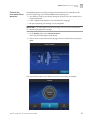
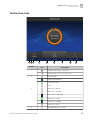
Clean, Initialize, and Run
Within the Home screen the Clean, Initialize, and Run programs lead you through
the necessary steps to prepare the instrument for sequencing and to start a sequencing
run. Press the main dial to start a program.
• Cleaning must be performed before each initialization to ensure that the reagents
from the previous run are cleared from the uid lines. The Clean program is
normally performed automatically at the completion of the previous sequencing
run. Perform a Clean if for any reason the sequencing run was not properly
completed. Follow the instructions provided on the touchscreen.
• The Initialize program must be performed before each run to load and prepare
the run reagents. The Initialize program walks you through:
– Emptying the waste reservoir.
– Loading the reagent cartridge, wash solution, and cleaning solution. (After
this step, the instrument performs a reagent check.)
Simple easy to follow instructions are provided on the touchscreen.
• The Run program walks you through steps leading up to and through
sequencing, including:
– Placing a loaded chip on the instrument.
– Selecting a Planned Run created in the Torrent Suite™ Software.
– Performing sequencing.
A
18
Ion S5
™
and Ion S5
™
XL Instrument User Guide

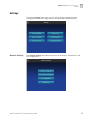
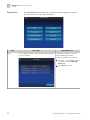
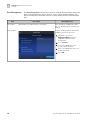
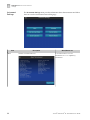
Settings
Through the Seings menu users can view and/or change instrument seings,
manage data and network congurations, and update the installed software.
The Network Seings menu allows the user to set IP Address, Torrent Server, and
FTP congurations.
Network Settings
Appendix A Touchscreen reference
Settings
A
Ion S5
™
and Ion S5
™
XL Instrument User Guide
19

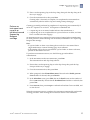
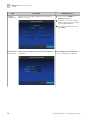
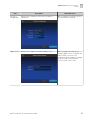
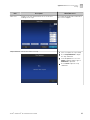
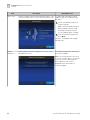
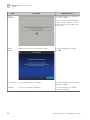
Item Description When/How to use
IP Address
Configuration
Allows users to set and/or change Internet Parameters
(DHCP or Static IP).
1. Select either the DHCP or
Static IP radio button.
2. Touch the screen in the field you
want to edit to activate the field. A
virtual keyboard appears.
3. Enter the new information, then
press Done.
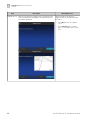
Torrent Server
Configuration
Allows users to change the Torrent Server IP, and user
information.
When a change to the Torrent Server
IP, or user information is required.
Appendix A Touchscreen reference
Settings
A
20
Ion S5
™
and Ion S5
™
XL Instrument User Guide
La page est en cours de chargement...
La page est en cours de chargement...
La page est en cours de chargement...
La page est en cours de chargement...
La page est en cours de chargement...
La page est en cours de chargement...
La page est en cours de chargement...
La page est en cours de chargement...
La page est en cours de chargement...
La page est en cours de chargement...
La page est en cours de chargement...
La page est en cours de chargement...
La page est en cours de chargement...
La page est en cours de chargement...
La page est en cours de chargement...
La page est en cours de chargement...
La page est en cours de chargement...
La page est en cours de chargement...
La page est en cours de chargement...
La page est en cours de chargement...
La page est en cours de chargement...
La page est en cours de chargement...
La page est en cours de chargement...
La page est en cours de chargement...
La page est en cours de chargement...
La page est en cours de chargement...
La page est en cours de chargement...
La page est en cours de chargement...
La page est en cours de chargement...
La page est en cours de chargement...
La page est en cours de chargement...
La page est en cours de chargement...
La page est en cours de chargement...
La page est en cours de chargement...
La page est en cours de chargement...
La page est en cours de chargement...
La page est en cours de chargement...
La page est en cours de chargement...
La page est en cours de chargement...
La page est en cours de chargement...
-
 1
1
-
 2
2
-
 3
3
-
 4
4
-
 5
5
-
 6
6
-
 7
7
-
 8
8
-
 9
9
-
 10
10
-
 11
11
-
 12
12
-
 13
13
-
 14
14
-
 15
15
-
 16
16
-
 17
17
-
 18
18
-
 19
19
-
 20
20
-
 21
21
-
 22
22
-
 23
23
-
 24
24
-
 25
25
-
 26
26
-
 27
27
-
 28
28
-
 29
29
-
 30
30
-
 31
31
-
 32
32
-
 33
33
-
 34
34
-
 35
35
-
 36
36
-
 37
37
-
 38
38
-
 39
39
-
 40
40
-
 41
41
-
 42
42
-
 43
43
-
 44
44
-
 45
45
-
 46
46
-
 47
47
-
 48
48
-
 49
49
-
 50
50
-
 51
51
-
 52
52
-
 53
53
-
 54
54
-
 55
55
-
 56
56
-
 57
57
-
 58
58
-
 59
59
-
 60
60


Thermo Fisher Scientific Ion S5 and Ion S5 XL Mode d'emploi
- Taper
- Mode d'emploi
dans d''autres langues
Documents connexes
-
 Thermo Fisher Scientific Ion GeneStudio S5 Food Protection Mode d'emploi
-
 Thermo Fisher Scientific Genexus Integrated Sequencer Mode d'emploi
-
 Thermo Fisher Scientific Ion GeneStudio S5 Food Protection System Mode d'emploi
-
 Thermo Fisher Scientific Corona Veo, Corona Veo RS Mode d'emploi
-
 Thermo Fisher Scientific CytoScan HT-CMA Assay 24-Array Format Le manuel du propriétaire
-
 Thermo Fisher Scientific PrepSEQ Nucleic Acid Sample Preparation Kit Mode d'emploi
-
 Thermo Fisher Scientific TaqMan GMO Screening Kit Mode d'emploi
-
 Thermo Fisher Scientific TaqMan GMO Maize Quantification Kit Mode d'emploi
-
 Thermo Fisher Scientific Neon Transfection System Mode d'emploi
-
 Thermo Fisher Scientific RapidFinder Poultry ID Kit Mode d'emploi


